ME MDM Android App Configurations
You can find these configurations by navigating to Device Management → App Repository → ME MDM App, where the required ME MDM App configuration settings can be configured and applied to devices or groups.
Custom Profile Configuration
This option is used to distribute a custom profile configuration for the ME MDM App. For instance, if the administrator wants to add a custom key to the passcode profile or offer a custom value for a key, they can do so by sending the necessary payload as JSON data. The JSON data will be installed as a profile in the device after you enter it in the field and click Save. Similarly, by utilising the same option, the profile can also be deleted from the device.
Custom Command Configuration
This option can be used to push custom commands like Remote Lock, Factory Reset etc to the devices. It can be enabled by adding the JSON data of the configuration under the option.
Unlock Lost Mode with Reset Passcode
Consider a device with a passcode that has been placed in Lost Mode. If the end user attempts to unlock it using the passcode, the device will revert to Lost Mode. To unlock the device, the admin must set a Reset Passcode and share it with the user, which will disable Lost Mode. The Reset Passcode option can be enabled in two ways, as outlined below:
Create Content Catalog Shortcut
This option can be configured in Kiosk devices to create a shortcut to the content catalog in the ME MDM App. The shortcut will be visible as an app icon in the device and will work even if the ME MDM app is hidden in Kiosk Mode.
Create App Catalog Shortcut
This option can be configured in Kiosk devices to create a shortcut to the app catalog in the ME MDM App. The shortcut will be visible as an app icon in the device and will work even if the MEMDM app is hidden in Kiosk Mode.
Enable Work Profile System Apps
This option can be used to enable additional system apps in the work profile which are not created by default. For example if the Email app is not available in the Work profile, we can enable it using this option.
Download Custom Firmware as Single Part
This option should be enabled in order to download firmware updates as a single file. Often if the file size is large, like 1 GB, the file will be splitted into 5MB and downloaded separately as multi part and then be merged. However, with this option the file will be downloaded as a whole.
Customize Asset Tag text size
This option will customize text size in the asset tag screen.
Edit Mac Randomization
This option should be enabled to modify mac addresses from randomized mac to device mac since wifi profile distributed through MDM can't be modified.
Lost Mode Title
This option can be used to modify the title in the Lost Mode page.
Deployment of Scheduled App Updates
This option can be used to schedule app update deployments.The package name(s) should be added manually separated by commas to enable this option.
Always-On VPN Package
This option allows you to specify the package name of the VPN app that will be set to Always-On VPN, even if the user does not launch it.
VPN Lockdown
Ensures that the specified app works only when the VPN is active. If the VPN is disabled, the app will not function, even if the device is connected to the internet.
Use Recovery Key from Revoke Admin
This option allows users to revoke the MDM app by entering a recovery key generated at inventory tab for a specific time frame.
Retain Managed App After De-Provision
This option prevents managed apps from being removed when the device is de-provisioned or unmanaged.
MDM App settings configuration
- Enable Alarm and Reminder Settings: Allows scheduled actions, such as app launches or OS updates, to occur at the precise configured time.
Account Configuration
- Enforce Assigned User’s Email Account:
- When enabled, only the assigned user’s email account will be allowed on the device.
- If the user adds any other accounts, those accounts will be automatically removed.
- Allowed Account Domains:
- This option allows only accounts belonging to the specified domains.
- If accounts from other domains are added, they will be automatically removed.
- You can specify a single domain or multiple domains separated by commas (e.g., zylker.com, company.org).
Note: If an account does not include a domain in its user name, it will be treated as restricted and removed.
- Remove Existing Disallowed Accounts:
- When enabled, any existing accounts that do not match the allowed user or domains will be removed automatically.
- When disabled, the rule applies only to accounts added after this policy is enforced.
Notes:
1. This configuration applies to all account types, including Google, Microsoft, Samsung, etc.
2. If the “Add Account” restriction is applied in the restriction profile, this configuration will not take effect.
3. If account-type-based restrictions are applied in the restriction profile, those account types will also be excluded from this configuration.
Custom Settings Configuration
Note:Custom setting configurations can be applied only for Kiosk devices.
- NFC Settings: If this option is enabled, the end user can access the NFC settings inside the custom settings.
- Device Passcode: If this option is enabled, the end user can access the Device Passcode settings inside the custom settings, and configure it.
- Accessibility Settings: If this option is enabled, the end user can access the Accessibility settings inside the custom settings, and configure it.
- Air-plane Mode: If this option is enabled, the end user can access the Airplane Mode settings inside the custom settings, and either enable or disable it.
- Display Settings: If this option is enabled, the end user can access the Display settings inside the custom settings, and configure it. The options available for Display settings in setting app will vary based on the Manufacturer and OS version.
- Location Settings: The user will be redirected to the Location Settings page to enable location-related options.
- Disable Bluetooth Settings: If this option is enabled, the end user will not have access to the Bluetooth settings and will be restricted from performing any Bluetooth-related activities in kiosk mode, such as pairing devices, enabling or disabling Bluetooth, or transferring files via Bluetooth.
Wi-Fi Settings configuration:
The Wi-Fi settings listed below can be enabled for Kiosk devices, allowing the user to access the Wi-Fi settings page in the Settings app from the Wi-Fi settings listed under the Kiosk Custom setting.
- Wi-Fi settings :This option can be enabled to provide the end user the option to open the settings and modify it, like mac address for managed Wi-Fi profiles.
- Wi-Fi settings page timeout : This setting decides the duration for which the Wi-Fi settings can be accessed, after which it shall automatically close and return back to Kiosk.
Custom Web Shortcuts Configuration
- Create Web Shortcut folder on home screen : Enabling this option allows you to create folders with web shortcuts on the device's home screen.
- Allow auto play videos : Enabling this option allows auto-play of videos for web shortcuts with restricted access.
- Clear cache : Enabling this option lets the user clear cache for web shortcuts with restricted access.
- Disable clear cookies after idle refresh timeout : By default,cookies in web shortcut will be cleared after idle refresh timeout.Enabling this option will not clear cookies even after idle timeout for web shortcuts with restricted access.
- Clear cookies : Enabling this option will clear cookies whenever web shortcuts with restricted access are opened or refreshed.
- Allow copy/paste : Enabling this option will clear cookies whenever web shortcuts with restricted access are opened or refreshed.
- Open the Web shortcuts with : The browser app with which the web shortcut should be opened can be configured by adding the package name under this option.
- Full Screen Mode : Enabling this option will open the web shortcuts in full screen mode by default for web shortcuts with restricted access.
- Show Custom Error Message : Displays a custom error message when an error occurs. If disabled, no error message will be shown.
Custom Launch App Configuration
-
Launch app in specified Interval
- Enable custom launch app in specified Interval : This option should be enabled or disabled to launch a custom app during specific time intervals.
- Package name: Add the names of the app package that have to be launched only during the specific interval.
- Launch timeout (in seconds): Under this option the timeout after which the app should be re-launched can be added.
-
Launch app after installation
- Enable custom launch app after installation : This option can be used to launch or open an app in the device automatically after first installation or updation by adding the package name in the given text box.
- Package name : The name(s) of the app package(s) that has to be launched after installation should be provided here separated by comma.
-
Managed Apps Data Sharing Configuration
- Allow MDM app to receive data from managed apps : Permits the MDM app to receive data from the configured managed apps.
- Allow Managed Apps : Provide the package names and SHA256 signature checksums of the apps that should be allowlisted. Only data shared from these verified packages will be processed. This ensures that only trusted apps are permitted to exchange data with the host app:
 [

      {

        "PackageName": "com.sample.myapp",

        "Sha256SignatureChecksum":

        "21f9scvajbs3e8aedf944cfe7f37sasaandd5b34c77vuahbsfyvanwqa"

      }

    ]
Custom Remote Troubleshoot Configuration
- Enable file transfer : This option can be enabled or disabled to permit file transfer between admin and user device during a remote troubleshooting session.
- Enable universal plugin : Universal plugin is an add-on that must be downloaded to the device and enabled in the Accessibility settings of the device to get remote control capabilities. Enabling this option downloads the universal plugin on the device; otherwise, the admin will only have Remote View capability.
- Accessibility Settings : Enabling this option prompts the user to manually grant accessibility permission, which is required for features such as remote control or unattended access.
- Enable Unattended Remote session access : This option allows remote sessions to be performed without user intervention. For unattended remote access to work, the device must be in Kiosk mode.
Note: The following conditions apply when using Unattended Remote Access:
- The device must support Remote Control. If it does not, enable the Universal Add-on to provide remote control capabilities.
- For some device models, Unattended Remote Access may not function even if Remote Control is supported.
Digital Signage Settings
Digital signage can be enabled in our ME MDM app. To enable digital signage the following pre-requisites are required :
Pre-Requisites
- A single app kiosk profile with ME MDM app needs to be associated to the device.
- The images and video files should be distributed to content catalog.
Digital signage when enabled allows user to display image and video files on android devices (like Android TV) back-to-back within the specified timeout. For this, image and video files must be distributed to content catalog.
- Enable Digital Signage :
This option can be used to enable or disable digital signage for Android devices. - Timeout for Images in Digital Signage : This option sets the time duration for the image files in the digital signage loop, after which they shall time out.
For example, if two image files are added to the content catalog, then the image files will play for the time duration given in the time out settings. If the time out is given as 10 seconds, the images will be displayed only for 10 seconds.
Block Camera App
These configurations will enable you to block the camera app in BYOD devices:
- Block Camera App: This option will block the camera app in both personal space and work space for BYOD devices configured with a work profile..
- Block Camera App for Geofence : This option will block the camera app in both personal space and work space in BYOD devices ,whenever the device becomes non-compliant with the geofence configuration.
For example If the configuration of geofence is such that the device becomes non compliant when inside a particular geofence range,the camera will be blocked. Similarly if the configuration of geofence is such that the device becomes non compliant when outside a particular geofence range,the camera will be blocked. - Enter the Geofence name: This option lets you give a name the geofence for which the camera app should be blocked.
- Block Camera App for Time Fence: This option can be used to enable a time frame during which the camera app should be blocked.
For example if the camera app should be blocked from 7 :00 AM -7:00 PM, then this time fence can be configured using this option. - Enter the Time Fence Range (HH:MM:SS format Example :11:00:00–14:00:00) : This option is for entering the time fence or time frame during which the camera app should be blocked.
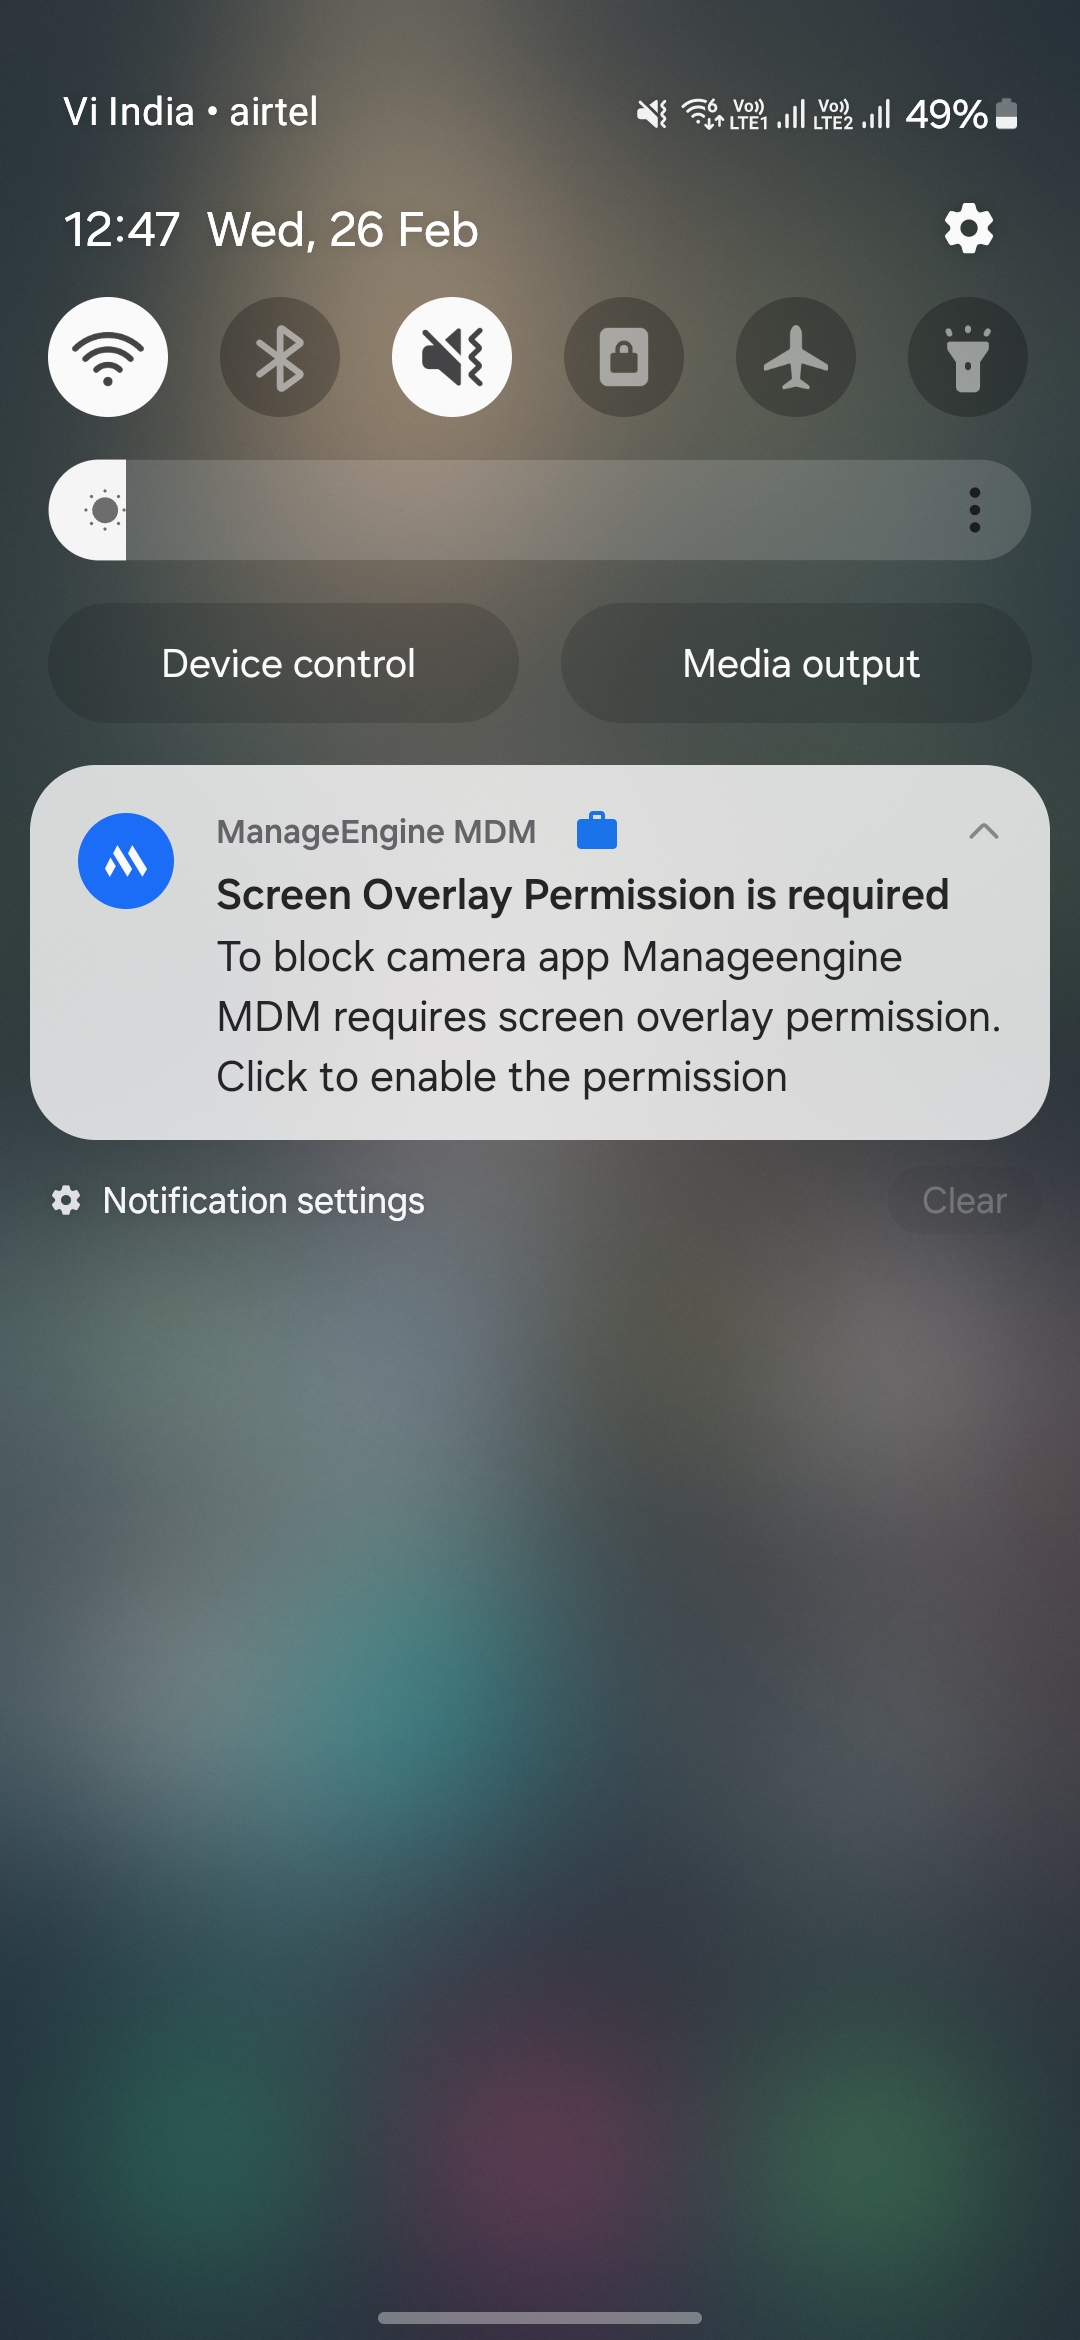
Note: When the "Block Camera App" option is enabled—whether for general blocking, geofence-based enforcement, or time-based restrictions—the Screen Overlay permission must be enabled on the device for the policy to function correctly.
Battery Optimization Configuration
These settings allow you to remove apps from being added to battery optimization list.
- Battery Optimization Whitelist for Knox devices : This is the option to enable or disable battery optimization whitelist for apps in Knox mobile devices.
- Package names to be excluded from battery optimization : Here you can add the names of the applications separated by commas that are to be excluded from battery optimization.
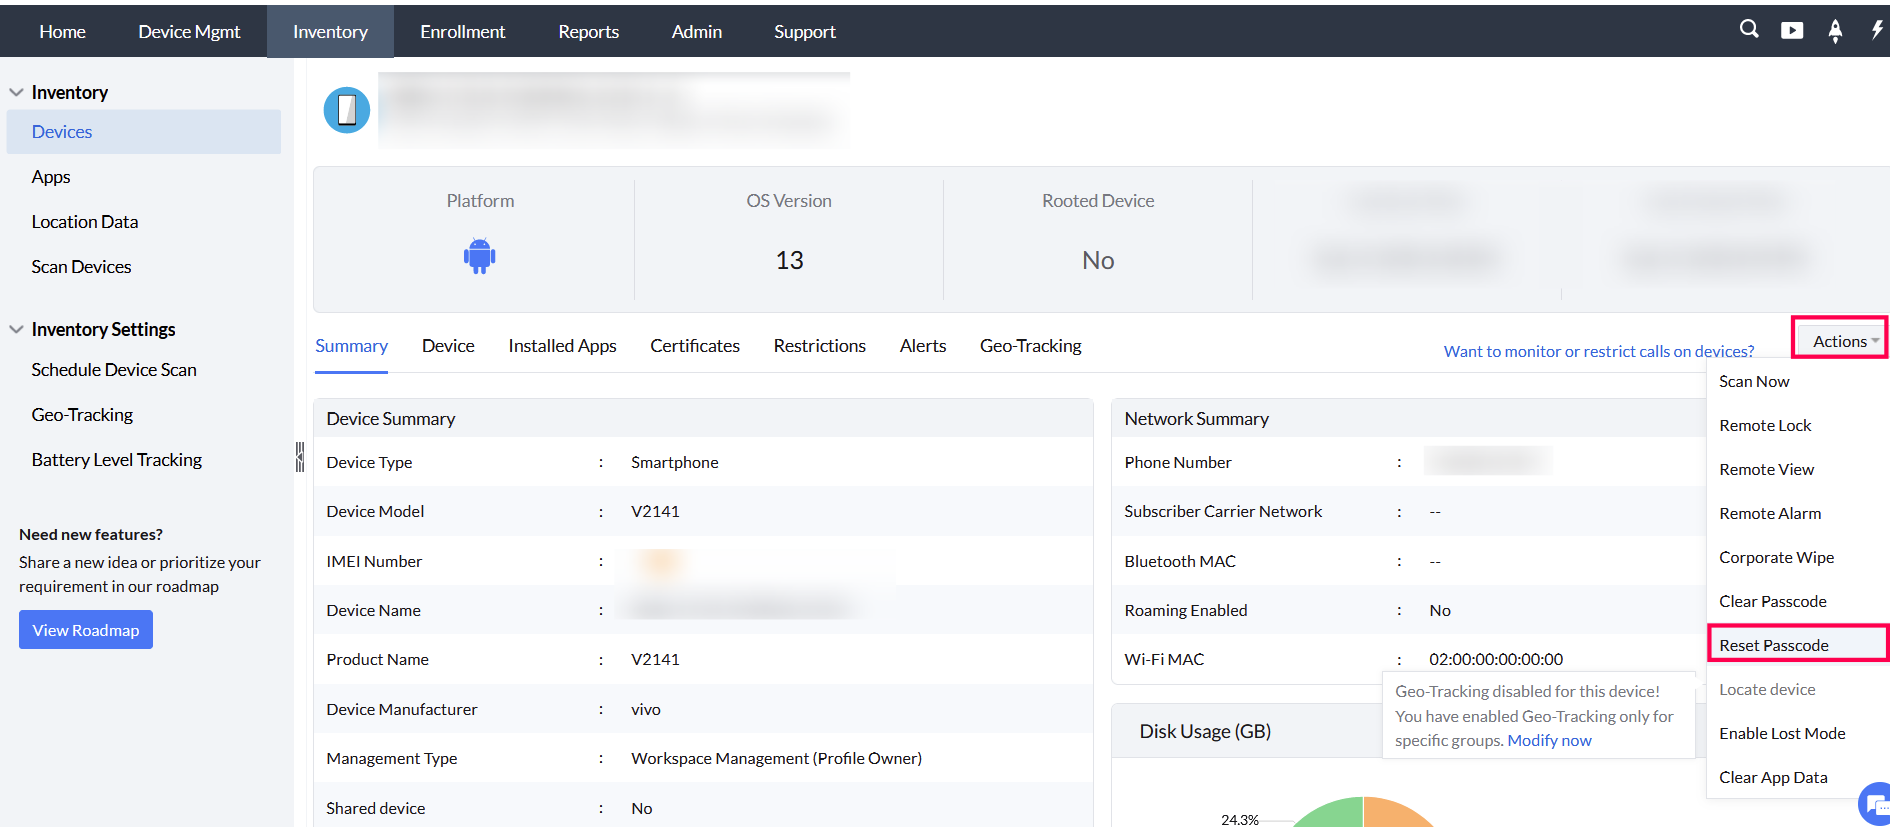
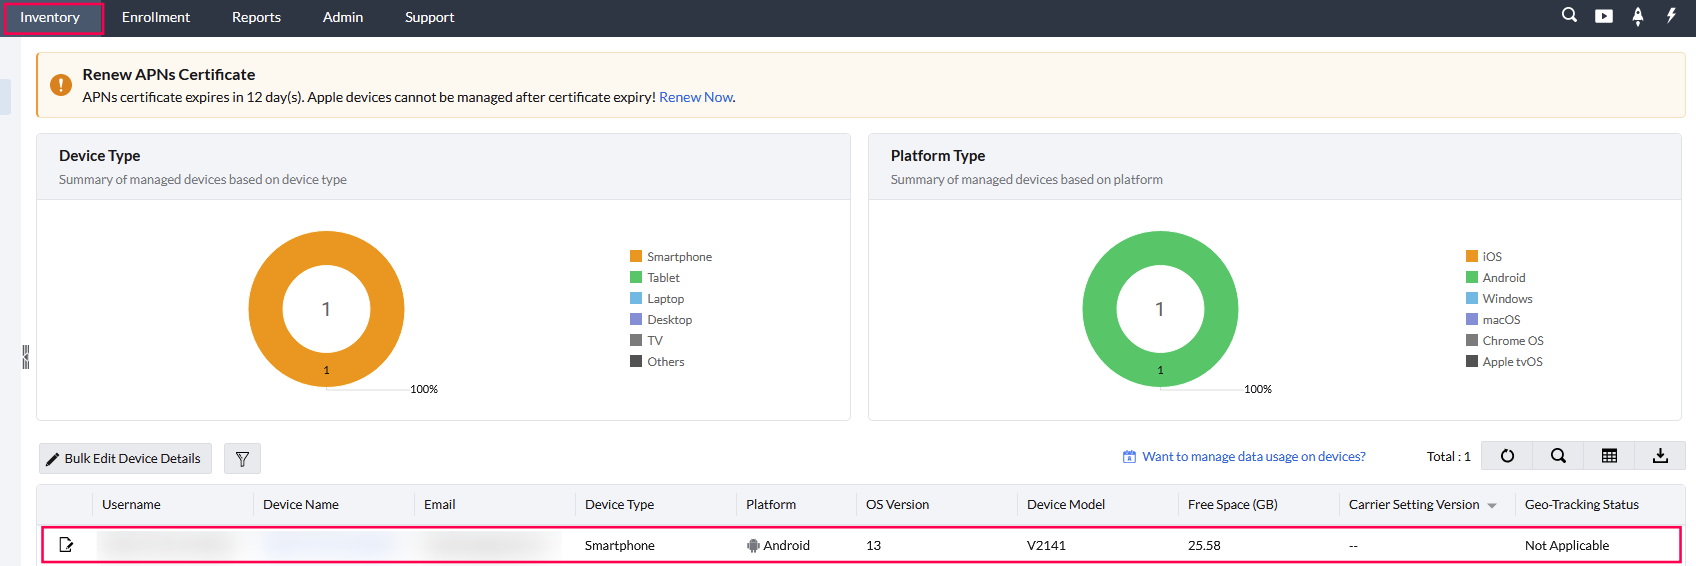
Using Inventory Actions
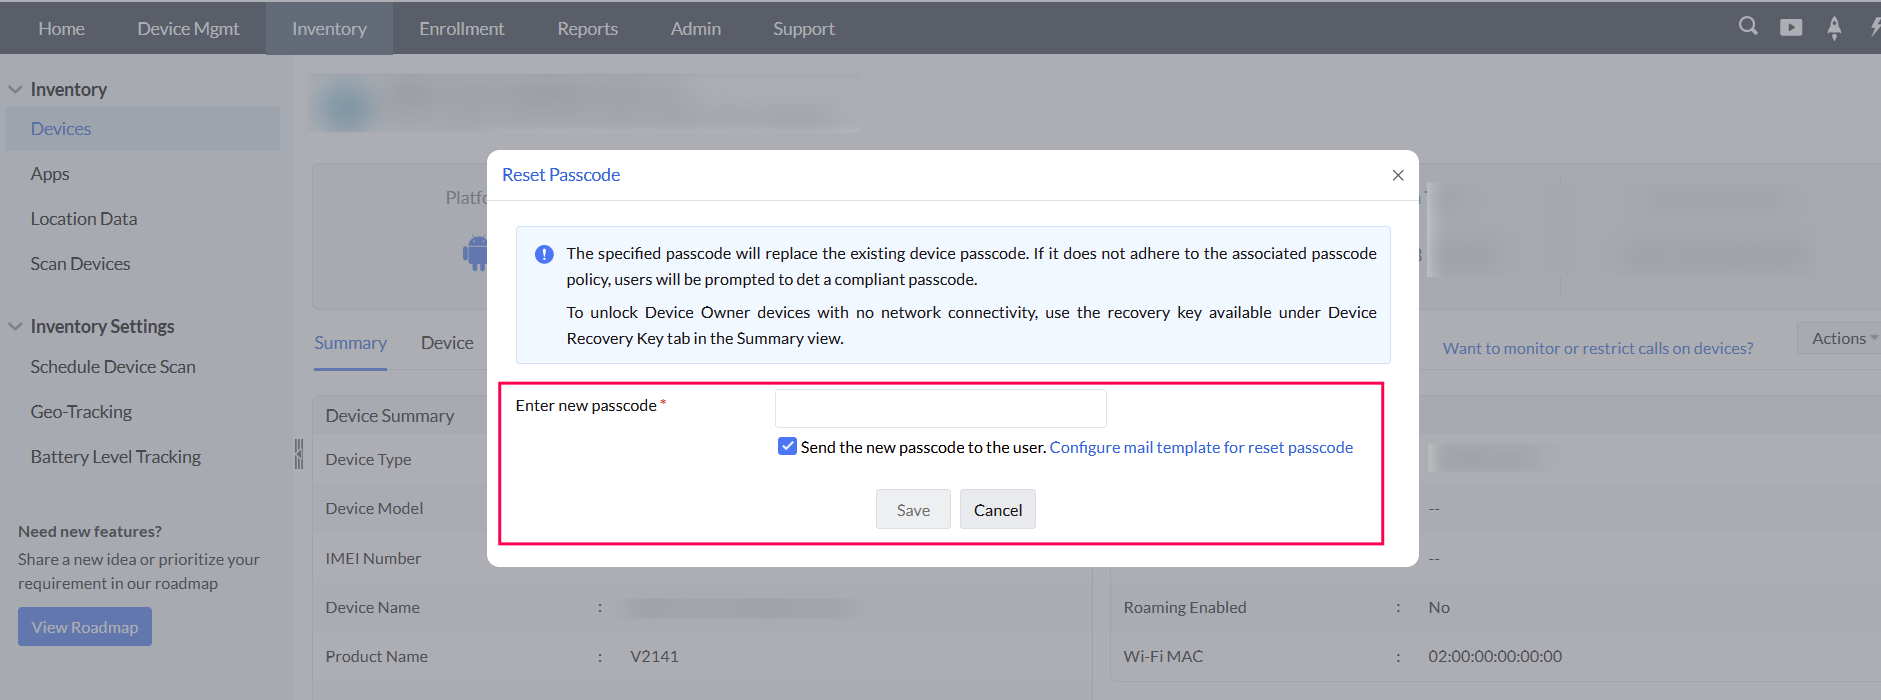
Follow the steps below to enable the Reset Passcode option in Inventory:
- Navigate to Inventory in the MDM Server.
- Select the device for which you want to enable the Reset Passcode.
- Click the Actions button in the top-right corner and choose the Reset Passcodeoption as shown below:
- Enter the new passcode and then click Save.
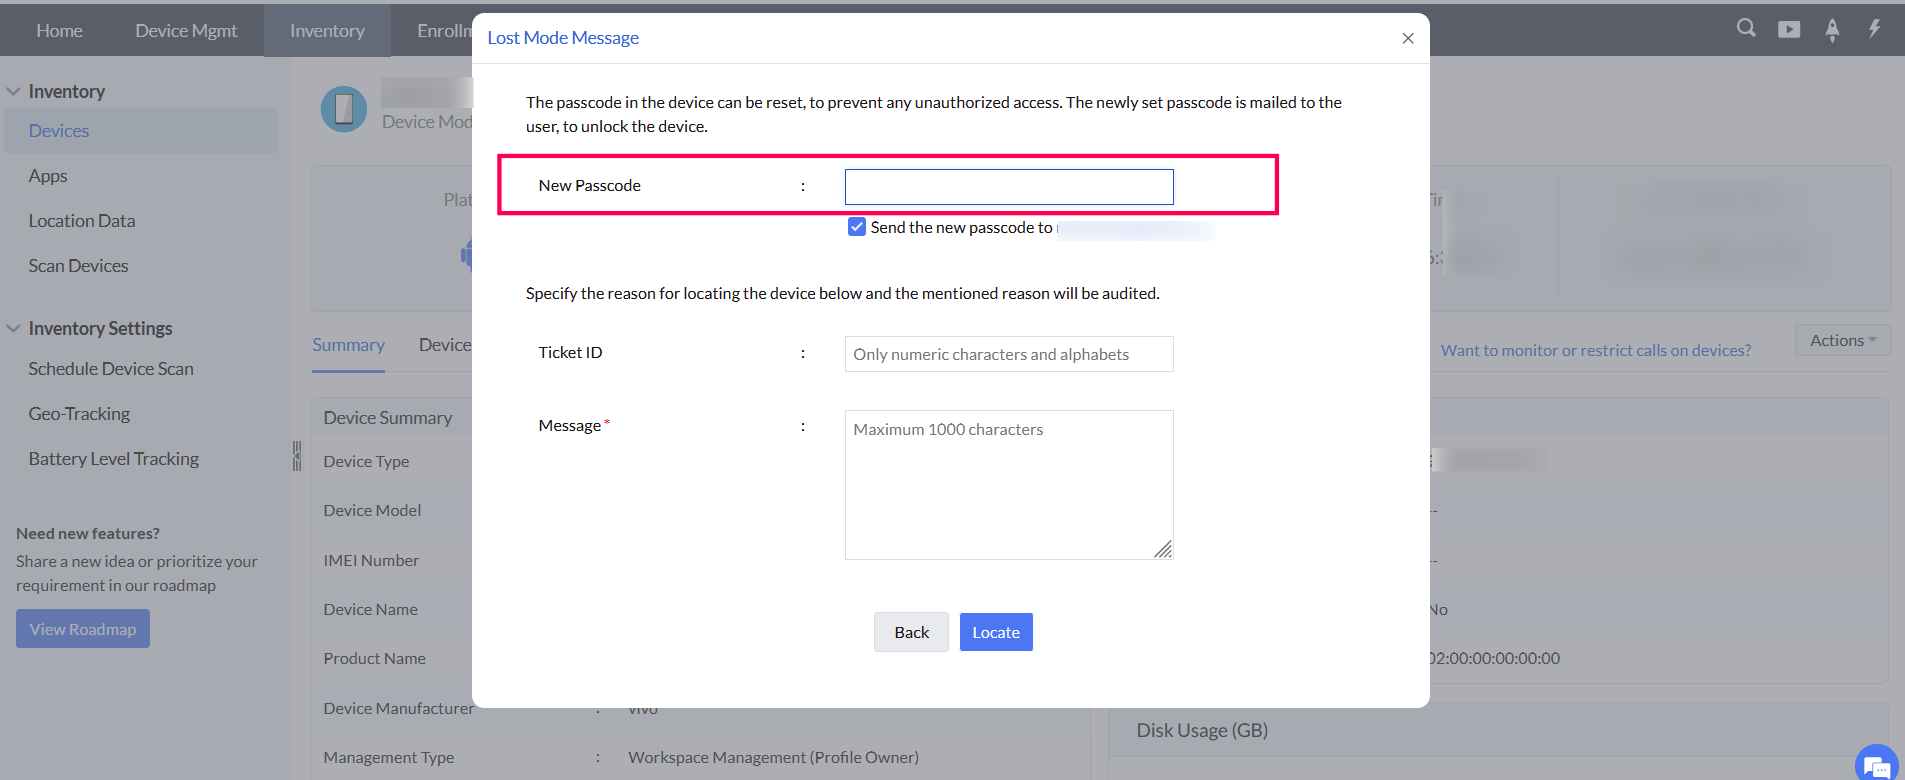
During Enabling Lost Mode
Follow the steps below to enable Reset Passcode in Inventory while activating Lost Mode:
- In the MDM Server go to Inventory.
- Under the devices tab, choose the device which has to be provisioned with Lost Mode.
- Click on the Actions button at the top right corner and select Enable Lost Mode option as shown below :

- A dialog-box will pop up where contact details to retrieve the device need to be entered.
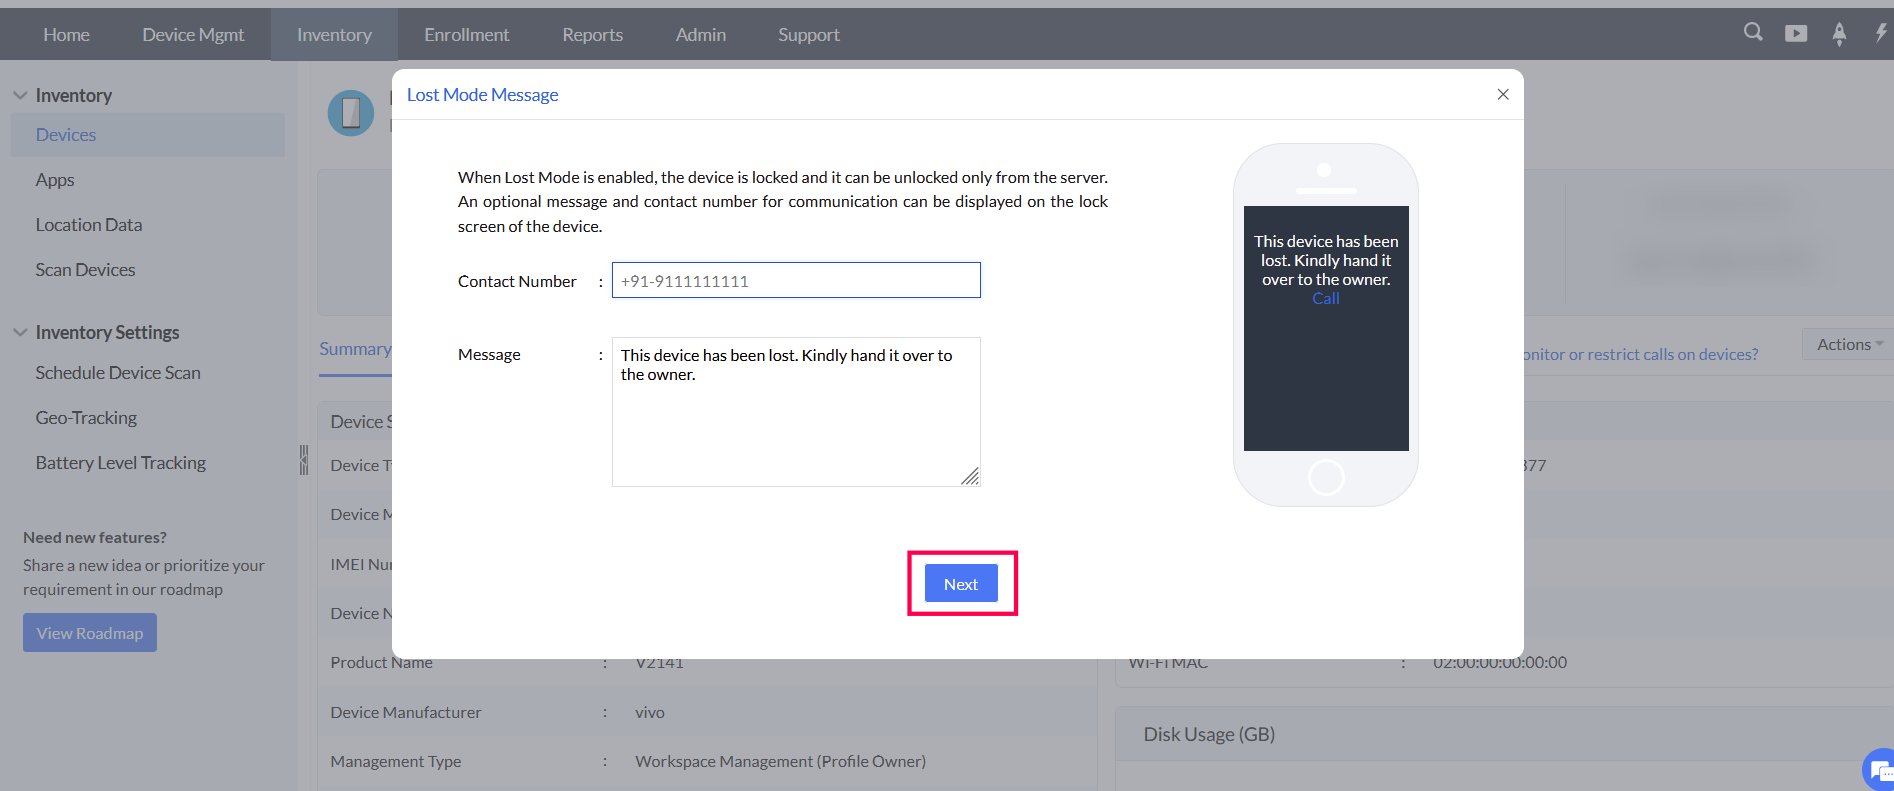
- On the next page of the pop up enter the new passcode and proceed with locating the device.