SNMP trap monitoring

SNMP definition
Simple network management protocol (SNMP) is a widely used network monitoring protocol that helps you to monitor remote devices that are connected via SNMP.
The architecture of SNMP includes three components: SNMP manager, managed device and SNMP agent.
- SNMP manager is the monitoring server which is responsible for sending requests and collecting monitoring data.
- A managed device is a device that is monitored. For eg: printers, servers, routers, switches.
- The SNMP agent is installed on the managed device and it sends the required responses to the manager.
What are SNMP traps
Traps are cryptic messages that are sent from the agent on the monitored device to the SNMP manager when a fault/network issue occurs in the device. The SNMP manager (monitoring server) in turn converts the trap into an alarm to notify the user. In short, a trap is sent immediately when something goes wrong in the monitored device.
For example, let us consider a printer that is remotely monitored by OpManager (SNMP Manager) using its SNMP monitoring feature. When an error occurs, say a paper jam issue, a trap is instantly generated in the printer and sent to OpManager, which in turn converts it into an alarm to notify the user.
Why should we process a trap
The data inside a trap is in the form of an object identifier (OID) value-pair and each value pair is called as a variable binding (varbind). The traps received are in a non-human-readable format and we process traps to convert this information into meaningful and human readable data.
The OID value associated with each trap is unique. This means that each metric that is monitored (for eg: Paper Jam, Door Open) will have a different OID in order to distinguish the traps.
How traps are converted into alarms in OpManager
Traps received in OpManager's SNMP trap monitor for faults/network issues/threshold violations will be converted into alarms to notify the IT admin.

While adding a Trap Processor, users can define the Match Criteria. The match criteria defines the varbind values, if the values match with the data inside the incoming trap OID, then an alarm will be raised. This alarm is generally called a Trap Alarm.
The Rearm criteria is defined to clear the alarm. When the varbind values of the incoming trap OID matches with the rearm criteria, then the alarm is cleared.
Navigate to Alarms --> Trap Alarms to view the list of trap alarms for devices.
Pre-requisite
In order to receive and process traps in OpManager, a user should configure the OpManager installed server as the trap destination in the monitored device.
Basic Configurations to process traps
Before processing traps, a user should enable trap processing in OpManager and complete the basic configurations.
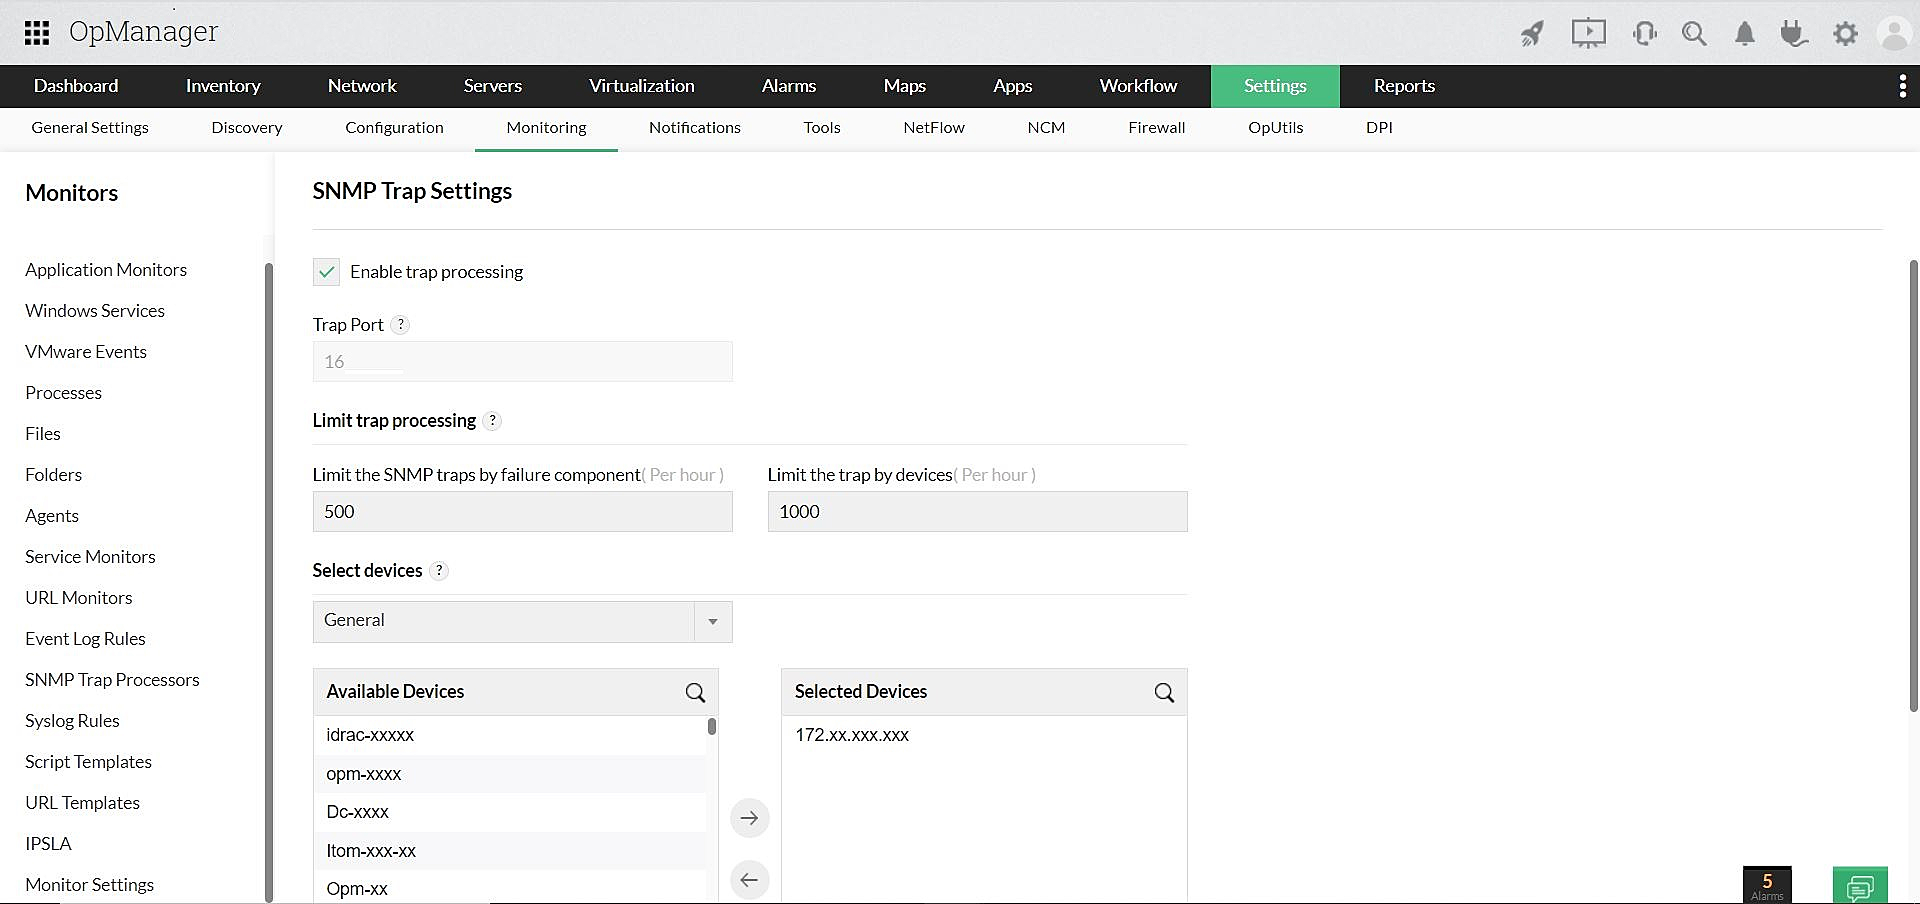
- Navigate to Settings --> Monitoring --> SNMP Trap Processors.
- Click on the Trap Settings.
- Enable trap processing. (By default, trap processing is disabled.)
- Enter the appropriate Trap Port. (Note: Trap will be received on this port, so ensure the port is not blocked)
- Enter the value for 'Limit the SNMP Trap by failure component'. This option enables you to limit the traps based on the alarm entities.
- Enter the value for 'Limit the trap by devices'. This option enables you to limit the traps based on the devices.
- Select the category to filter out the set of devices for which this configuration should be applied.
- Now choose the devices from the 'Available Devices' and transfer them to the 'Selected Devices' column.
- Finally, click Save to update.
Trap Processing in OpManager
Users can use OpManager to receive traps from an end device and process them in 3 different ways.
- View the incoming traps using Trap Viewer in real time. You can add a trap processor for all the received traps or only the traps for which you want to raise alarms.
- You can directly access the management information base (MIB) and convert the received trap OID into readable form.
- If you are aware of the OID and trap parameters, then you can directly add a trap processor for the trap as explained in the steps below.
Loading Trap Parsers from a MIB
Following are the steps to load the traps from various MIBs:
- Go to Settings → Monitoring → SNMP Trap Processors. All the configured processors are listed here.
- Hover the cursor on the Actions menu and click on Load Traps From Mibs.
- From the list of MIBs, select the MIB from which you want to load. The traps in that MIB are listed.
- Select the required trap variable, and click Add.
A Processor for the selected trap will be added, and will be listed.
How to add a trap processor?
1. Navigate to Settings--> Monitoring --> SNMP Trap Processors. Hover the cursor over the Actions tab and click on Add.
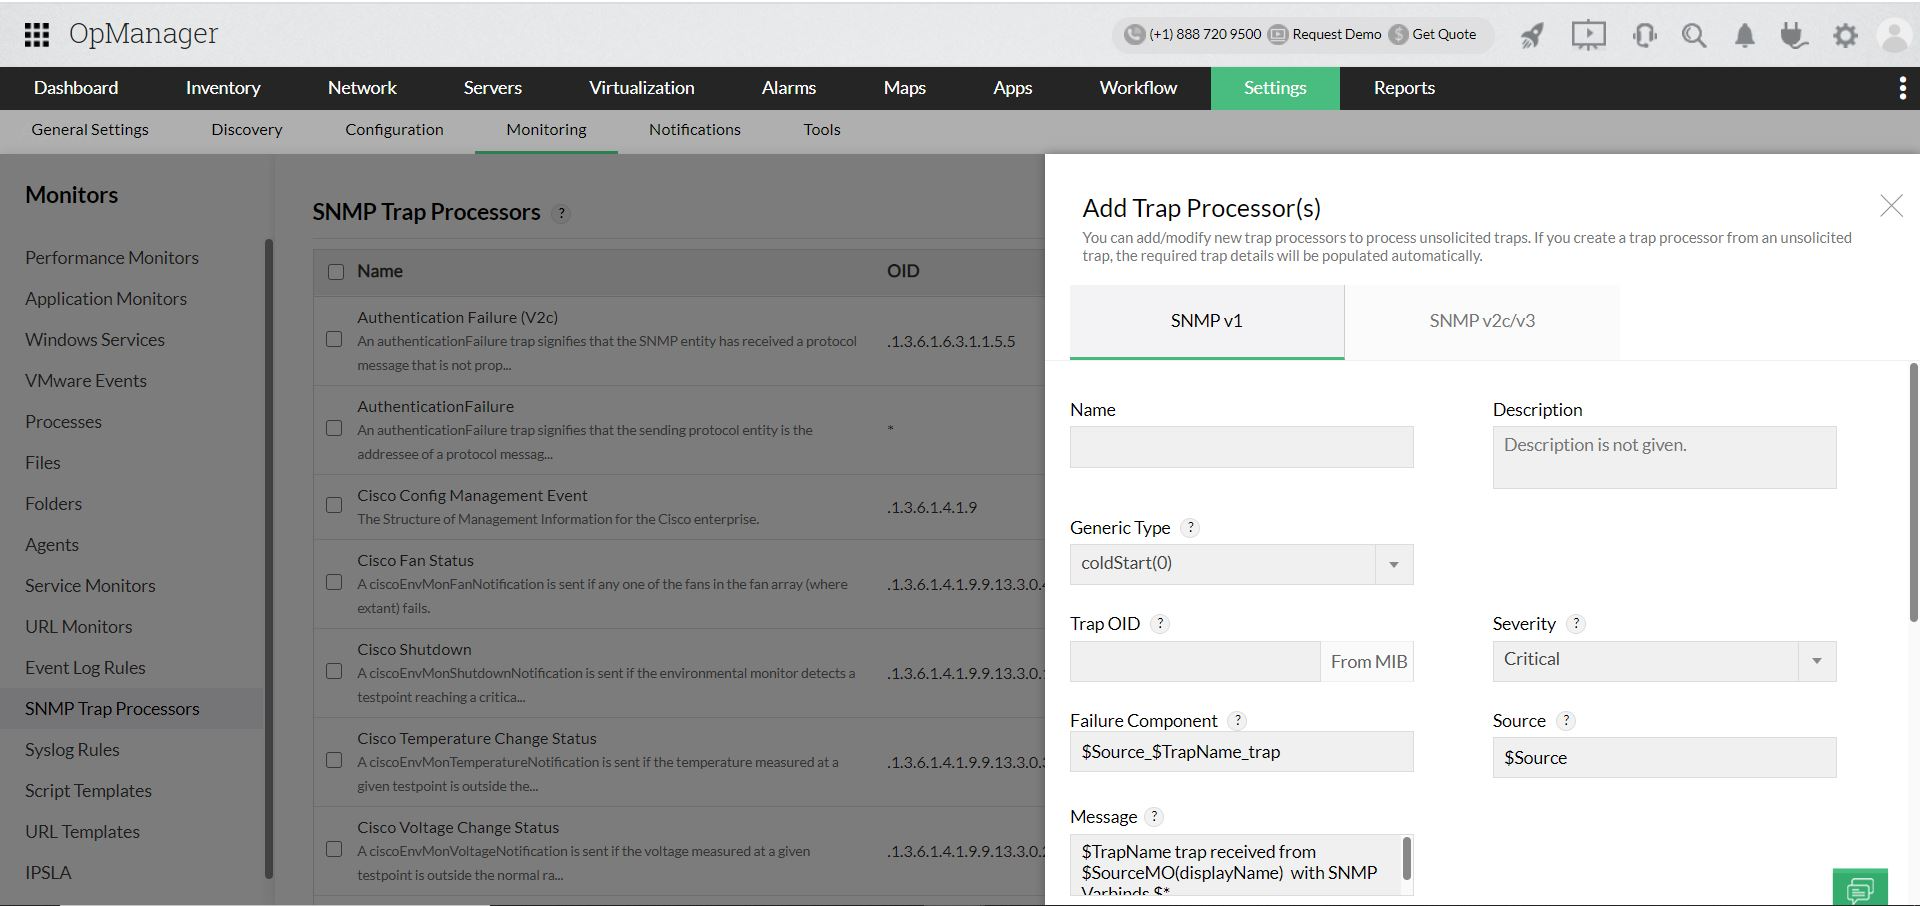
2. Choose the SNMP version - SNMP v1/ SNMP v2c/v3 and enter the Name and Description.
Note: When you use SNMP v3 to monitor a device and receive traps, please ensure that the same credentials are used for device monitoring and the traps.
3. If you choose SNMP v1, then choose the Generic Type from the drop down. OpManager supports the following types of traps for SNMP v1.
- coldStart:The agent re-initializes with its configuration altered.
- warmStart: The agent re-initializes with its configurations unaltered.
- Linkup: When the network interface card (NIC) on the agent is operating.
- Linkdown: When the network interface card on the agent fails.
- Authentication fails: This happens when an SNMP agent gets a request from an unrecognized community name.
- egpNeighborloss: Agent cannot communicate with its EGP (Exterior Gateway Protocol) peer.
- Enterprise specific: It varies based on the Vendor and specifies specific error conditions and error codes related to a particular vendor.
4. Enter the Trap OID (monitoring parameter) and the Severity of the alarm for that trap.
5. Enter the details of Failure Component. The failure component represents the metrics that are monitored in a source device and is used to limit the number of trap processors. For example, OpManager monitors the CPU utilization and the Fan status of a remote device, and the agent on the device sends a trap for high CPU utilization and another trap to notify Fan failure status. Because both these traps are from the same source device, OpManager will combine these two traps and consider them a single entity to limit the number of trap processors.
6. Enter the Source, which is the device from which the trap is received. The trap alarm will be mapped to this device.
7. Enter the Message. The content in the Message field contains the description for the created trap alarm.
8. Choose the Match Criteria protocol - AND/OR. Then choose the number of Varbinds and enter the corresponding Match Value. An alarm will be generated only when this value is matched with incoming trap. In the same way, enter the Rearm Criteria details. When the varbind values of the received trap matches with the varbind values configured for the Rearm Criteria the alarm raised for the trap will be cleared.
Handling trap alarms
You can perform the following actions with the alarms raised for traps.
- Configure Notification profile
- Execute workflow
- Escalate alarms
Notification Profile
The Notification Profile in OpManager provides a variety of options to handle the alarms. While primarily it is used to send the alarm details via email/SMS to the IT admins, it can be used to perform other actions like logging a ticket or running a program. This helps IT admins to monitor devices remotely and receive notifications on network issues.
Remote network monitoring is further simplified with OpManager's mobile application which is available for iOS and android users. Using the app you can get instant push notifications on device down status, faults and other performance degradation issues, so that you never miss an alert.
Execute a workflow
You can execute a saved workflow on a trap alarm. For example, you can raise a critical trap alarm as a ticket in desk applications like ServiceDesk Plus or ServiceNow to rectify the fault quickly.
Escalate alarms
For every alarm that is raised you can perform the following actions: Acknowledge, Unacknowledge, Clear and Delete.
But when IT admins fail to attend an alarm for a long time, the update can be escalated by configuring the Alarm Escalation Rule and the unattended alarm details can be sent to the concerned team members via SMS and email.