Adding Connections
Add remote target systems in Access Manager Plus (AMP) as Connections in order to launch secure remote connections tunneled through the Access Manager Plus server. There are five types of remote connections you can initiate from Access Manager Plus: RDP, SSH, VNC, SQL, HTTPS. Access Manager Plus offers an automatic discovery mechanism that helps discover Windows and Linux systems present in your network. Access Manager Plus allows importing connections from a CSV file and helps in adding multiple connections in bulk. You can also add individual connections manually, instead of bulk discovery/import. Listed below are three different ways to add new connections in Access Manager Plus:
- Add Connections Manually
1.1 RDP Connection
1.2 SSH Connection
1.3 VNC Connection
1.4 SQL Connection
1.5 HTTPS Connection
- Import Connections from CSV
- Discover Connections
1. Add Connections Manually
Below explained are detailed steps on how to add five types of remote systems as Connections in Access Manager Plus manually, so as to facilitate launching remote connections from the Access Manager Plus web interface.
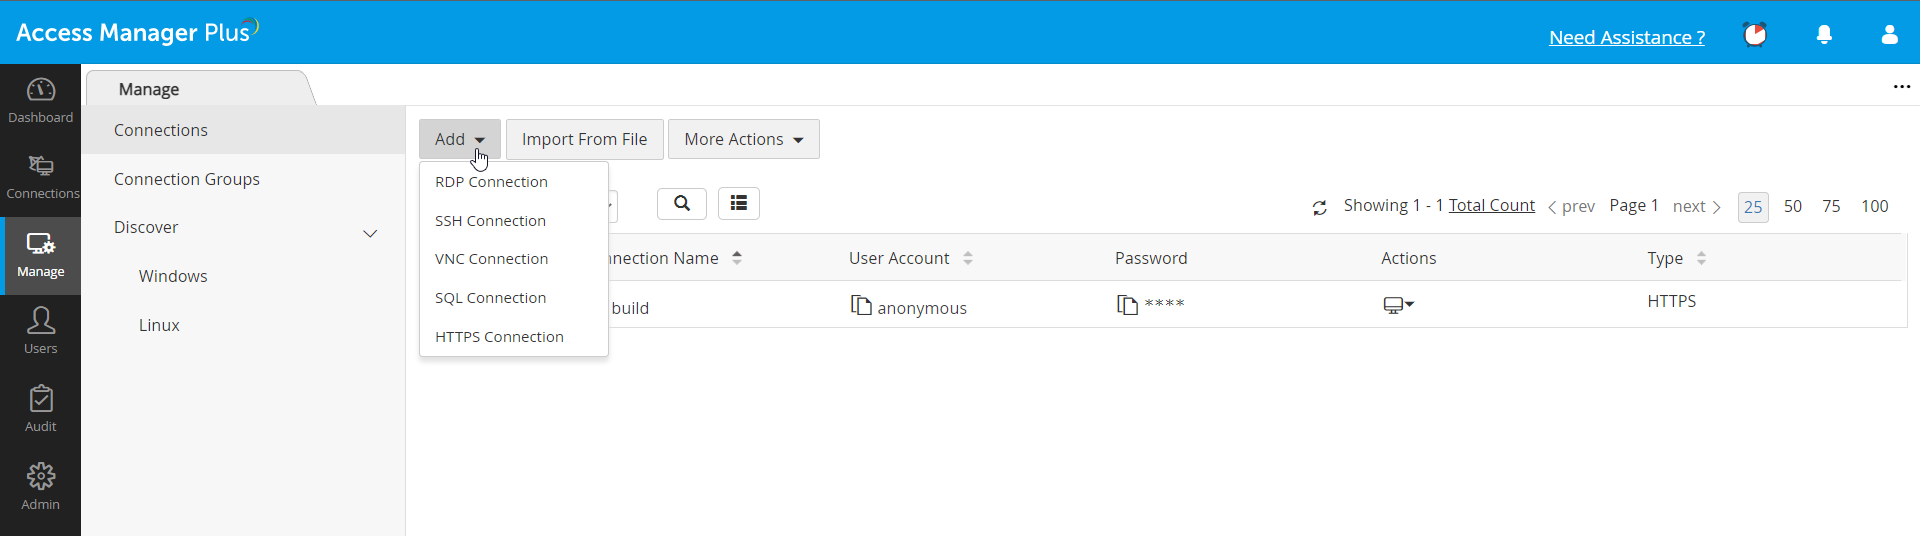
To add a connection, navigate to the Manage tab and click Add and continue with the below steps based on the type of connection you want to add. You can also add connections from the Connections tab. Click the '+' icon on the top right corner and click the type of connection you want to add.
1.1 RDP Connection
- Choose RDP Connection from the Add drop-down.
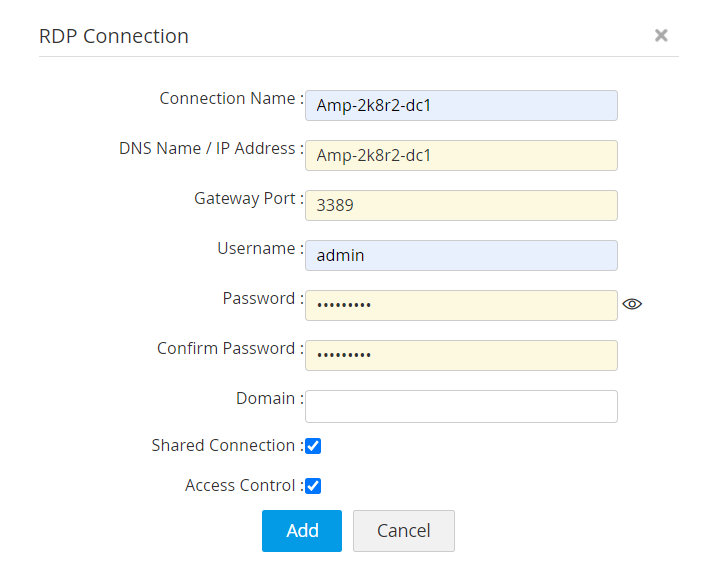
- In the pop-up, enter the following attributes:
- Connection Name.
- DNS name or the IP Address at which the remote system can be reached.
- Port corresponding to the remote Windows system. 3389 is the default port.
- The credentials of the connection in the Username and Password fields. Enter the password again for confirmation.
- Enter the Domain name if the remote system is a domain controller. In case the domain is specified, Access Manager Plus will try reaching the remote system through the domain name, eg. the domain name given is Zylker and the username is admin, Access Manager Plus will try to reach the system using Zylker/admin as the username.
- By default, all connections are private at the time of adding. Select the Shared Connections checkbox to make the connection public and accessible to other users.
- Select the Access Control checkbox to enforce other users to send a request for access to the connection rather than initiating the connection directly. The access requests will be visible to you in Admin >> Connection Access Requests from where you can either approve or reject the request. For ease of access, the connection requests will also be visible in the Notifications panel present at the top right corner of Access Manager Plus's web interface. Approve or reject requests directly from the Notifications panel. The Access Control checkbox is disabled for private connections.
- Once all attributes are provided, click Add. The RDP-based remote system will be added as a Connection in Access Manager Plus.
1.2 SSH Connection
- Choose Add SSH Connection from the Add drop-down.
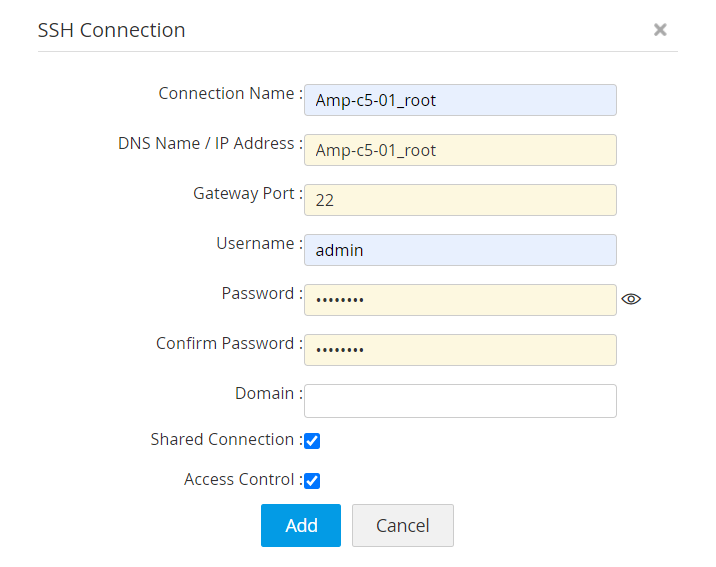
- In the pop-up, enter the following attributes:
- ConnectionName.
- DNS name or the IP Address at which the remote system can be reached.
- Port corresponding to the remote SSH-based system. 22 is the default port.
- The credentials of the connection in the Username and Password fields. Enter the password again for confirmation.
- Enter the Domain name if the remote system is a domain controller. In case the domain is specified, Access Manager Plus will try reaching the remote system through the domain name, eg. the domain name given is Zylker and the username is admin, Access Manager Plus will try to reach the system using Zylker/admin as the username.
- By default, all connections are private at the time of adding. Select the Shared Connections checkbox to make the connection public and accessible to other users.
- Select the Access Control checkbox to enforce other users to send a request for access to the connection rather than initiating the connection directly. The access requests will be visible to you in Admin >> Connection Access Requests from where you can either approve or reject the request. For ease of access, the connection requests will also be visible in the Notifications panel present at the top right corner of Access Manager Plus's web interface. Approve or reject requests directly from the Notifications panel. The Access Control checkbox is disabled for private connections.
- Once all attributes are provided, click Add. The SSH-based remote system will be added as a Connection in Access Manager Plus.
1.3 VNC Connection
- Choose VNC Connection from the Add drop-down.
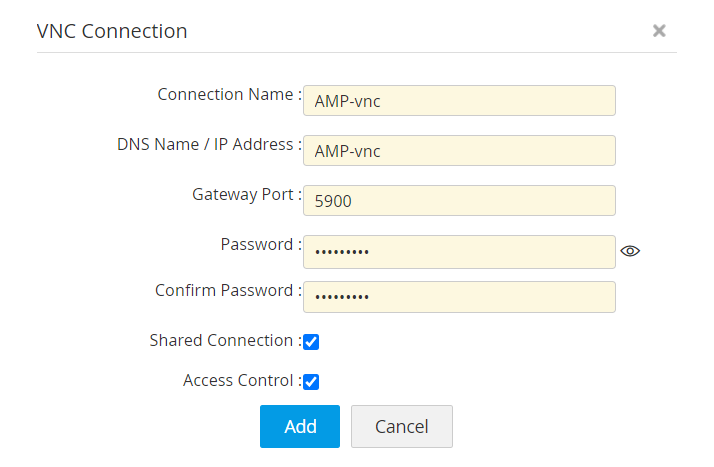
- In the pop-up, enter the following attributes:
- Connection Name.
- DNS name or the IP Address at which the VNC system can be reached.
- The corresponding VNC Port. 5900 is the default port.
- The credentials of VNC in the Username and Password fields. Enter the password again for confirmation.
- By default, all connections are private at the time of adding. Select the Shared Connections checkbox to make the connection public and accessible to other users.
- Select the Access Control checkbox to enforce other users to send a request for access to the connection rather than initiating the connection directly. The access requests will be visible to you in Admin >> Connection Access Requests from where you can either approve or reject the request. For ease of access, the connection requests will also be visible in the Notifications panel present at the top right corner of Access Manager Plus's web interface. Approve or reject requests directly from the Notifications panel. The Access Control checkbox is disabled for private connections.
- Once all attributes are provided, click Add. The VNC-based remote system will be added as a Connection in Access Manager Plus.
1.4 SQL Connection
- Choose SQL Connection from the Add drop-down.
- Access Manager Plus supports five different types of SQL connections and the steps for each type is explained below:
- MS SQL Server
- MySQL Server
- Sybase ASE
- Oracle DB Server
- PostgreSQL
1.4.1 MS SQL Server
- In the Add SQL Connection window, enter the following attributes
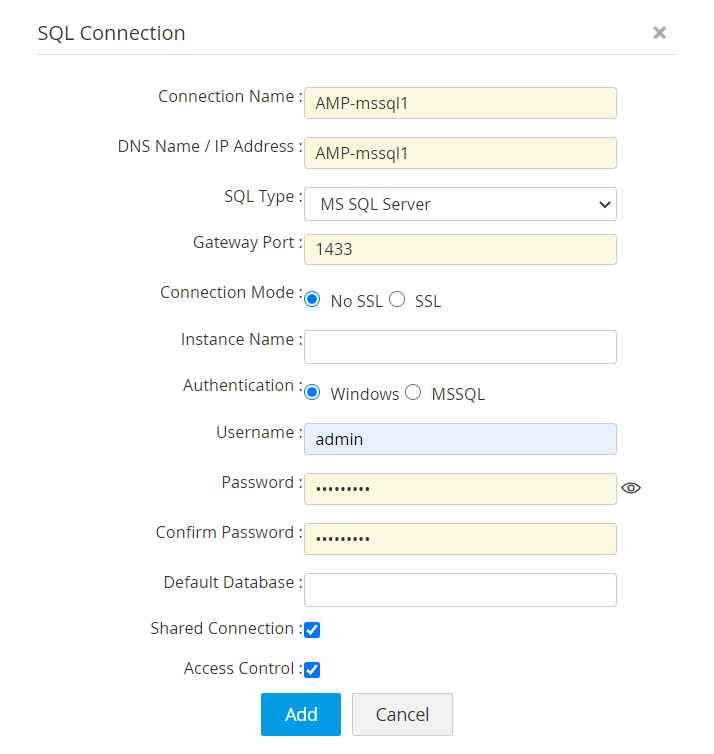
- Connection Name.
- DNS name or the IP Address at which the SQL system can be reached.
- Choose MS SQL Server from the SQL Type drop-down.
- Port corresponding to the remote MS SQL server. 1433 is the default port.
- Choose a Connection Mode: SSL or No SSL for the remote connection. In case of SSL mode, follow the below steps to import local certificate into Access Manager Plus:
- Instance Name: Specify the instance name only if there are multiple instances present in the database, otherwise this field is not mandatory.
- Choose the authentication mode as Windows or MSSQL.
- Enter the credentials corresponding to the authentication mode selected. Enter the password again for confirmation.
- The Default Database name field is not mandatory. However, in case the database is changed from the default one, then enter the database name. In the Instance Name field, enter the instance that corresponds to this database.
For SSL Mode:
i. Copy the server certificate and paste it under <AMP Installation Folder>/bin directory
ii. Open a command prompt and go to the <AMP Installation Folder>/bin directory
iii. From <AMP Installation Folder>/bin directory, execute the following command: importCert.bat <name of the server certificate>
- By default, all connections are private at the time of adding. Select the Shared Connections checkbox to make the connection public and accessible to other users.
- Select the Access Control checkbox to enforce other users to send a request for access to the connection rather than initiating the connection directly. The access requests will be visible to you in Admin >> Connection Access Requests from where you can either approve or reject the request. For ease of access, the connection requests will also be visible in the Notifications panel present at the top right corner of Access Manager Plus's web interface. Approve or reject requests directly from the Notifications panel. The Access Control checkbox is disabled for private connections.
- Once all attributes are provided, click Add. The MS SQL server will be added as a Connection in Access Manager Plus.
1.4.2 MySQL Server
- In the Add SQL Connection window, enter the following attributes

- Connection Name.
- DNS name or the IP Address at which the SQL system can be reached.
- Choose MySQL Server from the SQL Type drop-down.
- Port corresponding to the remote MySQL server. 3306 is the default port.
- Choose a Connection Mode: SSL or No SSL for the remote connection. In case of SSL mode, follow the below steps to import local certificate into Access Manager Plus:
- Enter the credentials of the MySQL server. Enter the password again for confirmation.
- The Default Database name field is not mandatory. However, in case the database is changed from the default one, then enter the database name.
For SSL Mode:
i. Copy the server certificate and paste it under <AMP Installation Folder>/bin directory
ii. Open a command prompt and go to the <AMP Installation Folder>/bin directory
iii. From <AMP Installation Folder>/bin directory, execute the following command: importCert.bat <name of the server certificate>
- By default, all connections are private at the time of adding. Select the Shared Connections checkbox to make the connection public and accessible to other users.
- Select the Access Control checkbox to enforce other users to send a request for access to the connection rather than initiating the connection directly. The access requests will be visible to you in Admin >> Connection Access Requests from where you can either approve or reject the request. For ease of access, the connection requests will also be visible in the Notifications panel present at the top right corner of Access Manager Plus's web interface. Approve or reject requests directly from the Notifications panel. The Access Control checkbox is disabled for private connections.
- Once all attributes are provided, click Add. The MySQL server will be added as a Connection in Access Manager Plus.
1.4.3 Sybase ASE
- In the Add SQL Connection window, enter the following attributes
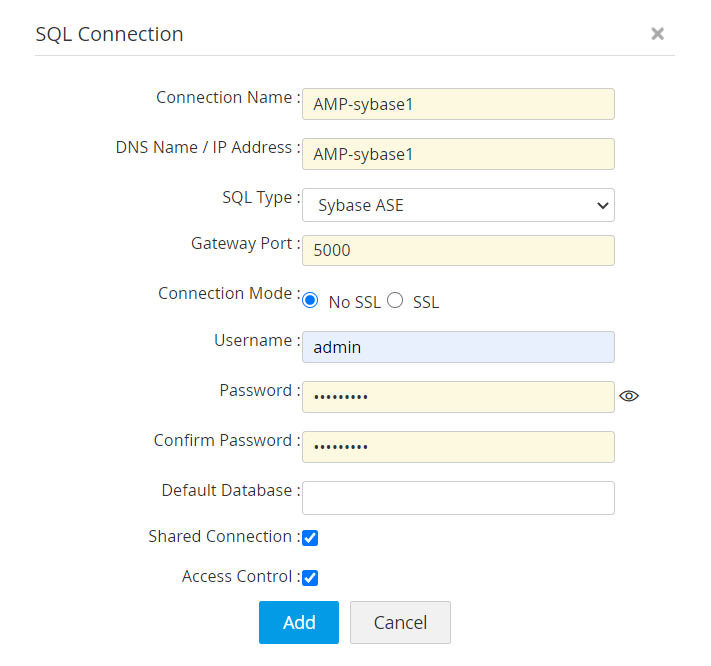
- Connection Name.
- DNS name or the IP Address at which the SQL system can be reached.
- Choose Sybase ASE from the SQL Type drop-down.
- Port corresponding to the remote Sybase ASE server. 5000 is the default port.
- Choose a Connection Mode: SSL or No SSL for the remote connection. In case of SSL mode, follow the below steps to import local certificate into Access Manager Plus:
- Enter the credentials of the Sybase ASE server. Enter the password again for confirmation.
- The Default Database name field is not mandatory. However, in case the database is changed from the default one, then enter the database name.
For SSL Mode:
i. Copy the server certificate and paste it under <AMP Installation Folder>/bin directory
ii. Open a command prompt and go to the <AMP Installation Folder>/bin directory
iii. From <AMP Installation Folder>/bin directory, execute the following command: importCert.bat <name of the server certificate>
- By default, all connections are private at the time of adding. Select the Shared Connections checkbox to make the connection public and accessible to other users.
- Select the Access Control checkbox to enforce other users to send a request for access to the connection rather than initiating the connection directly. The access requests will be visible to you in Admin >> Connection Access Requests from where you can either approve or reject the request. For ease of access, the connection requests will also be visible in the Notifications panel present at the top right corner of Access Manager Plus's web interface. Approve or reject requests directly from the Notifications panel. The Access Control checkbox is disabled for private connections.
- Once all attributes are provided, click Add. The Sybase ASE server will be added as a Connection in Access Manager Plus.
1.4.4 Oracle DB Server
- In the Add SQL Connection window, enter the following attributes
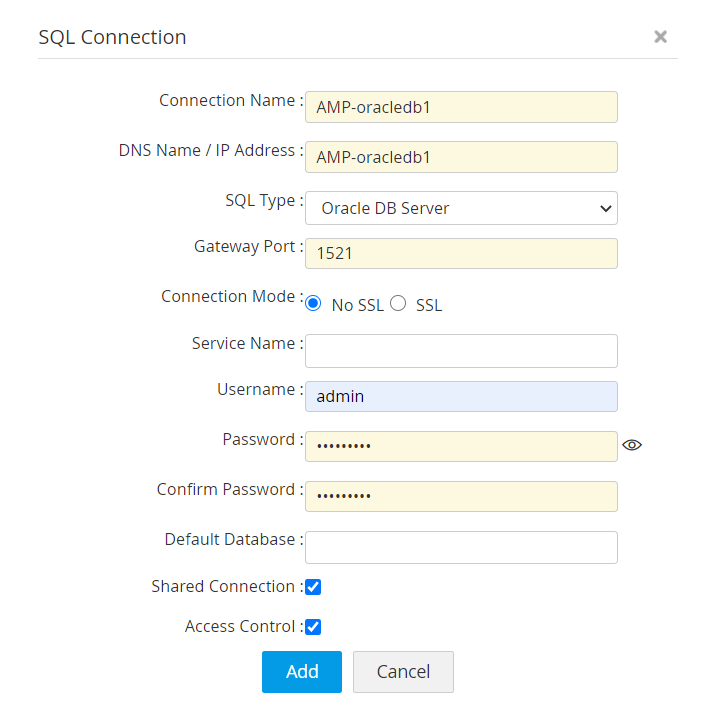
- Connection Name.
- DNS name or the IP Address at which the SQL system can be reached.
- Choose Oracle DB Server from the SQL Type drop-down.
- Port corresponding to the remote PostgreSQL server. 1521 is the default port.
- Choose a Connection Mode: SSL or No SSL for the remote connection. In case of SSL mode, follow the below steps to import local certificate into Access Manager Plus:
- Service Name: Specify the service name only if there are multiple services running in the database, otherwise this field is not mandatory.
- Enter the credentials of the Oracle DB server. Enter the password again for confirmation.
- The Default Database name field is not mandatory. However, in case the database is changed from the default one, then enter the database name.
For SSL Mode:
i. Copy the server certificate and paste it under <Access Manager Plus Installation Folder>/bin directory
ii. Open a command prompt and go to the <Access Manager Plus Installation Folder>/bin directory
iii. From <Access Manager Plus Installation Folder>/bin directory, execute the following command: importCert.bat <name of the server certificate>
- By default, all connections are private at the time of adding. Select the Shared Connections checkbox to make the connection public and accessible to other users.
- Select the Access Control checkbox to enforce other users to send a request for access to the connection rather than initiating the connection directly. The access requests will be visible to you in Admin >> Connection Access Requests from where you can either approve or reject the request. For ease of access, the connection requests will also be visible in the Notifications panel present at the top right corner of Access Manager Plus's web interface. Approve or reject requests directly from the Notifications panel. The Access Control checkbox is disabled for private connections.
- Once all attributes are provided, click Add. The Sybase ASE server will be added as a Connection in Access Manager Plus.
1.4.5 PostgreSQL Server
- In the Add SQL Connection window, enter the following attributes:

- Connection Name.
- DNS name or the IP Address at which the SQL system can be reached.
- Choose PostgreSQL Server from the SQL Type drop-down.
- Port corresponding to the remote PostgreSQL server. 5432 is the default port.
- Choose a Connection Mode: SSL or No SSL for the remote connection. In case of SSL mode, follow the below steps to import local certificate into Access Manager Plus:
- Enter the credentials of the Postgre SQL server. Enter the password again for confirmation.
- The Default Database name field is not mandatory. However, in case the database is changed from the default one, then enter the database name.
For SSL Mode:
i. Copy the server certificate and paste it under <AMP Installation Folder>/bin directory
ii. Open a command prompt and go to the <AMP Installation Folder>/bin directory
iii. From <AMP Installation Folder>/bin directory, execute the following command: importCert.bat <name of the server certificate>
- By default, all connections are private at the time of adding. Select the Shared Connections checkbox to make the connection public and accessible to other users.
- Select the Access Control checkbox to enforce other users to send a request for access to the connection rather than initiating the connection directly. The access requests will be visible to you in Admin >> Connection Access Requests from where you can either approve or reject the request. For ease of access, the connection requests will also be visible in the Notifications panel present at the top right corner of Access Manager Plus's web interface. Approve or reject requests directly from the Notifications panel. The Access Control checkbox is disabled for private connections.
- Once all attributes are provided, click Add. The PostgreSQL server will be added as a Connection in Access Manager Plus.
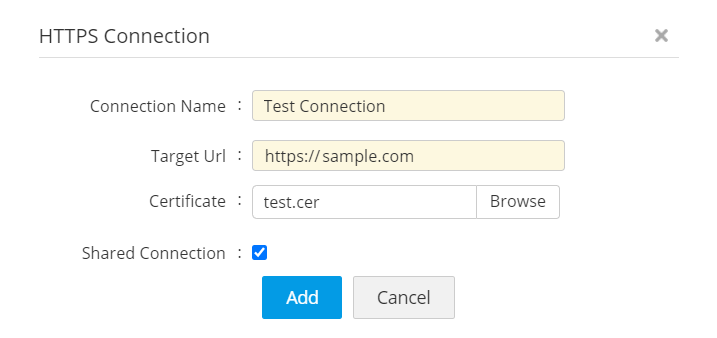
1.5 HTTPS Connection
Prerequisite: Before adding a target URL as a HTTPS connection, complete the HTTPS proxy server configuration in Admin >> Configuration >> HTTPS Proxy Server. Click here for the detailed steps.
- Choose HTTPS Connection from the Add drop-down.
- In the pop-up, enter the following attributes:
- Connection Name
- Target URL: Enter the HTTPS URL.
- Certificate: Click Browse to add the existing SSL certificate of the target website for securing the connection.
Steps for exporting a website's SSL certificate from Microsoft Edge browser:
a. Click the padlock icon available in the address bar next to the URL and click the Connection is secure option.
b. Here, click the certificate icon and go to the Details tab.
c. Click the Copy to file option, choose the required certificate format, enter a file name and path.
d. Click Next to export the SSL certificate of the web page.
- By default, all connections are private at the time of adding. Select the Shared Connection checkbox to make the connection public and accessible to other users.
- Once the connection is added, click Actions >> Configure Access Control if you wish to enforce other users to send a request for access to the connection rather than initiating the connection directly. The access requests will be visible to you in Admin >> Connection Access Requests from where you can either approve or reject the request. For ease of access, the connection requests will also be visible in the Notifications panel present at the top right corner of Access Manager Plus's web interface. Approve or reject requests directly from the Notifications panel.
- Once all attributes are provided, click Add. The web application will be added as a Connection in Access Manager Plus.
2. Import Connections from CSV
While manual addition is more suited for adding connections individually into Access Manager Plus, the import from CSV option allows you to import multiple systems in bulk. The entries could be present in any order in the CSV file. During the import, map the fields in the CSV file to the corresponding connection attributes in Access Manager Plus. Follow the below steps to import connections from a CSV file:
- Navigate to the Manage tab and click Import From File.
- In the Import Connections window, click Browse to choose and upload the CSV file.
- Click Next.
- Choosing attributes such as Connection Name, Username, Password are mandatory. You can map additional details like Connection Type, DNS Name/IP Address, Domain Name. Select the Shared Connection checkbox to make the imported connections public and accessible to other users.
- Click Submit. The connections from the CSV file will be imported into Access Manager Plus and will be visible under both Manage and Connections tabs.
- To edit the attributes of any connection, navigate to the Manage tab, click Actions drop-down beside the required connections and choose Edit.
Notes:
- If the CSV file contains a large number of entries, it will take a while to import all of them into Access Manager Plus. Once the import is done, you will get a confirmation message stating "All connections uploaded successfully".
- The result of every line imported will be logged as an audit record. For troubleshooting errors during import, refer to the log file in the location AMP installation directory\logs\amp0.txt.