Configuring SAML Single Sign-On (SSO) for Azure AD Users
Access Manager Plus offers support for SAML, which facilitates integration with Federated Identity Management Solutions for Single Sign-On. Access Manager Plus acts as the Service Provider (SP) and it integrates with Identity Providers (IdP) using SAML. The integration basically involves supplying details about SP to IdP and vice-versa. Once you integrate Access Manager Plus with an IdP, the users simply have to login to IdP and then, they can automatically login to Access Manager Plus from the respective identity provider's GUI without having to provide credentials again.
You can set up SAML (SSO) in Access Manager Plus for Azure AD users. This document also details steps to enable multi-factor authentication (MFA) in the Microsoft Azure portal.
Prerequisite
Before setting up SAML SSO, follow the steps provided here to import Azure AD users into Access Manager Plus.
Summary of Steps
- Steps to Configure SAML SSO for Azure AD Users
1.1 Adding an enterprise application in the Azure portal
- Steps to Enable MFA and Set up First Login for Azure AD Users
2.1 Enabling multi-factor authentication for Azure users
2.2 Assigning Azure users to the Enterprise Application
2.3 Setting up the first login for the MFA-enabled Azure users
1. Steps to Configure SAML SSO for Azure AD Users
Detailed below are the steps to configure SAML SSO in Access Manager Plus for Azure AD users in the Microsoft Azure portal.
1.1 Adding an Enterprise Application in the Azure Portal
- Login to the Microsoft Azure portal through the URL https://portal.azure.com.
- Click Azure Active Directory from the left most pane. Under Manage tab select Enterprise Applications.
- Click New Application available at the top of the Enterprise Applications page.
- You will be taken to the All Applications page which lists the applications from which you can choose and add. In the search bar, type "SAML" and press enter.
- From the search results, click SAML 1.1 Token enabled LOB App. The application will open in a minimized window on the right pane.
- Click the square icon at the right top corner to maximize the app window. Edit the name as AMP SAML 1.1 SSO and click Add.
- AMP SAML 1.1 SSO will be added as the Enterprise Application successfully.
1.2 Assigning Azure Users to the Enterprise Application
- Under Manage on the left pane, select Users and Groups and click Add User at the top.
- In the Add Assignment pane, click None Selected to open up a list of users. Select the required users and then click the Select option at the bottom.
- After the required users have been selected, click Assign to assign them to the enterprise application.
1.3 Configuring SAML SSO with Access Manager Plus
- Under Manage tab on the left pane, click Single sign-on. In the Select a single sign-on method window, select SAML.
- To set up single sign-on with SAML, you need to provide basic SAML configuration details here such as Identifier (entity ID) and Sign on URL.
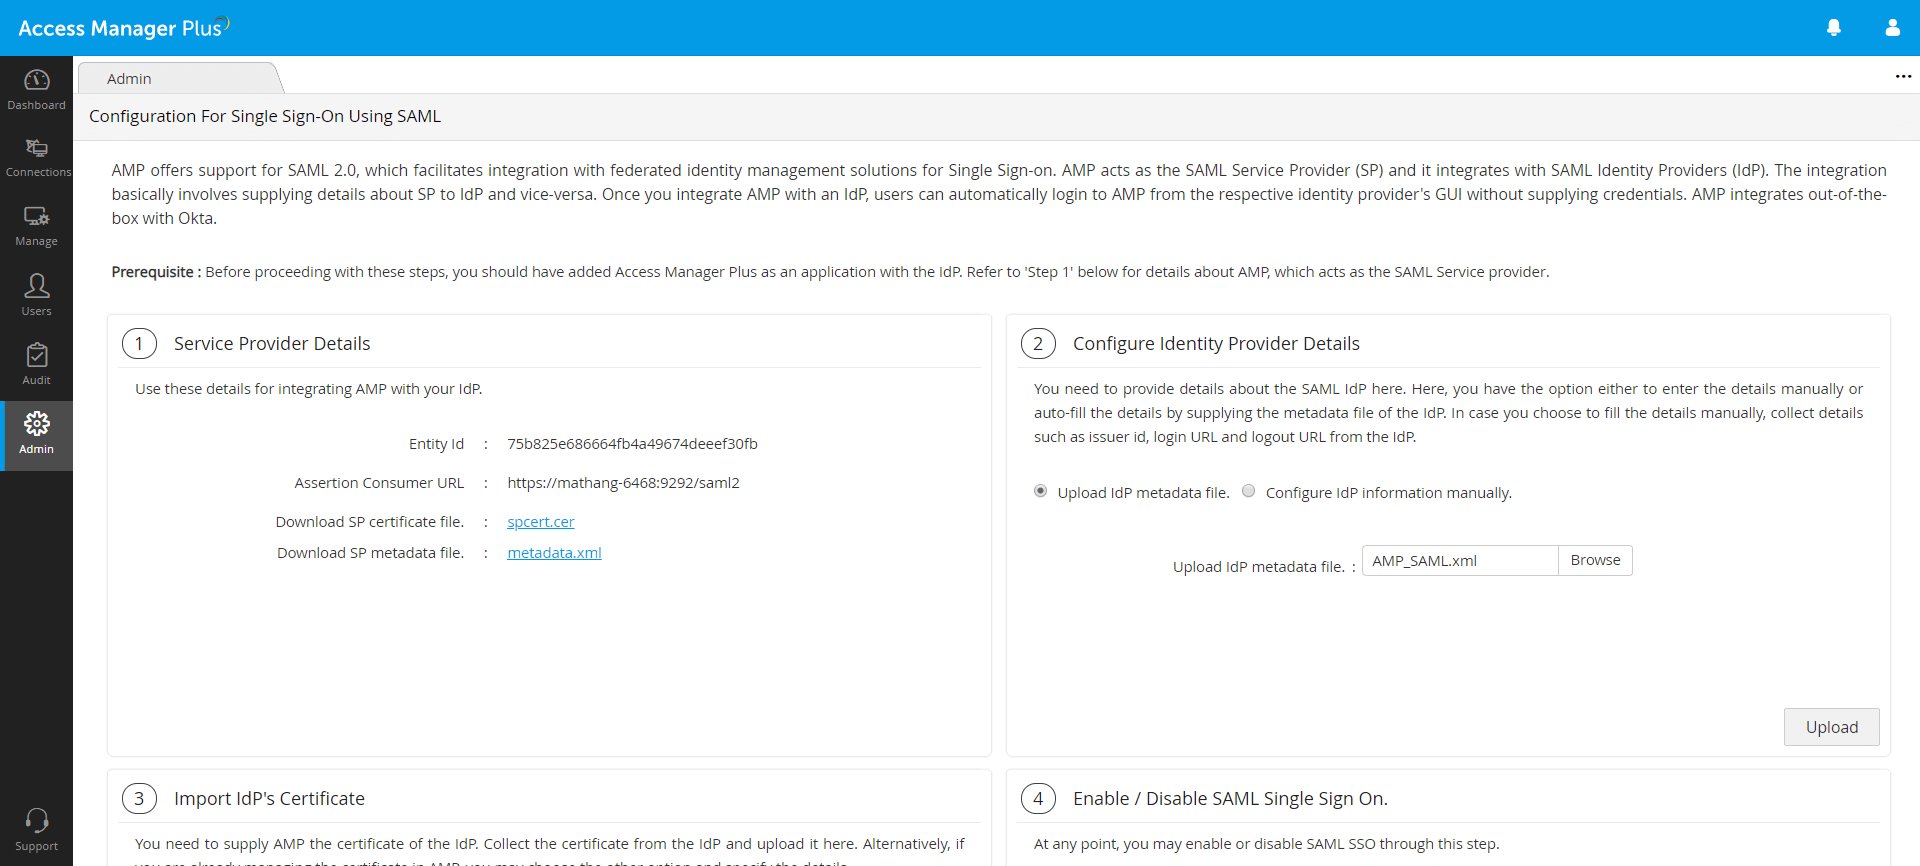
- You can get the Entity ID and Sign on URL from the Access Manager Plus interface.
- Once logged into Access Manager Plus, navigate to Admin >> Authentication >> SAML Single Sign On.
- Under 1. Service Provider Details, you will find Entity Id and Assertion Consumer URL; copy both the values.

- Go back to the Azure portal, click the edit icon to edit the Basic SAML Configuration details.
Enter the Entity Id from Access Manager Plus under Identifier (Entity ID) and enter the Assertion Consumer URL under the Sign on URL. Click Save. - Now the SAML configuration details taken from Access Manager Plus will be saved in the Azure portal.
- In the SAML configuration settings window, scroll down and go to the SAML Signing Certificate section and download the XML file named Federation Metadata XML.
- Go back to the Access Manager Plus interface, navigate to Admin >> Authentication >> Configure SAML Single sign-on.
- Under 2. Configure Identity Provider Details, select Upload idP metadata file, browse for the Federation Metadata XML file previously downloaded from the Azure portal and click Upload. Azure SAML SSO settings will now be saved in Access Manager Plus.
- Refresh the current page in Access Manager Plus. Now, under 3. Import IdP's Certificate, you will see the Current Certificate details such as Issuer, Subject, and Serial Number. Click Save.
- For the Azure SAML to function properly, go to the path: <AMP_Installation_Directory\AMP\conf\system_properties.conf> and verify if the below mentioned system properties are available in the conf file. If not, append them below the existing properties.
- Once the properties are added, restart the Access Manager Plus server for the changes to take effect.
- Finally, under 4. Enable/Disable SAML Single Sign On, click Enable Now to activate the SAML SSO.
- To validate if the single sign-on works, go to the Azure portal, click Validate under Validate single sign on with AMP SAML 1.1 SSO.
saml.redirect.idpprotocolbindingpost=true
saml.authcontext.comparison.exact=true
saml.AuthreqForceAuthn=false
saml.nameidFormat=unspecified
saml.idp.version=1.1
saml.authnContextClassRef=Password
2. Steps to Enable MFA and Set up First Login for Azure AD Users
Below are detailed steps to activate MFA for Azure AD users in the Microsoft portal and to set up their first login.
2.1 Enabling Multi-factor Authentication for Azure AD Users
- Login to the Microsoft Azure portal through the URL https://portal.azure.com.
- Select Azure Active Directory from the left pane.
- Under the Manage tab, select Users.
- Here, click the Multi-Factor Authentication option at the top. Now you will see the list of users populating in a new browser window.
- Select the user(s) for whom you want to enable MFA and click the Enable option on the right pane.
- In the pop-up box, click the enable multi-factor auth button to complete the set up.
2.2 Assigning Azure Users to the Enterprise Application
- Select Azure Active Directory from the left pane and under the Manage tab, select Enterprise applications.
- Search for your enterprise SAML application and select it.
- Select Users and groups from the left pane and click the Add User option at the top.
- In the Add Assignment pane, click None Selected to open up a list of users. Select the required users and then click the Select option at the bottom.
- After the required users have been selected, click Assign in the left pane to assign them to the enterprise application.
2.3 Setting Up First Login for the MFA-enabled Azure Users
Prerequisite:
You need to have the Microsoft Authenticator app installed in your phone for additional security verification.
Below steps are for users to set up their first login and multi-factor authentication using the Microsoft Authenticator app.
- Login to the Microsoft Azure portal - https://portal.azure.com
- Once you login, you will be redirected to the Additional security verification screen. Here, select Mobile app from the drop-down menu and select Receive notifications for verification. Click Next.
- Open up the Microsoft Authenticator app on your phone and scan the QR code shown; click Next.
- Select your country and enter the mobile number. Click Next.
- You will get a password for your first login in this window. Copy and save the password securely and click Done.
- The first login set up is complete. Now when you try to log into your Azure account for the first time, you will get a notification to your mobile device to verify the authenticity of your login attempt.