Server Settings
Using the Server Settings section in Access Manager Plus, configure various administrative settings and establish controls for better governance over connections and users that are part of the product. Customizing settings can help an administrator make the most of the security features that Access Manager Plus provides. Access Manager Plus offers various types of settings that range from customizing how event logs are recorded to setting up privacy controls for how data is displayed within the product. Below listed are different kinds of settings that are available in Access Manager Plus.
To configure settings in Access Manager Plus, navigate to Admin >> Server Settings and pick one from the options listed.
Types of Settings Available in Access Manager Plus
- Access Manager Plus Server Settings
- Log LevelSettings
- Mail Server Settings
- Proxy Server Settings
- General Settings
- Change Login Password
1. Access Manager Plus Server Settings
Click here to learn more about configuring Access Manager Plus server settings.
2. Log Level Settings
Every event that happens in Access Manager Plus, be it addition of users, addition of connections or import actions, generates event log that is stored locally in a text file in the Access Manager Plus installation directory under the path logs\amp0.txt.
Follow the below steps to change log levels:
- Under Admin >> Server Settings, click Log Level.

- In the pop-up, choose Info or Debug from the drop-down and click Save.
- Info - This is the default log level which records only the essential data such as date, time, name of the service, event and status of the event.
- Debug - This log level records a more detailed information about each event that happens during the operation of the product. When trying to troubleshoot a major discrepancy such as failure to import users through a CSV file, change the log level to Debug and replicate the issue to get a clearer picture of what is going wrong where; this information will be helpful to successfully troubleshoot and resolve errors.
3. Mail Server Settings
Click here to learn more about mail server settings.
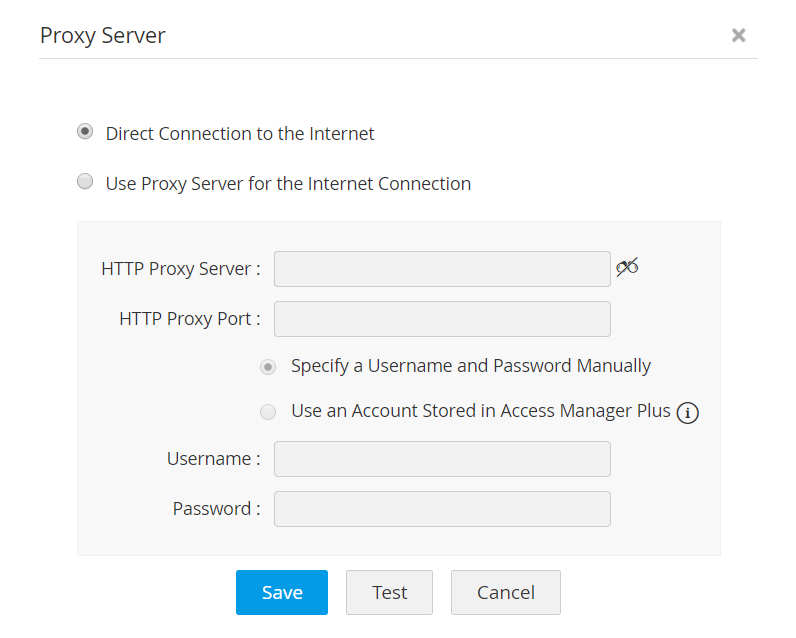
4. Proxy Server Settings
Using proxy server settings, you can set up an intermediate server between your local machine in which Access Manager Plus is running and the internet. Under Admin >> Server Settings, click Proxy Server. Here, you will find two options:
- Use Direct Connection to the Internet - choose this option to switch off any existing proxy server settings.
- Use Proxy Server for the Internet Connection - choose this option to set up a proxy server by entering the following details:
- Enter a proxy server name and port number.
- To authenticate the server, you can either provide the user name and password manually or choose an account already stored in Access Manager Plus.
- Click Test to check the connection. You will get a confirmation message if the connection works as expected.
- Click Save to save the proxy server settings. All connections to the internet will be routed via the proxy server hereafter.
5. General Settings
Click here to learn more about general settings.
6. Change Login Password
Click here to learn more about changing login password.