- Related Products
- AD360
- Log360
- ADAudit Plus
- ADSelfService Plus
- EventLog Analyzer
- Exchange Reporter Plus

Help Document
Two Factor Authentication
With two-factor authentication (2FA), you can add an extra layer of security to ADManager Plus. When users try to access the ADManager Plus interface, they will not be allowed to proceed until 2FA is completed. ADManager Plus' built-in admin is the only user with the option to skip 2FA. ADManager Plus provides options to perform 2FA through authentication services such as Duo Security, Google Authenticator, one time password via email, and more.
Steps to configure 2FA in ADManager Plus
- Navigate to the Delegation tab.
- In the left pane, under Configuration, click Logon Settings.
- In the Logon Settings page, navigate to the Two Factor Authentication tab.
- Toggle the Two Factor Authentication button on to enable 2FA.
- Select the desired 2FA from the following authentication services:
- Duo Security
- Google Authenticator
- One time password via email
- RSA Authenticator
- Microsoft Authenticator
- SMS Verification
Duo Security
Authentication via Duo Security can be configured in two ways in Web v4 SDK and Web v2 SDK.
Steps to configure Web v4 SDK
Note: A secure connection is required to set up the Web v4 SDK authentication. Please make sure that you have enabled HTTPS connection.
- Log in to your Duo Security account (e.g., https://admin-domain.duosecurity.com) or sign up for a new account and log in.
- Go to Applications and click Protect an Application.
- Search for Web SDK and click Protect.
- Copy the Client ID, Client secret, and API hostname values.
- Go to the ADManager Plus console and expand Duo Security.
- Check Enable Duo Security and select Web v4 SDK as the Integration Type.
- Paste the Client ID, Client secret, and API hostname obtained from the Duo Admin Panel in the respective fields.
- Enter the same username pattern used in Duo Security in the Username Pattern field.
- Click Save.
Steps to configure Web v2 SDK
Note: Duo Security has phased out Web v2 SDK, so it is recommended to switch to Web v4 SDK, which features the new Universal Prompt.
- Log in to your Duo Security account (e.g., https://admin-domain.duosecurity.com) or sign up for a new account and log in.
- Go to Applications and click Protect an Application.
- Search for Web SDK and click Protect.
- Copy the Integration key, Secret key, and API hostname values.
- Go to the ADManager Plus console and expand Duo Security.
- Check Enable Duo Security and select Web v2 SDK as the Integration Type.
- Paste the Integration key, Secret key, and API hostname obtained from the Duo Admin Panel in the respective fields.
- Enter the same username pattern used in Duo Security in the Username Pattern field.
- Click Save.
Please follow the steps below in the Duo Admin Panel to migrate from Web v2 SDK, which uses the traditional prompt, to Web v4 SDK, which employs the new Universal Prompt.
Steps to activate Duo Universal Prompt
- In the Duo Admin Panel, select the Web SDK application, which was previously configured for ADManager Plus, and copy the Integration key, Secret key and API hostname values.
- Scroll down to the Universal Prompt section. The App Update Ready message will be displayed, indicating that Universal Prompt can now be activated for ADManager Plus.
- Go to the ADManager Plus console and expand Duo Security.
- Click Web v4 SDK and paste the Integration key, Secret key, and API hostname values in the Client ID, Client Secret, and API hostname fields respectively.
- Once the Web v4 SDK is configured in ADManager Plus and a user authenticates through the frameless Duo v4 SDK, the App Update Ready message in Duo Admin Panel will be replaced with the New Prompt Ready message.
- Select Show new Universal Prompt to activate the universal prompt for ADManager Plus.
Google Authenticator
- Install and set up Google Authenticator on your smartphone by following the steps listed on this page.
- Switch to ADManager Plus and expand Google Authenticator.
- Click the Enable Google Authenticator button.
- While logging in to ADManager Plus, enter the code generated by the Google Authenticator app in your smartphone, in addition to your username and password.
One time password via email
The Email Server settings have to be configured to use One Time Password (OTP) via email as the 2FA method.
- Expand One time password via email and check the One time password via email option.
- Enter a subject and draft a message using Macros in the Subject and Message fields, respectively.
- Click Save.
RSA Authenticator
RSA SecurID is a 2FA mechanism developed by the RSA, the Security Division of EMC, for users attempting to access a network resource. Users can use the security codes generated by the RSA SecurID mobile app, a hardware token, or a token sent to their email or mobile device to log in to ADManager Plus. You can configure RSA SecurID for SDK integration or for REST API integration.
Steps to configure RSA SecurID for SDK integration
- Log in to your RSA admin console (e.g., https://RSA machinename.domain DNS name/sc).
- Go to the Access tab.
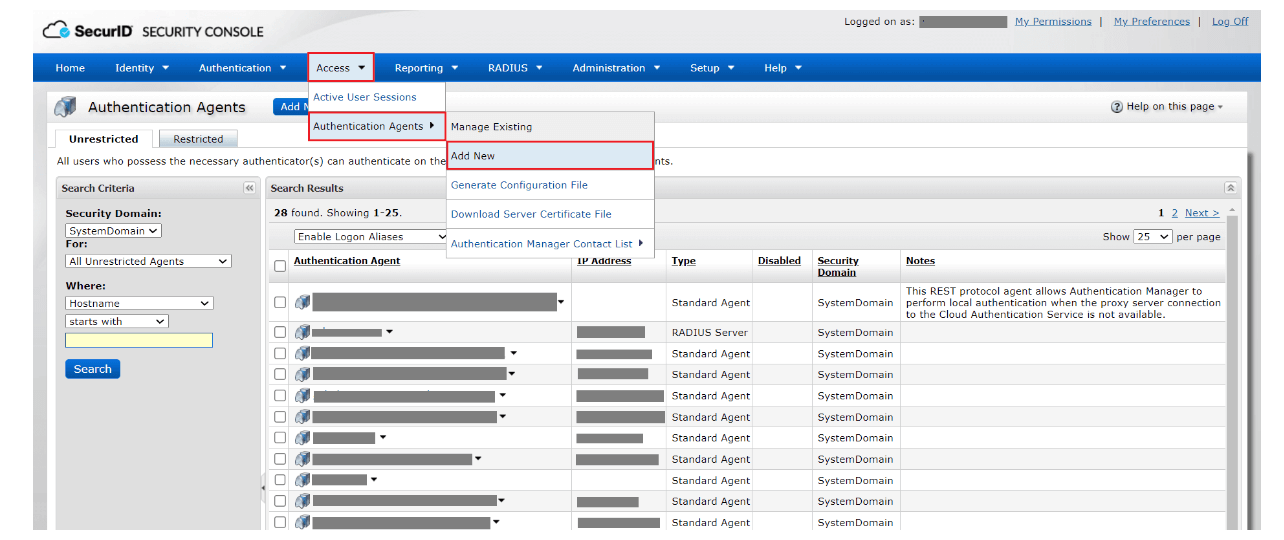
- Under Authentication Agents, click Add New.
- Add ADManager Plus Server as an Authentication Agent and click Save.
- Navigate back to the Access tab. Under Authentication Agents, click Generate Configuration File.
- Download the AM_Config.zip file.
- Copy the Authentication Manager configuration file, sdconf.rec from the zip and paste it in <-installation-dir>/bin. If there is a file named securid (node secret file), copy and paste it, too.
Note:- Ensure that the JAR files mentioned below are extracted from RSA SecurID and placed in the <ADManagerPlus_install_directory>/lib folder:
- authapi.jar
- Log4j.jar
- certj.jar
- commons-logging.jar
- cyrptojce.jar
- cryptojcommon.jar
- jcmFIPS.jar
- sslj.jar
- xmlsec.jar
- Restart ADManager Plus after adding the files.
Steps to configure RSA SecurID for REST API integration
- In the RSA admin console, navigate to Setup → System Settings.
- Under Authentication Settings, click RSA SecurID Authentication API.
- Copy the Access ID, Access Key, and Communication Port details.
- Go to the ADManager Plus console and expand RSA Authenticator.
- Check the Enable RSA Authenticator box.
- For Integration Type, select REST API.
- Enter the hostname of RSA Authentication Manager in the API Host Name field.
- Paste the port number and access key obtained in Step 3 in the Port and Access Key fields, respectively.
- Enter the authentication agent's name (i.e., the hostname of the ADManager Plus server) in the Client Id field.
- Check the Secure API requests to RSA server with HMAC Authentication box to verify the integrity of the authentication requests. Please follow the steps mentioned under HMAC prerequisites before enabling HMAC authentication.
- Enter the access ID copied in Step 3 in the Access Id field.
- Click Test Connection and Save.
Note: Please ensure that all the users are associated with the configured authentication agent (the ADManager Plus server) have enrolled in RSA Authentication Manager with the same username and SecurID tokens assigned to them.
Steps to configure the ADManager Plus server as an authentication agent
- Log on to your RSA admin console (e.g., https://RSA machinename.domain DNS name/sc).
- Navigate to Access → Authentication Agents → Add New.
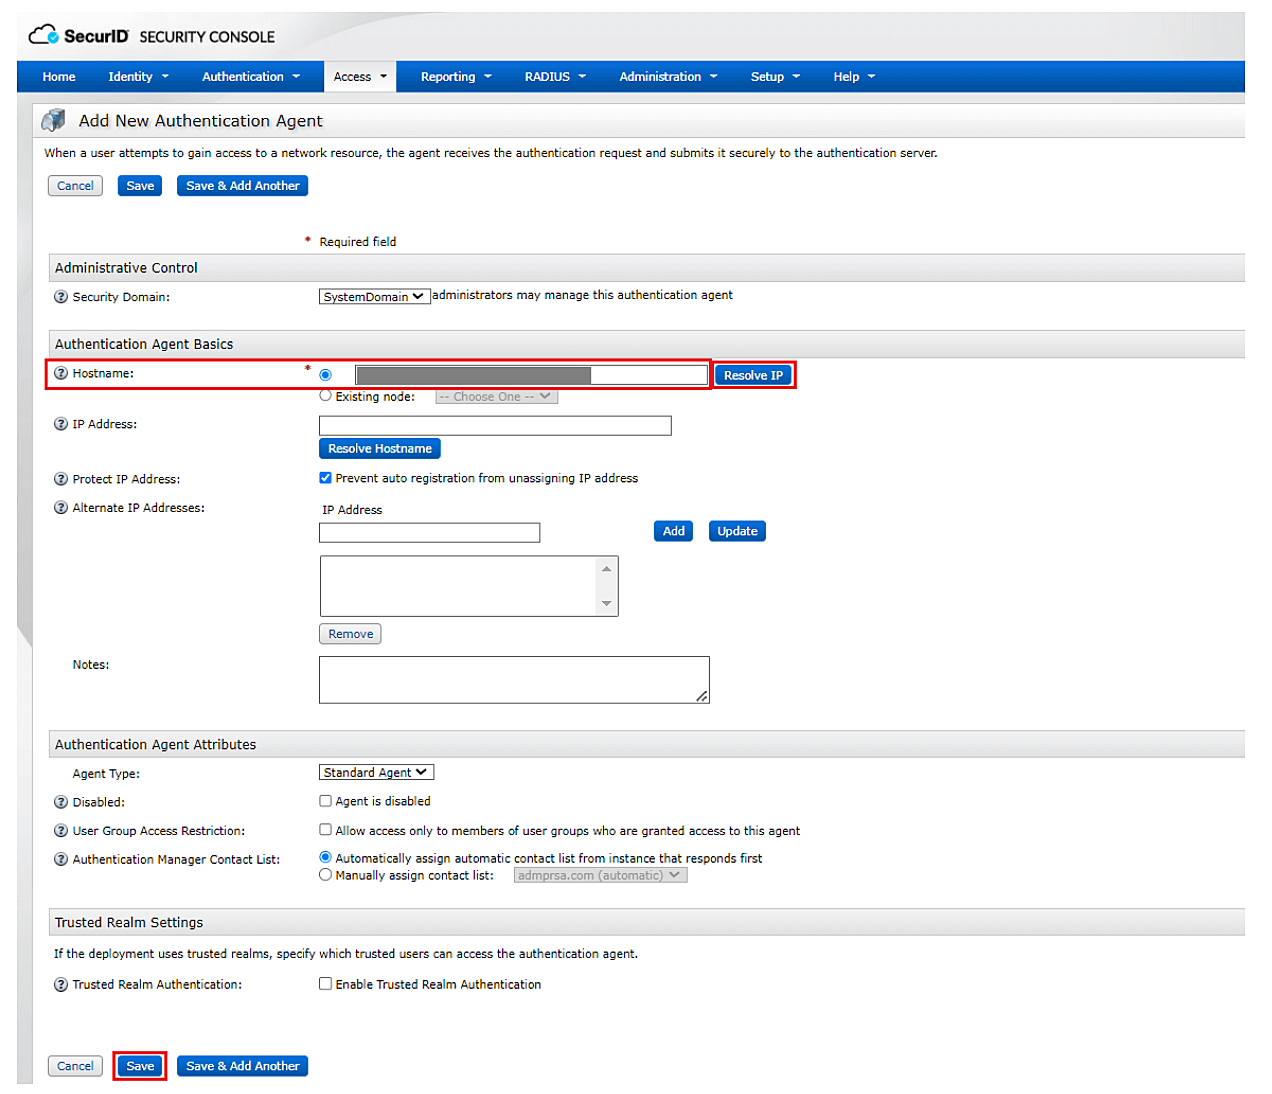
- Enter the hostname of the ADManager Plus server in the Hostname field and click Resolve IP to establish a connection between the SecurID SECURITY CONSOLE and the ADManager Plus server.
- Click Save to add the ADManager Plus server as an authentication agent.
HMAC prerequisites
Hash-based message authentication code (HMAC) is used to validate the authentication requests that are exchanged between authentication agents and the RSA SecurID Authentication API.
- Log on to the appliance with the Secure Shell client or access the appliance on a virtual machine with the VMware vSphere Client, Hyper-V Virtual Machine Manager, or Hyper-V Manager.
- To verify authentication requests by implementing HMAC, type the following:
./rsautil store –a update_config
auth_manager.rest_service.authorization.mode 1 GLOBAL 501
- To use only the RSA SecurID Authentication API's access key for authentication, type the following:
./rsautil store –a update_config
auth_manager.rest_service.authorization.mode 0 GLOBAL 501
Microsoft Authenticator
- Install and set up Microsoft Authenticator on your smartphone.
- Navigate to ADManager Plus and expand Microsoft Authenticator.
- Check the Enable Microsoft Authenticator option
- While logging in to ADManager Plus, enter the code generated by the Microsoft Authenticator app in your smartphone, in addition to your username and password.
SMS verification
To enable SMS verification as an authentication method, configure SMS gateway settings in ADManager Plus and follow these steps:
- Expand SMS Verification and check Enable SMS Verification.
- In the Message field, enter the SMS content using macros and click Save.
Steps to enroll your phone number
- Log in to ADManager Plus using your account credentials.
- In the Log in using SMS Verification page that opens up, enter your phone number and click Send Code.
- Enter the six-digit secret code you received via SMS in the field. If needed, enable the Trust this browser option to skip this step for the next 180 days.
- Click Verify code to verify.
- To manage the 2FA-enrolled users, click the Enrolled Users button. The list of 2FA-enrolled users is displayed. If needed, you can remove the configured 2FA and allow the user to reconfigure the settings.
- Click More options to configure the following:
- Check the Enable the "Trust this browser" option during authentication to trust the browser and let the authenticated help desk technicians into ADManager Plus without asking for 2FA for the time period specified in the Trust this browser for __ days field.
- Check Skip 2FA for the selected technicians and select the technicians from the pop-up window to allow the selected technicians to skip 2FA while logging in to ADManager Plus.
To personalize your preferred 2FA method
To choose your preferred authentication method, or to use an authentication service different from the one you are currently using, perform the following steps.
- Navigate to the My Account option at the top-right corner.
- In the left pane, click the Manage my TFA settings option.
- Click the Edit button and choose your preferred authentication method from the options available.
- To set Google Authenticator or Microsoft Authenticator as your preferred method, scan the QR code displayed on the screen and enter the code generated by the app in your smartphone.
- Click the Verify button.
Note: For users with Duo Security as the preferred authentication service, in the case of a lost or replaced smartphone, 2FA can still be performed smoothly by deleting the account in Duo. Follow the above steps, choose Duo Security as your preferred authentication method, and enable Duo Security once again to start from scratch.