- Related Products
- AD360
- Log360
- ADAudit Plus
- ADSelfService Plus
- EventLog Analyzer
- Exchange Reporter Plus

Help Document
Scheduling reports
Scheduling reports
With the Schedule Reports feature in ADManager Plus, administrators can automate report generation. Reports can be scheduled to be generated at a defined time and emailed to various stakeholders in desired formats.
To schedule a report:
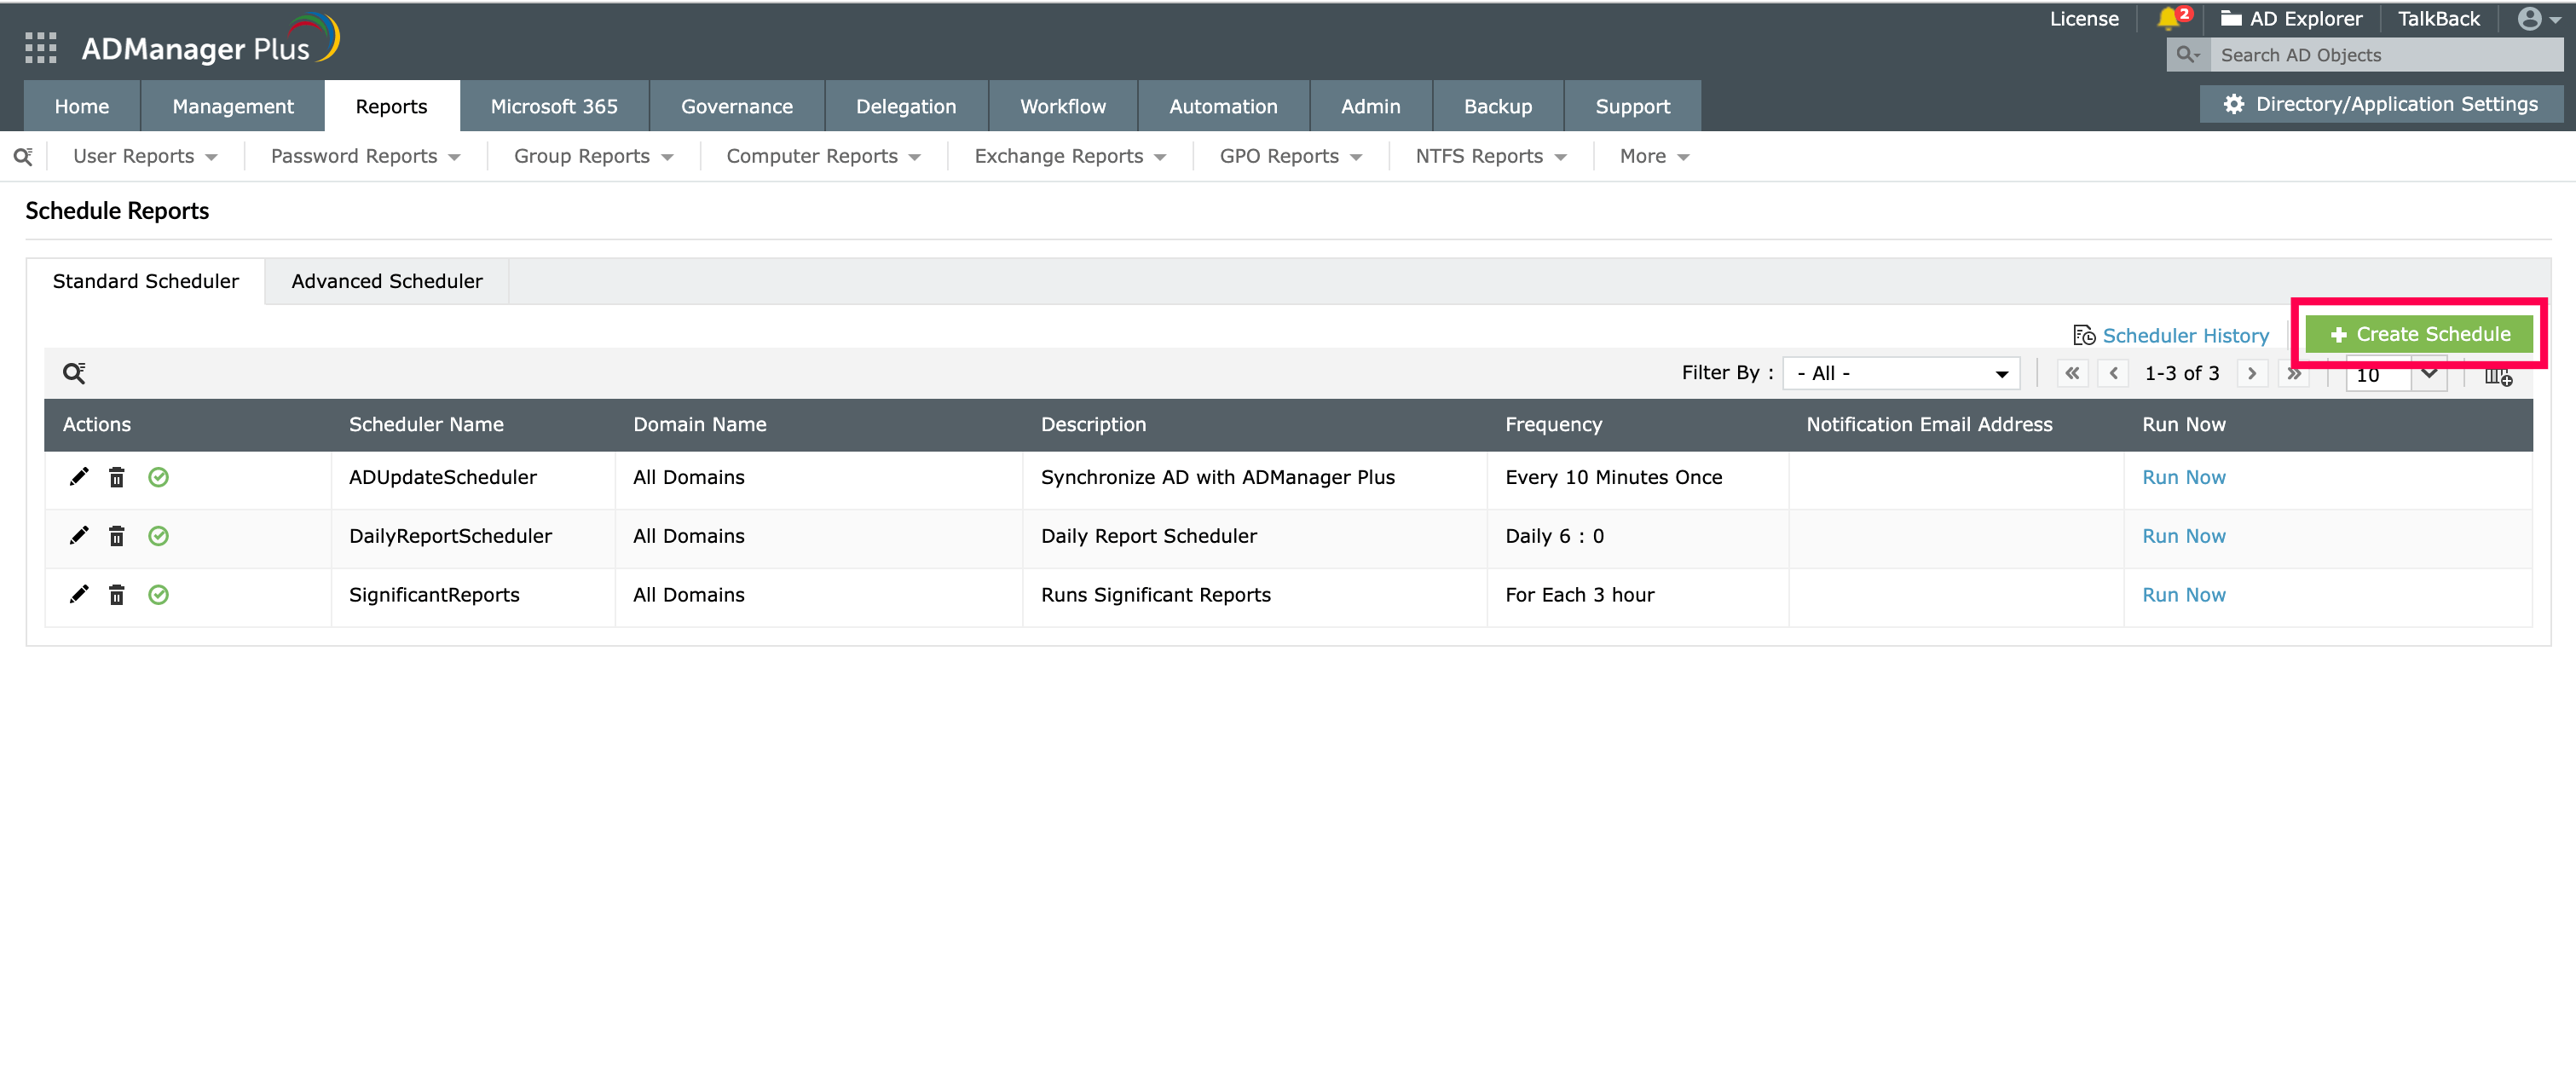
- Log in to ADManager Plus and navigate to the Reports tab.
- Click Schedule Reports at the top right corner of the page.
- Click Standard Scheduler.
- Click the + Create Schedule option at the top right corner to create a new schedule.
 Note: An alert message will be displayed if a mail server is not configured. Specify the desired server in the Email Server settings to proceed.
 - Enter a suitable name and description in the Schedule Name and Description fields.
- Select the desired domain from the Select Domain drop-down list. Click Add OUs to specify the OUs for which you wish to generate the report.
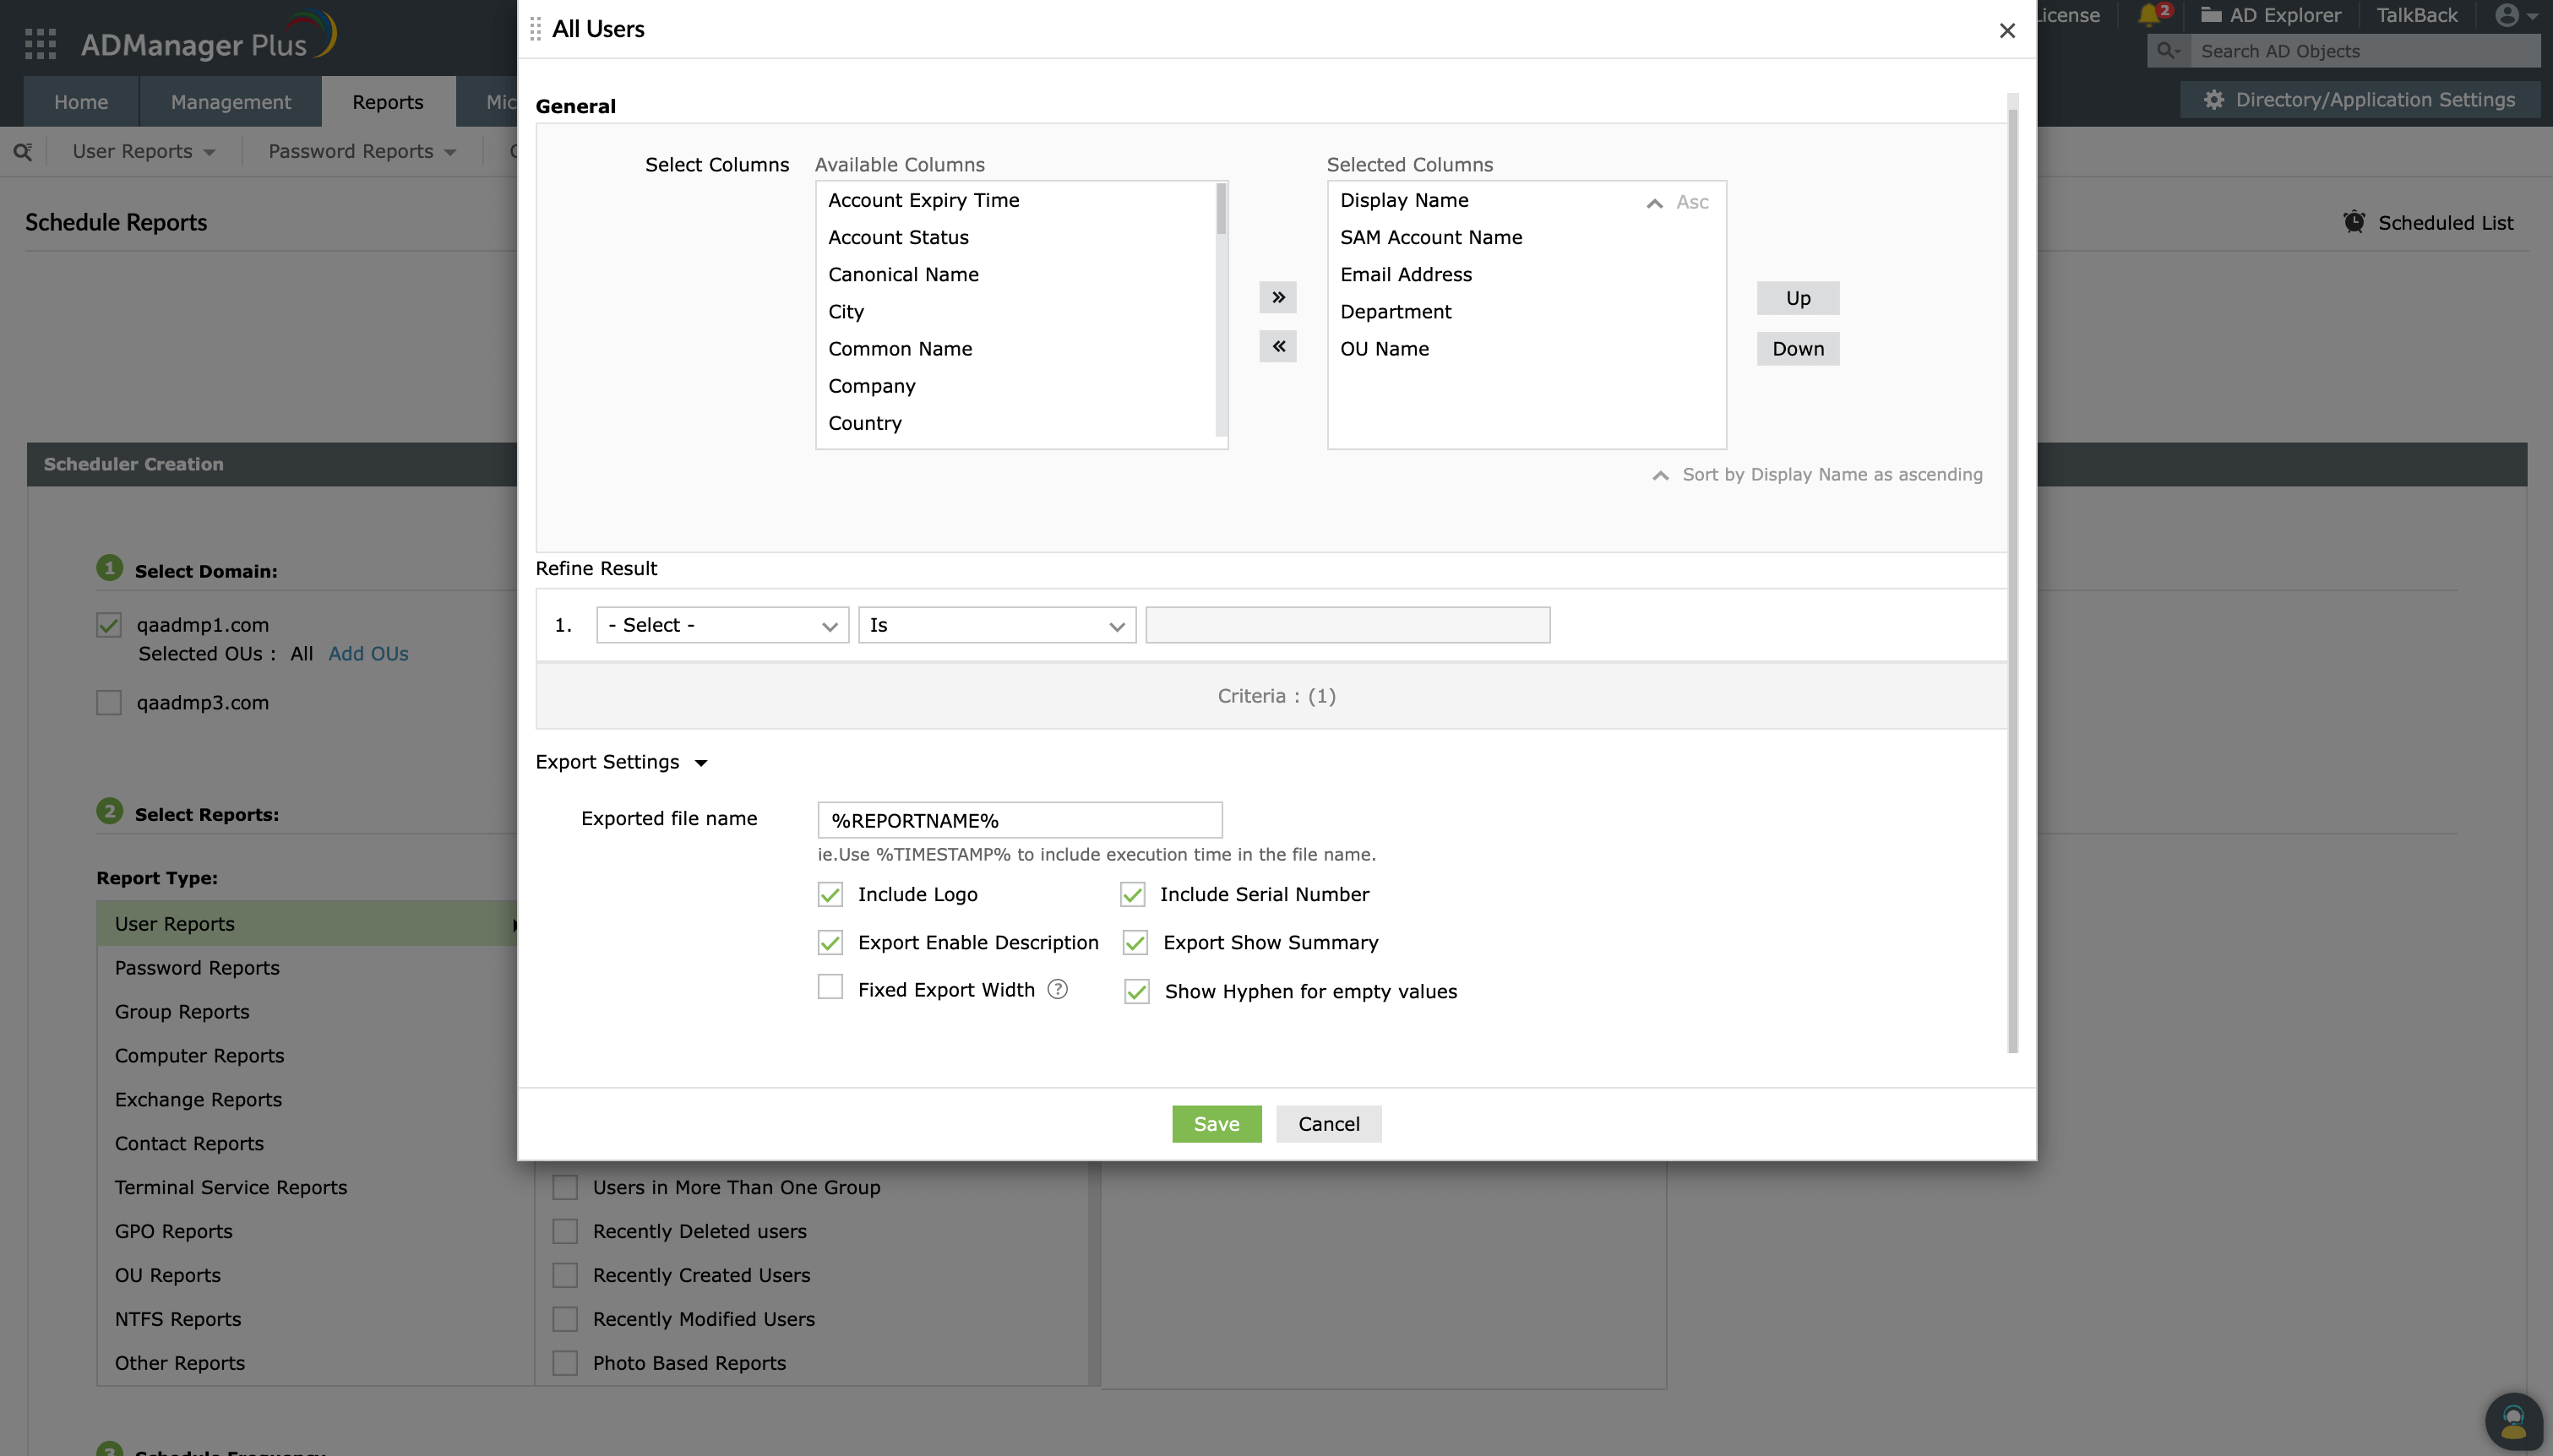
- In the Select Reports section, select the report that you would like to generate and click the Edit icon next to the report to customize the columns, refine results, and configure the file name.
- In the Schedule Frequency section, specify the execution time for this schedule.
- In the Notification Settings section, you can choose either a Notification Template or a Custom Notification, where you can specify the format in which the reports have to be emailed and the location where you would like to store them.
- Hit the Save button to save this new schedule. If you wish to save this schedule and run it once immediately, hit the Save & Run button.
Note: Refer the advanced-scheduler tab to learn how to schedule custom reports in ADManager Plus.
Select Reports
The Select Reports section is where you can select the type of report that you would like to schedule. Follow these steps to select and customize a report in this section:
- Select the report type in the first column and select the desired report from the Available Reports list.
- Click the edit icon next to the report. In the window that opens:
- Select Columns: Select the desired columns in the Available Columns section. To define the column display order, select a column and use the Up and Down button to arrange it. You can also sort a column using the up and down arrows.
- Refine Result: Add a condition based on which you'd like to refine the report's results.
- Export settings: Provide a filename for the report using macros in the Exported file name field. Check the Include Logo and Include Serial Number option to include ADManager Plus' logo and serial number in the exported report.
Schedule Frequency
You can set the time at which the scheduled reports have to be generated as per your requirements. With this option, you can have the reports generated repeatedly at the desired times. The following are the options available for specifying the execution time for scheduled reports:
- Hourly: This option generates the selected report once every "n" hours from the time the schedule is created.
- Daily: This option generates the report once every day at the specified time.
- Weekly: This option generates the selected report once a week, on the specified day, at the specified time.
- Monthly: This option generates the scheduled report once every month, on the specified day, at the specified time.
- Custom: You can create a customized execution time and frequency for the scheduled report using this option. Select Custom from the list and specify the following:
- Starting Date: Specify the day from which this schedule is to be executed.
- At: Set the time at which the scheduled report is to be generated.
- Frequency: Specify whether the schedule will be repeated or run only once. The repeat frequency can be in minutes, days, weeks, months, or years.
Custom Notification
Follow these steps in the Notification Settings section to select the desired format and specify the storage location for the generated report:
- Select the format in which you would like to have the report mailed to you from the Select Format drop-down list. The reports can be exported in PDF, HTML, XLSX, CSV, and CSVDE formats.
- Click the Storage Path button to specify the location where you would like to store the report.
- Enable the Overwrite existing exported files checkbox if you would like to replace an existing report with a new report, that is every time a new report having the same name is generated.
- Enable the Don't create extra folders option if you would like to store the report in the storage path specified above without creating extra folders. The report will then be stored in this format: ReportName_SchedulerName_Date_Time.FileType
Note: When the Don't create extra folders option is enabled along with the Overwrite existing exported folders option, the report will be stored in the following format:
ReportName_SchedulerName.FileType - The email addresses of the desired recipients can be mentioned in the Email To option. You can enter multiple email addresses, separated by commas.
Note: You can use the Send Test Mail option to send a test email and confirm if the recipient email address is a valid one.
Advanced Mail Settings
To send reports as attachments and to customize the email content click the Advanced Mail Settings option and configure the following:
- Enter the desired email subject and content in the Subject and Message fields, respectively.
- Check the Notify only if data is available option to send notification only when the generated report has data in it.
- Attachment: You can choose to send the reports as attachments, links, or mail content under this section.
- Attachment Type: Select this option to send the report as attachment via email. Choose the Send as file(s) option to send the report as an individual file in the specified format or the Send as zipped file option to send the report as a compressed ZIP file.
- Send as a link: Select this option if you wish to send the generated report as a link via email.
- Send report(s) as mail content: Select this option to send the report as part of the email content.
- Click OK to save the configurations.
Note: You can use the Send Test Mail option to send a test email and confirm if the recipient email address is a valid one.
- Enable or disable scheduled reports
- Delete scheduled reports
- Edit scheduled reports
- Copy scheduled reports
- Share scheduled reports
Enable or disable scheduled reports
Sometimes, you may need to temporarily pause a scheduled report and resume it later. You can decide when to enable or disable the scheduled report depending on your organization's needs.
To disable a scheduled report:
- Click the Reports tab.
- Click the Schedule Reports button. You will find a list of scheduled reports on the Schedule Reports page.
- In the Actions column, click the
 icon beside the scheduled report you want to disable. The icon will be replaced by the
  icon.
icon.
To enable a scheduled report:
- In the Actions column, click the icon beside the scheduled report you want to enable. The icon will be replaced by the icon.
Delete scheduled reports
When a scheduled report is no longer useful, you can delete it from the scheduled reports list. To delete a scheduled report:
- Click the Reports tab.
- Click the Schedule Reports button. You will find a list of scheduled reports on the Schedule Reports page.
- In the Actions column, click the
 icon beside the scheduled report you want to delete. The deleted scheduled report will no longer be listed.
Edit scheduled reports
You can make changes to an existing scheduled report as required using the edit option.
Follow the steps provided below to edit a scheduled report:
- Click the Reports tab.
- Click the Schedule Reports button. You will find a list of scheduled reports on the Schedule Reports page.
- In the Actions column, click the
 icon beside the scheduled report that you want to update.
 - Make the necessary changes.
- Click the Update button to save the changes.
- Click the Scheduled List link in the right corner to see the updated scheduled report in the list.
Copy scheduled reports
You can copy any existing scheduled report and create a new one using its settings by following the steps provided below:
- Click the Reports tab.
- Click the Schedule Reports button.
- Click the Scheduled List link in the right corner to see the list of available scheduled reports.
- In the Actions column, click the
 icon beside the scheduled report that you want to copy.
 - Provide a name for the new scheduled report and click Copy.
- You can now edit the new scheduled report according to your needs using the icon.
Share scheduled reports
You can share scheduled reports with select technicians or all technicians for better management and security. To share scheduled reports with technicians:
- Click the Reports tab.
- Click the Schedule Reports button.
- Click the Scheduled List in the right corner to see the list of available scheduled reports.
- In the Actions column, click the
 icon beside the scheduled report that you want to share.
 - In the pop-up that opens, search and add the technicians with whom you want to share the scheduled report.
- To share the scheduled report with all the technicians, check the Share With All Technicians box.
- Now, in the Access Level drop-down box, select the level of access from the three options given in the list.
- View: This level of access allows a technician to generate and copy the custom scheduled report.
- Edit: This level of access allows a technician to generate, copy, and edit the scheduled report.
- Full Access: This level of access allows a technician to generate, copy, edit, share, and delete the scheduled report.
- Click Share. A separate section within the pop-up will display the details of the shared scheduled report.
Share a Schedule
This option allows the administrator or the help desk technician who creates a schedule to share it with fellow help desk technicians. The technician with whom a schedule is shared will have permissions to view, copy, and execute the schedule.
Follow these steps to share a schedule:
- Click the Reports Tab
- Click the Schedule Report link to open the report scheduling page. You will be able to see list of report schedules that have been created.
- From the list of schedules, identify the one that you wish to share. Point the mouse over that schedule, and click the share icon that is displayed beside the schedule name.
- In the share scheduler window that opens up, click the 'choose' link and select the desired technicians.
If you wish to share this schedule with all the technicians, select the 'share with all technicians' option.
Note: The technicians with whom the schedule is shared will have the permission to only view, copy, and execute the schedule. They will not be able to edit it. - Click Share.
Advanced Report Scheduler
The advanced scheduler feature allows you to schedule custom reports as well as some important Active Directory and Google Workspace reports. You can find the list of supported reports here.
These steps will guide you through the process of scheduling a custom report.
Scheduling a custom report
- Navigate to the Reports tab.
- In the left pane, click Custom Reports.
- Click the Schedule Reports button on the top-right part of the window, under which you can find these two tabs:
- Standard Scheduler: Lists scheduled regular reports.
- Advanced Scheduler: Lists scheduled custom reports and other predefined custom reports.
- Click Scheduler History to view details of the previously executed schedules executed, such as execution status, schedule start time, email delivery status, etc.
- To create a new schedule, click Create Schedule.
- Enter a suitable name and description in the Schedule Name and Description fields.
- Click the + icon to add a report to the schedule in the Select Report option. A new pop-up window will open, and under the Select Category option, choose the report you wish to schedule.
- In the Schedule Frequency section, specify the execution time for this schedule.
- In the Notification Settings section, you can choose either a Notification Template or a Custom Notification, where you can specify the email format for the reports and the location where they should be stored.
- Hit the Save button to save this new schedule. If you wish to save this schedule and run it once immediately, hit the Save & Run button.
- In case you want to add the scheduling of a custom report as a help desk role, this page can guide you.
NOTE:
- The help desk technicians can view all custom reports, but they can edit or delete only those that they created.
- To delegate scheduling of custom reports as a help desk role, ensure you have enabled the Advanced Reports option under the Schedule Reports tab.
Reports supported by Advanced Scheduler
- Active Directory Reports
- Detailed Group members
- Report from CSV
- Google Workspace Reports
- Google Workspace Users
- Active Users
- Suspended Users
- Custom Reports
- Active Users
- User accounts without Kerberos pre-authentication
- Recently created but never logged on users
- Recently created security groups
- Non-builtin domain local groups
- Computers with decommissioned operating systems
- Dial-in access computers
- Managed contacts
- Unmanaged contacts