Integrating Microsoft Teams with Applications Manager
Overview
Microsoft Teams is a collaboration platform that helps your team stay connected through chat, channels, and meetings. Integrating Microsoft Teams with Applications Manager lets you receive real-time alarm notifications directly in your Teams channels using the Microsoft Graph API, so your team can respond to issues faster.
The integration involves registering Applications Manager as an app in Microsoft Azure, configuring an OAuth provider, and then setting up the Microsoft Teams integration and action within Applications Manager.
Prerequisites
Note: You need administrative access to the Microsoft Azure portal to register an application and grant the required Microsoft Graph API permissions.
How to integrate Microsoft Teams
- Step 1: Registering Applications Manager in Microsoft Azure
- Step 2: Configuring the OAuth provider in Applications Manager
- Step 3: Configuring the Microsoft Teams integration
- Step 4: Creating a new Microsoft Teams action
Step 1: Registering Applications Manager in Microsoft Azure
- Login to the Azure portal.
- Navigate to App registrations → New registration.
- Enter a Name for the application, for example, Applications Manager.
- Under Supported account types, choose the Accounts in this organizational directory only option.
- Under Redirect URI, choose Web as the platform and specify the value using the Redirect URI generated while configuring the OAuth provider in Applications Manager (see Step 2).
- Click Register to create the application.
- After registering the application, you will be redirected to the Application home page. Copy the Application (Client ID). This will be used as the Client ID.
- Go to Certificates & secrets → New client secret. Provide a description and expiry period, then click Add.
- Copy the generated Value immediately. This will be used as the Client Secret and cannot be retrieved later.
Note: If the value goes unreadable, and you are in need of client secret, you can create a new client secret and use the value. This client secret will expire depending on the duration you provide. Once it has expired create a new client secret and use the value.
- On the Overview page, click Endpoints and copy the OAuth 2.0 authorization endpoint (v2) and OAuth 2.0 token endpoint (v2) URLs. These will be used as the Authorization endpoint URL and Token endpoint URL respectively.
- Go to API permissions → Add a permission → Microsoft Graph → Delegated permissions, and add the following permissions:
- Team.ReadBasic.All
- Channel.ReadBasic.All
- ChannelMessage.Send
- offline_access
- Group.ReadWrite.All
- Click Grant admin consent to approve the added permissions.
Note: The offline_access scope is required to obtain a refresh token from Microsoft.
Step 2: Configuring the OAuth provider in Applications Manager
- Log in to Applications Manager and navigate to Settings → Discovery and Data Collection → Credential Settings → OAuth Provider.
- Click Add OAuth Provider.
- Provide the following details:
- Provider Name: A unique display name for the OAuth configuration, for example, Microsoft Teams.
- Grant Type: Leave this as the default value, Authorization Code.
- Redirect URI: This is auto-populated by Applications Manager. Copy this value and use it while registering the application in Azure (see Step 1).
- Client ID and Client Secret: Enter the values copied in Step 1.
- Authorization endpoint URL: Enter the OAuth 2.0 authorization endpoint copied in Step 1.
- Scope: Add the following scopes: Team.ReadBasic.All, Channel.ReadBasic.All, ChannelMessage.Send, offline_access, and Group.ReadWrite.All.
- Token endpoint URL: Enter the OAuth 2.0 token endpoint copied in Step 1.
- Token Request Method: Choose Post request body.
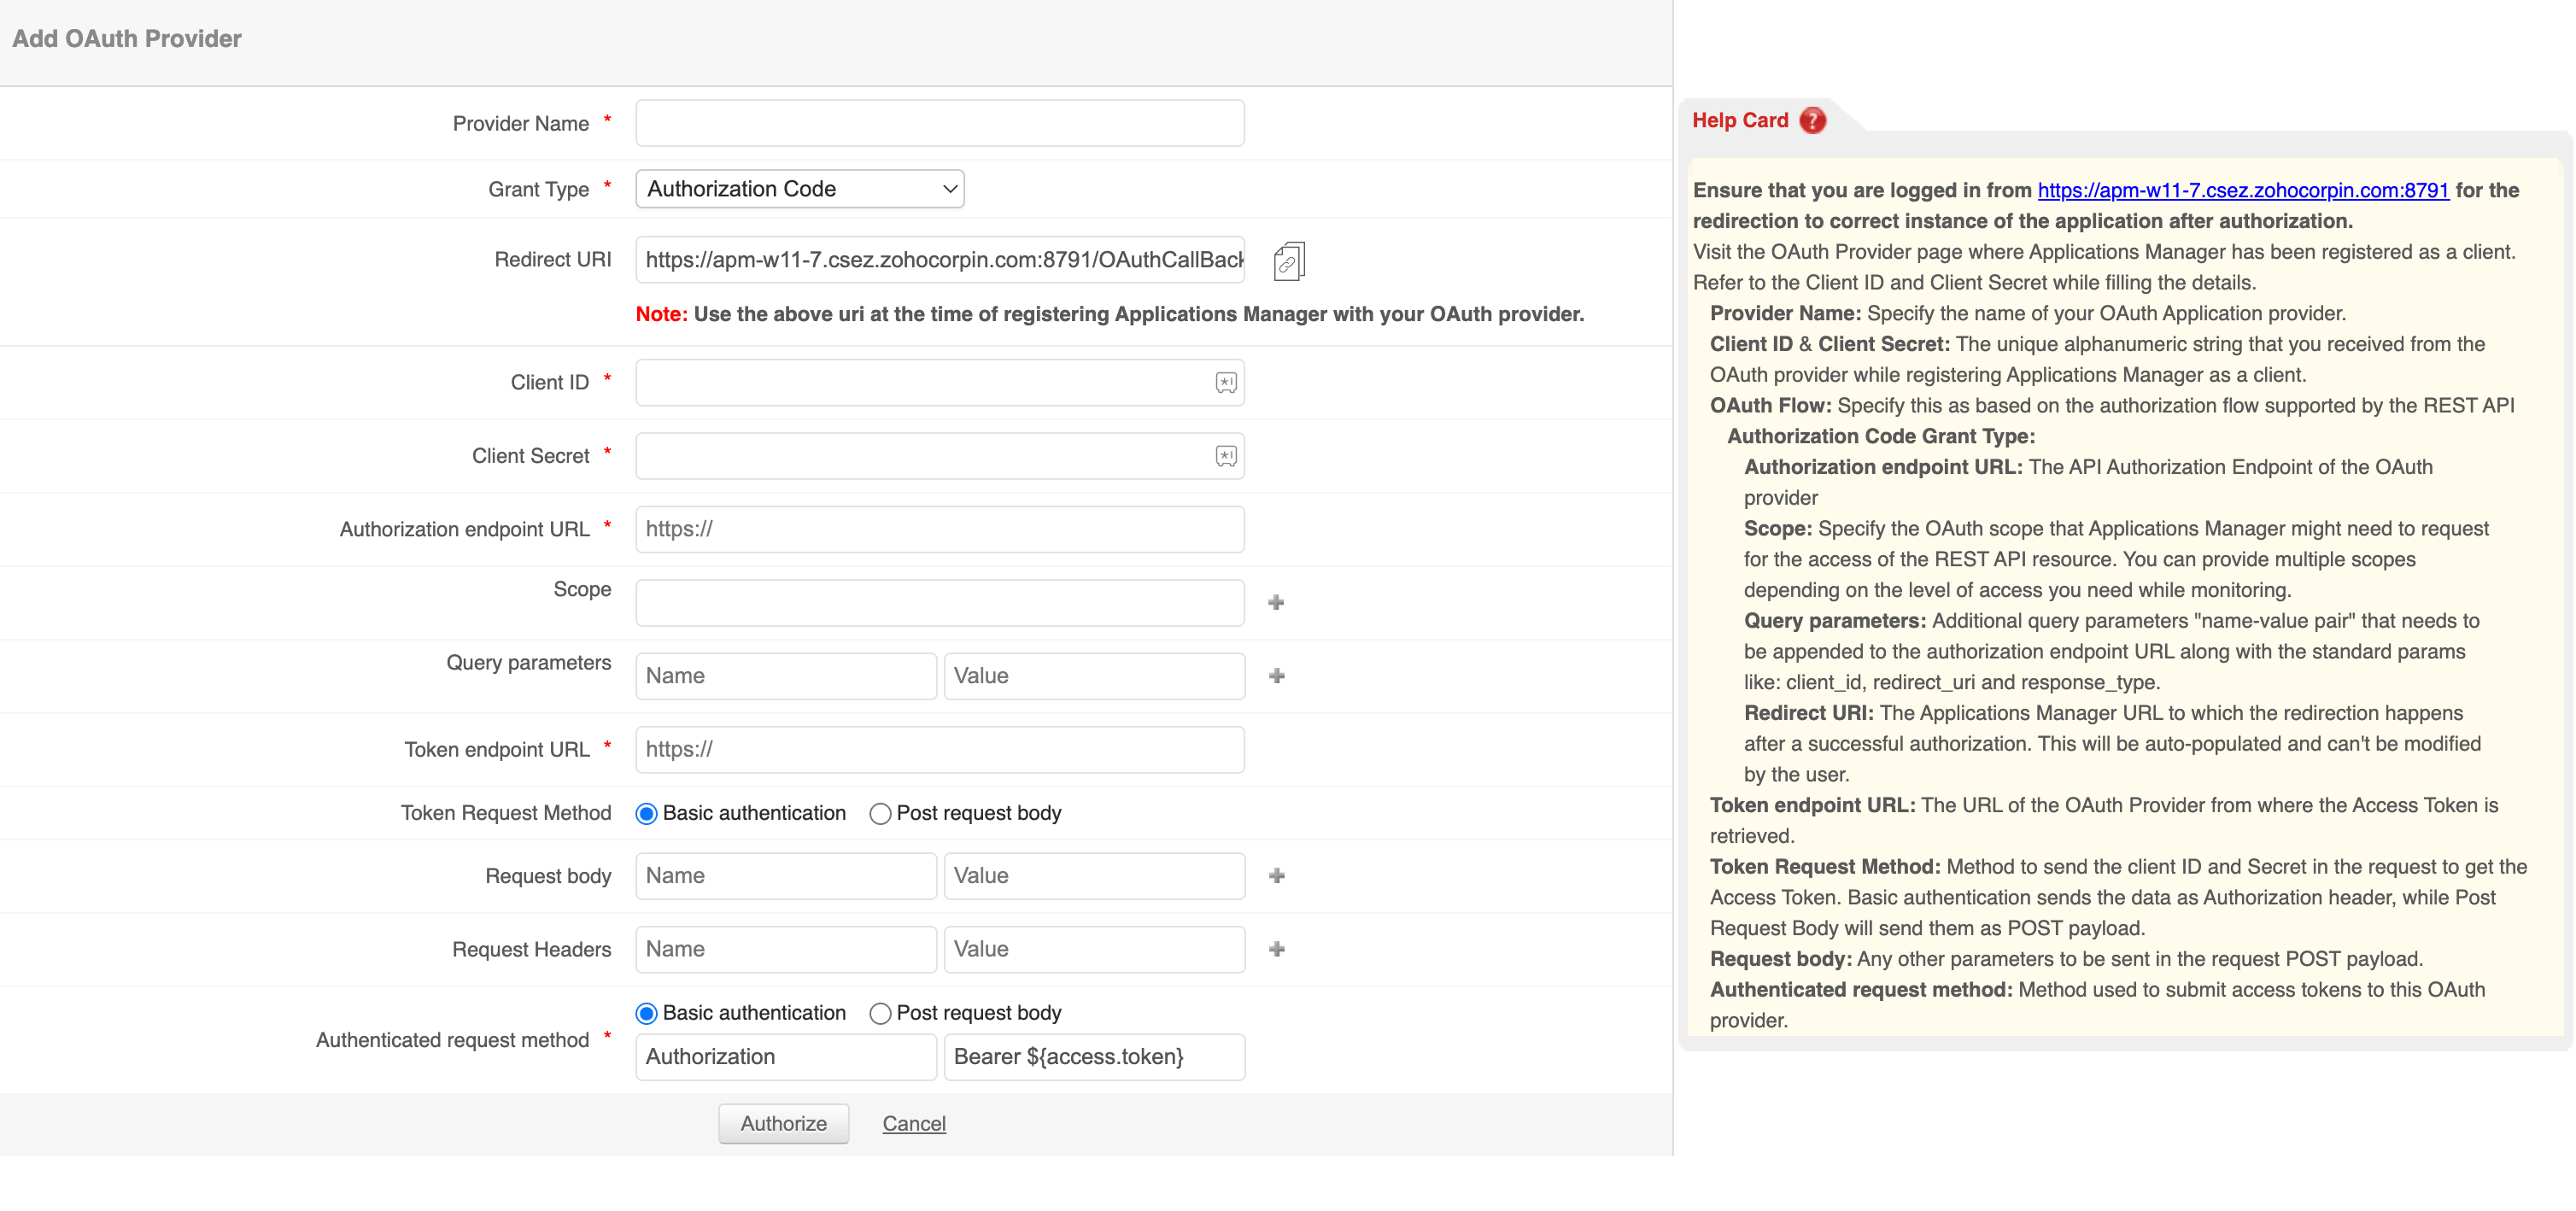
- Click Authorize. You will be redirected to the Microsoft sign-in page. Sign in with your Microsoft account credentials.
- Review the permissions requested and click Accept to grant consent.
Once consent is granted, the OAuth provider is added successfully in Applications Manager.
Step 3: Configuring the Microsoft Teams integration
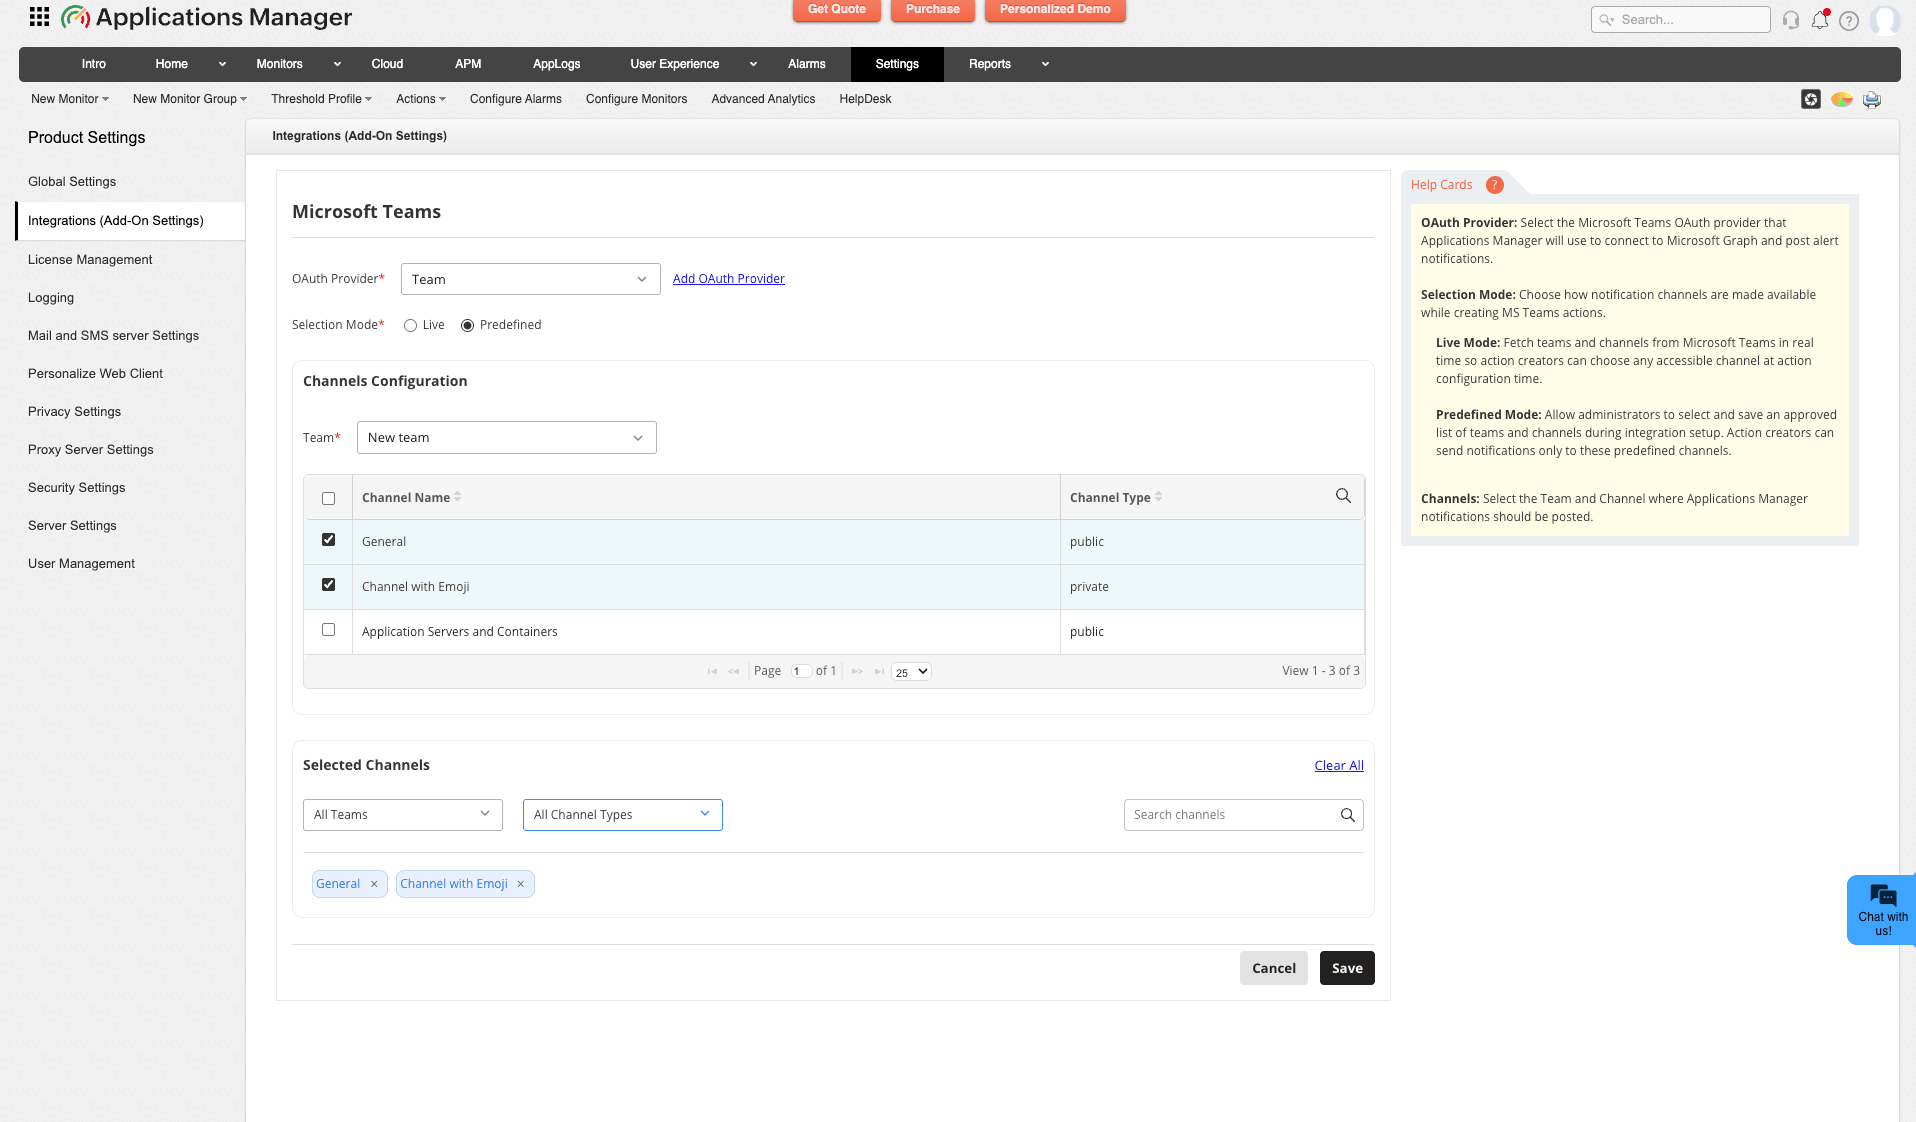
- Navigate to Settings → Product Settings → Integrations (Add-On Settings).
- Under the Microsoft Teams section, click on Add button.
- Select the OAuth Provider configured in Step 2 from the drop-down. You can also click Add OAuth Provider here to configure a new one.
- Choose a Selection Mode to determine how notification channels are to be made available while creating MS Teams action, based on the following options:
- Live: Fetches teams and channels from Microsoft Teams in real time, so action creators can choose any accessible channel while configuring the action.
- Predefined: Lets you select and save an approved list of teams and channels here. Action creators can send notifications only to these predefined channels.
- If Predefined is selected, under Channels Configuration, choose a Team from the drop-down. The available channels for that team, along with their Channel Type (public or private), are listed in the table below. Select the checkboxes against the required channels.
- The channels chosen are listed under Selected Channels, where you can filter by team or channel type, search for a channel, remove individual channels, or click Clear All to remove all of them.
- Click Save.
Step 4: Creating a new Microsoft Teams action
To create a new Microsoft Teams action in Applications Manager, follow the steps given below:
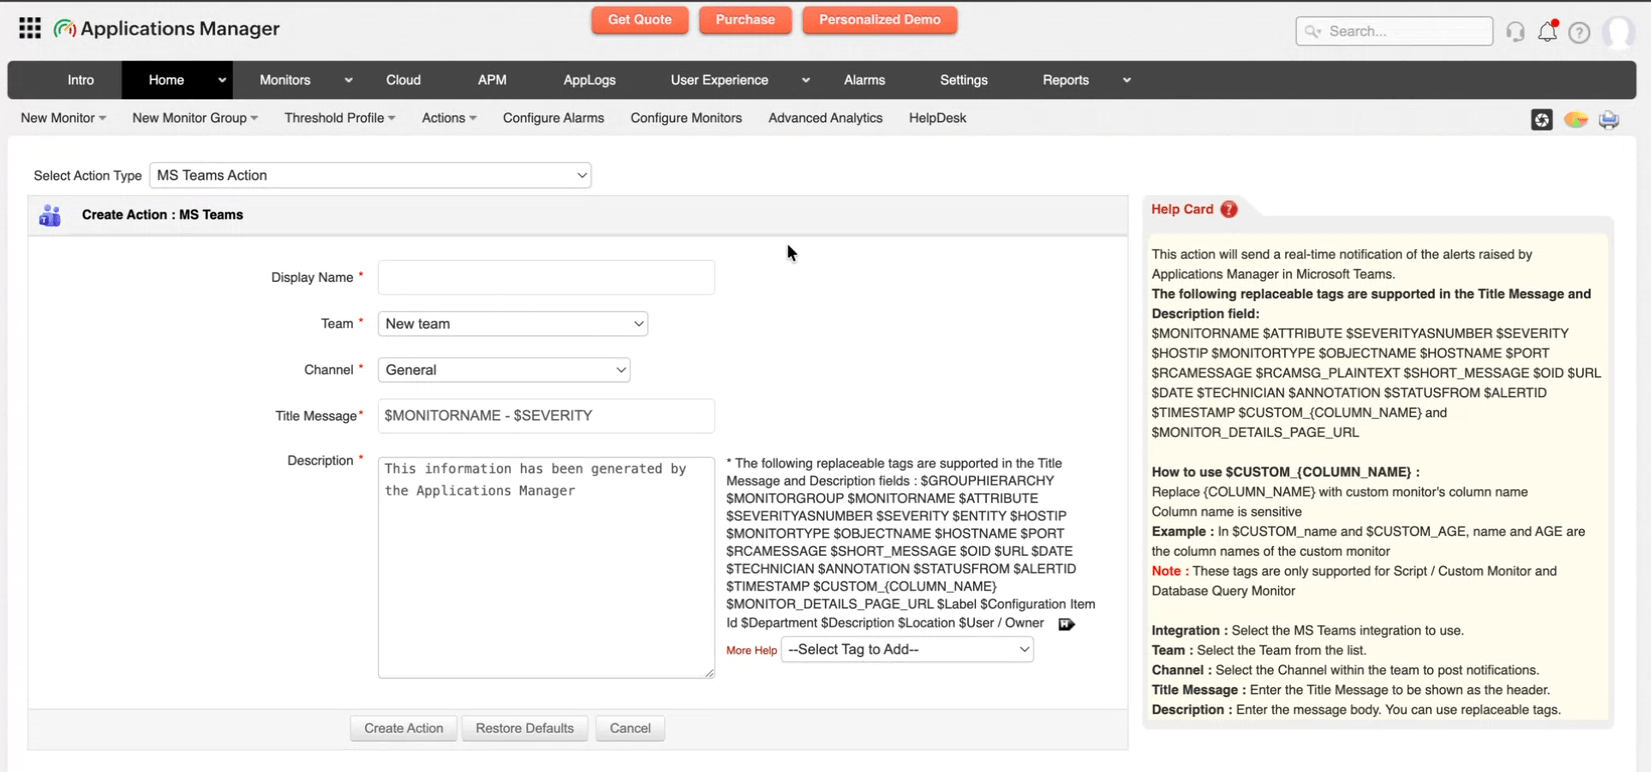
- Select the MS Teams Action option from the Actions menu.
- Enter the Display Name for the action.
- Select the Team to which the message notification has to be sent.
- Select the Channel within the chosen team to post the notifications. In Live mode, the list is fetched in real time; in Predefined mode, only the channels configured in Step 3 are listed.
- Enter the Title Message to be shown as the header of the notification.
- Under Description, specify the required fields to be shown in the message body by entering appropriate replaceable tags. You can choose a tag from the Select Tag to Add drop-down available next to the Description field. Learn more about replaceable tags.
- Click Create Action to finish creating the Microsoft Teams action.
After creating the Microsoft Teams action, you can test its execution by clicking the Execute [ ] icon for that action.