Webhook / REST API Action
Overview
Webhook / REST API action serves as a medium to interact and perform events on any third-party applications through the configured URL. Any alerts generated by the Applications Manager will trigger the Webhook / REST API actions to send the required event details, and allows you to streamline and manage your critical alarms, incidents or messages in any third-party application.
Creating a new Webhook / REST API action
To create a new Webhook / RestAPI action, follow the steps given below:
- Select the RestAPI Action option from the Actions menu.
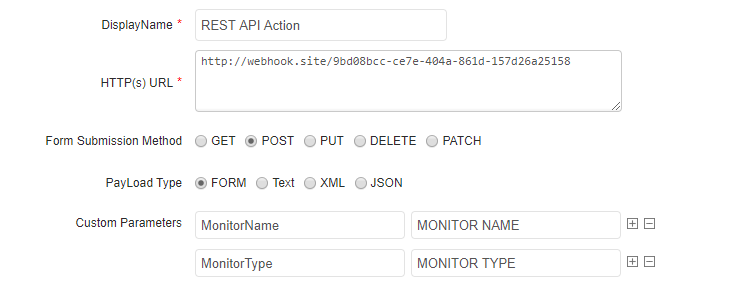
- Enter the Display Name for the action.
- Enter the HTTP(s) URL for which the REST API action should be triggered.
- Choose the Form Submission Method using any one of the following HTTP methods: GET, POST, PUT, DELETE or PATCH.
- Choose the PayLoad Type to send data requests through FORM, Text, XML or JSON.
- Enter the Custom Parameters that are to be sent in the Key and Value text boxes accordingly. You can add / remove multiple custom parameters using the (+ / -) buttons.
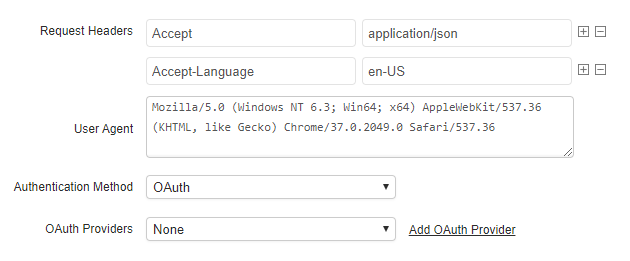
- Enter the Request Headers (HTTP Header Requests) that are required to be sent to request for specific pages/data from the HTTP URL. You can add / remove multiple header request parameters using the (+ / -) buttons.
- Enter the User Agent details of the requesting software from which the HTTP requests are being sent. You can choose the required User-Agent string details from the list shown while entering the value in the text box.
- Choose the Authentication Method required, if any, by choosing any one of the following authentication methods:
- No Auth: This option lets you access the HTTP URL without any authentication.
- Basic / NTLM: This option lets you access the HTTP URL with a basic authentication method (NTLM Protocol). This can be configured by entering the username and password required to access the URL.
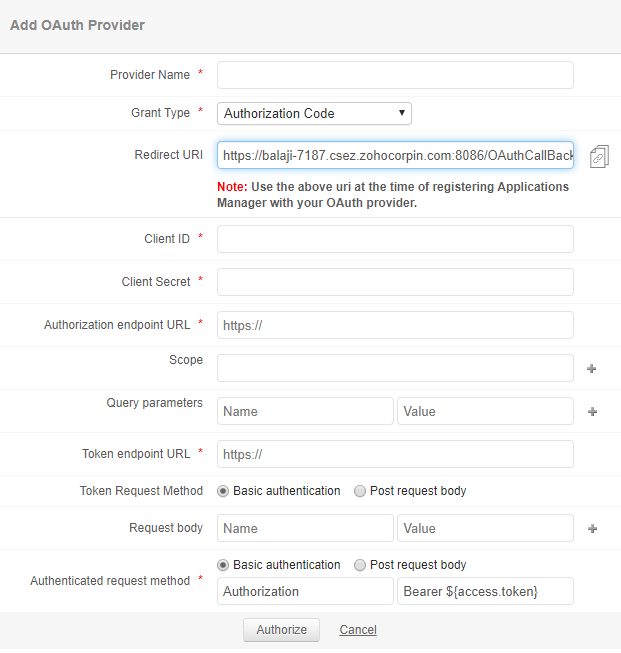
- OAuth: This option lets you access the HTTP URL using OAuth (Open Authorization). This can be configured either by selecting the OAuth provider required to access the URL, from the drop down list. Also, you can create a new OAuth provider by clicking on the Add Oauth Provider link. (Refer Oauth Provider)
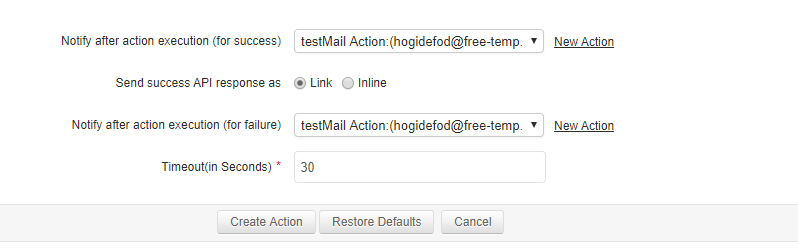
- You can use the Notify after action execution option for both success or failure conditions of an action either by selecting an existing email address or by defining a new email addresses using the New Action link. Under success condition, you can choose to receive success API response through mail using any one of the following options:
- Link: This option sends the URL response as a web link to your mail.
- Inline: This option sends the URL response by loading it within the mail itself.
Note: If the Inline option is chosen and the API response exceeds the mail size limit, then the response will be sent as a web link. The mail size limit value can be specified in the Admin --> Product Settings --> Global Settings tab.
- Enter the Timeout value within which a connection has to be established with the URL.
- Click the Create Action button to finish creating the Rest API action.
After creating the Webhook / Rest API action, you can test its execution by clicking the Execute![]() icon of that action.
icon of that action.
