Distributed Asset Scan
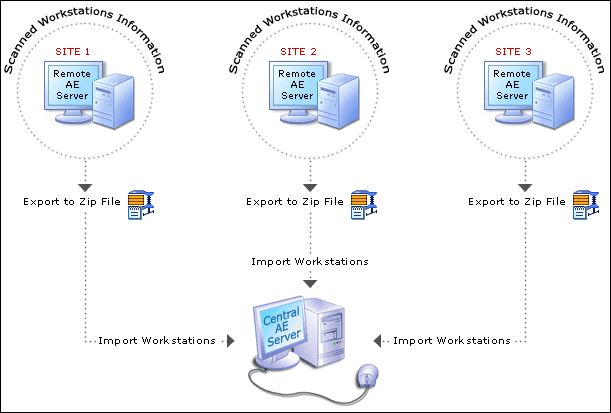
In a wide spread organization distributed across various sites, the Central AE Server may not be able to access all the assets in sites. Hence, a Remote AE server is installed in each site which scans and maintains all the workstations, and user information of the respective sites. The data from the Remote AE Server is pushed to the Central AE Server either manually or by scheduling the data periodically.
Since there is a constant need to update the users and workstation information in the Central AE Server, you can automate the process by specifying the central server details in the remote server thereby synchronizing the two servers.
|
Note
|
The same installation can be used as central server and remote server, there are no separate downloads. |
|
Methods to perform Distributed Asset Scan
Manual
Auto Synchronization
|
Asset Scan in Remote AE Server
The scanned information in the Remote AE Server can be updated periodically either manually or automatically in the Central AE Server.
Installing the Remote AE Server
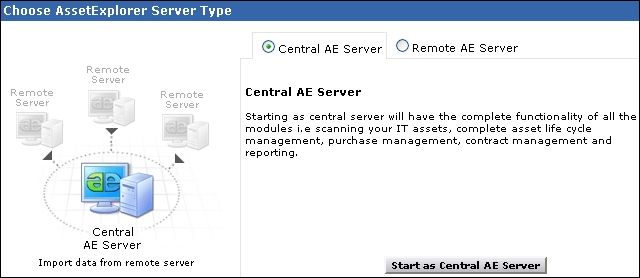
You can install AssetExplorer as a Remote Server by choosing the server type as Remote AE Server on starting the application for the first time. The application gets started as the Remote AE Server.
Accessing the Configuration
Click the Admin tab in the header pane.
Click Distributed Asset Scan
 icon under Discovery block.
Methods to export the data
The data can be exported manually or pushed automatically in the Central AE Server.
Manual
Click on Export Data to export the asset data into a zip file.
A confirmation message appears. Click Ok to proceed.
If the data has be generated successfully, an Export Data box pops up.
Click on the link to download the zip.
Send the zip file to the central server location through E-mail or through some storage device.
Auto Synchronization
If the central server is reachable, configure the details of the central AE Server by clicking on Central Server Settings.
Server Name: Enter the Server Name or IP Address of the Central AE Server.
Server Port: The port where the Central AE Server is installed.
Server Protocol: The protocol to connect the central server and the remote server. Say, Http, Https
Site: Site where the Remote AE Server is installed. The site specified must be configured in the central server so that the assets and users is associated to the appropriate site.
Username & Password: Credentials of the Central AE Server.
Domain Name: Specify Domain Name if Active Directory authentication is enabled in Central AE Server.
The Central Server may be connected through a proxy server. In this case,
Enable Is connected through Proxy Server check box.
Proxy Server Name: The Server Name or IP Address of the Proxy server.
Proxy Server Port: The port of the proxy server.
Proxy Username & Password: Credentials of the Proxy Server.
On configuring the Central Server Settings, you can export and push the data to central server automatically by clicking on Export and Push Data to Central Server Now button. The executed date, status of the operation and related comments is displayed in the List View.
Schedule Pushing of data to Central AE Server
You can schedule to push the data from the remote AE server to the central AE Server at periodic intervals.
Click on Schedule to synchronize data with Central Server link.
Select Enable radio button.
Select the number of days after which the data should be pushed to the central server.
Select the date from the calender icon to start the process. Also select the Time in hours and minutes from the drop down.
If there is a failure in pushing the data to the central server, you can send a Notify to the technician. Specify the email address in the text provided.
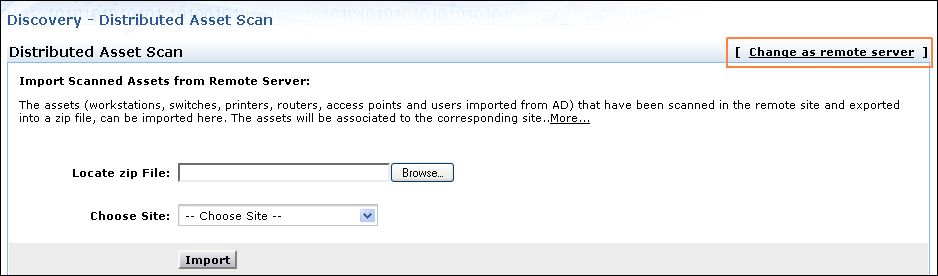
Importing data in Central AE Server
Installing the Central AE Server
You can install AssetExplorer as a Central Server by choosing the server type as Central AE Server on starting the application for the first time. The application is started as the Central AE Server.
Accessing the Configuration
Click the Admin tab in the header pane.
Click on Distributed Asset Scan icon
under Discovery block. Click Browse and locate the zip file of the scanned assets.
Select the Site of the remote server from the drop down.
Click Import button to import the data. On importing the data successfully you get a success message.