Discovering Resources and Privileged Accounts
(Feature available only in the Enterprise Edition)
Password Manager Pro provides the option to automatically discover endpoints in your environment and enumerate the privileged accounts associated with them. This helps enterprises to secure all their privileged identities swiftly and randomize the passwords of the accounts, upon discovery and thereafter at periodic intervals. It is possible to discover a variety of devices such as Windows, Linux, VMware and Network devices, and also the service accounts associated with Windows and Linux (SSH only) domain accounts.
The entire privileged accounts discovery process can be split into the following steps:
- Discover Resources
1.1 Steps to Discover Resources
i. Windows
ii. Linux
iii. Network Devices
iv. VMware - Add the discovered Resources into Password Manager Pro
2.1 Windows
2.2 Linux
2.3 VMware
2.4 Network Devices
- Discover Privileged Accounts
3.1 Accounts Discovery: Prerequisite
3.2 Database accounts discovery
3.3 Discover Privileged Accounts of Individual Resources
3.4 Automated periodic discovery of privileged accounts
3.5 Randomize Passwords Post Discovery - Auto Logon using AD, Entra ID and LDAP
Apart from the above topics, you will also learn how to Randomize Passwords Post Discovery.
1. Discover Resources
The first step to adding resources to Password Manager Pro is the discovery of different endpoints present in your network. The following sections explain how Password Manager Pro goes about discovering different endpoints:
1.1 Steps to Discover Resources
1.1.i Windows
Password Manager Pro automatically discovers and lists all the Windows domains from the Windows domain controller, where the Password Manager Pro is running. All you need to do is to select the required domain and provide the domain controller credentials.
Windows servers can be discovered directly from Active Directory. WMI API is used to connect with the domain controller and fetch the list of all the servers/workstations that are part of the selected Group/OU. Then, the WMI connection is established to reach out to each Windows end-point for device discovery.
Prerequisites:
Make sure you have installed the following, before commencing the discovery:
- Microsoft .Net framework 4.5.2 or above.
- Microsoft Visual C++ 2015 redistributable.
Steps to Discover Windows Servers:
- Navigate to Resources >> Discover Resources >> Windows. The below wizard is displayed.
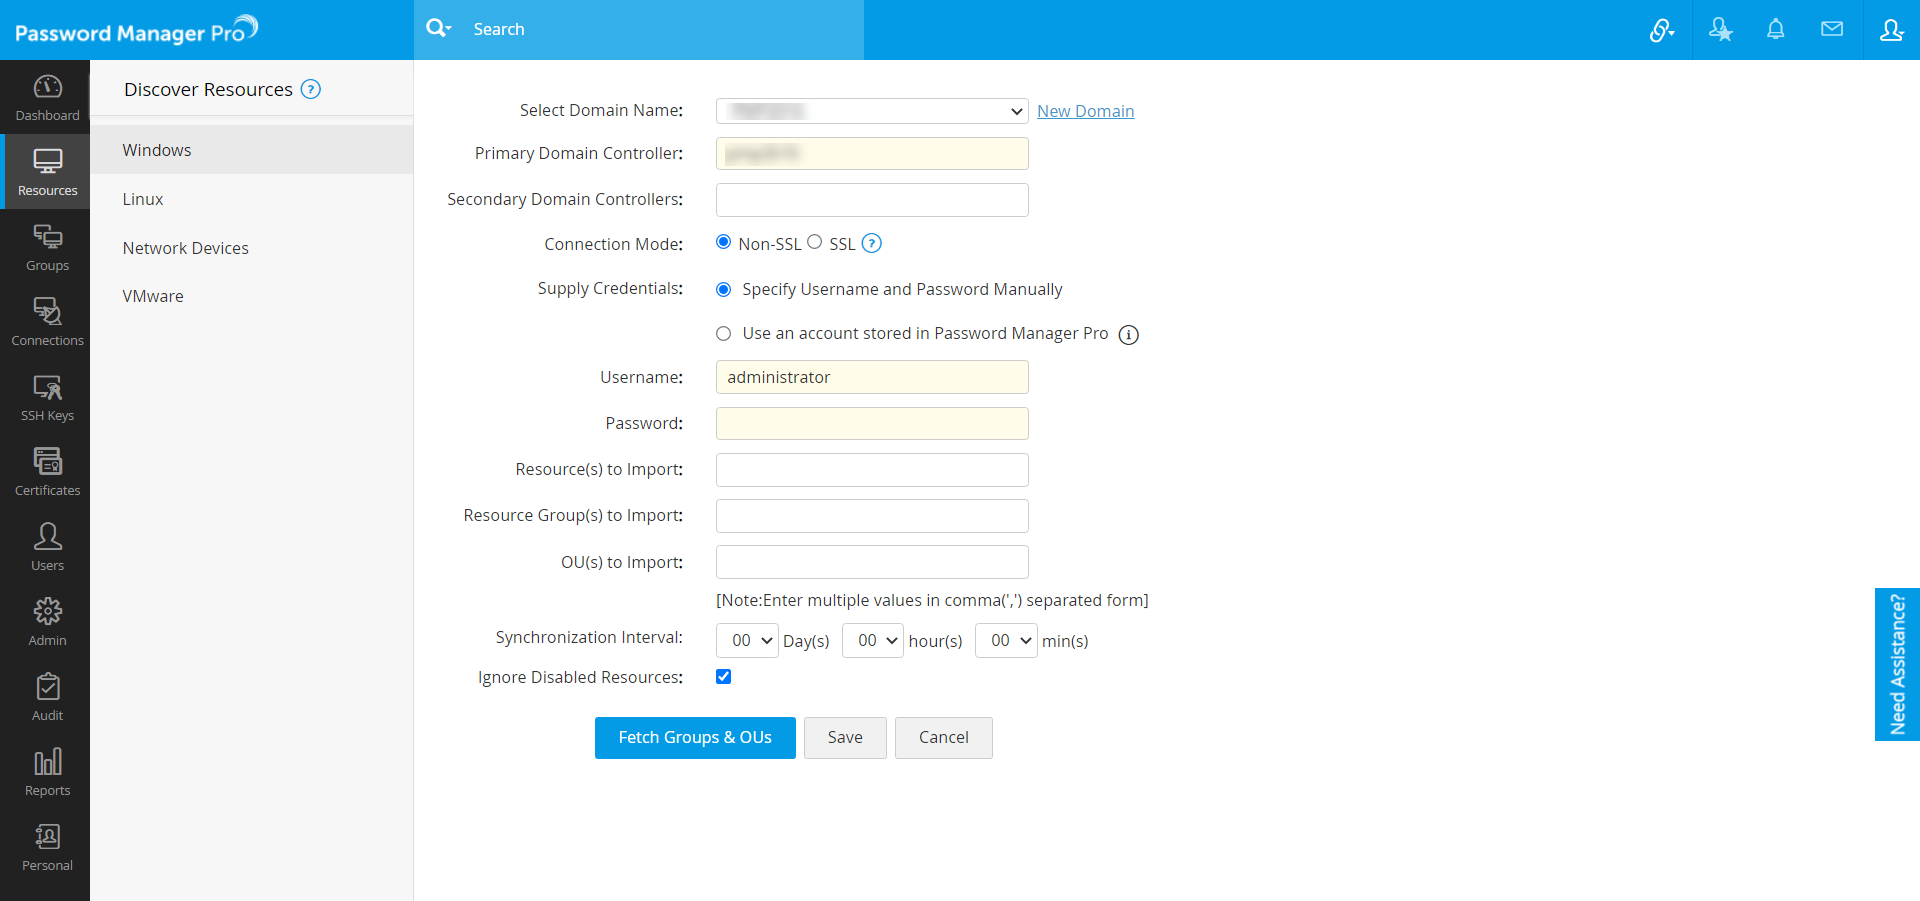
- Fill in the details as mentioned below:
- Choose a Domain Name, from which the assets are to be imported, from the drop-down list [OR] click New Domain >> Add and enter a new domain name.
- Specify the Primary Domain Controller.
- Specify one or more Secondary Domain Controllers.
Note: Mention the DNS names of the secondary domain controllers as comma-separated values. One of the listed controllers will be used when the primary controller is down. When you use SSL mode, make sure the DNS name specified here matches the CN (common name) specified in the SSL certificate for the domain controller.
- For each domain, you can configure the connection either through SSL or Non SSL. (Password Manager Pro strongly recommends encrypted communication via SSL for enhanced security.)
- Supply valid credentials.
- Specify a valid Username/Password manually:
- Specify the DNS name of the domain controller along with a valid user credential (Username/ Password) which has read permission in that domain controller.
- If you want to discover users from multiple domains, enter the username as <DomainName >\<username>. For example, if you want to discover users of DOMAIN A users by giving DOMAIN B username/password, you need to enter the username as <DOMAIN B>\username. Any procedure that you normally use to import the SSL certificates to the machine's certificate store can also be followed to import the domain controller's certificate into Password Manager Pro's store. Just ensure that the certificate is in the base 64 format and it is stored in the Password Manager Pro bin directory, after which it can be imported to use with Password Manager Pro.
- In the machine where Password Manager Pro is installed, launch Internet Explorer and navigate to Control Panel >> Internet Options >> Content >> Certificates.
- Click Import. Browse and locate the root certificate issued by your CA.
- Click Next and choose the option Automatically select the certificate store based on the type of certificate and install.
- Now, click Import again. Browse and locate the domain controller certificate.
- Click Next and choose the option Automatically select the certificate store based on the type of certificate and install.
- Apply the changes and close the wizard.
- Repeat the procedure to install other certificates in the root chain.
- Use an Account Stored in Password Manager Pro:
- You can use a user account which is already stored in Password Manager Pro. This step will help Password Manager Pro gain access and fetch the user accounts present under the specified domain name.
Note: This option allows Password Manager Pro server to communicate with this particular domain controller over SSL. Repeat the following steps for all domain controllers to which you want Password Manager Pro to communicate with over SSL. Note that the DNS name you specify for the domain controller should match the CN (common name) specified in the SSL certificate for the domain controller.
- Specify Resources, Resource Groups or OU's by specifying their names as comma-separated values in the respective text fields.
- If you want to import only a particular resource, enter the required resource name(s) in comma-separated form in the Resource(s) to Import field.
- Similarly, you can choose to import only specific resource groups or OUs from the domain. You can specify the names in the Resource group(s) to Import or OU(s) to Import fields respectively, in comma-separated form.
- You can use a user account which is already stored in Password Manager Pro. This step will help Password Manager Pro gain access and fetch the user accounts present under the specified domain name.
- Specify a valid Username/Password manually:
- If you have specified a resource, a resource group, or an OU, click on Import to initiate the process. If you have left the fields empty, you can click on Fetch Groups and OU's to enumerate all the available to resources from which you can choose and import.
- Password Manager Pro periodically queries the AD to keep the resources in sync - new resources added to the AD are automatically added to Password Manager Pro to keep the resources database in sync. All you need to do is enter the time interval for Password Manager Pro to query the AD and ensure to set the sync interval to 3 hours or more based on the number of resource groups and OUs discovered. Click Save.
- Click Fetch Groups & OUs.
- On successful discovery of resources, you can add All/ Selected Resources into Password Manager Pro.
1.1.ii Linux:
Password Manager Pro uses Telnet and SSH as the remote connection modes to discover the devices, where Telnet/SSH are running.
Steps to Discover Linux Servers:
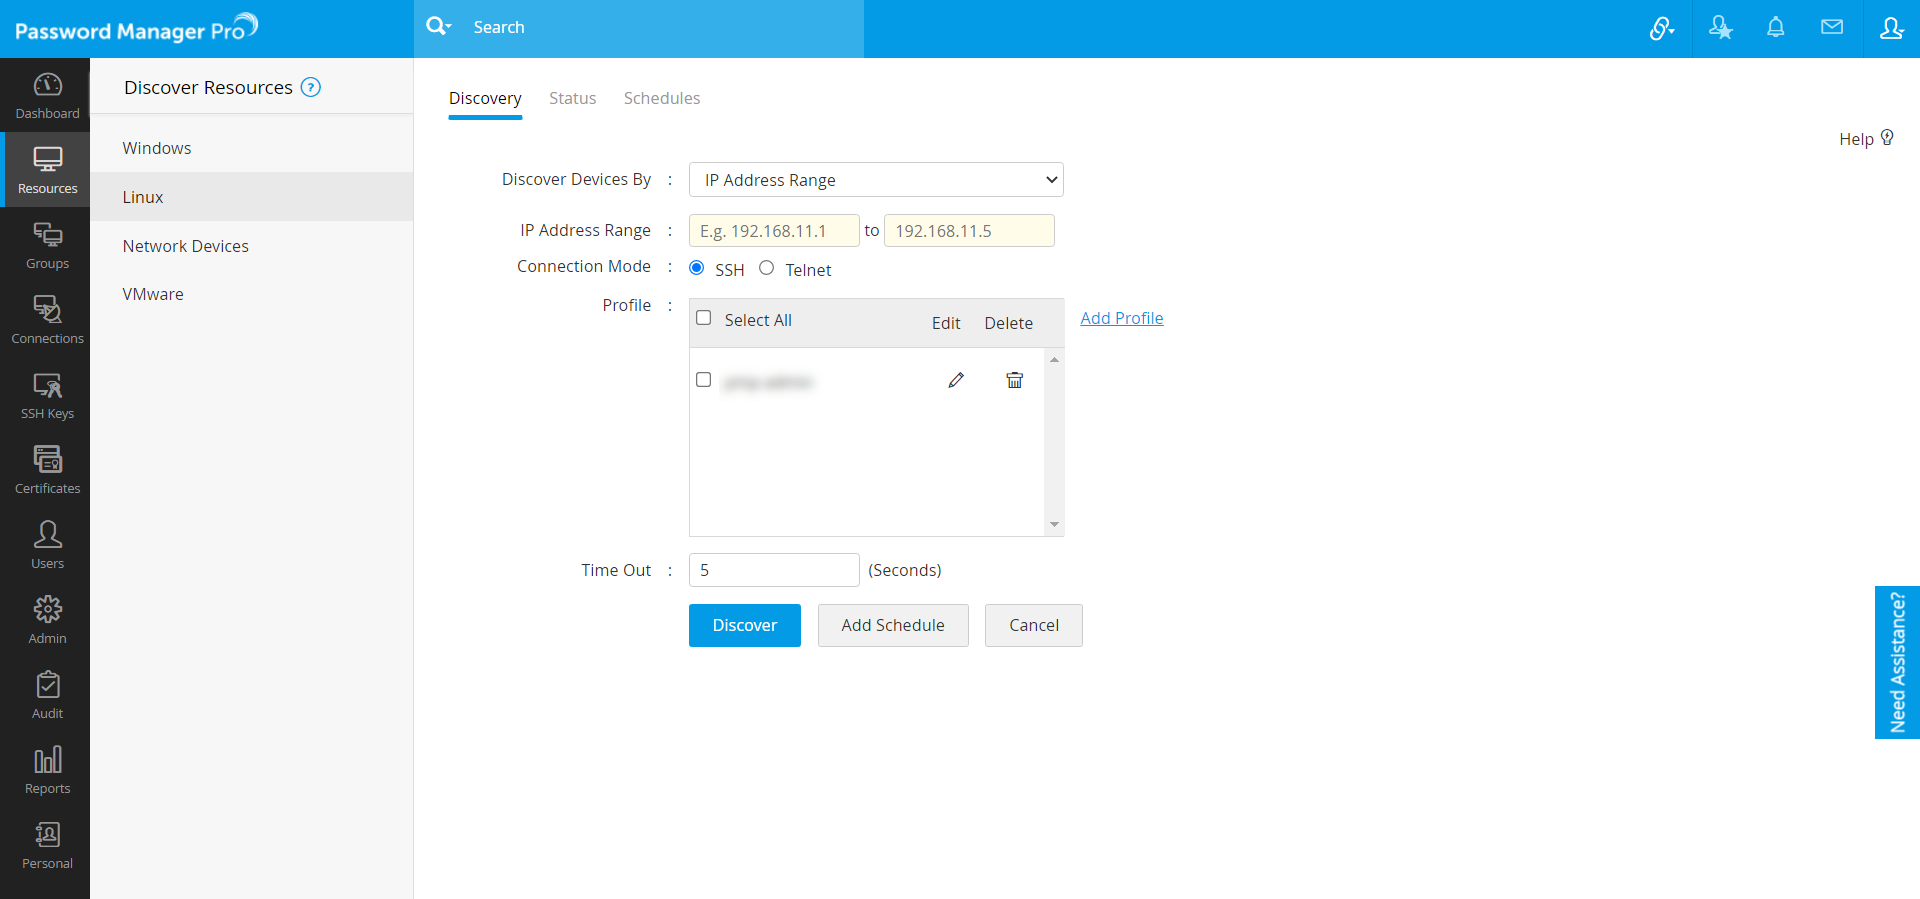
- Navigate to Resources >> Discover Resources >> Linux.
- Choose to discover using either of the Telnet or SSH.
Discover using Telnet:
- Choose the Connection Mode as Telnet.
- As mentioned in Network Devices discovery part, you can discover a single VM device by specifying the host name or IP address OR multiple devices present in an IP range OR discover multiple devices whose details are available in a flat file.
- You can set the maximum Time Out period to be up to 999 seconds, within which the devices must be discovered.
- Enter the Telnet Port number (default port - 23).
- Click Discover. A Discovery Confirmation window pops up. Choose whether to send notifications to "All administrators" or to specific people. If you choose the latter option, specify the email addresses separated by commas. Click Proceed. Now, you will see the Discovery Status page where the discovered device will be added as a task. You will also see other details such as date/time when the discovery was invoked, completed, etc.
- If you want to schedule a periodic resource discovery, click Add Schedule. You will see a new window where you can create an automated scheduled task for discovering the newly added accounts during resource discovery. To know more, click here.

- If the device to be discovered is present on a subnet, different from the host where Password Manager Pro is running, discovery might take longer than the actual timeout specified, due to extended connectivity time.
- The Telnet option will be disabled soon, and you will have only "SSH" as the dedicated remote connection mode.
Notes:
Discover using SSH:
- Choose the Connection Mode as SSH.
- As mentioned in Network Devices discovery part you can discover a single device by specifying the host name or IP address OR multiple devices present in an IP range OR discover multiple devices whose details are available in a flat file.
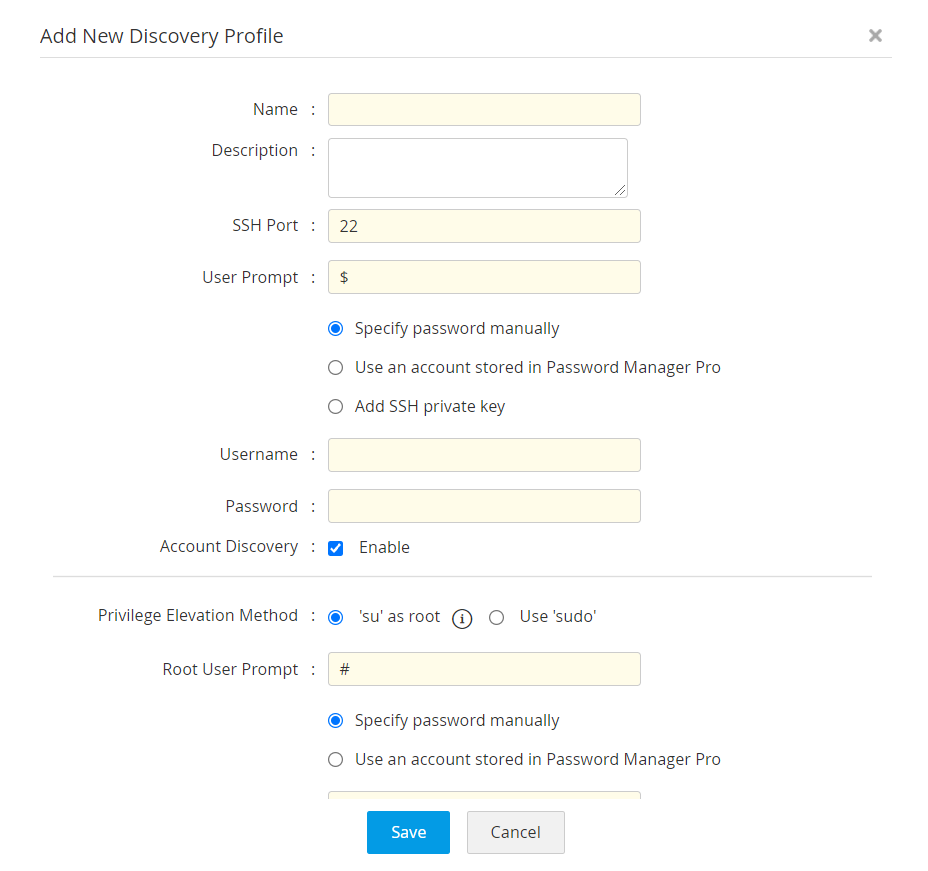
- Initiate the profile configuration process. Choose an existing discovery profile(s) or click Add Profile. The Add New Discovery Profile wizard is displayed.
- Fill in details such as Name, Description, SSH Port number and User Prompt.
- Configure credentials in either of the below 3 ways:
- Specify the password manually: If you choose this option, you need to enter a valid Username and Password.
- Use an Account Stored in Password Manager Pro: If you choose this option, you need to choose a Resource Name and an Account Name from the respective dropdowns.
- Add SSH private key: If you choose this option, you need to enter details such as Username, Private Key Name and the Private Key Password. Choose a valid SSH key file.
- Account Discovery: Besides resource discovery, SSH connectivity allows discovery of related account(s), as well from the machine. By default, this option will be enabled. Disable, if you don't want any account(s) to be discovered.
- Choose a Privilege Elevation Method: This option appears only if you have enabled account discovery in the previous step.
- 'su' as root: If you choose this option, provide the credentials of a super user only, in the fields that follow.
- Use 'sudo': If you choose this option and if the credentials configured in step (ii) is of a "sudo" privileged user, then all the resources(s) and the related account(s) will be discovered. If the credentials configured in step (ii) is of a "normal" user, then only the resource(s) will be discovered.
- Click Save.
- Set the maximum time limit within which the device discovery is expected to be completed. Specify a Time Out value, in seconds.
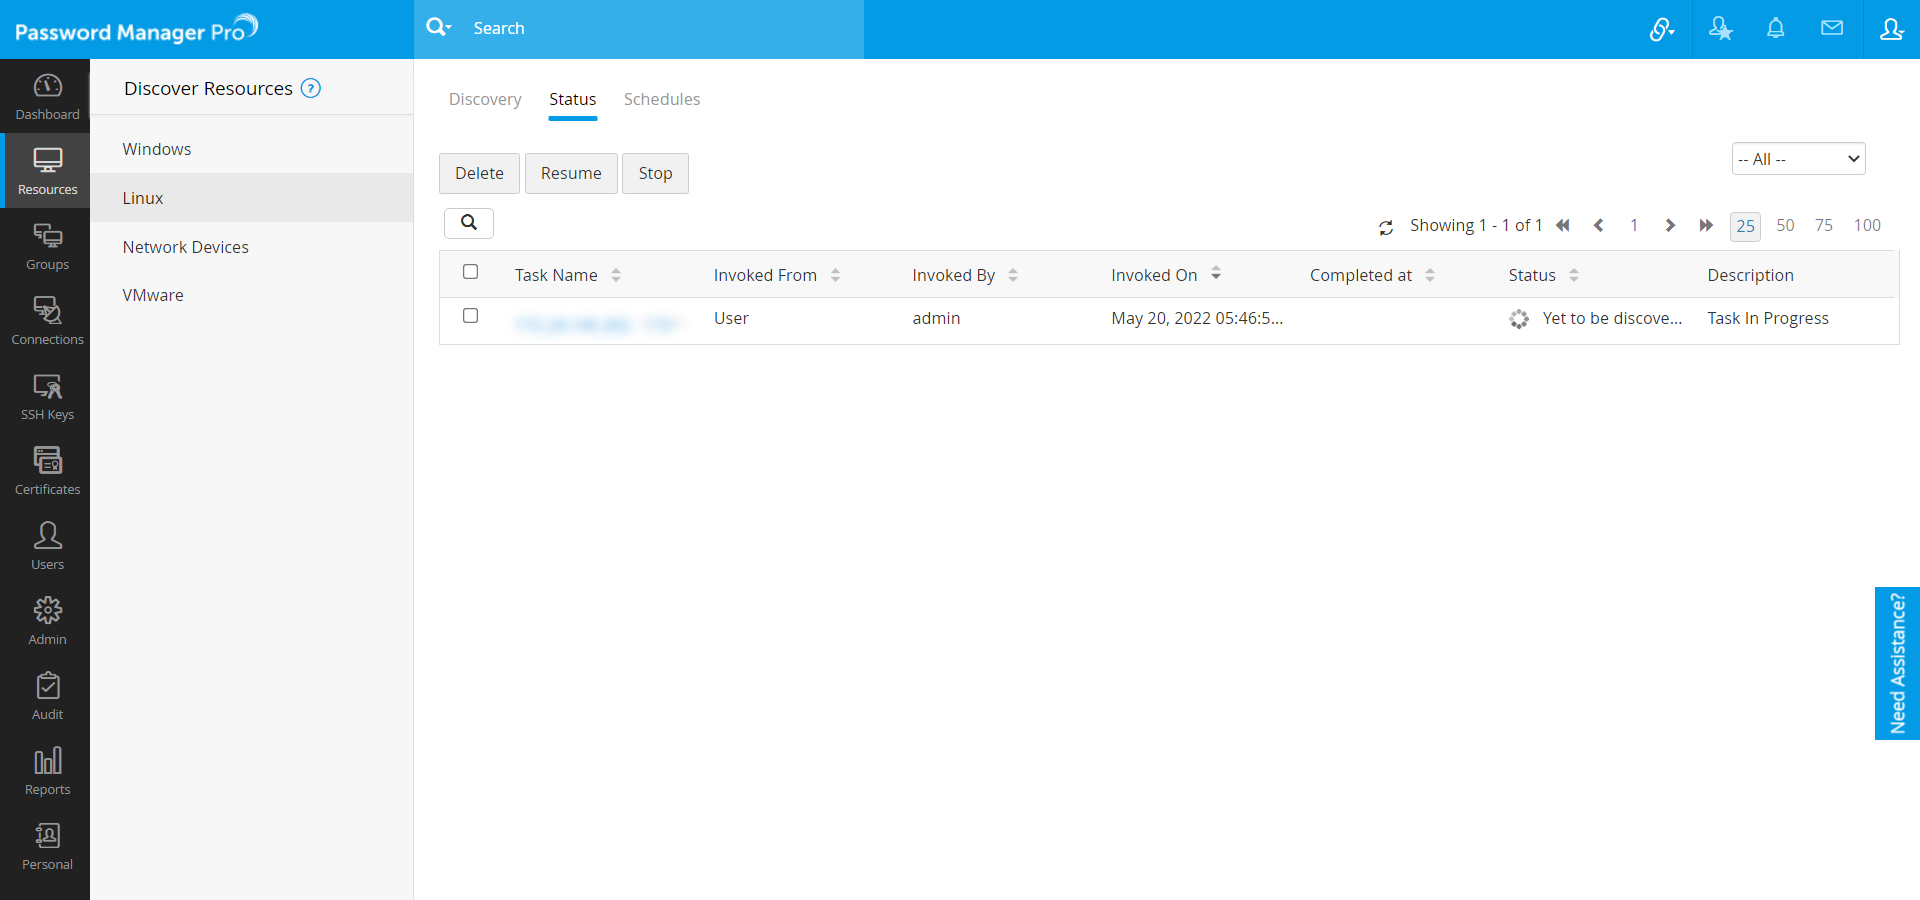
- Click Discover. A Discovery Confirmation window pops up. Choose whether to send notifications to "All administrators" or to specific people. If you choose the latter option, specify the email addresses separated by commas. Click Proceed. Now, you will see the Discovery Status page where the discovered device will be added as a task. You will also see other details such as date/time when the discovery was invoked, completed, etc.
- If you want to schedule a periodic resource discovery, click Add Schedule. You will see a new window where you can create an automated scheduled task for discovering the newly added accounts during resource discovery. To know more, click here.
Note: If the device to be discovered is present on a subnet, different from the host where Password Manager Pro is running, discovery might take longer than the actual timeout specified, due to extended connectivity time.
1.1.iii Network Devices
Prerequisite - Create discovery profiles
Before proceeding with discovering the network devices, you should create discovery profiles that help Password Manager Pro to use common details for discovering multiple devices.
Steps to Discover Network Devices:
- Navigate to Resources >> Discover Resources >> Network Devices.
- There are three different options to discover the devices:
- Discover a single device by specifying the Host Name / IP Address (Sample values are 192.168.1.1, cisco2611, etc.).
- Discover multiple devices by entering an IP Address Range (e.g. 192.168.11.1 To 192.168.11.5).
- Discover IT assets in bulk by importing a file containing multiple Host Names / IP Addresses. Enter one value per line and specify the IP Address Range as comma-separated or tab-separated values.
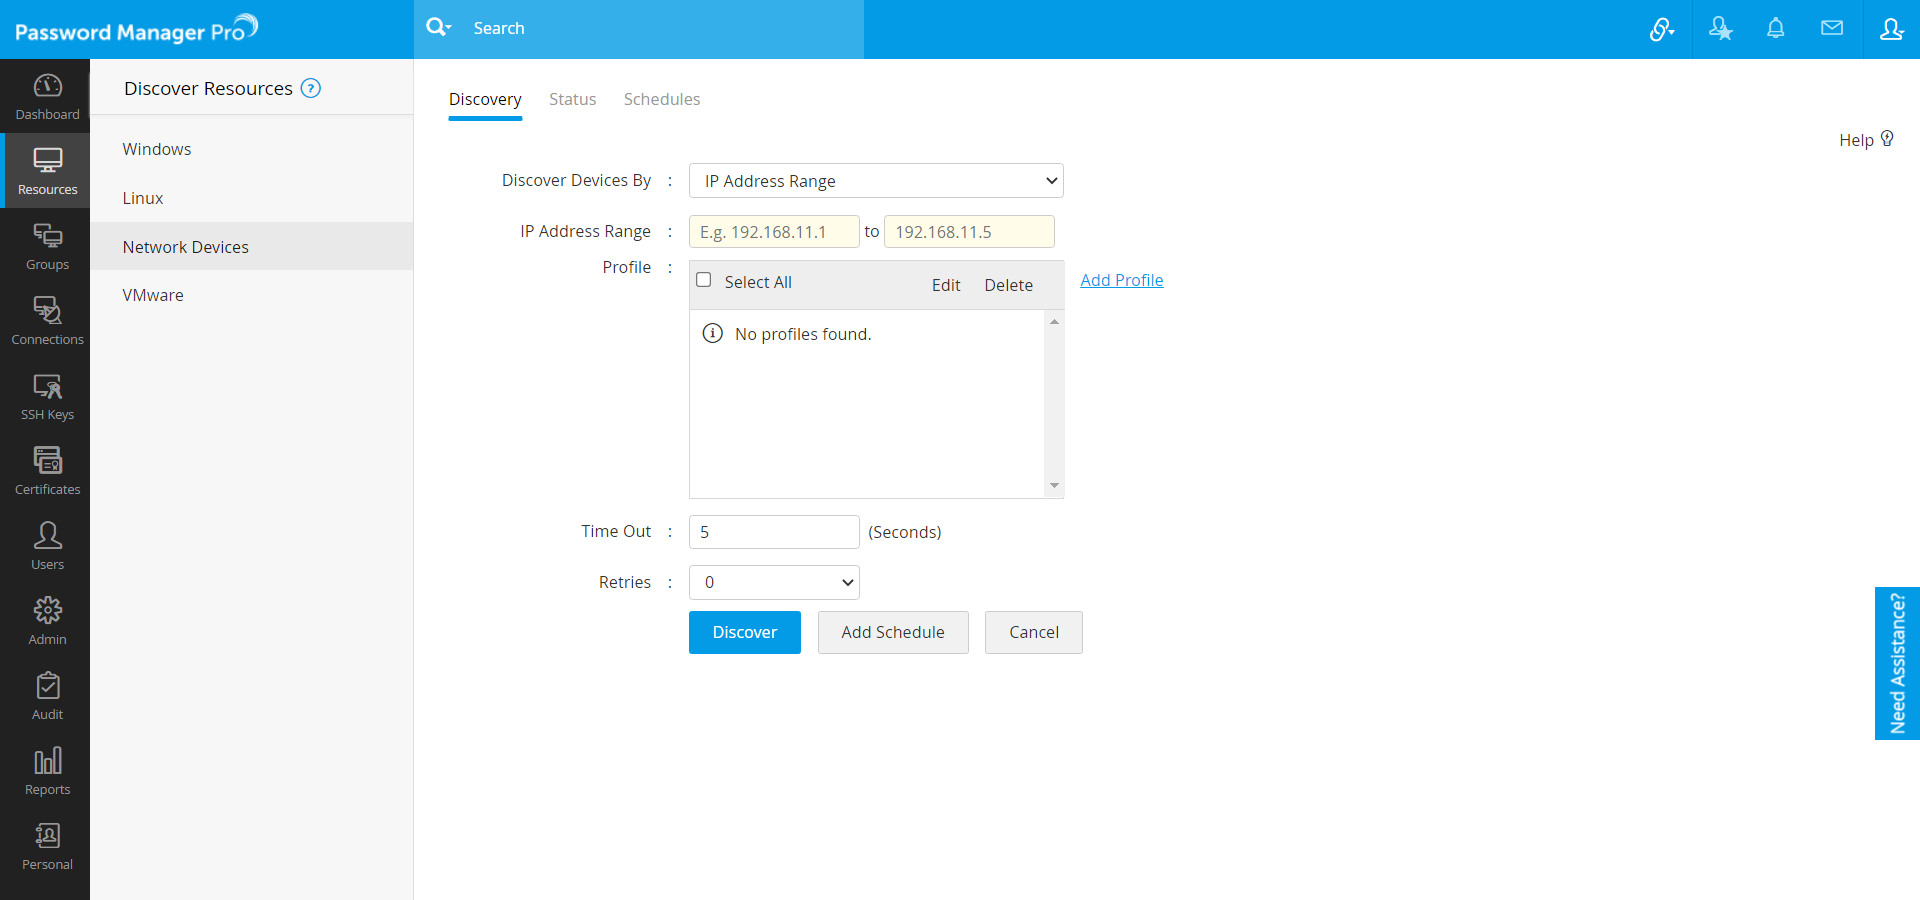
Note: At present, Password Manager Pro supports IPV4 format only.
- Choose an existing discovery profile(s) [OR] click Add new profile beside the Profile field, to initiate the profile configuration process. SNMP versions V1, V2C, V3 are used for performing a GET of sysobject ID for identifying the network device vendor and model information. The profile creation process for each of the protocols has been explained below:
- SNMP - V1, V2c:
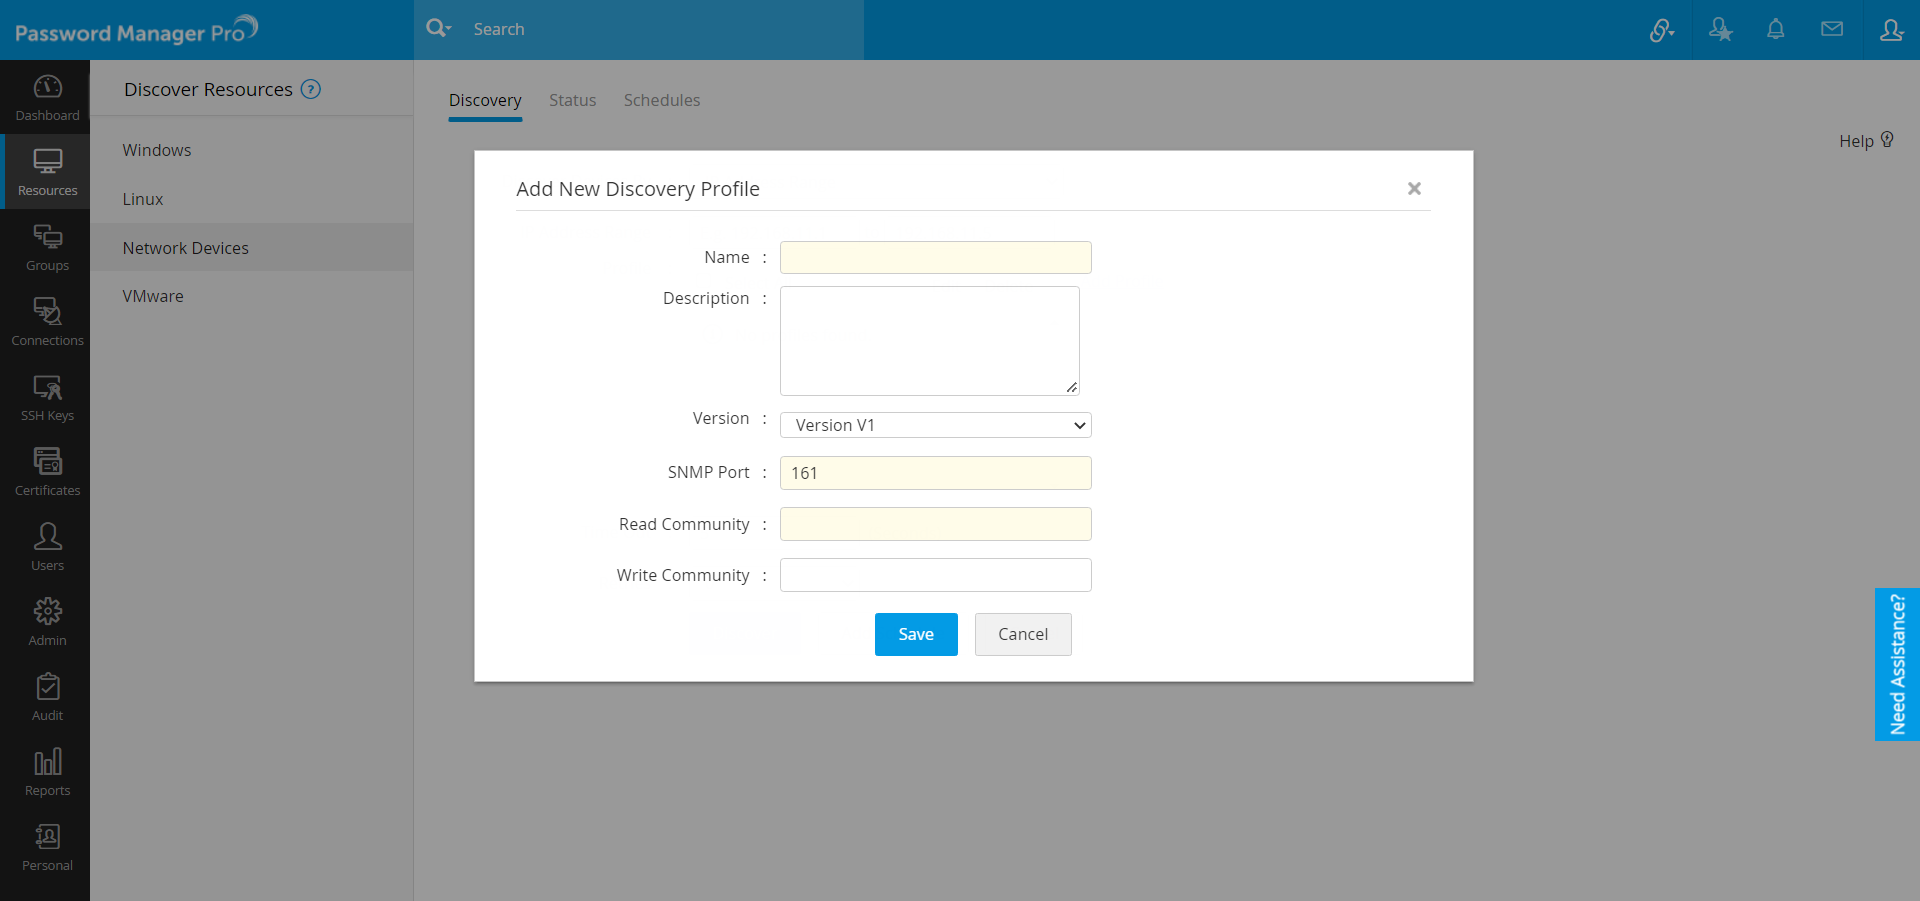
For creating a profile for devices making use of SNMP V1 and V2c:
- Enter the new profile Name. This name uniquely identifies the profile.
- Enter a Description about the profile for your reference.
- Select the SNMP Version SNMP V1 or V2c in the Version drop-down list.
- Enter the SNMP Port number.
- Enter the Read Community (mandatory). Optionally, you can also specify the Write Community.
- Save the profile.
- SNMP V3:
For creating a profile for devices using SNMP V3:
- Enter a unique profile Name.
- Enter a Description about the profile for your reference.
- Select the SNMP Version from the Version drop-down list as Version V3.
- Enter the SNMP Port number.
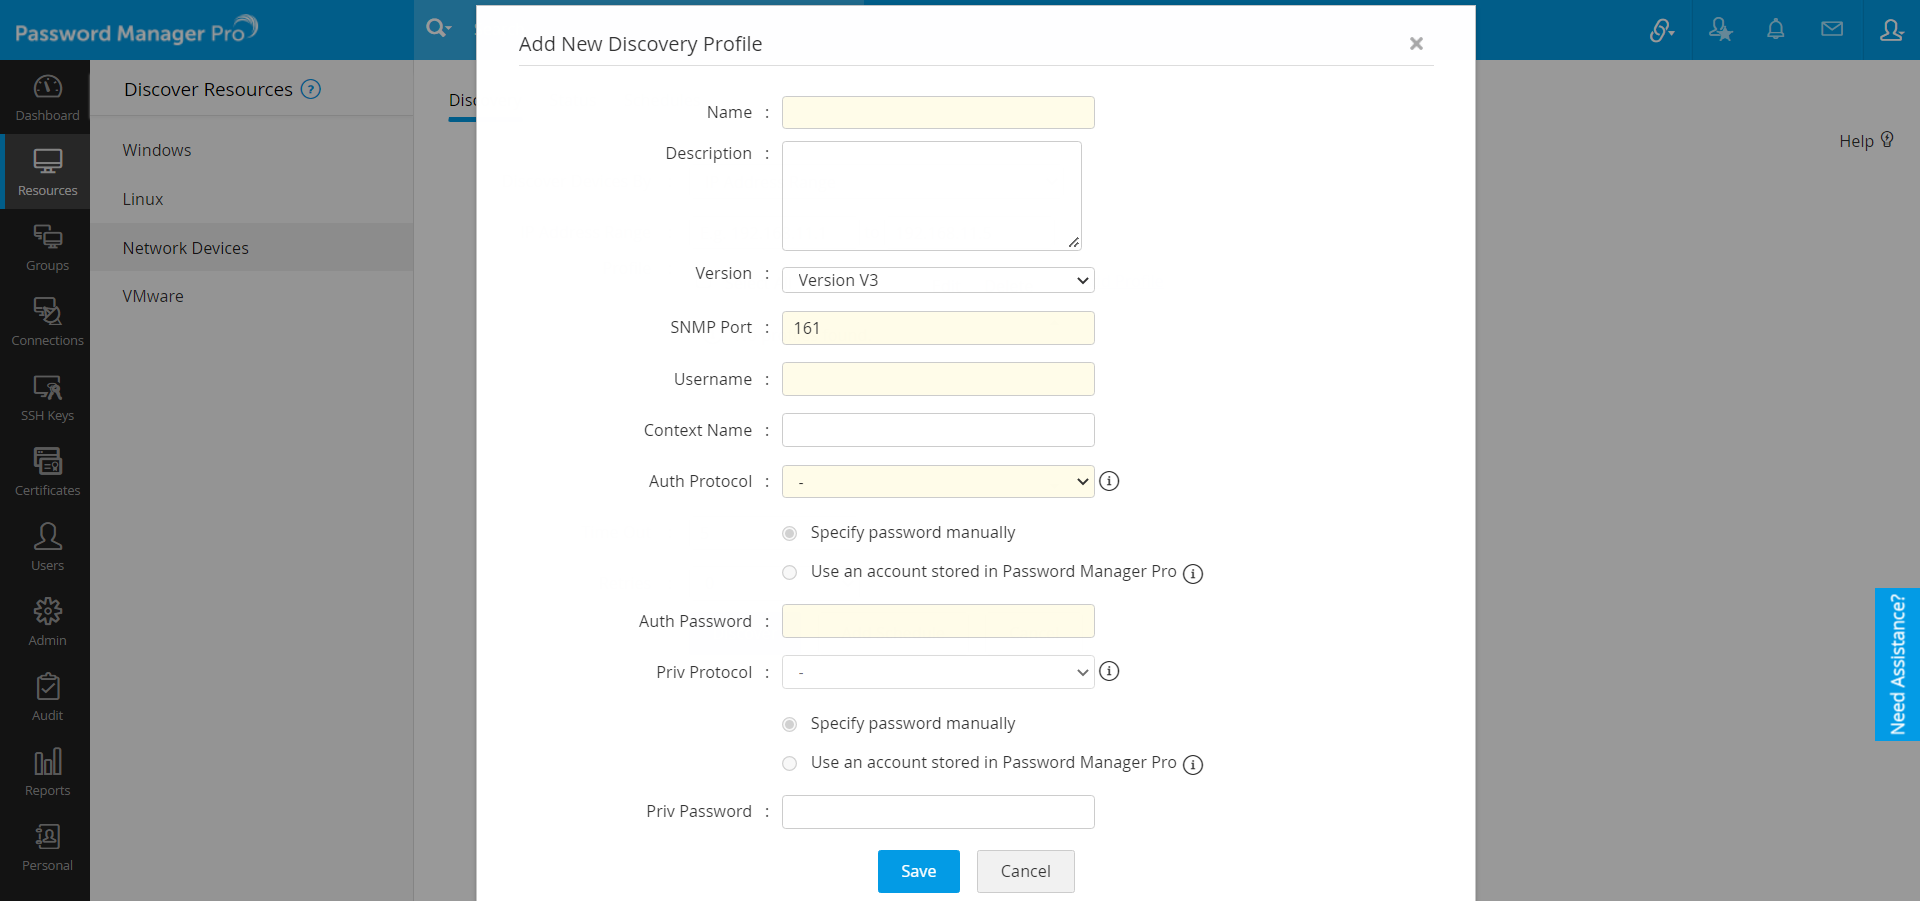
- User Name: Enter the name of the user (principal) on behalf of whom the message is being exchanged.
- Context Name: An SNMP context name or "context" in short, is a collection of management information accessible by an SNMP entity. An item of management information may exist in more than one context. An SNMP entity potentially has access to many contexts. In other words, if a management information has been defined under a certain context by an SNMP V3 entity, any management application can access that information by giving that context name. The "context name" is an octet string, which has at least one management information.
- Authentication Protocol & Password: Select any of the authentication protocols (MD5 or SHA) and enter the password. MD5 and SHA are processes which are used for generating authentication/privacy keys in SNMPv3 applications.
- You can either enter the password manually or use a user account stored in Password Manager Pro. (Follow above steps)
- Priv Protocol: Select the required privacy protocol and also specify the Priv Password.
- Save the profile.
- To avoid time-delay, you can set the number of Retries (maximum 5) up to which Password Manager Pro should keep attempting to discover the devices.
- Click Discover. A Discovery Confirmation window pops up. Choose whether to send notifications to "All administrators" or to specific people. If you choose the latter option, specify the email addresses separated by commas. Click Proceed. Now, you will see the Discovery Status page where the discovered device will be added as a task. You will also see other details such as date/time when the discovery was invoked, completed, etc.
- If you want to schedule a periodic resource discovery, click Add Schedule. You will see a new window where you can create an automated scheduled task for discovering the newly added accounts during resource discovery. To know more, click here.
1.1.iv VMware
For VMware, VSphere API is used to get the list of all ESXi hosts for device discovery.
Prerequisite - Create Discovery Profiles
Before proceeding with discovering VMware devices, you should create discovery profiles that help Password Manager Pro use common details for discovering multiple devices. You can create the discovery profiles using your vCenter API username and password.
Steps to Discover VMware Devices
- Navigate to Resources >> Discover Resources >> VMware.
- As detailed above in the Network Devices discovery section, you can discover a single VM device by specifying the host name or IP address OR multiple devices present in an IP range OR discover multiple devices whose details are available in a flat file.
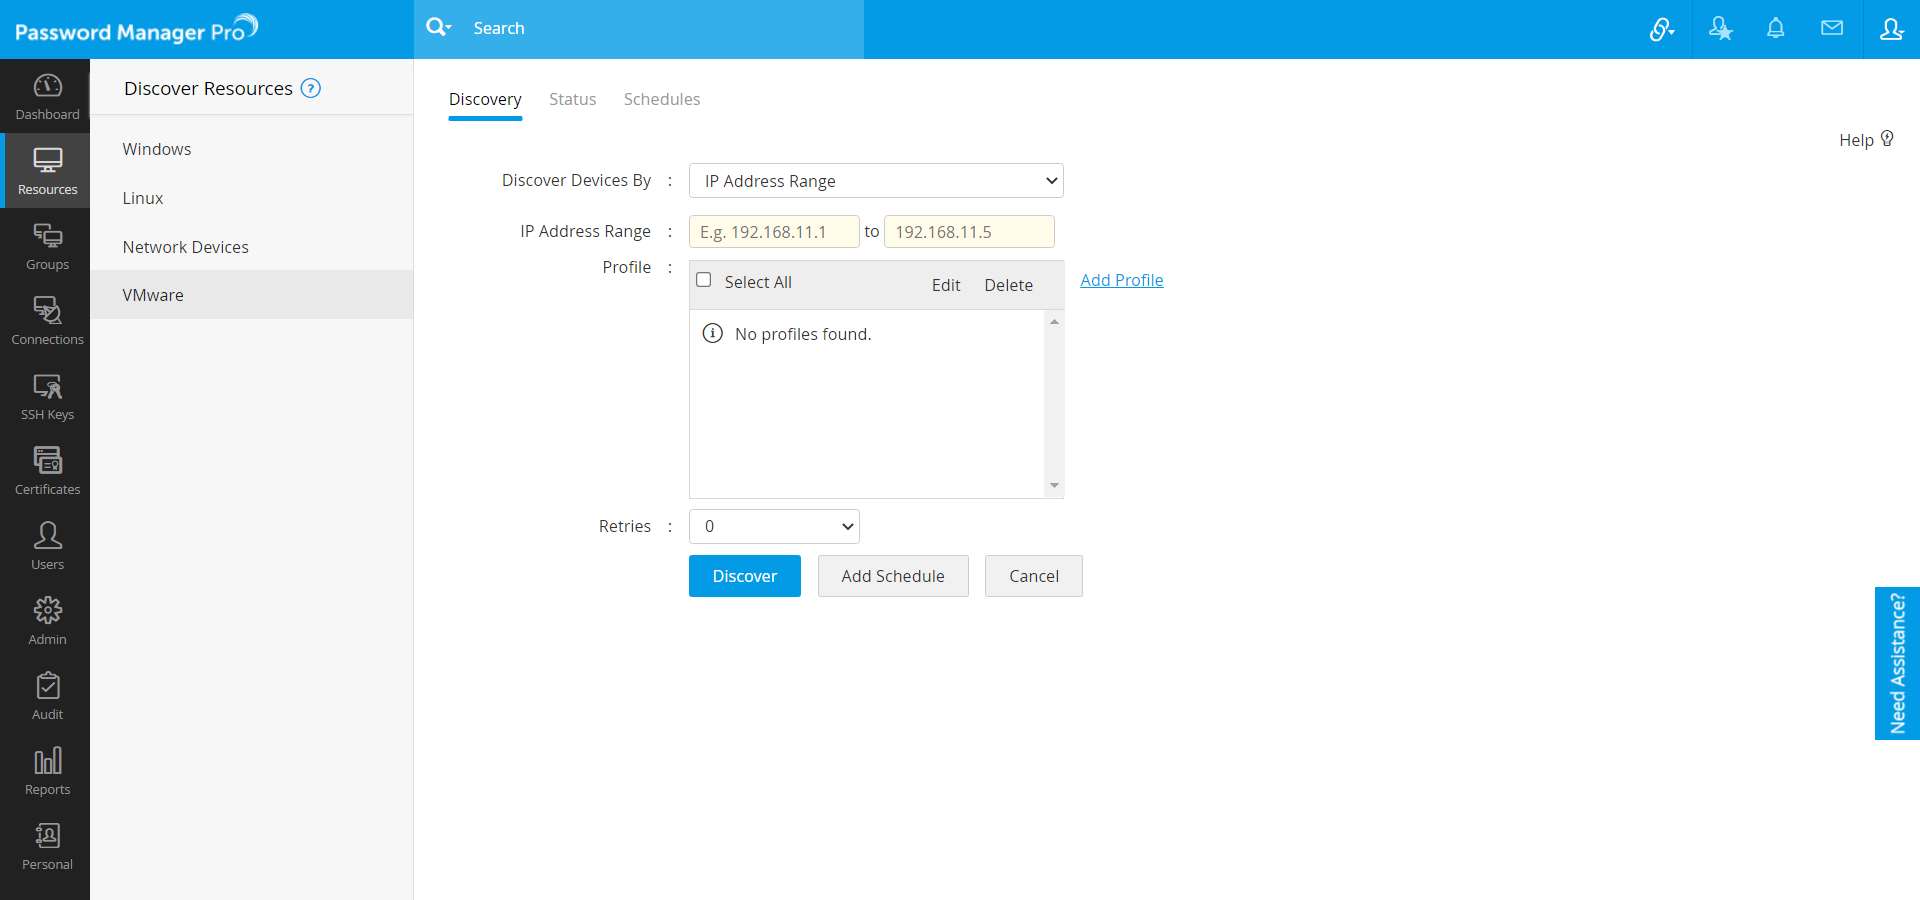
- Choose an existing discovery profile(s) [OR] click Add profile to initiate the profile configuration process.
- In the new window that opens, enter a unique profile Name.
- Enter a Description about the profile for your reference.
- Enter the VMware Port, the vCenter API Username and Password to establish communication with the virtual device. You can either enter the password manually or use a user account stored in Password Manager Pro. (Follow above steps)
- Click Save.
- To avoid time-delay, you can set the number of Retries (maximum 5) up to which Password Manager Pro should keep attempting to discover the devices.
- Click Discover. A Discovery Confirmation window pops up. Choose whether to send notifications to "All administrators" or to specific people. If you choose the latter option, specify the email addresses separated by commas. Click Proceed. Now, you will see the Discovery Status page where the discovered device will be added as a task. You will also see other details such as date/time when the discovery was invoked, completed, etc.
- If you want to schedule a periodic resource discovery, click Add Schedule. You will see a new window where you can create an automated scheduled task for discovering the newly added accounts during resource discovery. To know more, click here.
1.2 Scheduled Resource Discovery
Add schedules to perform automated periodic resource discovery of Linux, VMware, and Network devices at specified intervals. Set the repeat frequency, set import criteria - filter resources during import based on Resource Name or DNS name using specific criteria. You can also choose to send notifications. Check out the detailed steps below:
Note: Scheduled Resource Discovery is available only for Discover devices using IP Range.
- After mentioning the required details, click Add Schedules.
- In the pop-up that appears:
- Select the occurrence between Once, Days or Monthly.
- If you choose the occurrence as Once, mention the Start From and the Start Time. This will allow users to schedule the discovery once on the mentioned Start Date.
- If you choose the occurrence as Days, mention the Start From, Interval Day(s) and the Start Time.
- If you choose the occurrence as Monthly, mention the On and the Start Time.
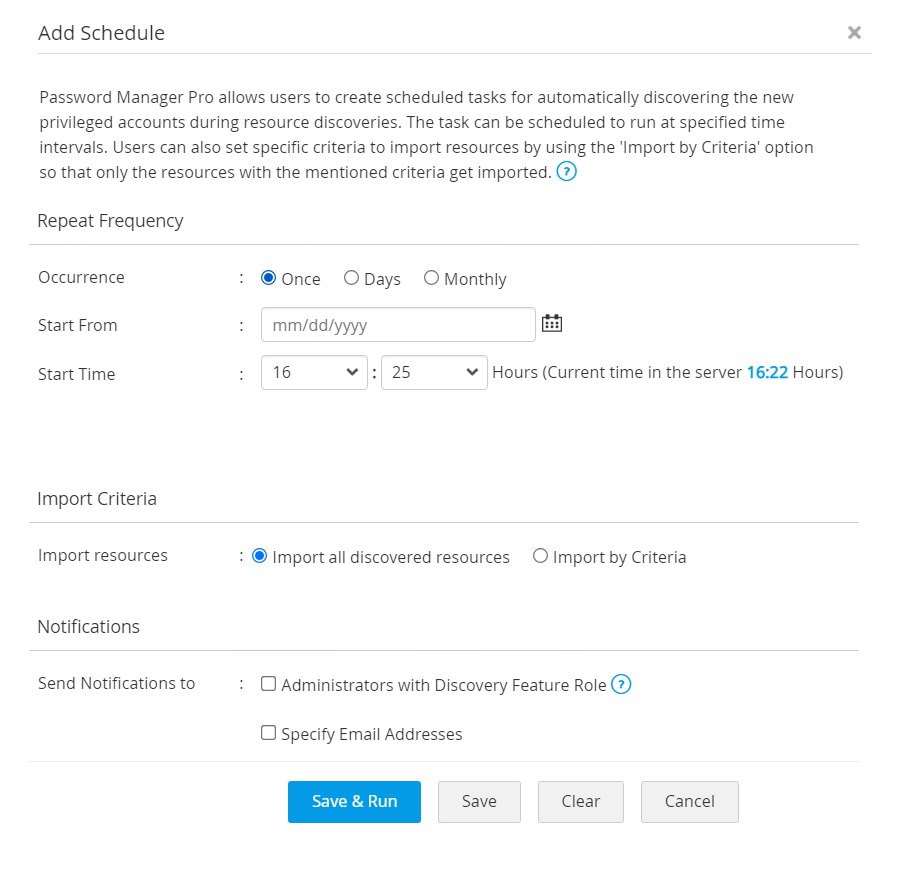
- Select if you want to Import all Discovered Resources or if you want to Import by Criteria.
- If you choose to Import by Criteria, mention the conditions by which you want to import the discovered resources.
- You can choose to Match all of the following or Match any of the following mentioned criteria.
- Select Resource Name or DNS name. You can filter the search based on conditions such as 'equals' or 'does not equal', 'contains' or 'does not contain', 'starts with' or 'ends with'.
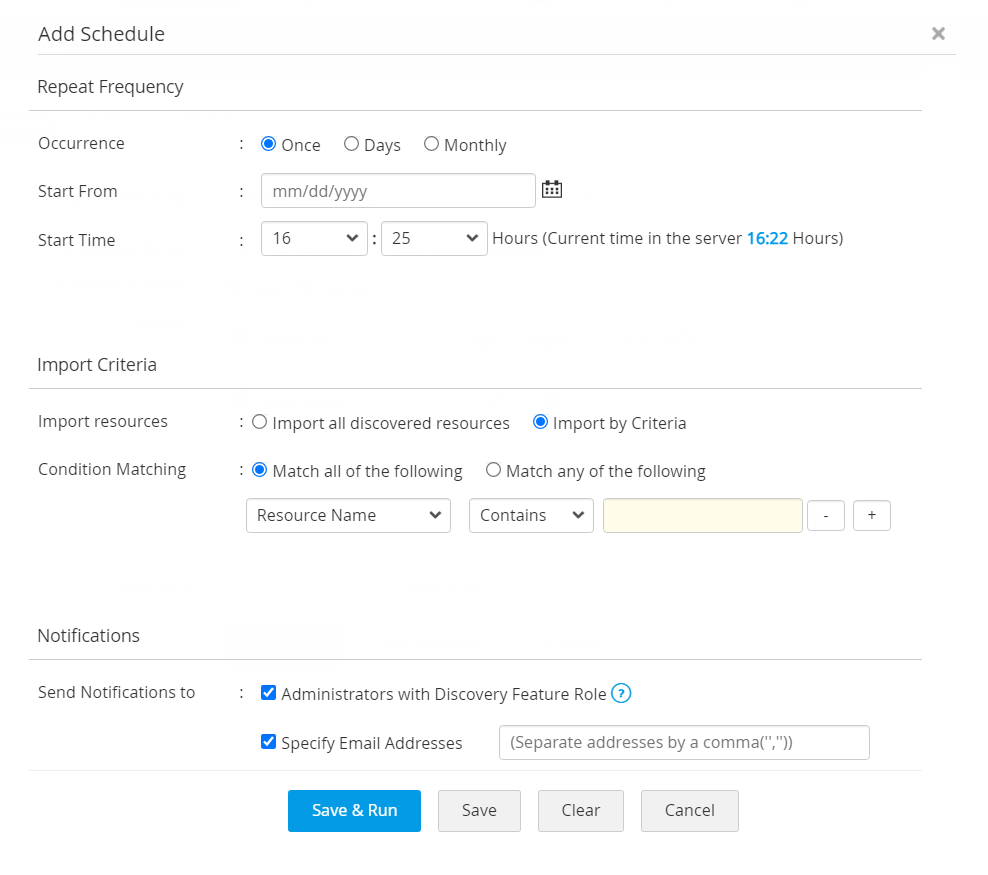
- Select Administrators with Discovery Feature Role or Specify Email Address and mention the email address separated by comma to notify about the schedule.
- Click Save to save the schedule.
- Click Save and Run to save and run the schedule (applicable only for Days and Monthly occurrence).
Now, you have successfully added a schedule for Resource Discovery. The added schedule can be viewed from the Discovery Schedules tab or from Admin >> Manage >> Scheduled Task. From here, you will also be able to Edit, Disable and Delete the schedule.
1.3 Track Discovery Status
- After initiating the discovery operation, Password Manager Pro allows you to track the status of the operation in real-time.
- The list of discovery operations, which are currently running in the background can be found in the Status tab. Using the same tab, you can also track down the history of discovery scans which were performed earlier.
- For any Discovery operation, you can find its Task name, Time invoked, Completed At, and Discovery Status.
- Password Manager Pro also provides an option to stop any discovery operation which is currently in progress.
- Click any Task Name to view the entire list of IT assets discovered during that particular task.
2. Add the Discovered Resources into Password Manager Pro
The following topics explain how each type of discovered resources are added into Password Manager Pro:
2.1 Windows
When a Group/OU is imported from AD, the Windows devices that are part of the Group/OU will be automatically listed under the Resources tab, from where they can be viewed.
2.2 Linux
For Linux devices, you need to move the discovered resources to the Resource tab manually. In the Discovery Status window under the Discover Resources option, select the required resources that are discovered and move them to Resources tab. This operation can also be performed in bulk by selecting multiple resources discovered.
2.3 VMware
For VMware, you need to move the discovered resources to the Resource tab manually. In the Discovery Status window under the Discover Resources option, select the required resources that are discovered and move them to the Resources tab. This operation can also be performed in bulk by selecting multiple resources discovered.
2.4 Network Devices
For network devices, you need to move the discovered resources to the Resource tab manually. In the Discovery Status window under Discover Resources, select the required resources that are discovered and move them to the Resources tab. This operation can also be performed in bulk by selecting multiple resources discovered.
- In the Discovery Status window, Password Manager Pro provides you an option either to add all discovered resources or add selected resources into the inventory.
- In the Discovery Status window, upon clicking a task name, the Discovery Task Status will pop up.
- Click on Add all discovered resources, to add the entire set of resources into Password Manager Pro inventory and click OK button.
- If you want to add only particular resources into the Password Manager Pro inventory, select those resources and click on Add selected resources.
3. Discover Privileged Accounts
After successfully discovering the IT assets, the next step is to discover the privileged accounts associated with those IT assets. You can discover the privileged accounts associated with each resource individually as well as in bulk.
3.1 Accounts Discovery: Pre-requisite
(Supply Credentials for Remote Synchronization)To discover and enumerate the privileged accounts (including local administrator accounts) from the resources, you need to supply the credentials to enable Password Manager Pro to fetch the accounts. You can do this by clicking the Edit button against each resource. This step has to be repeated for all resources whose accounts are to be discovered.
- Navigate to the Resources tab.
- Click the Resource Actions icon against WindowsDomain resource and select Configure password reset from the drop-down list.
- In the pop-up form that appears, select the Domain Admin account as the Administrator Account.
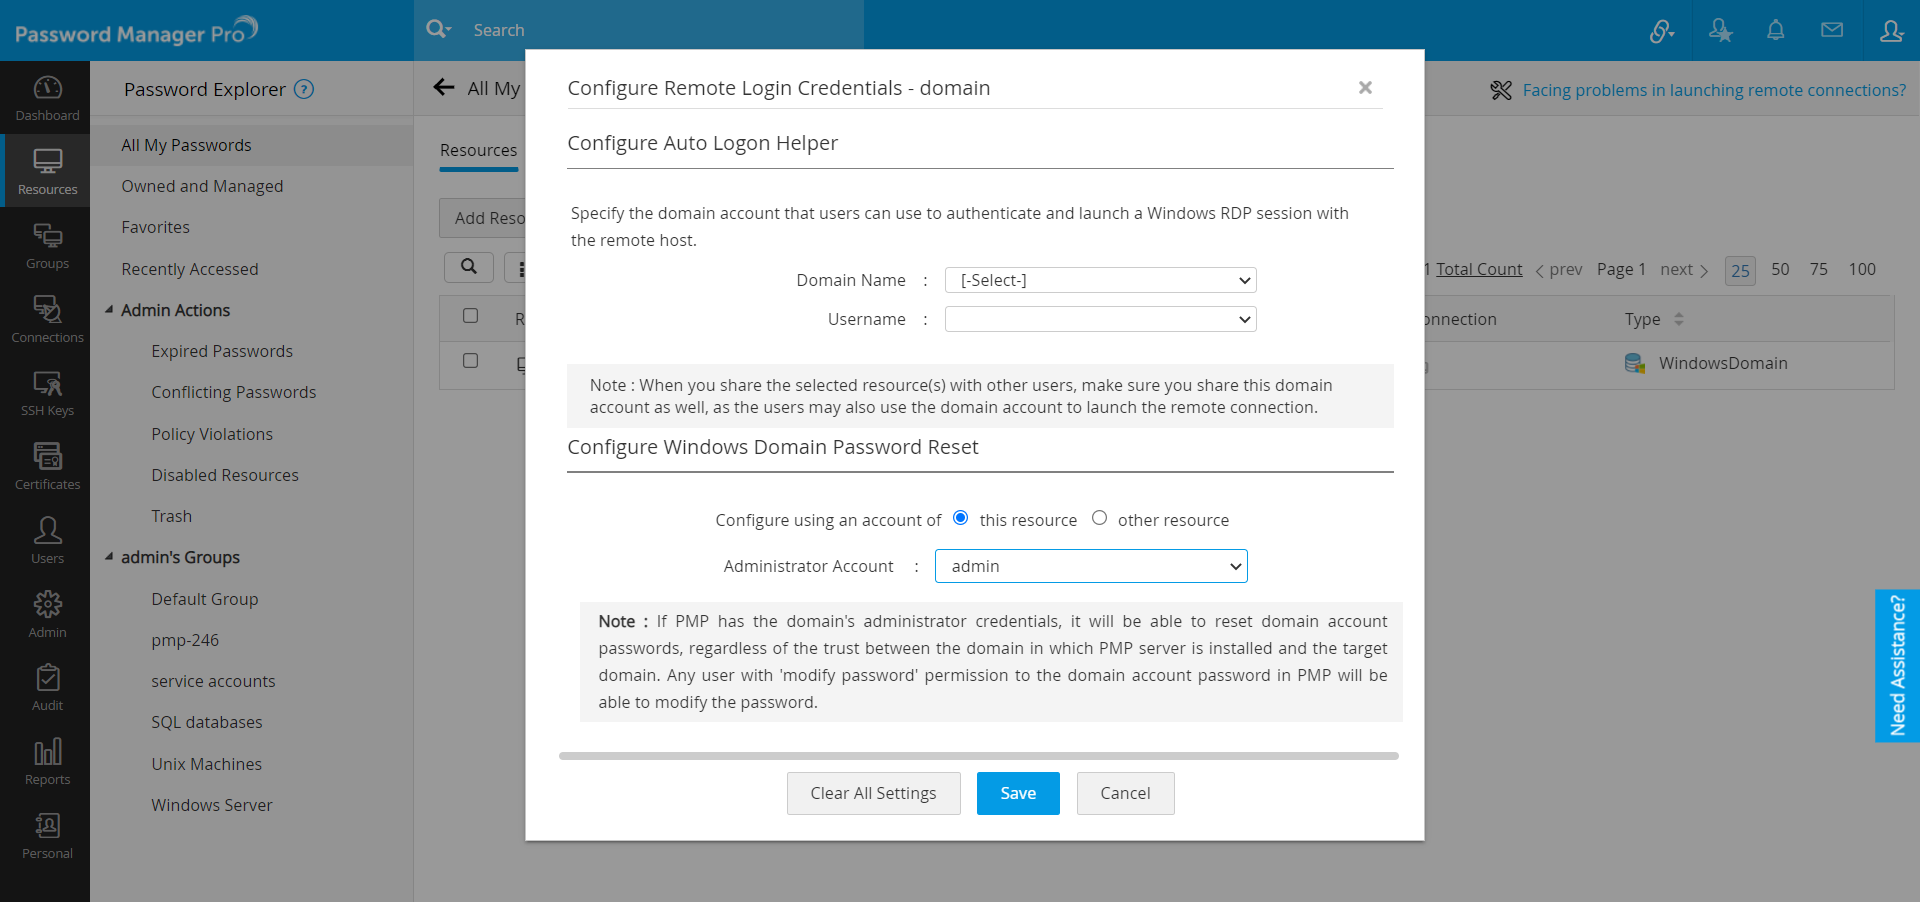
- Password Manager Pro supports only specific resource types for privileged accounts discovery. If any of your device is not supported, but is similar to the other supported types, you may select the closest resource type available and try discovering the accounts.
- When discovering resources, Password Manager Pro fills the resource type field as well. However, check the resource type field and ensure that the correct type is chosen. Otherwise, change the type.
- Click Save.
3.1.i Discovery of Windows Service Accounts and Local Accounts Associated with the Domain Member Server
When discovering Windows accounts, Password Manager Pro will also automatically fetch the service accounts associated with services present in the domain members. The Windows service accounts discovery and enumeration of the same in the inventory takes place as explained below:
- Initially, Password Manager Pro will create a Windows domain resource with the domain name. For example, if the domain name is "Password Manager Pro", then the resource name created will also be "Password Manager Pro - Domain Controller."
- Then, Password Manager Pro will try to fetch all the available Windows member servers that are available under the specified OU or groups.
- After importing the available resources, the corresponding local accounts associated with those resources will also be fetched.
Finally, the service accounts will be fetched for the imported resources. These service accounts will be mapped to the resource group that contains the resources where service accounts are used. The resource group will be created in the form "DomainName_MemberServerGroup." For example, if the domain name is given as Password Manager Pro, the resource group name will be PMP_MemberServerGroup. If the resource group with that name already exists, resource will be added to that resource group.
3.2 Database Accounts Discovery
Similar to the resources listed above, you can also discover database accounts through the discovery feature in Password Manager Pro.
As mentioned above, to discover and enumerate the privileged accounts (including local administrator accounts) from database resources, you need to supply the credentials to enable Password Manager Pro to fetch the accounts. You can do this by clicking the Edit button against each resource. This step has to be repeated for all resources whose accounts are to be discovered.
Database Resource Types Supported by Password Manager Pro:
- MS SQL
- MySQL
- PostgreSQL
- Oracle
- Sybase
Pre-requisites:
(Supply Credentials for Remote Synchronization)
i. MS SQL Server
- To add an MS SQL resource to Password Manager Pro, navigate to Resources > Add Resource and add a resource with the resource type MS SQL server and a valid DNS name/IP address.
- In the Add Account window, provide an administrator account's credentials to facilitate the account discovery through this account.
- To configure remote password reset for this resource, click the Resource Actions drop-down menu beside the resource and select Configure Remote Password Reset.
- For an MSSQL server, the default port in 1433. Select an administrator account from the Account Name drop-down list and click Save to save the settings.
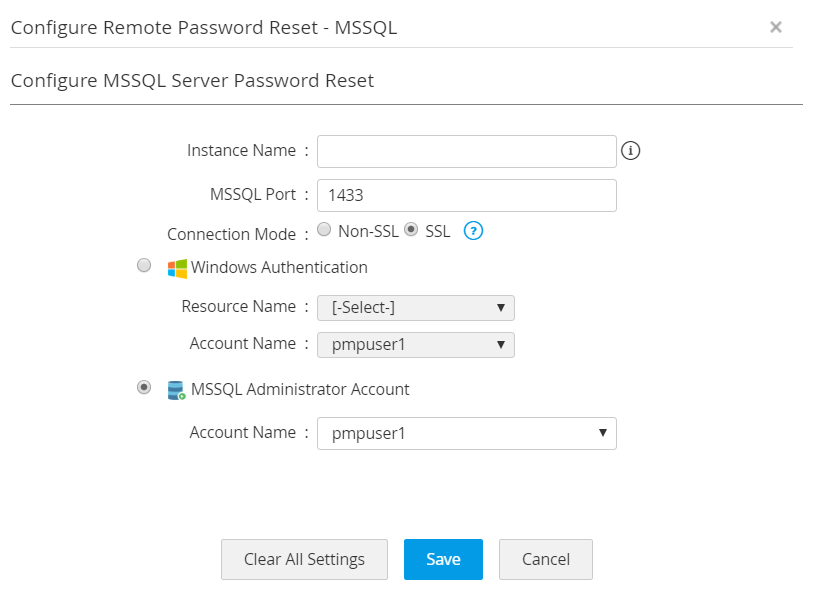
- You can configure the connection either through SSL or Non SSL mode. In case of SSL mode, the SSL certificate must be imported before discovering accounts in Password Manager Pro.
- To enable the SSL mode, the MS SQL server should be serving over SSL and you will have to import the database server's root certificate into the Password Manager Pro server machine's certificate store.
- You need to import all the root and intermediate certificates that are present in the respective certificate chain. Before you import the root certificate, stop the Password Manager Pro server.
- Open a command prompt and navigate to <PMP_SERVER_HOME>\bin directory and execute the following command:
ForWindows:
importCert.bat<Absolute Path of certificate>
ForLinux:
importCert.sh<Absolute Path of certificate> - Restart Password Manager Pro server.
ii. MySQL server
- To add a MySQL resource to Password Manager Pro, navigate to Resources >> Add Resource and add a resource with the resource type MySQL server and a valid DNS name/IP address.
- In the Add Account window, provide an administrator account's credentials to facilitate the account discovery through this account.
- To configure remote password reset for this resource, click on the Resource Actions drop-down menu beside the resource and select Configure Remote Password Reset.
- For a MySQL server, the default port in 3306.Select an administrator account from the Root Account Name drop-down list and click Save to save the settings.

- You can configure the connection either through SSL or Non SSL mode. In case of SSL mode, the SSL certificate must be imported before discovering accounts in Password Manager Pro.
- To enable the SSL mode, the MS SQL server should be serving over SSL and you will have to import the database server's root certificate into the Password Manager Pro server machine's certificate store.
- You need to import all the root and intermediate certificates that are present in the respective certificate chain. Before you import the root certificate, stop the Password Manager Pro server.
- Open a command prompt and navigate to <PMP_SERVER_HOME>\bin directory and execute the following command:
ForWindows
importCert.bat<Absolute Path of certificate>
ForLinux
importCert.sh<Absolute Path of certificate> - Restart Password Manager Pro server.
iii. PostgreSQL Server
- To add a PostgreSQL resource to Password Manager Pro, navigate to Resources >> Add Resource and add a resource with the resource type PostgreSQL server and a valid DNS name/IP address.
- In the Add Account window, provide an administrator account's credentials to facilitate the account discovery through this account.
- To configure remote password reset for this resource, click on the Resource Actions drop-down menu beside the resource and select Configure Remote Password Reset.
- For a PostgreSQL server, the default port in 5432.
Select an administrator account from the Root Account Name drop-down list and click Save to save the settings.

- You can configure the connection either through SSL or Non SSL mode. In case of SSL mode, the SSL certificate must be imported before discovering accounts in Password Manager Pro.
- To enable the SSL mode, the MS SQL server should be serving over SSL and you will have to import the database server's root certificate into the Password Manager Pro server machine's certificate store.
- You need to import all the root and intermediate certificates that are present in the respective certificate chain.
- Before you import the root certificate, stop the Password Manager Pro server.
- Open a command prompt and navigate to <PMP_SERVER_HOME>\bin directory and execute the following command:
ForWindows
importCert.bat <Absolute Path of certificate>
ForLinux
importCert.sh <Absolute Path of certificate> - Restart Password Manager Pro server.
iv. Oracle DB Server
- To add an Oracle DB resource to Password Manager Pro, navigate to Resources >> Add Resource and add a resource with the resource type Oracle DB server and a valid DNS name/IP address.
- In the Add Account window, provide an administrator account's credentials to facilitate the account discovery through this account.
- To configure remote password reset for this resource, click on the Resource Actions drop-down menu beside the resource and select Configure Remote Password Reset.
- For an Oracle DB server, the default port is 1521. Select an Administrator Account from the drop down list and click Save to save the settings.
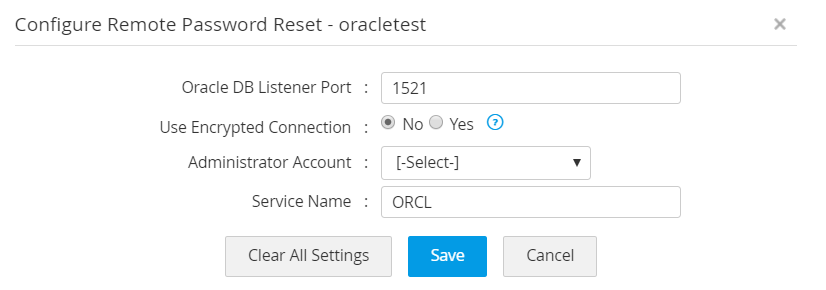
- You can configure the connection either through SSL or Non SSL. In case of SSL mode, the SSL certificate must be imported before discovering accounts in Password Manager Pro.
- To enable the SSL mode, the MS SQL server should be serving over SSL and you will have to import the database server's root certificate into the Password Manager Pro server machine's certificate store.
- You need to import all the root and intermediate certificates that are present in the respective certificate chain.
- Before you import the root certificate, stop the Password Manager Pro server.
- Open a command prompt and navigate to <PMP_SERVER_HOME>\bin directory and execute the following command:
ForWindows
importCert.bat <Absolute Path of certificate>
ForLinux
importCert.sh <Absolute Path of certificate> - Restart Password Manager Pro server.
v. Sybase Server
- To add a Sybase resource to Password Manager Pro, navigate to Resources >> Add Resource and add a resource with the resource type Sybase ASE and a valid DNS name/IP address.
- In the Add Account window, provide an administrator account's credentials to facilitate the account discovery through this account.
- To configure remote password reset for this resource, click on the Resource Actions drop-down menu beside the resource and select Configure Remote Password Reset.
- For a Sybase server, the default port in 5000. Select an Administrator Account from the drop-down list and click Save to save the settings.

- You can configure the connection either through SSL or Non SSL.
- In case of SSL mode, the SSL certificate must be imported before discovering accounts in Password Manager Pro.
- To enable the SSL mode, the MS SQL server should be serving over SSL and you will have to import the database server's root certificate into the Password Manager Pro server machine's certificate store.
- You need to import all the root and intermediate certificates that are present in the respective certificate chain.
- Before you import the root certificate, stop the Password Manager Pro server.
- Open a command prompt and navigate to <PMP_SERVER_HOME>\bin directory and execute the following command:
ForWindows
importCert.bat <Absolute Path of certificate>
ForLinux
importCert.sh <Absolute Path of certificate> - Restart Password Manager Pro server.
3.3. Discover Privileged Accounts of Individual Resources
Privileged Account Discovery can be initiated from four places in the Password Manager Pro UI:
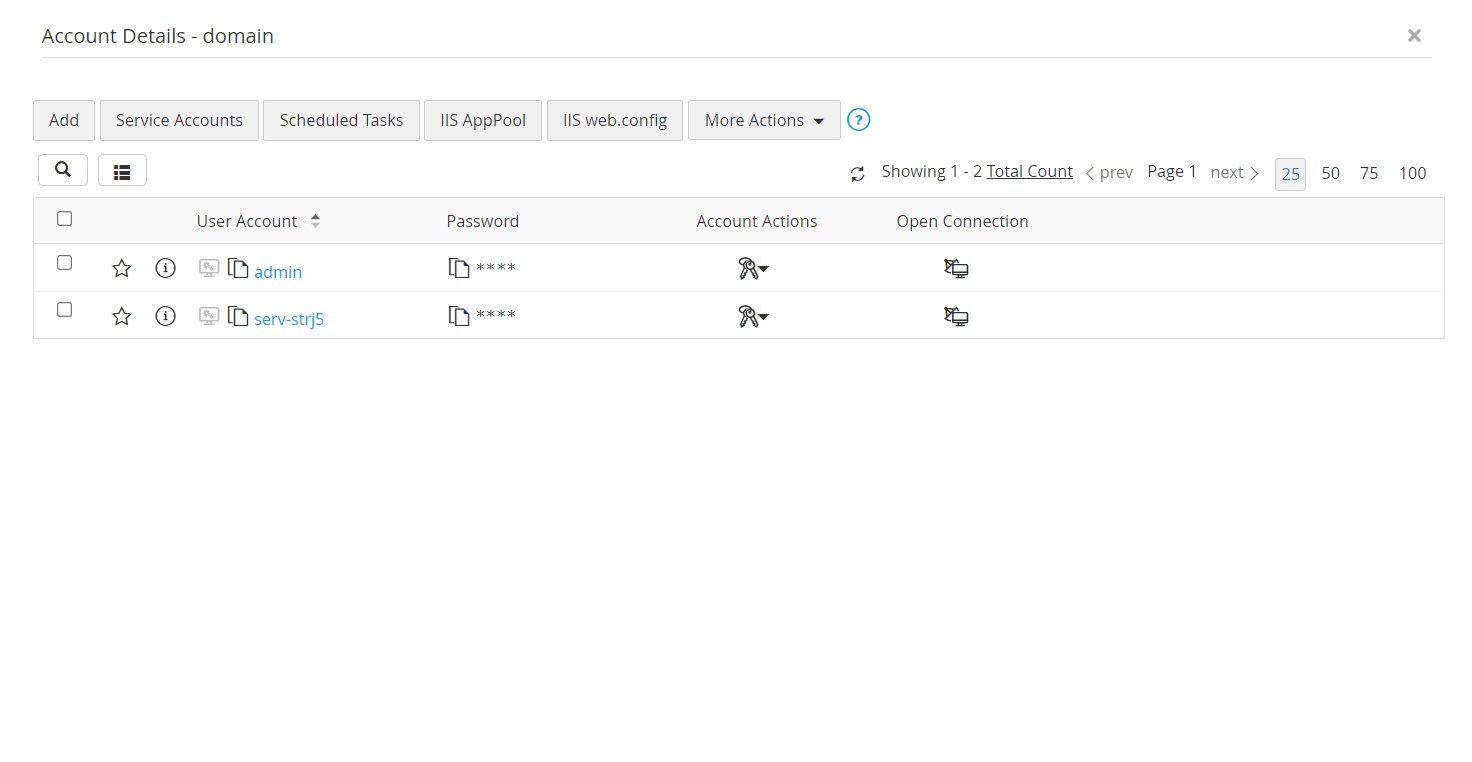
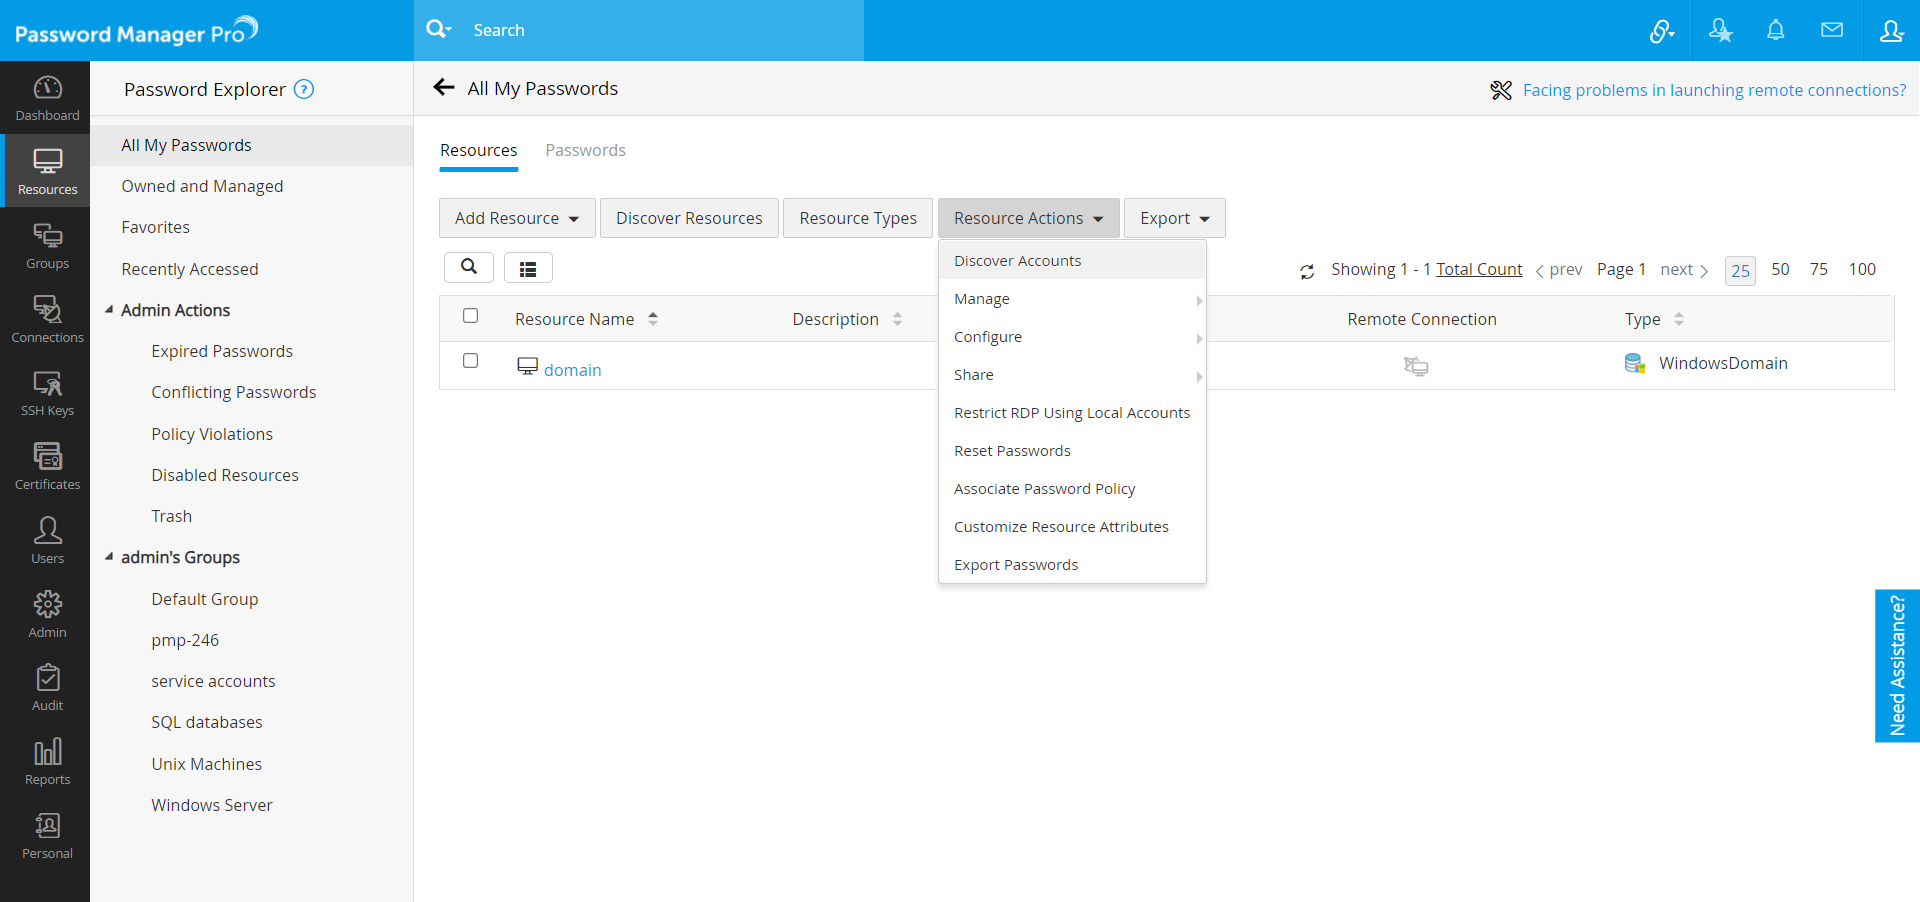
- In the Resources tab, upon clicking a resource, you will see the Discover Accounts button. You can use this option whenever you want to discover new accounts added under that particular resource.
- You can also use the Discover Accounts option to discover accounts that are part of multiple resources. Select multiple resources using the checkboxes and click on this option to discover the accounts that are part of all the selected resources.
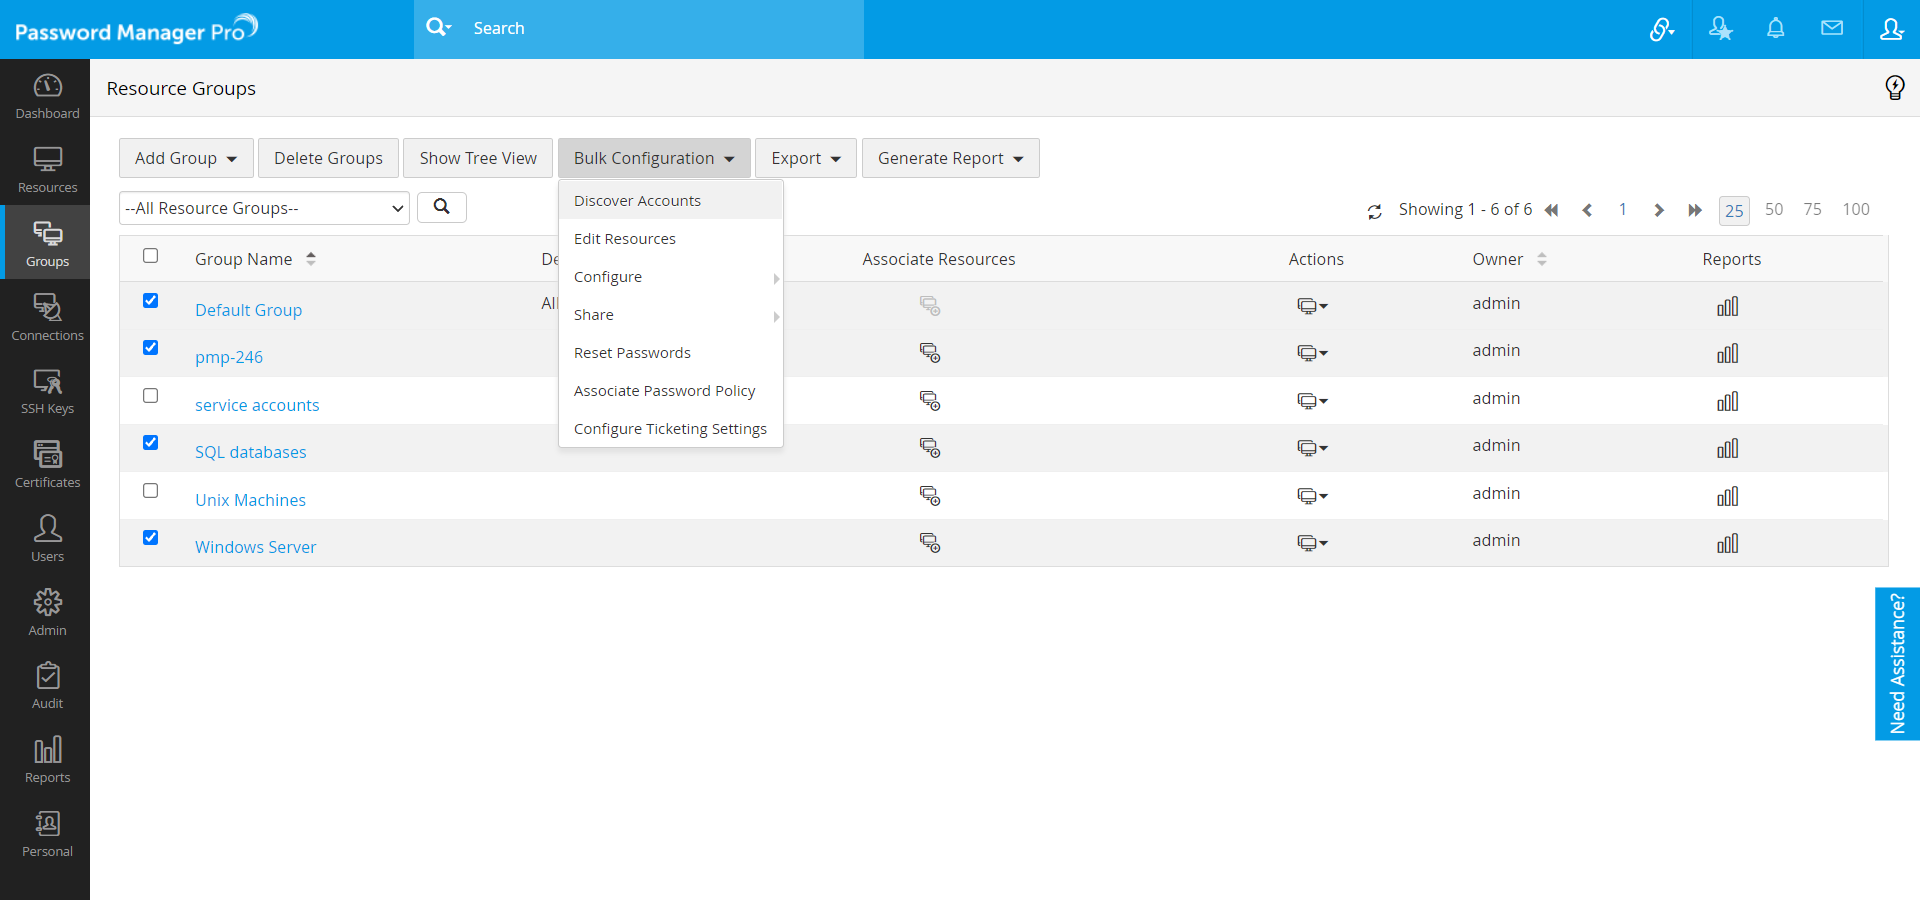
- In the Groups tab, select Discover Accounts from the Bulk Configuration drop-down menu. You can select multiple resource groups and use this option to discover the accounts that are part of all the selected resource groups.
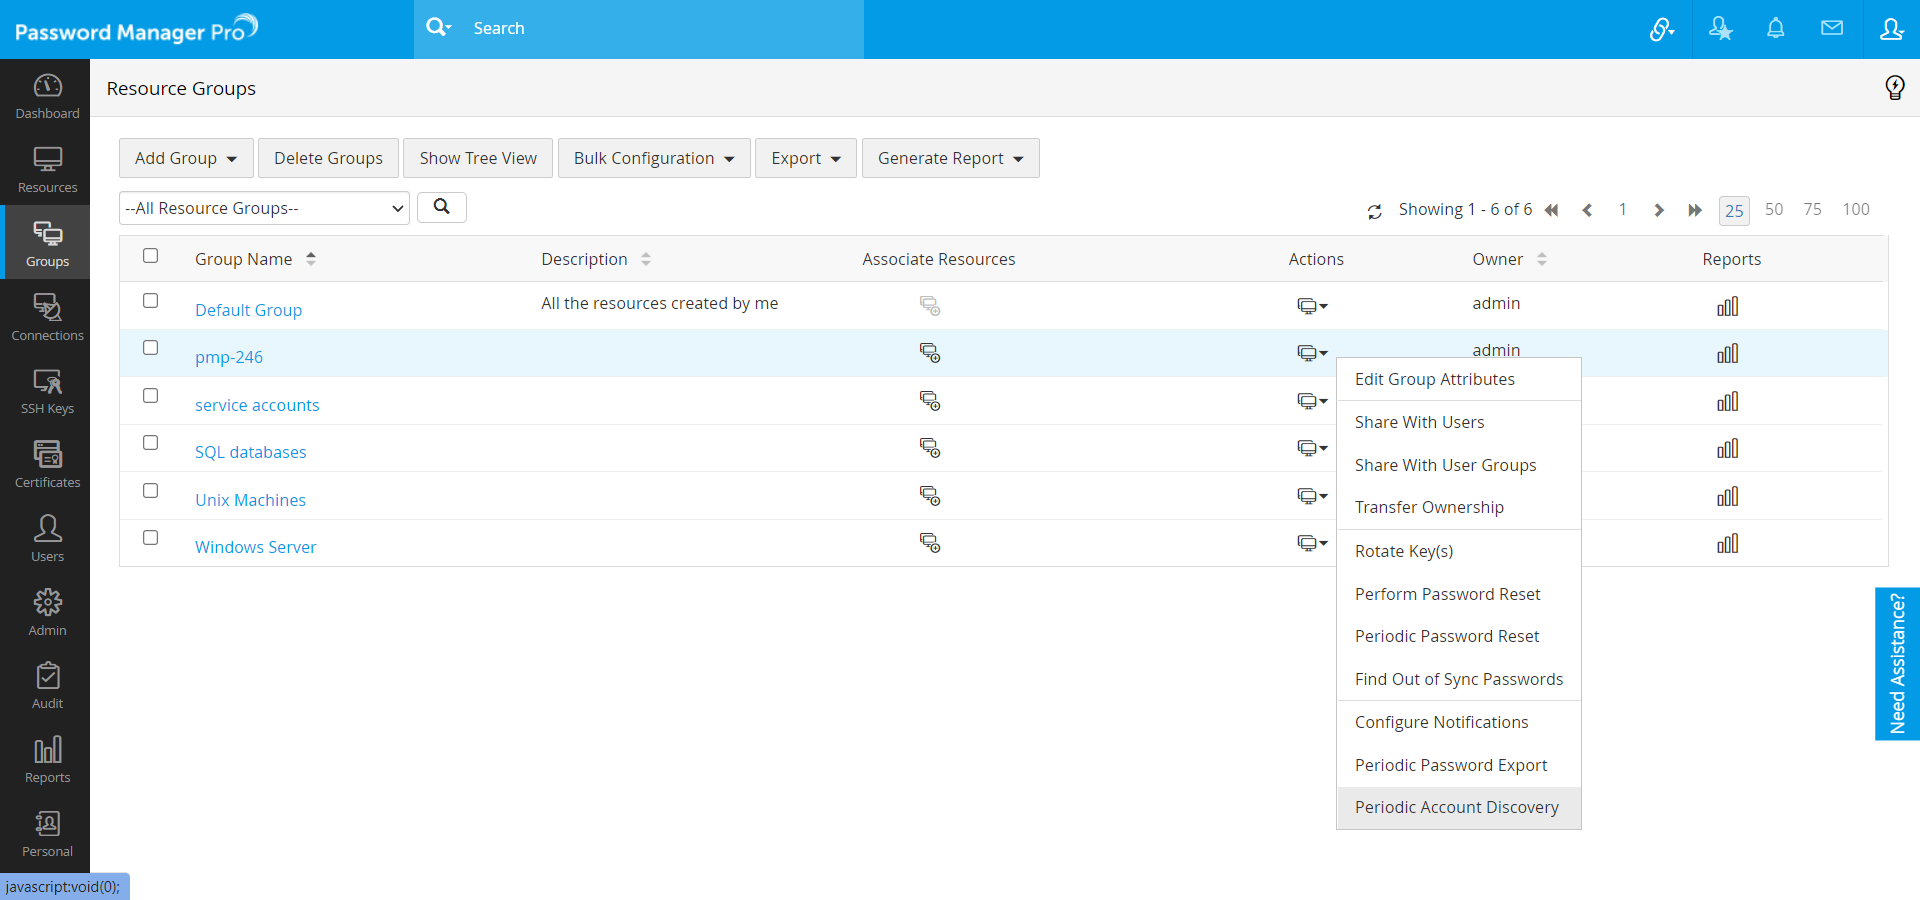
- In the Resource Groups tab, select Periodic Account Discovery from the Actions drop-down list. Using this, you can create a scheduled task to periodically discover the accounts that are part of the resources belonging to the resource group.
3.4 Automated Periodic Discovery of Privileged Accounts
You can automatically discover the privileged accounts of the resources at periodic intervals. This can be configured at the resource group level. The accounts discovered through this method will be added automatically.
- Navigate to the Groups tab.
- Click the Actions icon against the resource group and select Periodic Account Discovery from the dropdown.
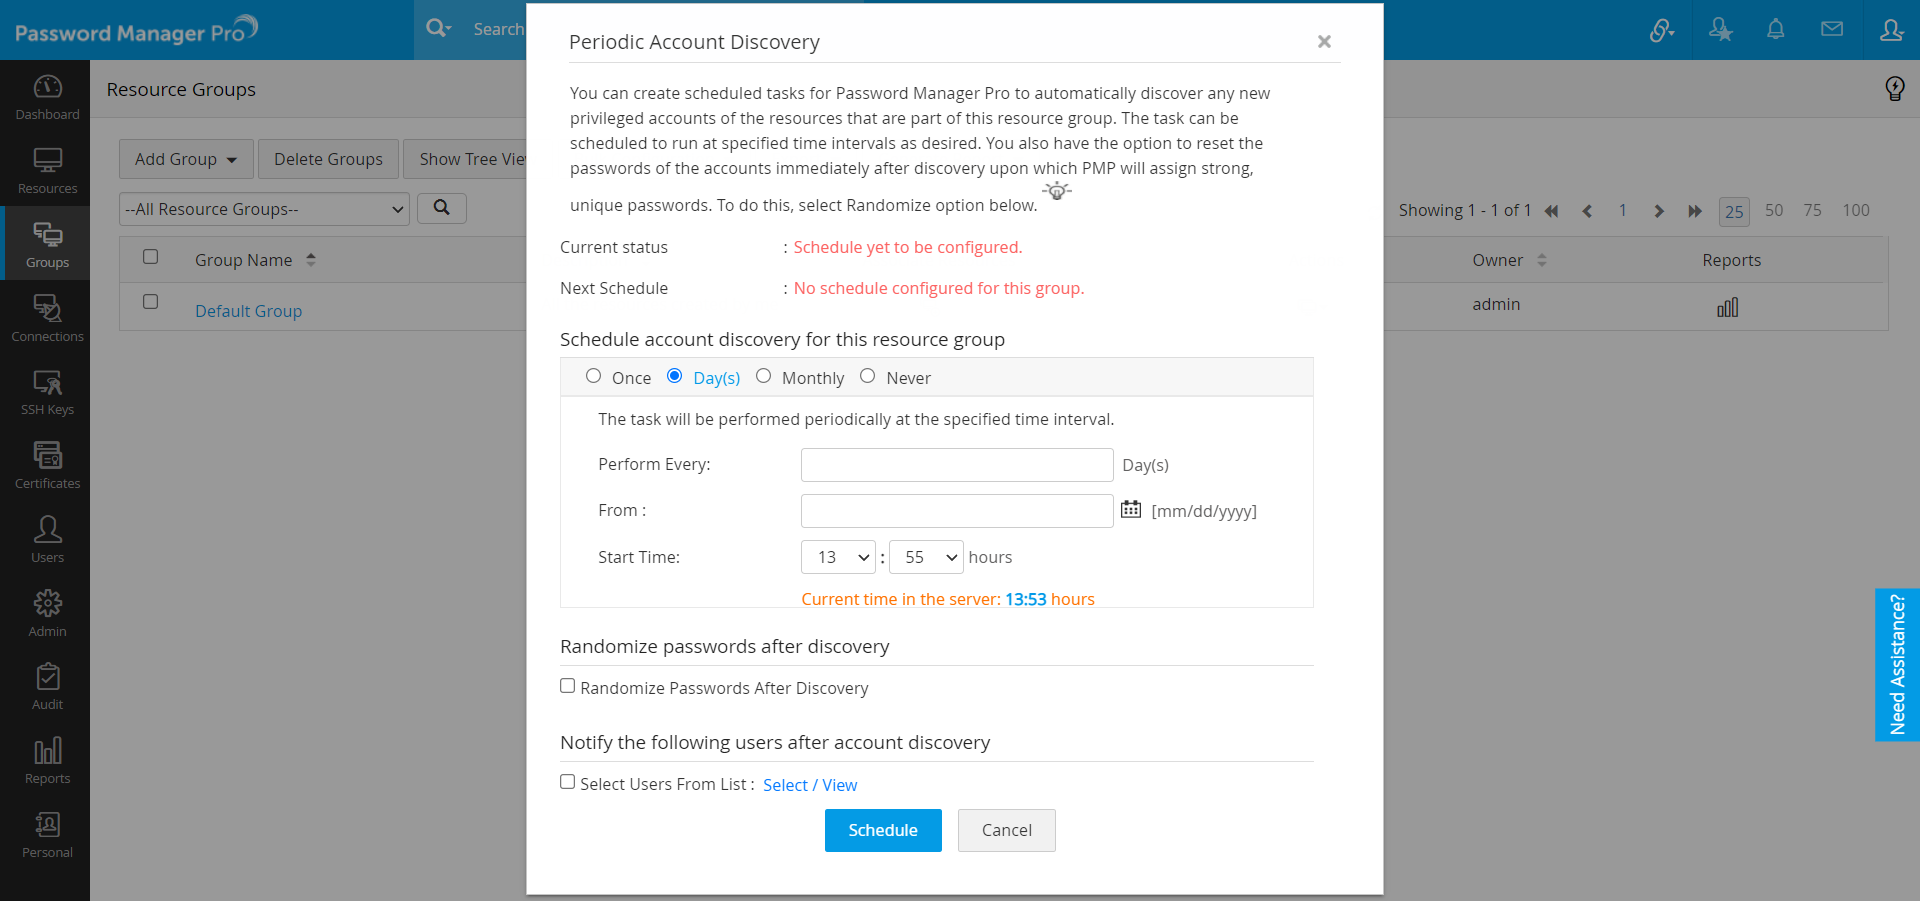
Once
Now or Later
Days
Perform on a specific day repeatedly starting from a particular date and time (maximum number of days allowed is 999).
Monthly
On a particular day and time every month.
Never
To stop schedule.
- Password Manager Pro also provides you with an option to notify the existing Password Manager Pro users or the specified email IDs once the account discovery process is completed.
- The scheduled account discovery process will be reflected in the audit trails for security purposes.
- Click on the Schedule button.
If you are using Password Manager Pro MSP edition, discovery option for the client organization can be enabled from the Admin tab as follows:
- Navigate to Admin >> Settings >> General Settings.
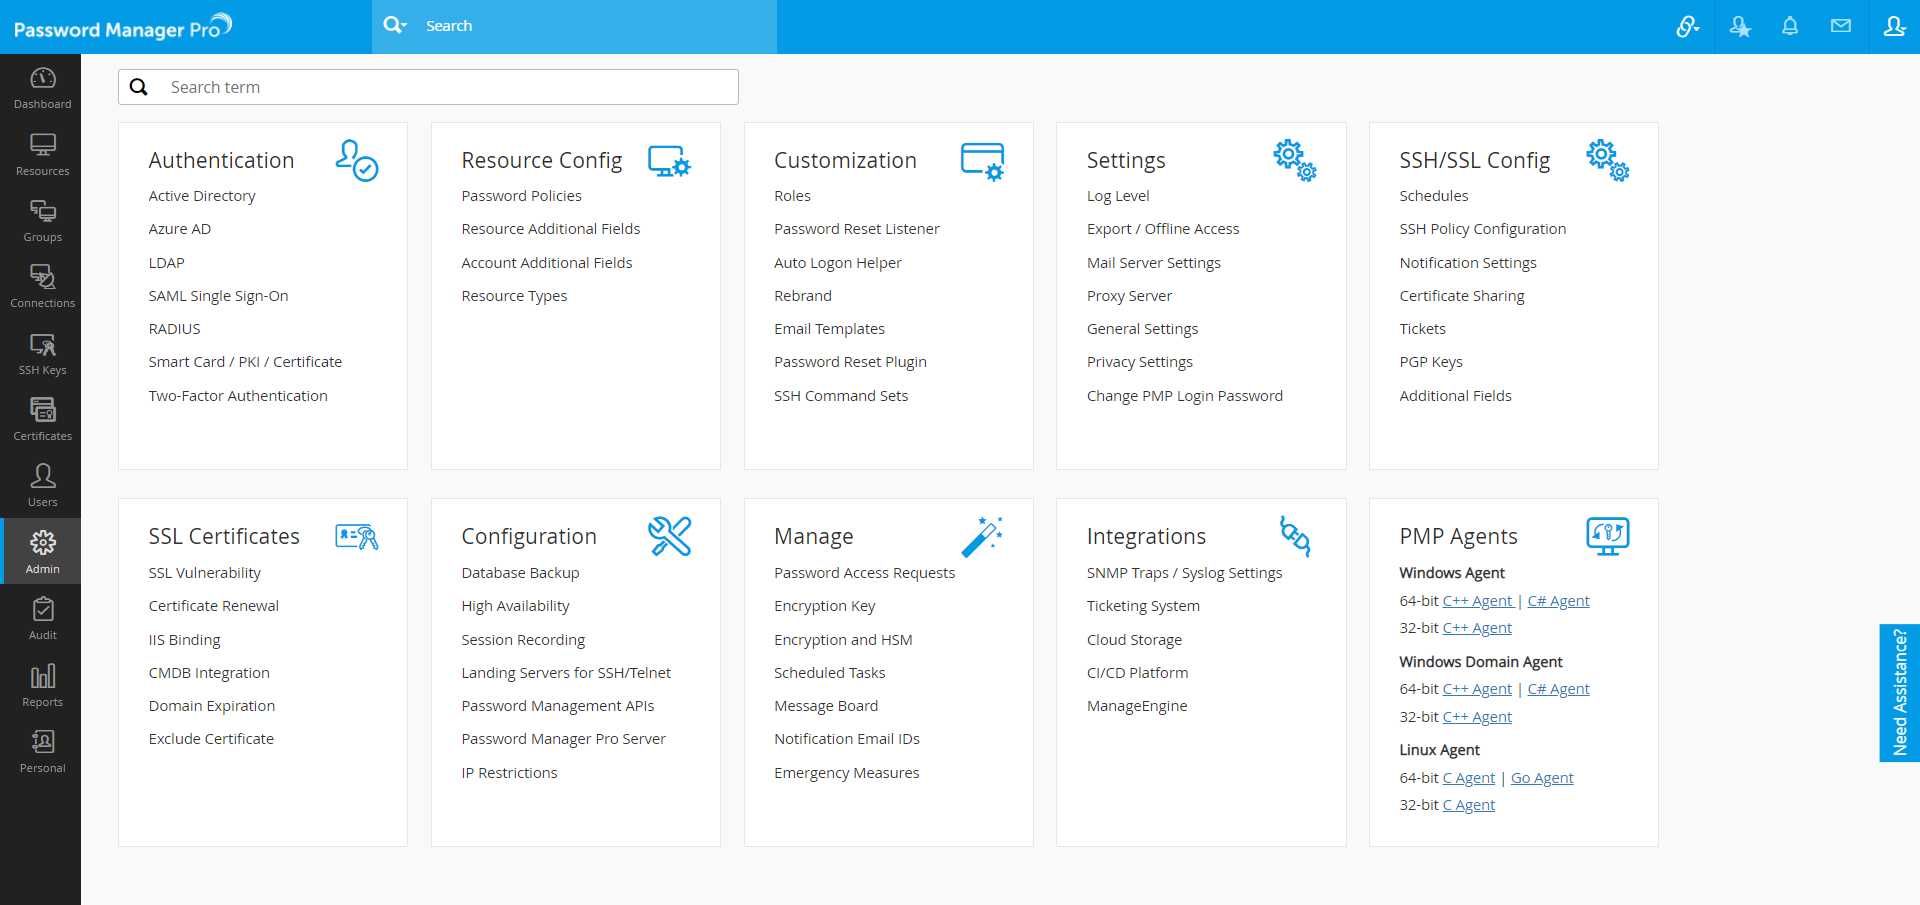
- In the UI that opens, select User Management from the options on the left hand side.
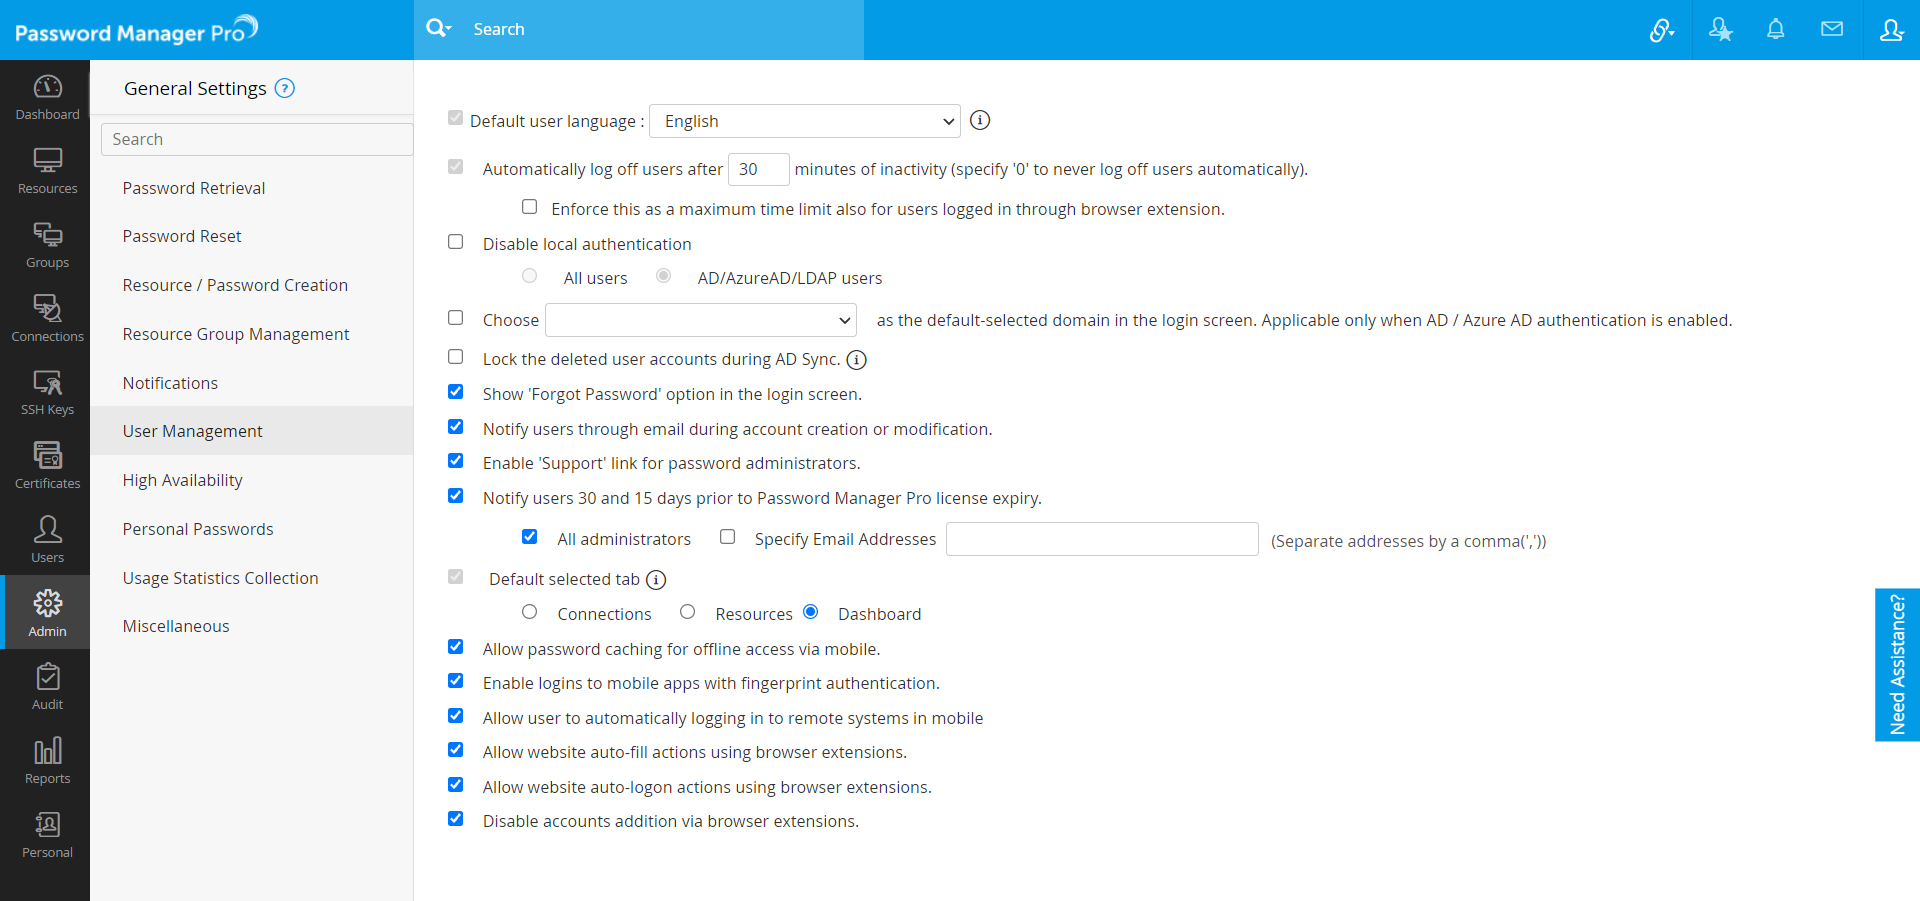
- Select the checkbox Enable Discovery in client organization.
- Click Save.
After discovering the accounts, it is recommended to randomize the passwords of the newly discovered accounts.
Note: You can also discover the privileged accounts in the agent mode.
3.5 Randomize Passwords Post Discovery
After discovering accounts, it is recommended to reset the passwords of the newly discovered accounts. When accounts are discovered, Password Manager Pro can only fetch the user account name, it cannot fetch the actual password. However, Password Manager Pro is capable of randomizing the passwords upon discovery according to the password policy. The new passwords will then be stored in Password Manager Pro.
To randomize passwords after discovery,
- Navigate to the Resources tab.
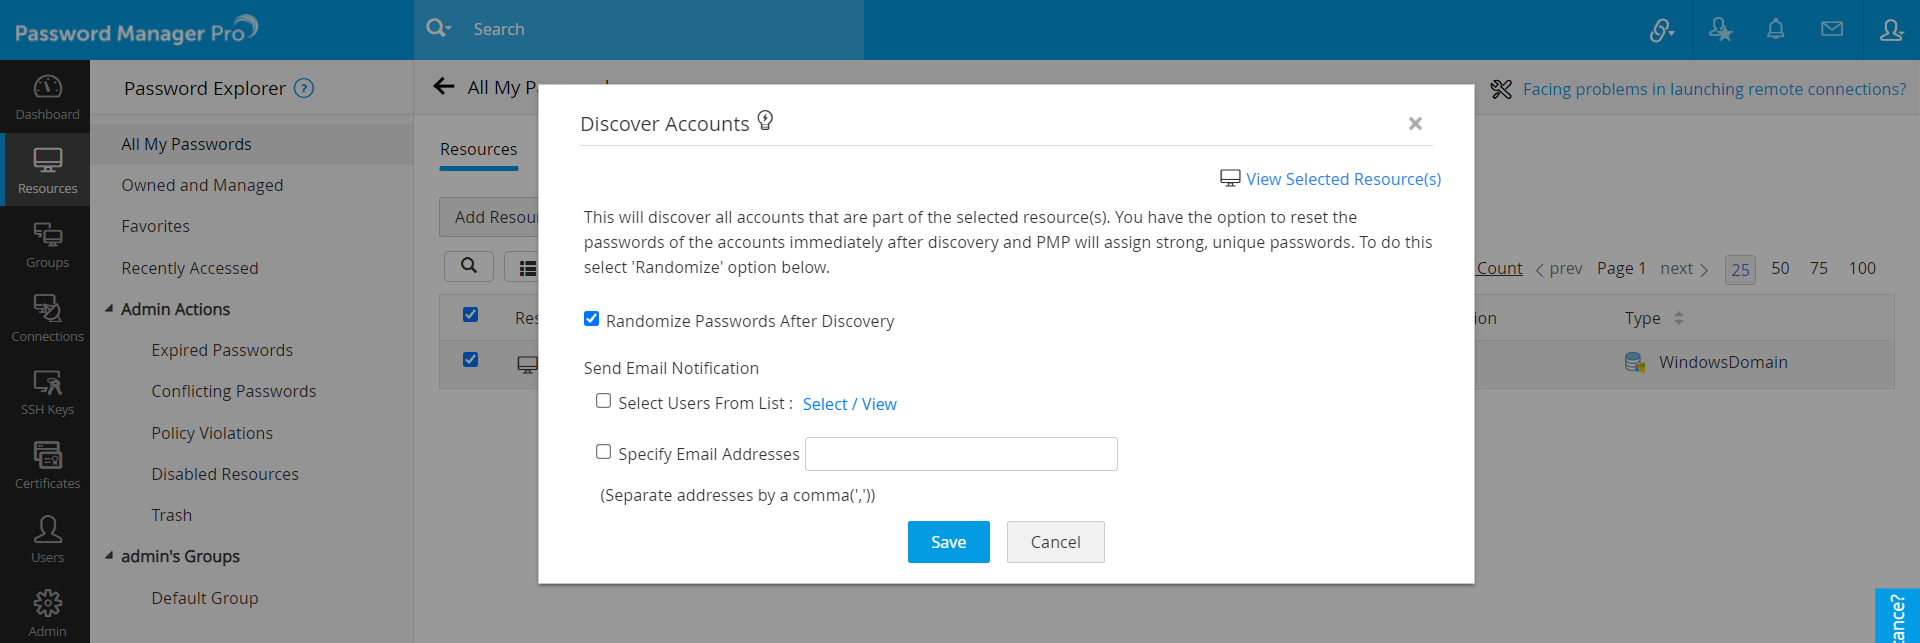
- Select the resource(s) whose passwords are to be reset, click the Resource Actions button and select Discover Accounts from the drop-down.
- In the dialog box that opens, select the checkbox Randomize passwords after discovery.
- You can send notification about randomization to password owners. There is also provision to notify other users and specific email IDs.
- Click Save.
4. Auto Logon using AD, Entra ID and LDAP
Password Manager Pro allows users to launch a direct RDP connection with the target resource using any domain account that is owned by you or shared with you. Users can select the required Domain account or can use the currently logged in AD/Entra ID/LDAP account to connect to the desired resource. To do this,
- Navigate to the Resources tab and click the Remote Connection icon beside the required resource.
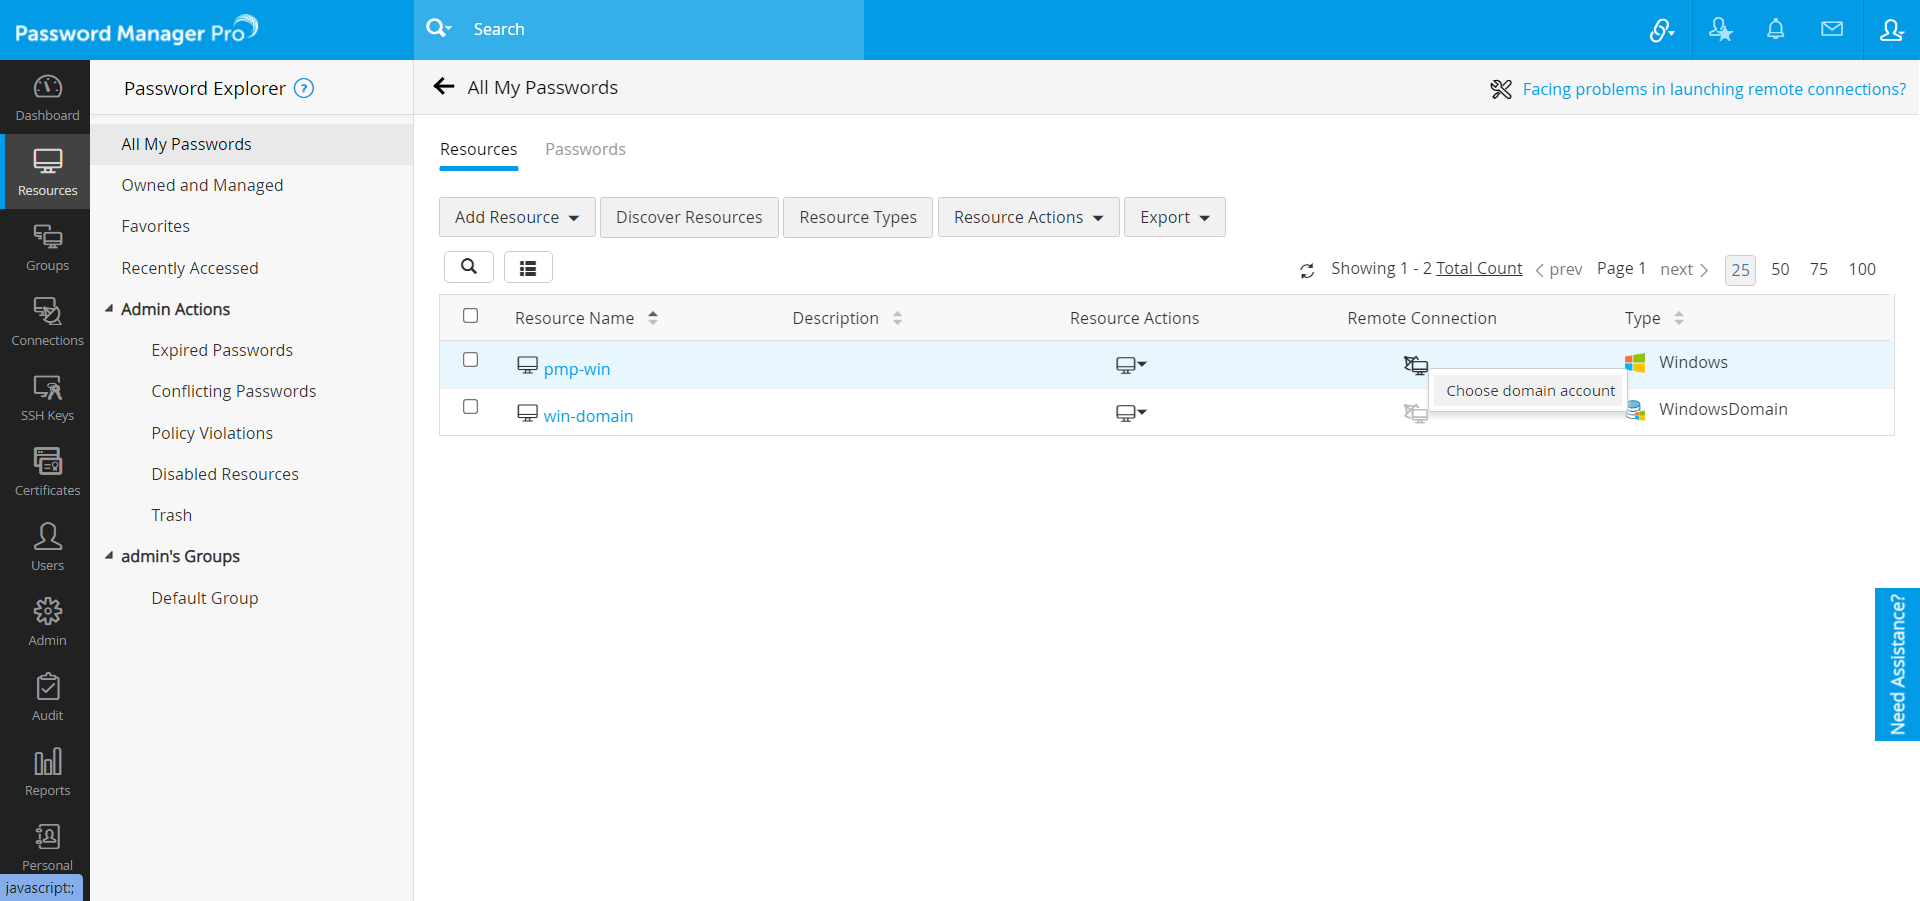
[OR]
Navigate to the Connections tab and click on the required resource. - Click choose domain account.
- In the pop-up that appears,
- You can choose to Use domain account or Use <account_name> Credentials.
- If you choose to Use domain account, select the Resource Name and the Account Name.
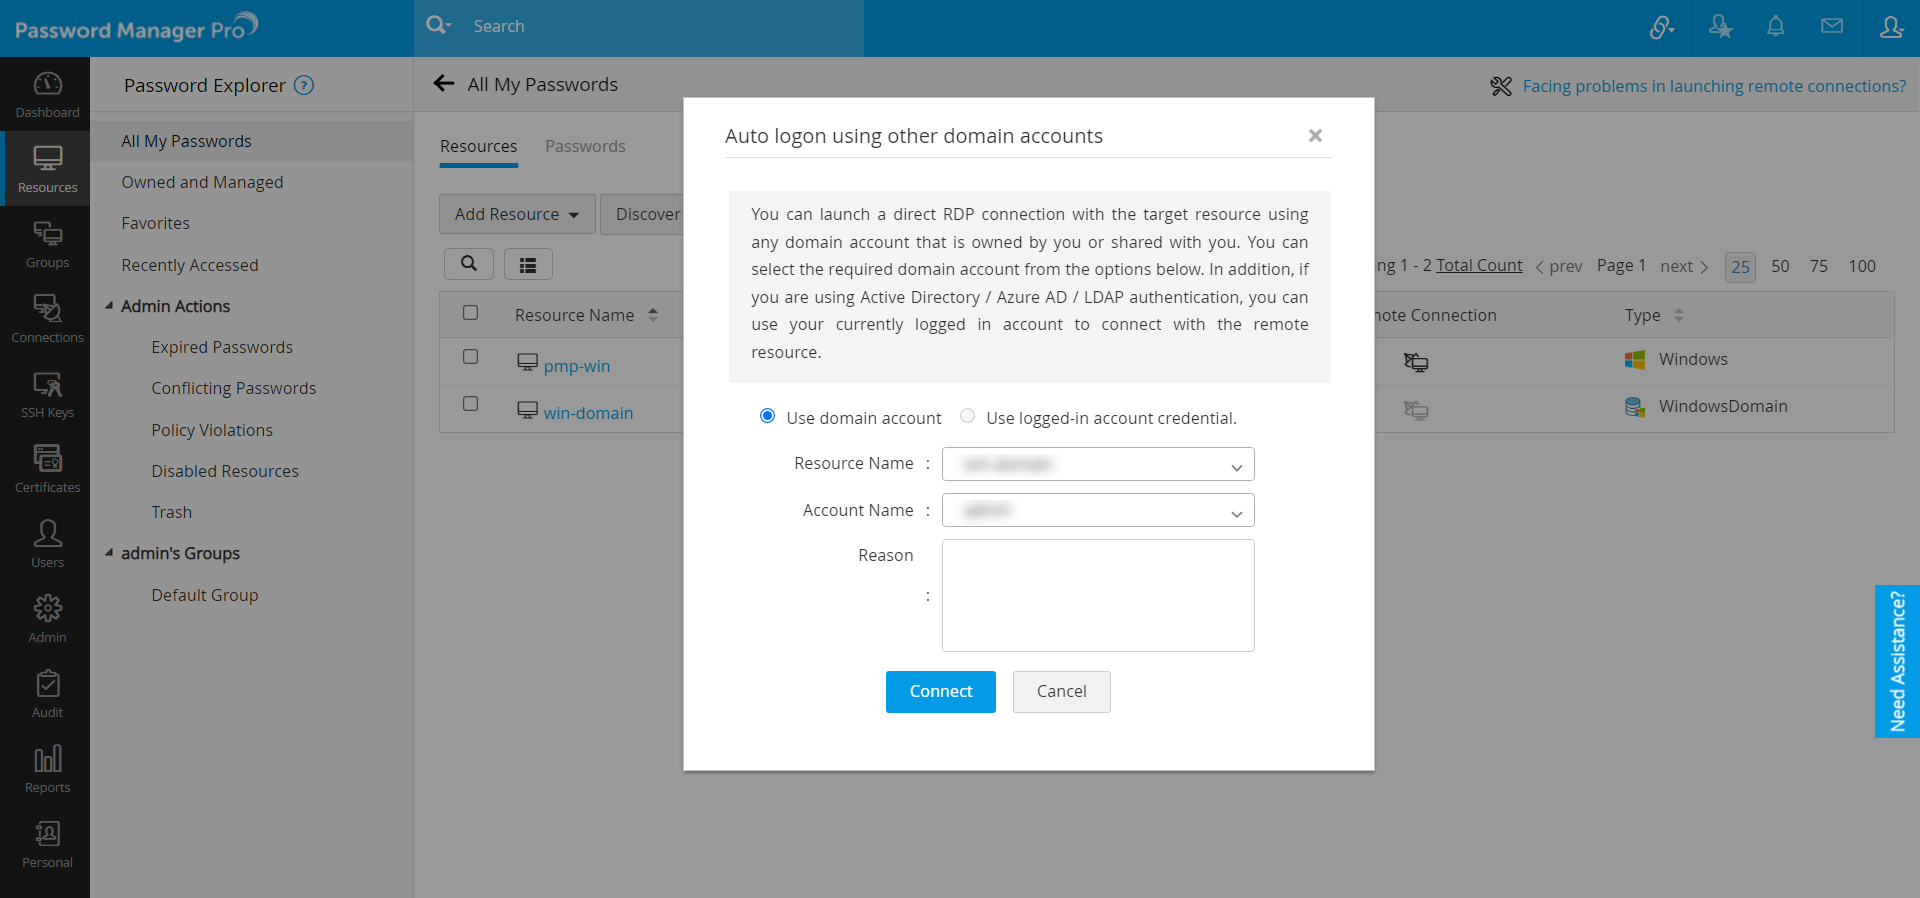
- If you choose to Use <account_name> Credentials (currently logged in AD / Entra ID / LDAP), mention the account Password.
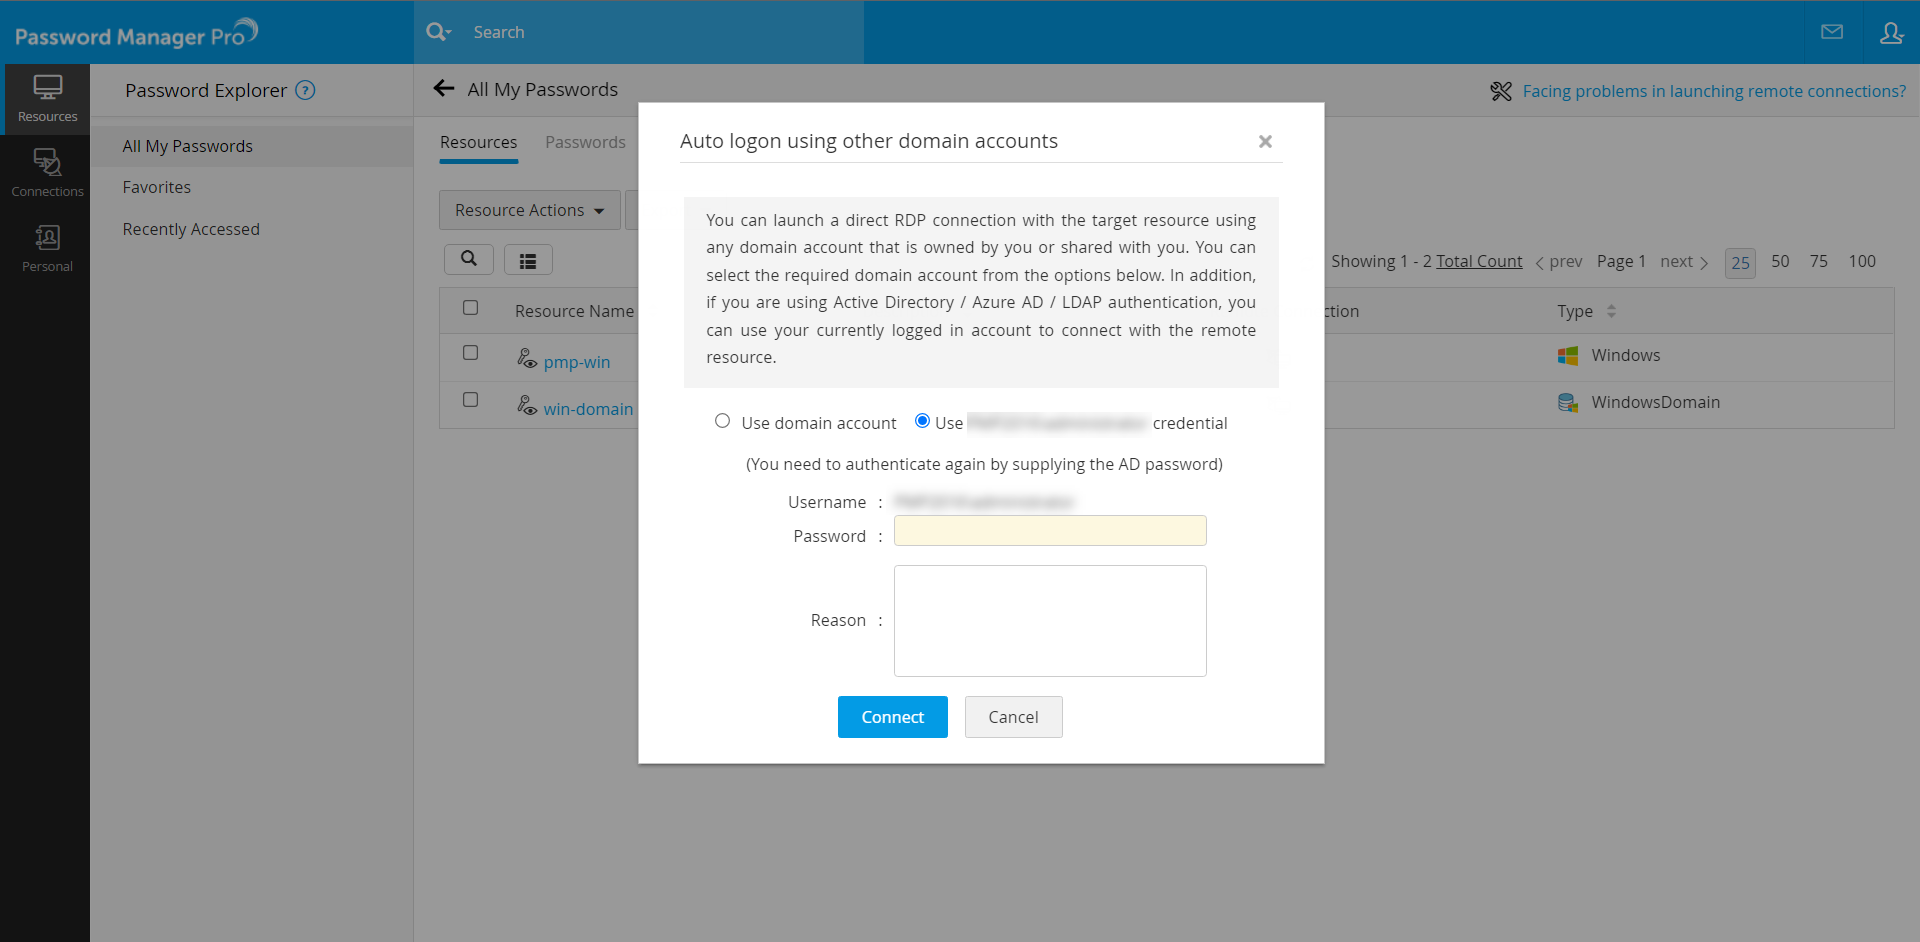
- If you choose to Use domain account, select the Resource Name and the Account Name.
- Enter the Reason for establishing the connection (mandatory) and click Connect.
- You can choose to Use domain account or Use <account_name> Credentials.
- Now, you have successfully established a connection with that resource.
Click to learn about enabling Active Directory, Entra ID or LDAP authentication in Password Manager Pro.
