Duo Security
ADSelfService Plus' Duo Security integration enables organizations to leverage their existing Duo MFA investment within ADSelfService Plus' MFA workflows. This provides a consistent authentication experience across all enterprise systems, and maintains centralized management of all the authenticators used in your organization through the ADSelfService Plus admin portal.
How it works
ADSelfService Plus integrates with Duo Security through two SDK options:
- Web v4 SDK: Uses Duo's OIDC-based Universal Prompt with a modern UI that redirects users to Duo for authentication
- Web v2 SDK: Uses the traditional Duo prompt displayed within an ADSelfService Plus iframe.
During authentication, users are prompted to verify their identity using Duo's methods—push notifications to the Duo mobile app, six-digit verification codes from the Duo app, or security key authentication. ADSelfService Plus communicates with Duo's servers using the configured API credentials to validate the user's authentication response.
Optionally, administrators can configure the Auth API to synchronize user enrollment status between systems and enable the Device Management Portal to allow users to self-manage their enrolled Duo devices.
Prerequisites
- Add the API hostname and admin console (for example, https://********.duosecurity.com) as a trusted site or intranet site in the users' machine if they are using a version of Internet Explorer older than v9.0
- Please follow these steps in the Duo Admin Panel to migrate from Web v2 SDK, which uses the traditional prompt, to Web v4 SDK, which employs the new Universal Prompt.
Configuration and integration steps
Configuring Duo Security involves a two-part process: first, in the ADSelfService Plus admin console where you select the integration type (Web v4 SDK recommended) and input connection details; and second, in the Duo Admin Panel where you create applications and obtain the necessary credentials. Optionally, you can configure the Device Management Portal to allow users to manage their enrolled devices directly through self-service, and set up the Auth API to ensure user enrollment status remains synchronized between both systems.
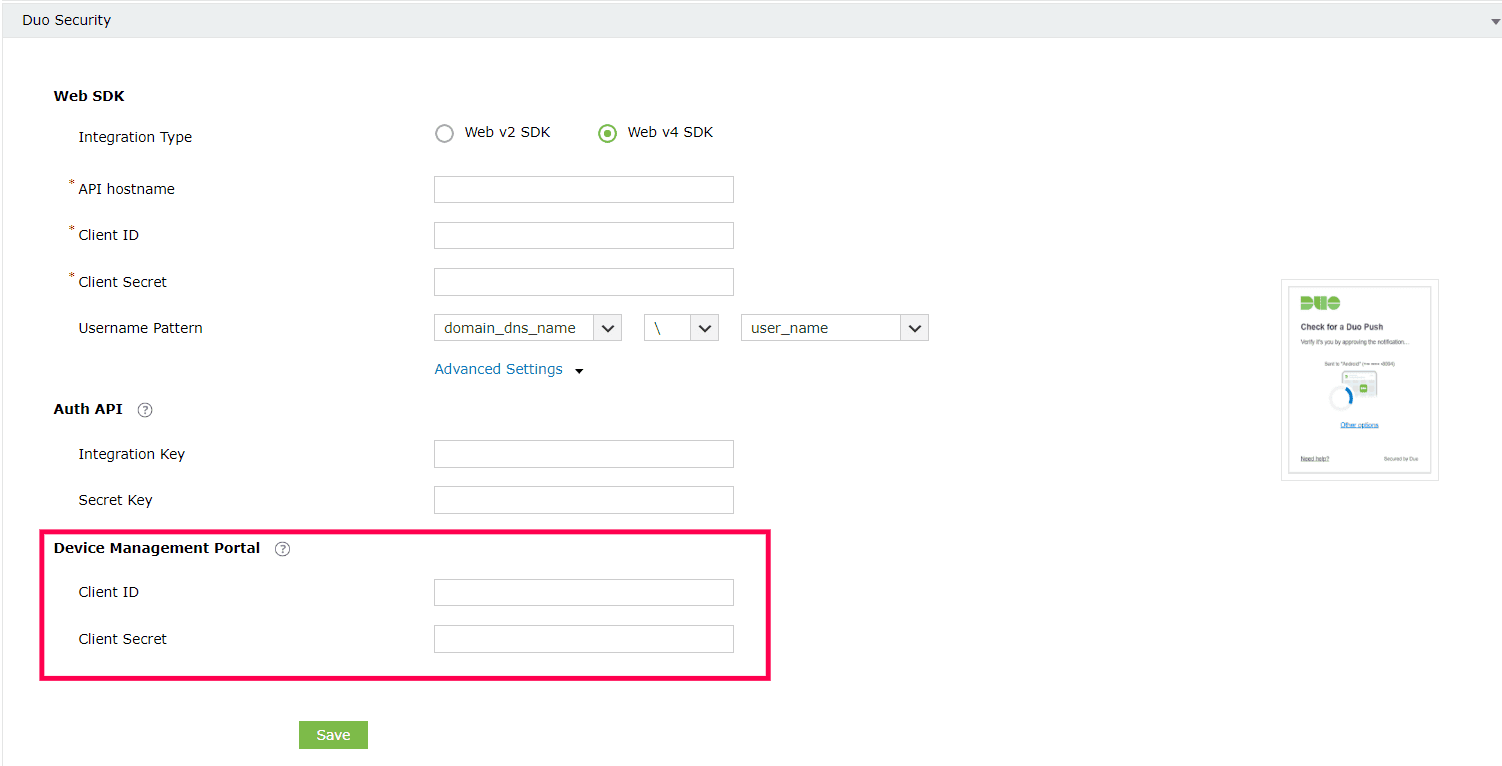
Web v4 SDK configuration steps
- Log into your Duo Security account (for example, https://********.duosecurity.com) or sign up for a new account and log in.
- Go to Applications and click Protect an Application.
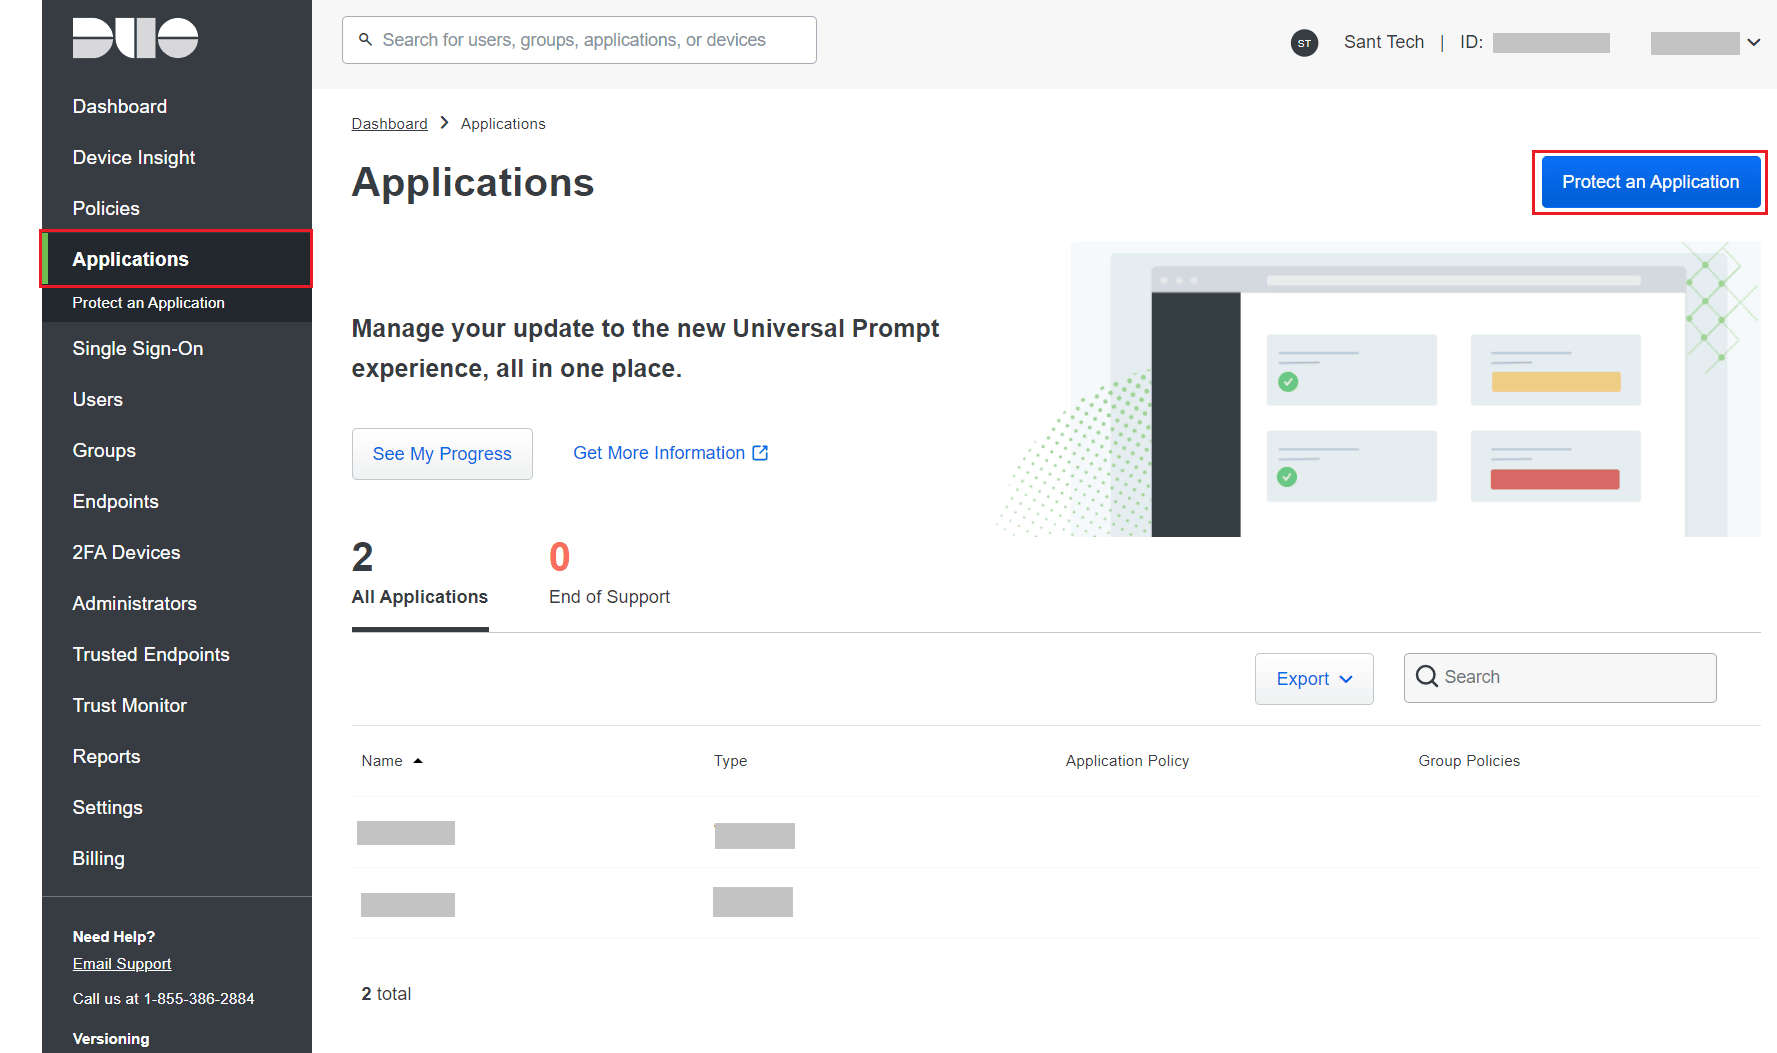
- Search for Web SDK and click Protect.

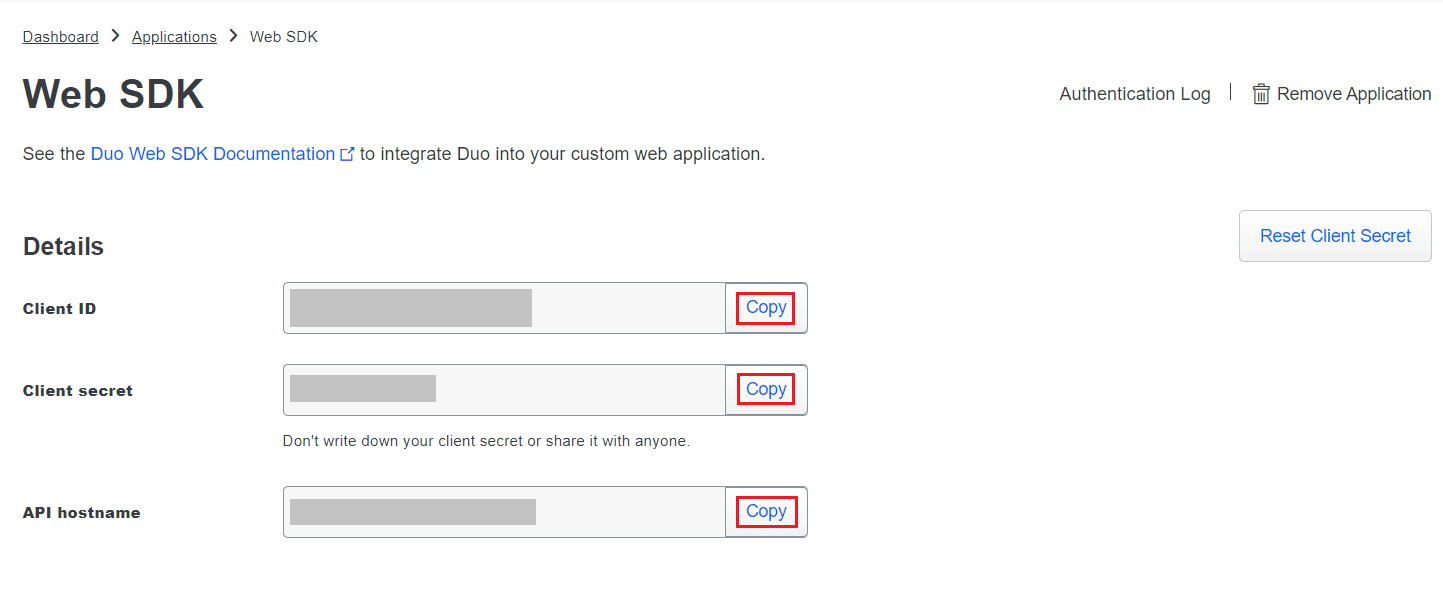
- Copy the Client ID, Client secret, and API hostname values.
- From the ADSelfService Plus admin portal, navigate to Configuration > Multi-factor Authentication > Duo Security.
- Select Web v4 SDK for Integration Type.
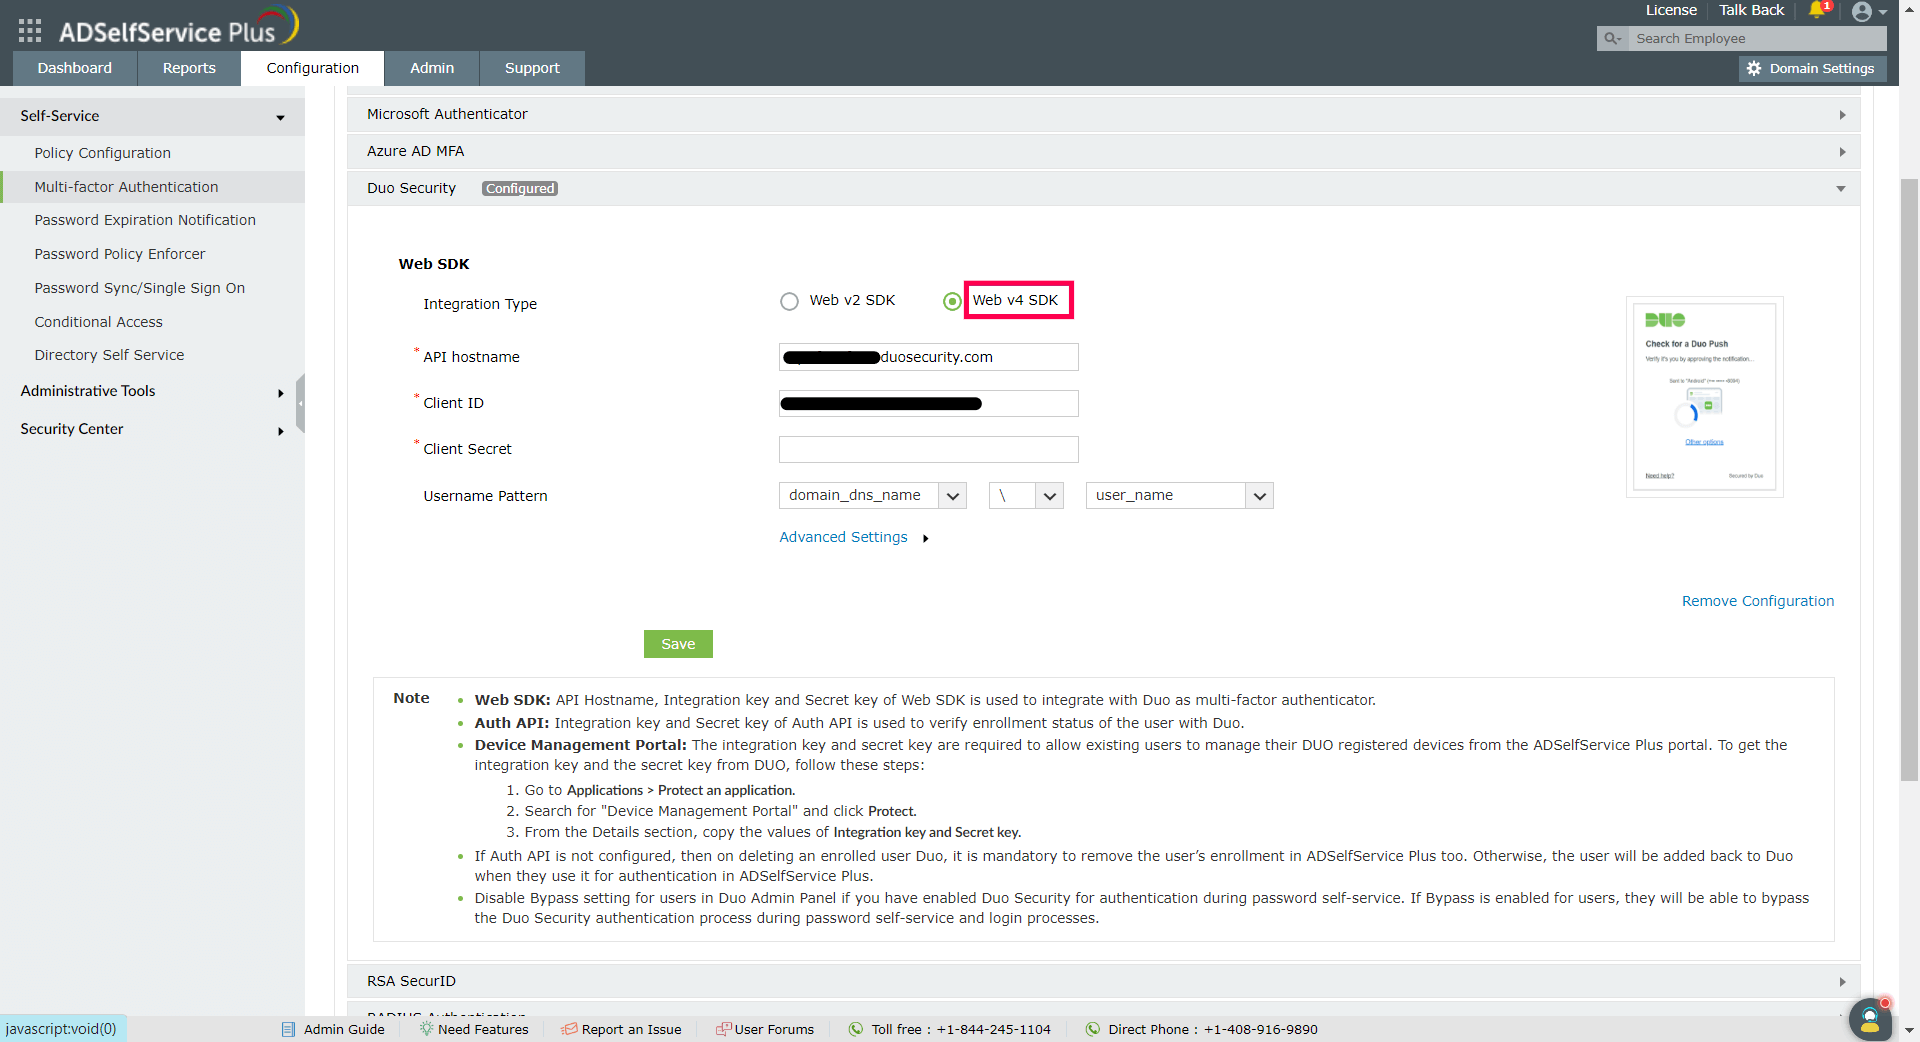
- Paste the Client ID, Client secret, and API hostname obtained from the Duo Admin Panel in the respective fields.
- Enter the same username pattern used in Duo Security in the Username Pattern field.
- Click Save.
Configuring Auth API for Web v4 configurations of Duo Security
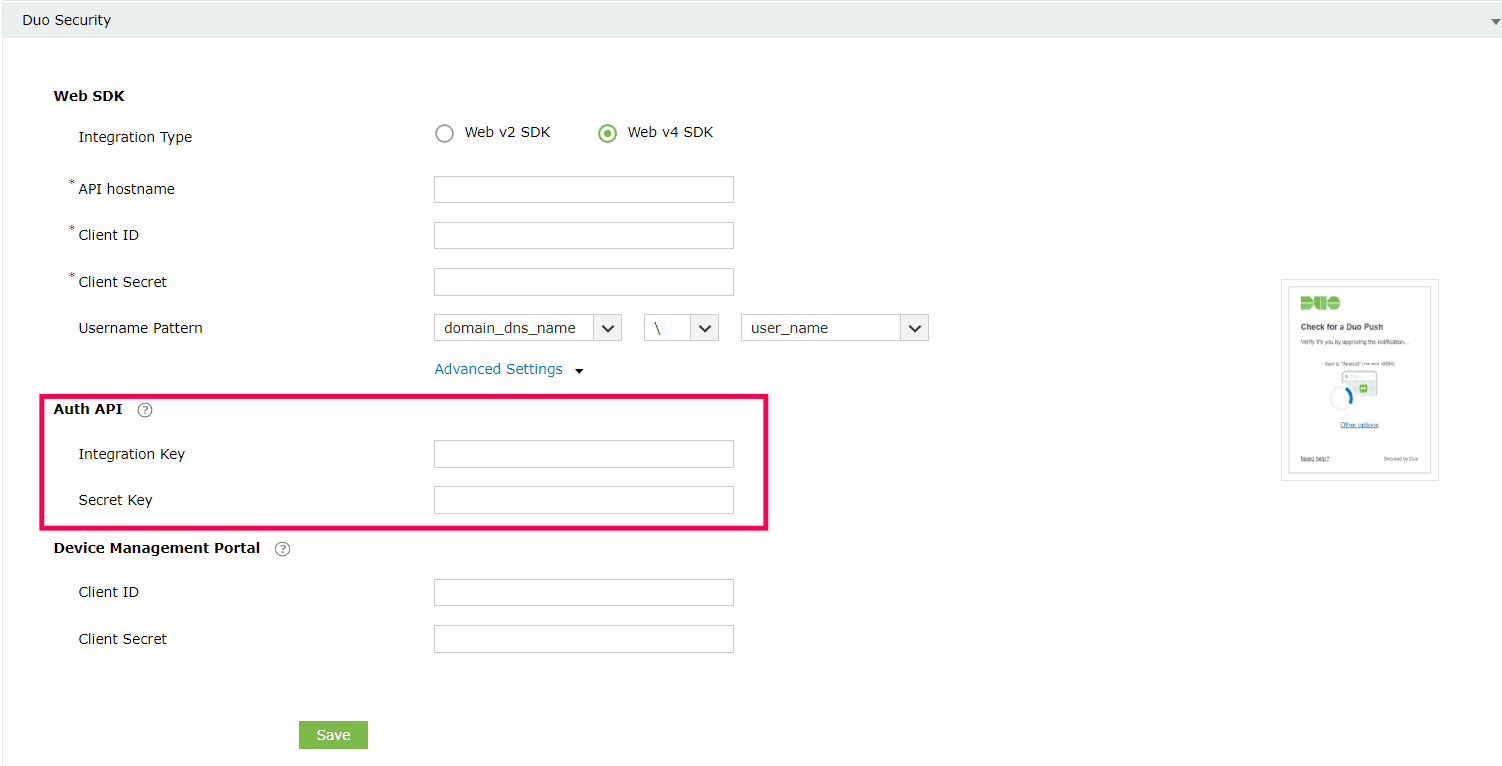
- If configuring Auth API, follow these steps and obtain the Integration Key and Secret Key from the Duo Security portal.
- Under the Web v4 SDK configuration settings for Duo Security, click Advanced Settings to open up the Auth API configuration settings.
- Paste the Integration Key and Secret Key into the relevant fields, and click Save.
Configuring Device Management Portal settings for WebV4 configurations of Duo Security
The Duo Device Management Portal enables users to add or remove Duo-registered devices from the self-service portal. The Device Management Portal for Web v4 uses Duo's OIDC-based universal prompt with a redesigned UI that redirects users to Duo on a new tab. Here are the steps to configure the Duo Device Management portal:
- Log into Duo Security and go to Applications > Protect an Application.
- Search for Device Management Portal. Click Protect.
- Copy the Client ID and Client Secret from the Details section.
- Under the Web v4 SDK configuration settings for Duo Security, Click Advanced Settings to open the Device Management Portal settings.
- Paste the Client ID and Client Secret into the relevant fields and click Save.

Web v2 SDK configuration steps
- Log in to your Duo Security account (for example, https://********.duosecurity.com) or sign up for a new account and log in.
- Go to Applications and click Protect an Application.

- Search for Web SDK and click Protect.

- Copy the Integration key, Secret key, and API hostname values.

- In ADSelfService Plus, navigate to Configuration > Multi-factor Authentication > Duo Security.
- Select Web v2 SDK for Integration Type.
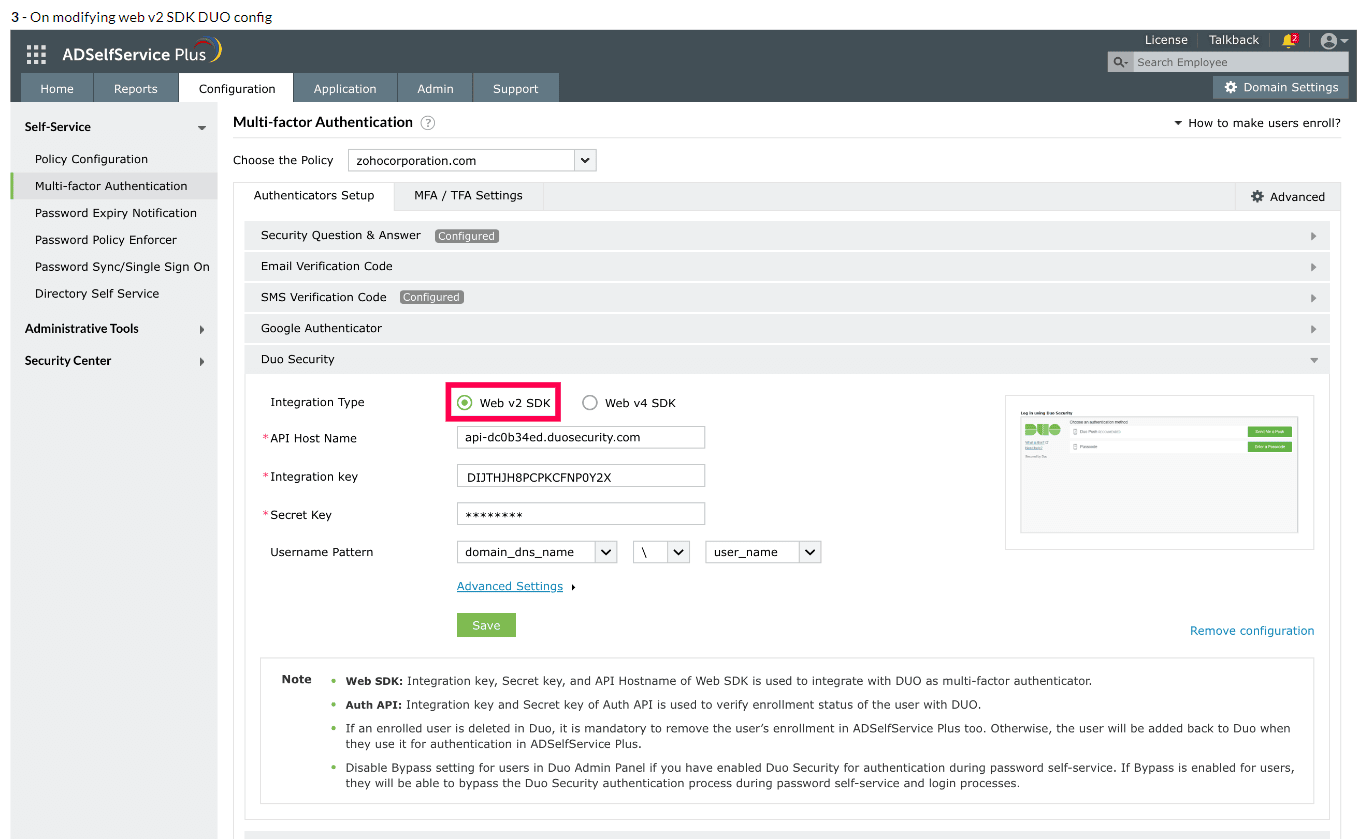
- Paste the Integration key, Secret key, and API hostname obtained from the Duo Admin Panel in the respective fields.
- Enter the same username pattern used in Duo Security in the Username Pattern field.
- Click Save.
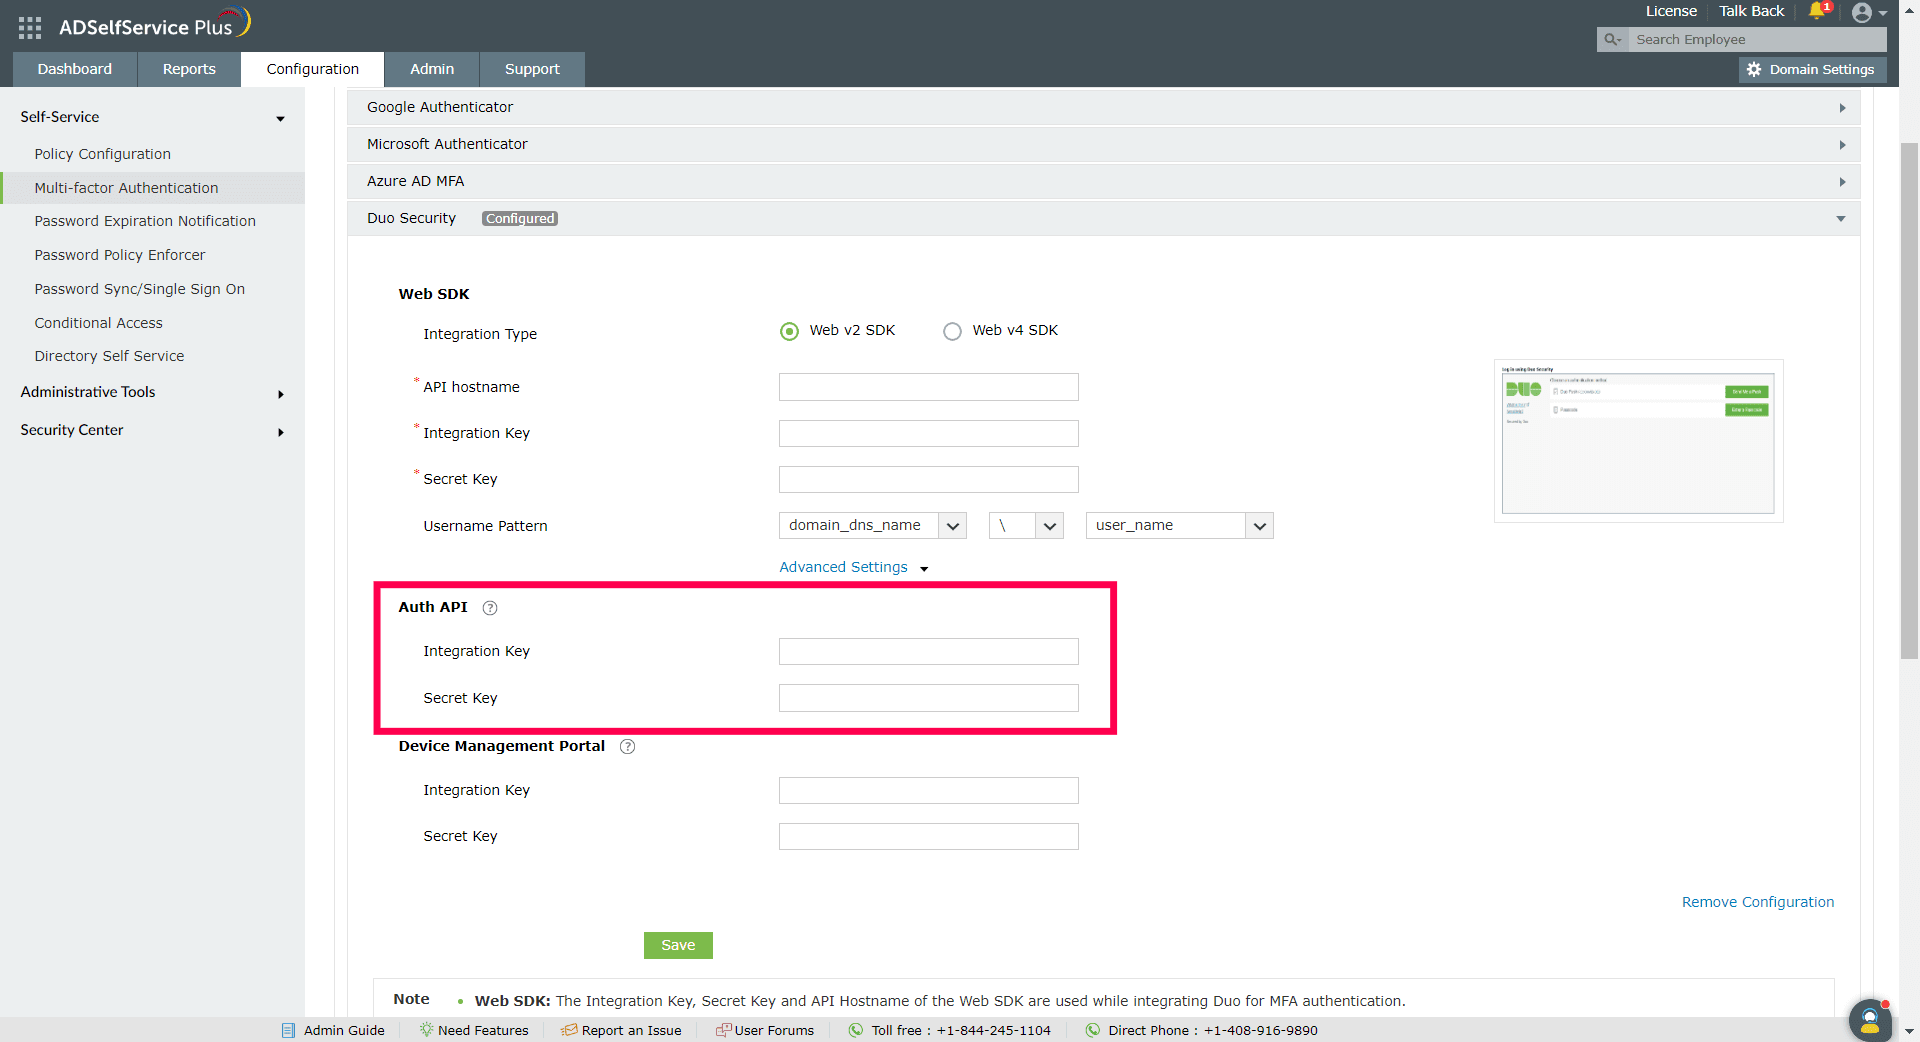
Configuring Auth API for Web v2 configurations of Duo Security
- If configuring Auth API, follow these steps and obtain the Integration Key and Secret Key from the Duo Security portal.
- Under the Web v2 SDK configuration settings for Duo Security, click Advanced Settings to open the Auth API configuration settings.
- Paste the Integration Key and Secret Key into the relevant fields and click Save.
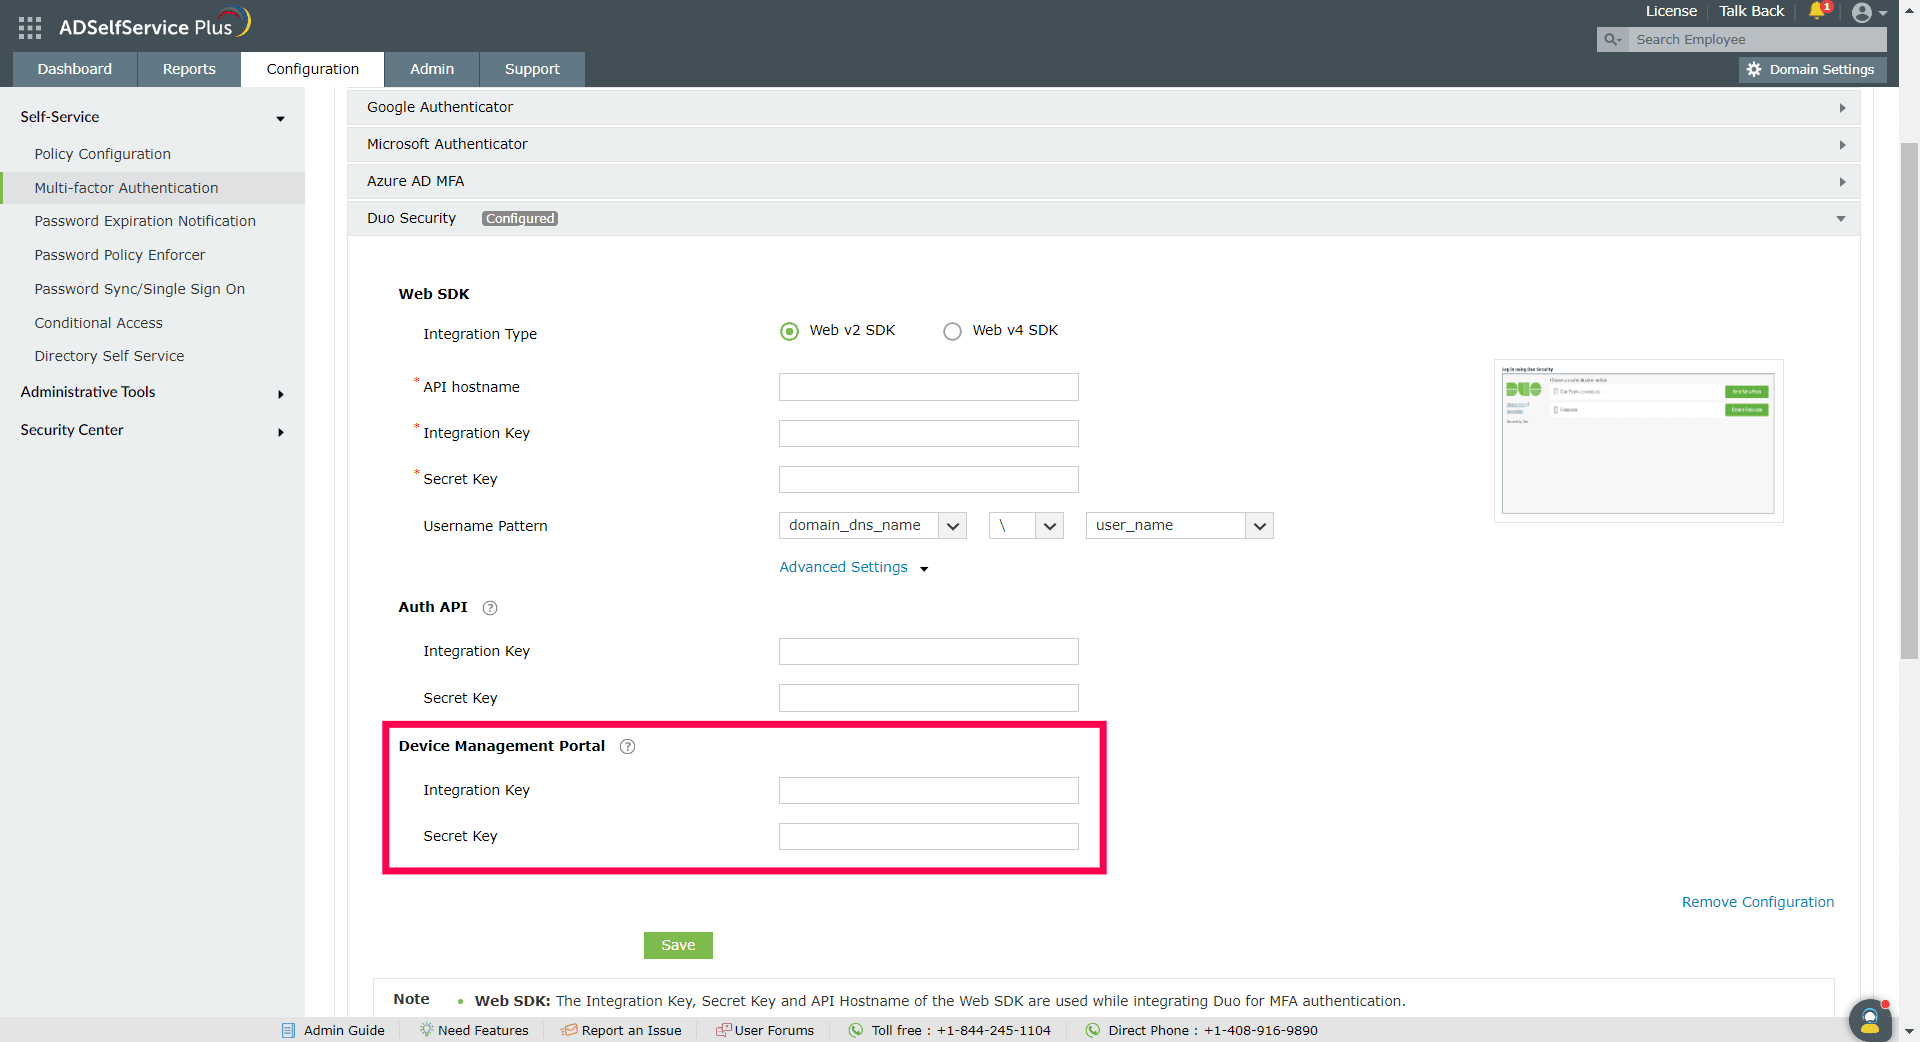
Configuring Device Management Portal settings for WebV2 configurations of Duo Security
The Device Management Portal for Web v2 uses a traditional Duo prompt which will be displayed in an iframe in ADSelfService Plus.
- Log into Duo Security and go to Applications > Protect an Application.
- Search for Device Management Portal. Click Protect.
- Copy the Integration key and Secret key from the Details section.
- Under the Web v2 SDK configuration settings for Duo Security, click Advanced Settings to open the Device Management Portal settings.
- Paste the Integration Key and Secret Key into the relevant fields and click Save.
Configuring Auth API in Duo Security
Configuring Auth API in Duo Security is optional. Auth API configuration is used to verify the user's enrollment with Duo Security. If Auth API is not configured, then on deleting a user's enrollment in Duo Security, it is mandatory to manually remove the user's enrollment in ADSelfService Plus too. If not, the user will be added back to Duo Security if it is used for authentication in ADSelfService Plus.
Steps to be followed if configuring Auth API
- Login to the Duo Security portal.
- Navigate to Applications and click Protect An Application.
- Search for Auth API. Click Protect this Application.
- Copy the Integration key and Secret key.
Steps to migrate to the new Universal Prompt
- In the Duo Admin Panel, select the Web SDK application, which was previously configured for ADSelfService Plus, and copy the Integration key, Secret key and API hostname values.
- Scroll down to the Universal Prompt section. The App Update Ready message will be displayed, indicating that Universal Prompt can now be activated for ADSelfService Plus.
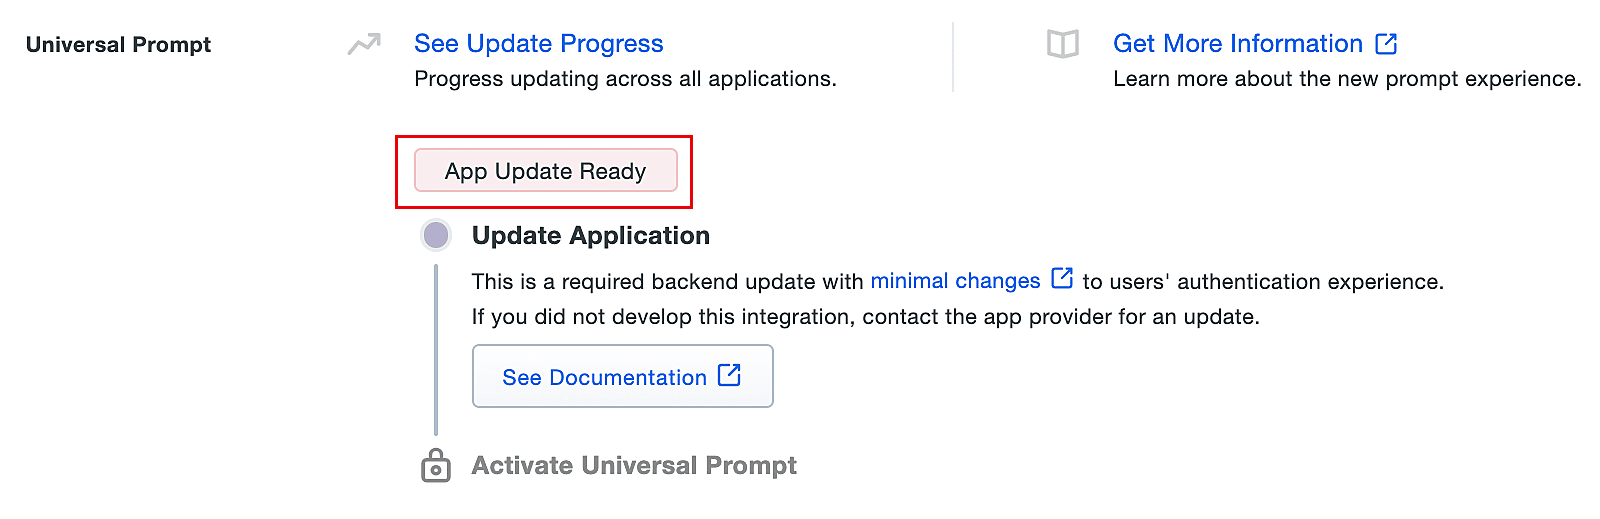
- In ADSelfService Plus, navigate to Configuration > Multi-factor Authentication > Duo Security.
- Click Web v4 SDK and paste the Integration key, Secret key, and API hostname values in the Client ID, Client Secret, and API Host name fields respectively.
- Once the Web v4 SDK is configured in ADSelfService Plus and a user authenticates through the frameless Duo v4 SDK, the App Update Ready message in Duo Admin Panel will be updated and the New Prompt Ready message will be displayed.
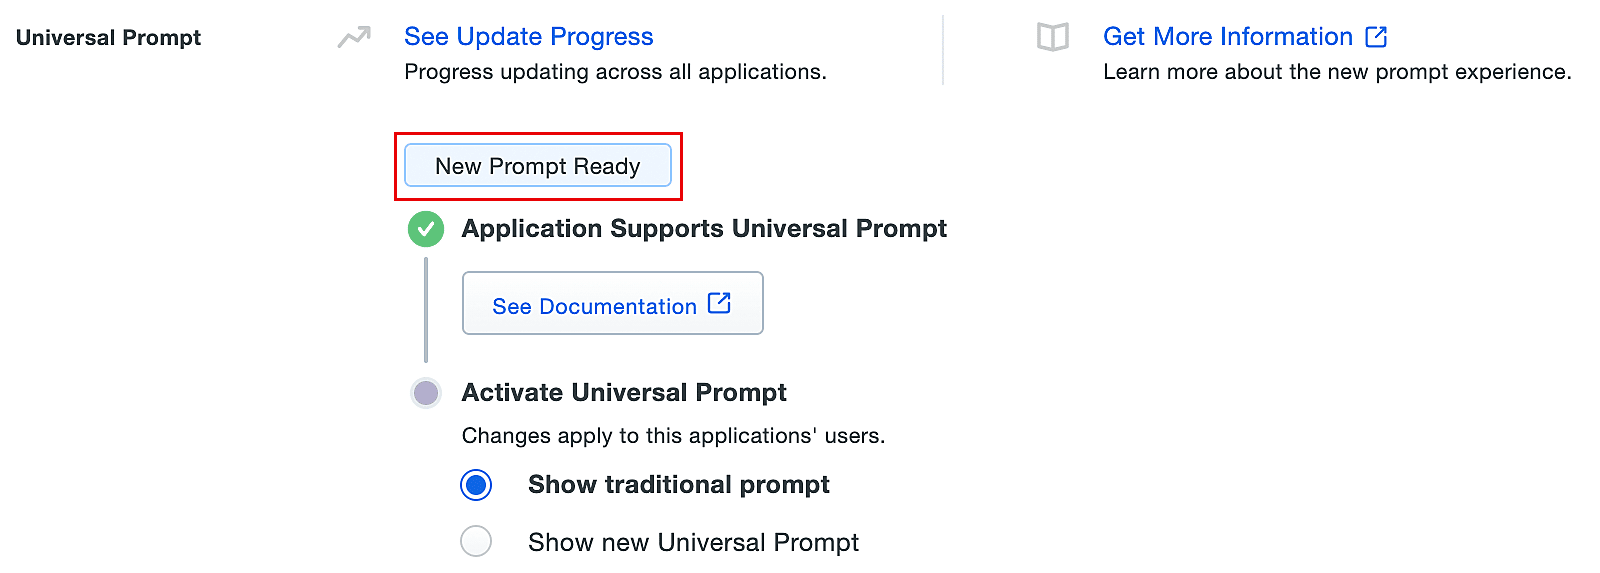
- Select Show new Universal Prompt to activate the universal prompt for ADSelfService Plus.
Setting up user enrollment
The last step is setting up the process for users to enroll for Duo Authentication and utilize it for identity verification.
You can learn about the various enrollment options available in ADSelfService Plus, here.
Tip
- You can see how the enrollment settings you configure will be presented to your users, here.