Assigning Technician to a Change
Each change is handled by a technician, who is responsible for closing the change.
To assign a technician,
-
Log in to the ServiceDesk Plus - MSP application using your user name and password.
-
Click the Change tab in the header pane. This opens the Changes list page.
-
Click the Title of the change for which you have to assign a technician. This opens the change details page.
-
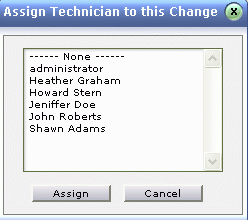
Click the Actions combo box on the right hand side of the page ->Click Assign Technician option from the list. This opens Assign Technician pop up page as shown below. Select the technician from the list and Assign the change to the technician.

-
Alternatively, you can also assign technician using inline edit option. Click the technician name shown in the change details block. This opens the drop down box as shown below. Select the technician from the list and click the
 icon to select the technician name else click cancel icon.

You can also assign more than one change at a time to a technician.
To bulk assign changes to technicians
-
In the Changes list page, select the changes to be assigned a technician by enabling the check box beside left side each of the change title.

-
Click the Select Technician check box. Select the technician from the drop down list.
-
Assign the technician.
ServiceDesk Plus - MSP provides an option to the technicians to pick-up change(s). If there are unassigned changes, the technicians can pick-up any of the unassigned changes from the list. This in turn will increase the efficiency of the IT help desk team.
To pick up changes,
-
From the change list view page, select the changes you would like to pick up by enabling the check box. The unassigned changes will be in bold font.
-
Click Pick up button. The selected change will be assigned to you. (Or)
-
You can also pick up changes after viewing the change details. Click the title of the change to open View Change page.
-
Click Assign tab. Select Pick Up option to pick up the change.

