Request Life Cycle
Request Life Cycle in ServiceDesk Plus MSP allows admins to formulate a request resolution process with built-in guidance for the help desk technician. Through a simple drag and drop process, the SDAdmin can create a visual process builder and define the resolution process. You can create, discuss, and rework the process drafts before publishing the life cycle.
Request Life Cycle Overview: Video
Define life cycles for processes specific to your organization and associate with incident or service templates. For example, you can define a life cycle for any asset request and associate it with service templates configured for laptop, mobile phones, or any hardware requests.
NOTE: You can associate one life cycle with multiple templates, but you can associate a template with only one life cycle.
A life cycle ensures efficient process adherence; you can establish a directional flow, minimize the scope for human errors, and provide privileged (role-based) access to status transitions.
Using the Request Life Cycle feature, you can provide adequate guidance to the technician to resolve the assigned requests. When a life cycle is configured to a request template, only the next possible transitions and the allowed status/es will be available for the technician to choose from.
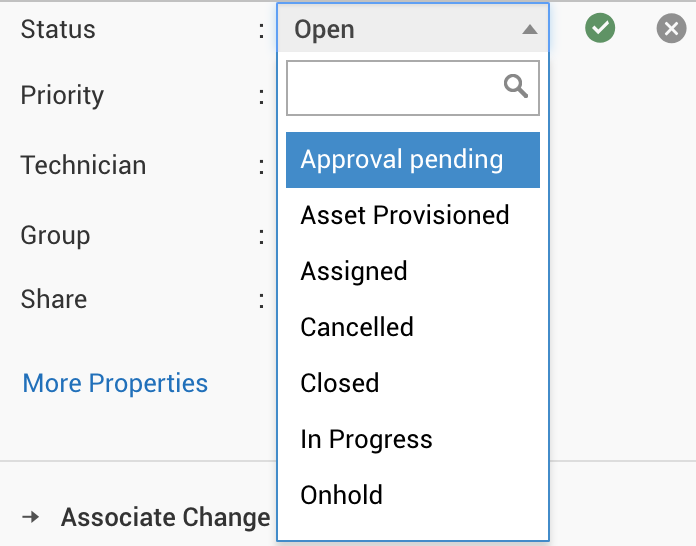
In the absence of a life cycle, as shown in Fig. 1, the technician can choose any status, which could lead to incorrect customer notifications on the request status. That is, for a request that is temporarily put on hold, if the technician chooses Closed, instead of Onhold, the customer might receive an incorrect (closed) notification for the request logged.
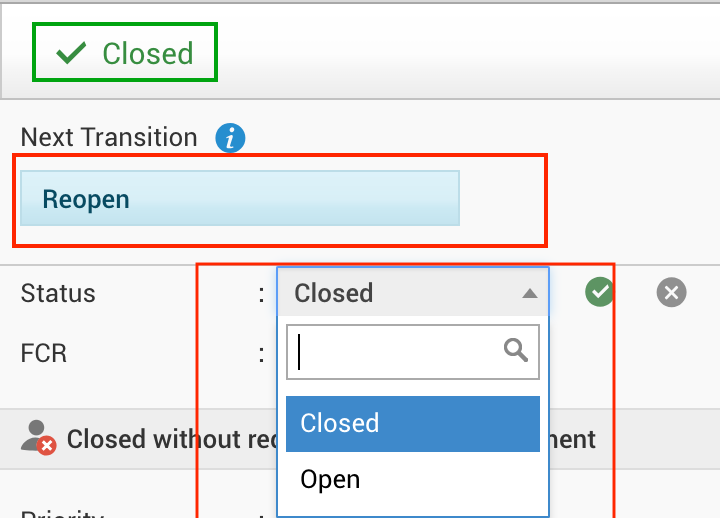
On the other hand, using the life cycle, admins can control the status/es (Fig. 2) that a technician can choose from, ensuring status accuracy and correct customer communication. Moreover, admins can also configure the next possible transitions for each status. This will provide the much-needed guidance for the technician, and you can ensure process adherence and reduce any scope for process violation.
To know more about configuring the life cycle, you can sequentially go through this document or click appropriate sections from the following links:
-
Request Life Cycle Terminology
-
Configuring Request Life Cycle
-
Life Cycle Status Modifications
-
Linear and Graphical Views
-
Editing a Life Cycle
-
Request Life Cycle List View
-
Request Life Cycle: Summary
Request Life Cycle Terminology
Before you configure the request life cycle, familiarize yourself with the following terms:
Status is the actual state of the incoming request. For example, all logged in requests are in the Open status while all requests that are waiting for updates will be in the On-Hold status. The life cycle includes Stop-Timer status/es as well.
You can configure these statuses under Admin>>Help Desk Customizer>>Status.
Transition refers to the actual movement of the request from one state to another. A transition is further divided into Before, During, and After. Under each phase, you can configure various settings to control the status movement of the request and also configure specific settings such as provide privileged access, customize notifications, mandate fields, and execute rules on the fulfillment of specified criteria.
You can also configure various actions under each transition. For example, you can execute scripts for specific actions, negate the process, or send notifications. These are transition actions.
Start/End Block: These are representative of the initial or the final phase of the request. They are not status/es; they can be connected to active statuses such as Open/Assigned or Completed/Closed. During request creation, only the status/es connected to the start block will be shown in the Request Details page to the technician.
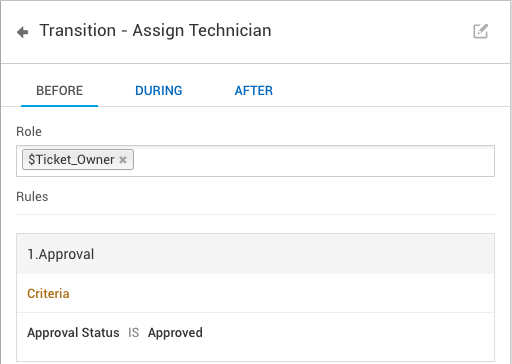
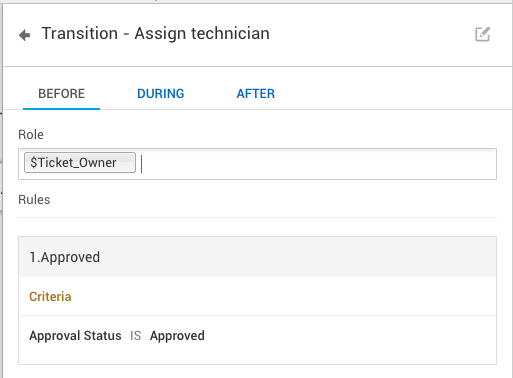
Before: This refers to the phase before a transition occurs and the request can move into a status. This phase has two configuration settings, roles and rules. Under roles, you can restrict transition access to specific technicians. For example, if only the assigned technician/s can move the request into the In-Progress status, you can select the roles ($Ticket_owner or $Group_members) accordingly. Under such a configuration, you'll make the transition visible only to a specific technician or to the technicians in the specified support group. Under rules, you define the criteria for the request to move into the status. The criteria defines whether the transition will be shown to the technician. For example, you can define the Approval Status criteria as Approved. That is, only if the Approval Status of the request is approved, the next transition, say Assigned is shown in the Request Details page to the technician.
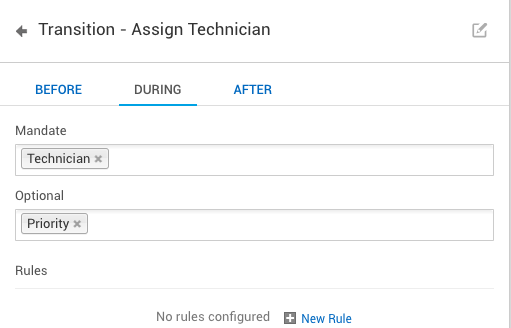
During: This refers to the phase when the request is moving into a specific status. These configurations have two parts, mandatory fields and rules. While the request is about to move into the status, you can mandate certain fields. For example, you can mandate the technician field for the request to move into the Assigned status, or the Resolution field for the request to move into the Resolved status.That is, as long as the request stays in the status, the mandatory fields cannot be left empty. Rules can be configured to check for certain criteria and negate the action. To define actions when the criteria is met, you can use custom scripts. Note that these custom scripts can be used to execute any action except status update, because the script is already triggered due to a status change. You can add a maximum of 10 rules. To execute all the rules (on criteria match) in sequence, turn on cascade execution. If the cascade execution is NOT turned on, the rule execution breaks after the first match of the rule.
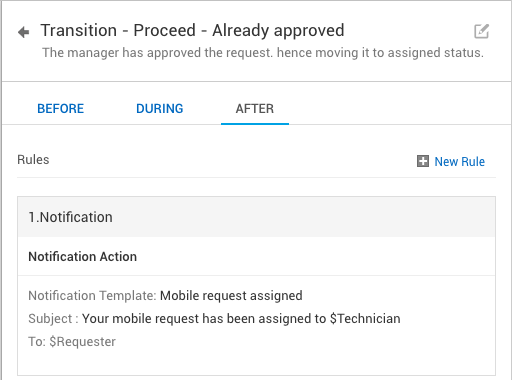
After: This refers to the phase when the request has moved to a status. Here you configure rules to check for criteria and accordingly define actions using custom scripts. You can also configure notifications for the stakeholders. New notification templates can also be configured and sent to all organizational roles and other stakeholders, such as $on_behalf_of_user or $ticketowner. For example, when a request from a VIP user or a high-priority request is assigned to a technician, a unique request assignment notification can be configured to be sent.
Configuring Request Life Cycle
Go to Admin>>Helpdesk Customizer>>Request Life Cycle.
Click New, provide a name and description for the life cycle, associate the relevant templates, and Save as shown below:
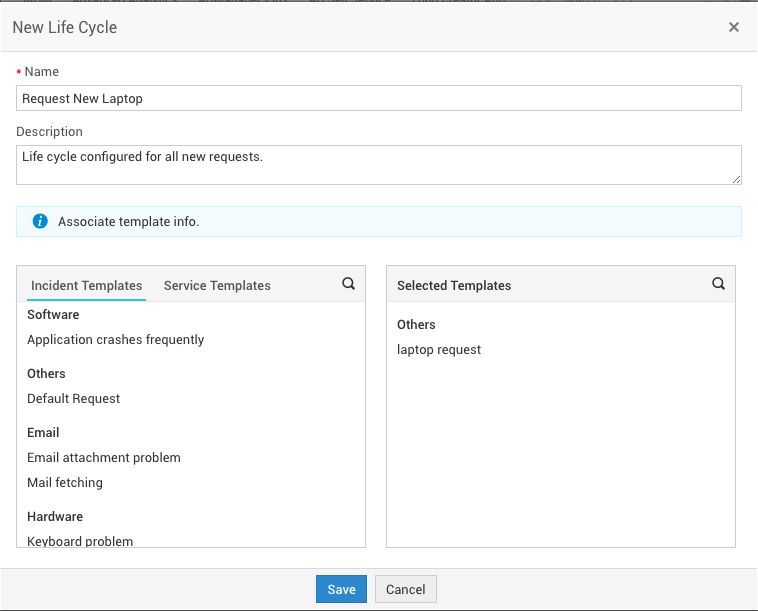
The life cycle will appear prepopulated with various nodes (status) and transitions. You can either work with these or undo all of them and create new status/es and transitions on the life cycle canvas. Use the zoom slider on the left to increase or decrease the size of the canvas. You can also move the life cycle around the canvas by using the hand tool cursor.
To add a status to the life cycle, drag it from the right panel. To connect two status/es by a transition, hover over a status, click the plus sign and drag it up to the next status. Click the button that appears on the connector to provide the transition name, description, and help content that will be displayed on the Request Details page.
The request life cycle begins at the Start block and completes at the End block. When the request is created, only status/es connected to the Start are displayed to the user. Similarly, the request flow is considered to be closed only when the request reaches a status connected to the End block. Ensure that the default statuses configured in the associated templates are connected to the Start node in the life cycle. For example, if the status in the associated template is Open, make sure that the status you connect to the Start node in the life cycle is also Open.
Let us configure a sample life cycle for one of the most commonly raised requests in any organization; the request for a laptop. This life cycle can be associated to service request templates already configured for desktops, mobile phones, and other hardware requests.
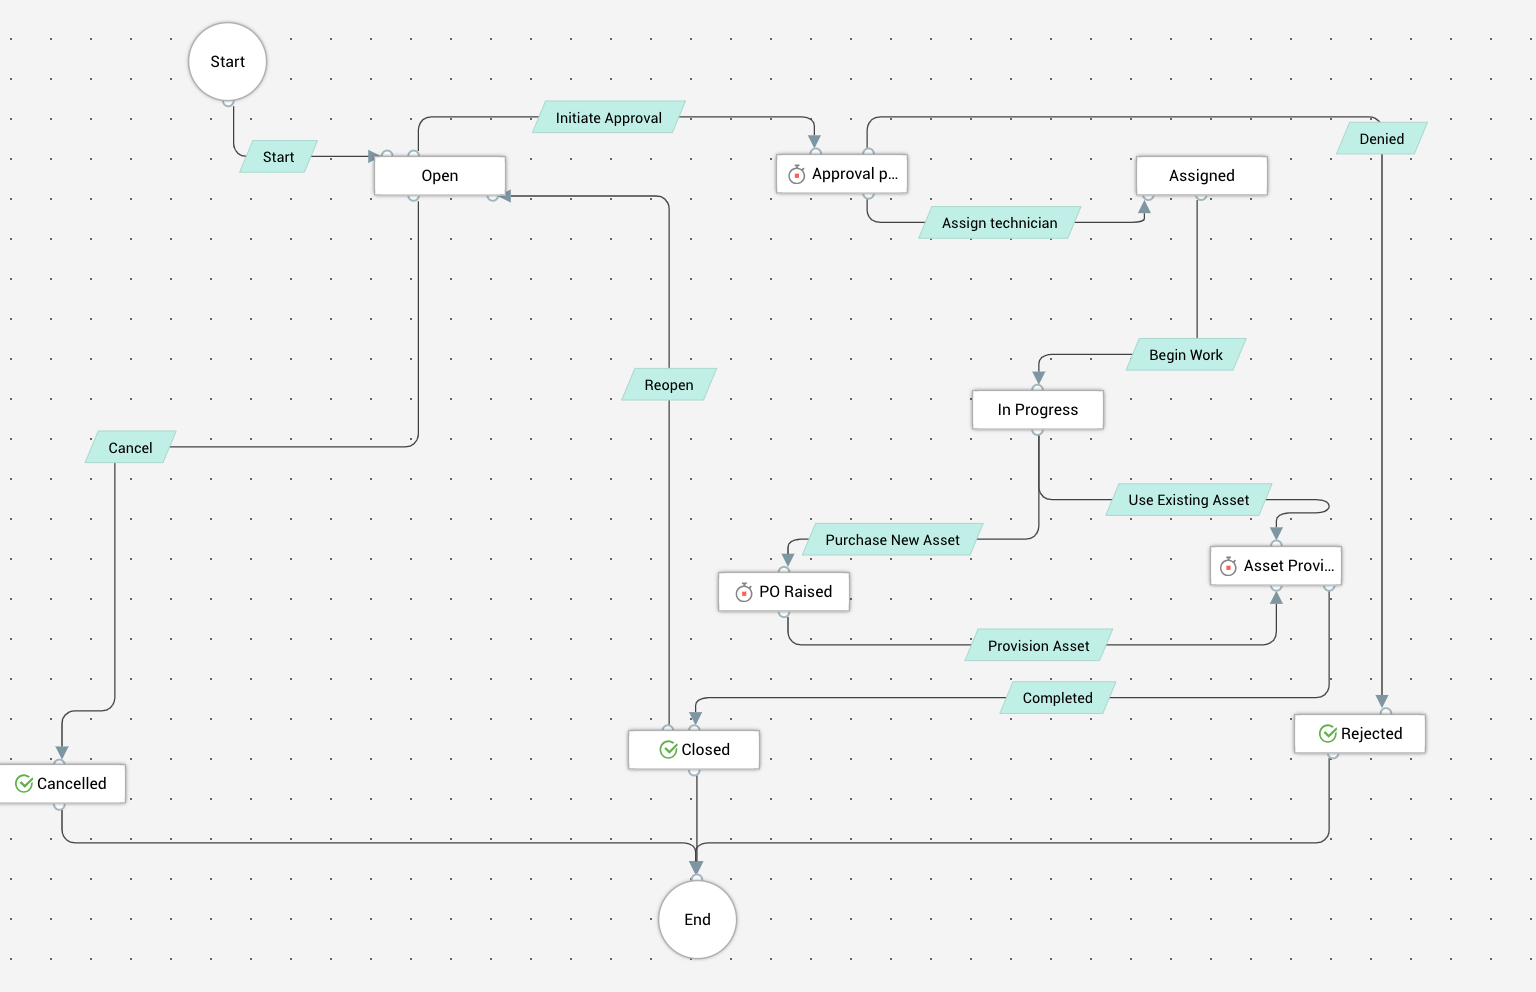
The request resolution process for this request will contain the following statuses: Open, Approval, Assigned, In Progress, Asset Provisioning/PO Raised (if the asset is not available already), and Closed/Rejected/Cancelled. Note that the status movement of the request may not necessarily be linear. For example, an open request can be cancelled or even rejected. Similarly a closed request can also be reopened. The processes that happen between status/es are configured under a transition.
All transitions, except the Open status transition, will contain three phases to be configured: Before, During, and After. Note that it is not mandatory to configure all the transitions or their phases. You can choose to configure just one transition or just one phase of a transition to suit your requirements. However, for the request to move from one status to another, you must configure the transitions. Transition Actions can be configured per your requirements, and it is not mandatory for each transition to have transition actions configured. In the absence of transition configurations, the request will remain in the same status.
The following screenshot displays the life cycle for a laptop request:
For the sample life cycle, let's look at the configurations set up for the Assign Technician transition. Firstly, you can make the transition visible only to the ticket owner. In that case, under Before>Roles, choose $TicketOwner. For the request to move into this status, you can choose the Approval Criteria as Approved.
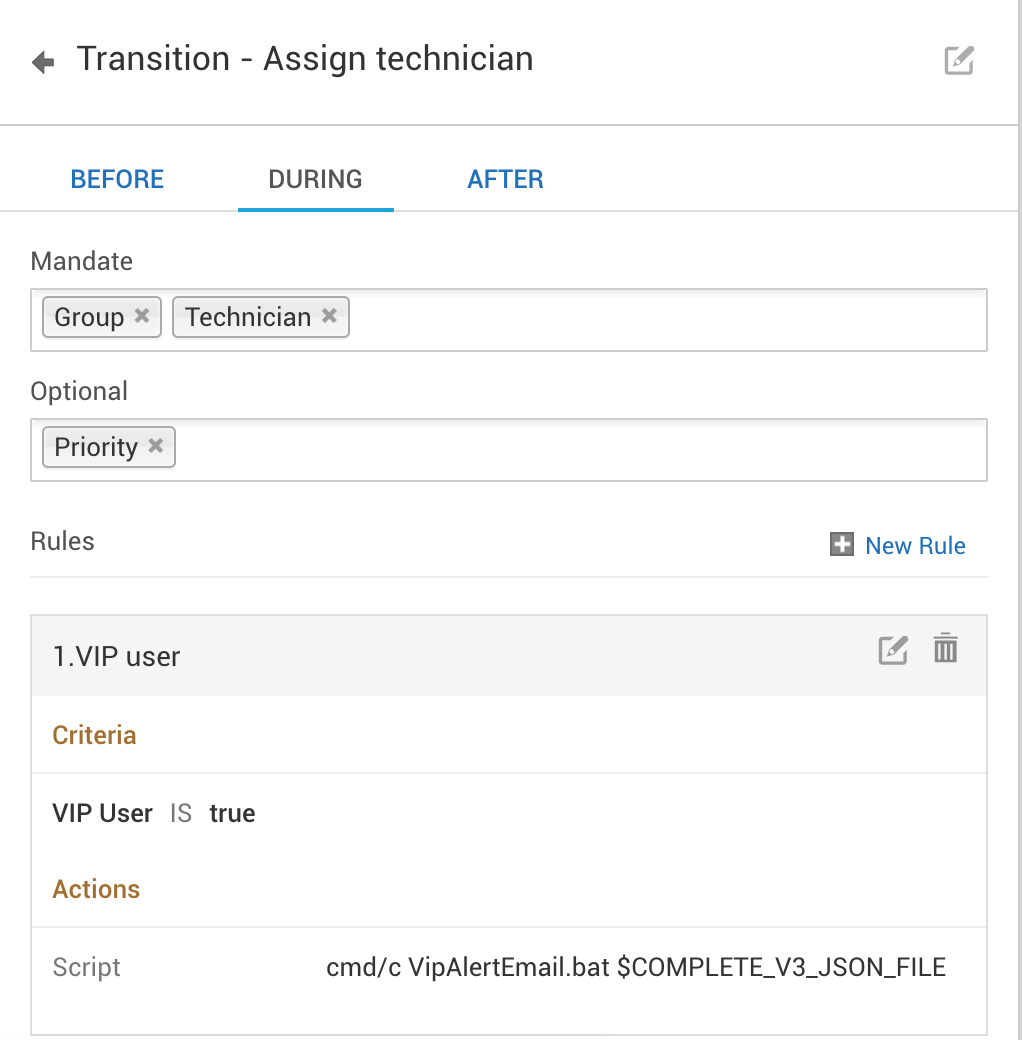
Then, when the request moves into Assigned status, you can mandate the Group and Technician. These might appear as a pop-up to the technician working on the request. In parallel, you can also check if the request was raised by a VIP user and send out an alert the technician and group details collected in this phase. To define the rule, configure criteria as if VIP user is true, then execute a script to send out an alert to the concerned technician or technician group.
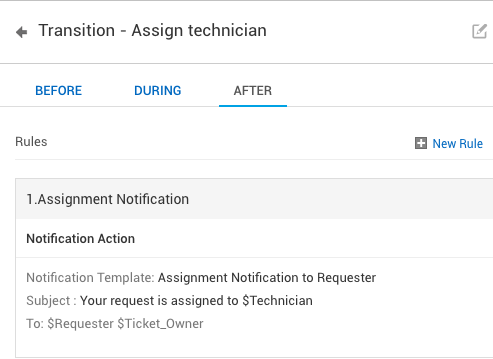
Finally, when the request has moved into the Assigned status, you can configure actions based on certain criteria, and importantly send out custom email notifications for each transition action to the ticket owner, the admin, or the support group. Here, you can create new notification templates as well. For example, you can send out custom notifications to technicians about the category of the requests assigned to them, including any additional details from the ticket.
Mandatory fields and dependancy requests completion rules configured under Request Closing Rules will not be applied for requests that have a life cycle associated. These must be configured under the respective transitions inside life cycle.
Notification Configurations
Under the After phase of any transition, you can configure notifications to be sent to the following predefined roles:
- $ACCOUNT_MANAGERS
- $CEO
- $CFO
- $CIO
- $COO
- $DEPARTMENT_APPROVERS
- $DEPARTMENT_INCHARGES
- $DEPT_HEAD
- $GENERAL_MANAGER
- $POINT_OF_CONTACT
- $REGIONAL_INCHARGE
- $REGIONAL_MANAGER
- $REPOTING_TO
- $SITE_INCHARGE
- $SITE_MANAGER
- $CC_Users
- $Dependent_Requests_Owners
- $Editor
- $Group_Members
- $Linked_Requests_Owners
- $Linked_To_Request_Owner
- $On_Behalf_Of_User
- $Requester
- $Shared_Requesters
- $Shared_Technicians
- $Task_Owners
- $Ticket_Owner
Skipped Transition Configurations
Mandatory fields under the During transitions are skipped in the following scenarios for templates associated with a life cycle:
- Request addition by email
- Conversion of incidents to service requests and vice versa
- Preventive maintenance tasks
- Requests import from XLS
- Splitting conversations into new requests
For some user operations such as converting incidents to service requests or vice versa and system operations such as automated closures, SLA escalations, and preventive maintainance tasks, the Before transition configurations are skipped.
Save and Publish Life Cycle
After you configure all the transition settings across all statuses, you can save the life cycle as a draft to work on it at a later point time, or publish it right away. Note that life cycle configurations will be saved only when the Save Draft button is clicked.
To edit an already published life cycle, click the Save Draft button and continue modifying the life cycle per your requirements.
Life Cycle Status Modifications
Request life cycle configurations for status modifications take precedence over all other configurations and rules, including business rules.
In the following scenarios, operations configured to be performed on the requests will be stopped:
- No transitions are configured for the current status to move to the target status.
- Before conditions (role and rule) are not met.
- When a negate condition is configured.
- When the configured Field and Form rules affect the template status.
- If the system changed status is in conflict with the life cycle.
- External actions such as custom triggers, custom menu, or API calls from other integrated applications do not comply with the life cycle.
Linear and Graphical Views
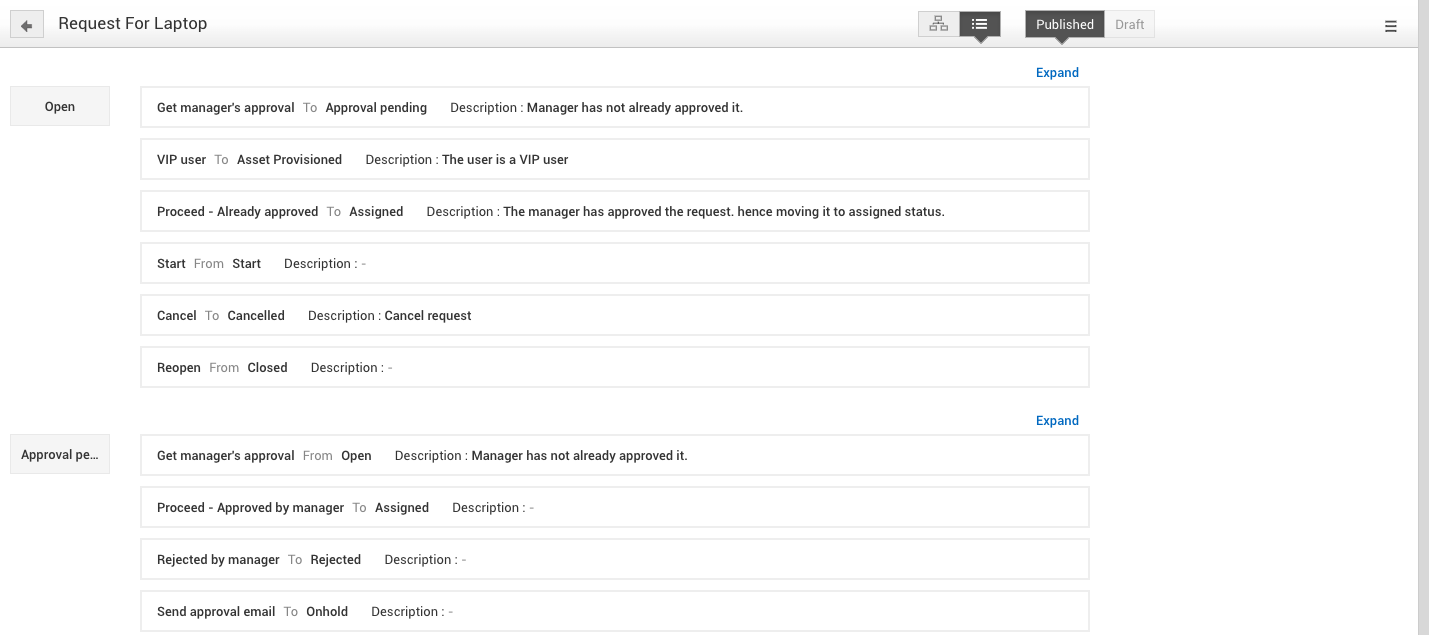
You can toggle between the Graphical and Linear view of the request life cycle. The linear view provides at a glance expandable views of all the transitions and their configurations, categorized by status.
The following screenshot captures the Open status transition configuration for the Request for Laptop life cycle (discussed above).
Editing a Life Cycle
While configuring the life cycle, if you want to modify its name or associate new templates or modify the associations, click the edit button![]() in the upper half of the right panel.
in the upper half of the right panel.
Request Life Cycle List View
On the list view page, you can choose to list either the Active Life Cycle or Inactive Life Cycle.

To delete a life cycle, click the hamburger button next to the life cycle. Using this button, you can also make a published life cycle inactive. Making published life cycle inactive will dissociate all the requests linked to this life cycle.

To find any life cycle using its name or the associated template, use the search field. Type out the first few letters of the life cycle in the field; the matching results will be listed below.

Request Life Cycle: Summary
The Request Life Cycle feature in ServiceDesk Plus MSP is a drag-and-drop life cycle builder that can be effectively used to provide guidance to the technicians.
A transition refers to the path between two statuses, and each transition is further divided into Before, During, and After phases with individual configurations.
Restrict the visibility of the transition to specific Role or Group by configuring Roles in the Before transition.
Define when the transition can be invoked by configuring Rules in the Before transition.
Collect relevant and just in time data by configuring mandatory and optional fields in the During phase.
Check the transition's validity and negate it, if necessary, by configuring Rules and Script execution in the During phase.
Enable actions over third-party applications by configuring script execution in the After phase.
Notify relevant stakeholders by configuring email notifications in the After phase.

