ADManager Plus Integration
ADManager Plus is a simple, easy-to-use Windows active directory management and reporting solution that helps AD administrators and help desk technicians with their day-to-day activities. With a centralized and intuitive web-based UI, the software handles a variety of complex tasks like bulk management of user accounts and other AD objects, delegates role-based access to help desk technicians, and generates an exhaustive list of AD reports, some of which are an essential requirement to satisfy Compliance Audits.
- SDP MSP-ADMP Integration
-
Domain Configuration in SDP MSP
-
ADManager Plus- Server configuration in SDP MSP
-
ServiceDesk Plus MSP Server configuration and Authentication in ADMP
-
Create users in ADManager Plus from SDP MSP
-
Syncing Additional fields created in SDP MSP with ADMP
SDP MSP-ADMP Integration: SDP MSP -ADManager Plus integration offers ease of use for AD administrators and help desk technicians to do actions quickly in AD thus reducing the copying of data (Eg: Request form's data) from SDP MSP into ADMP forms. Administrators can reset a password, create, delete, unlock, enable or disable users in AD from within ServiceDesk Plus MSP. SDP MSP-ADMP integration can be configured in Admin>> ME Integrations >> ADManager Plus.

Domain Configuration in SDP MSP:
For SDP MSP-ADMP integration, Domain creation for the user is necessary.
- Domain for an existing user in SDP MSP can be configured under Admin >>MSP Details >> Technician >> Login Details >> Select Domain.
- New domain can be added in SDP MSP using Admin->Discovery->Windows Domain Scan.
- The domains listed in AD Actions pages (say Create AD Users) is "Account Based".
Note
The Login name and Domain name of Help Desk technician in ADMP should be same as in SDP MSP.
ADManager Plus- Server configuration in SDP MSP:
The first step in SDP MSP-ADMP integration will involve entering the ADMP's server details in SDP MSP and vice versa. This will ensure registration of the server details in both the applications.
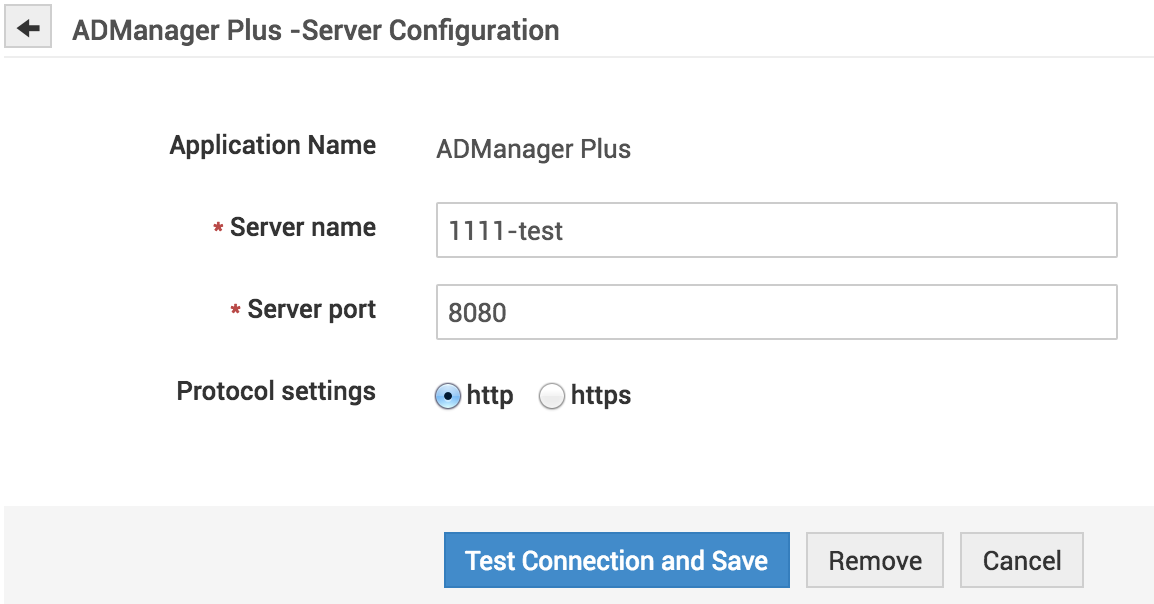
- Enter the Server name and Server Port where the application is currently running and choose between HTTP and HTTPS protocol settings.
-
Click Test Connection and Save. This will check for an established connection between SDP MSP and ADMP in their respective ports and save the settings.
-
Click 'Remove' to remove the established connection between the two applications. Clicking 'Cancel' will cancel the entered settings that have not been saved and return back to the List view page.
- After configuring the server settings, the general settings page with the list of ADManager Plus Actions and their description will be displayed along with an option to edit corresponding actions.
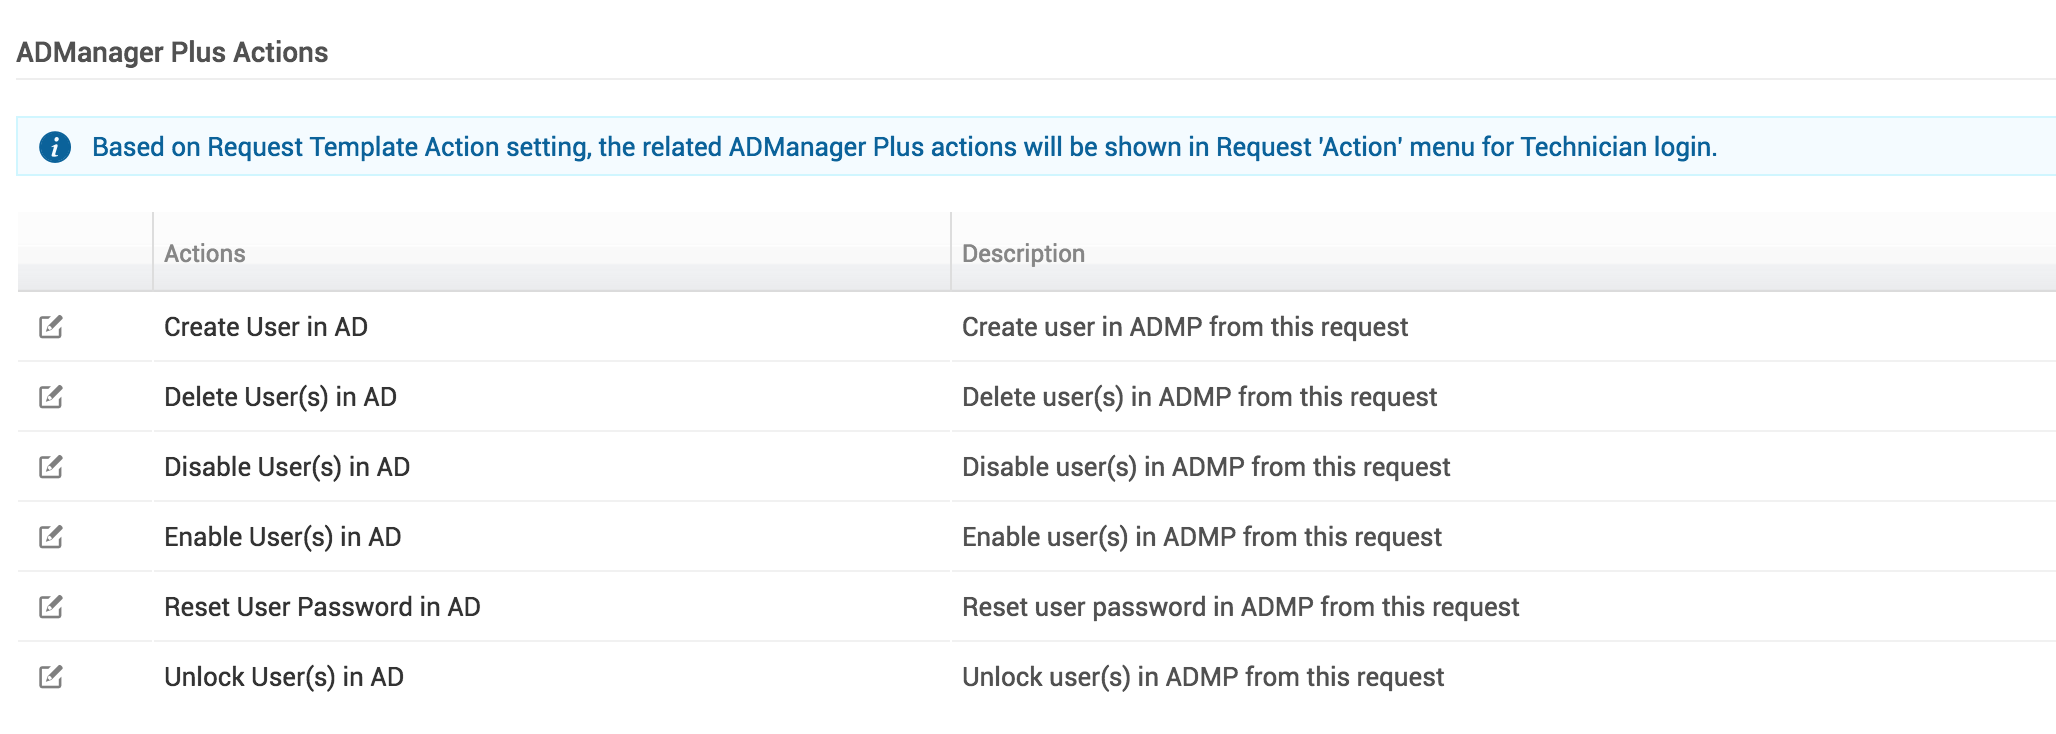
- On clicking 'edit', the 'Edit Action' page will be displayed. Enter/edit Action Name and provide a suitable description.
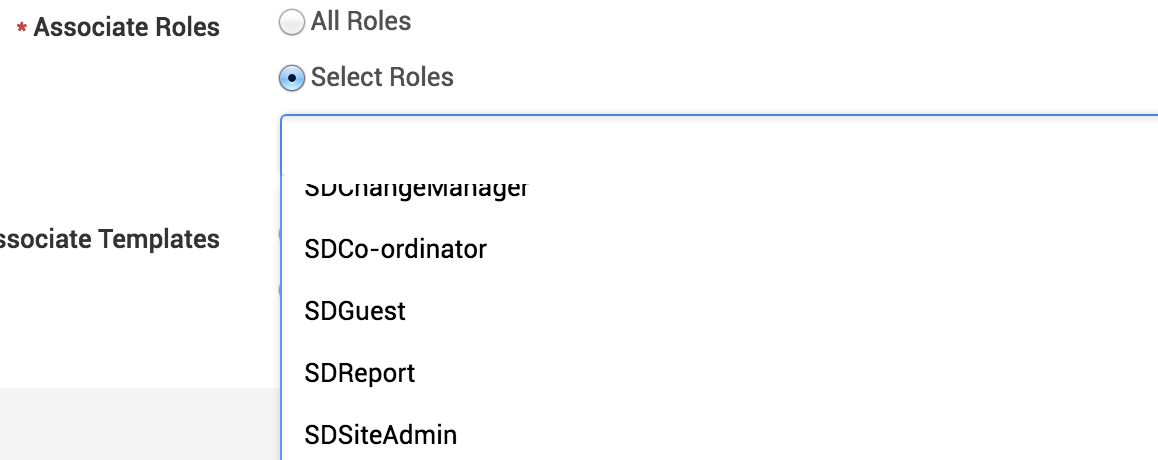
Associate Roles: Choose 'All Roles' or 'Select Role'. Choosing 'All Roles' will provide permission for all Technicians to perform that action. 'Select Role' displays the list of Roles and the Admin can choose users with selected roles to perform that action. Eg: SDAdmin, SDSiteAdmin etc.,
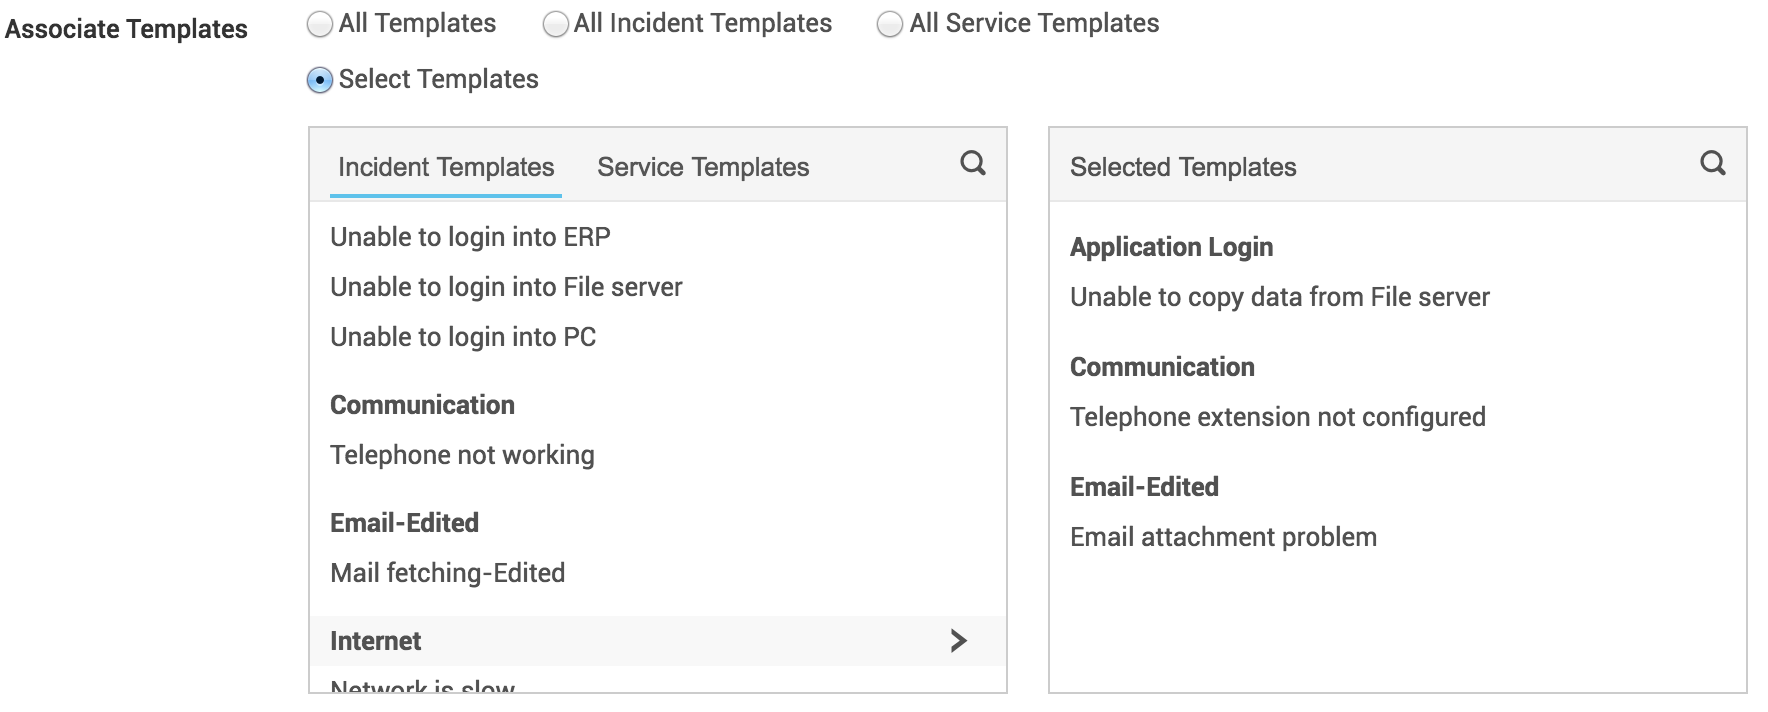
- Associate Templates: Choose all Templates or All Incident/Service Request or few selected Request Templates in which the corresponding action should be displayed. Requests created using that Request Template will have that action displayed in the Request details page under 'Actions' tab.
Note
The Administrator can also choose the options (Eg: Create User in AD, Delete User in AD) to be displayed in 'Actions' tab, by selecting the Template Actions available under Admin >> Service Catalog >> Service category >> Select the desired template >> Workflow >> Template Actions >> Enable/Disable.
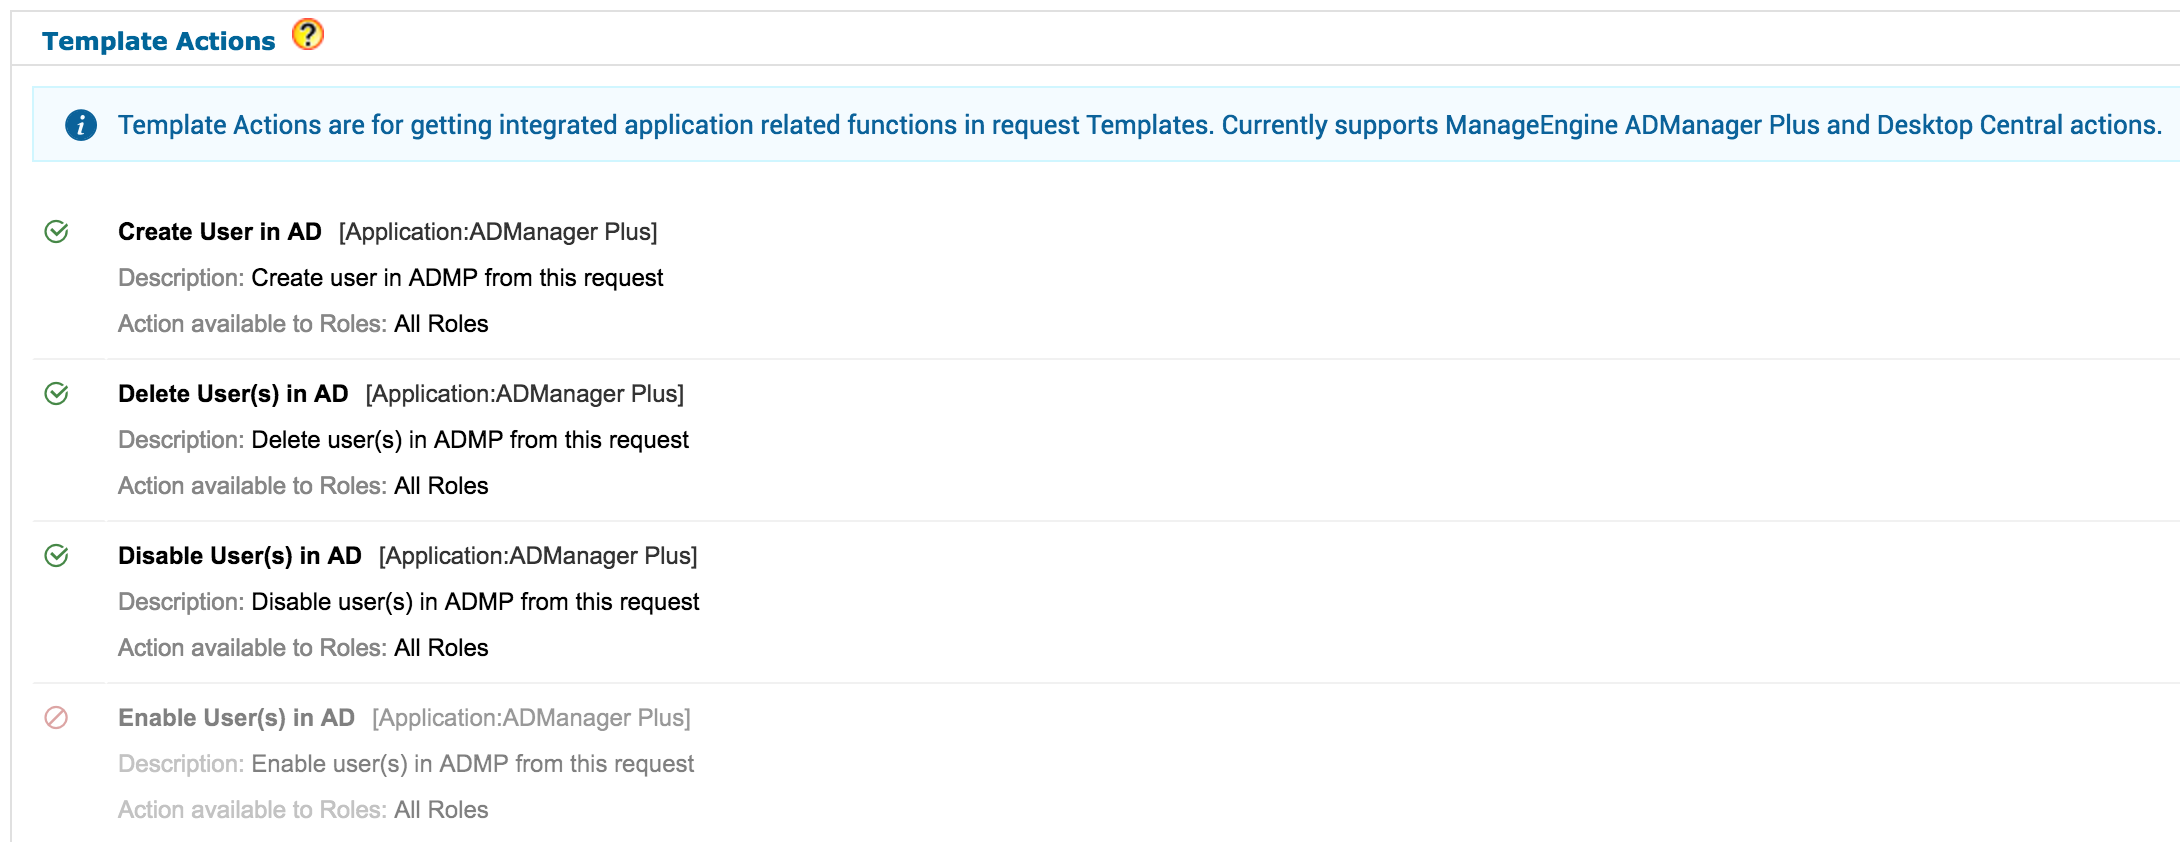
- From the list of options, Enable/Disable the options to be listed in the 'Actions' tab of Request details page.

- The enabled options to be displayed in 'Actions' tab will be displayed as follows for every Request created using that template. An entry in History will be added only when the menu is invoked from Request Details page.
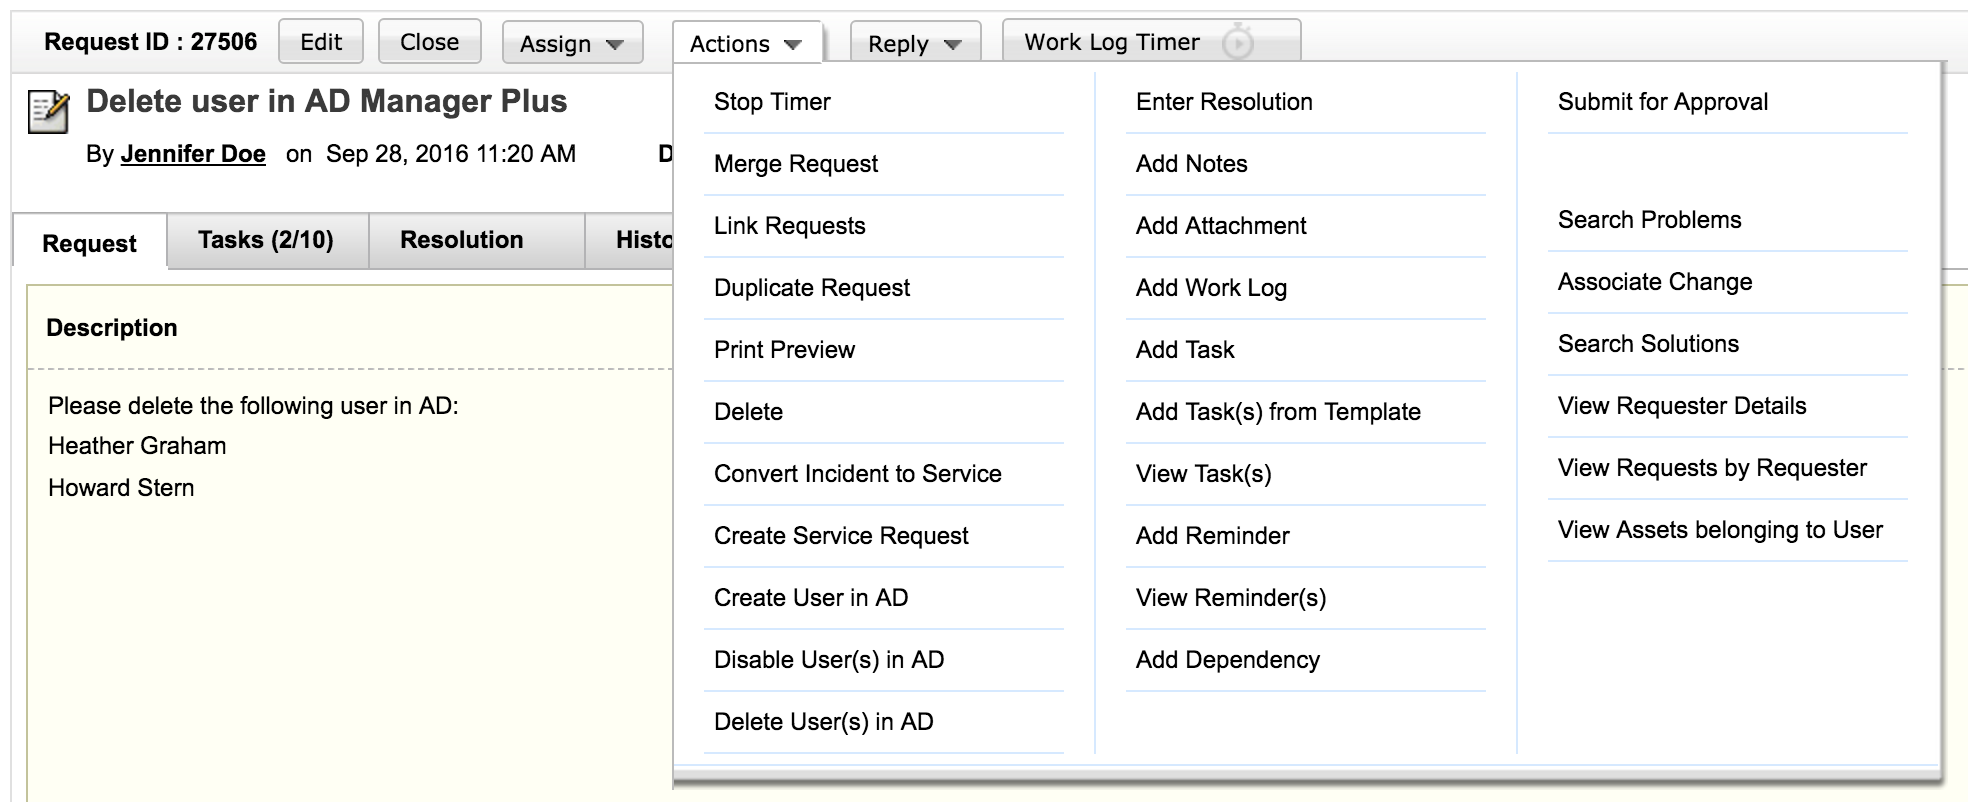
Create user in ADManager Plus from SDP MSP:
Based on Actions enabled for each Request Template, the Technician can perform the permitted actions.
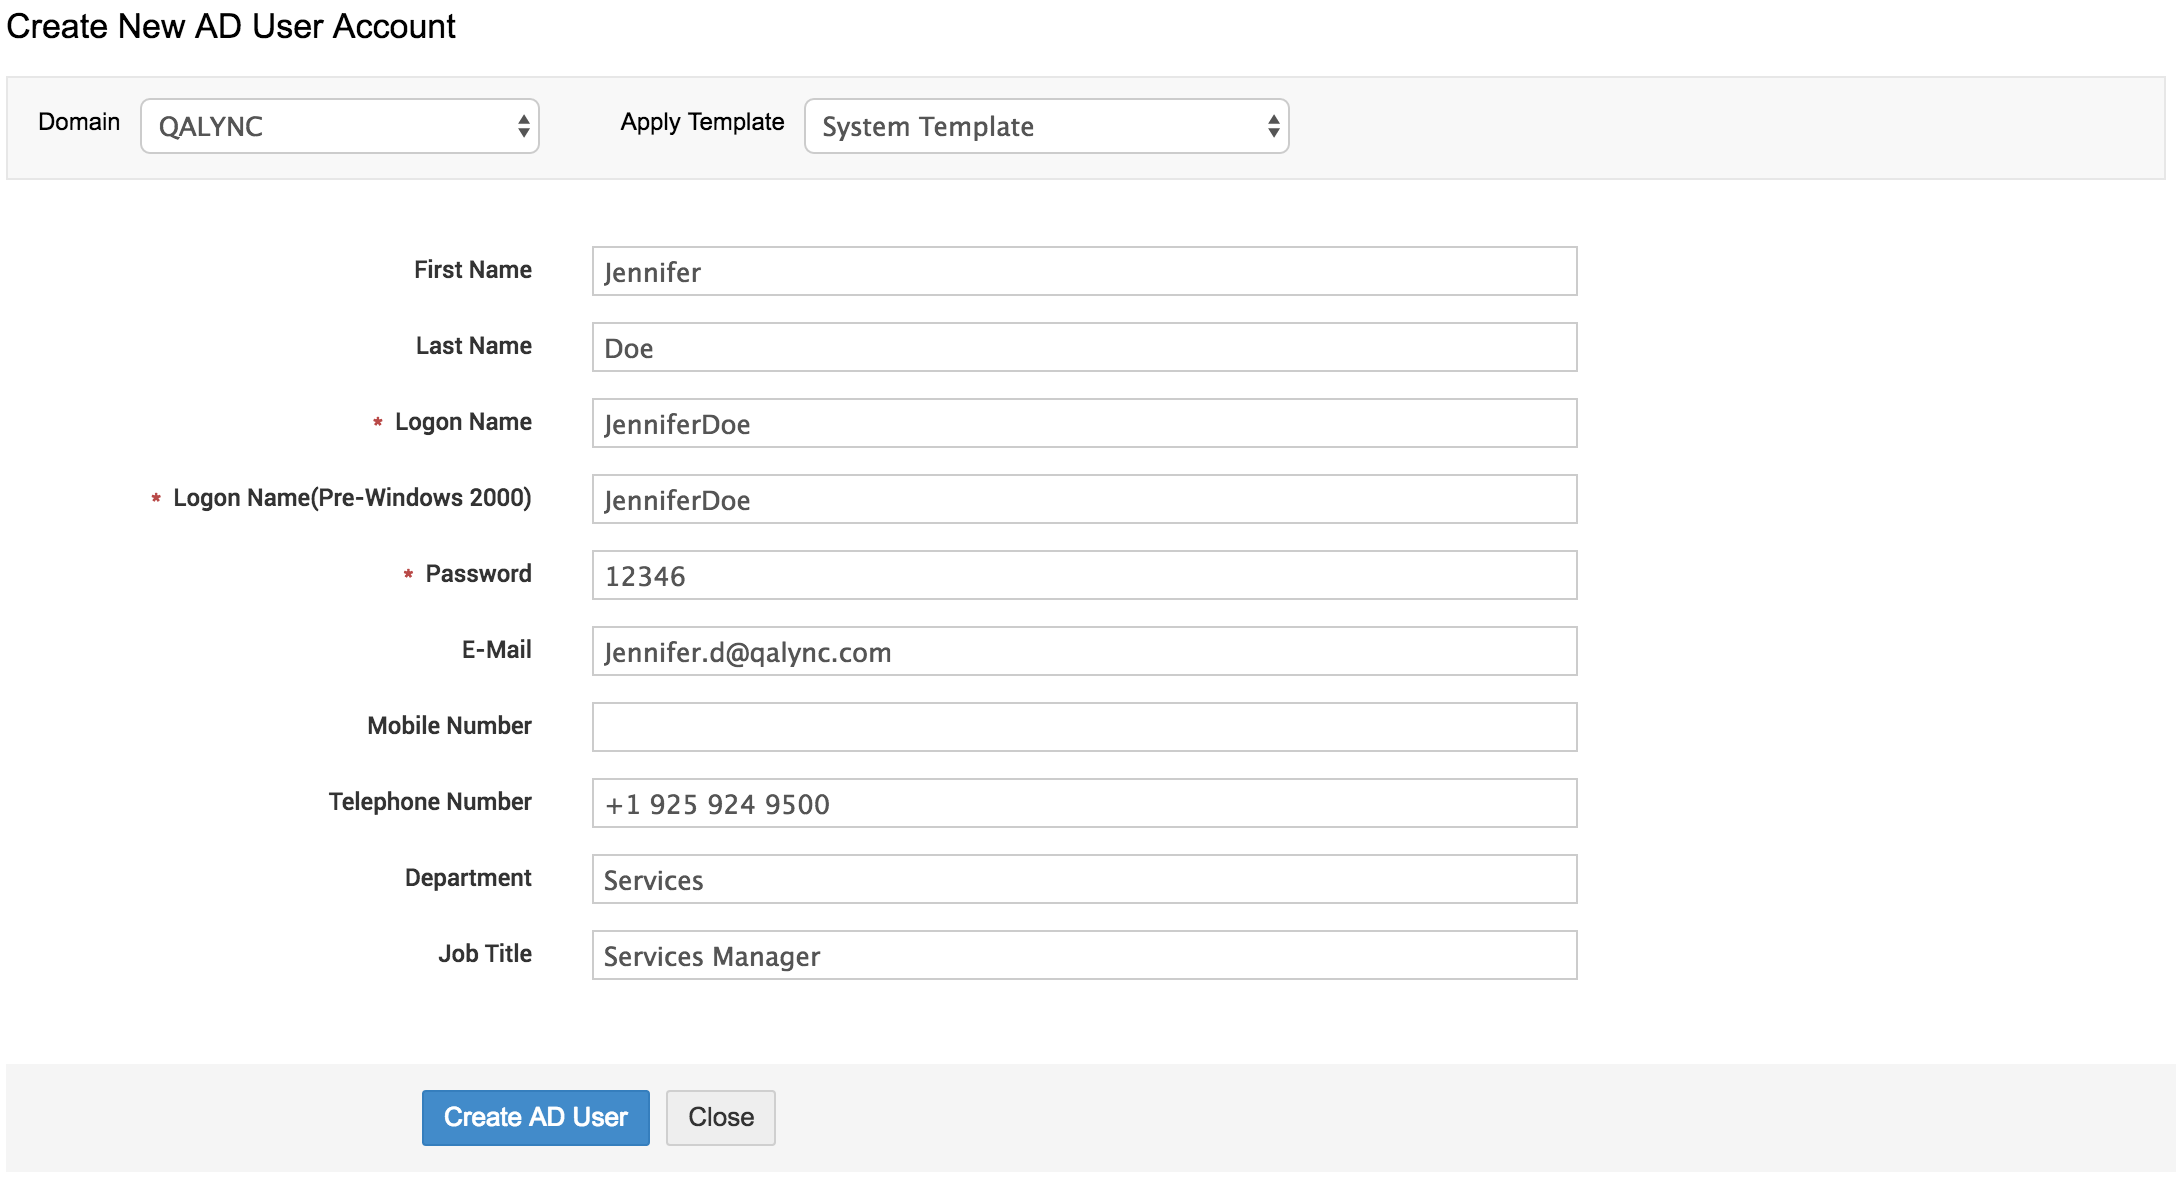
Eg: When 'Create user in AD' is invoked from 'Request Details page >> Actions tab', a pop-up with required fields will be displayed. Note that these fields have to mapped exactly between the two applications. Provide all the details and click 'Create AD User'. To add more fields,
- Open the Admp.xml file available under [SDPMSP_Home] >> integration >> resources >> admp >> conf.
- Edit "create_user" and include the desired additional fields. The field can be a text field/ date field/ date time field/ pick list field.
Note
- To include the additional fields, it is necessary that the Id of the corresponding additional field in ADManager Plus is known. The Id values can be viewed here.
SDP MSP FIeld Name Field Id Request ID WORKORDERID Created By CREATEDBY Subject SUBJECT Template REQUESTTEMPLATE Mode MODE SLA SLA Asset ASSET Site SITE Service Category SERVICE Category CATEGORY SubCategory SUBCATEGORY Item ITEM Technician TECHNICIAN Status STATUS Priority PRIORITY Level LEVEL Impact IMPACT Impact Details IMPACTDETAILS Urgency URGENCY Request Type REQUESTTYPE Group GROUP Description DESCRIPTION Description Short SHORTDESCRIPTION Requester REQUESTER Department DEPARTMENT Created Date CREATEDDATE DueBy Date DUEBYDATE Time Elapsed TIMESPENTONREQ Resolved Date RESOLVEDTIME Completed Date COMPLETEDTIME Response DueBy Time RESPONSEDUEBYTIME Additional Fields Field Name in SDP MSP - In bulk actions form, instead of searching manually for a field, mention that field (for eg: Employee Name, etc.,) in the Admp.xml file under 'menu name'. This will search for the given field value in ADMP. i.e. For operations like Enable/Disable/Unlock/Delete Users(s) in ADMP, the value for searching the user in ADMP can be taken from SDP MSP request data. Thus a Technician invoking these actions do not have to enter the value for search field manually.
Note
- The domains listed in AD Actions pages (say Create AD Users) is "Account Based".
- For example, if the SDP MSP's domain is shared with Account 1 and Account 2, then MSP's domain will be listed for both Account 1 and Account 2. If it is not shared, then only the domain specific to the account will be listed.
ServiceDesk Plus MSP Server configuration and Authentication in ADMP:
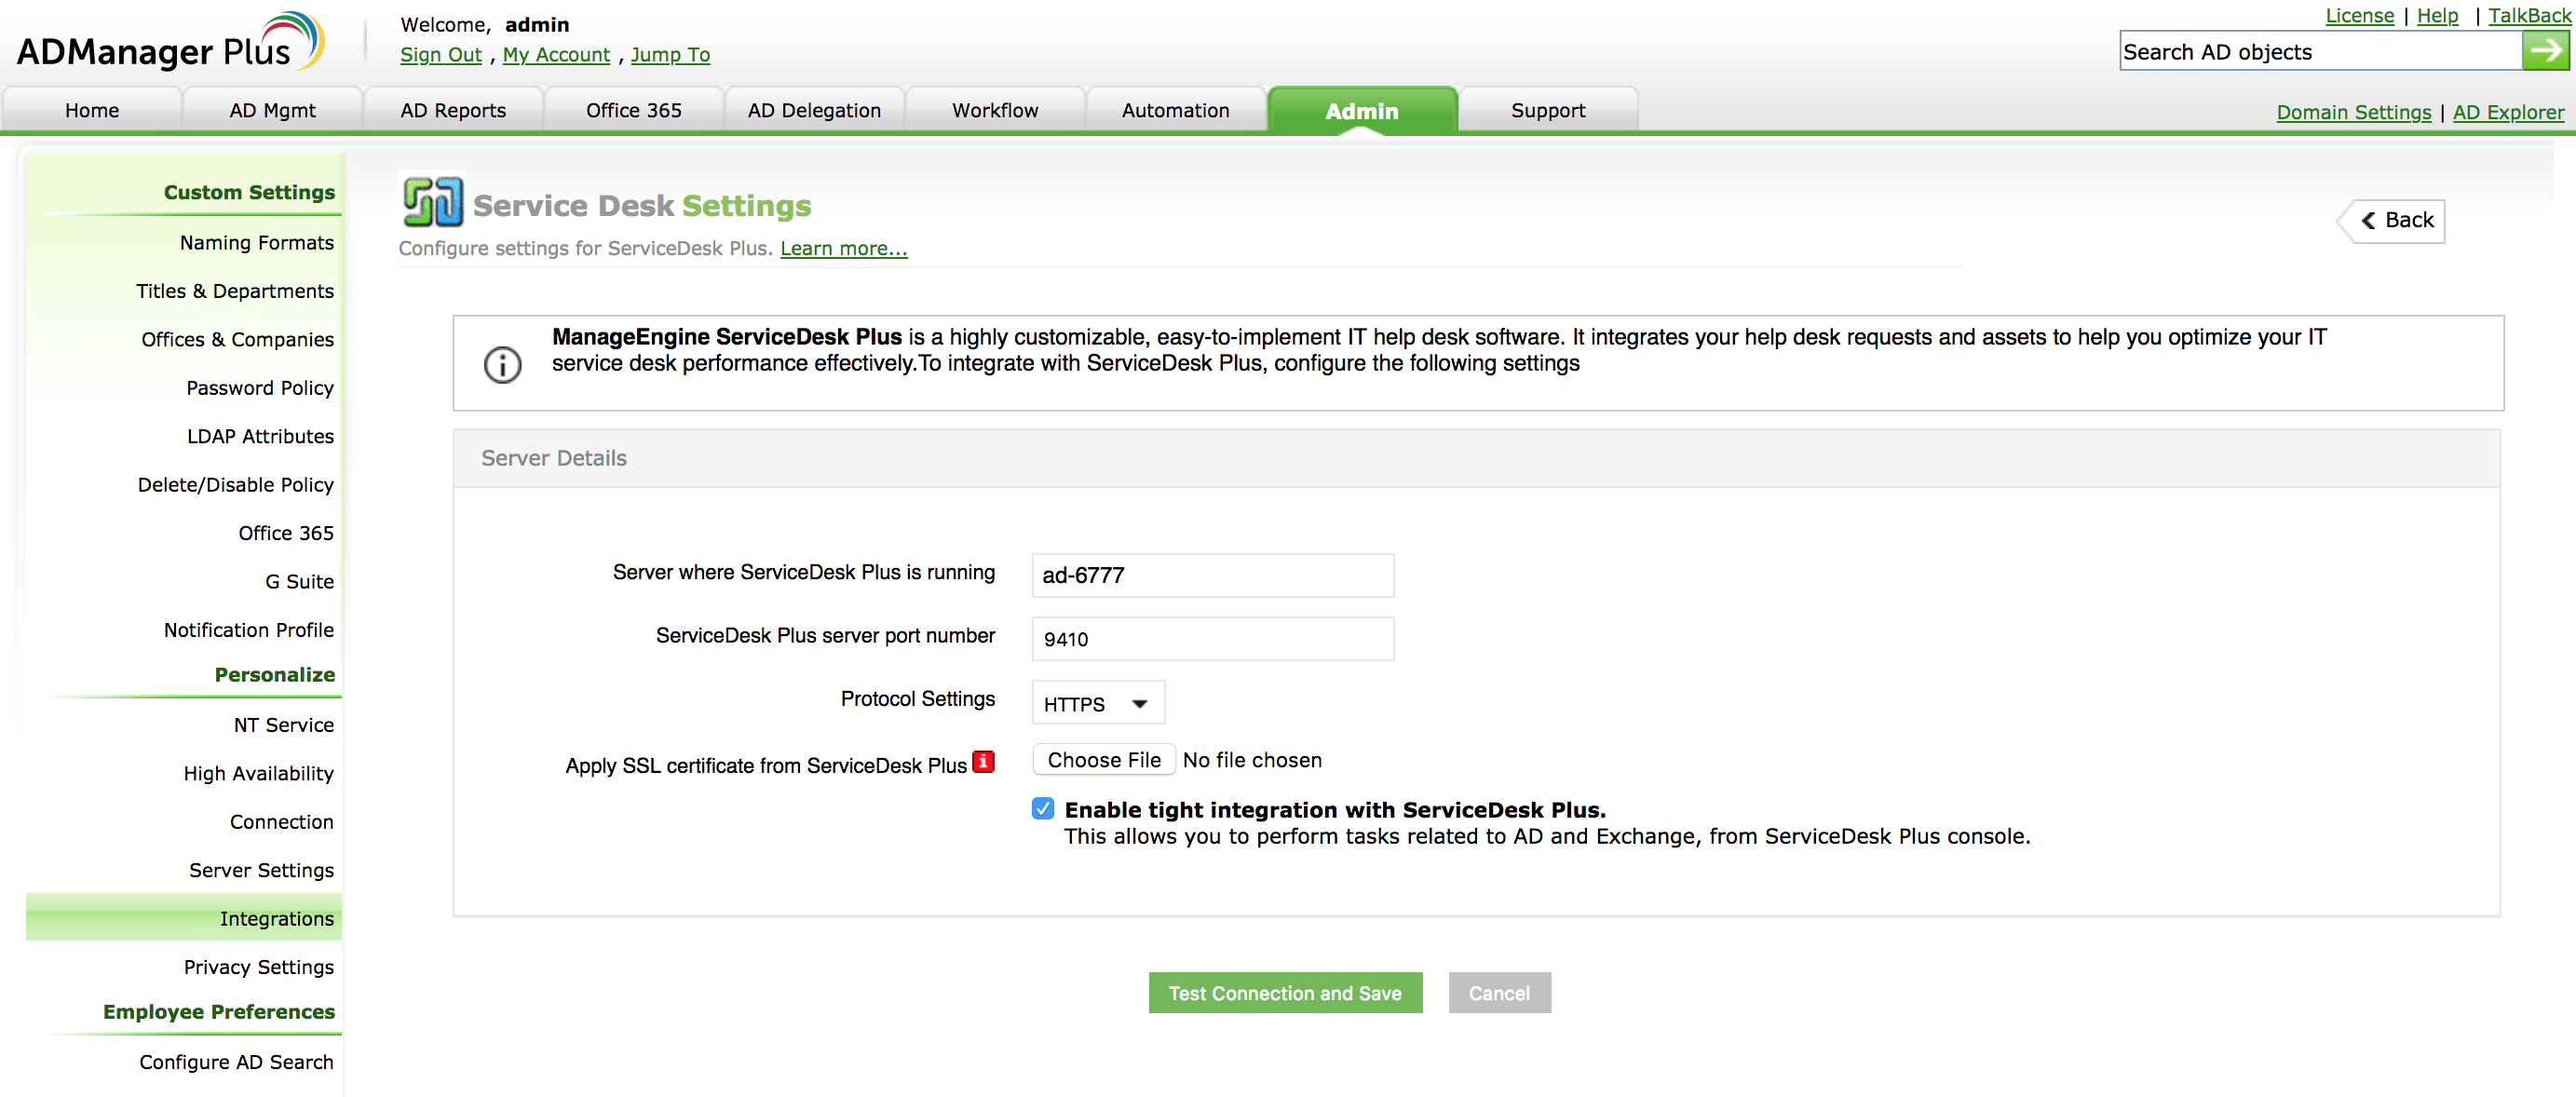
The following settings have to be entered and configured in ADManager Plus. The settings are available under ADMP >> Admin >> Personalize >> Integrations >> ServiceDesk.
- Enter the Server name and Server Port where the SDP MSP application is currently running and choose the protocol settings.
- Enable the 'Enable tight integration with ServiceDesk Plus' checkbox. This will ensure Integration between the two applications and exchange related tasks from SDP.
- Click 'Test connection and Save'. This will check for an established connection between SDP and ADMP in their respective ports and saves the settings
This integration will be available only for those Technicians in SDP MSP configured as Help Desk Technicians in ADMP. To configure SDP MSP Technicians who are AD Users:
- Go to AD Delegation >> Help Desk Delegation >> Help Desk Technicians >> Add New Technician.
- Select 'Help Desk Roles', Templates and groups for the Technicians and click 'Save'.
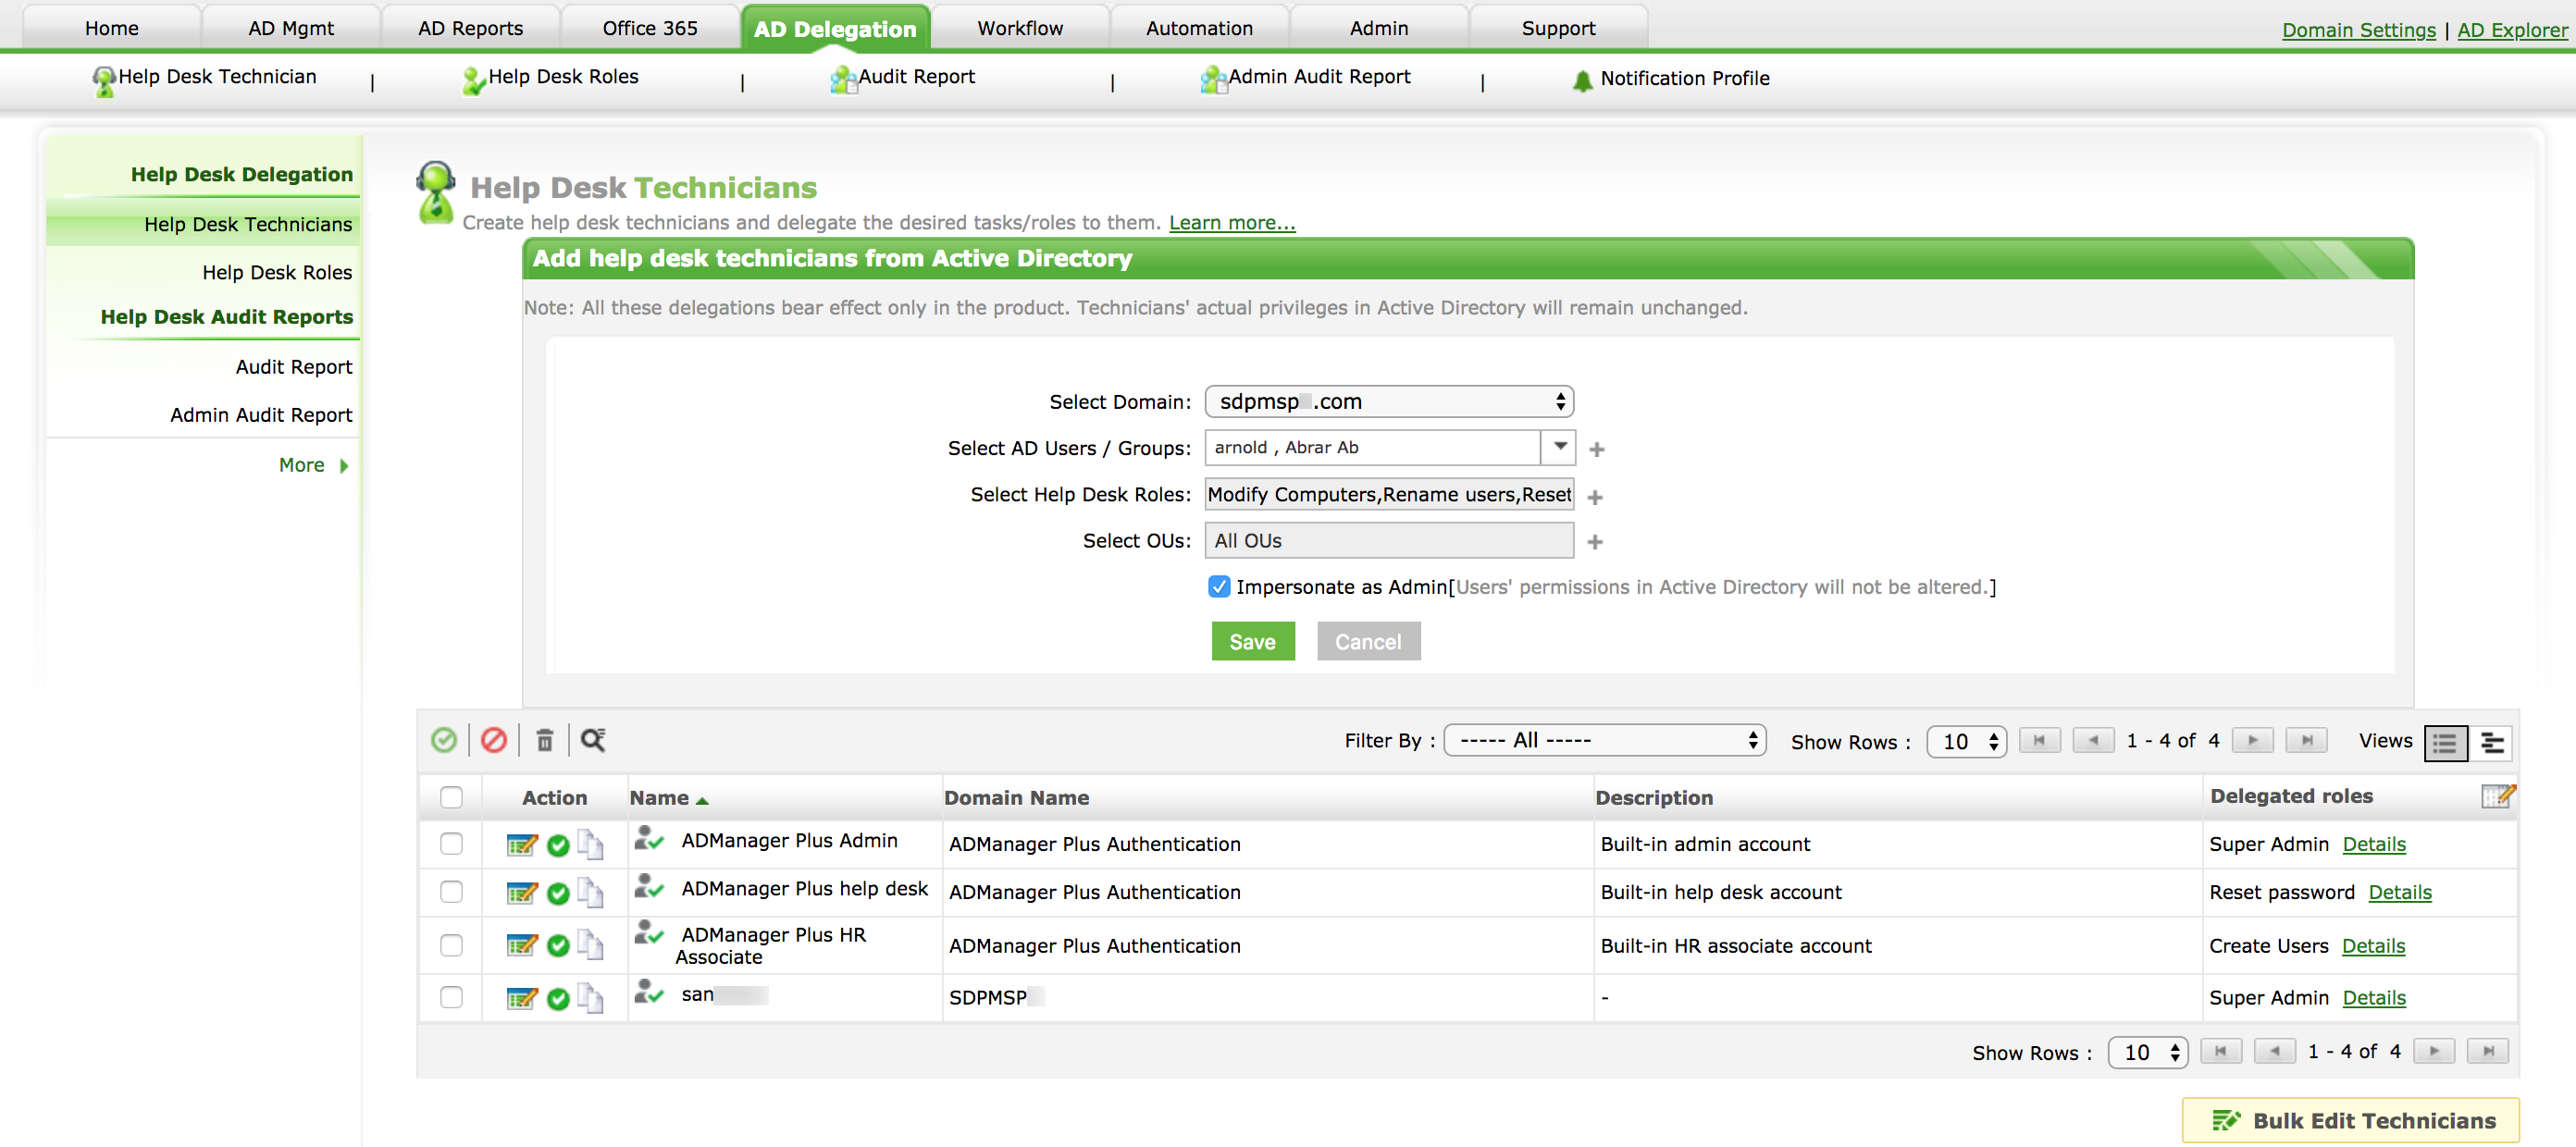
- Help Desk Technicians can also be added from Active Directory. Select the Domain, AD users, help desk roles, and Organizational Units. Enable 'Impersonate as Admin' checkbox, if that Technician can also be an Admin. Click Save'.
Sample Scenario:
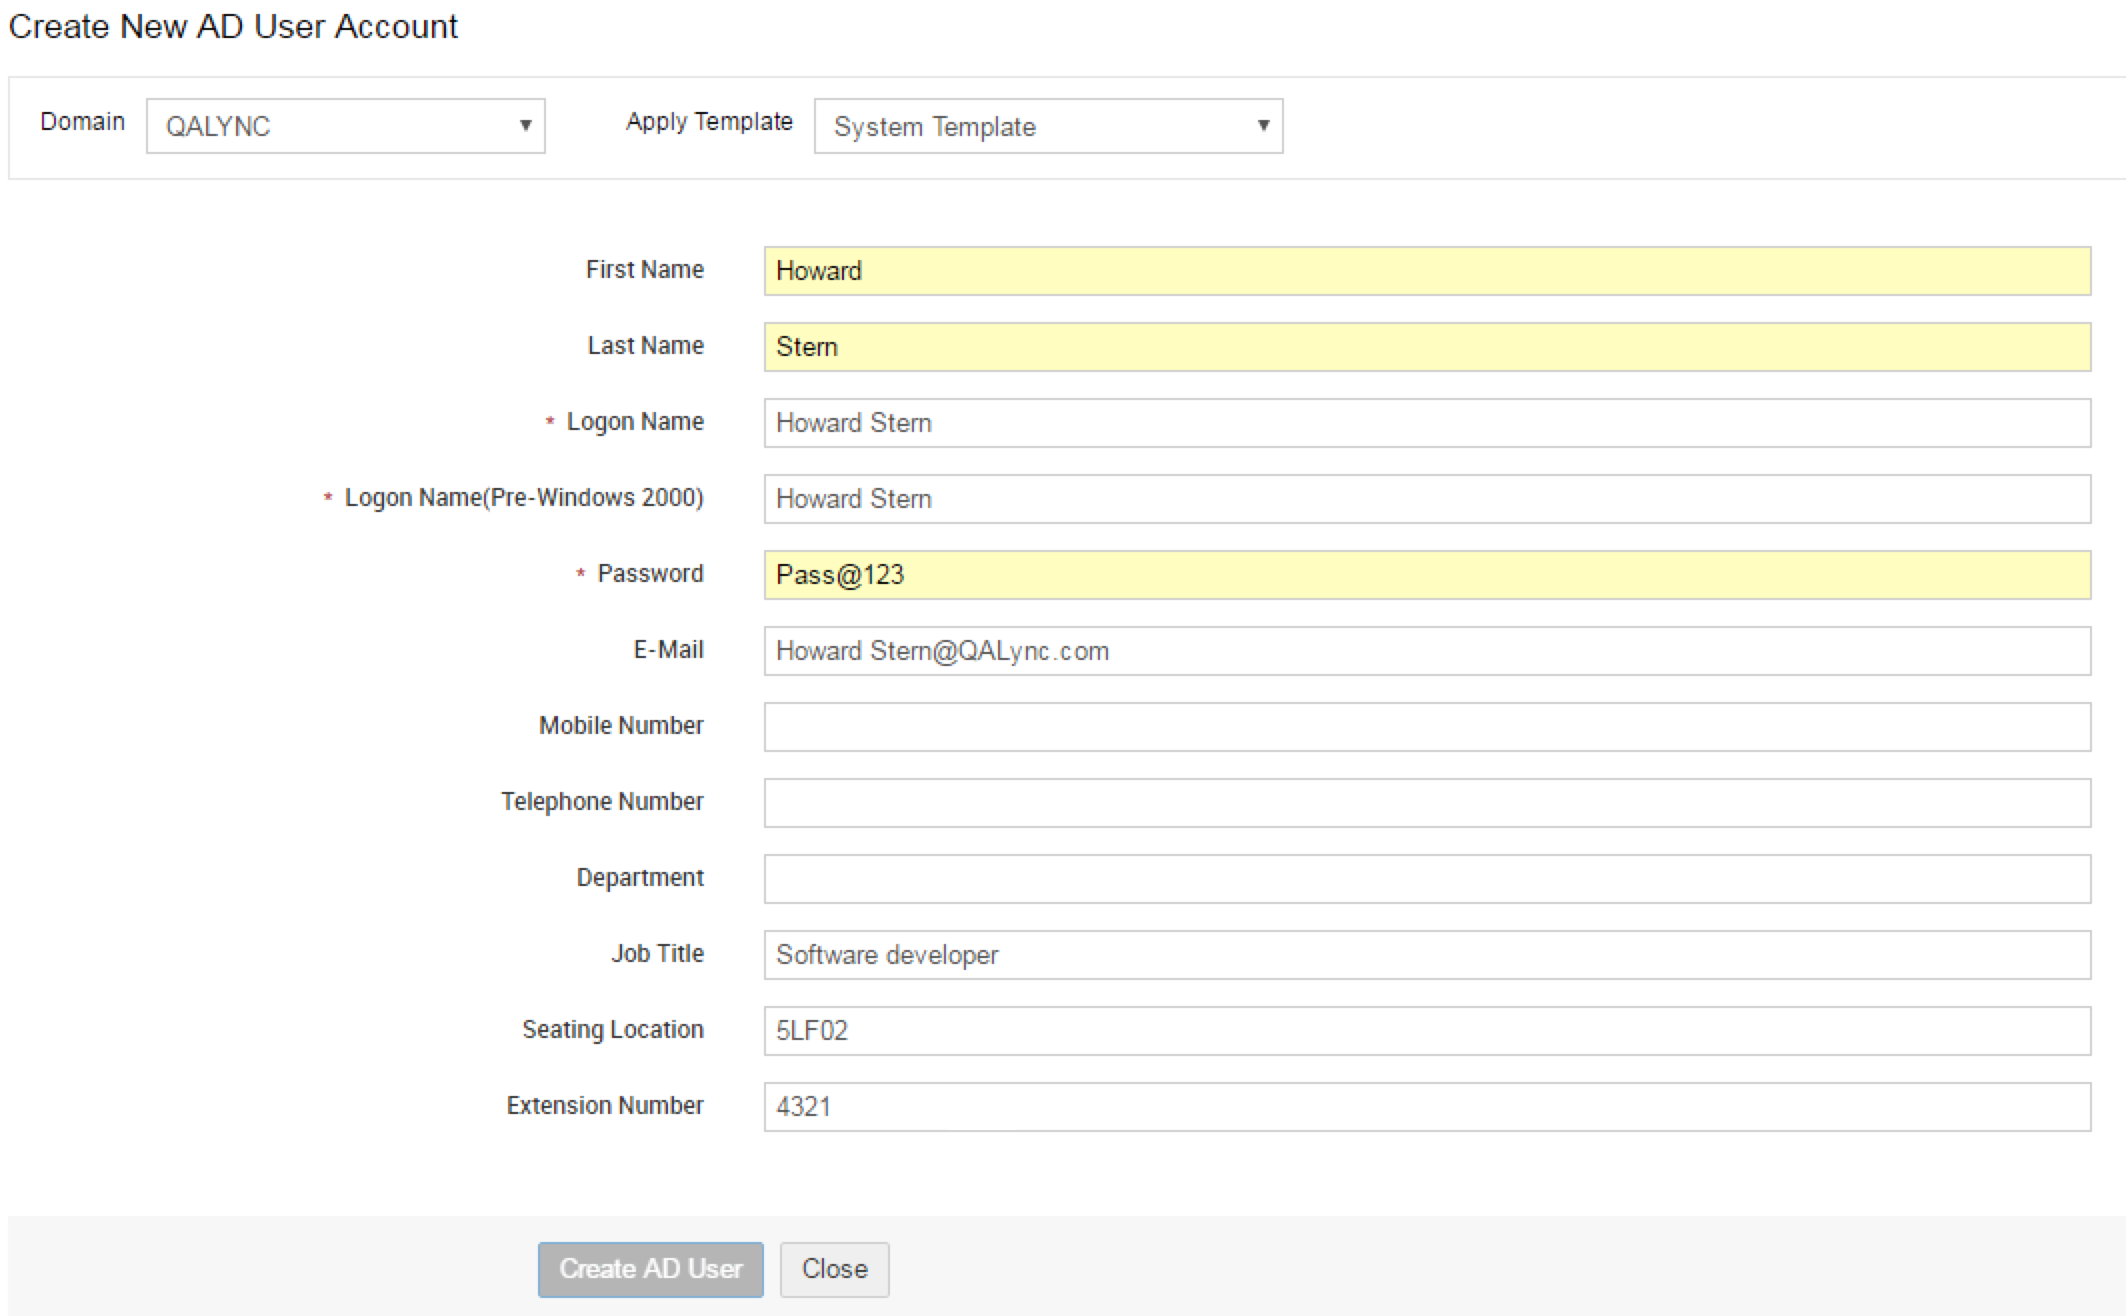
Let us take a sample scenario where a new employee joins the organization and a new account has to be created in SDP MSP and in AD. Instead of entering details twice, the Administrator can create a user in AD from SDP MSP and also sync the additional information ( such as 'Seating Location' and 'Extension Number') obtained in additional fields. Note that the resource fields cannot be synced between SDP MSP and ADMP.
Syncing Additional fields created in SDP MSP:
Additional fields added in a Request Template can be synced with AD Manager Plus by following the below steps:
1. Create the required additional fields 'Seating Location' and the 'Extension Number' from Admin >> Helpdesk Customizer >> Incident- Additional Fields.

2. After creating the additional fields, open the Admp.xml file available under [SDP_Home] >> integration >> resources >> admp >> conf.
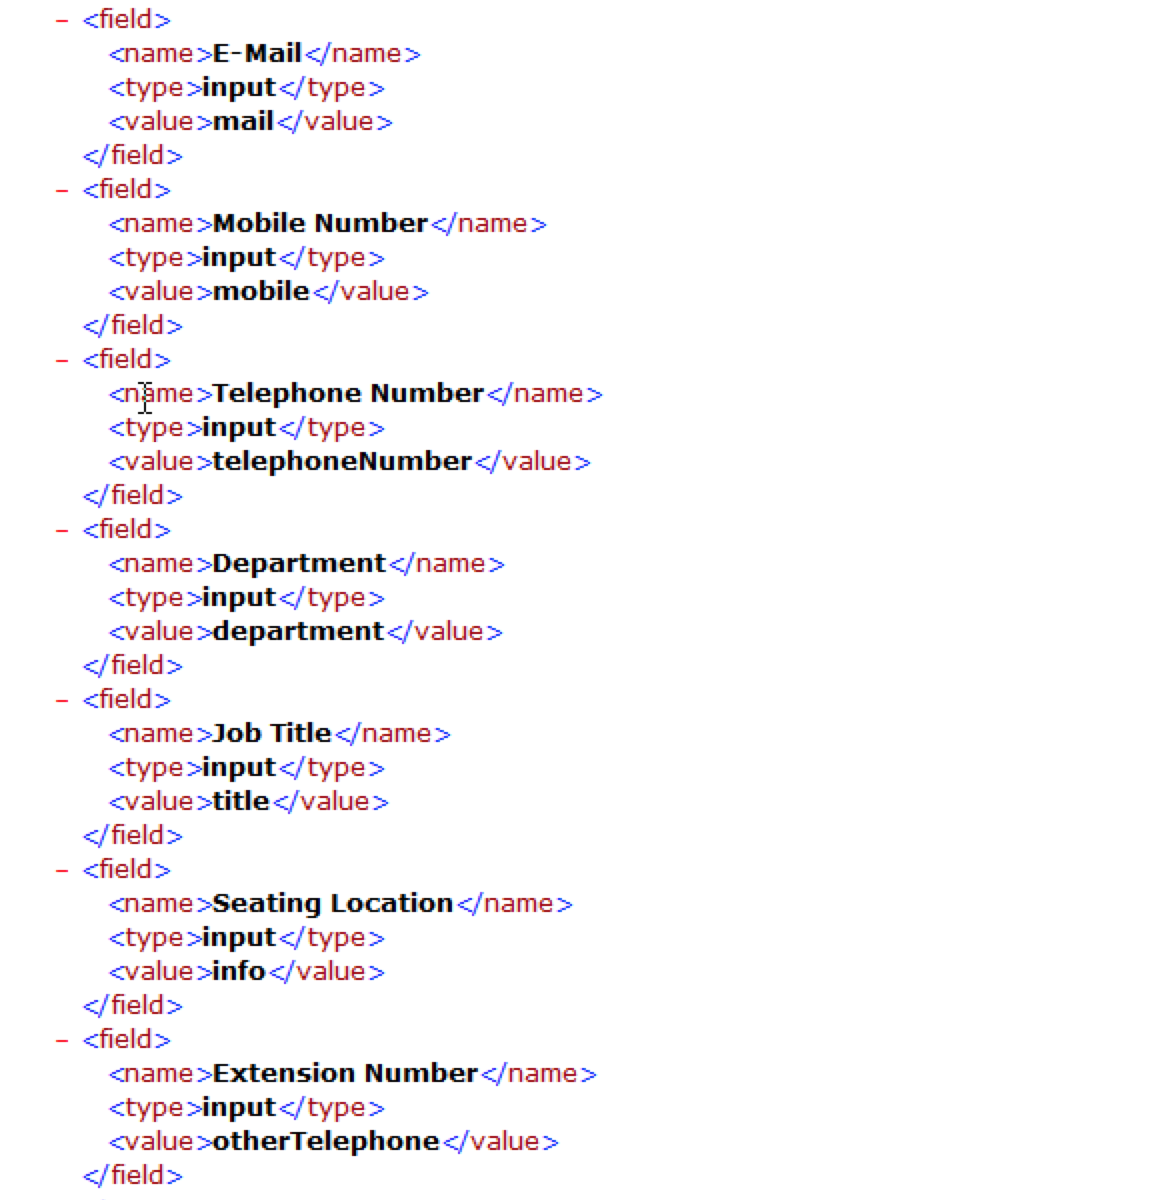
In the HTML fields, enter the name, type and value of the additional field added. The value of the field can be obtained from the Active Directory attributes file.
Eg: Seating Location:
<field>
<name>Seating Location</name>
<type>input</type>
<value>info</value>
</field>
Extension Number:
<field>
<name>Extension Number</name>
<type>input</type>
<value>otherTelephone</value>
</field>
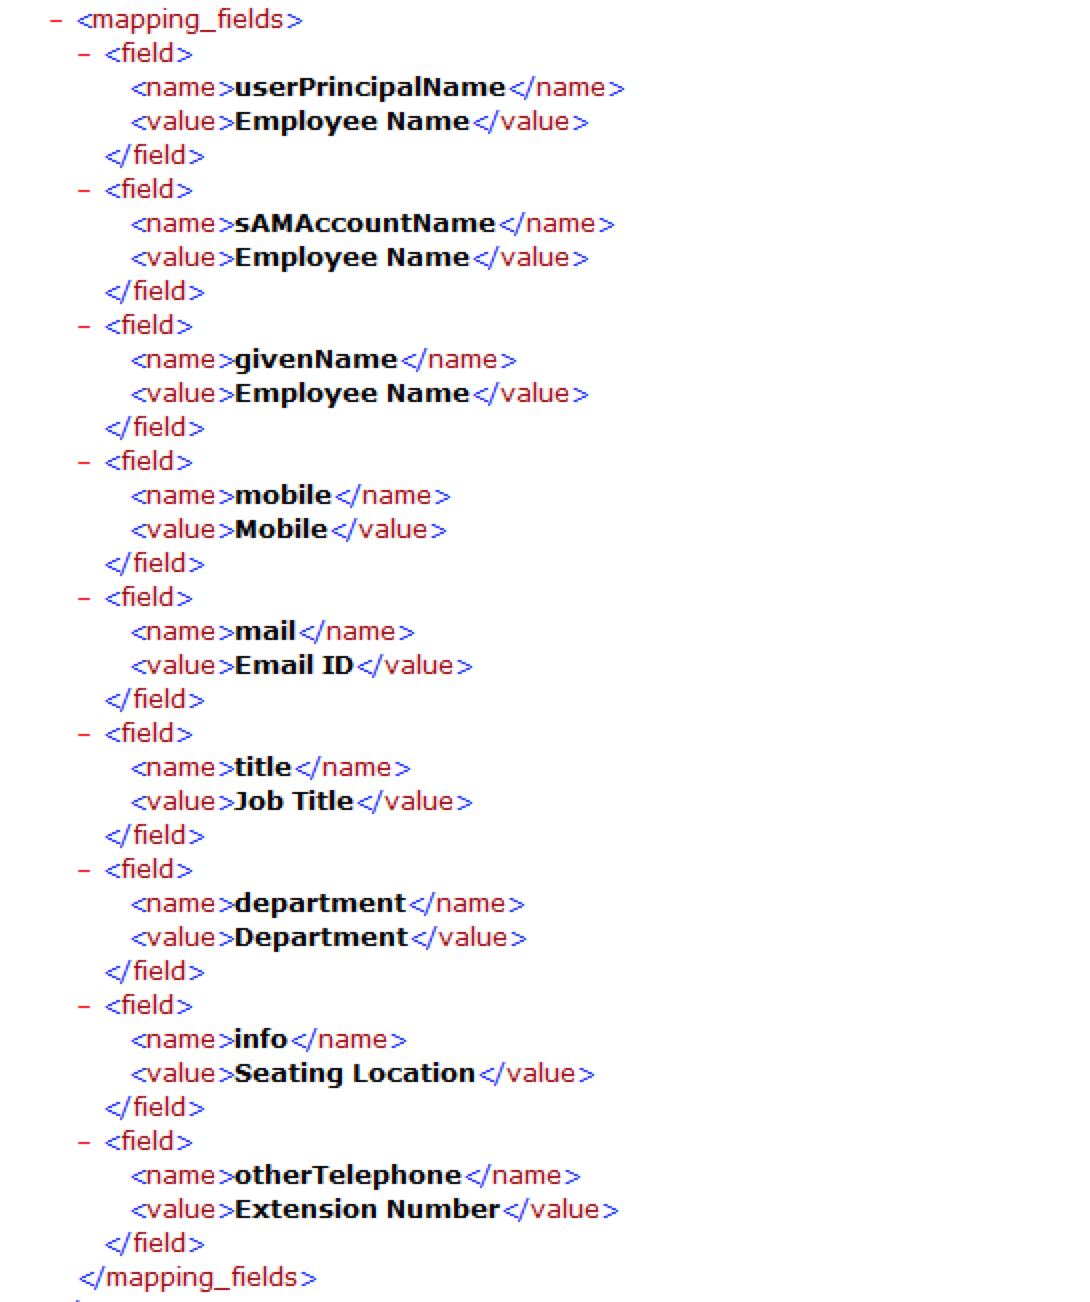
3. After entering the HTML fields, enter the mapping fields with the exact name and value.
For eg:
Seating Location:
<field>
<name>info</name>
<value>Seating Location>
</field>
Extension Number:
<field>
<name>otherTelephone</name>
<value>Extension Number</value>
</field>
4. Create a new AD user account from Actions menu of the Request details page. A pop-up containing the created additional fields will be displayed as follows. Enter the necessary details and click 'Create AD User'.
5. The user will be successfully created in AD. You can check the added AD user in ADMP under AD Mgmt >> Modify Single User by filtering the domain of the user created.
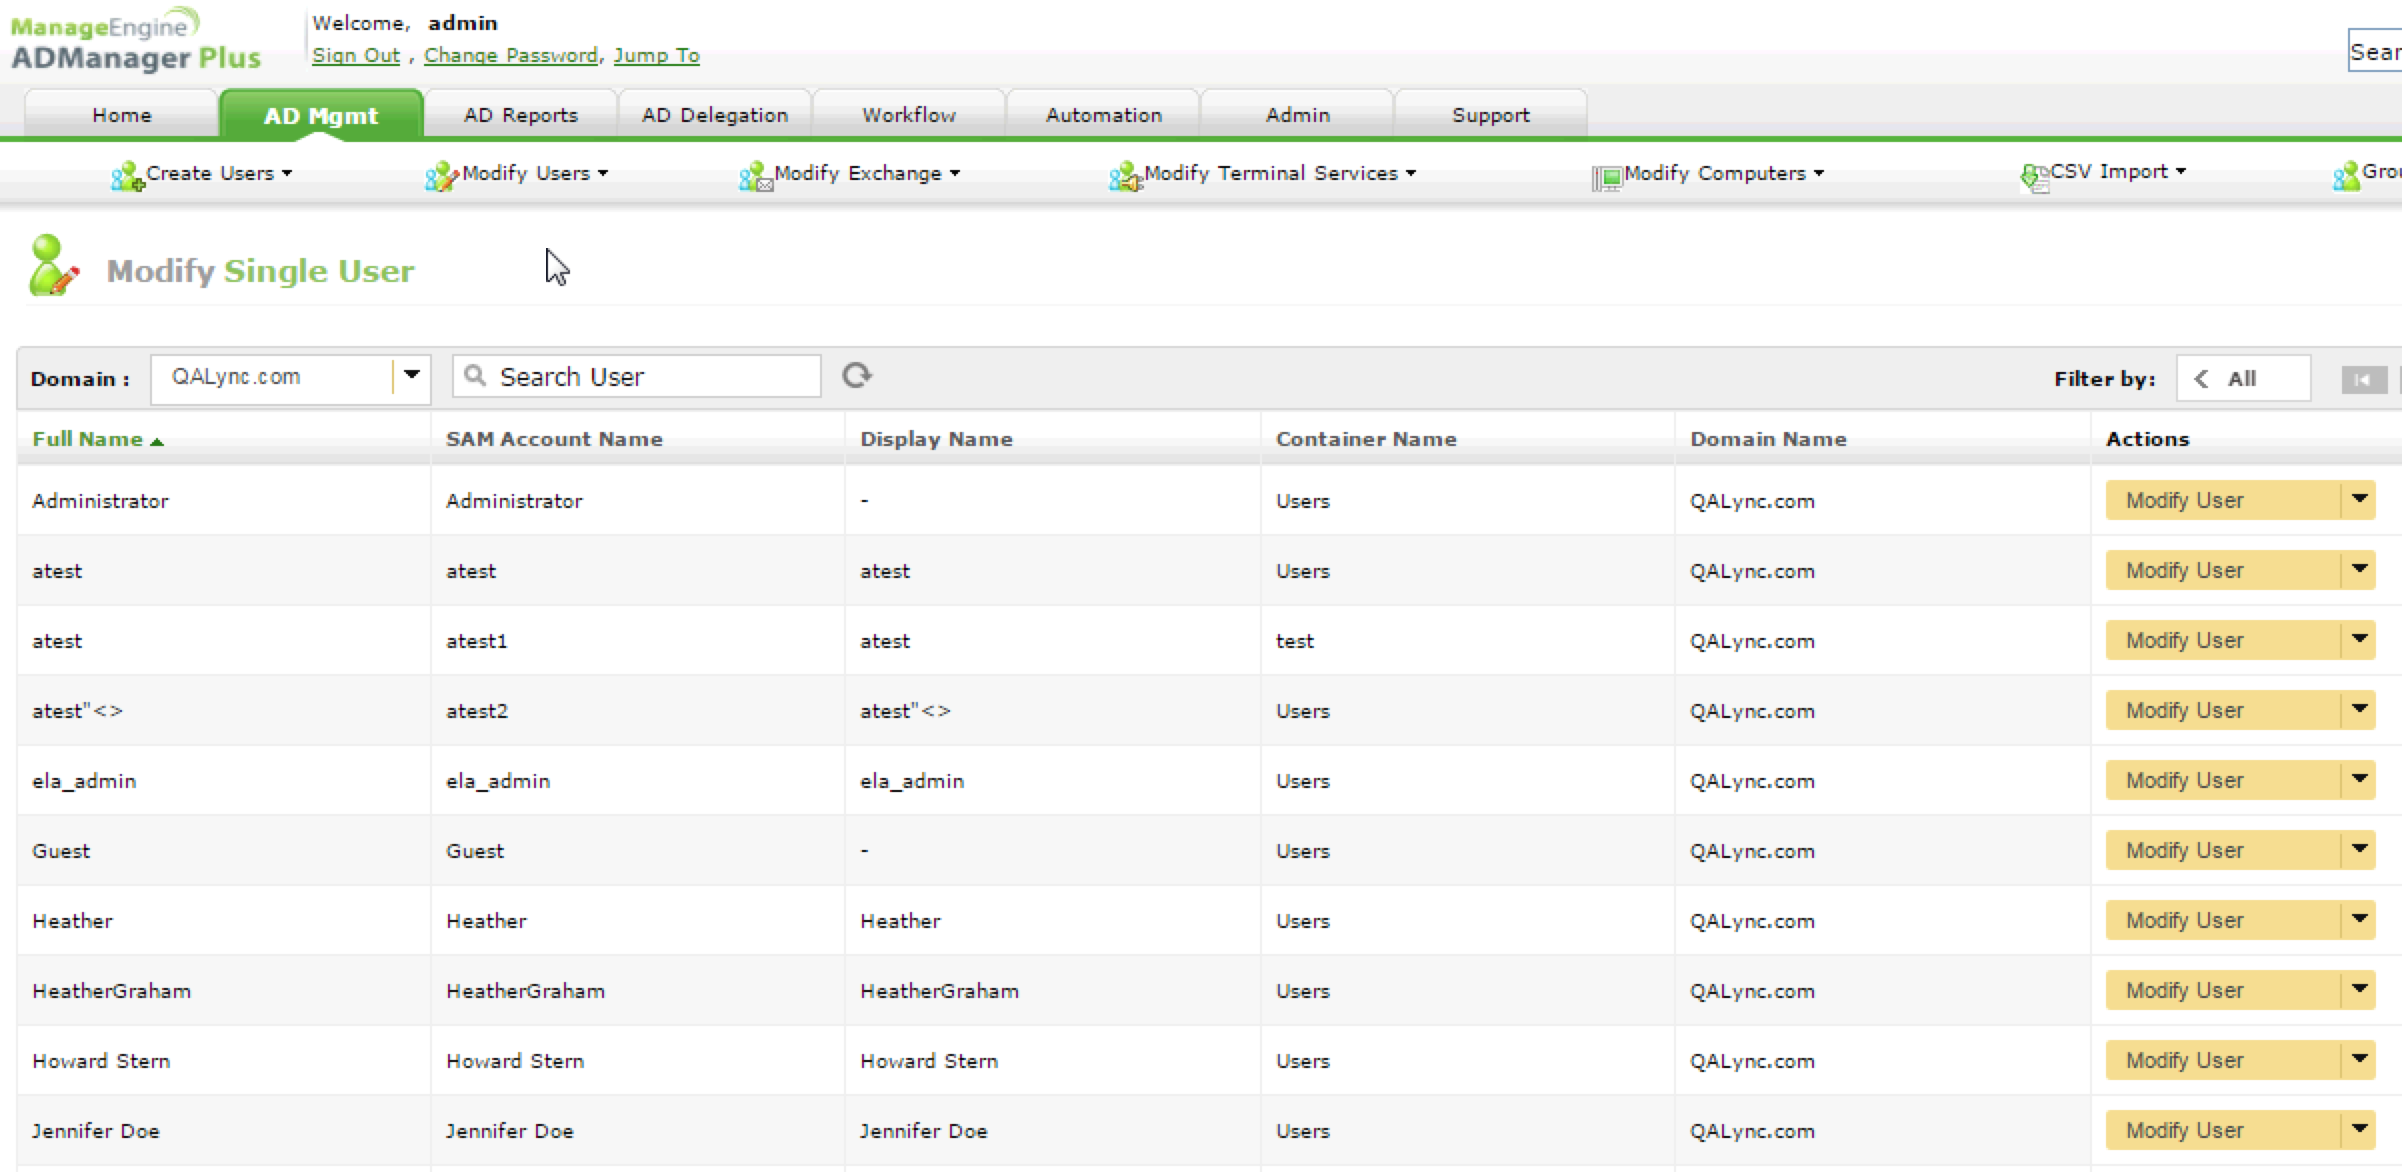
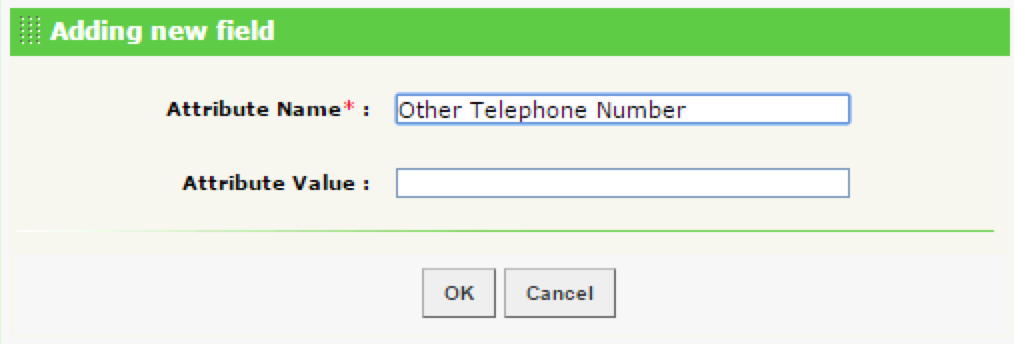
6. Click on 'Modify User' drop-down button >>Modify User Properties to view the details of the added user (also includes details of the additional fields added). Make sure that additional fields added in SDP MSP are available as default attribute fields in ADMP. You can check the default attributes avaialble in ADMP in this file. If the created additional field and its details are not supported by default in ADMP, then create a new custom attribute under Custom Attributes >> Adding new field.
If ADManager Plus runs in HTTPS mode, you will have to generate and install a certificate to establish a connection between ServiceDesk Plus MSP and ADManager Plus servers. Learn more here.

