
Customizing Software List View
ManageEngine ServiceDesk Plus MSP allows you to customize the software list view to include columns of your choice.
To customize the list view
-
Log in to the ServiceDesk Plus MSP application using your user name and password.
-
Click the Inventory tab in the header pane.
-
Click Scanned Software link from the View block on the left menu.
-
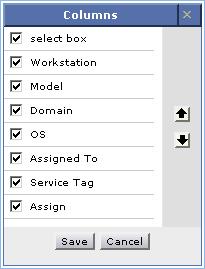
Click the column edit icon
 available at the corner of the software list headers. This opens the available columns that can be displayed in the list view. All those that are visible currently, will have the check box beside them selected.
-
To remove a column, remove the selection from the respective check box beside the column name.
-
To add a column to the list view, select the unchecked select box beside the column name.
-
To change the column order, click the up and down arrow after selecting the column that you wish to move.
-
Click Save.
This will add only those columns which you have chosen in the list view. You can also sort the list view based on columns. To sort software by column, click the column header. Clicking it once will sort it in ascending order. Clicking twice will sort the column in descending order.
|
|
Note: The column sort will be possible only with Software Name and Type column. |