
Viewing the Software List
To view the list of software that is discovered during the workstation auditing in your organization
-
Log in to the ServiceDesk Plus MSP application.
-
Click the Inventory tab in the header pane.
-
Click Scanned Software link in the left menu under the Views block.
-
To view the details of an individual software, click the corresponding Software Name in the software list view page.
This page lists all the available software in your organization. The list has details, such as software name, software type in which it is classified, the number of licenses purchased, the number of installations made, and the number of licenses available. These details help you in checking for software license compliance and also proactively procure additional licenses of any software, or check for reallocation in advance, as the need may be.
Viewing Filtered Software List
The software can be grouped under various classifications, such as Managed, Excluded, and Prohibited. When you want to track the number of copies of a software in use in your organization, then move the software to the Managed software type and track them on a periodic basis.
Excluded software will usually be the list of software that are most commonly available in all the workstations by default. This could include system files, programs that come along with the operating system, and application that need not be tracked.
Any software that is prohibited as per the policy of your organization, can be classified under the Prohibited category.
The ones that are not grouped under any of these will be grouped as Unidentified or the first time a software is discovered during the workstation auditing, it is classified under the unidentified software type. The asset administrator can then move the software to a different type based on the company policy.
To view a specific classification of software
-
Click the Inventory tab in the header pane.
-
Click the Scanned Software link in the left menu under the Views block.
-
In the center pane, Filter Viewing: drop down has the various classifications in which the software are grouped, such as Excluded, Managed, Prohibited, and Unidentified. Select any category to view the software categorized under it.
Changing Software Classification
As told earlier, you can classify software identified by the application into managed, excluded, prohibited, and unidentified. When a software is detected by the application during an audit of the workstations, it will, by default, be categorized as Unidentified. You can change the software category later.
To change the software classification type
-
In the Software list view, select the check box available beside the Software Name.
-
From the Move to: drop-down menu, select the category to which you want to move the selected software.
Alternatively,
-
From the Software list view, click the name of the software which you want to move to a different classification type.
-
Click the Change software type link available on the right side, under the Actions block. Change Software Type is opened in a separate pop-up with the current type selected by default.
-
Now select the software type you want.
-
Click the Change button. The details are updated with the change.
When you change the software type classification, it is reflected across all instances where the software is listed including the workstation details.
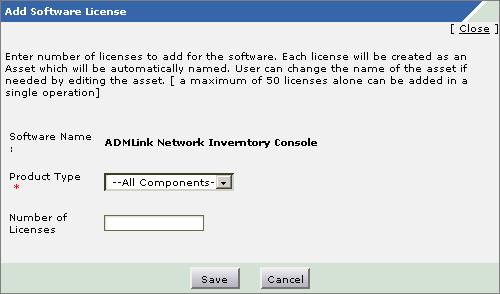
To add software licenses
-
In the software list view page, click the Software Name for which you need to add licenses.
-
On the right side, in the Actions block, click the Add software license link. A Software Licenses adding window opens.
-
From the product type combo box, select the product type as software. If the product type has already been selected, then this combo box will not be displayed. Instead, the selected product type will be displayed.
-
Enter the Number of Licenses that you want to add. This field can take only numeric values.
-
Click Save. A message is displayed with names of the software assets that have been added.
All the licenses added for the software will be listed as separate assets in the asset list and will have a unique asset name associated to each of the license. The maximum number of licenses that you can add in the above form at one time is 50. If you need to add more than 50 licenses of the software, open the Add Software License window again and add the rest of the licenses. Continue this process till you have added the required number of licenses.
The number of licenses that you had added in the form will be displayed in the software details page, beside the Total License text. The Available Licenses lists the remaining licenses to be used to install the software in various workstations. The workstations in which the software is installed are also displayed. To view the details of an workstation, click the name of that workstation.
Viewing Software Installation Details
To view the software installation details, such as workstations where the software is installed, software license compliance, and software type classification
-
In the software list view, click the Software Name whose installation details you wish to see. The above-mentioned details are displayed. The top section gives details such as product name, product version, total licenses bought, used licenses, and available licenses. If there is license incompliance, a License Violation warning message is displayed. Also, the licensed and unlicensed installations are listed under the respective heads.
-
From here you can also view the details of any workstation in which the software is installed, by clicking the workstation name from the list.
You can convert an unlicensed installation to licensed installation of the software in a particular workstation.
-
In the software details page, under the Unlicensed Installations section, select check box beside the workstations for which you wish to allocate software license.
-
Click Allocate License button. If the licenses are available, then they will be moved to licensed Installation.
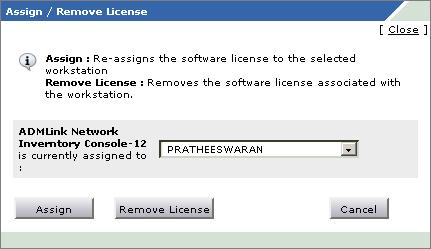
To remove or reassign the software license from licensed installations
-
In the software details page, under the Licensed Installations section, click the
 icon for the workstation where you wish to remove the software license. The Assign / Remove License window pops up.
-
To reassign, select a different workstation from the combo box and click Assign.
-
To remove license, click Remove License button. If you do not wish to change anything, just click Cancel.
You can attach software assets to the workstation.
-
In the software details view, the unlicensed installations are listed under the corresponding head along the workstation names in which they have been installed.
-
Click the Attach Software Asset to Workstation icon
 . The attach asset window pops up.
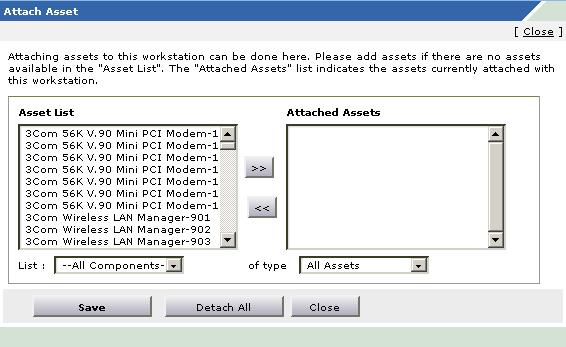
-
From the Asset List select the software that you wish to attach to the workstation and click >> button to move it to the Attached Assets list. If you want to attach any other software asset, then select those also and move it under Attached Assets.
-
Click Save.
In the Attach Asset window, you can filter the list of software that appear in the Asset List by selecting the specific software component from the combo box available just below the Asset List.
To export the software details as a PDF file
-
In the software list view, click the Software Name.
-
On the right side in the Tasks block, click Export as PDF link. The PDF file with the software details will be created. A system dialog will open with the choices to save or open the file.
-
Select your option and click OK.
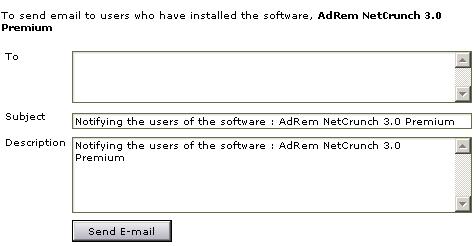
To e-mail the users:
-
In the software list view, click a Software Name
-
On the right side in the Tasks block, under the Notification category, click the Email Users link. A pop-up window opens with the mail To filled with the e-mail IDs of the users of the software. If there are no users associated with any of the workstations having the software, then you can identify the user to the whom the mail needs to go and enter their e-mail address in the field. The subject and description fields are also pre-filled as in the figure.
-
You can change the details as per your wish.
-
Click Send E-mail. A message that the mail is successfully sent is displayed.
-
Click Close in the top right corner of the window to close the same.