
Working with Tasks
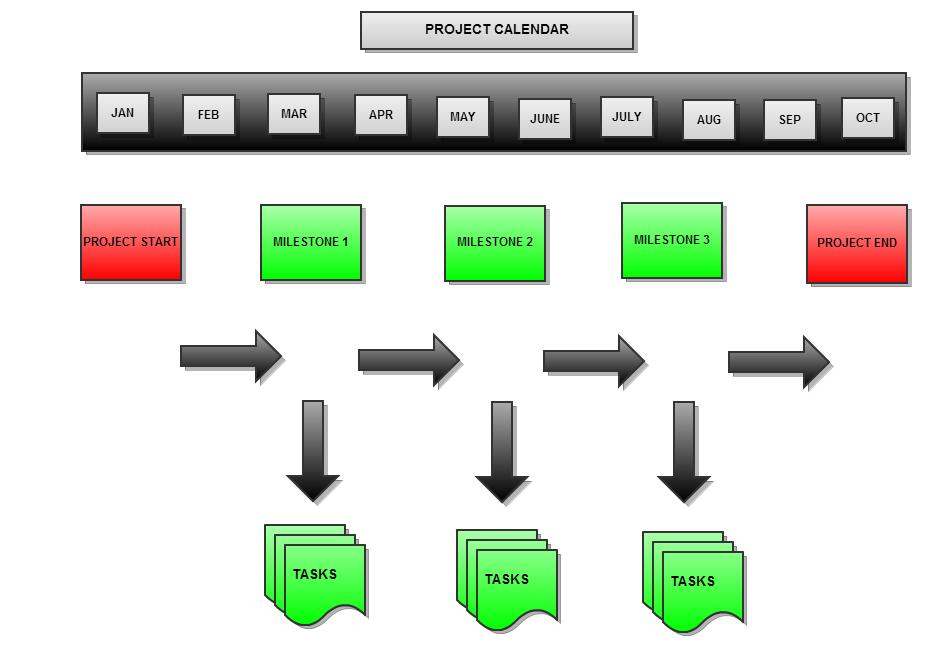
Task is an activity that is a part of a Project. In other words, Project has multiple phases with Task being a small incident/part of each and every phase. Tasks can be associated with Milestones or can be directly linked to the project. In general, Tasks are the most basic elements that ensure various actions are performed in an orderly manner within the project.
|
Scenario: To understand Tasks better let us consider the same IT Test Environment SetUp Project used for Milestones: IT Test Environment Set Up can be split into 3 major phases - that is, milestones:
These Milestones can further be divided into following steps: determining database purpose, organizing required information, dividing information into tables and so on for database configuration. Likewise workstation and test configuration too would have several steps. These actions that may or may not be a part of Milestone are known as Tasks. |
Configuring Tasks
To create a task for a milestone,
-
Select the Milestone from the Milestone List view and click on the Tasks tab in the header pane.
-
Click Add New button to open the New Task form. (Use Add New Link while creating first Task)
-
Specify task Title and Description.
-
You can add a task instantly by using the pre-defined task templates in the application. Select a template from Use Task Template drop down. The task details such as Title and Description are automatically populated.
-
The milestone associated will be displayed in the Associated Milestone field.
-
Select Status and Priority from the drop down.
-
Select Owner (technician) of the task from the drop down. (Members of this project with "Project View" permission will be listed in the owner drop down.)
-
Specify Task Scheduled Start and Scheduled End date.
-
If the task requires on-site visit, then select the Requires on-site visit check box.
Adding more details to Task(s)
To indicate Task's progress and to discuss about ways of bettering it, you are provided with the following fields:
To add more details about the task, click More Fields... button in the New Task form.
-
Select the Actual Start date of the project.
-
Select the Task type from the drop down.
-
Specify the % of completion that helps denote the extent to which the task has been completed (any value between 1 - 100).
-
Specify the Additional Cost in the field provided.
-
Specify any relevant comment about the task in the Comments field.
Quick Add Tasks
To add tasks to projects instantly,
-
Navigate to the tasks tab within a project.
-
Click Quick Add at the top of the task list view.
-
Enter the task title and assign the task owner. Alternatively, you can simply add the task title and hit Enter.

Scheduling Tasks
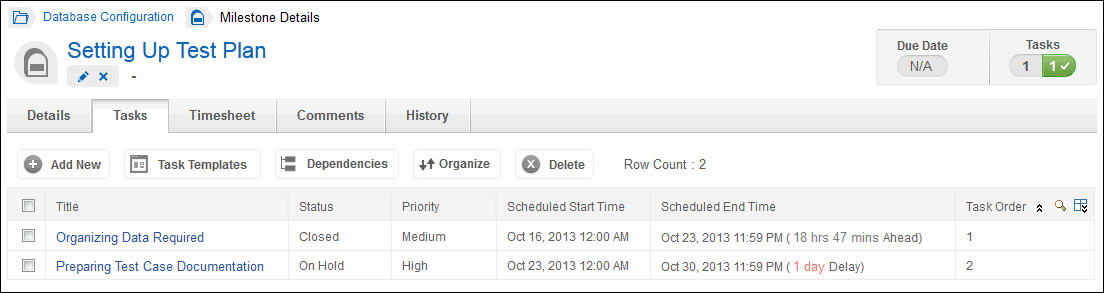
Task Scheduling not only helps you schedule the task but also determine whether the task is 'on-schedule', 'delayed' or 'ahead' by comparing it against real-time completion.
To schedule the task do the following:
-
Configure the Scheduled Start and Scheduled End Date
-
Fill in the Actual Start and Actual End Date (upon project completion)
-
Based on Scheduled/Actual Dates, task would be considered:
-
On Schedule if the Scheduled Date and Actual Date are the same.
-
Delayed if the Task (Actual Date) has past the Scheduled Date. (no of days by which project is delayed gets displayed on the project list view page)
-
Ahead if the Task (Actual Date) is completed before the Scheduled Date. (no of days by which project is ahead gets displayed on the project list view page)
Adding Work Log
Using this option, the time spent by a technician on a task can be recorded. It takes the time of creation to till the request is closed.
-
Click the Title of the task to which you like to enter work log.
-
Click Work Log tab.
-
Select Owner (technician) from the drop down.
-
Select the Start Time and End Time of the task from the calendar lookup.
-
The Time Taken To Resolve the task will be automatically displayed on selecting the Start Time and End Time.
-
If there are any extra charges specify in the Other Charges field.
-
Specify any relevant information about the time spent in the Description field.
-
Click Save button. The work log is listed in the Work Log tab.
Editing Task
To edit a task,
-
Click the Title of the task which you want to edit from the Task List view page. This opens the Task Details page.
-
Click the Edit icon
 displayed below the Task title to modify the task details.
 -
On modifying the details, click Save button to save the changes. If you do not want to save the changes, click Cancel.
Deleting Tasks
Task can be deleted in two ways:
a. Bulk Delete: From Task List view page, select Task(s) to be deleted, and click on Delete button.
b. Single Delete: Select the task to be deleted by clicking on the task title in the Task List view page and click on Delete icon ![]() .
.
Tasks - Basic Elements of Projects