
Receiving PO Items
Once the PO is approved, it is sent to the vendor to receive the ordered items. The ordered items can be received either partially or completely from the vendor. In both the cases you can have the receipt of the received items. On receiving the partial items from the vendor the purchase order can be marked as Partially Received and moved under Partially Received POs. And on receiving the complete items from the vendor, the purchase order can be moved under Closed POs.
-
Log in to the ServiceDesk Plus - MSP application using your user name and password.
-
Click the Purchase tab in the header pane. This opens the Purchase Order list view page.
To mark partially or completely receive items,
-
From the Purchase Order list view page select the corresponding filter option from the Filter Showing combo box. By default, the list of All POs will be displayed.
-
Select Approved POs from the Filter Showing combo box. Click the PO # Name for the received items. This opens View Purchase Order page.
-
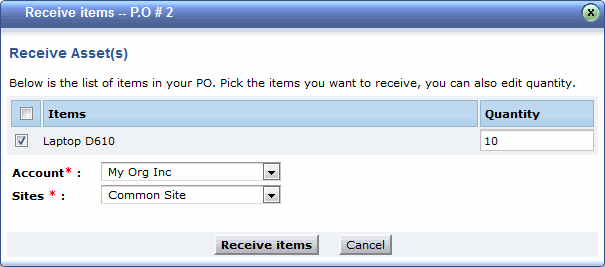
Click on the Actions tab and click Receive Items. The Receive Items dialog pops up.
-
Enable the check box beside each of the received items. If only a part of the ordered items are delivered, then click the quantity of the item which is partially received and enter the quantities that have been received as shown below,
-
Select the Account from the drop down to recieve the items. The Sites will be automatically populated on selecting the Account.
-
Click Receive Items button. This updates the PO with the Received Quantity value and moves the PO under Partially Received POs.
When a future shipment arrives, you can follow the above process to update the quantity of items that have been delivered. Once all the items have been received, the PO moves to the closed status.
All the received items from the PO will be added as resources automatically. And the resources that are created from a particular PO will be associated to that particular PO.
Associated Assets
The purchased items received can be viewed and associated to groups.
-
Click Actions tab -> Associated Assets link option. This will display all the assets that were created from the PO.
-
Associate the assets to the group by enabling the check box beside the asset. Click Actions button --> Add to Group. This opens the Add Resource(s) to pop up window.
-
Select the group from the existing list of groups or enable the radio button beside New Group, to add a new group. The asset gets associated to the corresponding group.