Mobile Client
ManageEngine SupportCenter Plus mobile client improves the efficiency and productivity of your support system by providing the Support Reps with the ability to instantly access their requests while they are away from their desk through their mobile devices. It is a complete browser based web application supporting request features like viewing requests, adding a new request, closing resolved requests, assigning requests, adding resolution and deleting a request.
SupportCenter Mobile Client is compatible with mobile devices such as Blackberry, iPhone, Android and other Smartphones, and is accessed through the mobile browser on typing the url http://<machine-name>:<port-number>/m.
Features
-
Supports request module features such as, creating new request, viewing request details, adding resolution to a request, adding time entry, assigning support reps to a request, closing completed requests and deleting requests.
-
Any actions performed on the requests are based on the Roles assigned to the support reps.
Getting Started
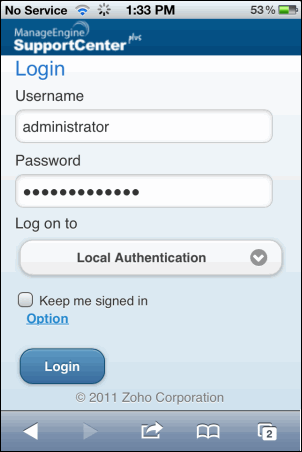
On connecting your mobile device to http://<machine-name>:<port-name>/m, the screen opens to display the login page.
-
User name: User name of the support rep who logged-in server.
-
Password: Password of the support rep for the logged server.
-
Log on to: Choose the domain of the logged in support rep.
-
Keep me signed in: Select this check box to keep signed in forever.
Click Login.
Note: SupportCenter Plus Mobile Client does not support Single Sign-On (SSO).
On logging into the application from your mobile device, the home page displays the Overview, Requests, Search, Recent Items, Business Units, Log out and Change Language options.
-
Overview - displays the number of Overdue Requests, Requests Due Today and Pending Requests of the logged in Support Rep.
-
Requests - displays the request list with option to select, all the Custom Views.
-
Search - search for requests on entering the Request ID in the Search text field.
-
Recent Items - displays the recent items viewed by the Support Rep.
-
Business Units - displays the business units configured in SupportCenter Plus. The business units assigned and enabled to the logged-in support rep are displayed under this tab.
-
Log out - to log out from the mobile client.
-
Change Language - change the language to be displayed in the application from the drop down.
Overview
The overview section of the logged in support rep comprises of the number of all Overdue requests, Requests due to be completed today, the pending requests and the open requests. Click on a view to display the list of request under it.

To revert back to the Home page click home icon  on the top right corner of the page.
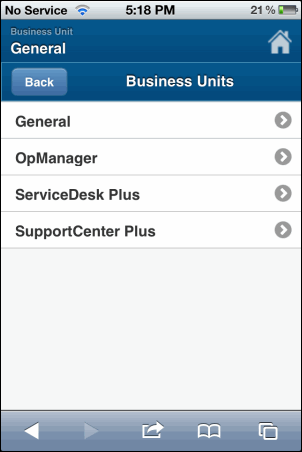
Business Units
The business units assigned and enabled to the logged in support rep is listed under this section. To switch business unit, click the required business unit in the Business Units list view page.
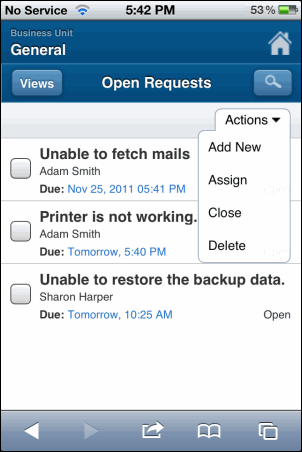
Requests
Selecting Requests from the home page takes you to 'My Pending' requests by default. The requests views can be viewed by clicking Views button. From the Actions drop down you can perform further operations on the request such as adding new request, assigning support reps to request, closing completed requests and deleting requests.
The request list view displays a total of ten requests in a page. You can navigate to other pages using the navigation options below the page. To go back to the Home page, click the home icon icon on the top right corner of the page.
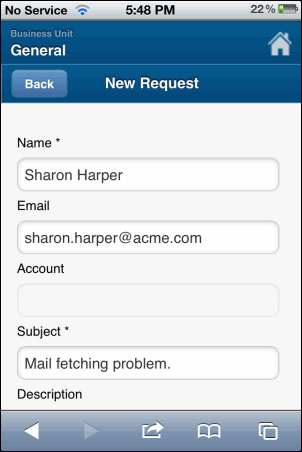
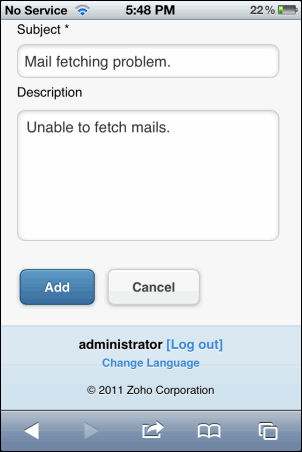
Creating New Request
Requests can now be instantly created from your mobile device on entering details such as, name, email, account, subject and description.
Select Add New from the Actions drop down in the Request list view.
-
Name - name of the contact raising the request.
-
Email - the email ID of the contact.
-
Account - name of the account which is automatically displayed on entering the contact name. The account name will be displayed only when the contact is associated to the account.
-
Subject - a brief summary of the request.
-
Description - a detail description of the request.
Click Add to save and add the request in the request list view.
Viewing Request Details
To view the details of the request, click on the request you wish to view from the request list view page. The request details page displays the Request ID along with the subject of the request, contact name with request created date and time, Support Rep assigned to the request, Due date of the request, Status of the request, last updated date, and Description.
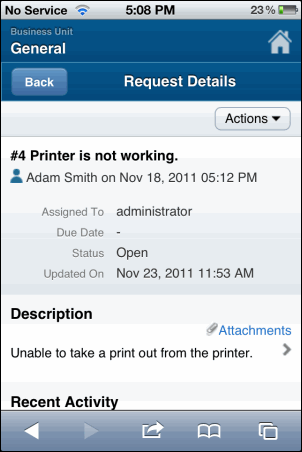
From the request details page, you can perform the following operations:
Editing Request
You can edit the request properties such as status, mode, level, priority, group, support rep, category, sub-category, item, product, created date, created by, response dueby time, and due date.
-
In the request details page, select Edit option from the Actions drop down. The Edit Properties page is displayed.
-
Edit the request properties as required.
-
Click Save.
NOTE: You can also click Properties link in the request details page to edit the request properties.
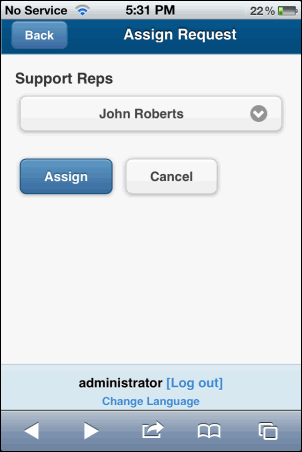
Assigning Request
If you are assigning requests to support reps using your mobile device, then the list of all the available support reps are displayed.
-
In the request details page, click the Actions drop down and select Assign option.
-
Select a support rep from the Support Reps drop down.
-
Click Assign.
Note: You can also assign request to the support rep from the request list view page.
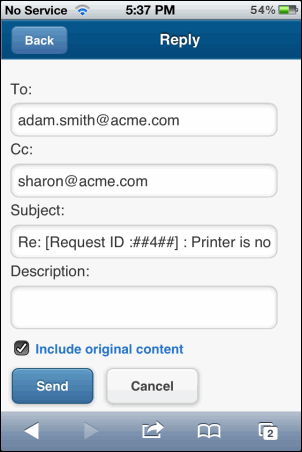
Replying to the contact
-
In the request details page, click Reply button. The Reply page is displayed.
-
Enter the To address of the contact.
-
If you want to send the same information to more than one person then enter the e-mail address of those people in the CC field with comma as a separator.
-
The Subject is pre-populated. You can edit the subject if required.
-
Enter the detailed description relevant to the request in the Description field.
-
Select the Include original content check box, if you would like to include the previous content of the mail.
-
Click Send button.
Forwarding Requests to Support Reps
-
In the request details page, click Forward button. The Forward page is displayed.
-
Enter the To address of the support rep.
-
You can also send the same information to more than one support rep by specifying the mail address in CC field.
-
The Subject is pre-populated. You can edit the subject if required.
-
Provide a detailed description with any other associated details relevant to the request in the Description text box.
-
Select the Include original content check box, if you would like to include the previous content of the mail.
-
Click Send to send the mail to the concern support rep.
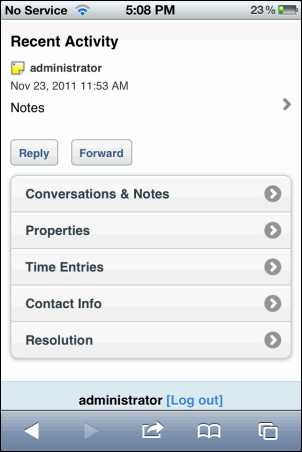
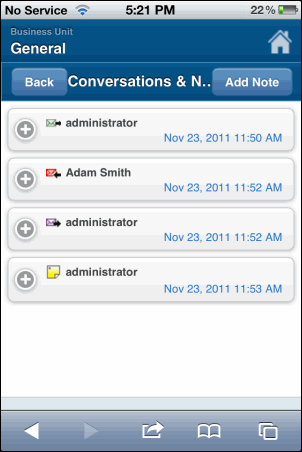
Conversations and Notes
All the mail transactions between the support rep handling the request and contact, and the notes added to the request can be viewed as Conversation and Notes in the request details page.
Viewing Conversations and Notes
Click Conversations and Notes link in the request details page to view the conversation and notes list.
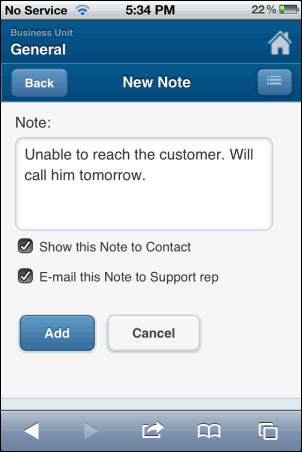
Adding Notes
To add note to a request:
-
Click the Conversations and Notes link in the request details page.
-
Click the Add Notes button to open the New Note page.
-
Enter the content in the Note text box.
-
The note added can be made public or private.
-
By default, the notes are private, but can be made public on selecting Show this notes to Contact also check box.
-
You can also notify the support rep assigned to the request about the addition of note on selecting E-mail this Note to Support rep check box.
-
Click Add button. The note is added along with a date and time stamp. The name of the person who added the note is also displayed.
You can add any number of notes to a request. The added notes are displayed in the descending order with recently added note first. You also have options to edit and delete the notes.
Deleting Requests
-
In the request details page, click the Actions drop down and select Delete option.
-
A dialog box pops up asking your confirmation on the delete operation.
-
Click OK to proceed. The request is deleted.
Note: You can also delete more than one request by selecting the check box and selecting the Delete option from the Actions drop down in the request list view page.
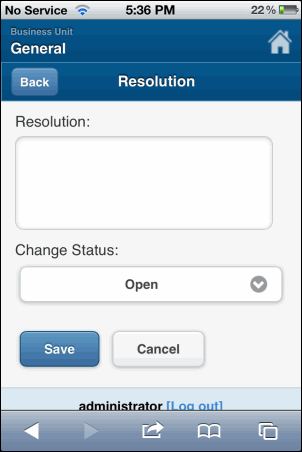
Resolution
Using Resolution option, you can enter resolution for a request, view existing resolution and edit them if required.
NOTE:
Adding Resolution to a request
-
From the request details page, click Resolution tab to open the Resolution page.
-
Enter the resolution in the text field.
-
You can also change the status of the resolution from Change Status drop down list.
-
Click Save.
Editing Resolution for a request
-
Click Resolution from the request details page.
-
If the resolution is added to the request then the Edit button appears.
-
Click Edit to modify the resolution.
-
Modify the content and if necessary change the status.
-
Click Save.
Time Entries
Using Time Entry option, you can record the total time spent on resolving a request. You can Add, View, Edit and Delete Time Entry.
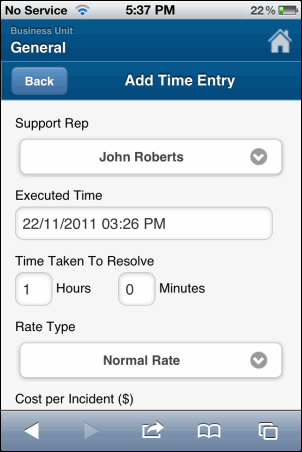
Adding Time Entry
-
Click the Time Entries tab in the request details page.
-
Click the add time entry icon  to open the Add Time Entry page.
-
By default, the support rep assigned to the request is displayed in Support Rep drop down box. If required, you can choose the support rep from the drop down list.
-
Select the date and time when the request was Executed by clicking the field.
-
Specify the total Time Taken to Resolve the request in Hours and Minutes.
-
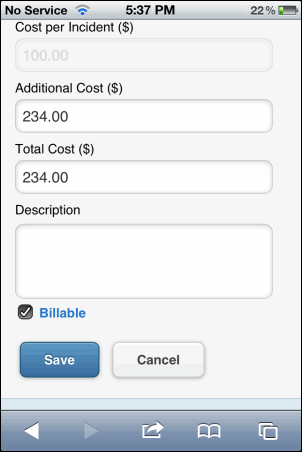
Select the Rate type from the drop down. The cost per incident or hour specified and added to the Support Plan is displayed automatically.
-
If there are any Additional Cost, then the same can be provided in the field.
-
The Total Cost in $ is automatically populated on entering the above two fields.
-
Specify the Description about the time spent details in the given text box.
-
By default the Billable check box is selected. If you wish to make the time entry as non-billable, clear the Billable check box.
-
Click Save.
Viewing Time Entries
-
In the request details page, click the Time Entries tab. The Time Entires List view is displayed listing all the time entries added for the request.
-
The time entries are displayed along with the name of the Support Rep who had resolved the request, the Time taken to Execute the request, the Total Time Spent for the request and the Total Cost to be paid by the customer.
NOTE: From the Time Entries List view, you can edit and delete the time entry.
Editing Time Entry
-
In the Time Entries list view page, click edit icon  beside the time entry which you want to edit. The fileds in the time entry page turn editable.
-
You can select the Support Rep, select the Executed Time, edit the Time Taken To Resolve the request, select the Rate Type, edit the Additional cost, Total Costs and Description of the time entry.
-
Select or clear the Billable check box as you wish.
-
Click Save. The details are saved and listed in the Time Entries list view page.
Deleting Time Entry
-
In the Time Entries list view page, click delete icon  beside the time entry which you want to delete.
-
A dialog box pops up asking your confirmation on the delete operation.
-
Click OK to proceed. The time entry is deleted.
Closing Request
When the contact is completely satisfied that his/her request has been completely attended to and the reported problem has been resolved by the support rep, then the request can be closed by the support rep.
NOTE:
If you have selected the mandatory fields to be filled while closing the request in Request Closing Rules, then enter the mandatory field and close the request. Else an error message appears and the request cannot be closed unless the field value is entered.
To close the request:
-
In the request details page, click the Actions drop down and select Delete option.
-
A dialog box pops up asking your confirmation to close the request.
-
Click OK to proceed. The request is closed.
If you have enabled the option to send survey on completion of request, a survey form is sent to the contact via mail. Alternatively, you can also change the status field to Closed while editing the request.
Limitations of SupportCenter Plus Mobile Client
-
Supports only Request module.
-
Only Support Reps can access mobile client through their mobile devices.
-
Inline edit for changing the request properties is not supported.
-
Requests cannot be created through Request Template though templates are configured in the server.