Assigning Requests to Support Rep
All the unassigned requests raised in SupportCenter Plus can be assigned to Groups and Support Reps. This increases the efficiency and turn around time of the support desk team. Hence reducing the waiting period of the request as they are assigned and answered sooner by the support reps.
You can either pickup the request or assign it to support reps.
Assigning request to Support Rep
Each request is owned by a support rep, who are responsible for handling the request until it is closed. To assign a support rep,
-
Click on the Request tab in the header pane to open the request list view page.
-
Click the Subject link of the request to be assigned a support rep.
-
From the request details page, click Assign drop down menu -> select Assign option. The Assign Group and Support Rep page opens.
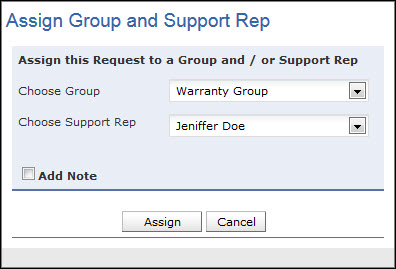
You can either assign the request to a Group or to a Support Rep, or to a Group and Support Rep.
-
Choose the Group of the request from the combo box.
-
Select the Support Rep under the selected Group to assign the request.
- You can also a add note by enabling the Add Note check box.
-
Click Assign button.
-
Alternatively, you can also assign support rep using inline edit option. Click the support rep name shown in the request details block. This opens the drop down box as shown below. Select the support rep from the list and click the  icon to select the support rep name else click cancel icon.
- When two users working on the same request tries to assign different support rep at the same time, a warning message will be displayed in a pop up window as shown below. This message will be displayed while trying to assign support rep using Request List view page and Request Details page.
Picking up Request
You can self-pick up all the unassigned requests and assign the requests in your name. To pick up requests,
-
Click on the Request tab in the header pane to open the request list view page.
-
Select the Subject link of the request you wish to pick up.
-
From the request details page, click on Assign drop down menu -> select Pickup option. The request gets assigned to you.
Bulk Assign Request
You can also assign more than one request to the support rep or to yourself. To assign requests in bulk,
-
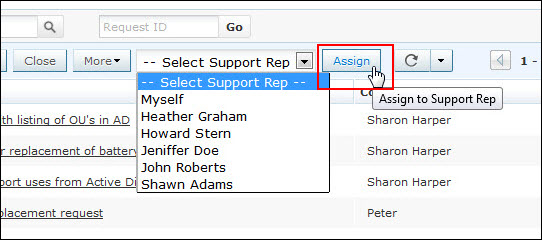
From the Requests list view page, select the requests to be assigned to a support rep by enabling the check box.
-
Click the Select Support Rep drop down menu and select the name of the Support Rep from the list. You can also assign the requests to yourself on selecting Myself from the list.
-
Click Assign button. The requests gets assigned to the selected support rep.
Unassigning Support Rep
You can unassign a request from the support rep and move it back to unassigned status. To unassign a support rep,
-
From the request list view page, click the Subject link of the request to be unassigned a support rep.
-
From the request details page, click Assign drop down menu and select Assign option. The Assign Group and Support Rep pop-up page opens .
-
Click the Choose Support Rep combo box and select NONE.
-
Click on Assign button. The request gets unassigned.