Installing Remote Access Plus agents
Once you've created the Zoho account, log-in to the Remote Access application and install the agents on the remote computers you want to access and troubleshoot. Installing agents manually on all the computers should be a tiring task, so you can automate the entire agent installation process by following any one of the given methods.
- Installing the Distribution Server and the agents
- Installing the Roaming agents
- Using GPO script
- Using agent installation link
- Imaging the agents and deploying the imaged OS
- Installing the agents using local AD
- Installing agents using SCCM
- Installing agents using Microsoft Intune
- Bulk Installation of Agents in AWS Instances
Installing the Distribution Server and the agents
You can install the Distribution Server and agents by following the steps mentioned below:
- You can log in to web console and navigate to Agent.
- Choose Scope of Management.
- Select Remote Office and click Download Agent. This should be done on the computer, where the Distribution Server needs to be installed.
- This option allows the administrator to download the Distribution Server and the agents.
- Once the download/installation is completed, you can right-click setup.bat and run as administrator to execute it.
- You will be prompted to choose the below-listed options on the command prompt
- Install Distribution Server in the computer
- Install Agent in this computer
- Install Distribution Server in this computer and agents in multiple computers
- Install Agents in multiple computers
You should add computer names or IP address in the computernames.txt file and keep them ready for agent installation.
Note: The admin$\Temp folder of the target machine must be reachable from the computer that we are trying to deploy the agent.
- You can choose option 3
- Providing the administrator credentials will invoke agent installations on the target computers.
Installing agents
In case you have installed the distribution server and you wanted to add only the newly added computer, you can choose to follow the steps above and at step 6, you will have to choose option 4. This will invoke agent installation since the Distribution Server is already installed.
Roaming Agent Installation Steps
You can install the Roaming Agents by following the steps mentioned below:
- Log into web console and navigate to Agent.
- Choose Scope of Management(SoM).
- Select Remote Office and click Download Agent.
- Once the download is completed, you should right-click the setup.bat file and run as administrator to execute it.
- You'll be prompted to choose the below-listed options on the command prompt:
- Install Agents on multiple computers.
- Install Agent on this computer.
- You can choose option (2).
- The agents will be installed in the target computers.
Using GPO script
- Download the Agent Zip file, extract it, and follow the steps given below:
- Click the Agent tab, navigate to Scope of Management.
- Click Download Agent.
- Select the required office.
- Note: This can be a local office or a remote office depending on which computers you want to install agents in.
- Save the .msi, .mst &DCAgentServerInfo.json file in the network share that you've created.
- Click Start>Run.
- Enter gpmc.msc.
- Click OK.
- Right-click the domain and select Create and Link a GPO here.
- Specify a name for the GPO.
- Select the GPO.
- Note:If you want to install the agent on only a few client computers, follow the steps given below. To install the agent in all your client computers skip these steps.
- Click the Scope tab.
- In the Security Filtering section, click Add.
- In the Select User, Computer, or Group dialog box, click Object Types.
- Specify specific computer object types.
- Click OK.
- Specify the computer names.
- Click Check Names.
- Click OK.
- Right-click the GPO and click Edit.
- Expand Computer Configuration>Policies>Windows Settings>Scripts.
- Right-click Startup and click Properties.
- Click Show Files.
- Drag and drop the InstallAgent.vbs (download the .txt file and rename it as .vbs), UEMSAgent.msi, UEMSAgent.mst, DCAgentServerInfo.json to this location (Domain name\Sys Vol\Domain name\Policies\{ID}\Machine\Scripts\Startup) and copy the location path.
- In the Startup Properties dialog box, click Add.
- Browse and navigate to the location (Domain name\Sys Vol\Domain name\Policies\{ID}\Machine\Scripts\Startup) and select the InstallAgent.vbs script or specify the path (copied location) and the script as mentioned below: (Domain name\Sys Vol\Domain name\Policies\{ID}\Machine\Scripts\Startup)\InstallAgent.vbs
- Specify the script parameters as mentioned here: UEMSAgent.msi UEMSAgent.mst
- Click OK to close the Add a Script dialog box.
- Click OK to close the Startup Properties dialog box.
- Close the Group Policy Object Editor.
- Close the Group Policy Management dialog box.
- The agents will be installed in the target computers.
You've now installed an agent in client computers using GPO.
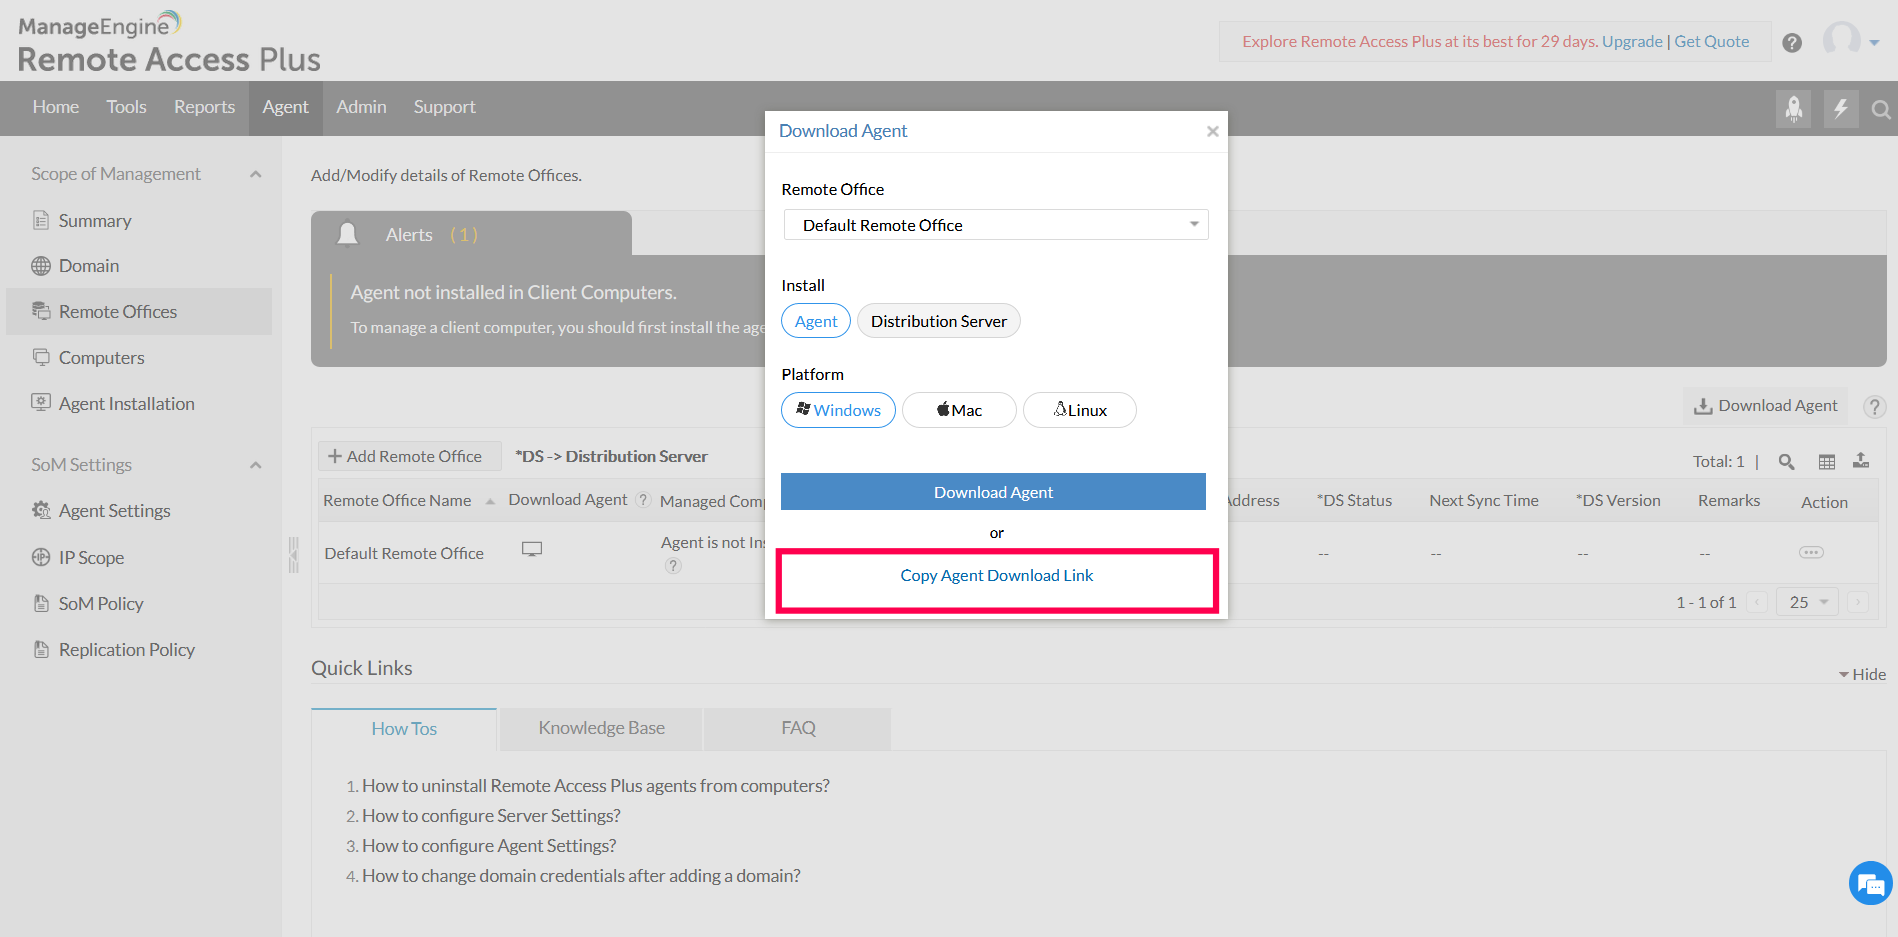
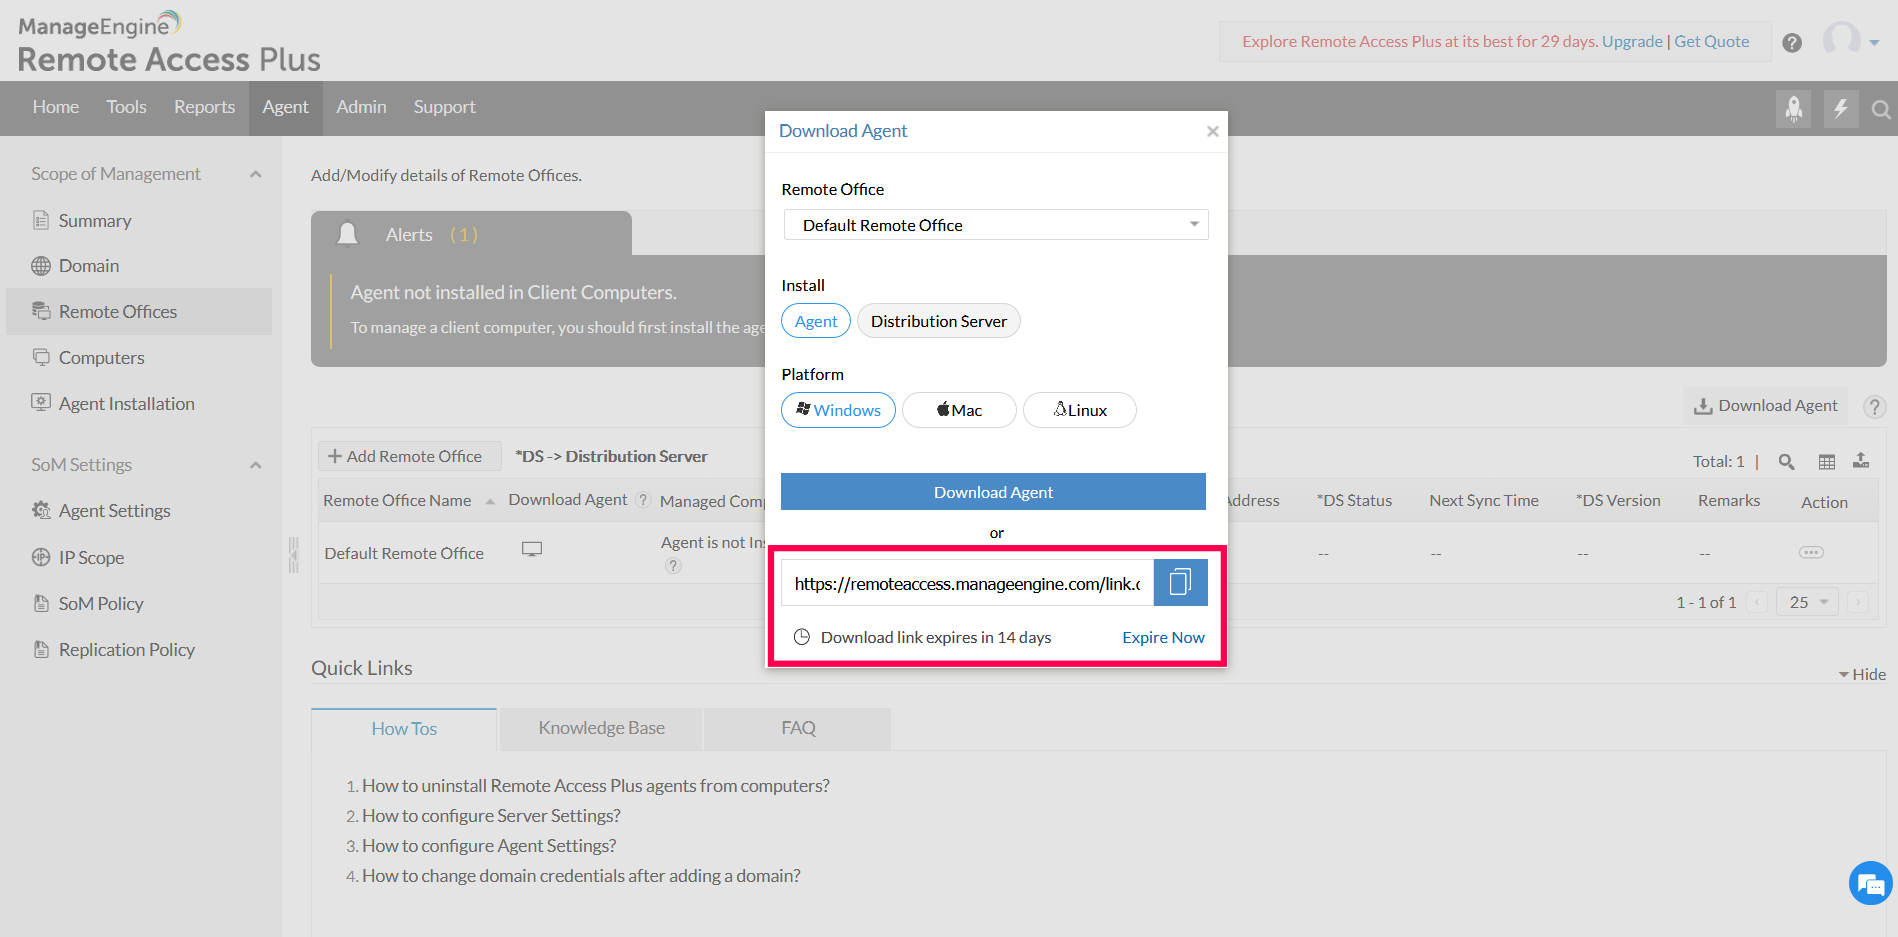
Using agent installation link
Remote Access Plus agent can be downloaded from a copied link. The copied link can be shared to end users who could then download and install the agents in their machines. This option is available on clicking Download Agent from Remote Offices or Computers tab. On clicking copy option, the URL for the selected Remote Office will be created. The default expiry time of the URL is 15 days. Using the copied link, agent can be installed:
- Directly from the browser
- From the terminal
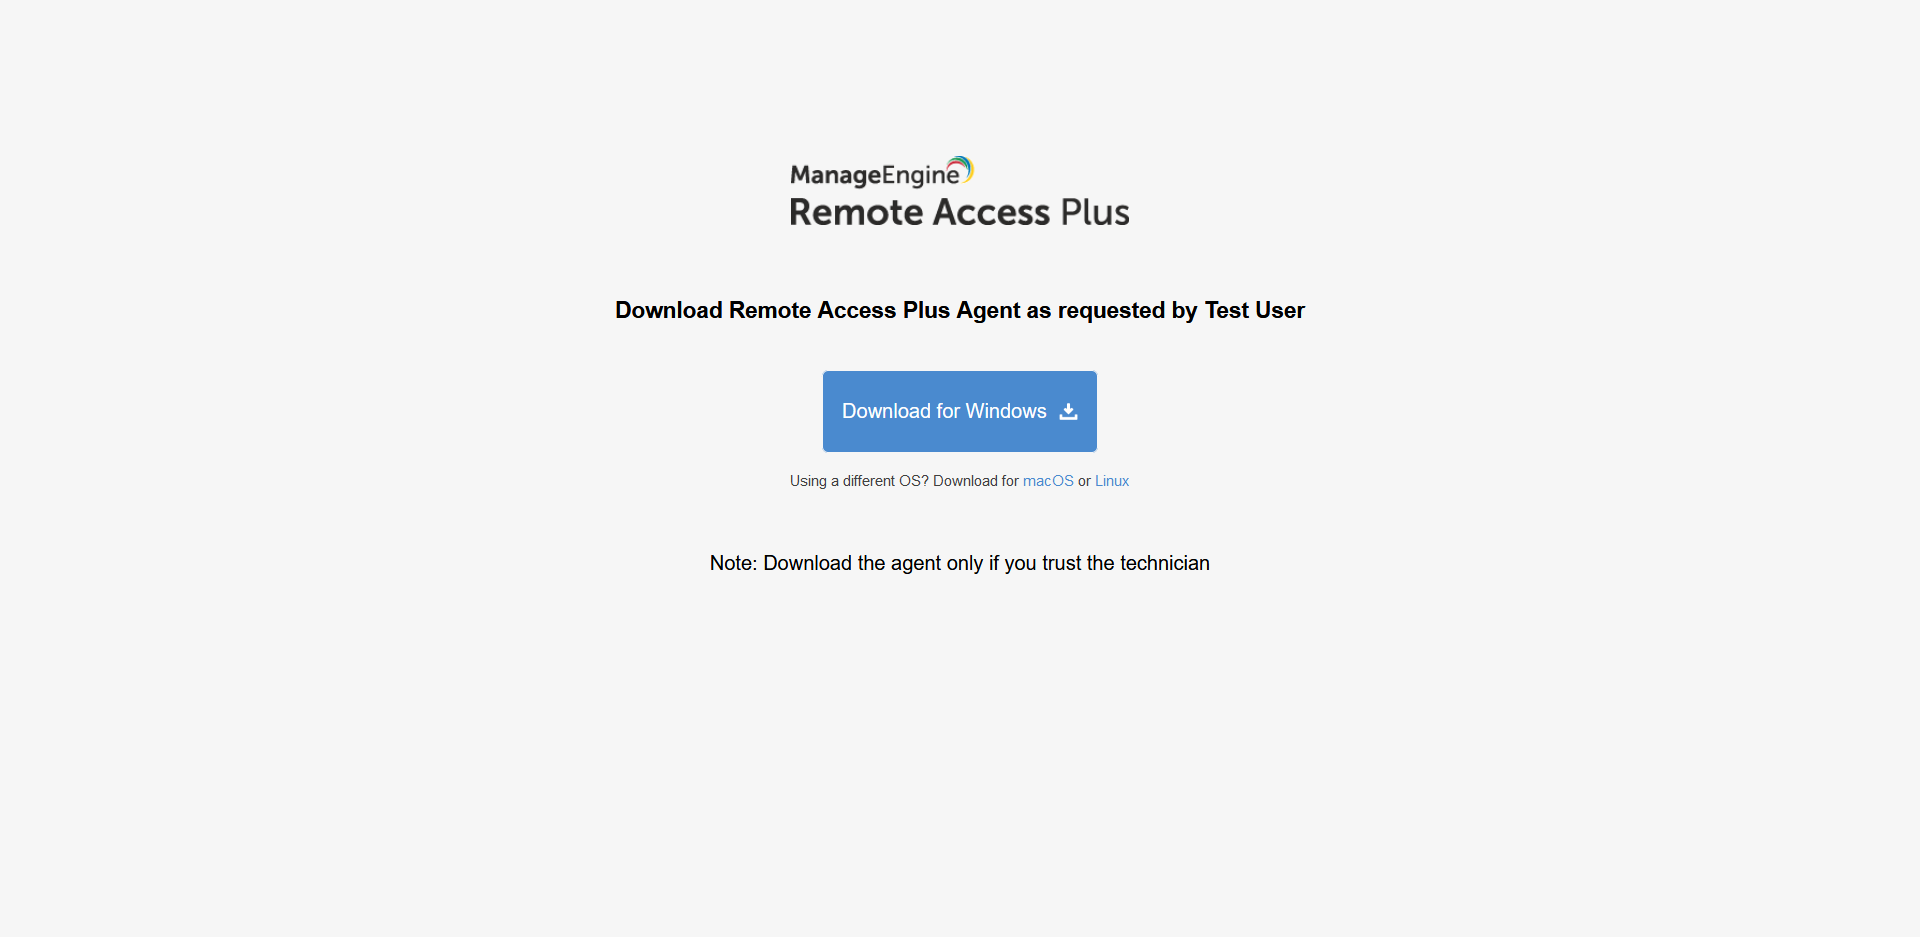
Directly from the browser:
On visiting the copied URL from the browser, the user will be presented with an option to download the agent. The user has to select the OS and the agent download will be initiated. If the user visits the URL from an unsupported browser, an error page will be displayed. If the user visits the copied URL from a supported browser post the expiry time, the error page will be displayed.
From the terminal:
In case the user wishes to download the agent via terminal, he/she can do so, by modifying the copied URL. The format of the copied URL from the console (for US Data Center) is:
https://remoteaccess.manageengine.com/link.do?actionToCall=download&encapiKey=<encapiKey>
For terminal based download, an extra OS parameter is required:
https://remoteaccess.manageengine.com/link.do?actionToCall=download&encapiKey=<encapiKey>&os=<supported-os>
Valid OS parameters are:
Note: OS must be supported for the product for which agent is downloaded.
Agent can be downloaded using CURL. The CURL download command is:
- curl "paste_copied_url_with_os_param" --output DCAgent.exe - (Windows)
- curl "paste_copied_url_with_os_param" --output DCAgent.zip - (macOS or Linux)
Silent Installation of Agent EXE (Windows):
Once the URL is downloaded, the agent can be installed silently using EXE itself for Windows machines by adding "/silent" argument. The command to install agent is:
DCAgent.exe /silent
Alternatively, the installation process can be automated using a powershell script.
- Replace the url in the below script with the copied url
- Save the script as .ps1 filetype
- Run the powershell script
Downloaded User:
For additional security, on enabling waiting for approval option, we can get to know from which technician's shared link, the agent was installed. Based on this, we can approve the computers to be managed.
Installing the agents using local AD
You can install agents by following the steps mentioned below:
Note: Distribution Server must be added and installed manually before proceeding with agent installation. To install Distribution Server manually, refer to Installing the Distribution Server and the agents.
- Agent -> Computers -> Add Computers button. Select a AD connector and add a domain/workgroup.
- Click the Select Computers link pertaining to a domain/workgroup. This opens the Select Computers dialog listing all the available computers of the domain/workgroup.
- Select the computers that have to be managed through Remote Access Plus Cloud and click Ok. You can also manually specify the computer names instead of choosing them from the list. The selected computers get added to the Selected Computers table in the Add Computers view.
- Repeat steps 2 and 3 for adding computers from multiple domains/workgroups. Select the "Install Agent Immediately" checkbox to install the Remote Access Plus agents in the selected computers immediately. When this option is not selected, the computers are only added. You need to install the agents later to manage them.
- Click done to add the selected computers. All the selected computers get added to the Scope of Management.
- The Computers page will list all the computers that are being managed by the Cloud along with the status of the agent installation and the agent version. Agents can also be installed at a later stage, by selecting the computers from Agent -> Computers page and clicking the Install Agent button.
Note: Roaming agents cannot be pushed and installed through the AD.
Installing the agents using SCCM
You can install agents using SCCM by following the steps mentioned below:
- Download Agent.
- Extract these 3 files and paste them in a shared path, which is accessible by all the computers. (Files to be extracted: i) RemoteAccessPlusAgent.msi ii) RemoteAccessPlusAgent.mst iii) DCAgentServerInfo.json)
- Change the shared path location as mentioned in the batch file.
- Create an SCCM package with this script.
- Deploy the package.
- The agents will be installed in the target computers.
Installing agents using Microsoft Intune
You can install agents using Microsoft Intune by following the steps mentioned below:
- Download Agent.
- Extract these 3 files and paste them in a shared path, which is accessible by all the computers. (Files to be extracted: i) RemoteAccessPlusAgent.msi ii) RemoteAccessPlusAgent.mst iii) DCAgentServerInfo.json).
- From the extracted location, Compress the following files using 7-zip.
- RemoteAccessPlusAgent.msi
- RemoteAccessPlusAgent.mst
- DCAgentServerInfo.json
- Setup.bat (NOTE : Download the Setup.bat file from the following link and use that file while compressing).
- Name this compressed file as remoteaccessplusagent.7z.
When using 7-zip to compress the files, use the Setup.bat file downloaded from the link only. Do not use the file that is already present in the Agent folder.
- Open the following link, Copy the contents and paste it in a text file named config.txt
- Download the LZMA SDK package from the link, extract the contents. Go to the bin folder and locate the file 7zS2.sfx.
- Create a folder and include the files
- remoteaccessplusagent.7z
- config.txt
- 7zS2.sfx
- Open Command prompt with Admin privilege in the same folder and run the command, copy /b 7zS2.sfx + config.txt + remoteaccessplusagent.7z agent.exe
- An executable file agent.exe will be generated in the same folder.
- Install the executable agent.exe manually in a machine without an agent (test machine). If the agent installation fails in this machine, retrace the steps again. If the installation succeeds then proceed.
- Upload this executable file to Microsoft Intune.
- Now you can deploy the agent through Microsoft Intune to the machines in your network.
- The agents will be installed in the target computers.
Bulk Installation of Agents in AWS Instances
The following are the steps to install agents in bulk in AWS Instances
- Create S3 Bucket in the region you want to deploy the Agents.
- Upload all files from the downloaded Agent zip folder to the created bucket and set the permission as public.
- Create IAM role for SSM.
- In the IAM console navigate to Roles -> Create Roles.
- In the Select type of trusted entity, choose AWS service.
- Choose the service EC2.
- If the specified service has only one use case, it is selected automatically after which choose NEXT: Permissions.
NOTE:
Use cases are defined by the service to include the trust policy that the service requires.
- In the Create role window as given in the figure below, search for AmazonEC2RoleForSSM and select it.
Note: You can also add AmazonEC2RoleForSSM in the already existing IAM role.
- Change EC2 settings.
- Select the existing instance.
- Choose Action at the top of the screen.
- Choose Instance settings and assign the created role.
- Run the command to install the agents in AWS Instances.
- In the AWS System Manager console, choose Run Command
- Run the following command :
Note:
BUCKETPATH is object URL.
New-Item -ItemType directory -Path C:\\LocalOffice\\localsetup
$WebClient = New-Object System.Net.WebClient $WebClient.DownloadFile("BUCKETPATH/DCAgentServerInfo.json","LOCALPATH/DCAgentServerInfo.json") $WebClient.DownloadFile("BUCKETPATH/RemoteAccessPlusAgent.msi","LOCALPATH/RemoteAccessPlusAgent.msi") $WebClient.DownloadFile("BUCKETPATH/RemoteAccessPlusAgent.mst","LOCALPATH/RemoteAccessPlusAgent.mst") $WebClient.DownloadFile("BUCKETPATH/setup.bat","LOCALPATH/setup.bat") cmd /c msiexec /i C:\\LocalOffice\\localsetup\\RemoteAccessPlusAgent.msi REBOOT="REALLYSUPPRESS" MSIRESTARTMANAGERCONTROL="Disable" TRANSFORMS=C:\\LocalOffice\\localsetup\\RemoteAccessPlusAgent.mst ENABLESILENT=yes /qn
- The agents will be installed in the target computers.
