Knowledge Base

How to export Exchange Online mailboxes to PST format using RecoveryManager Plus

In this article:

Objective

This article explains how to export Exchange Online mailboxes to PST format using RecoveryManager Plus, helping organizations manage email data more effectively and maintain compliance through efficient archiving. Exporting to PST also aids in optimizing storage and reclaiming unused licenses. The guide walks users through each step of the export process and highlights the benefits of using RecoveryManager Plus for this task.

Why export Exchange Online mailboxes to PST format?

Exporting Exchange Online mailbox data to PST format is important for a number of reasons. Some of the most common reasons include:

  • Compliance and legal requirements: PST exports help organizations archive email data systematically, making it easier to retrieve information during audits and legal inquiries.
  • Accessing archived data: PST files allow you to access archived mailboxes that you no longer need to access on a regular basis.
  • Mailbox size management: Exporting older emails to PST format helps manage mailbox size and improves performance, ensuring users can access necessary information without reaching storage limits.
  • Reclaim unused licenses: Retaining mailboxes in Exchange Online requires a paid license. Exporting mailboxes to PST files facilitates reclaiming licenses from former users while retaining access to mailboxes.

Steps to follow

The following steps illustrate how you export entire mailboxes or specific mailbox items in your Exchange Online environment to PST format.

To export a mailbox from your on-premises Exchange,

  1. Navigate to the Exchange tab > Export > Export to PST.
  2. Click on the New Export Job button located in the top-right corner of the screen.
  3. Select Microsoft 365 in the Exchange Type drop-down.
  4. Select the Microsoft 365 tenant which contains the mailbox that you wish to export to PST from the Tenant drop-down.
  5. Provide a name for the export job.
  6. Select the mailboxes that you wish to export by clicking the add icon Add Icon in the Select Mailboxes field. You can select all the mailboxes by selecting the check-box adjacent to the Display Name text. To search for individual mailboxes, use the search icon Search icon. After you’ve selected all the mailboxes you wish to export to PST, click OK.

    Note: You can also import a CSV file with the list of mailboxes to be exported by clicking the import icon Import icon. In the pop-up that appears, click Browse and select the CSV file which contains the mailboxes to be exported.

  7. In the Mailbox Folders to Exclude drop-down, select the folders that you wish to exclude from being exported to PST.
  8. Select the Repository in which the exported PST is to be stored.
  9. Click Advanced Settings to configure the following additional settings.
    • To split the PST file into multiple smaller files to overcome the import limit of Outlook, select Enable split PST and provide the maximum size for each file in the space provided. The application supports splitting PST files to a maximum of 50GB.

      Note: The individual PST files might slightly exceed or fall short by a maximum of 10% of the specified file size.

    • To add a layer of security for your PST, select Secure PST with a password and provide a password.
    • To export items created or modified in a specific time range, select Export items in range and set the time from the calendar.
  10. Click Export to start the process.
    1
     

    Choose the mailboxes to include in the export job

    1
     

    Set the size limit at which the PST file should be split into multiple parts.

    Exporting Exchange Online mailboxes to PST

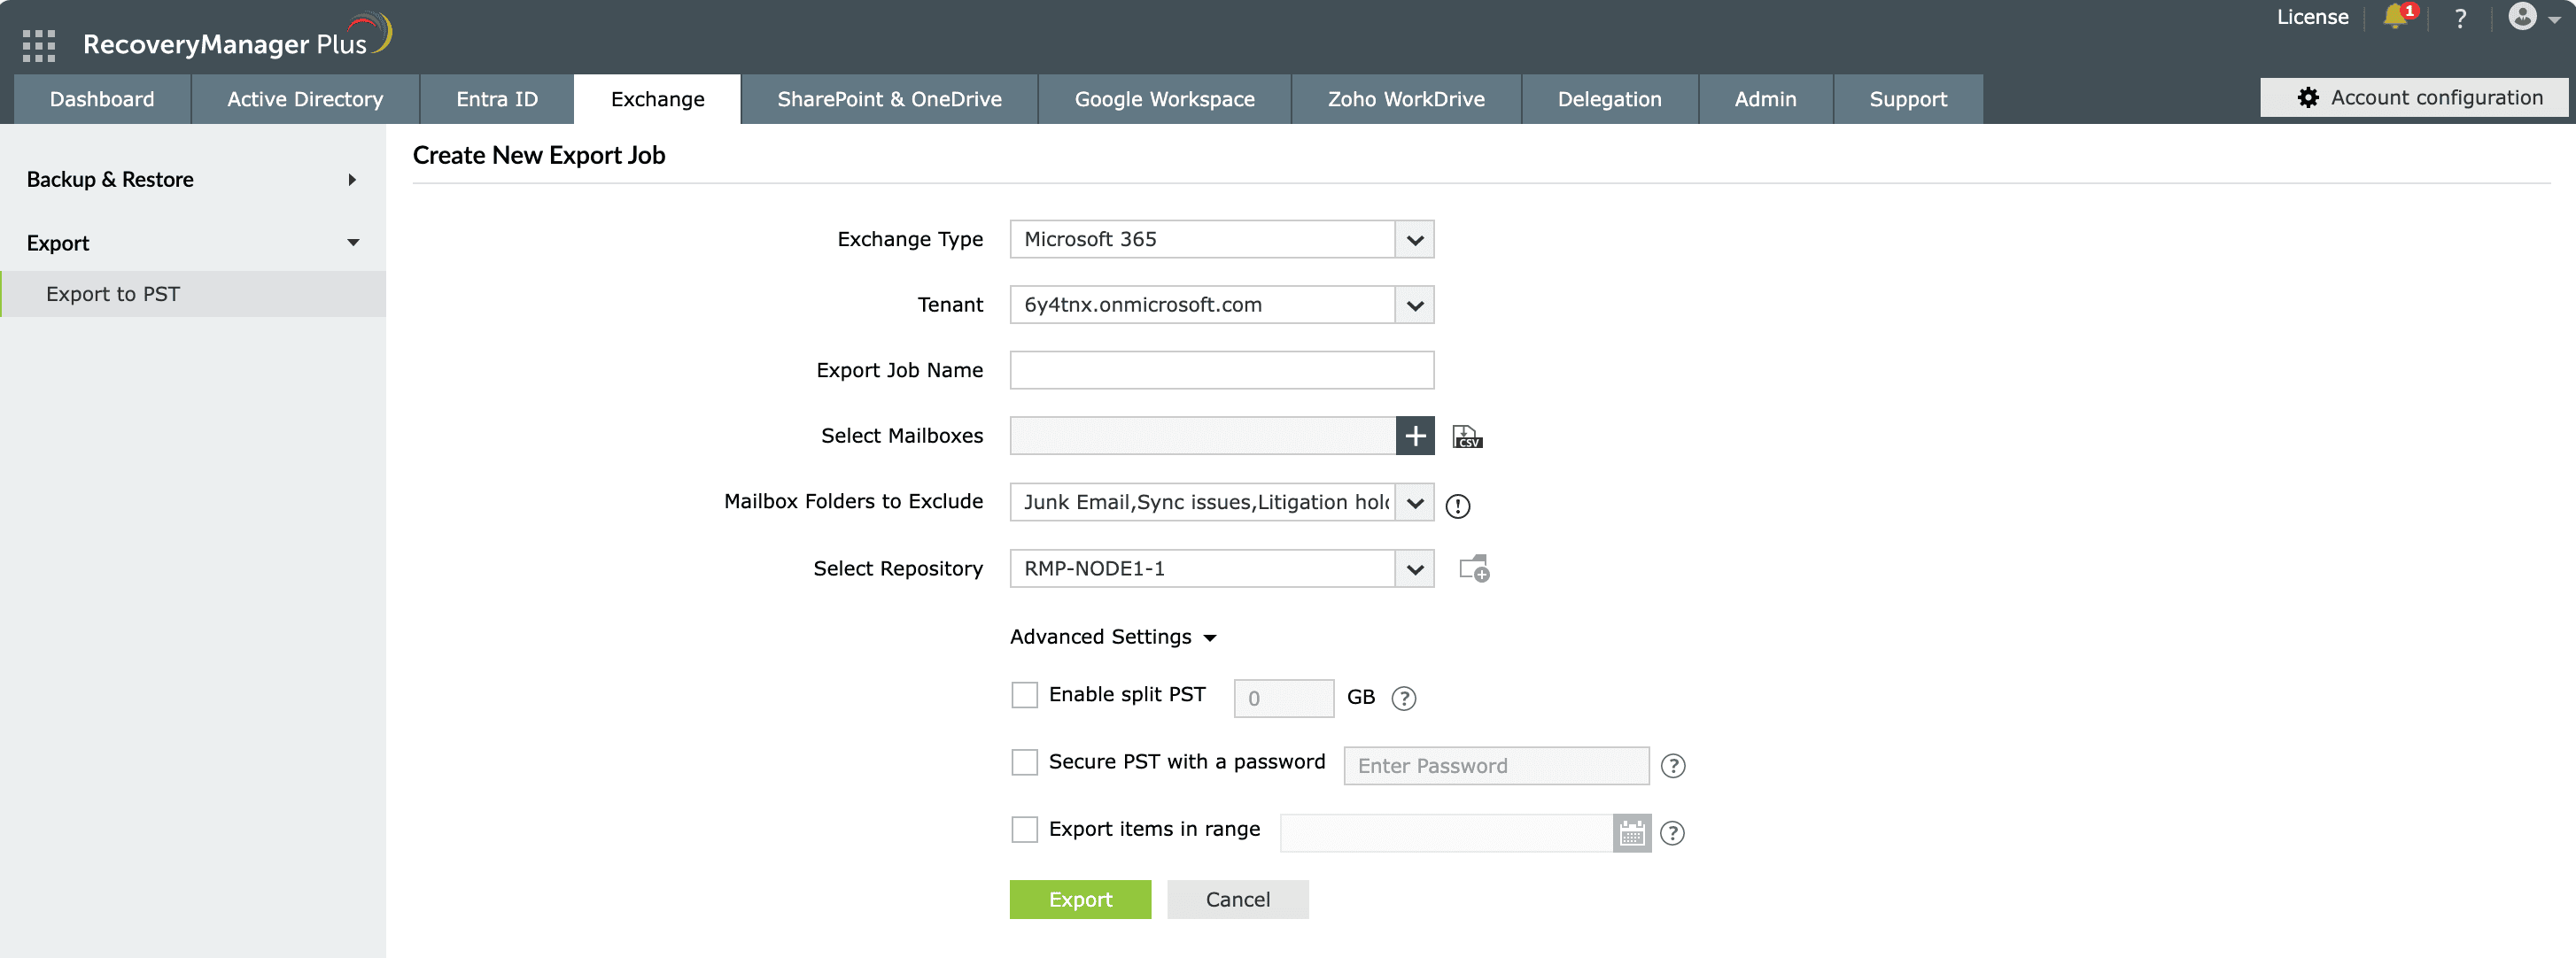
    Figure 1: Exporting Exchange Online mailboxes to PST using RecoveryManager Plus.

    Choose the mailboxes to include in the export job
    Set the size limit at which the PST file should be split into multiple parts.

    Once you have exported a mailbox to PST, the screen will display the following information.

    • The name of the export job.
    • The path where the PST file is stored.
    • The time at which the export job was initiated.
    • The time taken to complete the export job.
    • The status (success/failure) of the export job.
      • If the product encountered an issue at any point during the PST export, click the Retry link to resume the PST export.
      • Clicking the View Details link under the status field will display the list of steps the product performed and the status of each step. Finding out the step at which the export failed will assist in troubleshooting any issue that the product might encounter. Clicking Stop will stop the export operation.

Benefits of using RecoveryManager Plus to export mailboxes to PST format

  • Bulk export: Simplify the process of exporting multiple mailboxes at once using a CSV file, making it easy to manage large volumes of email data.
  • Split PST files: Export the contents of a mailbox to multiple PST files, each with a maximum size of 50GB, to overcome the Outlook import limit.
  • Password protection: Secure PST files with a password, providing an additional layer of security for the exported data.
  • Flexible export: Choose to export entire mailboxes or specific items based on your needs.

Last updated on: 23-05-2025

Need further assistance?

Fill this form, and we'll contact you rightaway.

Request Support

  •  
  • *
     
  • *
     
  • *
     
  • By submitting you agree to processing of personal data according to the Privacy Policy.

"Thank you for submitting your request.

Our technical support team will get in touch with you at the earliest."

A single pane of glass for AD, Entra ID, Microsoft 365,
Google Workspace, Exchange, and Zoho WorkDrive backup.
  • » Personal WorkDrive backup
  • » Backup retention
  • » Incremental backup