Knowledge Base

How to restore Exchange Online mailboxes using RecoveryManager Plus

In this article:

Objective

This article explains how to restore Exchange Online mailboxes using RecoveryManager Plus. It guides users through selecting backup schedules, reviewing mailbox contents, and performing full or item-level restorations. This capability is crucial for recovering lost, deleted, or corrupted mailbox content, helping organizations maintain business continuity and meet compliance requirements by enabling quick, reliable data recovery.

Prerequisites

  • To restore Exchange Online mailboxes, you must have at least one backup of the mailboxes in RecoveryManager Plus. For information on how to back up Exchange Online mailboxes, click here.

Steps to restore Exchange Online mailboxes

By following these steps, you can securely restore Exchange Online mailboxes with RecoveryManager Plus.

  1. Log in to RecoveryManager Plus as an administrator.
  2. Navigate to Exchange > Restore.
  3. Select Microsoft 365 in the Exchange Type drop-down.
  4. Select the tenant with the mailbox for which data is to be restored.
  5. From the Select Backup drop-down, select the schedule that contains the mailbox to be restored.
  6. Once you’ve selected the schedule, a list of all mailboxes backed up in the selected schedule will be displayed. The result will also contain information like the email address, number of items backed up, total size of the backup, and number of items backed up during the last backup cycle and the size of those items. Click the Backup history icon icon-backup to see the complete information about every backup operation carried out for the particular mailbox.
  7. Select the mailboxes that you want to restore and click the Review and Restore button (Fig. 1). You can also use the search icon icon-search to short-list the mailboxes using the name or the email address of the user.
    1
     

    Select the backup schedule that includes the mailbox you want to restore.

    1
     

    Review the selected mailboxes before starting the restoration process.

    Restoring Exchange Online mailboxes in RecoveryManager Plus.

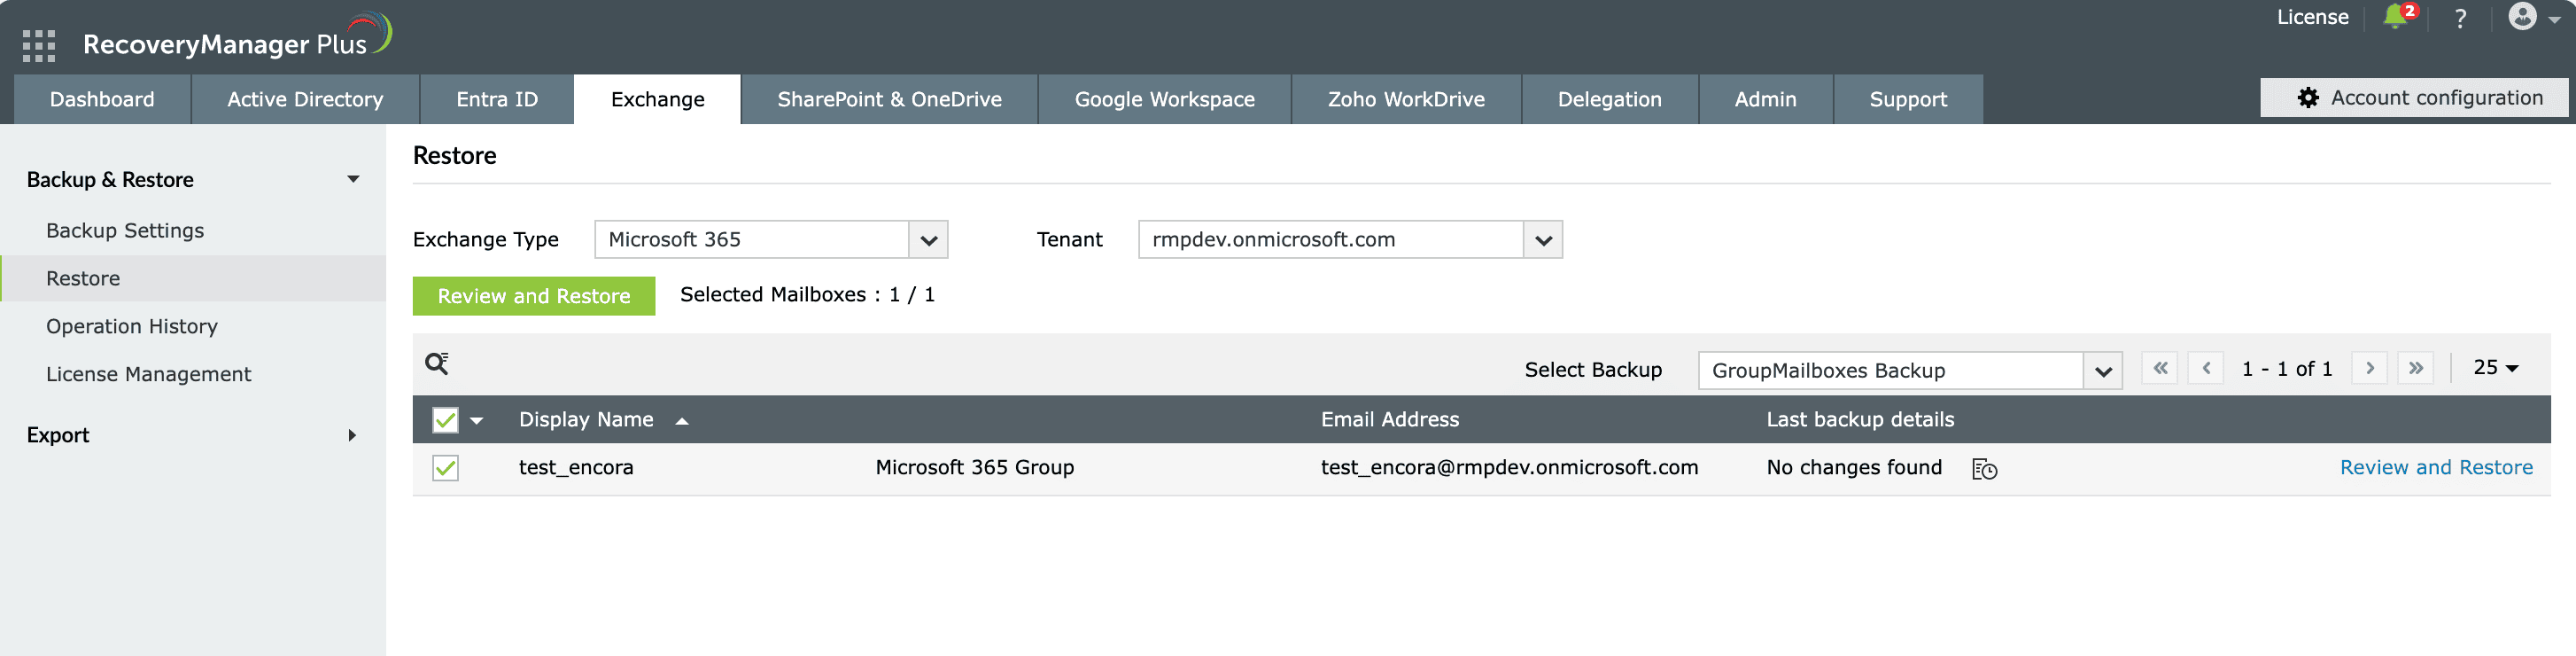
    Figure 1: Restoring Exchange Online mailboxes in RecoveryManager Plus.

    Select the backup schedule that includes the mailbox you want to restore.
    Review the selected mailboxes before starting the restoration process.

  8. On the screen that appears, the left pane provides the list of all the mailboxes you have selected.
    • Use the Select All link to restore or export all the mailboxes you have selected.
    • To restore or export particular mailboxes to the backed-up version, click the check box against the mailbox’s name. You can also use the search bar at the top of the left pane to search for a particular mailbox.
    • To restore individual items, like contacts, notes, or individual mailbox folders, click the mailbox name to display all folders, select the items that you wish to restore, and follow the steps listed here to restore or export the items.
    • Note: Once you've selected a mailbox folder, you can further limit your search to items that match specific criteria by clicking the search icon icon-search in the top-left corner of the results screen. Depending on the folder that you've selected, you'll be provided with a list of filters.
    • You can also use the Advanced Search option to search the entire backup for items that match specific criteria:
      • Click the Advanced Search link located in the top-right corner of the screen (Fig. 2).
      • In the pop-up that appears, the Select Mailboxes field will display the list of all the mailboxes that you selected on the previous screen. Choose the mailboxes you want to search within.
      • Select the type of item that you want to search for from the list of available options: calendar, contact, journal, mail, note, post, and task.
      • Provide the criteria to search and select the items that you wish to restore.
        1
         

        Select specific mailbox items from the left pane.

        1
         

        Use filters with the Advanced Search option to search for specific mailbox items.

        Selecting Exchange Online mailbox items for restoration.

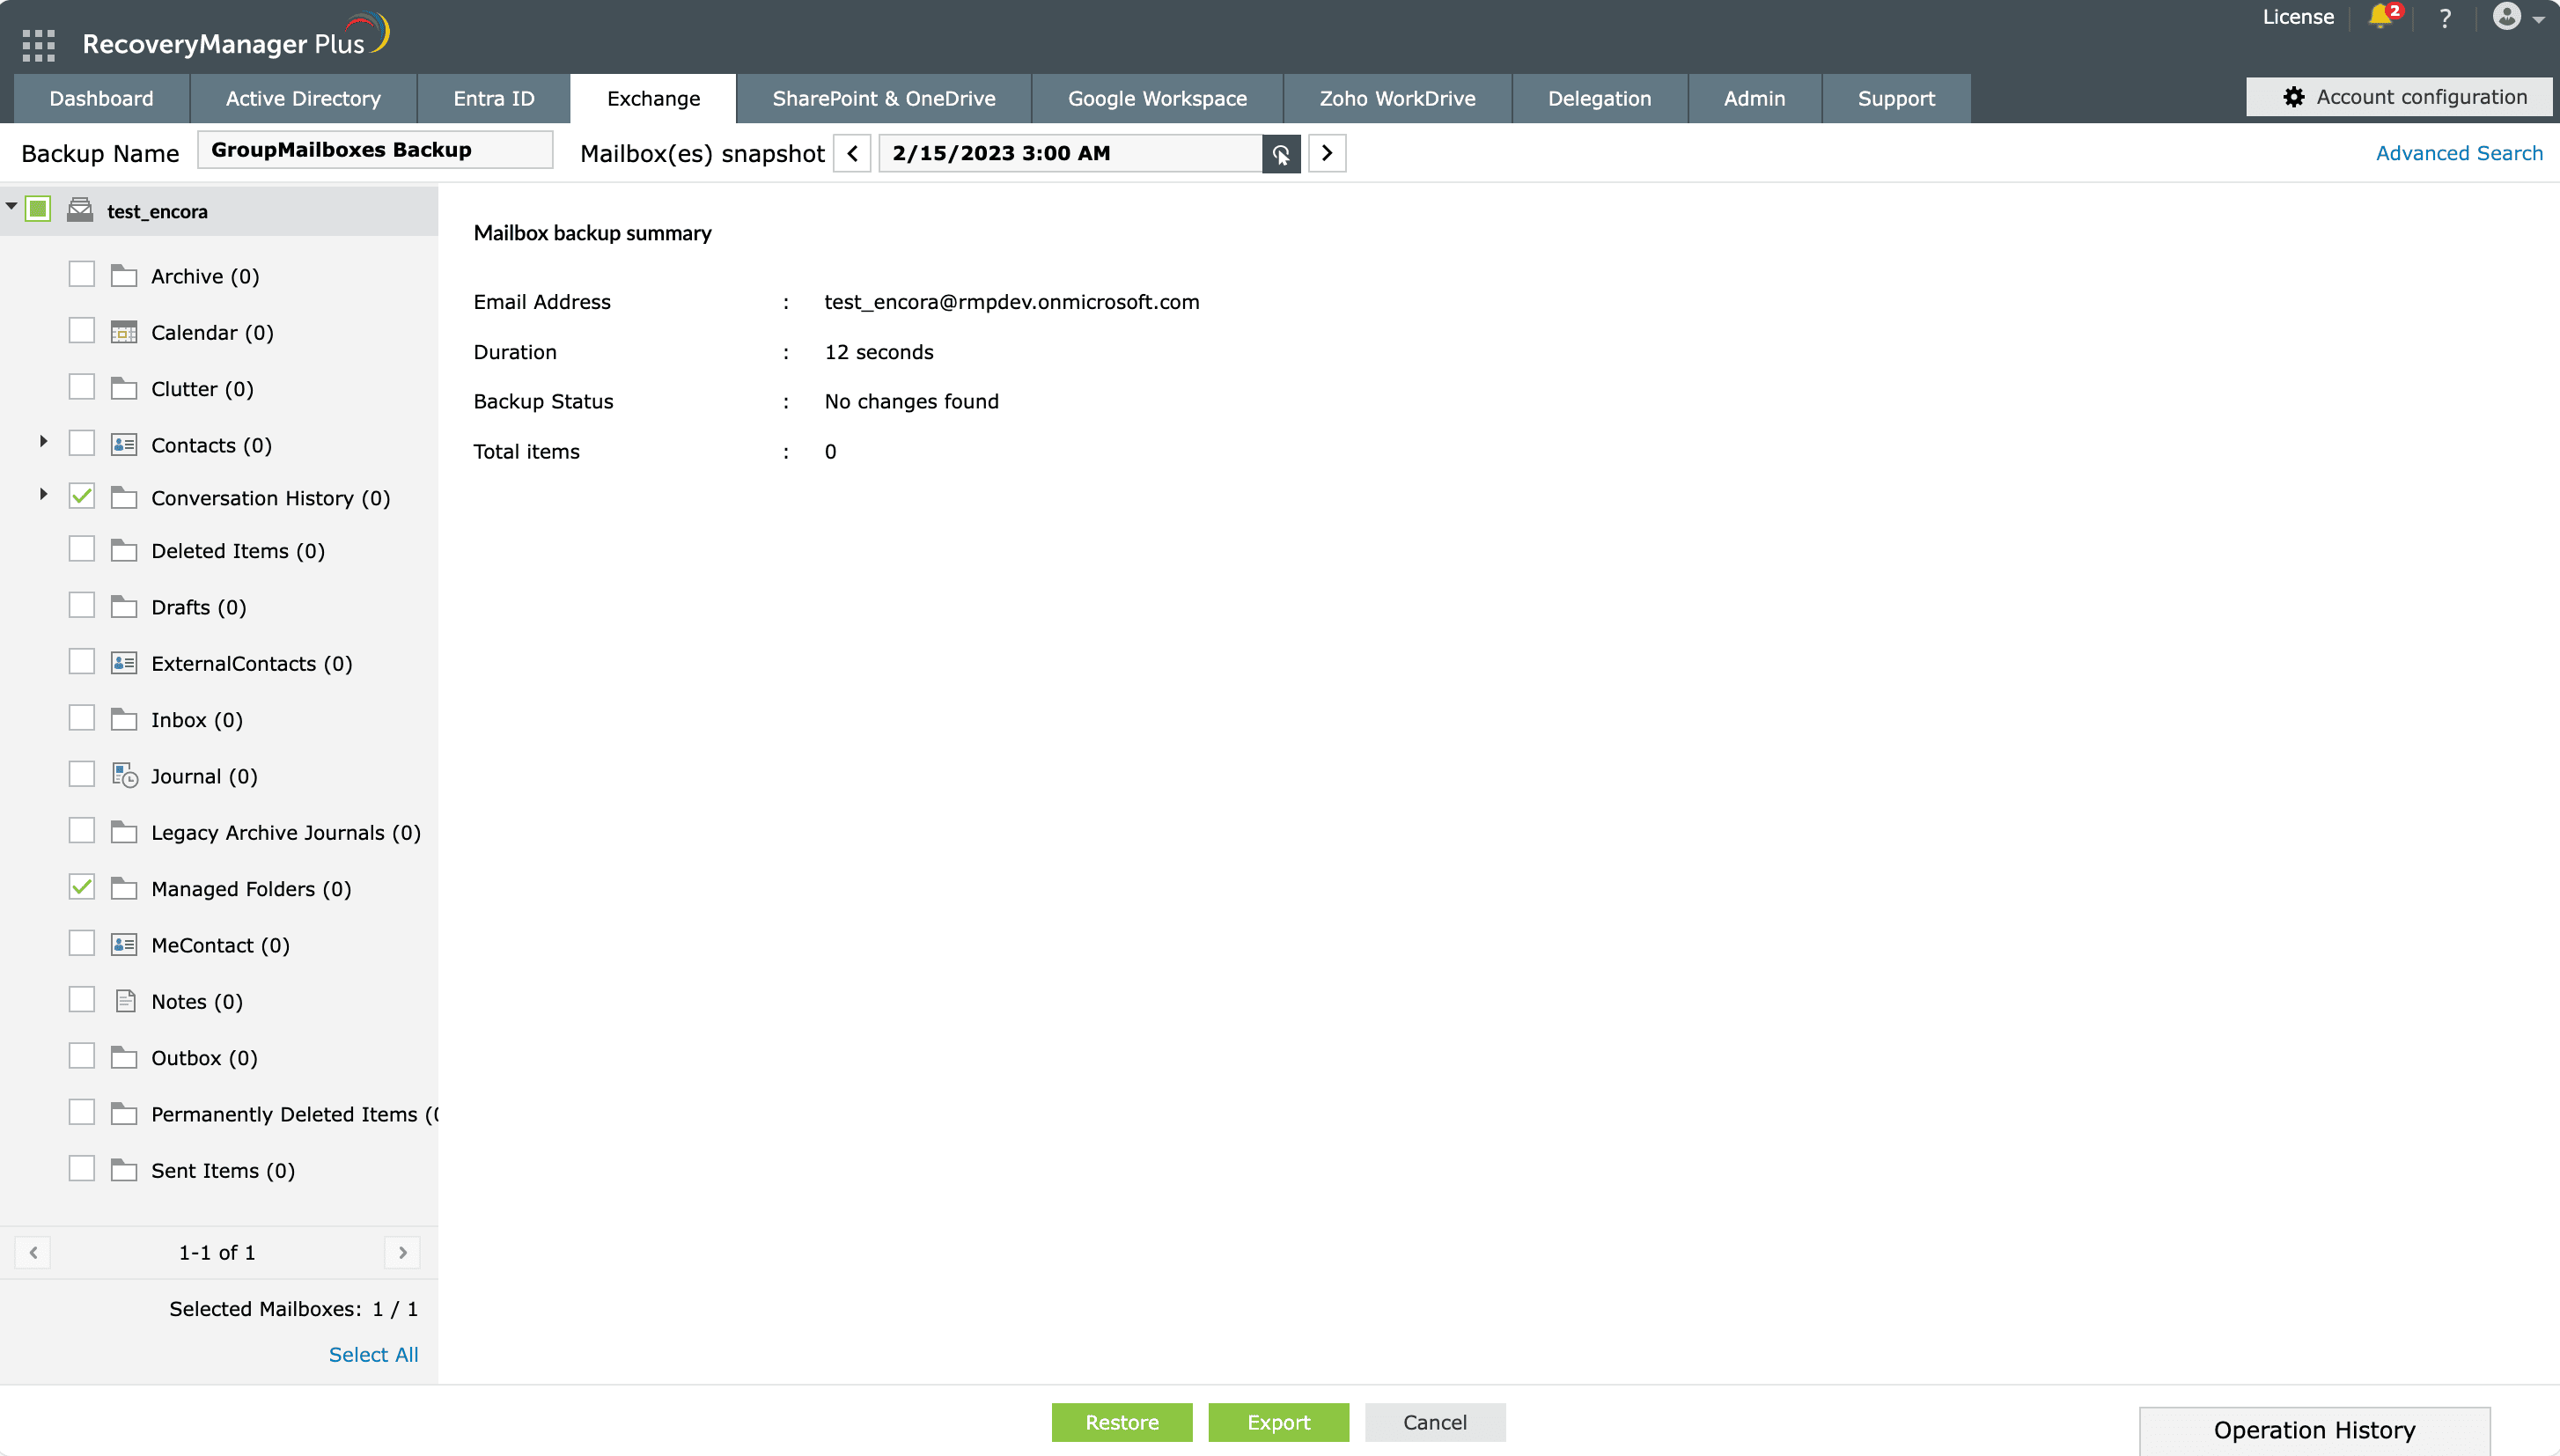
        Figure 2: Selecting Exchange Online mailbox items for restoration in RecoveryManager Plus.

        Select specific mailbox items from the left pane.
        Use filters with the Advanced Search option to search for specific mailbox items.

  9. Once you have selected the mailboxes, click the Restore button located at the bottom of the page. The Restore Wizard pop-up will appear.
  10. The first screen shows the mailboxes that you selected for restoration and the number of items that will be restored for each mailbox. Click Next after verifying the selection.
  11. Select if the contents should be restored to the same location or a different location.
    • If you wish to restore the contents to the same location, select Restore to original location.
    • If you wish to restore the contents to a different location, select Restore to different location and click Browse. You can restore the contents of the mailbox to an on-premises Exchange mailbox or an Exchange Online mailbox.
    • Click Select Target Folder to provide the folder in which the items are to be restored.
  12. Provide a name for the restore operation. You can choose to restore just the modified items or the missing items by selecting the appropriate option. Click Restore to begin the restoration process.
  13. Click Operation History in the bottom-right corner of the screen to view the status of the last five restorations. Clicking Stop will stop the restore operation. Clicking the View All link in the pop-up will take you to the Operation History screen. For more information on what the Restore History screen provides, click here.

Related topics and articles

Last updated on: 23-05-2025

Need further assistance?

Fill this form, and we'll contact you rightaway.

Request Support

  •  
  • *
     
  • *
     
  • *
     
  • By submitting you agree to processing of personal data according to the Privacy Policy.

"Thank you for submitting your request.

Our technical support team will get in touch with you at the earliest."

A single pane of glass for AD, Entra ID, Microsoft 365,
Google Workspace, Exchange, and Zoho WorkDrive backup.
  • » Personal WorkDrive backup
  • » Backup retention
  • » Incremental backup