Understand subform field
The subform field enables you to display a form within a form. The form in which you add a subform is referred as the main form. Refer to the following sections to learn about subforms:
Appearance
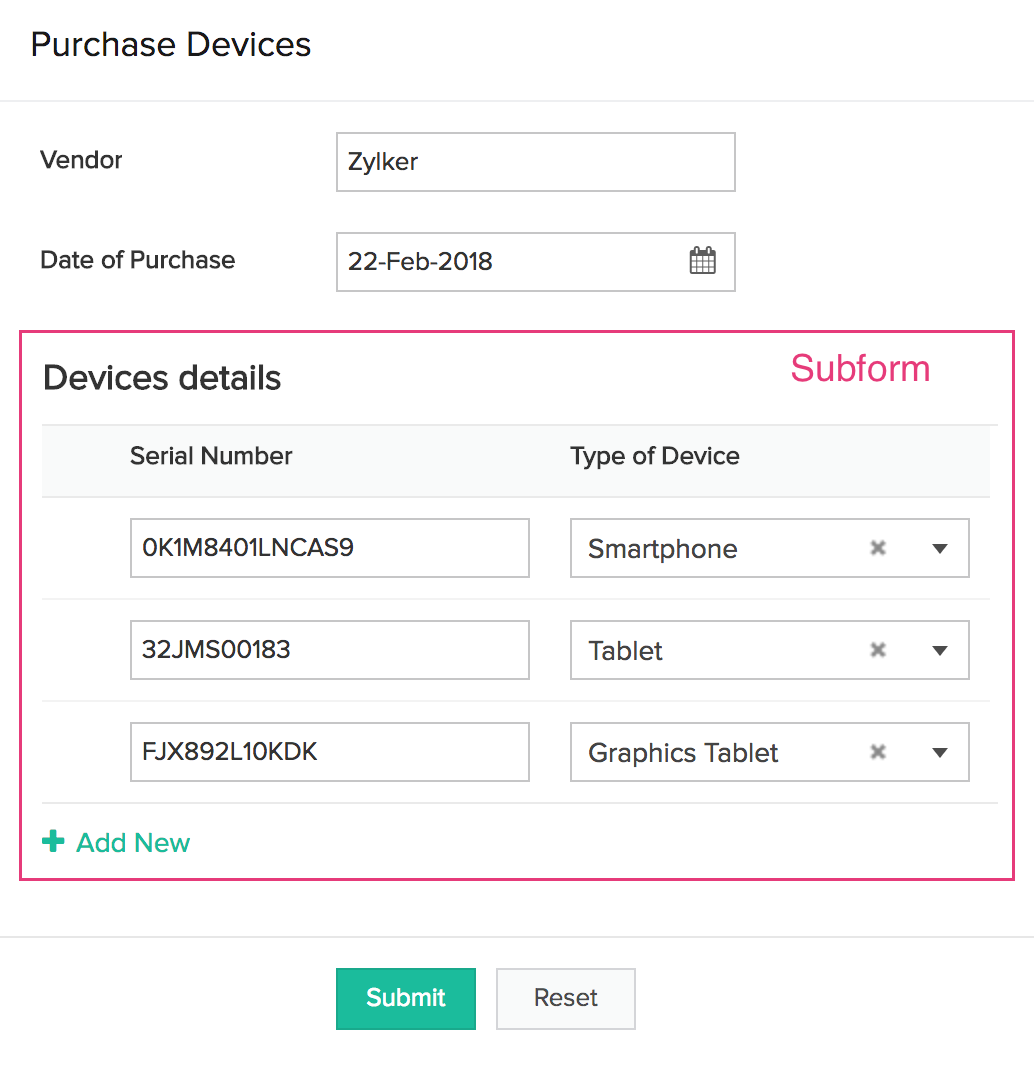
Below is how a subform looks on a form:
- When a user accesses from a web browser:
When to use this field
The subform field is best suited for enabling your users to enter data that has a master-detail relationship. Let us take the example of IT Asset Management (ITAM) to understand this.
Imagine that you are building an app to manage the devices - laptops, smartphones, and tablets, in your organization, and as part of it, want to capture the following for each device:
- Its date of purchase
- The purchase order number is was bought under
- Vendor-related data like the name, email address, phone number, and address of the vendor from whom the purchase is made
- Device-related data like the name, type, serial number, and price of the device
Well, accomplishing this isn't tough. You just need to create a form (say, Purchase Order Form), and share it with your asset manager. Imagine if your form allows the asset manager to submit the purchase details of one device per entry. Then, even if your asset manager purchases multiple devices from a vendor on the same date, he/she would have to submit that many entries through the Purchase Order Form. Consequently, the records stored in the Purchase Order Form will look (in its report) as if they represent separate purchases when they are not.
A subform can help in this scenario. But let's first answer the question: Is a master-detail relationship present in this above scenario? Yes, it is. Here's how:
- First, each devices is purchased from a vendor. This establishes that there is a relationship between a device and a vendor.
- Second, does your IT manager purchase (from a vendor) one device at a time? Mostly, no.
- As multiple devices may be purchased as part of the same order, the date of purchase, purchase order number and vendor-related data are the Master, with the device-related data being the Detail.
When you add a subform field in your form, such that it enables entering the details of devices being purchased, the following will be the benefits:
- Each time a purchase is made, your asset manager will be able to enter the details of all devices in one go. (Each purchase record can have multiple devices associated with it)
- Consequently, when your asset manager accesses the report, it will look as if the devices have been grouped per purchase.
Understand adding a subform field to your form
When you add a subform field to your form, you need to define if the subform is a:
- Blank Form: This option enables you to create a form within the main form such that, the subform's existence is inside the main form
- Existing Form: This option enables you to add an existing form (present in your app) as a subform
If you want to enable your users to separately view the subform records in a report, you must create that form and then add it as a subform. Else, the subform records can only be viewed in the main form's reports.
Features
You can perform the following customizations for the user experience of subforms in your form:
- Customize field width: You can set the width of the fields in the subform. The following options are available:
- Adjust field width automatically: This option will automatically assign the widths of each field in the subform
- Adjust field width manually: This option will let you set the width of each field in the subform
- Set default entries: You can set the number of entries your subform will expect your users to enter. However, this does not compel your users to enter that many entries in the subform. They can add more or less number of entries.
- Limit maximum entries: You can set the maximum number of entries that the subform will accept from your users. When your users click/tap Add New to add an entry that exceeds the maximum number of allowed entries, they will instead be prompted with the message: You have reached maximum number of rows. You cannot add further.
- Customize the field name and field link name of this field
- Make it mandatory for your users to enter an input in this field
- Enable showing this field only to the app’s admin (and hide it from other users)
- Enable displaying a tooltip message when your users hover on this field
- Enable sorting for the fields listed within the subform. For instance, a Customer Form might require its subform to list the recent orders of a customer. Here, the subform can be sorted by specifying the sorting preference as descending. Let's say a customer record is added with the list of orders in the subform. The sorted list in the subform will be available while viewing the record in the report and while editing the record.
If you have added an existing form as a subform, then in reports, you can enable the data stored in the subform field to appear clickable (on a web browser) and tappable (on a phone/tablet), such that on clicking/tapping it, your users can get to see the Detail View of the related form's report.