Apple DEP (Device Enrollment Program): How to Enroll & Deploy Apple Devices?
Apple Device Enrollment Program or Apple DEP, is a free Apple Deployment Program or tool that enables IT admins to simplify the bulk enrollment and deployment of Apple devices including iOS, iPadOS, macOS, and tvOS devices in the organization. Essentially, Apple DEP is a tool to enroll Apple devices. Apple DEP enrollment is preferred in most organizations as it makes the enrollment process of corporate-owned iOS devices automated and seamless for IT Admins. Through the Apple Device Enrollment Program (DEP) portal, the IT Admin can enroll Apple devices into MDM without any direct contact with the devices and also, enable Supervision of devices during the initial setup, including the possibility to ease the configuration process by skipping a few initial setup stages which are not mandatory for your organization. For detailed information about Apple Device Enrollment Program or Apple DEP, you can refer to this. You can enroll devices not purchased directly from Apple or its reseller with Apple DEP, through Apple Configurator as explained here. Also, the device needs to access the domains listed here.
NOTE: Apple Deployment Program is a free Apple service that simplifies the deployment of corporate Apple in organizations. Apple provides two deployment services under the Apple Deployment Program, one is the Apple Device Enrollment Program (which is now updated to Apple Business Manager) for enterprises and the Apple School Manager for educational institutions

We have made your job simpler!
Learn how to set up Apple Device Enrollment Program (Apple DEP) with MDM, in just 3 minutes through this demo video.
How Apple Device Enrollment Program works?
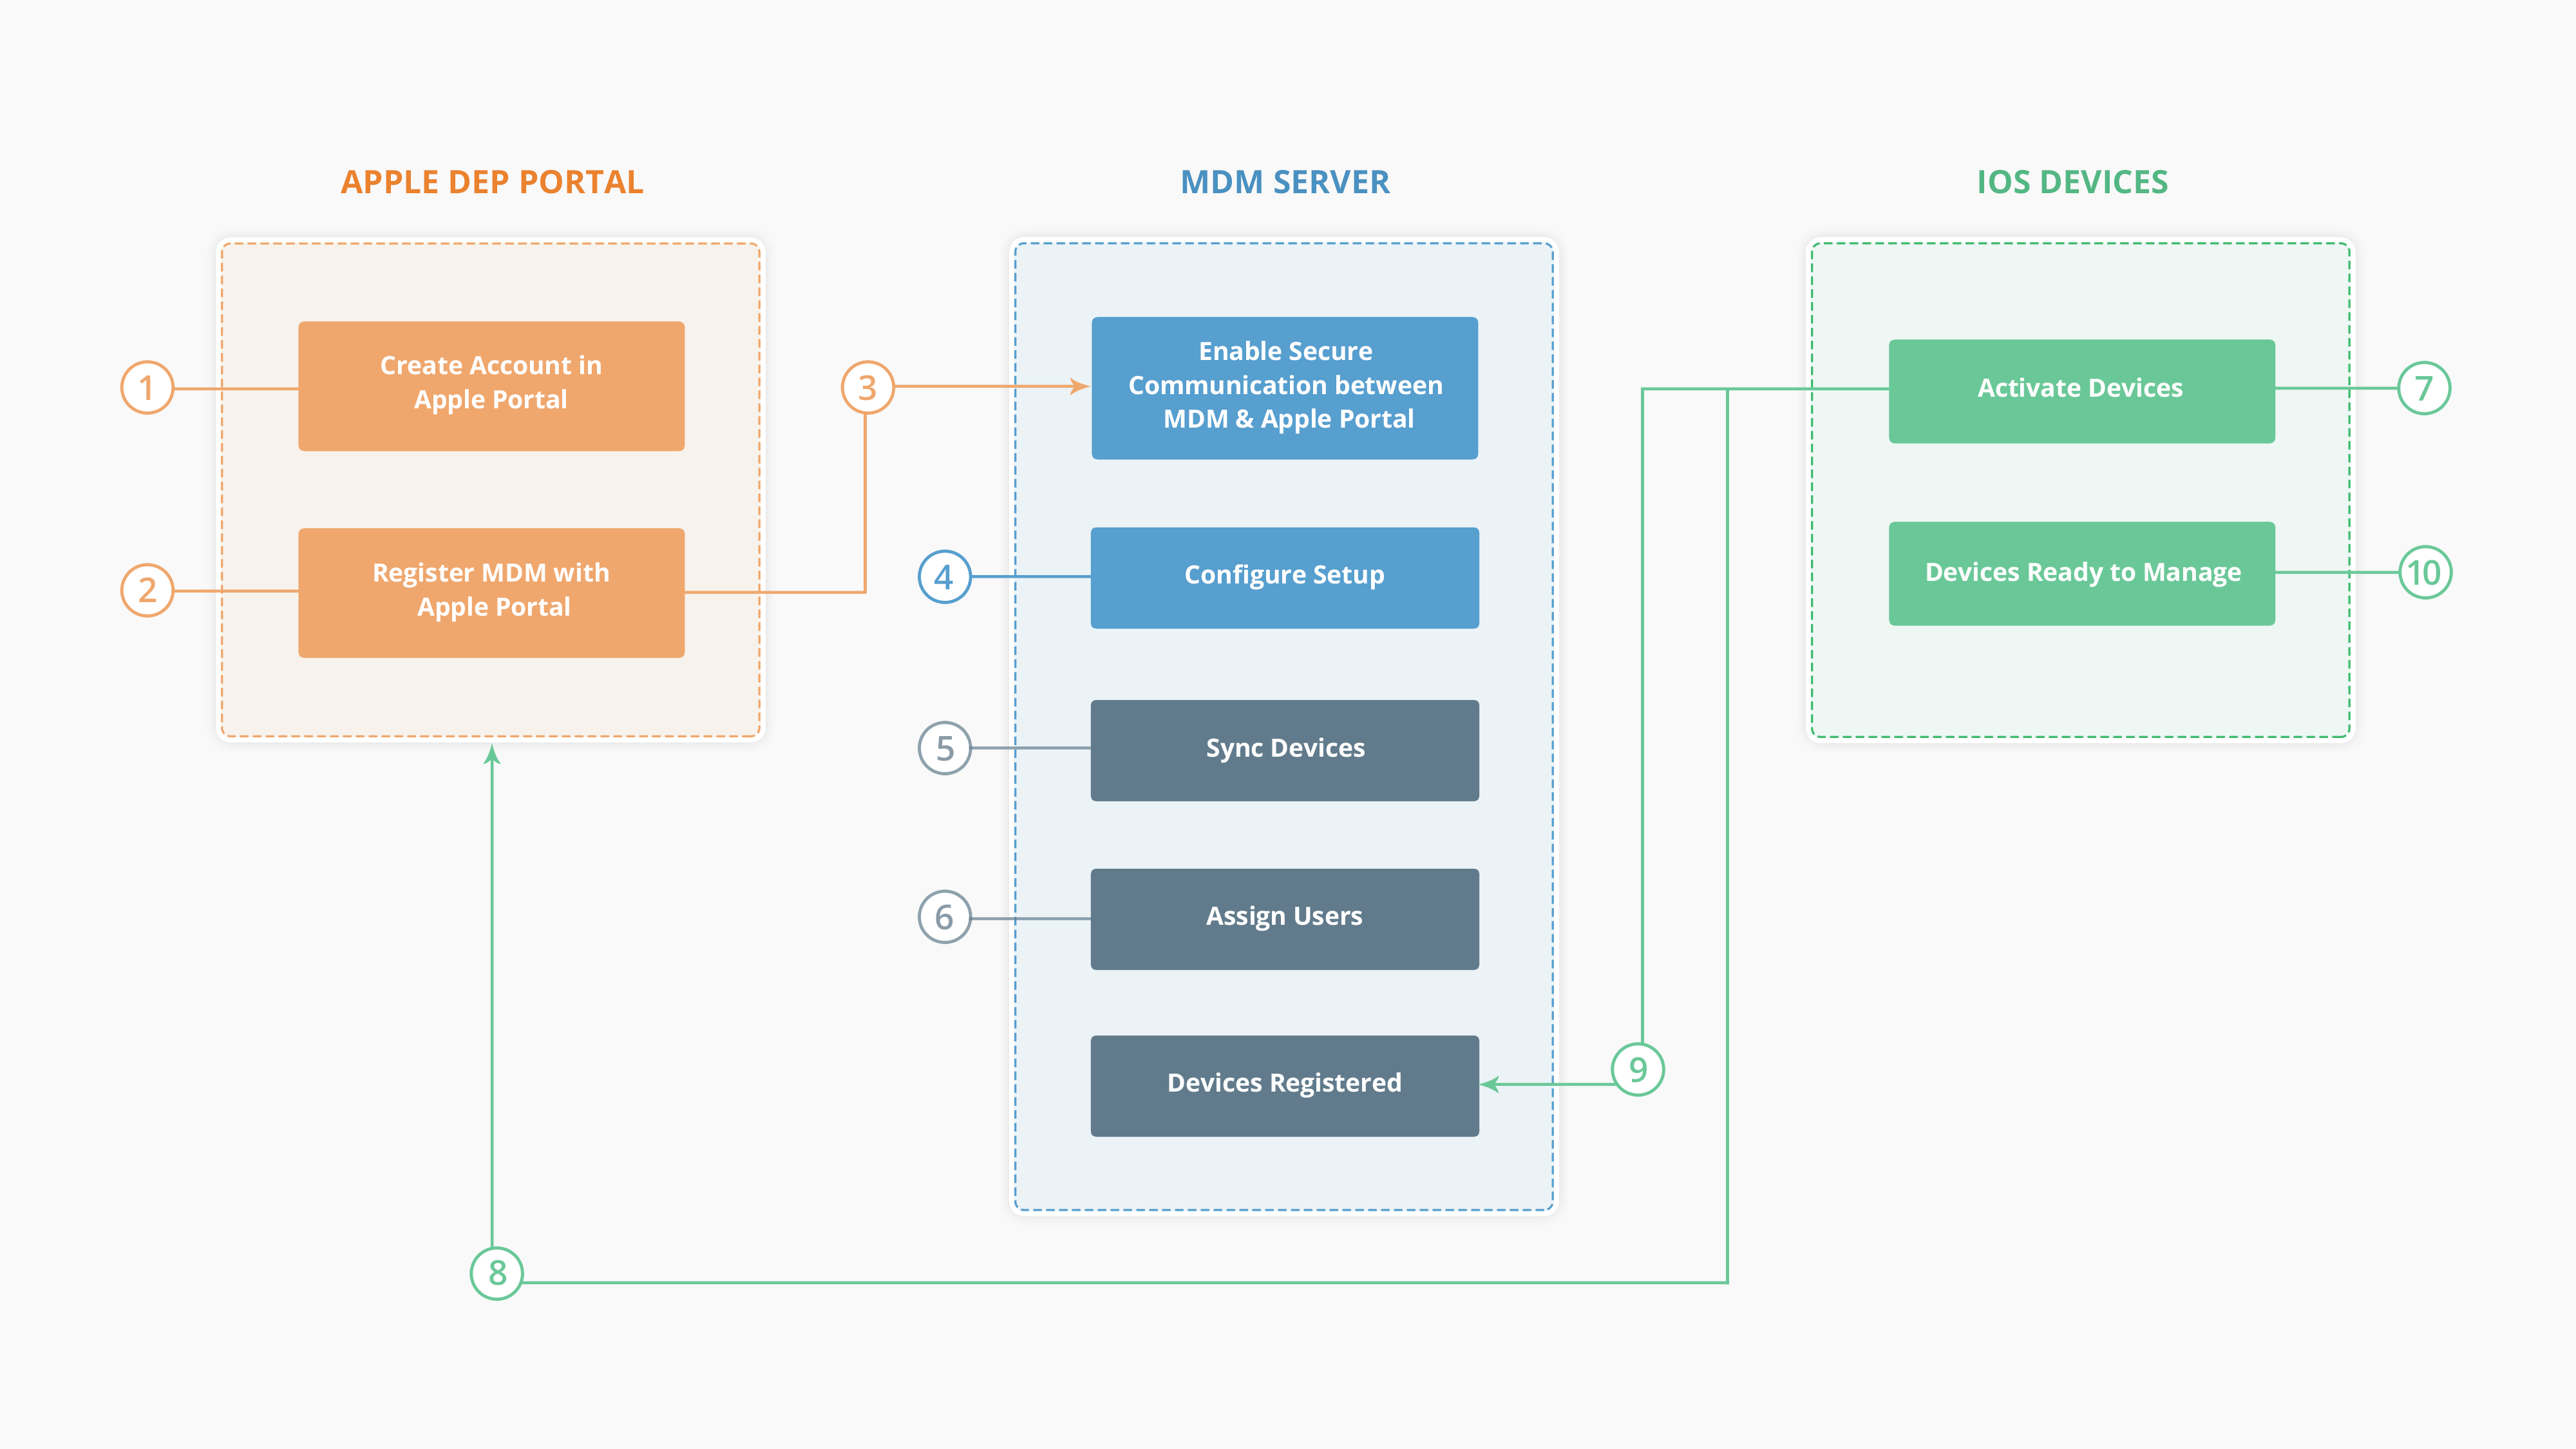
Apple Device Enrollment Program (Apple DEP) enrollment process first starts, when your organization purchases iOS devices from Apple or from Apple authorized resellers. You have to log into your Apple Deployment Program Portal (Apple DEP portal) account or create a new account, by referring to steps given in Device Enrollment Program Guide. You have to register MDM with the Apple DEP Portal. Once you have registered the MDM server, secure communication is enabled between the MDM server and the Apple DEP Portal. This is used to synchronize the details of devices, purchased using Apple DEP portal. When you find the devices synced from Apple DEP portal, you can assign it to users. Whenever the devices are activated, all restrictions and configurations imposed using MDM are automatically installed on all your devices Over The Air (OTA). By configuring DEP, you can ensure all the devices purchased under DEP, are managed by MDM by default as soon as they are activated.
The best part of the Apple Device Enrollment Program (Apple DEP) enrollment is that once the devices are configured and enrolled with MDM, the devices can never go unmanaged from MDM at any point, even if the device is factory reset. A device must be removed from DEP itself to unmanage it
Integrating Apple Device Enrollment Program (Apple DEP) with MDM
After creating your organization's Apple ID and Apple Deployment Program Account by following the steps mentioned in the DEP program Guide, you need to carry out the steps outlined below, to seamlessly enroll and manage your organization's corporate iOS devices using MDM.
First, you need to link the MDM server to Apple Deployment Program (Apple DEP) portal. For this:
- On the MDM server, navigate to Enrollment -> Apple -> Apple Enrollment (DEP).
- Download MDM Public Key certificate which has to be uploaded on Apple Deployment Program portal while adding MDM Server.
- Log in to Apple's DEP portal using the Apple ID of your organization.
- Create a new virtual MDM server on Apple's DEP portal by clicking 'Add MDM Server'.
- Navigate to Device Enrollment Program -> Manage Servers
- Click Add MDM Server and type in a suitable name for your MDM Server.
- Now, you need to upload MDM Public Key certificate, you downloaded earlier from MDM .
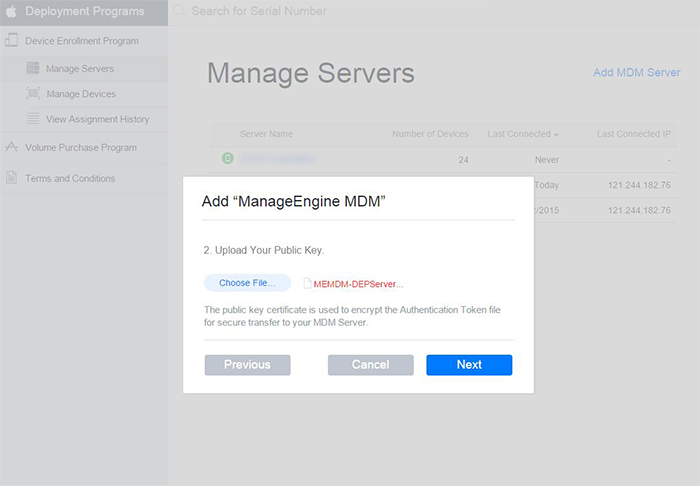
- You can now download the DEP Token generated by Apple.
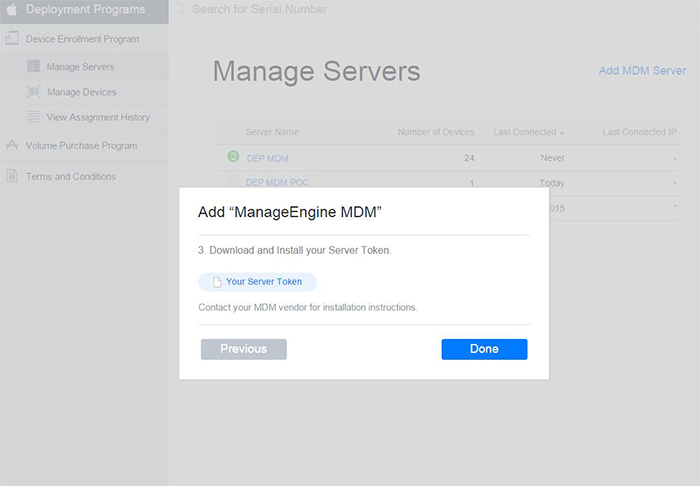
- Navigate back to your MDM console and then Upload DEP Token
- Specify the email address, which is to receive notifications regarding DEP token expiry.
- Click on Upload to complete the uploading of DEP token. You can configure the device activation settings as explained here.
How to enroll/add devices to Apple DEP?
After linking your MDM Server to Apple DEP, you can add devices to MDM using one of the three methods; Serial Number, Order Number, or Uploading CSV File.
Using Order Number
You can add devices to Apple DEP using the order number of purchases done by your organization from Apple. Your organization would have an Apple Customer Number, which contains the history of all orders or purchases made.
To add all or a specific number of devices purchased under a particular order number from Apple, directly to MDM, follow the steps mentioned below:
- On your Apple Deployment Program portal, navigate to Device Enrollment Program -> Manage Devices
- Select the option Order Number for choosing devices as shown and mention the required order number.
- Now you must choose the action Assign to Server and specify the name of the MDM server which was configured earlier.
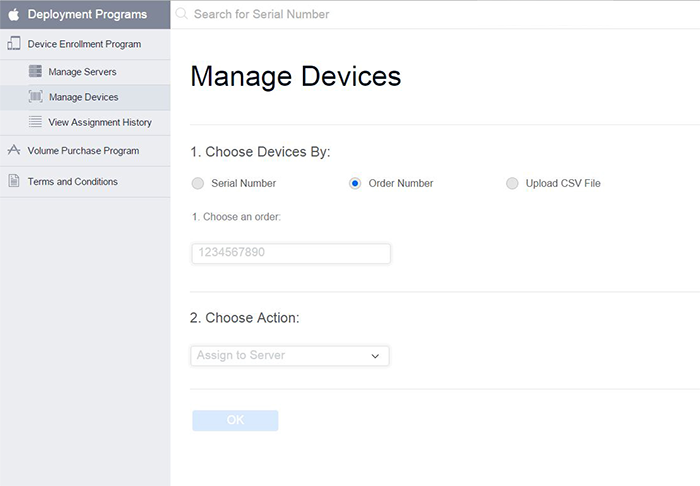
MDM Server is now automatically assigned with the iOS devices.
Using Serial Number
This method of adding devices can be chosen when the device is in physical proximity to IT Admin and easy to be erased.
To add devices to MDM using Serial Number, follow the steps mentioned below:
- On your Apple Deployment Program portal, navigate to Device Enrollment Program -> Manage Devices
- Select the option Serial Number for choosing devices and mention the serial numbers of the required devices using comma-separated values as shown.
- Now you must choose the action Assign to Server and specify the name of the MDM server which was configured earlier.
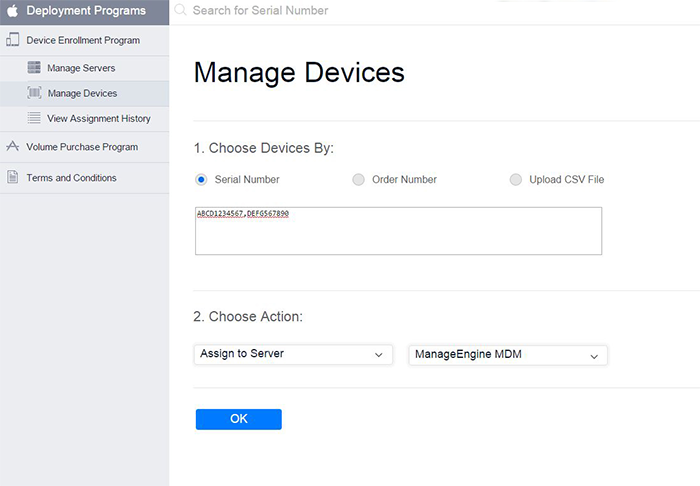
MDM Server is now automatically assigned with the iOS devices.
Uploading CSV File
You can upload a CSV File containing a list of Serial Numbers of the required devices to the Apple Device Enrollment Program portal. To add devices to MDM, by uploading a CSV file, follow the steps mentioned below:
- On your Apple Deployment Program portal, navigate to Device Enrollment Program -> Manage Devices
- Select the option Upload CSV File for choosing devices, browse and upload the required CSV File containing a list of Serial Numbers of Devices.
- Now you must choose the action Assign to Server and specify the name of the MDM server which was configured earlier.
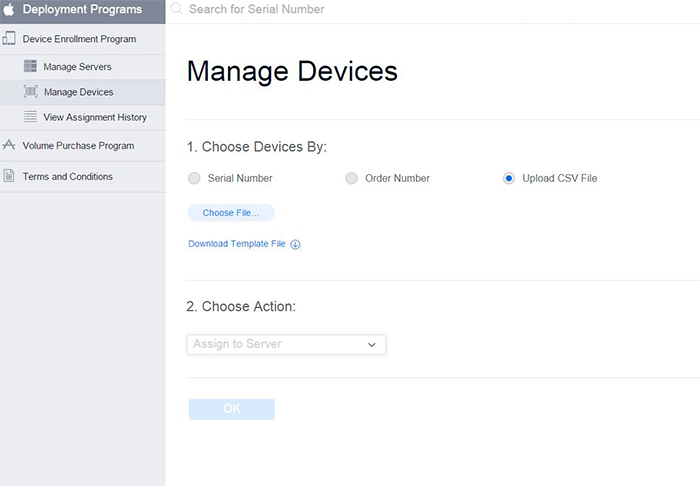
MDM Server is now automatically assigned with the iOS devices.
|
|
An alternative to adding CSV file is to automate the user assignment. Automated user assignment ensures the users are authenticated and self-assigned when the device is enrolled. This option must be enabled when DEP is configured or if already configured, you can enable the option from DEP settings. The only pre-requisite is, AD/Azure must be configured in MDM. When enrolling the device using DEP auto-assignment, the user name to be provided in the device must be in the format: domain name\user name |

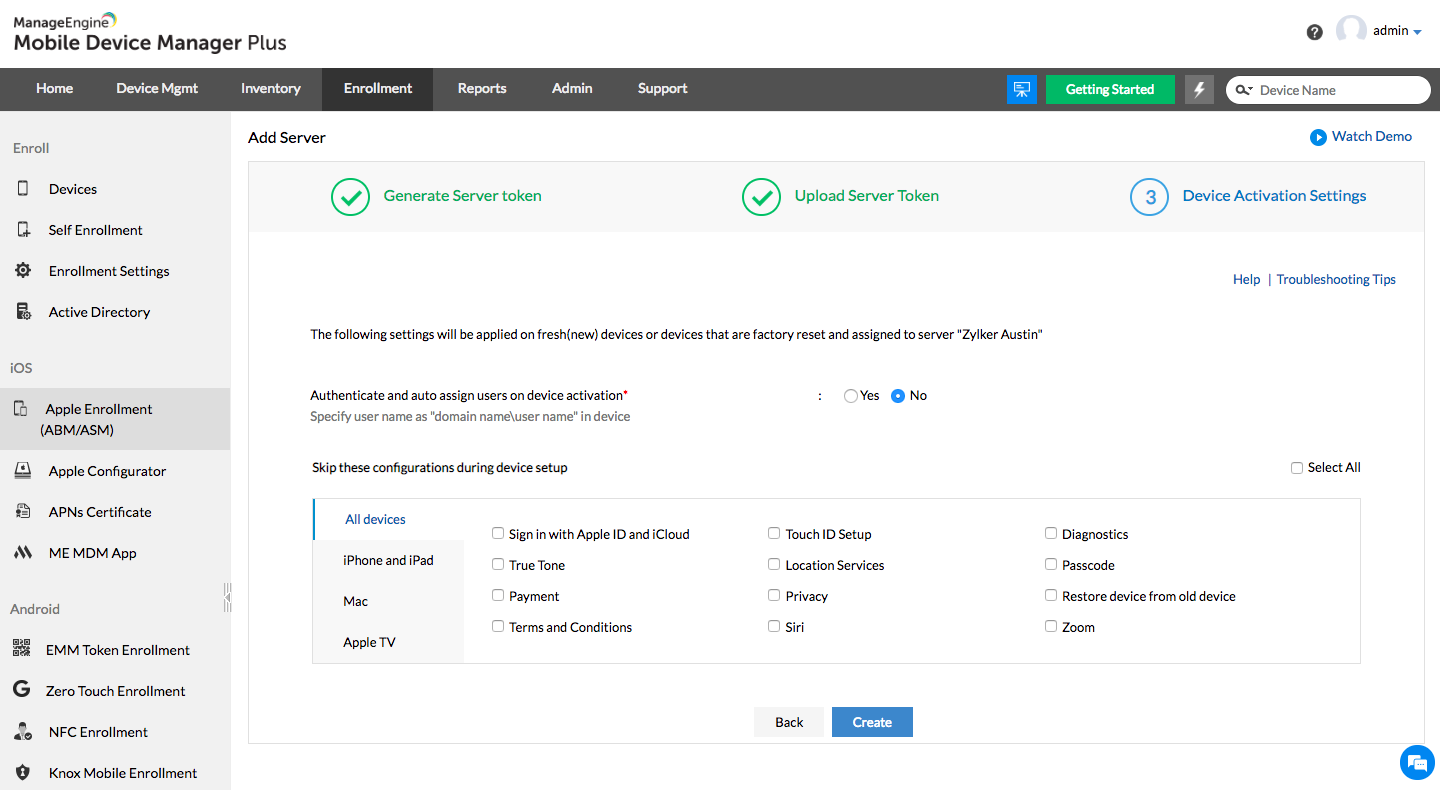
Device Activation Settings
On completion of adding devices to MDM, all the devices would be enrolled successfully. Before enrolling the devices, you have to create a DEP Profile and apply it to all devices. You can create and apply profile settings over-the-air to all your devices at one go, by following the steps mentioned below:
- On MDM console, navigate to Enrollment -> iOS -> Apple Enrollment (DEP)
- Complete the required fields displayed under Device Activation Settings
- Click Create. Now, DEP automatically gets applied to all added devices.
| SETTINGS | DESCRIPTION |
|---|---|
| DEP Settings | |
| Restrict users from removing MDM | This ensures the user cannot revoke MDM management from the managed device. |
| Supervise devices | Enable Supervision of devices. For detailed information on Supervised Devices, refer this. |
| Force install MDM during device setup | Make device enrollment with MDM, mandatory during the initial setup of the device |
| Authenticate and auto-assign users on device activation (Applicable only for On-premises) | If you want to automate the user assignment process, enable this option. This allows the user to use his Active Directory credentials and assign the device to himself upon activation. |
| Skip these configurations during device setup | During device activation, you are required to follow some initial setup steps. With MDM, you can optionally skip selective steps or completely skip the setup. Assuming your organization wants to prevent users from setting up Siri during the setup assistant process, you can do so by selecting Siri from the list of configuration settings provided. The list of configuration settings is given below. |
| CONFIGURATION | DESCRIPTION |
|---|---|
| Sign in with Apple ID and iCloud | Select to skip Apple ID and iCloud sign in by the user during setup. This does not restrict the user from signing in once the device setup is completed. |
| Touch ID Setup | Select to skip Touch ID configuration during setup. The user can, later on, configure the Touch ID after completing the device setup. |
| Diagnostics | Select to omit a user prompt to send diagnostic data to Apple during device setup. |
| Display Tone | Select to skip the Display Tone setup assistant screen during device setup. |
| Location Services | Select to disable Location Services during setup. If disabled, Location Services are turned off. The user can modify the location settings after completing the device setup. |
| Passcode | Select to prevent users from setting up a Passcode during the setup assistant process. This can be skipped if a passcode profile is distributed through MDM. |
| Payment | Select to prevent users from setting up an Apple Pay account in the setup assistant. This does not restrict the user from configuring it once the device setup is completed. |
| Privacy | Select to omit the Privacy screen during the setup assistant process. |
| Restore backup from old device | Select to restrict user from restoring iCloud / iTunes backup to device. |
| Terms and Conditions | Select to disable the Terms and Conditions step during device setup. If disabled, the Terms and Conditions are accepted by default. |
| Siri | Select to restrict the user from configuring Siri during device setup. If restricted, Siri is turned off. This does not restrict the user from configuring it once the device setup is completed. |
| Zoom | Select to omit the Zoom functionality step during device setup. |
| CONFIGURATION | DESCRIPTION |
|---|---|
| Restore from Android device | Select to prevent users from restoring back up from an Android device. |
| Keyboard Selection | Select to prevent users from choosing a keyboard type during device setup. |
| Home Button Sensitivity | Select to allow users to enroll devices without configuring the Home button sensitivity during setup. |
| iMessage and FaceTime | Select to skip the iMessage and FaceTime prompt during the setup assistant process. This does not restrict the user from configuring the same once the device setup is completed. |
| New feature highlights | Select to skip on-boarding informational screens for user education during the setup assistant process (“Cover Sheet, Multitasking & Control Center”, for example). |
| Screen Time | Select to prevent informing users about Screen Time during device setup. |
| Mandatory software updates | Select to skip the Mandatory software update screen during the setup assistant process. |
| Watch Migration | Select to prevent users from viewing options for Watch Migration during the device setup. |
| Appearance | Select to skip the Choose your Look screen during mac setup. |
| CONFIGURATION | DESCRIPTION |
|---|---|
| FileVault | Select to prevent users from configuring a FileVault account during device setup. It is recommended to configure and distribute a FileVault Encryption profile through MDM. |
| iCloud diagnostics | Select to omit a user prompt to send diagnostics to iCloud during device setup. |
| iCloud storage | Select to skip iCloud Documents and Desktop screen during device setup. |
| Apple Registration | Select to restrict user from registering the device with Apple during setup. |
| CONFIGURATION | DESCRIPTION |
|---|---|
| Screensaver | Select to allow users to enroll a tvOS device without configuring a screensaver. This does not restrict the user from configuring the same once the device setup is completed. |
| Tap to Setup | Select to skip the option of setting up Apple TV using an associated iOS device (user needs to enter the account information and setting choices separately). |
| Home screen layout sync | Select to prevent users from toggling the TV home screen layout during device setup. |
| TV Provider SignIn | Select to prevent users from signing in to a TV provider during setup. |
| Where is this Apple TV? Screen | Select to omit the Where is this Apple TV step on tvOS devices during setup. |
Now, all your corporate iOS devices are associated with the DEP Profile created using MDM.
Syncing Devices
After creating the DEP and applying it to devices, you can choose to Sync Devices by navigating to Enrollment-> iOS -> Apple Enrollment (DEP). Once the devices are synced, all devices get automatically listed.
Only when the devices are activated by the user, it gets enrolled into MDM and is listed under Settings -> Enrollment-> Devices
In case the devices are not new, the devices should be factory reset, in order to be configured using DEP. Users can reset their devices, by navigating to Settings -> General -> Reset -> Erase All Content and Settings on the iOS devices.
Assigning Users to Devices
You can assign all the devices to individual users. Navigate to Assign User tab under Enrollment -> iOS -> Apple Enrollment (DEP)-> Devices. You can upload a CSV File containing details of all the users to whom devices have to be assigned. Now, the devices enrolled using Apple Device Enrollment Program get assigned to the appropriate users.
How to remove Devices from the Apple DEP (Device Enrollment Program) Server?
When a device is enrolled using DEP, one of the most important benefits is that the user cannot unmanage the device even when factory reset. To unmanage the device, the admin must remove the device (iOS, iPadOS) from the MDM server. Once the device is removed from the MDM server, the device is automatically removed from the Apple DEP portal.
The devices enrolled with one DEP account cannot be enrolled in another. Therefore, you must remove the device from the Apple DEP first before enrolling into another. Follow the steps given below to remove the devices from the Apple DEP portal.
- Log into the DEP portal and click on Manage Devices.
- Enter either the serial number or order number of the devices. If you are trying to remove multiple devices, you can upload a CSV file with the device details.
- Under Choose Actions select Unassign device. This unbinds the device from this DEP account and removes that device from the Apple DEP portal.
NOTE: To remove the devices from Apple DEP, always select Unassign device and not Disown device. Disown device should be used only if the device is lost or permanently damaged and will never be part of any workforce. Disowning devices is a non-reversible action and once disowned the device can never be part of an organization.
Troubleshooting Tips
- MDM server is not able to contact DEP to sync devices.
Check if mdmenrollment.itunes.apple.com is allowed along with other domains and ports listed here. Also, verify the availability of the required Apple services.
- Even after successful sync, the device is not listed in the MDM server on DEP page.
Check if the device has been enrolled in the MDM server using an enrollment method other than DEP. Remove the device from management, reset the device and sync again with the server. The device gets listed on the DEP page.
- During device activation, you encounter the error message "The configuration can't be downloaded. The configuration is not available".
Check your network connectivity. Also, check if the MDM server is reachable using the browser of another device in the same network.
- During device activation, you encounter the error message "NSURLErrorDomain error -1012".
Check your network connectivity. Also, check if the server certificate was copied correctly to the forwarding server while configuring it.
- During device activation, you encounter the error message "A server with the specified hostname could not be found.".
Check your network connectivity. Also, check if the MDM server is reachable using the browser of another device in the same network. If not, make the required changes to the server's NAT settings
- If you are trying to enroll devices not purchased from Apple or authorized resellers.
Apple now allows adding ios 11 devices not purchased directly from Apple or authorized resellers into DEP. Follow the steps given here to use Apple Configurator to add devices to DEP.
- While adding devices to the DEP portal you encounter the error "NOT_ACCESSIBLE".
This error is shown if the device is either not eligible for DEP enrollment or is either already enrolled or owned by another organization. Follow the steps given here to add the device to DEP using Apple Configurator if the device is not eligible for DEP. Else, add the device to the correct DEP portal based on the device owner.
- While adding devices to the DEP portal via Apple Configurator you encounter the error 'Provisional enrollment failed'.
This error is shown if the device is unable to contact the DEP server. Factory reset the device and proceed until the Wi-Fi configuration step. Prepare the device using Apple Configurator and follow the steps for adding it to DEP.