Mac FileVault Encryption
This feature is available in Professional, Free, and Trial editions of MDM
Encrypting information stored in employee computers is mandated in most organizations. Encryption ensures that the information on these computers can only be accessed by authorized users. The users authenticate themselves with their login credentials, which in turn decrypts the information for access.
Filevault is the most preferred tool for encrypting the data on mac machines. It provides two methods for encrypting the data on the systems.
- Encryption using iCloud password
- Encryption using institutional recovery key
Encryption using Mobile Device Manager Plus
Though users can manually encrypt their systems, it is always recommended to use a device management solution to encrypt the managed systems. This ensures uniformity in the encryption process used and also that all the users have encrypted their devices. Using Mobile Device Manager Plus to perform FileVault encryption on Mac machines also has the following benefits
- One time setup- You need to create and distribute the profile to groups only once, and all the devices will be encrypted.
- No user dependency- Once the admin creates the profile and applies it to the devices, the encryption process will begin when the device is logged in the next time, without any user intervention.
- Enforced encryption- The admin of the organization can ensure that encryption is enforced on all the required systems using the desired encryption methods.
- Keys stored in the server- The user does not have to be tasked with remembering the personal recovery key if they forget their passwords.
- Simplified set up procedure- The user has to just choose the method of encryption, enable and upload a certificate to complete the setup process.
Using Mobile Device Manager Plus, a Mac system can be encrypted using any of the following methods
- Personal recovery key
- Institutional recovery key
- Personal and institutional recovery key
Encryption using personal recovery key
Filevault allows users to generate a personal recovery key that can be used to access their encrypted data in addition to their login credentials. If the user forgets his login password the user will be prompted to enter this generated recovery key to decrypt his system.
Mobile Device Manager Plus supports encryption using a recovery key. The recovery key generated during encryption can then be posted to the Mobile Device Manager Plus server. This ensures the users can request their organization's IT admins to provide them the recovery key to access their data. Since the personal recovery key is specific to users, this also prevents any unauthorized use of the recovery key.
Follow the steps given here to encrypt data using personal recovery key.
- On the MDM console, navigate to Device Mgmt ->Apple profile
- Enter a name for the profile and select FileVault Encryption
- Enable the option to use personal recovery key to encrypt user's mac systems.
- You can choose to show the generated key to the user, to allow them to make a note of it.
- Save and publish the profile.
- You can then associate this profile to either Group(s) or Device(s).
Here are a few possible cases that the admin might encounter while setting up FileVault:
Case 1:
FileVault Status: Disabled.
Restart the device, or request the user to log out to manage FileVault.
If a FileVault profile has been distributed to the devices, but the FileVault status on the MDM server is displayed as Disabled, it indicates that FileVault is still not managed by MDM. To manage FileVault Encryption on the device using Mobile Device Manager Plus, follow the given steps:
- Remotely restart the device by navigating to Inventory> Devices> Actions> Restart.
(or)
- Notify the user to restart the device.
(or)
- Request the user to log out from the device.
Once the user logs back into the device, they will be prompted to enter their username and password. After the device is unlocked, MDM will automatically initiate a device scan, to fetch the FileVault Recovery Key(s), thereby managing FileVault on the device(s).
Case 2:
FileVault Status: Disabled.
This status will be displayed when FileVault encryption has been disabled on the device, and no FileVault profile has been distributed to the device. To enable and manage FileVault Encryption, create a FileVault profile, and enable the Recovery key for the device(s).
Rotating FileVault Recovery Keys:
To ensure additional security for user data, files and any important information on the device's drive, MDM also allows the admin to update the FileVault Recovery Key. This also ensures that the same/old Recovery Key cannot be used again. To rotate/update the FileVault Recovery key, follow the given steps:
- On the Inventory tab, click on Devices and select the macOS device to which the FileVault Encryption profile has been distributed to.
- After selecting the device, click on Security Settings. If FileVault has been enabled, click on Actions and select Rotate Recovery Key.
- A pop-up box will be displayed. Click on Rotate Key to update the FileVault Recovery key on the MDM server.
The rotated Recovery Key will be displayed along with the updated date and time.
Case 3:
Managing FileVault when it has already been enabled on the device:
FileVault Status: Enabled.
Key unavailable. Import the Personal Recovery Key and distribute a FileVault profile to the device(s).
In some instances, FileVault might have been enabled on the device through a different/previous MDM solution, or by the users themselves. In order to manage FileVault on the device using Mobile Device Manager Plus, follow the given steps:
- Import the filevault recovery key.
If you have stored your recovery key, you can use that key. Else, you can generate the key using the below command:
sudo fdesetup changerecovery -personal
- Copy the generated key and paste in the MDM server.
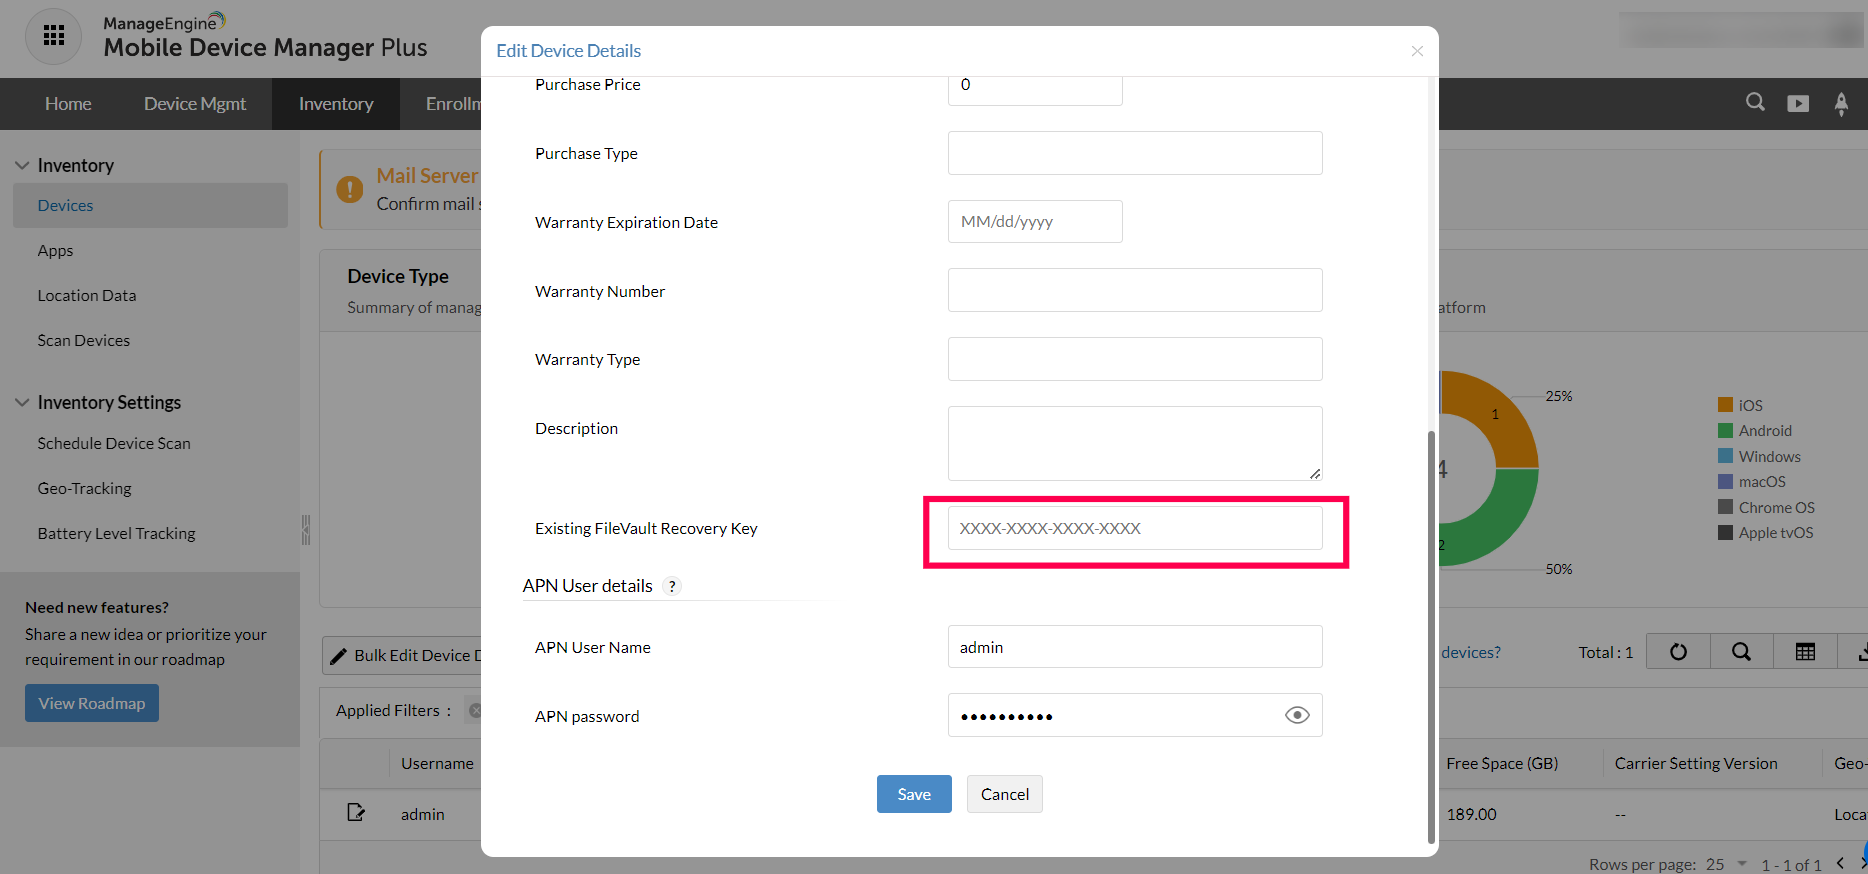
Inventory -> Devices -> Choose the device whose key has to be updated-> Click on the edit icon and paste the key in the field Existing Filevault Recovery key.
- Once the Recovery Key is imported to the MDM server, distribute a FileVault Encryption profile to the device(s).
- Restart the device from the server. Or, notify the user to restart the device, or log out from the device.
After the user logs into the device with their username and password, MDM will automatically initiate a device scan. Once the scan is complete, the updated FileVault Recovery Keys will be received for MDM to manage FileVault on the device.
Importing the Personal Recovery Key:
The Personal Recovery key might not be available on the MDM server, if FileVault has been enabled on the device from another MDM solution. For the key to be made available on the MDM server, it needs to be imported.
To import the Personal Recovery Key for a single device, navigate to Inventory> Devices > Device details> Security Settings> Existing FileVault recovery key.
- To import the Personal Recovery Key for devices in bulk, navigate to Inventory and click on the Devices tab.
- Select Bulk edit device details, click on Browse and upload the CSV file with the Existing FileVault recovery key details entered.
After the Recovery Key has been imported, create and distribute a FileVault Encryption profile to the device.
Encryption using institutional recovery key
Organizations can also choose to just use a single key or a certificate to encrypt the mac systems of the employees. To use a certificate to encrypt the systems, the administrator must first create the certificate and upload it to the MDM server.
To use institutional recovery key to encrypt the systems, the admin has to perform the following steps
- Create a certificate for encryption
- Uploading certificate to Mobile Device Manager Plus
Creating Certificate
This section explains the steps to create and export the institutional recovery key-
- On an administrator computer, open Terminal and execute the following command: sudo security create-filevaultmaster-keychain /Library/Keychains/FileVaultMaster.keychain
- Enter the login password/credential.
- Create a password for the new keychain when prompted. This password will be used to access the keychain certificate created in the next few steps. A keychain FileVaultMaster.keychain is created in the following location /Library/Keychains/
- You will have to unlock the keychain to copy or edit the created keychain. Enter the following command in the terminal to unlock the keychain-security unlock-keychain /Library/Keychains/FileVaultMaster.keychain
- Enter the previously created keychain password to unlock the keychain.
- Open Keychain Access.
- From the menu bar, choose File->Add Keychain
- Press Cmd+up to move up in the folder hierarchy. Continue till it reaches the last page, select the disk and then navigate to /Library/Keychains/ to find the created keychain.
- Select the FileVaultMaster.keychain file located in this folder.
- Select FileVaultMaster under the Keychains heading in the sidebar, and then select All Items under the Category heading in the sidebar.
- Verify that a private key is associated with the certificate. Select the certificate and the private key.
- From the menu bar, choose File -> Export Items and save the items as a .p12 file.
- The .p12 file is a bundle that contains both the FileVault Recovery Key and the private key.
- Create and verify another password to secure the file, and then click OK.
- You will be prompted to enter this password when uploading the recovery key.
- Delete the key chain you created.
- Quit Keychain Access.
The FileVault Recovery Key and the private key are saved as a .p12 file in the location you specified. This file can be used to encrypt the user's computers.
Uploading the certificate in Mobile Device Manager Plus
Once the required certificate is created, the admin has to upload this certificate to the Mobile Device Manager Plus console and distribute it to the systems to be encrypted. Follow the steps given below to upload and distribute the institutional recovery key.
- On the MDM console, navigate to Device Management -> Profiles
- Select Apple from the dropbox that appears on clicking Create Profile.
- Click on FileVault Encryption.
- Select Institutional Recovery Key certificate as the encryption method
- Browse and upload the .p12 file certificate created. Save and publish the profile.
This profile can then be distributed to the required groups and devices.
Encrypting using both Personal and Institutional Recovery key
Mobile Device Manager Plus also allows the admin to encrypt the systems using both a personal recovery key and the institutional recovery key. This is helpful when the data is to be decrypted, the user can choose which method to use to decrypt their data.
Steps to encrypt using personal and institutional recovery key.
- On the MDM console, navigate to Device Management -> Profiles
- Select Apple from the dropbox that appears on clicking Create Profile.
- Click on FileVault Encryption.
- Select Personal and Institutional Recovery key as the encryption method
- Upload the certificate, and if needed, allow the users access to the personal recovery key.
- Save and publish the profile.
- Distribute the profile to the required groups and devices.
Decrypting mac systems when users forget their passwords
If a user forgets their passwords the user can contact the admin to decrypt their systems. The admin can check the encryption method used to encrypt the system by navigating to Inventory, selecting the device name and clicking on FileVault Encryption tab. Based on the type of encryption used, the admin has two options to decrypt the system.
- Personal recovery key- If the user has the recovery key handy, they can enter this key in the login page when prompted. They can also obtain this key from the Mobile Device Manager Plus server from the page where the encryption method details are available. Once the recovery key is entered, the user will be asked to set a new password.
- Institutional recovery key- If institutional recovery key is used, then the system cannot be decrypted directly, the user can only retrieve the encrypted files. The system can be put to recovery mode. The admin can access the certificate used for encryption by navigating to Inventory ->Device name -> FileVault Encryption. Download the certificate. To decrypt the system that is encrypted using institutional recovery key, the admin has to follow the steps given below-
Converting p12 to keychain format
- On a mac machine, navigate to Keychain Access
- Create a new keychain by navigating to File->New keychain
- Enter FileVaultMaster as the name for the keychain and secure it using a password
- Select the created keychain and navigate to File->Import Items
- Select the .p12 certificate downloaded from Mobile Device Manager Plus
- Enter the password for the certificate specified while downloading from Mobile Device Manager Plus
Unlock A Filevault 2-encrypted Volume With An Institutional Recovery Key
Requirements
- macOS running OS 10.9 or higher
- An external drive or USB drive
Steps
- On the administrator's system, where the originally created keychain (institutional recovery key) is stored. Copy FileVaultMaster.keychain-db along with the private key to an external drive or USB drive
- Boot the machine that has to be decrypted, in recovery mode, by holding command-R while starting up.
To unlock the keychain
- Plug in the USB or external drive with the FileVaultMaster keychain to the device to be decrypted. Once in recovery mode, the drive should automatically mount. You can also mount it using Disk Utility.
- Open Terminal by navigating to Utilities->Terminal
- Unlock the keychain in the Terminal, by running the command security unlock-keychain /Volumes/[nameofdrive]/[path]/FileVaultMaster.keychain. When prompted, enter the password that was used to create the keychain.
- Entering the correct password will unlock the keychain.
Unlock the encrypted volume
MacOS devices running macOS High Sierra (10.13) may have been upgraded to Apple’s new APFS. Follow the steps below to unlock the encrypted volume
- If your device is using APFS, find the APFS disk role by using diskutil apfs list.
- Unlock the encrypted volume by using diskutil apfs unlockVolume [APFS disk role] -recoverykeychain /Volumes/[nameofdrive]/FileVaultMaster.keychain
- You can now browse the directories of the unlocked drive, or you can decrypt the drive and turn off.
- You can then decrypt the files using diskutil apfs decryptVolume /dev/[APFS disk role] You can check the progress by running diskutil apfs list again.
If you are still using mac version lower than 10.13 follow the steps given below to unlock and decrypt the volume
- If your device is using macOS Extended (HFS+), find the CoreStorage Volumes (UUID) by using diskutil cs list
- Find the Logical Volume UUID of the encrypted drive, by running the command diskutil corestorage list
- Unlock the volume with diskutil corestorage unlockVolume [UUID] -recoveryKeyChain /Volumes/[nameofdrive]/[path]/FileVaultMaster.keychain
- The volume should unlock and mount, you can now retrieve the files.
- Decrypt the files using diskutil corestorage revert [UUID] -recoveryKeychain /Volumes/[nameofdrive]/[path]/FileVaultMaster.keychain
Best Practices
Best practices to manage FileVault
Troubleshooting Tips
- There was a problem enabling FileVault on your computer. You should use System Preferences Security and privacy to view or change FileVault.
This message is shown when FileVault is being configured for a mobile account or a user account which does not have the Server Token. To check if a particular account has the Server Token, open Terminal on the Mac machine and enter the following command:
sysadminctl -secureTokenStatus username_goes_here
To add the Server Token to a specific account, use:
sysadminctl -secureTokenOn username_which_needs_secure_token_goes_here -password password_goes_here