Integrating PAM360 with ManageEngine ADManager Plus
ManageEngine PAM360 integrates with ManageEngine ADManager Plus (ADMP) to provide a comprehensive solution for managing and securing access to Active Directory (AD) environments. This integration enables IT administrators to centralize the management of AD security groups and streamline privilege elevation for domain users.
PAM360 connects to ADManager Plus using its API and the server credentials configured during setup. Once integrated, all the AD security groups managed in ADMP are automatically fetched and listed in PAM360. Administrators can then manage these groups - adding or removing domain accounts, directly from the PAM360 interface, eliminating the need to switch between tools. This allows for efficient enforcement of access control policies and facilitates just-in-time privilege elevation for domain accounts based on organizational needs.
Additionally, the integration strengthens password management between the two solutions. In earlier versions, whenever a domain account password was rotated in PAM360, the updated password had to be manually entered in ADMP to maintain uninterrupted access. Without this manual update, AD users could face issues such as failed password resets or locked accounts, leading to increased help desk requests. Starting from build 7300, PAM360 addresses this limitation by enabling the association of domain accounts in ADMP with their counterparts in PAM360. Once mapped, any password rotation performed in PAM360 is automatically synchronized with the corresponding account in ADMP. This ensures password consistency across both platforms, minimizes administrative overhead, and helps maintain seamless user operations across the Active Directory environment.
Additional Detail
Refer this document to learn more about AD groups management in ADManager Plus.
This document discusses the process of integrating PAM360 with ADMP. At the end of this document, you will have learned the following:
- Prerequisites
- Configuring the ADMP Integration
- Mapping Accounts to ADManager Plus Security Groups
- Associating Domain Accounts in ADMP with PAM360
- Troubleshooting Tips
1. Prerequisites
Before commencing the integration, verify if all of the below prerequisites are satisfied:
- PAM360 supports connection via HTTPS only, hence it is mandatory to import a valid SSL certificate in the server. Follow the steps given below to import a certificate in the server:
- Stop the PAM360 service.
- Open the command prompt with the administrative privilege, navigate to the <PAM360-Installation-Directory>/bin folder, and execute the following command:
importCert.bat <Absolute-Path-of-the-ADMP-Certificate>
- Now, restart the PAM360 service.
- The common name of the certificate must match the host name of the active ADMP server.
- At least one authorized admin in PAM360 must be a valid technician in ADMP.
2. Configuring the ADMP Integration
You can perform all the configurations related to the PAM360 - ADManager Plus integration from the PAM360 portal. To configure the integration, provide the host name and port details of the machine where ADManager Plus is installed. Once you have entered all the required details and saved the configuration, PAM360 will try to set up a connection with ADManager Plus. After the successful connection, the domain details will be retrieved from ADManager Plus and saved in the PAM360 database, and the integration will be established.
- Navigate to Admin >> Integrations >> ManageEngine.
- On the page that appears, click the Enable button to configure the ADManager Plus integration. If it is already enabled, and you want to edit it, click Edit.
- Configure the following details as follows:
- Enter the ADManager Plus Host Name.
- Enter the Port of the ADManager Plus server.

- Click Enable to save the settings.
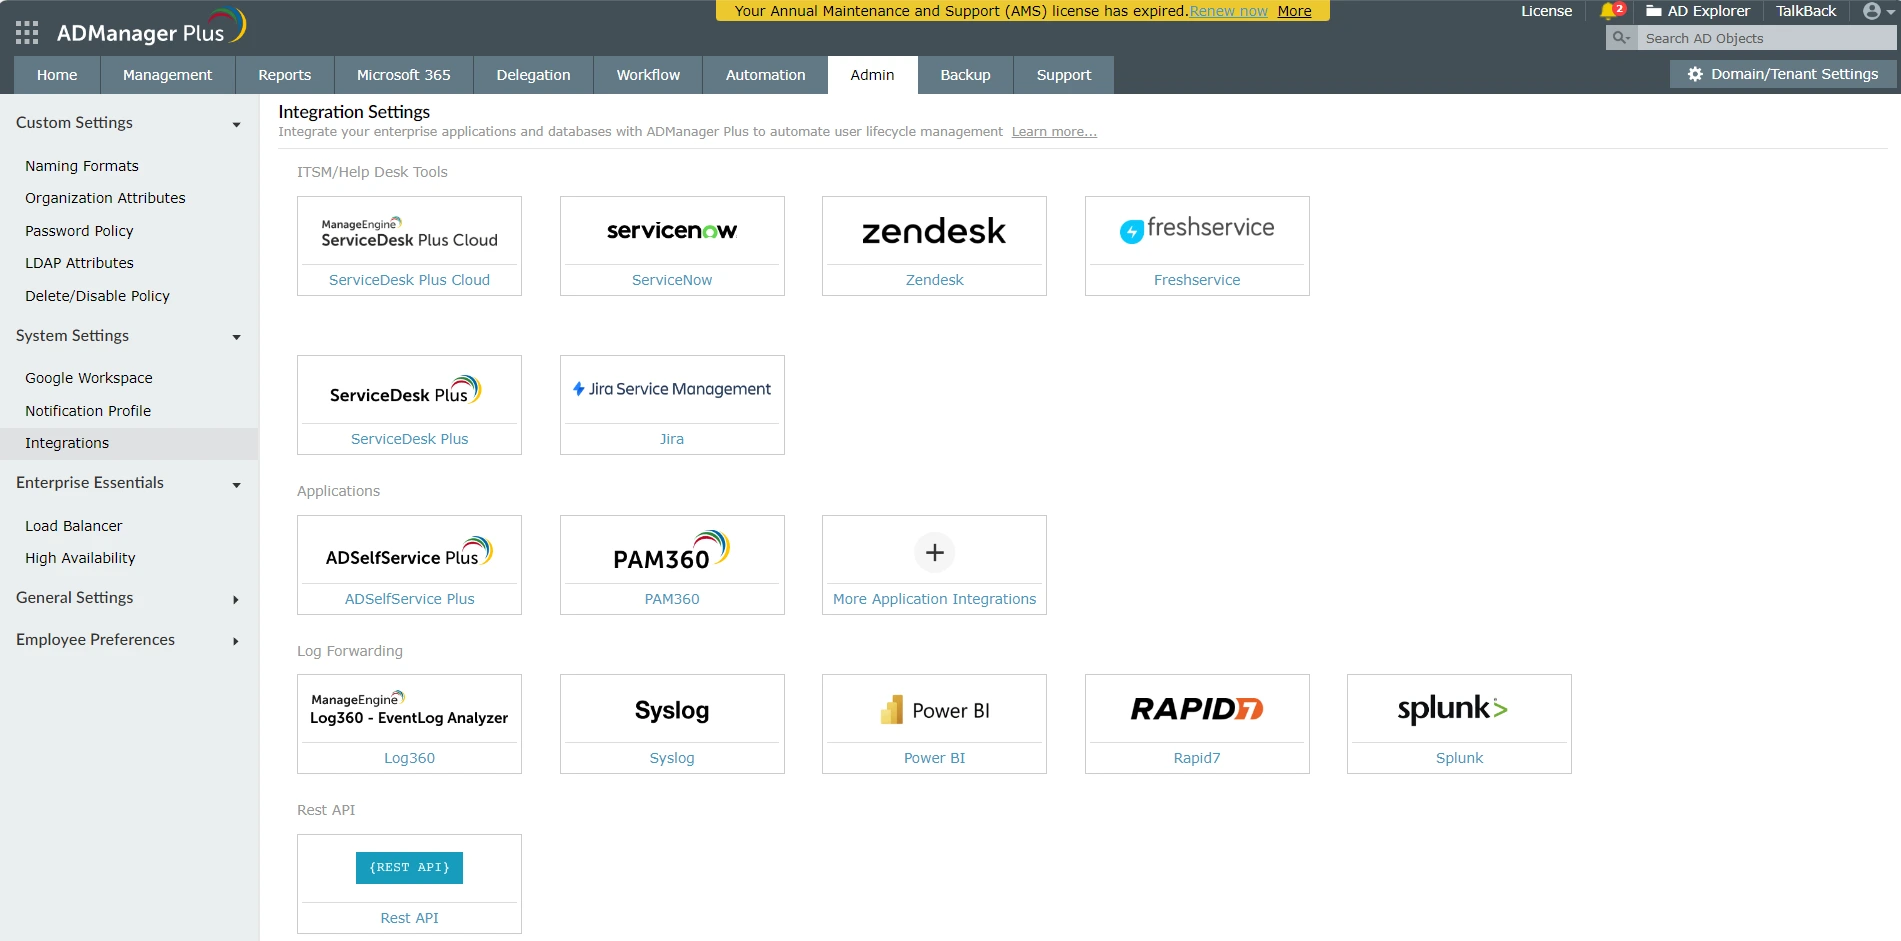
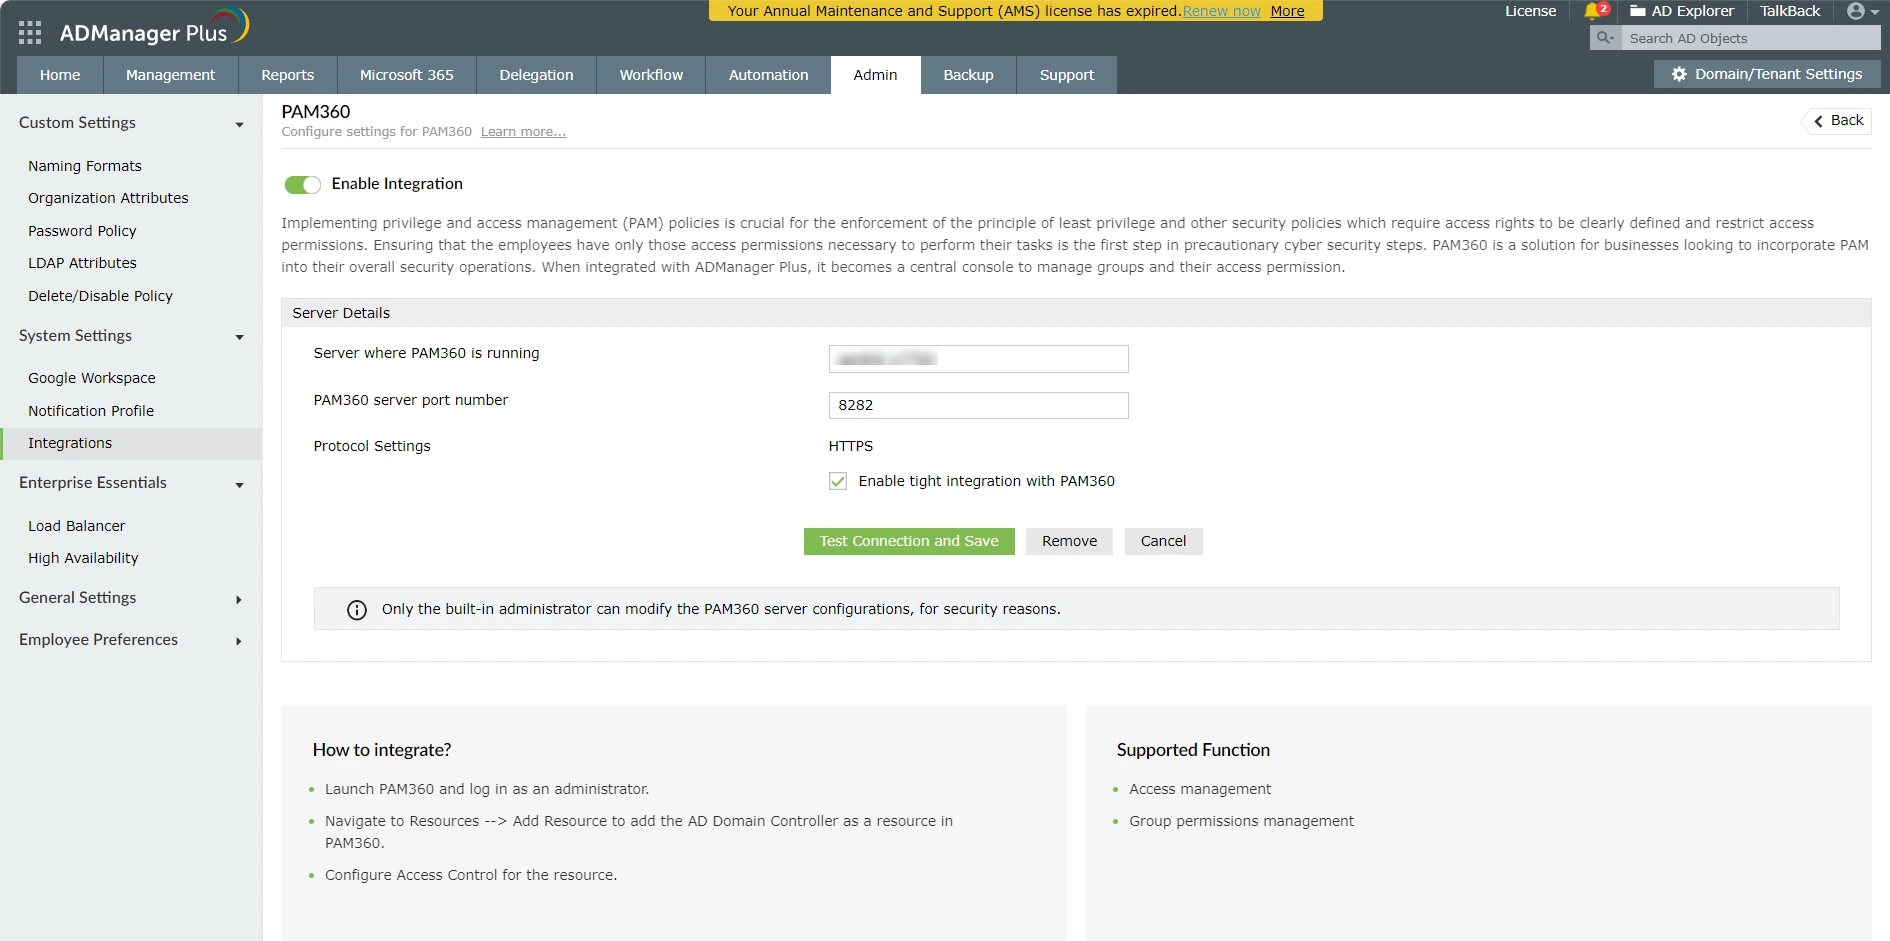
- Now, access the ADManager Plus web console and navigate to Admin >> Integrations >> PAM360. Ensure that the Enable Integration toggle is turned on.
- Under Server Details, enter the PAM360 Hostname and Port in the required fields.

- Enable the checkbox Enable tight integration with PAM360 and click the Test Connection and Save button to verify the connection and save the settings.

The PAM360 - ADManager Plus integration is enabled now. Proceed with mapping of domain accounts to the AD security groups.
3. Mapping Accounts to ADManager Plus Security Groups
Caution
Before proceeding, ensure that an Active Directory user is imported into PAM360 and granted administrator privileges. The same user should also exist as a valid technician in ADManager Plus inorder to delegate the required tasks.
Once the PAM360 - ADManager Plus integration is complete, follow the below steps to perform policy configuration. The Policy Configuration option lets you elevate domain accounts to security groups just in time (AD security groups already exist in the Domain Controller and by extension, in the ADManager Plus also).
- Navigate to Resources >> Add Resource to add the AD Domain Controller as a resource in PAM360.
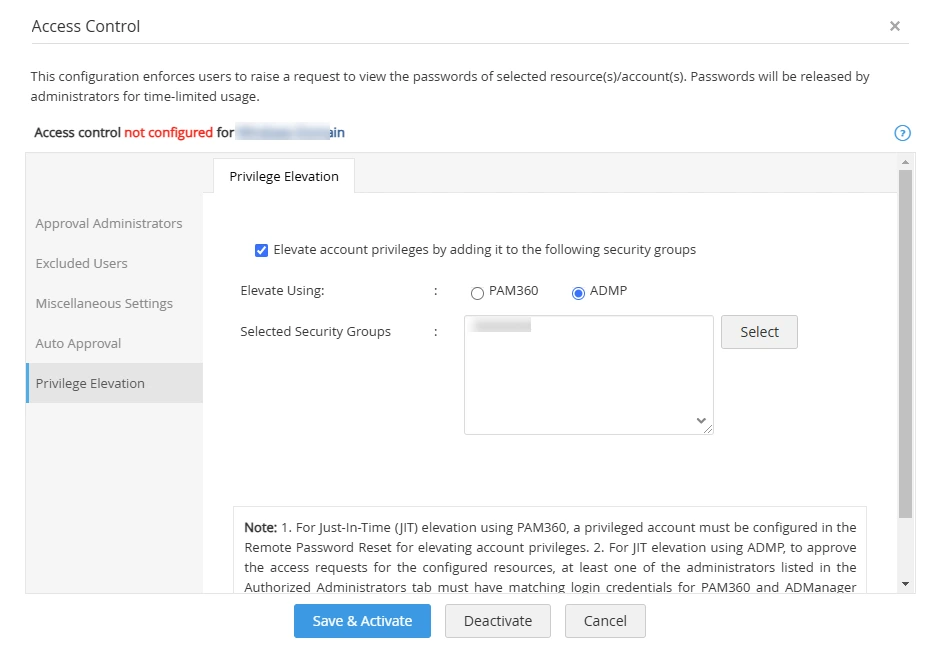
- Click Resource Actions beside the required resource and click Configure Access Control.
- In the Approval Administrators tab, ensure that at least one of the Authorized Administrators listed here is a valid technician in ADManager Plus also. This is to facilitate approval of access requests to the selected resource(s) once the policy configuration changes are applied.
- In the Policy Configuration tab, click Select to list all the AD groups available in ADManager Plus.
- Choose the groups to which you want to add the resource and click Save. You can view the chosen groups under the Selected Groups box.

- Select the Elevate accounts to the security groups option and click Save and Activate.

Now, when the resource is shared to a user with Password User or Password Auditor user roles, they can request for password access or elevation. This request can be approved or rejected by any admin in the Authorized Administrator list as long as their user role satisfies the following criteria: The user designated to perform privilege elevation must have an Administrator role in PAM360 (i.e., any one of the following user roles: Privileged Administrator, Administrator, and Password Administrator), and in ADManager Plus, they must have a user role with any of the following permissions: modify users and modify groups. However, the users who receive privilege elevation in PAM360 need not have any special permissions in ADManager Plus. Click here to learn more about user roles in PAM360.
Caution
- Direct changes made to the group configuration in ADManager Plus will override the changes made in PAM360. Following are a few examples:
- A domain account is elevated to the System Admin security group through PAM360 policy configuration.
- A user connects to a shared server using the domain account.
- Through the defined access control and policy configuration in PAM360, the normal domain account is automatically elevated just-in-time to the security group System Admin and gets assigned with the required privilege.
- However, during this time, if the domain account elevation is removed from the security group in ADManager Plus, then the privilege will be removed in PAM360 immediately.
- To perform the Group Membership Automation operations in this integration, you should be using the Professional edition of ADManager Plus, as the Group Automation functionality is supported only in that edition.
4. Associating Domain Accounts in ADMP with PAM360
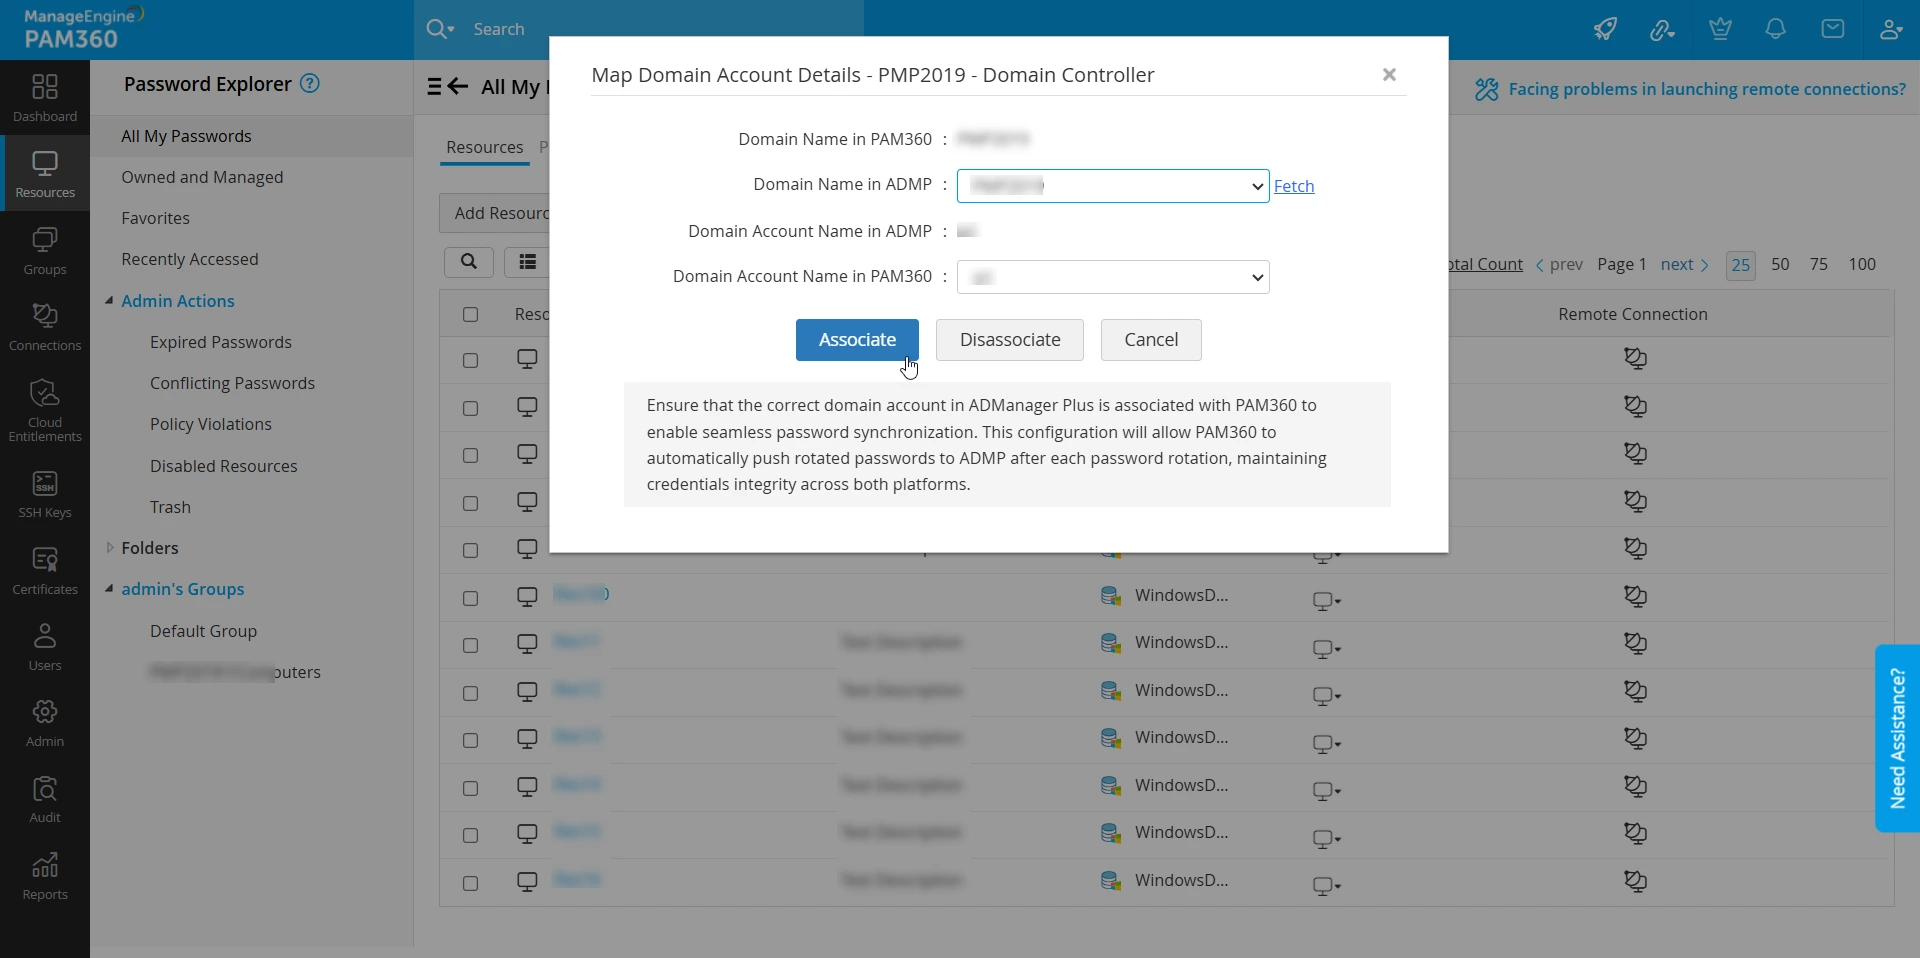
Associating domain accounts in ADMP with PAM360 ensures seamless password synchronization. When a password rotation occurs in PAM360, it automatically updates the corresponding password in ADMP. To associate the domain account details, follow these steps:
- Navigate to the Resources tab, click the Resource Actions dropdown beside the desired Windows Domain resource, and select Associate followed by ADManager Plus.
Additional Detail
This option is only applicable for Windows Domain resources and with an active ADMP integration.
- In the window that appears, click the Fetch button to import the domain name from ADMP.

- Select the domain details, i.e., Domain Name and Account Name, which are to be associated from the respective dropdown.
Additional Details
- The Domain Account Name in PAM360 will be automatically selected based on the Domain Account Name selected in ADMP.
- An alert message will be prompted when a mismatch in the ADMP-PAM360 domain account details is suspected. Verify if you have associated the correct domain account details of ADMP in PAM360. Only then the automatic synchronization of domain account password will occur with the right domain account in ADMP.
Upon associating the ADMP domain account details in PAM360, the automatic synchronization of the domain account password will occur when the remote password reset is executed from PAM360.
5. Troubleshooting Tips
If you encounter issues during the integration or while using it, follow these tips to resolve common problems:
- Ensure all necessary certificates are correctly imported into PAM360. Improper or missing certificates can lead to failed connections or data retrieval issues.
- Confirm that both the PAM360 and the ADMP server can communicate with each other. The network connectivity should be bi-directional to allow successful data exchange and integration.
- If user groups are not visible under Access Control >> Policy Configuration, verify that the Domain Name is correctly specified in the Windows Domain Controller (DC) resource within PAM360. An incorrect or missing domain name may prevent PAM360 from retrieving the associated groups.
If you encounter any persistent issues, please contact our support at pam360-support@manageengine.com.