Notification Settings
EventLog Analyzer distributes the scheduled and automatically-generated reports to users via email. It notifies users with alerts via both email and SMS.
The email and SMS settings can be configured according to your environment's requirements.
To configure or change email settings,
- Navigate to Settings > System Settings > Notification Settings > Mail Settings.
EventLog Analyzer provides two modes of mail server configuration:
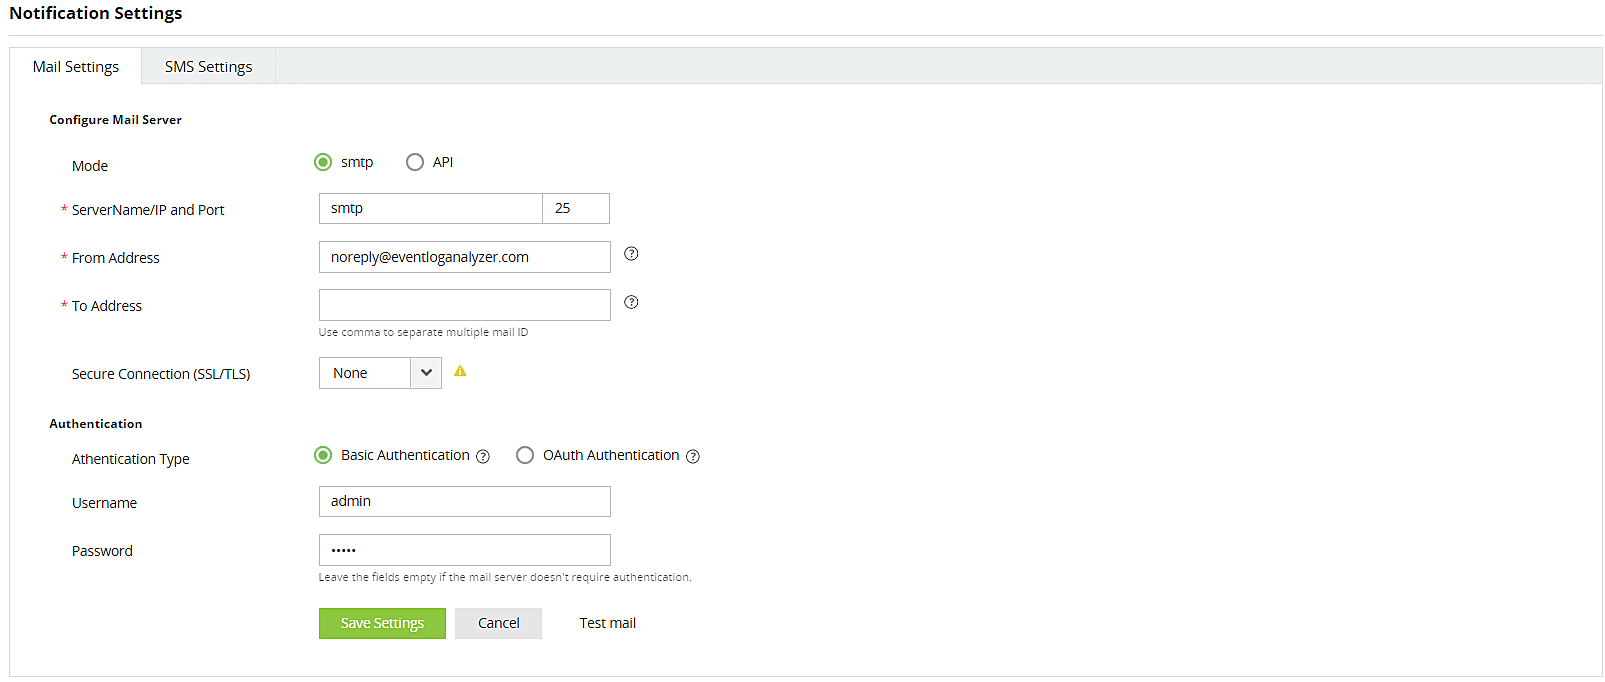
SMTP
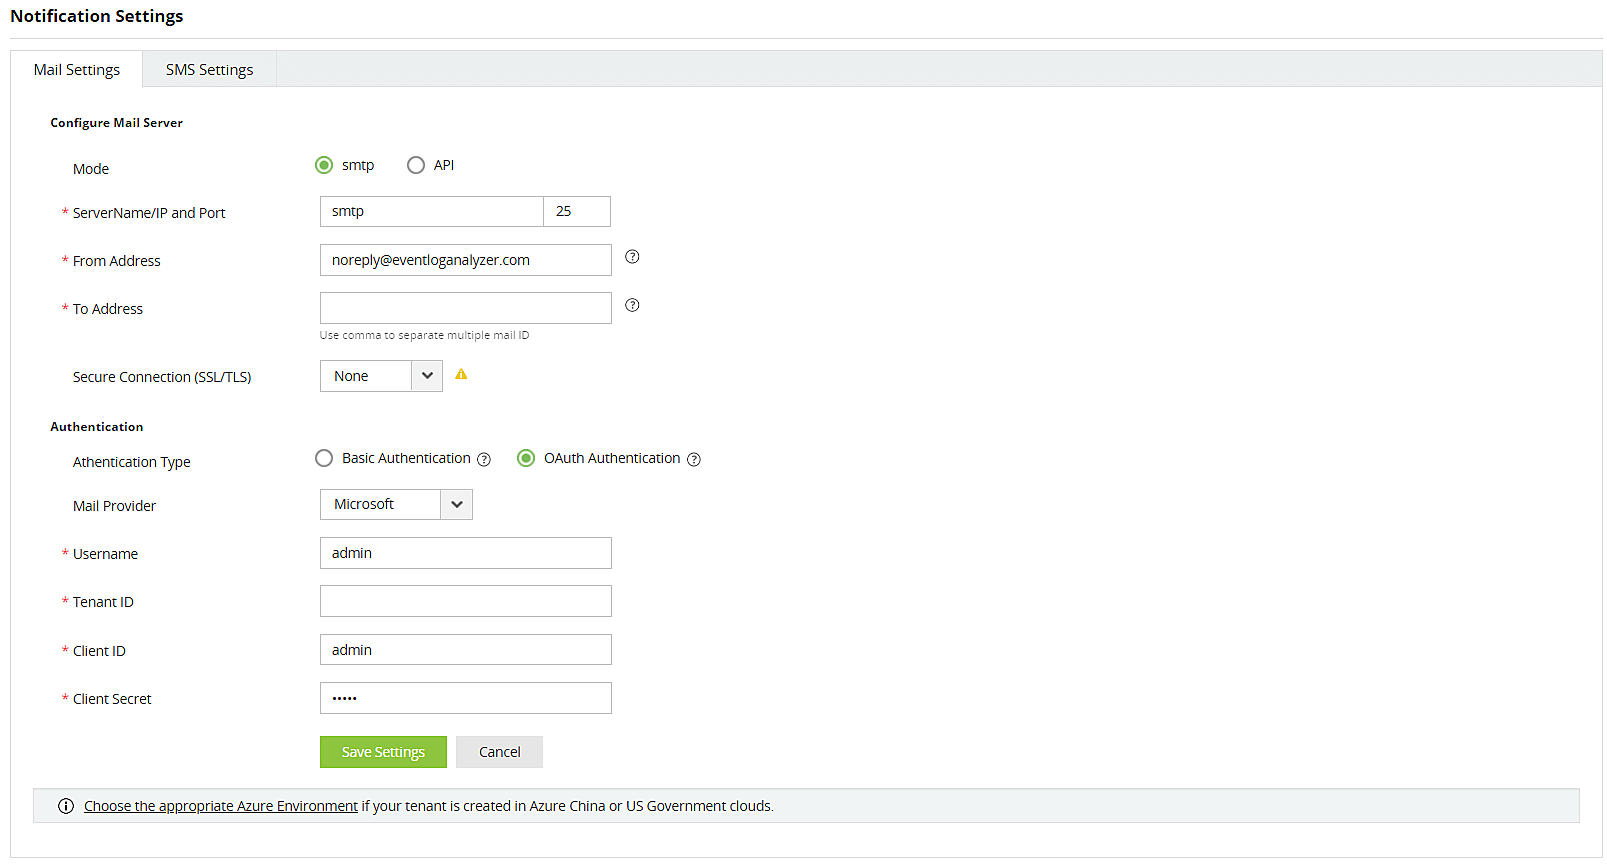
This method allows you to create and authenticate a mail server via Basic or OAuth authentication.
To configure an SMTP mail server,
- In the field, select SMTP.
- Enter your mail server's Server Name or IP, and Port Number in the respective fields.
- In the From Address field, enter the email address that will be used to send out notifications, alerts, etc., from eventLog Analyzer.
- In the To Address field, enter your email address if you wish to receive notifications for the emails sent from eventLog Analyzer.
- Select the connection security type from the available options: SSL, TLS, or None.
- Select the authentication type from the options provided:
- Basic authentication
- Enter the Username and Password to access the mail server.
- If your mail server does not require authentication, leave the fields empty.
- OAuth authentication
- If you have selected Basic Authentication in step 6, you can have Log360 send a test email by clicking the Test Mail button.
- Click Save Settings to save your mail server configuration.
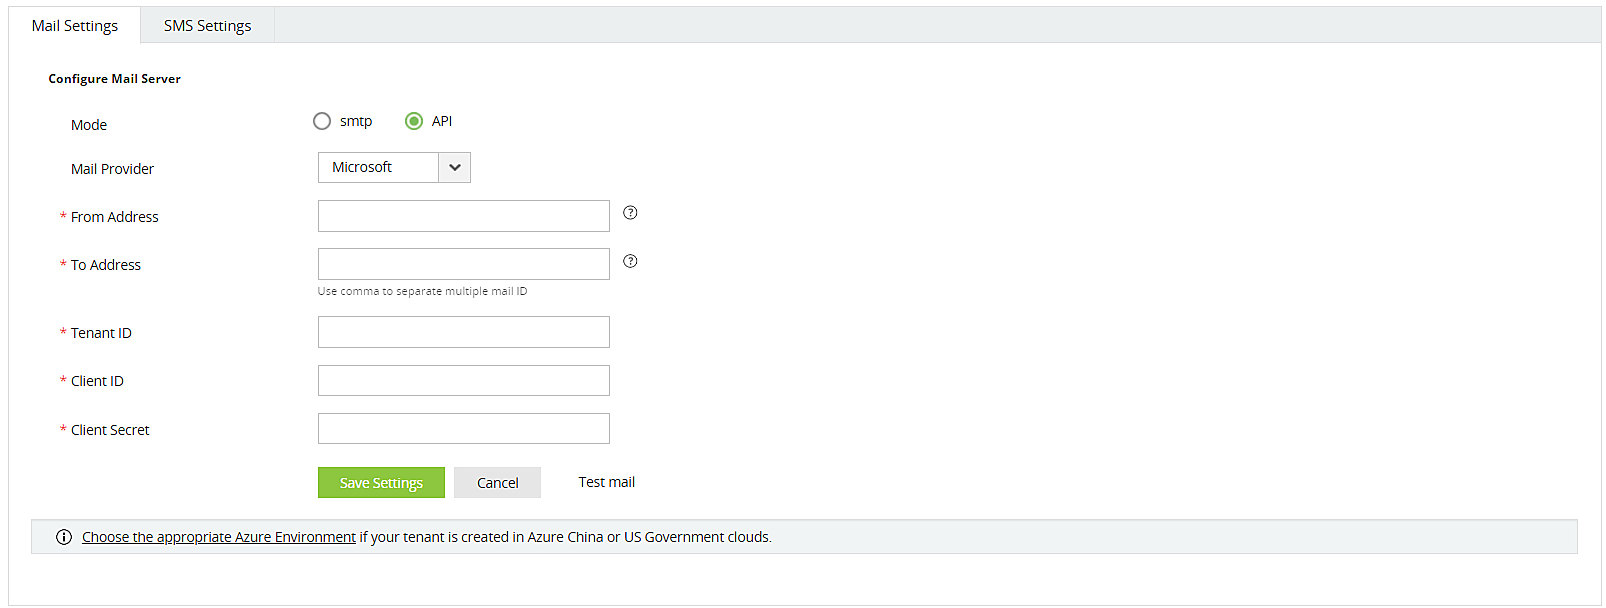
API
This method allows you to create and authenticate a mail server via your mail provider’s API.
- In the Mode field, select API.
- Select your mail provider from the available options: Microsoft or Google.
- In the From Address field, enter the email address that will be used to send out notifications, alerts, etc., from eventLog Analyzer.
- In the To Address field, enter your email address if you wish to receive notifications for the emails sent from eventLog Analyzer.
- If your mail provider is Microsoft, provide the Tenant ID, Client ID, and Client Secret in the respective fields. In EventLog Analyzer, the Azure Cloud is considered the default Azure environment. You can modify the Azure environment setting by clicking the Choose the appropriate Azure environment link.
Note: To learn how to find your Google Tenant ID, Client ID, and Client Secret, click
here.
- If your mail provider is Google, upload the JSON private key file.
Note: To learn how to get your JSON private key file, click
here.
- Click Save settings.
Steps to find your Azure Tenant ID, Client ID, and Client Secret for SMTP mail server configuration
- Log in to portal.azure.com.
- Under Azure services, click App registrations → New registration.
- Provide a Name of your choice and select the Supported account types. (Leave it as default).
- In the Redirect URI field, select web & paste the following OAuth link: https://identitymanager.manageengine.com/api/public/v1/oauth/redirect (or) You can also add the localhost redirect API in the following syntax.
protocol://localhost:port_number/context_if_any/RestAPI/WC/OAuthSetting For example, http://localhost:8400/event/RestAPI/WC/OAuthSetting. If you have only added localhost as the redirect URI, you must access the product using localhost to configure mail server.
- On the next page, you will find the application details. Copy the Client ID & Tenant ID.
- From the left pane, click Certificates & secrets → New client secret.
- Provide a Description for the client secret, and in the Expires field, choose the validity of the client secret and click Add.
- The client secret will be generated. Copy the string displayed under Value.
- Click Save setting and complete the authorization prompt.
Steps to find your Google Workspace Client ID, and Client Secret for SMTP mail server configuration
- Log in to console.developers.google.com.
- In the dashboard, click Create to create a new project if there is no existing project or select any existing project and click New Project.
- Enter the Project Name. In the Location field, click Browse and select the parent organization. Click Create.
- In the left pane of the displayed project details page, click APIs & Services → Library.
- From the available list of APIs, select Gmail API and click Enable. You can use the search option to find the API quickly.
- In the left pane, click OAuth consent screen and choose the User Type. If you don't have a Google workspace account, choose External User.
- Provide the Application Name, Application Logo, and the support email of your help desk, developer information, and click Save & continue.
- Click Add or Remove Scopes, choose Gmail API (https://mail.google.com/), and click Update. Then, click Save & Continue.
- Add a test user and click Save & continue.
- In the left pane, click Credentials → Create Credentials → OAuth Client ID.
- Select the application type as Web Application. Provide a name of your choice.
- In the Authorized Redirect URIs, paste the following OAuth link: https://identitymanager.manageengine.com/api/public/v1/oauth/redirect (or) You can also add localhost redirect API in the following pattern.
protocol://localhost:port_number/context_if_any/RestAPI/WC/OAuthSetting For example, http://localhost:8400/event/RestAPI/WC/OAuthSetting. If you have only added localhost as the redirect URI, you must access the product using localhost to configure the mail server.
- Click Save.
- Click DOWNLOAD JSON to download the file containing the authorization server details. Copy the Client ID and Client Secret displayed on the screen.
Steps to find your Azure Tenant ID, Client ID, and Client Secret for API mail server configuration
- Log in to portal.azure.com.
- Under Azure services, click App registrations → New registration.
- Enter a Name of your choice and choose the Supported account types. (If you’re unsure about the supported account types, select Accounts in the organizational directory only).
- In the left pane, click API Permission → Add a permission.
- Click Microsoft Graph → Application permission.
- Search Mail and select the permission Mail.Send. Click Add Permission.
- Click Grant admin consent.
- Copy the Client ID & Tenant ID displayed.
- In the left pane, click Certificates & secrets → New client secret.
- Provide a Description for the client secret. In the Expires field, choose the validity of the client secret and click Add.
- The client secret will be generated. Copy the string displayed under Value.
Steps to download JSON private key for API mail server configuration
- Log in to console.developers.google.com.
- Open the Service accounts page.
- Click Create Project. Enter the project name, organization and location. Click Create.
- Click + Create service account button from the top row.
- Under Service account details, type a name, ID, and description for the service account, then click Create and continue.
- If required, you can also select the IAM roles to be granted to the service account using the Grant this service account access to project option.
- Click Continue
- If required, you can add the users or groups that are allowed to use and manage the service account.
- Click Done.
- Click the email address for the service account you created.
- Click the Keys tab.
- In the Add key dropdown list, select Create new key.
- Select key type as JSON.
- Click Create.
Your new public/private key pair will be generated and downloaded to your machine. Please keep the private key safe as this will be the only copy, and you cannot generate the same private key again.
Once you have downloaded the JSON private key, you’ll have to enable Gmail API service and provide domain-wide authority to the service account.
Enable Gmail API service
- Login to console.developers.google.com.
- Select the project from the dropdown menu.
- Click + Enable APIS and Services.
- Select Gmail API and click Enable.
Delegating domain-wide authority to the service account
- Log in to the Google Workspace domain's Admin console as a super administrator.
- Navigate to Main menu → Security → Access and data control → API Controls.
- In the Domain wide delegation pane, select Manage Domain Wide Delegation.
- Click Add new.
- In the Client ID field, enter the service account's Client ID. You can find your service account's client ID on the Service accounts page.
- In the OAuth scopes (comma-delimited) field, enter the list of scopes that your application should be granted access to. For example, if your application needs domain-wide full access to the Google Mail API, enter: https://mail.google.com.
- Click Authorize.
Your application now has the authority to make API calls as users in your domain (to "impersonate" users). When you prepare to make authorized API calls, specify the user to impersonate as.
SMS Settings
To configure or change SMS settings,
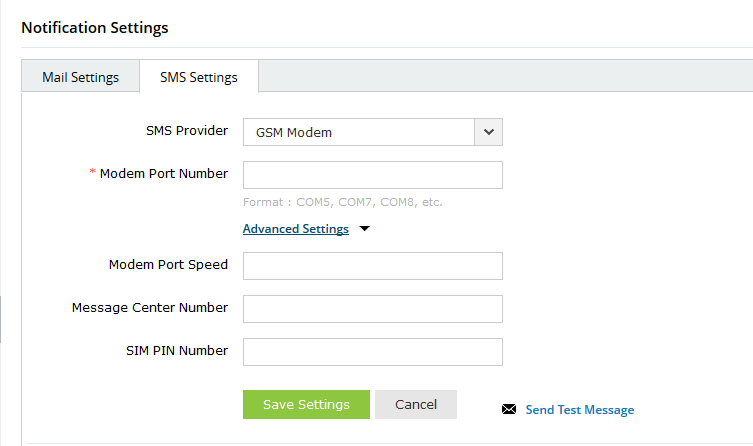
- Navigate to Settings > System Settings > Notification Settings > SMS Settings.
- For sending SMS alerts, you can configure EventLog Analyzer to use a GSM modem or a custom SMS gateway of your own.
GSM Modem Configuration
To configure a GSM modem,
- Go to Settings > System Settings > Notification Settings > SMS Settings.
- In the SMS Provider drop-down field, select GSM Modem.
- In Modem Port Number, enter the hardware port of the EventLog Analyzer server machine to which the SMS hardware component provided by the telecom service provider is connected.
- Click Save Settings to complete configuration.
- If the SMS settings are not configured here, EventLog Analyzer prompts you to configure SMS settings at the Alert Profile Creation screen.
Steps involved in configuring the modem port and modem speed:
- Connect your GSM Modem to the serial communication port.
- Only a serial cable must be used for connectivity.
- The port number for Windows devices will be comX. For example, COM7 or COM8.
- Enter the port number to which the modem is connected. For example, COM1.
Requirements for establishing SMS server connection:
- The modem/mobile must have GSM functionality with a provision to insert a SIM card.
- It should support 7-bit (GSM default alphabet), 8-bit, and Unicode (UCS2) encoding.
- Ensure that the GSM modem configured with EventLog Analyzer is not used by any other application.
- If you experience any issue in sending SMS notifications through the GSM modem, please restart EventLog Analyzer and try again.
- Matching these criteria will allow EventLog Analyzer to support your modem/mobile phone.
Custom SMS Gateway Configuration
You can configure you own custom SMS gateway, provided the gateway which is based on HTTP, SMTP or SMPP.
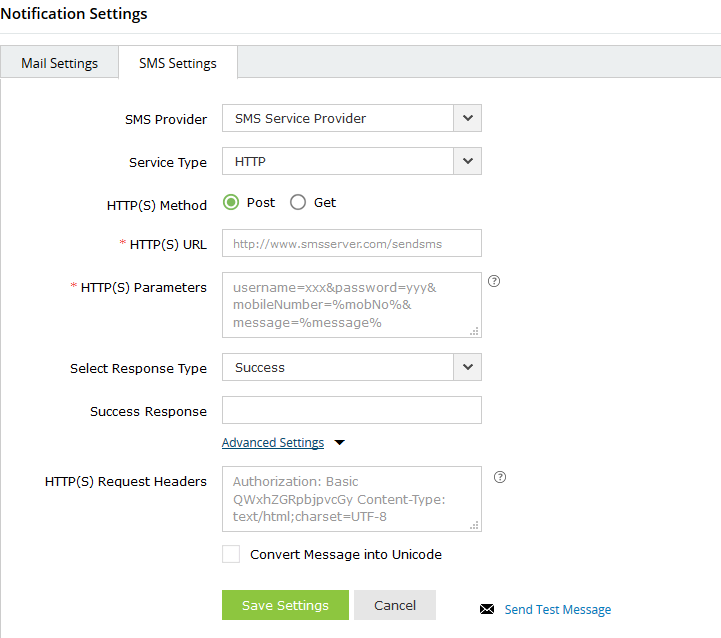
HTTP-based SMS Provider:
- Navigate to Settings > System Settings > Notification Settings > SMS Settings.
- In the SMS Provider drop-down field, select SMS Service Provider.
- In the Service Type drop-down field, select HTTP.
- In the HTTP(S) Method field, select whether you want to use the Post or Get method for sending SMS.
- In the HTTP(S) URL field, enter the URL of your SMS gateway provider.
- In the HTTP(S) Parameters field, enter the HTTP parameters specific to your SMS provider.
Note: Separate the HTTP parameters with ampersand (&) symbols.
Example format: userName=xxx&password=yyy&mobileNumber=%mobNo&message=%message%
where,
userName = the parameter which is used to denote the API authentication username
xxx = API authentication username
password = the parameter which is used to denote the API authentication password
yyy = API authentication password
mobileNumber = recipient parameter
%mobNo% = this macro denotes the user's mobile number
message = message parameter
%message% = this macro denotes the SMS message content
More HTTP Parameters - If you SMS provider requires more parameters like unicode and apiID, include them as well using the '&' sign
- Specify the response you get from your provider to determine the success of sending the SMS.
- Click Advanced Settings and enter the HTTP request headers specific to your SMS provider.
- Select the check box Convert Message into Unicode to send SMS in Unicode format.
- Click Save Settings to complete configuration.
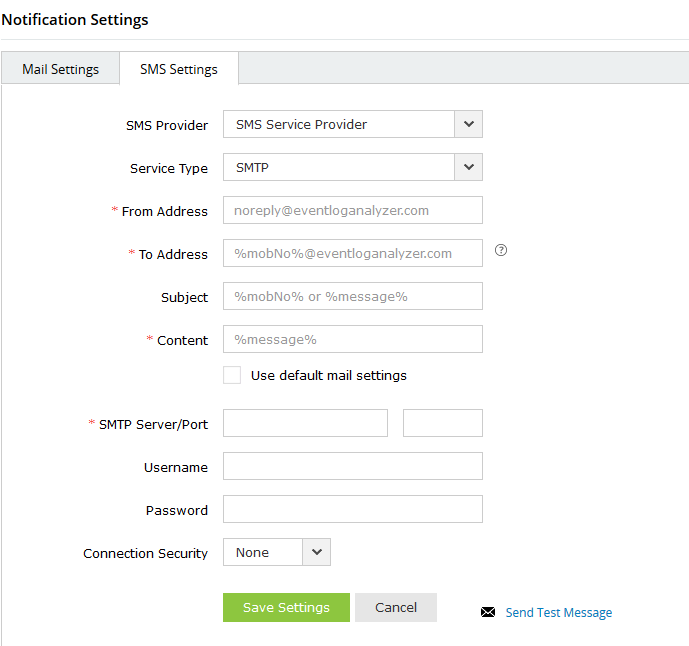
SMTP-based SMS Provider:
- Navigate to Settings > System Settings > Notification Settings > SMS Settings.
- In the SMS Provider drop-down field, select SMS Service Provider.
- In the Service Type drop-down field, select SMTP.
- In the From Address field, enter an email address from which you want to send the SMS. For example, noreply@eventloganalyzer.com
- In the To Address field, enter the %mobNo% macro followed by the email of your provider. For example: %mobNo%@clickatell.com. Refer to your SMS provider to know the exact values.
- In the Subject field, enter either the mobile number or message, which is based on your SMS provider.
- In the Content field, enter appropriate data, which varies based on the SMS provider.
- In the SMTP Server/Port field, enter the name or IP address of the SMTP Server and its port number.
- Enter appropriate credentials for the SMTP server in the Username and Password fields.
- Click Save Settings to complete configuration.
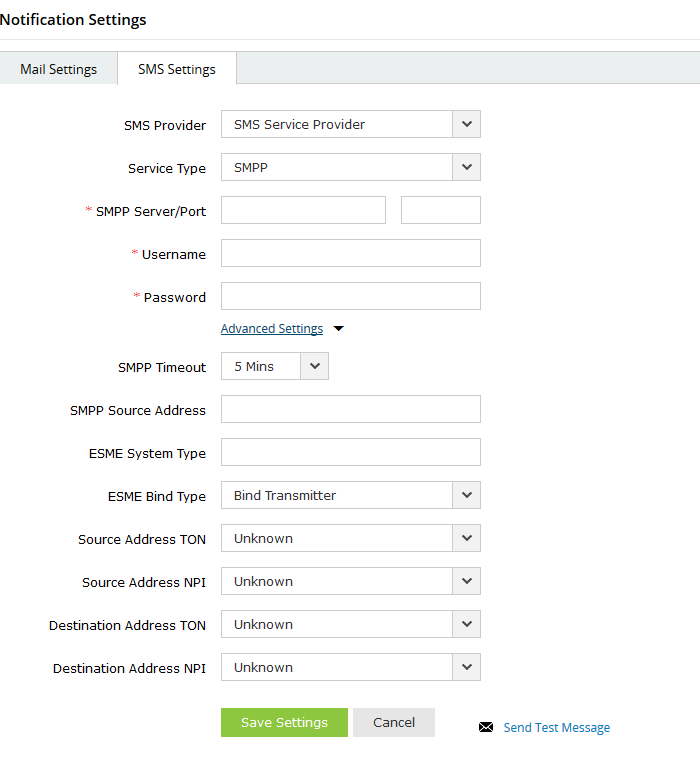
SMPP-based SMS Provider:
- Navigate to Settings > System Settings > Notification Settings > SMS Settings.
- In the SMS Provider drop-down field, select SMS Service Provider.
- In the Service Type drop-down field, select SMTP.
- In the SMPP Server/Port field, enter the name or IP address of the SMPP Server and its port number.
- Enter appropriate credentials for the SMPP server in the Username and Password fields.
- Click Advanced Settings and in the SMPP Source Address field, enter the appropriate IP address.
- Select the type of number (TON) and numeric plan indicator (NPI) of the source address.
- Select the type of number (TON) and numeric plan indicator (NPI) of the destination address.
- Click Save Settings to complete configuration.
 Click here to expand