SSO Settings
If the SSO Settings option is enabled, users can automatically log in to ADSelfService Plus by simply logging in to their Windows machine or through a third-party identity provider.
ADSelfService Plus supports single sign-on (SSO) with two types of authentication:
1. NTLM Authentication
In this method of authentcation, users log in to the ADSelfService Plus web console using the credentials they used to log in to the machine. To enable NTLM authentication, follow the steps below.
Prerequisites:
- Navigate to Admin > Customize > Logon Settings > Single sign-On.
- Check the Enable SSO box to enable SSO in ADSelfService Plus.
- Jespa deployment
- Download the latest Jespa JAR file.
- Unzip the downloaded file and paste the Jespa JAR file (filename jespa-2.0.0.jar) to the <ADSelfServicePlus_install_directory > /lib folder; where <ADSelfServicePlus_install_directory> is the location in which ADSelfService Plus is installed.
- Restart ADSelfService Plus for the changes to take effect.
- Ensure a computer account has been configured in the ADSelfService Plus admin portal for NTLM SSO.
- Customers who are on build 6210 or lower can continue using the feature without having to perform the first prerequisite.
- The default package has a Jespa (third-party) limitation which supports unlimited users for 60 days and only 25 users after. If you want to continue using Jespa for NTLM authentication for unlimited users beyond 60 days, you will need to purchase it from IOPLEX.
Please contact support@adselfserviceplus.com if you need any help configuring NTLM authentication for your users.
Configuration steps:
- Navigate to Admin > Customize > Logon Settings > Single sign-On.
- Click the Enable SSO checkbox to enable SSO in ADSelfService Plus.
- Select NTLM Authentication.
- To use the NTLM authentication service, a computer account not associated with a physical computer in your network has to be created in AD with a specific password that meets the password policy in AD. This is required, as only a computer account can validate the NTLM credentials (domain name, username, and one-way hash of the password obtained during machine login) of a user.
- Click Configure Now to provide the details of the computer account. NTLM authentication is domain-based, so this type of authentication can be enabled for a select set of domains of your choice.
- If you already have such a computer account, type the Computer Name and it's Password in the fields provided. You can also create a new computer account by providing the required details and clicking the Create this computer account in the domain checkbox. Enable or disable the computer accounts by clicking the enable/disable button.
- Click Save.
- If you've installed ADSelfService Plus on a machine that does not belong to the domain you've chosen, click the Advanced button and specify the DNS Server and DNS Site of the domain.


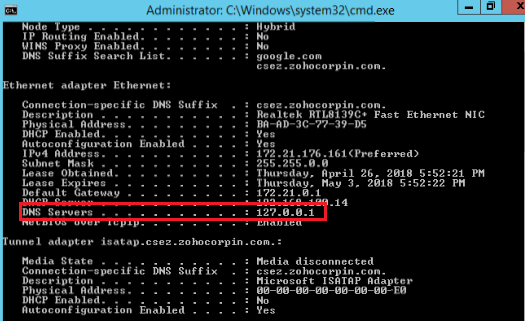
A. Finding the IP address of the DNS servers
- From a machine that belongs to the domain you've selected, open the command prompt, type “ipconfig /all”, and press enter.
- Enter the IP address displayed under the DNS Servers in the respective field in ADSelfService Plus.
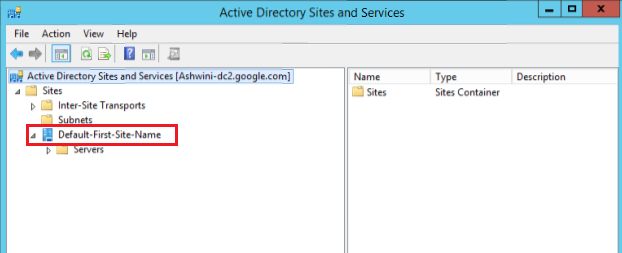
B. Finding the DNS site
- Navigate to Active Directory Sites and Services.
- Enter the DNS Site containing the domain controller of the selected domain in the respective field in ADSelfService Plus.
C. Adding sites to the local intranet zone
There are two ways to apply the required configuration:
Method 1: Using a group policy (supported on Google Chrome and Internet Explorer)
- Create a new Group Policy Object and navigate to User Configuration > Administrative Templates > Windows Components > Internet Explorer > Internet Control Panel > Security Page > Sites to Zones Assignment list. Select Enable.
- Click Show to display the zone assignments. Enter the access URL in Value name and relate it to the trusted sites by entering "1" in Value, then click OK.
- Navigate to User Configurations > Administrative Templates > All Settings > Logon options. Select Enable.
- From the Logon options list, click Automatic logon only in Intranet zone, then OK.
Method 2: Manual configuration
1.Google Chrome:
- Navigate to Settings > Advanced drop-down > System module > Open proxy settings.
- Click the Security tab and select the Local intranet icon.
- Click the Sites button, enter the access URL of ADSelfService Plus in the required field, and click Add.
2.Internet Explorer:
- Navigate to Tools > Internet Options > Security.
- Click the Security tab and select the Local intranet icon.
- Click the Sites button, enter the access URL of ADSelfService Plus in the required field, and click Add.
3.Mozilla Firefox:
- Type "about:config" in the address bar and hit the enter key to display the list of preferences. If there's a warning message displayed, click I accept the risk to proceed.
- Navigate to the network.automatic-ntlm-auth.trusted-urls preference.
- Double-click the preference and enter the access URL of ADSelfService Plus (e.g. selfservice-5994:8888).
- Click OK.
2. SAML Authentication
In this method of authentication, users log in to the ADSelfService Plus web console using the credentials of a SAML-based identity provider.
After enabling the SAML-based SSO option, every time a user attempts to access ADSelfService Plus' web console, the IdP receives the authentication request. IdP authenticates the user, and after successful authentication, the user will be automatically logged in to the ADSelfService Plus portal. If the user is already logged in to the identity provider, when that user tries to access ADSelfService Plus, they will be granted access automatically.
Prerequisites:
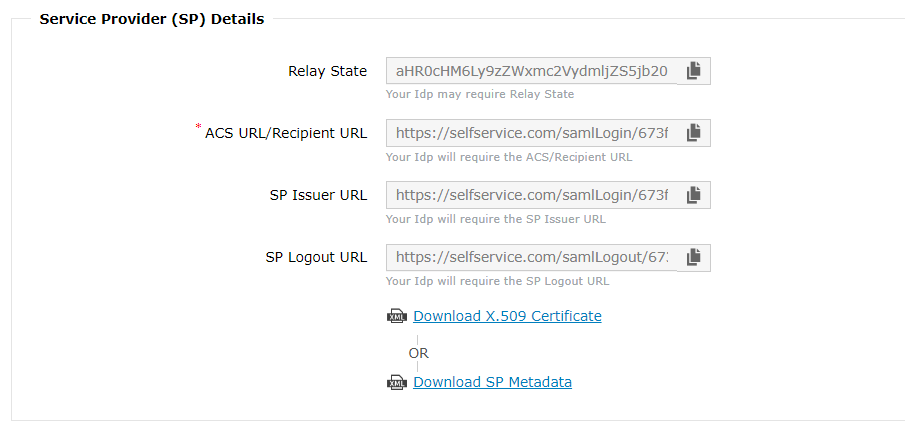
- Log in to ADSelfService Plus web console as an administrator. Navigate to Admin > Customize
> Logon settings > Single sign-On.. Click the Enable SSO checkbox and
the SAML Authentication button. Copy the ACS URL/Recipient URL and
the Relay State URL.
- The SAML-based identity provider that you intend to use must have ADSelfService Plus as one of its supported SAML applications. If it is not supported by default, you can add ADSelfService Plus as a new application in the identity providers supported out-of-the-box (Okta, OneLogin, AD FS) or as a custom identity provider (e.g, Entra ID). Find the steps to add a new application here: Okta, OneLogin, AD FS, Line Works, Entra ID, and 1Kosmos. For other identity providers, contact the identity provider's support team for further assistance.
-
Log in to your identity provider with admin credentials, and navigate to ADSelfService Plus from the list of applications provided. Either download the Metadata in XML format, or get the required data by copying the Issuer URL/Entity ID, IdP Login URL, IdP Logout URL, and X509-certificate. You'll need this information while configuring ADSelfService Plus for logon SSO.
Service Provider Configuration (ADSelfService Plus)
- Navigate to Admin > Customize > Logon settings > Single sign-On.
- Check the Enable SSO checkbox to enable SSO in ADSelfService Plus.
- Click the SAML Authentication button to enable SAML configuration in your domain.
- Select the identity provider of your choice in the Select IdP drop-down. If you have selected Custom SAML from the drop-down, you must type in the IdP name and upload IdP logo in the respective fields.
- There are two SAML Configuration Modes: Upload Metadata File and Manual Configuration.
- Select Upload Metadata File if you have downloaded the IdP metadata file from the identity provider.
- Click Browse to upload the IdP metadata file.
- Select Manual Configuration to manually configure the URLs and certificates.
- Enter the Issuer URL/Entity ID URL obtained from the identity provider in the respective field (Refer to step 3 of Prerequisites).
- In the IdP Login URL, enter the Login URL obtained from the identity provider (Refer to step 3 of Prerequisites).
- In the space provided for X.509-Certificate, enter the public certificate key fetched from the identity provider (Refer to step 3 of Prerequisites).
- If you want to use a custom SAML IdP, select Custom SAML from the Select IdP drop-down menu, and enter a name in the IdP Name field. You can also attach the IdP's logo in the IdP Logo field.
- Click Advanced Settings to configure the SAML request and response that are processed.
- Select whether the SAML Request sent to the IdP will be signed or unsigned from the SAML Request drop-down menu.
- Select the Authentication Context Class sent in the SAML request from the Authentication Context Class drop-down menu.
- Select the SAML Response and Assertion Signature from the respective drop-down menus to determine whether the messages received from the IdP are signed or not.
- Select the Signature Algorithm that the IdP uses to sign the SAML response/assertion from the Signature Algorithm drop-down menu.
- Select Encrypted or Unencrypted from the Assertion Encryption drop-down menu.
- If the SAML assertion is encrypted, select either Self-Signed or CA-Signed from the Encryption Certificate drop-down options provided.
- If the encryption certificate is CA-Signed, upload the CA Public Key and CA Private Key as given by the certificate authority (CA).
- If the encryption certificate is Self-Signed, then you can download the self-signed certificate by clicking Download Self Signed Certificate. You will need this for configuring SAML authentication in the IdP.
- Select either Enable or Disable from the Single Logout drop-down menu. When the Single Logout option is configured and a user logs out of ADSelfService Plus, the user is automatically logged out from the IdP and vice versa.
- Click Save.
- A summary of the IdP and service provider configurations are displayed below.
- To regenerate the SAML signing and self-signed encryption certificates, click Regenerate corresponding to the respective Signing Certificate and Encryption Certificate fields. The certificates expire by default after a period of one year.


