ADSelfService Plus supports SSO logins to any OAuth or OpenID Connect-enabled custom enterprise application. In this document, get the steps to configure OpenID Connect-based SSO for custom applications.
- Log in to ADSelfService Plus using administrator credentials.
- Navigate to Configuration > Self-Service > Password Sync/Single Sign On.
- Click Add Application.
- Click the Custom Application option in the left pane.
- Enter a suitable Name and Description for the application.
- Enter the Domain Name for your application account. For example, if your username is johndoe@thinktodaytech.com, then thinktodaytech.com is your domain name.
- Choose the policies you want to assign from the Assign Policies drop-down.
- You can also add a small or large icon of the application, if desired.
- Under the SSO tab, select Enable Single Sign-On.
- From the Select Sign-on Method drop-down, choose OAuth/OpenID Connect.
- From the Supported SSO Flow drop-down, choose SP-Initiated or IdP-Initiated.
Note: It is advisable to contact the support team of your SP application and verify the supported SSO flow(s) before choosing the supported SSO flow.
If selecting SP-Initiated flow
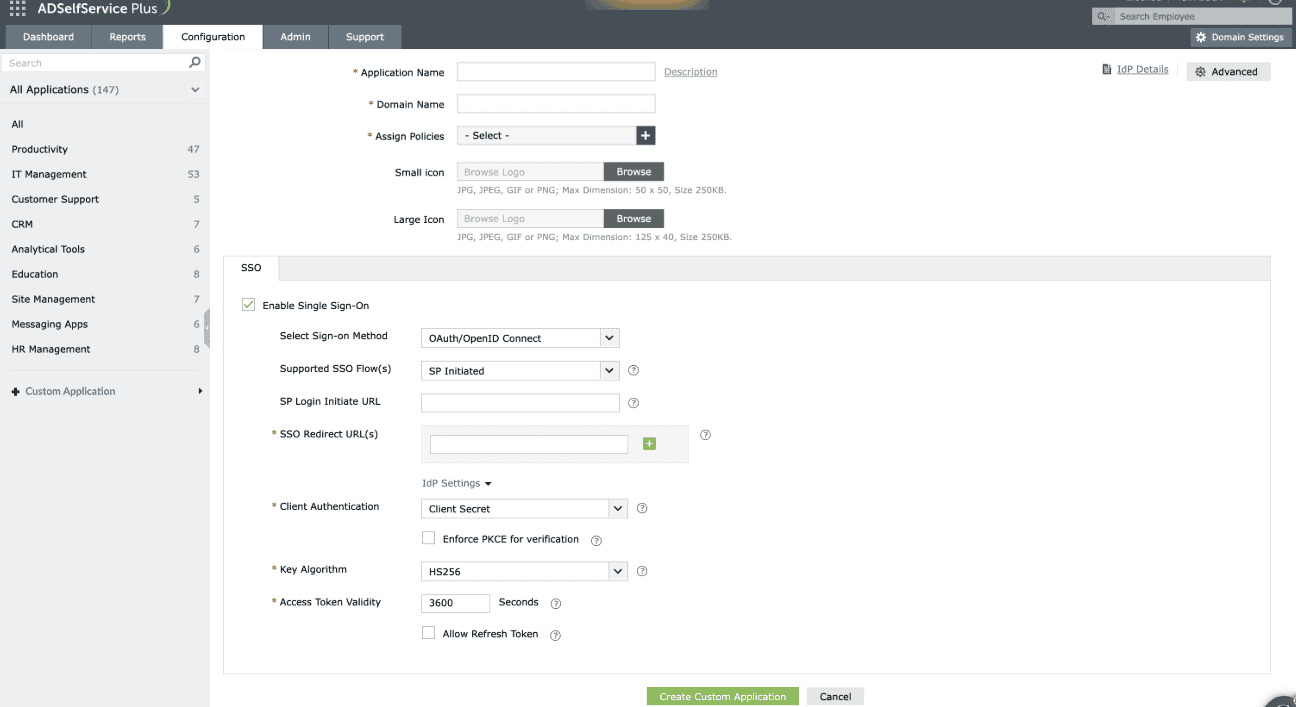
Fig. 1: Choosing the SP-Initiated flow from the Supported SSO Flow drop-down to define how the SSO request will be initiated by the Service Provider.
- Enter the URL of the service provider's login page in the SP Login Initiate URL field.
Note: Some apps require sign-in to begin from their login page, known as SP-initiated login. Users are first directed to the app's login page, specified in the SP Login Initiate URL field, after which the SP redirects them to ADSelfService Plus, the identity provider (IdP) for authentication.
If selecting IdP-Initiated flow
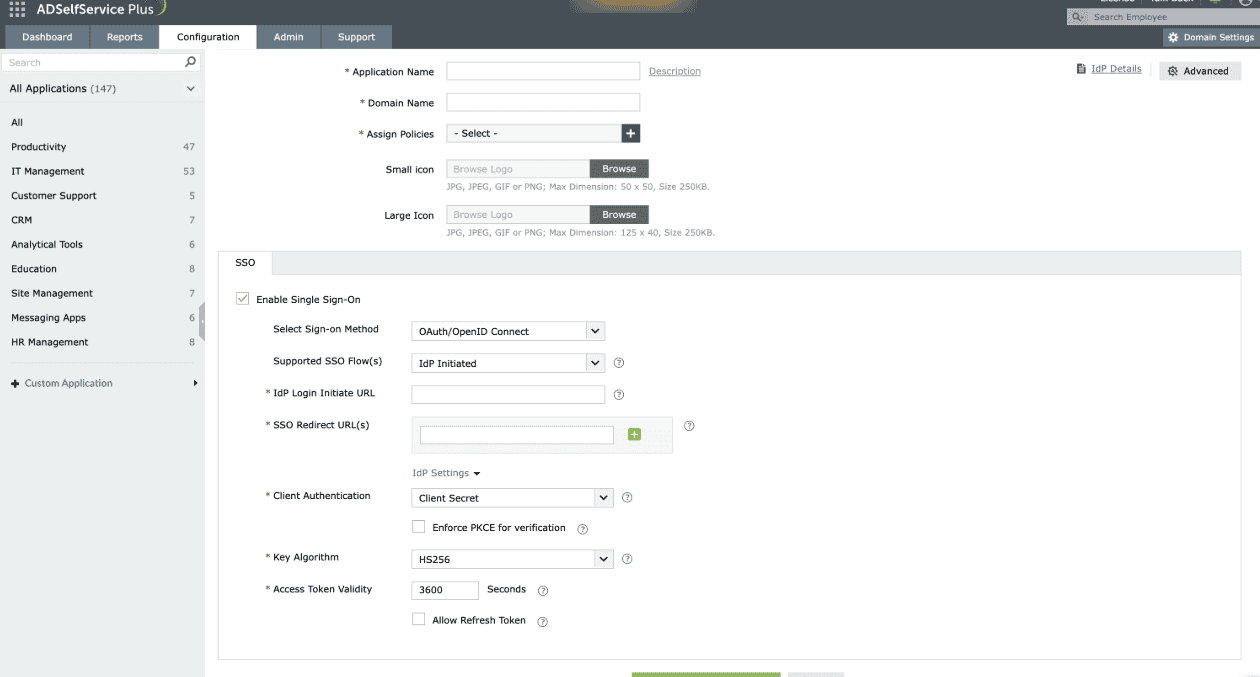
Fig. 2: Choosing the IdP-Initiated flow from the Supported SSO Flow drop-down to define how the SSO request will be initiated by the identity provider.
- In the IdP Login Initiate URL field, enter the application's URL to which the IdP sends the id_token, enabling the SP to complete the login process. Once this URL is configured, users will be able to log in to the application by clicking that particular application in the ADSelfService Plus user portal.
- In the SSO Redirect URL(s) field, enter all the available Authorization redirect or callback URLs obtained from your SP in step 2 of the prerequisites. The URL(s) can be found in the SP's OAuth/OIDC SSO configuration page.
- From the Client Authentication drop-down, choose the client authentication method as per service provider (SP) requirement. This mode determines how the IdP will authenticate the SP's access token request.

Fig. 3: Choosing the appropriate client authentication mode from the drop-down to define how the IdP will authenticate the SP’s access token request.
- Client Secret: A unified mode that includes the following methods:
- Client Secret Basic: The SP encodes the client_id and client_secret in Base64 and includes them in the Authorization header of the access token request.
- Client Secret Post: The SP includes the client_id and client_secret in the request body while sending access token request.
- Client Secret JWT: The SP generates a JWT (JSON Web Token) using the client_secret to digitally sign the request.
The IdP validates the credentials or signature to authorize the request.
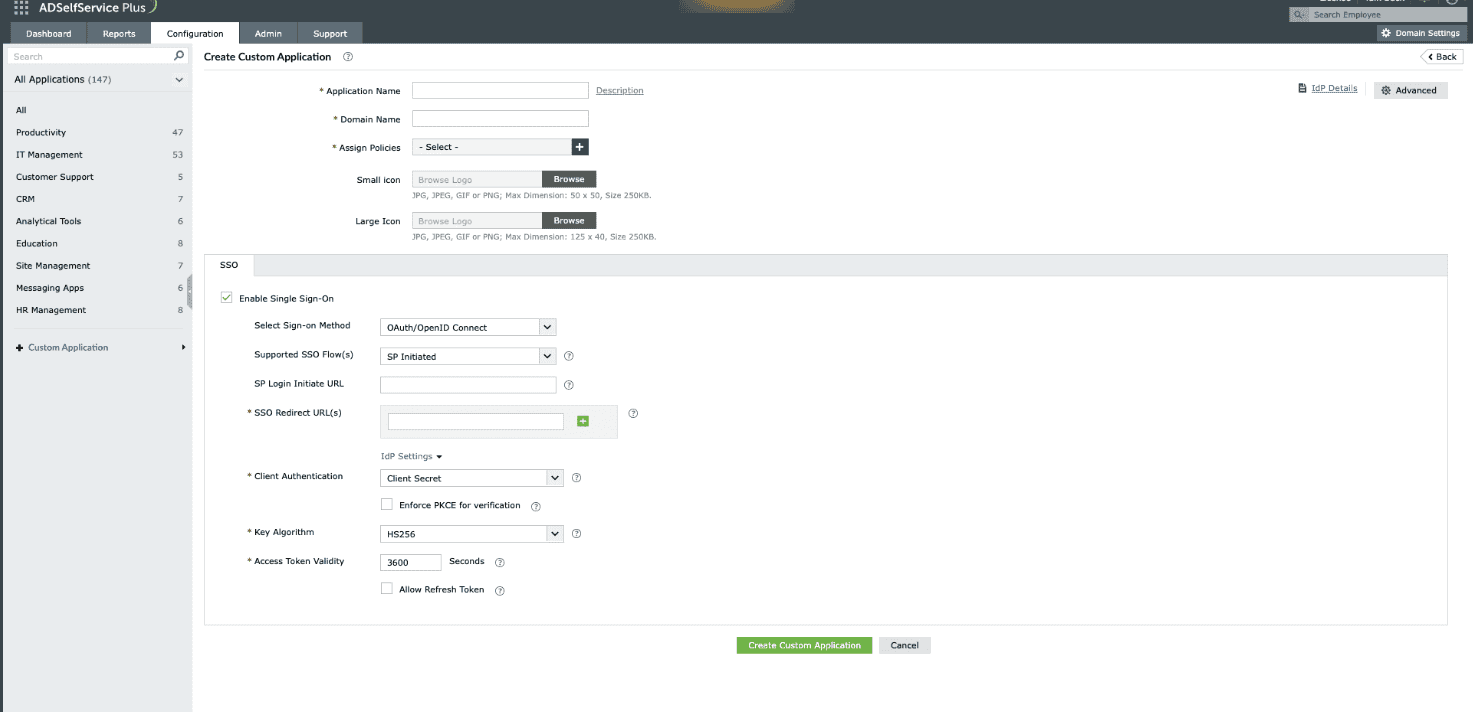
Fig. 4: Choosing the Client Secret authentication mode.
- Private Key JWT: The SP provides a JWKS (JSON Web Key Set) URL containing its public key. During access token requests, the SP uses its private key to sign the JWT. The IdP verifies this signature using the public key obtained from the JWKS URL.
- None: No client authentication is involved, making this option suitable for single-page applications that cannot securely store client secrets. If this option is selected, PKCE (Proof Key for Code Exchange) is automatically selected and becomes mandatory for additional security. Ensure that your client application supports PKCE to complete user authentication successfully.
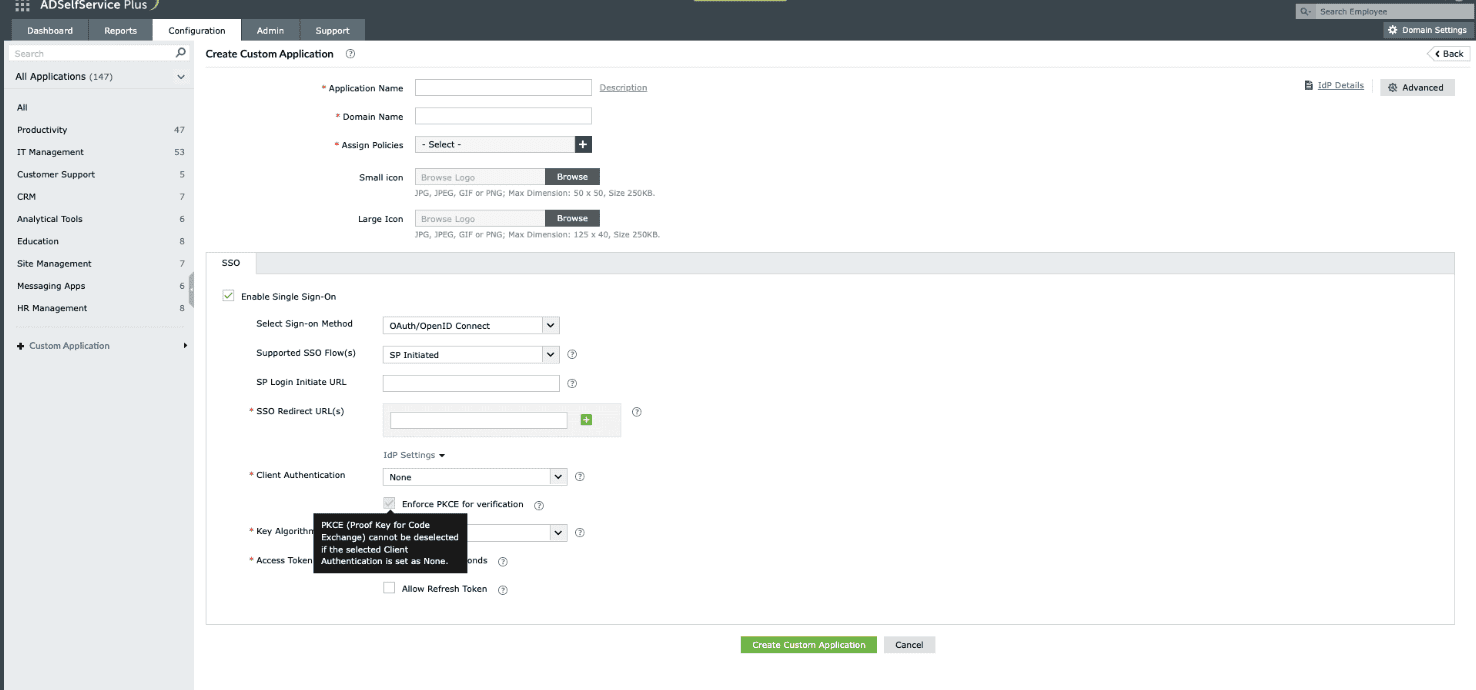
Fig. 5: Choosing the None client authentication mode.
- Enable the Enforce PKCE for verification checkbox to enhance security during the token request verification process. This option is applicable for all client authentication modes except None.

Fig. 6: Enforcing PKCE to enhance security during the verification process in Client Secret/Private Key JWT mode.
- Upon choosing the Private Key JWT as the client authentication method, ADSelfService Plus will need the JWKS URL details from the SP to obtain the public key, which will then be used to verify the signature.
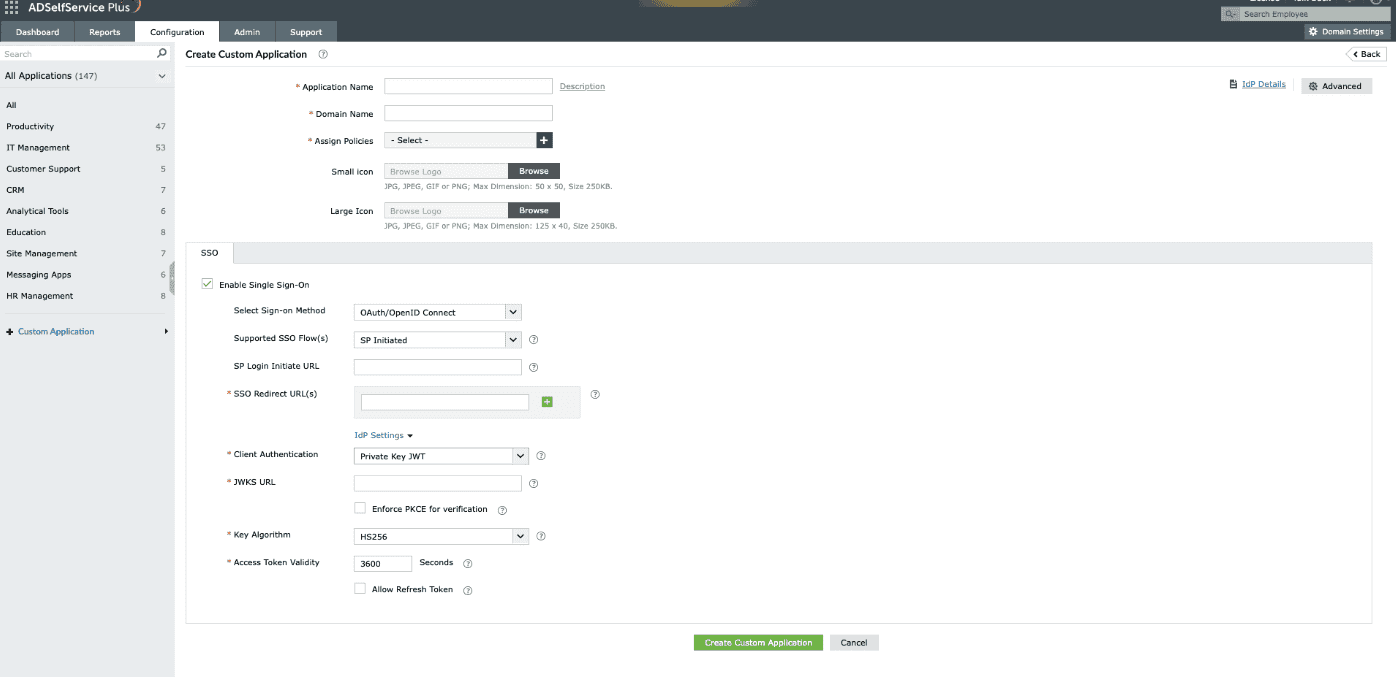
Fig. 7: Choosing the Private Key JWT client authentication mode.
- From the Key Algorithm drop-down, choose the appropriate algorithm: HS256, RS256, RS384, or RS512.
Note: The Key Algorithm is the algorithm used to sign tokens, such as the id_token or access_token. Using an algorithm to sign tokens ensures the token's integrity and authenticity.
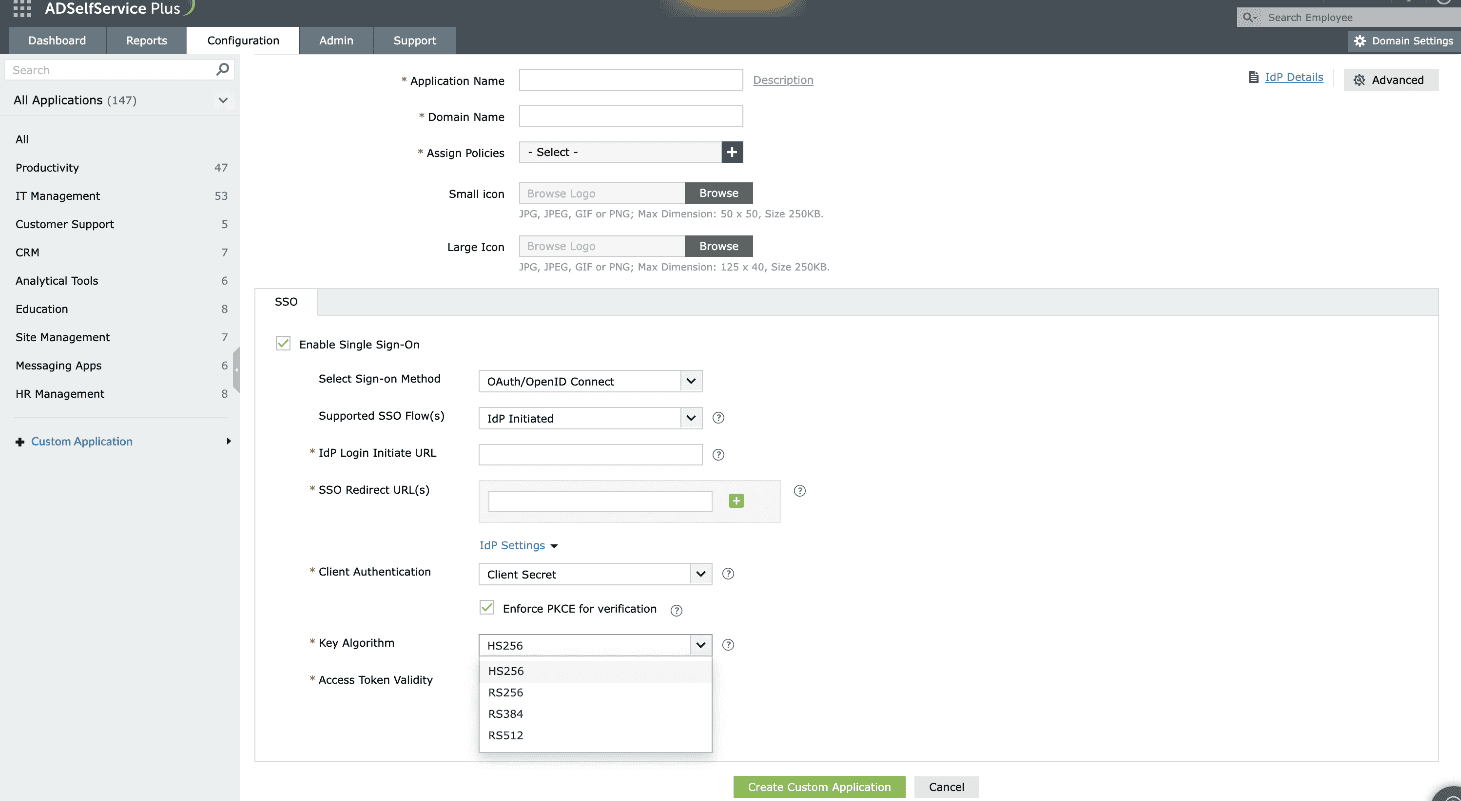
Fig. 8: Choosing the appropriate key algorithm (HS256, RS256, RS384, or RS512) from the drop-down to define how the access token will be signed.
HS256: A symmetric algorithm that uses one shared secret (i.e. client_secret generated during custom application creation in IdP), to sign and validate the token instead of using a public key pair.
RS256: RSA signature with SHA-256. It is an asymmetric algorithm which uses a public or private key pair, generated and managed by IdP (the IdP uses the private key to generate the signature, and the application uses a public key to validate the signature).
RS384: Same as RS256, except this uses a SHA-384 hashing algorithm for creating the RSA signature.
RS512: Same as RS256, except this uses a SHA-512 hashing algorithm for creating the RSA signature.
- The Access Token Validity field is set to 3600 seconds by default. You can change this value if required.
Note: Access Token Validity denotes the time limit for which the token sent by the IdP will be accessible by the SP.
- Click the Allow Refresh Token check box to allow the SP to obtain access tokens without needing the user to re-authenticate every time.
- Click Advanced Configuration in the top-right corner.
- Under OAuth/OpenID Connect Claim Attributes Configuration, map the attributes as per your requirement.
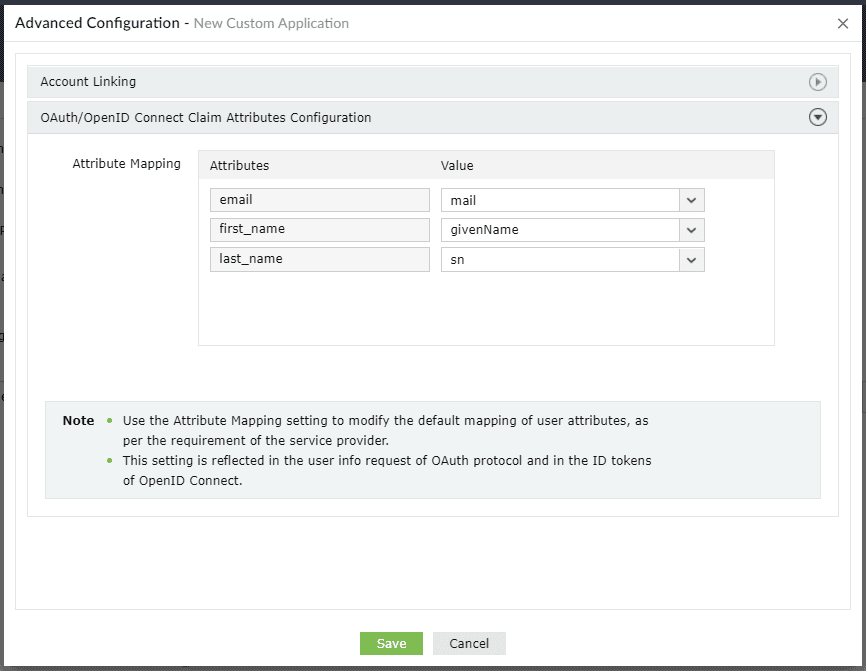
Fig. 9: Mapping user attributes under OAuth/OpenID Connect Claim Attributes Configuration.
- Click Create Custom Application.
The users who fall under the policies you chose in step 7 can now sign into the custom application from their user portal using SSO.
 ADManager Plus
 ADAudit Plus
 Exchange Reporter Plus
 M365 Manager Plus