Vulnerability Manager Plus installs an agent in all the client computers that have to be managed using Vulnerability Manager Plus. The agent properties can also be customized prior to installing the agents. For details on customization, refer to Configuring Agent settings.
This document will explain you on the following:
- Installing Agents from Vulnerability Manager Plus Console
- Installing Agents Using Windows GPO
- Installing Agents Manually
- Retry Agent Installation
- Uninstalling Agents
- Removing the Computers
- Identifying the Live Status of Vulnerability Manager Plus Agent
Installing Agents from Vulnerability Manager Plus Console
- The client computers can be added from Admin tab --> SoM --> Add Computers button. This will list the domains and workgroups that have been added.
- Click the Select Computers link pertaining to a domain/workgroup. This opens the Select Computers dialog listing all the available computers of the domain/workgroup.
- Select the computers that have to be managed using Vulnerability Manager Plus and click OK. You can also manually specify the computer names instead of choosing them from the list. The selected computers gets added to the Selected Computers table in the Add Computers view.
- Repeat steps 2 and 3 for adding computers from multiple domains/workgroups.
- Select the "Install Agent Immediately" check box to install the Vulnerability Manager Plus agents in the selected computers immediately. When this option is not selected, the computers are only added. You need to install the agents later to manage them.
|
- Click Done to add the selected computers. All the selected computers gets added to the Scope of Management.
The Scope of Management page will list all the computers that are being managed by Vulnerability Manager Plus along with the status of the agent installation and the agent version. Agents can also be installed at a later stage, by selecting the computers from Admin --> SoM page and clicking the Install Agent button from the Vulnerability Manager Plus Console.
Installing Agents Using Windows GPO
Windows GPO is a powerful and versatile tool. Vulnerability Manager Plus agent can be installed using the GPO light-weight tool. Follow the steps given below to create a Group policy and link it with OUs and Domains.
Steps:
- Download and extract the Agent Installer files (.msi & .mst).
- Navigate to Admin tab.
- Under SoM Settings, click on Scope of Management
- Click on Download Agent.
- Select the required remote office.
Save the .msi and .mst in a folder location.
- Download the GPO_Tool.ps1 script on the location where the .msi and .mst files are saved.
- If you want to configure the policy using VB script, then download and save the script InstallAgent.vbs on the same location.
(or)
- In case you want to configure the policy using PowerShell script, then download and save the script PSInstallAgent.ps1 on the same location.
- Run windows PowerShell in administrative mode and navigate to that script (GPO_Tool.ps1) location, then execute the script with arguments as mentioned below.
For vb script configuration: GPO_Tool.ps1 VulnerabilityManagerPlusAgent.msi VulnerabilityManagerPlusAgent.mst InstallAgent.vbs
For PowerShell script configuration: GPO_Tool.ps1 VulnerabilityManagerPlusAgent.msi VulnerabilityManagerPlusAgent.mst PSInstallAgent.ps1
- In the PowerShell window, enter the name of the GPO to be created and press Enter.
After creating the GPO, enter the distinguished name of the OU or Domainto be linked with. Follow the steps mentioned below to get the distinguished name:
- Open Active directory users and computers in Administrative tools.
- Right click on the OU / Domain which you want to be linked with.
- Select Properties -> Attribute Editor -> distinguishedName -> View
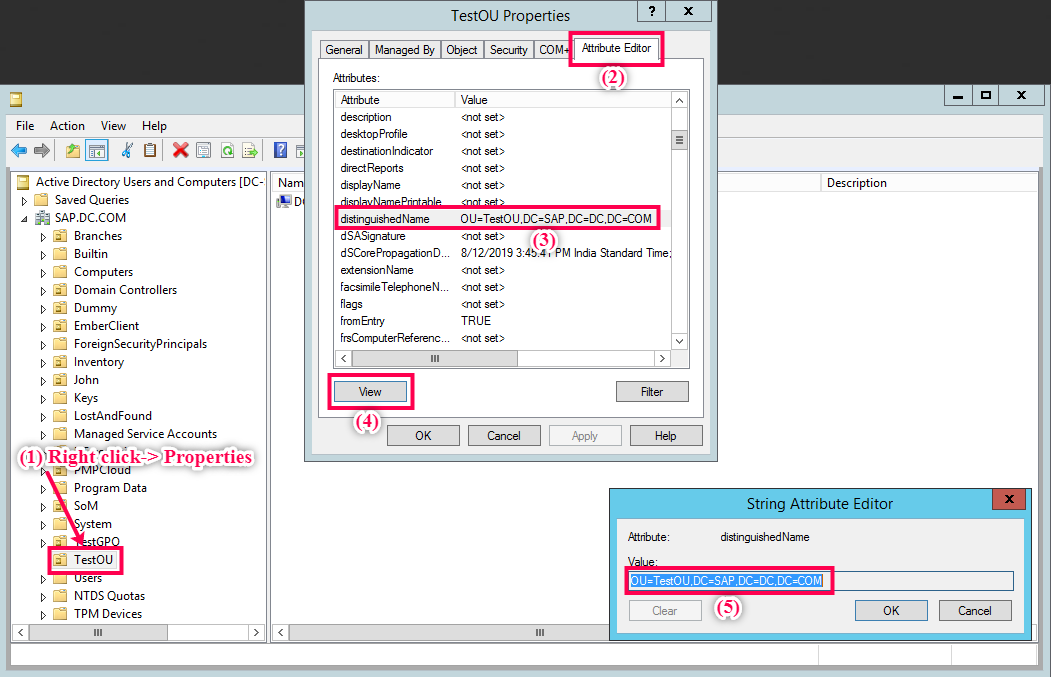
- Copy and paste the value of distinguishedName in the powershell window and press enter.
- Now paste the copied distinguished name in the PowerShell window and click Enter.
- If you want to 'Add' another Domain, press y and repeat step 5. Else, press n to end the process.
Installing Agents Manually
To install a LAN agent manually, follow the steps given below:
- Under SoM, select the Remote Offices tab
- In the Download Agent column, against the local office you have added, click the Download LAN Agent icon
- Save the .zip file in the computer on which you want to install the agent
- Extract the contents of the zip file
- Open a command prompt with run as admin privilege and navigate to the location of extracted zip folder and run the command setup.bat
- Select option 1 to install agent in this computer
You have now successfully deployed LAN agent.
Retry Agent Installation
Enabling this settings will automatically retry to install the Vulnerability Manager Plus agents, on the failed targets. If the one of the target computer is not reachable, instead of manually retrying to install the agent, you can specify the number of times, the automatic retry should happen. You can also specify the maximum frequency for this to be repeated. The retry process will be performed based on the specified frequency for the specified number of days. Mail alerts can be configured to notify when the agent installation has succeeded on one or more computers. Follow the steps mentioned below to configure retry agent installation process:
- Click Admin & tab on Vulnerability Manager Plus web console
- Choose SoM
- Select Settings
- Enable the check box, to retry agent installation process
- Specify the frequency and the number of days for the retry process to happen.
- Specify the email address to which the notifications need to be sent.
You have successfully configured the settings to retry agent installation on failed computers.
Uninstalling Agents
- To uninstall the agents from the computers, select the desktops from the list and select Uninstall Agent from the Actions box.
- If Uninstallation Restriction is configured, Enter the OTP prompted, either on the command line interpreter or UI displayed. To view the OTP configured, navigate to Agent > Scope of Management > Computers (in product console) or Menu > Scope of Management > Computers > Actions (in mobile app).
Removing the Computers
To remove the computers from the list, select the computers and select Remove Computer from the Actions box. The Vulnerability Manager Plus agents have to be uninstalled prior to removing a computer from the scope.
Identifying the Live Status of Vulnerability Manager Plus Agent
Vulnerability Manager Plus updates the live status of computers periodically. This data is updated every ten minutes or while an on-demand operation is performed on a client computer. You can see the live status of the Vulnerability Manager Plus agents by clicking on SoM, under Computers View. The following status will be displayed:
- The computer icon will be in green color if the Vulnerability Manager Plus Agent is live.
- The computer icon will be in red, if the Vulnerability Manager Plus agent is down. Vulnerability Manager Plus agent can be down in the following scenarios:
- If the computer is not in the network
- If the computer is shutdown
- If the Vulnerability Manager Plus agent service has been stopped
- If the Vulnerability Manager Plus agent has been crashed
- The computer icon will be in grey, if Vulnerability Manager Plus agent is not installed in it. Those computers are discovered in the SoM because they are added to the active directory but not managed by Vulnerability Manager Plus.