Upgrade Manager
The upgrade process for OpManager Nexus - installed servers across your network is simplified using the Upgrade Manager. It offers a centralised platform to manage and perform upgrades for OpManager Nexus Standalone servers, Central, Probes, their Failover servers and APM plug-in. The enhanced smart upgrade feature helps to overcome the bottlenecks faced during the upgrade process.
Upgrade process for versions 12.8.344 & above
For 12.8.344 and above, the upgrade manager simplifies the process into three stages:
Note:
- In the Enterprise Edition, all Probe services must be up and actively communicating with the Central server. For Failover setups, both the primary and secondary services should be up and running.
- For service pack versions 12.8.344 and above, manual backup prerequisites are optional as the Upgrade Manager takes the backup automatically.
- The QPM, designed to deliver targeted patches can be seamlessly applied across services using Upgrade Manager, following the same steps as a service pack.
- If you are encountering issues caused by AV/EDR interactions during the upgrade process, please follow this exclusion guide.
1. Upload service packs
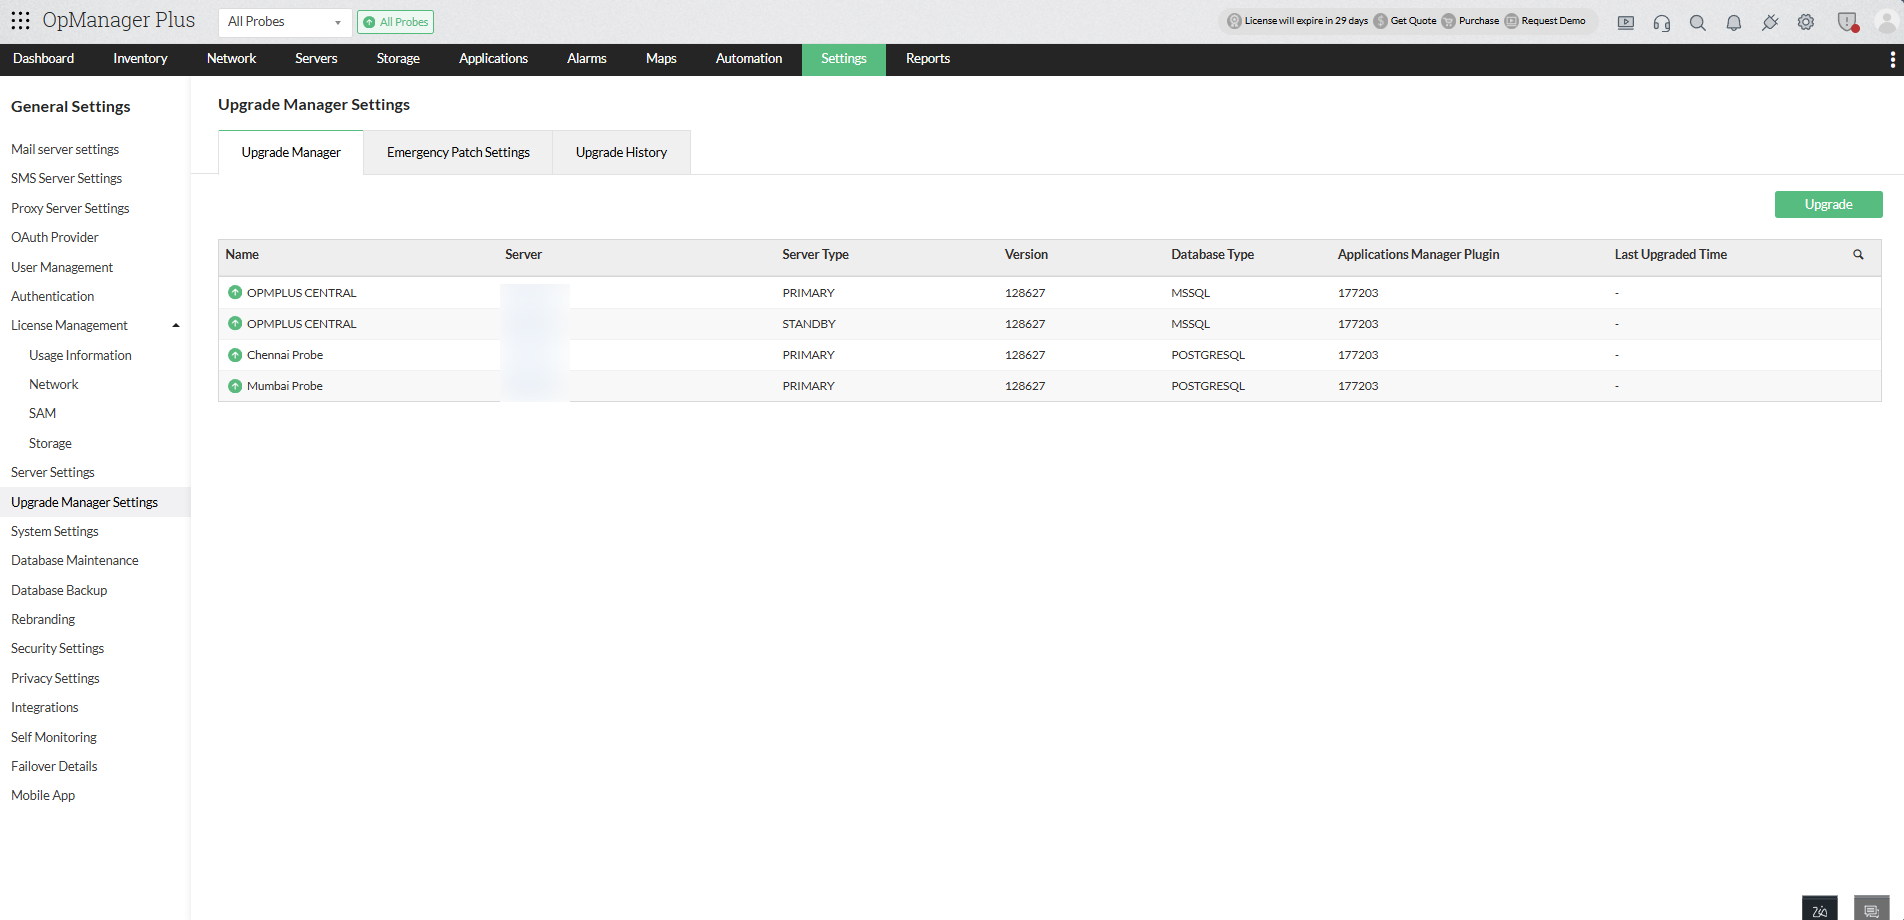
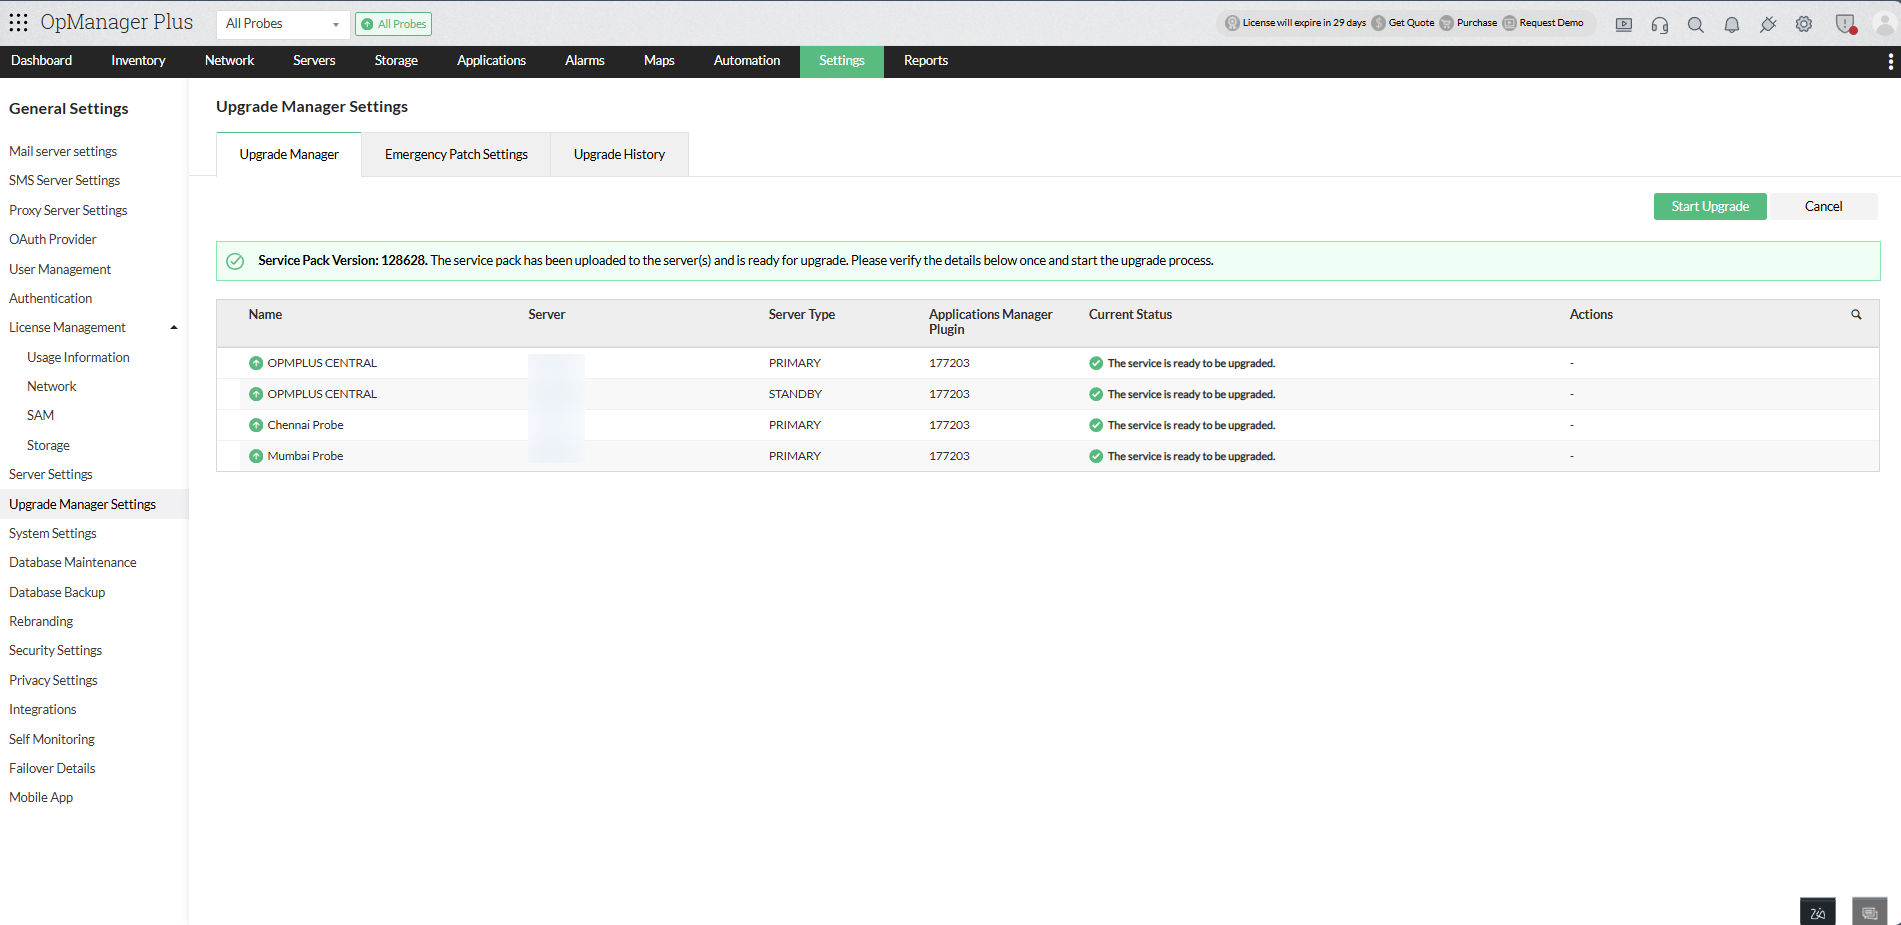
- Go to Settings > General Settings > Upgrade Manager Settings > Upgrade Manager.
- The upgrade manager page provides comprehensive installation details about the servers.
- Click the Upgrade option at the top right.
- Download the relevant service pack from the click here option provided below the OpManager Nexus service pack field, and click Upload.
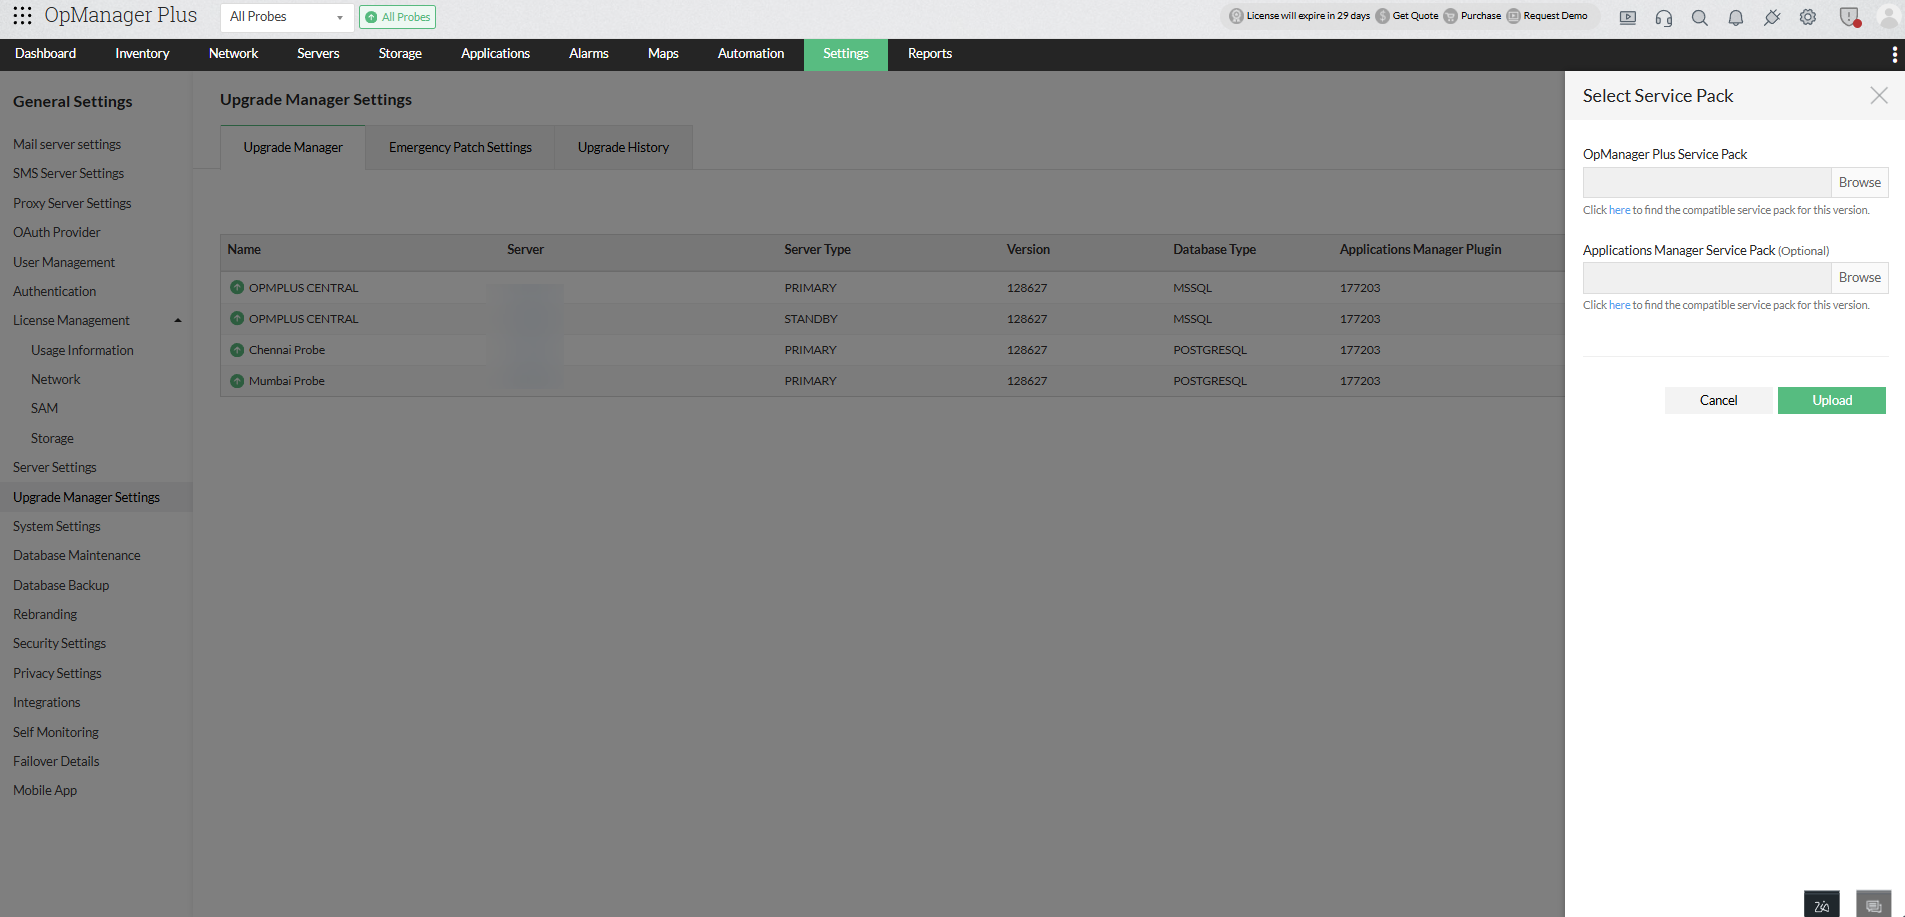
Note: If the service pack validation fails, you will be prompted to download and import an Integrity Certificate file to retry the validation process and proceed with the upgrade. Click here to download the certificate.
- Enterprise Edition: Once the service packs are downloaded in Central, they will automatically be fetched by the Probes. The version number and type of each service pack will be shown for every Probe in the Upgrade Manager.
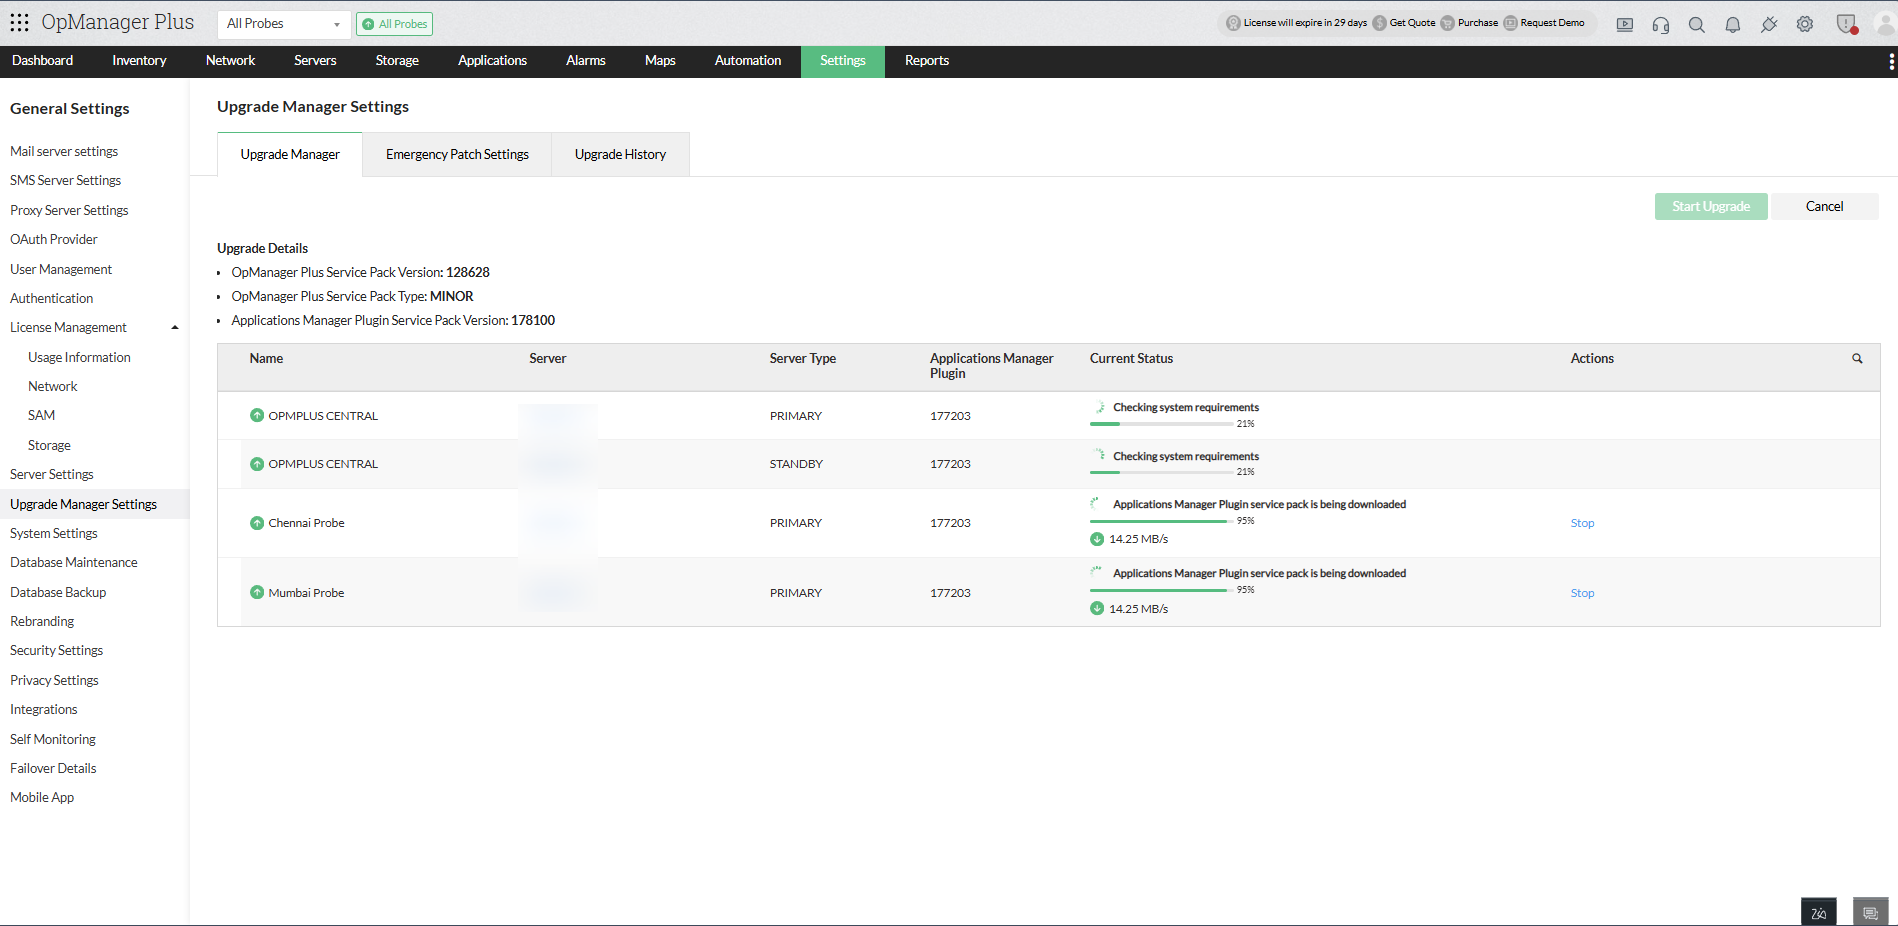
- The service pack's download progress status for individual Probes will be displayed under the Current Status column.
While downloading the service pack, if slowness or network issues is encountered, you can manually stop the download using the Stop button in the Actions column. In that case, manually copy the service pack to the <OpManager NexusProbe>\UpgradeManager directory for OpManager Nexus service packs, and <OpManager Nexus Probe>\AppManager\UpgradeManager for APM Plugin service packs. Use the Refresh button to fetch the latest status of the respective Probe service.
- If a Probe goes offline or loses connection with Central during the service pack download, then the download will automatically resume once communication is restored.
2. Health check
Once the service pack is downloaded, the system automatically verifies the upgrade requisites via a health check.
- If the check fails, click Details to view the reasons for the failure.
- After resolving the issues, click Retry to run the health check again.
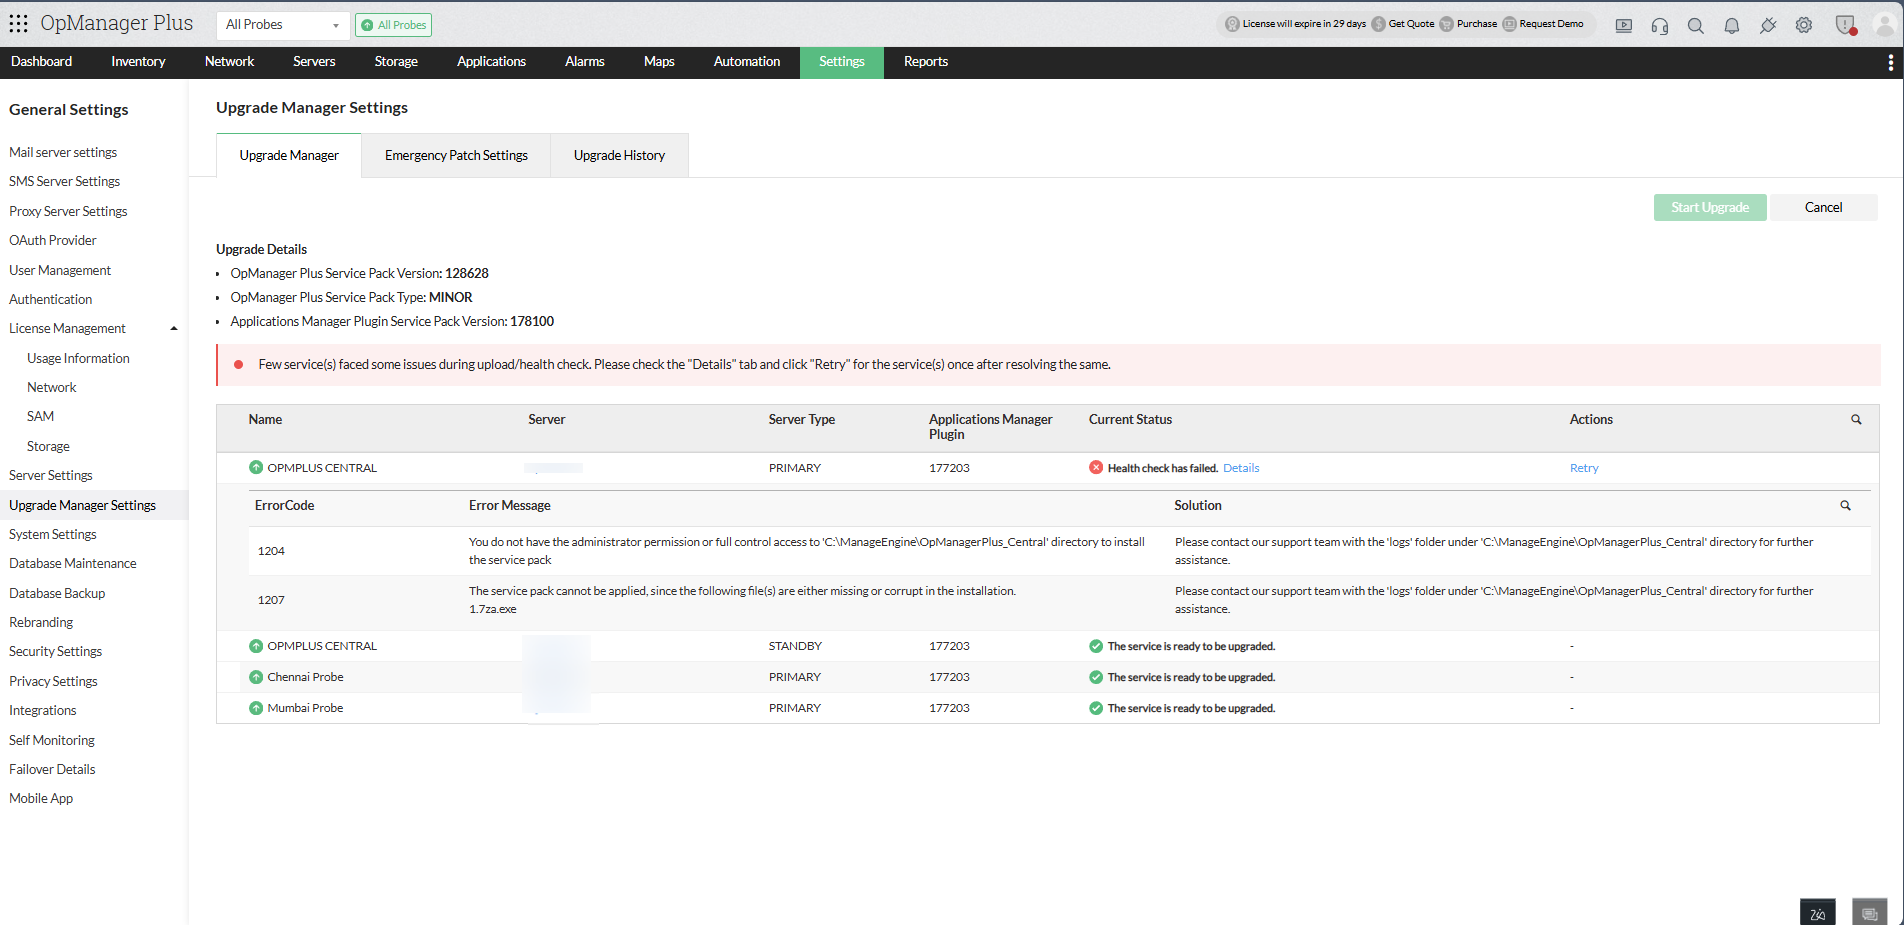
- With a successful health check for both the Central and all Probes, the product is now ready for the upgrade.
- Click on Start Upgrade to proceed with the upgrade.
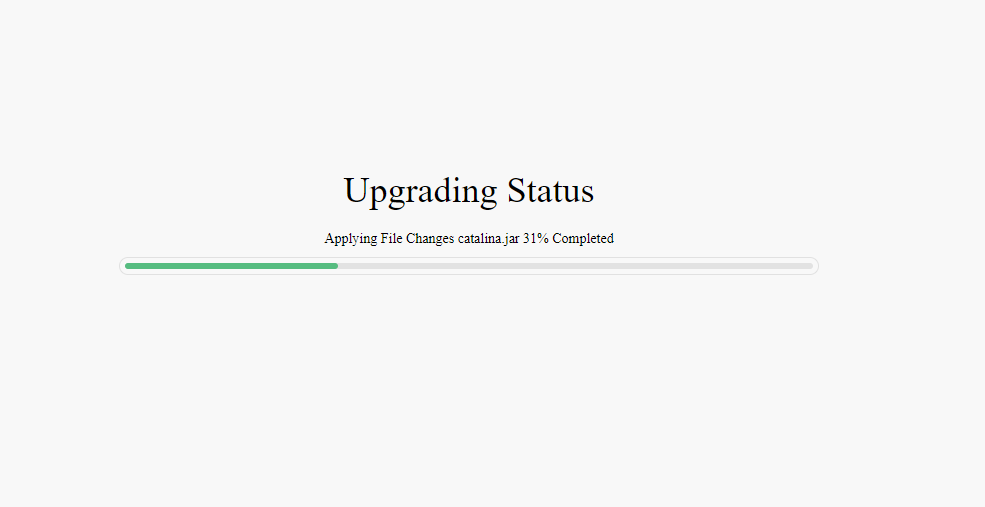
3. Upgrade process
- The upgrade will start, and the progress will be displayed automatically on the service URL.
- The APM plugin upgrade will automatically start once OpManager Nexus has been successfully upgraded on the server.
- For Failover servers, the upgrade will start automatically for both the active and the standby server.
- All Probes will automatically begin upgrading simultaneously once the Central upgrade is successfully completed.
- Upgrade details for individual servers will be automatically updated under the Current Status column in Central.
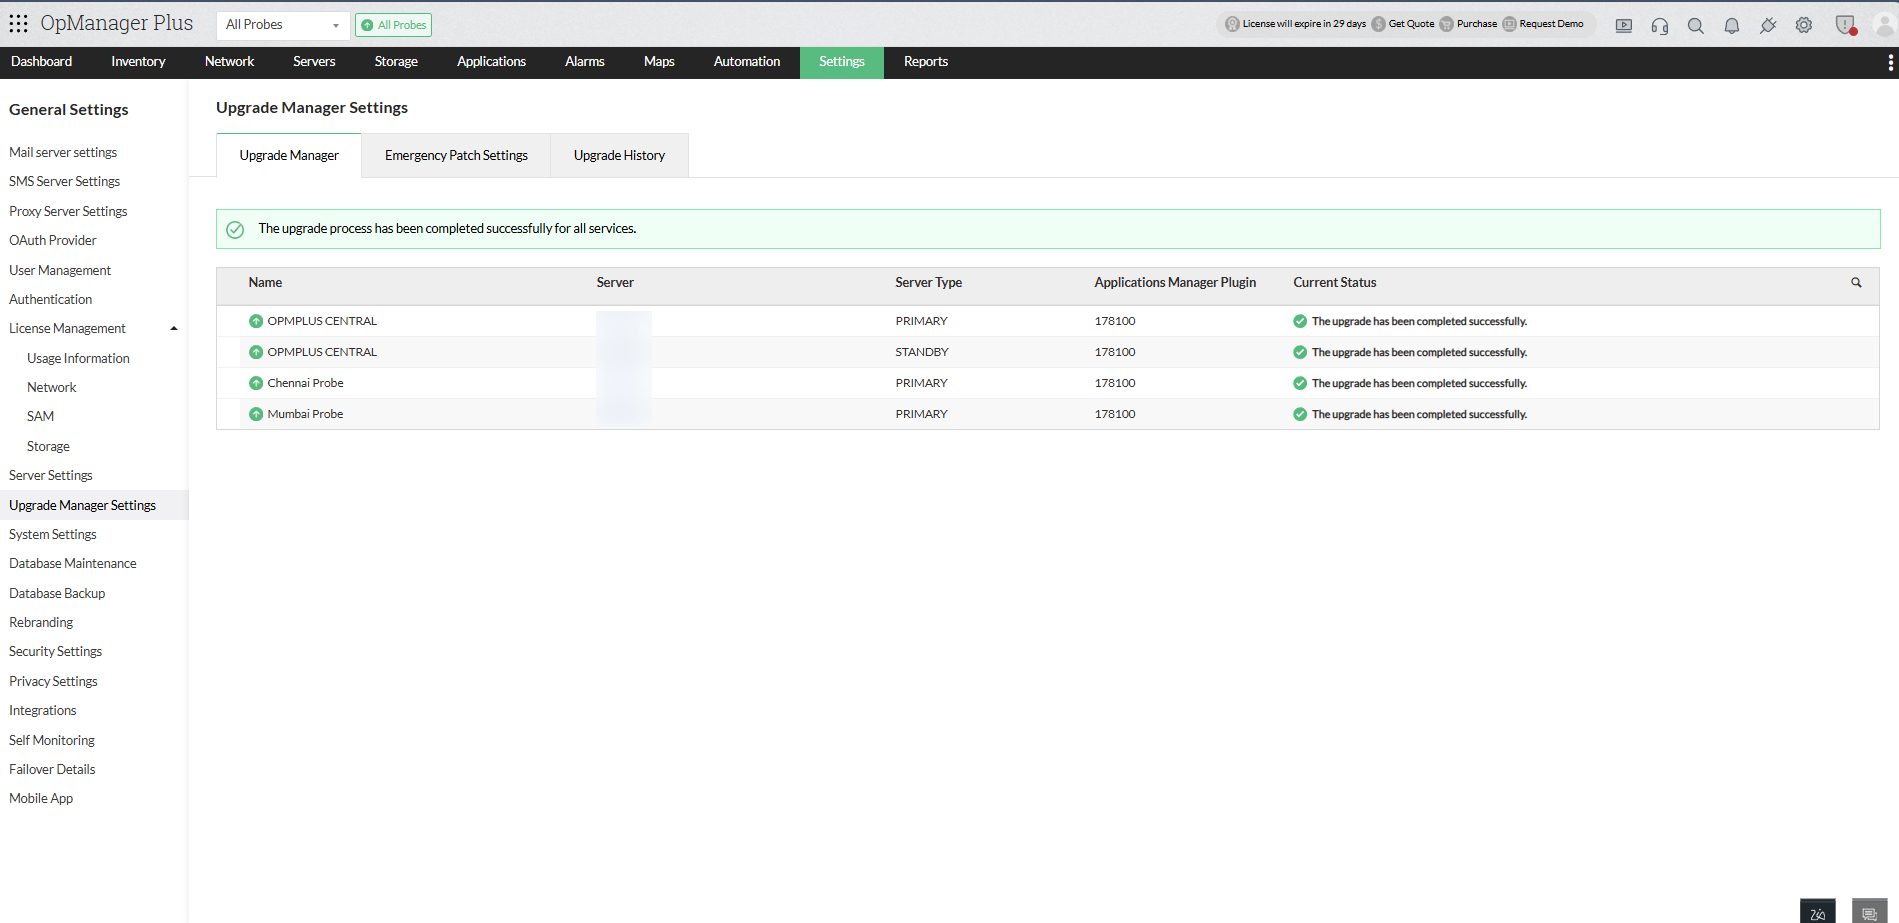
The upgrade process for OpManager Nexus versions above 12.8.344 will be successfully completed.
Upgrade process for versions below 12.8.344
- Upgrade Backup Pre-requisites
- Upgrade Pre-requisites
- Edition-specific Upgrade
- Upgrade OpManager Nexus using UpdateManager.bat and .sh file
- Smart upgrade
Upgrade Backup Pre-requisites
- Take VM snapshot / folder backup of the OpManager Nexus Service.
- If Failover service is configured, take VM snapshot / folder backup of the OpManager Nexus Service in both primary and secondary services.
- If the configured database type is MSSQL or Remote PGSQL, take backup of OpManager Nexus Database as well.
To backup only the configuration data:
- Open command prompt with administrative privileges and go to < OpManager Nexus Home>/bin/backup directory and execute the below command:
<OpManager Nexus Home>/bin/backup>BackupDB.bat -mode configdata. - This is used to backup only the configuration data (Backup Conf., Images folder, the details of Devices, Device Templates, Interfaces, Interface Template, Dashboards & Widgets, Infrastructure Views, Business Views, Credentials, Notification Profiles and Users) and not the performance data.
Upgrade Pre-requisites
Before Upgrading OpManager Nexus, there are certain pre-requisites to follow for a seamless upgrade process.
- If you are encountering issues caused by AV/EDR interactions during the upgrade process, please follow this exclusion guide.
- Ensure that the user performing the upgrade has the required permissions for the OpManager folder.
Edition-specific Upgrade
| Edition | Without Failover | New Failover | Old Failover |
| Standard / Professional | Upgrade the service using the UpdateManager.bat /.sh file and once the upgrade is completed start the service to continue monitoring. |
|
|
| Enterprise Edition | Upgrade the service using the steps provided for Smart Upgrade. | To upgrade the service, follow the steps provided here. | |
Upgrade OpManager Nexus using UpdateManager.bat/.sh file
- Download the appropriate version from the service packs page.
- Stop the OpManager Nexus service for the upgrade.
- Open command prompt with administrative privileges and go to <OpManager Nexus_Home>/bin/ directory.
- Execute
UpdateManager.batfile (useUpdateManager.shfor Linux). - Browse to the downloaded service pack and select the .ppm file.
- Click install and proceed to complete the installation process.
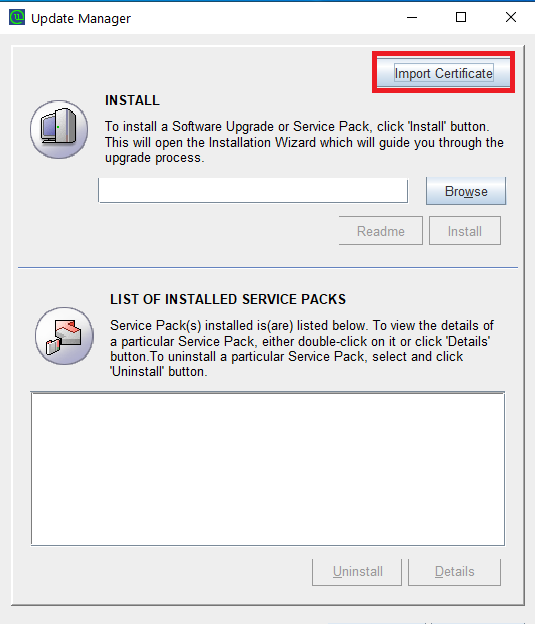
Steps to import the public certificate during an offline upgrade
- For service packs versions 12.8.000 and below, download this certificate, and for service packs versions above 12.8.000, download this certificate.
- Launch the Update Manager by running UpdateManager.bat (or UpdateManager.sh for Linux) located in the <OpManager Nexus_Home>/bin directory.
- Click the Import Certificate button in the top-right corner.
- Browse and select the downloaded certificate file, then click Import.
- Once the certificate is successfully imported, proceed with applying the .ppm file to begin the upgrade.
Smart Upgrade (Automatic upgrading of Probe servers)
- The Probe will automatically contact the Central server.
- Once the Probe server detects a build number mismatch with the Central server, all the Probe services will be stopped.
- The Probe server downloads the Update Pack from the Central server and starts upgrading.
- Once the update process is complete, restart all Probe services.
The following content applies to OpManager Nexus versions with build number 12.5.375 and above, till build number 12.8.344
Smart Upgrade (enhanced version)
With this enhancement, users can now view the live upgrade status of the Probes in the Central.
The entire process happens in three parts:
- Adding the ppm file.
- Sending it to all the Probes.
- Upgrading Central and Probes (Smart Upgrade)
Smart Upgrade Process:(For versions below 12.8.344)
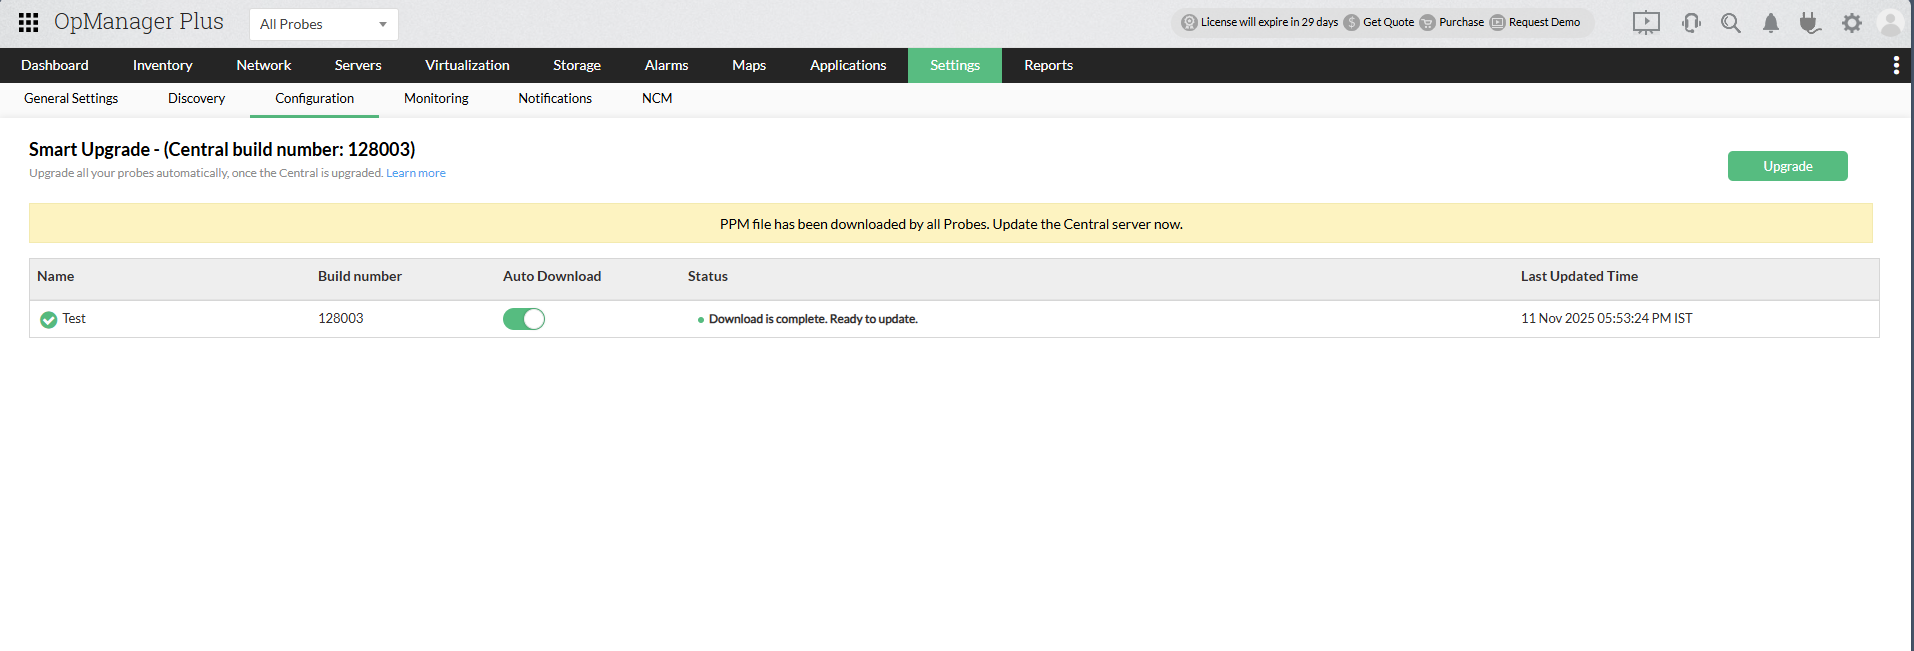
- In the Central, navigate to Settings --> Configuration --> Probe details page and click on Smart Upgrade.

- Click on the Browse to add the ppm file.
- Click on Upload.

- Once the ppm file is uploaded, the download complete status is shown and the Upgrade button appears on the top right corner.
- Click on Upgrade and at first the Central gets upgraded. (The Central goes down and is restarted once again.)
- After this the real time upgrade progress of the corresponding Probes is displayed in the Central.
- Once all the Probes are upgraded, the Upgrade Success status is updated.
Note:
- When the Auto Download option is enabled, the Probe automatically pulls the ppm file from the Central.
- When the Auto Download option is disabled, the ppm file should be placed manually in the specified OpManager Nexus Probe\SUM folder.
- Smart Upgrade for Old Model Failover (for base versions prior to 12.8.344)
- Smart Upgrade for New Failover (Virtual IP) (for base versions prior to 12.8.344)
- How to identify the Failover model
Smart Upgrade for Old Model Failover:
For base versions prior to 12.8.344, follow the steps below to upgrade the setup configured with Old Model Failover via Smart Upgrade:
- Stop all the secondary services.
- Download the ppm file.
- Go to the primary Central server, navigate to Settings --> Configuration --> Probe Details page, and click on "Smart Upgrade." Then, upload the ppm file by clicking browse.
- Once the ppm is uploaded in Central, it will be downloaded by all the Probes.
- Click "Upgrade" to start the Smart Upgrade.
- The primary Central server will start the upgrade, and once it is complete, the primary Probe will upgrade.
- After the upgrade is complete, stop all the primary services completely.
- Manually upgrade the secondary Central and secondary Probe using the UpdateManager.bat file, from the <OpManager Nexus>/bin directory.
- Start the secondary servers first, and they will enter active mode.
- Now, start the primary servers. The primary servers will take 20 to 30 secs to switch into active mode, and the secondary servers will revert to standby mode.
Smart Upgrade for New Failover (Virtual IP):
For base versions prior to 12.8.344, follow the steps below to upgrade the setup configured with New Failover (Virtual IP) via Smart Upgrade:
- Stop all the secondary services. Ensure that the secondary server's OpManager Nexus folder is accessible to the primary server.
- Download the ppm file.
- Go to the primary Central server, navigate to Settings --> Configuration --> Probe Details page, and click on "Smart Upgrade." Then, upload the ppm file by clicking browse.
- Click "Upgrade" to start the smart upgrade.
- All the primary and the secondary servers will be upgraded simultaneously.
- After the upgrade, the primary servers will start automatically. Start the secondary servers after that.
- The primary servers will enter active mode, and the secondary servers will be in standby mode.
How to identify the Failover model
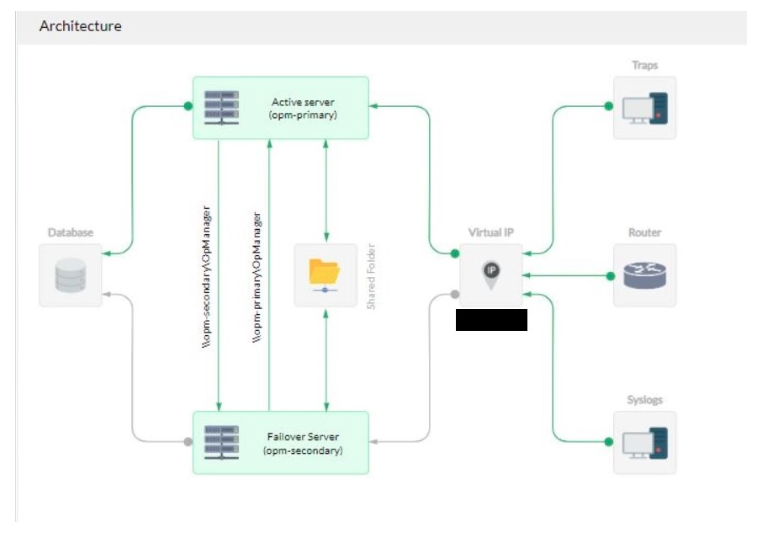
Failover models that do not use Virtual IP and share folder are called Old Failover model, whereas, Failover models that use Virtual IP and share folder can be called as the New Failover model. There are two methods to identify the Failover model.
Method 1 (via UI)
- In OpManager Nexus UI, navigate to Settings -> General Settings -> Failover Details.
- If there is only a table, it is the old Failover.

- If the Failover architecture is displayed, it must be the new Failover model.
Method 2 (manual steps)
Old Failover
Connect to OpManager Nexus database. Or ensure that DB Query is enabled under System Settings -> Client settings tab, and click the Support icon from the OpManager Nexus UI, select DB Query and then execute the below query. If there are two rows, then it is the old Failover model.
- For Essential / Central - Select * from FailOverDetails where ID = -1;
- For Probe - Select * from FailOverDetails where ID = (Select MOID from ManagedObject where TYPE='Region');
New Failover
- If the file itom_fos.conf is present in both the primary and the secondary server, under <OpManager Nexus Home>/conf directory, then it is the new Failover model.
