Product Settings
Last updated on:
Overview
This document provides a comprehensive walkthrough of the Product Settings module in Log360, allowing administrators to tailor how the product behaves and responds to operational needs. From configuring product notifications to enforcing security measures, these settings offer granular control over performance and protection.
These configurations provide numerous customization capabilities, including limits for emails and SMSs, alert email formats, correlation permissions, and notification settings. The Product Settings tab has three sub-tabs, each having certain customization options:
Product Configurations
To configure settings such as views per page, number of rows displayed in reports, and so on in the product, follow the steps given below.
- Navigate to the Settings tab and click on Product Settings listed under General in Admin Settings as highlighted below.

Image 1: Product settings via the Settings tab - You will be taken to the Product Settings module with the Product Configurations sub-tab displayed.

Image 2: Product Configurations sub-tab via the Product Settings tab Below is the detailed list of all the fields present in these settings.
Configurations Default Values Description Records Per Page 10 Select the number of records to be displayed in the pages of the user interface. The options available are: 10, 20, 50, and 100. Daily Email Limit 500 Set the maximum permissible number of emails that can be sent per day. Enable or disable the mail limit alert by selecting the Enable/Disable Mail Limit Alert checkbox. There could be a mail server or client limitation for sending the emails. Disable Email Limit (checkbox) Empty checkbox Ticking the checkbox will allow you to remove any limits for the maximum permissible number of emails that can be sent per day. Daily SMS Limit 50 Set the maximum permissible number of SMS messages to be sent per day. The telecom service provider often sets a limit to the number of SMSs that can be sent per day. Alert Email Format HTML Select whether the alert emails are sent in HTML or plaintext format. Mitre ATT&CK Framework Disabled Consolidated data from the Mitre reports will be displayed on the new dashboard tab Mitre Overview when this option has been enabled.Note: This feature will increase log processing and it might affect the performance. Database Query Access Enabled Configure whether access to the product's database is allowed or denied. The product's database can be queried to access product data stored in it. Security Patch Update Disabled Option to Automatically download Critical Security Patch to your Instance Date and Time Format yyyy-MM-dd HH:mm:ss Set the format of date and time that needs to be displayed throughout the product. Other than the few predefined formats available, you can also create formats of your own. There are a few rules to be followed while creating your own date and time format: - The permitted separators are hyphen(-), slash (/), full stop(.), colon(:), comma(,), and space.
- A space is the only separator that can be used between the date and the time.
- There should not be any separators at the beginning or at the end.
- Two continuous separators are not allowed.
- Entering two digits for the month will display the month in numbers, whereas entering three digits will display it in words. Ex. 'MM' will display June as 06 and 'MMM' will display it as Jun.
Auto-Update Rules Enabled Option to Automatically download Critical Security Patch to your Instance Export Limit 20000 Set the maximum number of records to be included in an exported report. Rows in Top N Reports 10 Set the number of rows to be displayed for reports under the Top N Reports section. Compliance Report Record Limit 500 Set the maximum number of records to be included in a Scheduled Compliance Report. Report Time Out 1440 mins Set the maximum time allowed to generate a report. Attach Report As Zipped Folder Select the report format to be attached in email. The available options are: PDF/CSV Report and Zipped Folder. Reporting Mode Send Email Configure whether you want to save the reports in a folder in the machine, send them as mail attachments, or both. For Save to Location and Send Email & Save to Location options, you have to enter the location to save the reports in the text box. The reporting mode options available are Send Email, Save to Location, and Send Email & Save to Location. Empty Reports Mailing Action Mail without attachment Configure whether you want to receive a mail or not when the reports are empty. There are two types of mail that you can receive. By selecting Mail without attachment, you will receive a mail without the empty reports. Mail with attachment, will let you receive a mail with the empty reports attached. You can choose not to receive a mail by selecting Don't mail reports. Maximum Alerts per Alert profile 10000 Maximum number of alerts that will be triggered for an alert profile in a day. The recommended value is a maximum of 10,000. - After making the necessary changes, click on Save.
- Upon successful completion of action, the below pop-up appears.

- Click on the Reset button if you wish to reset all the configurations made in the fields and redo them.
Product Notifications
To configure the scenarios for which you want to receive notifications from the product, follow the steps given below.
- Navigate to the Settings tab and click on Product Settings listed under General in Admin Settings as highlighted below.
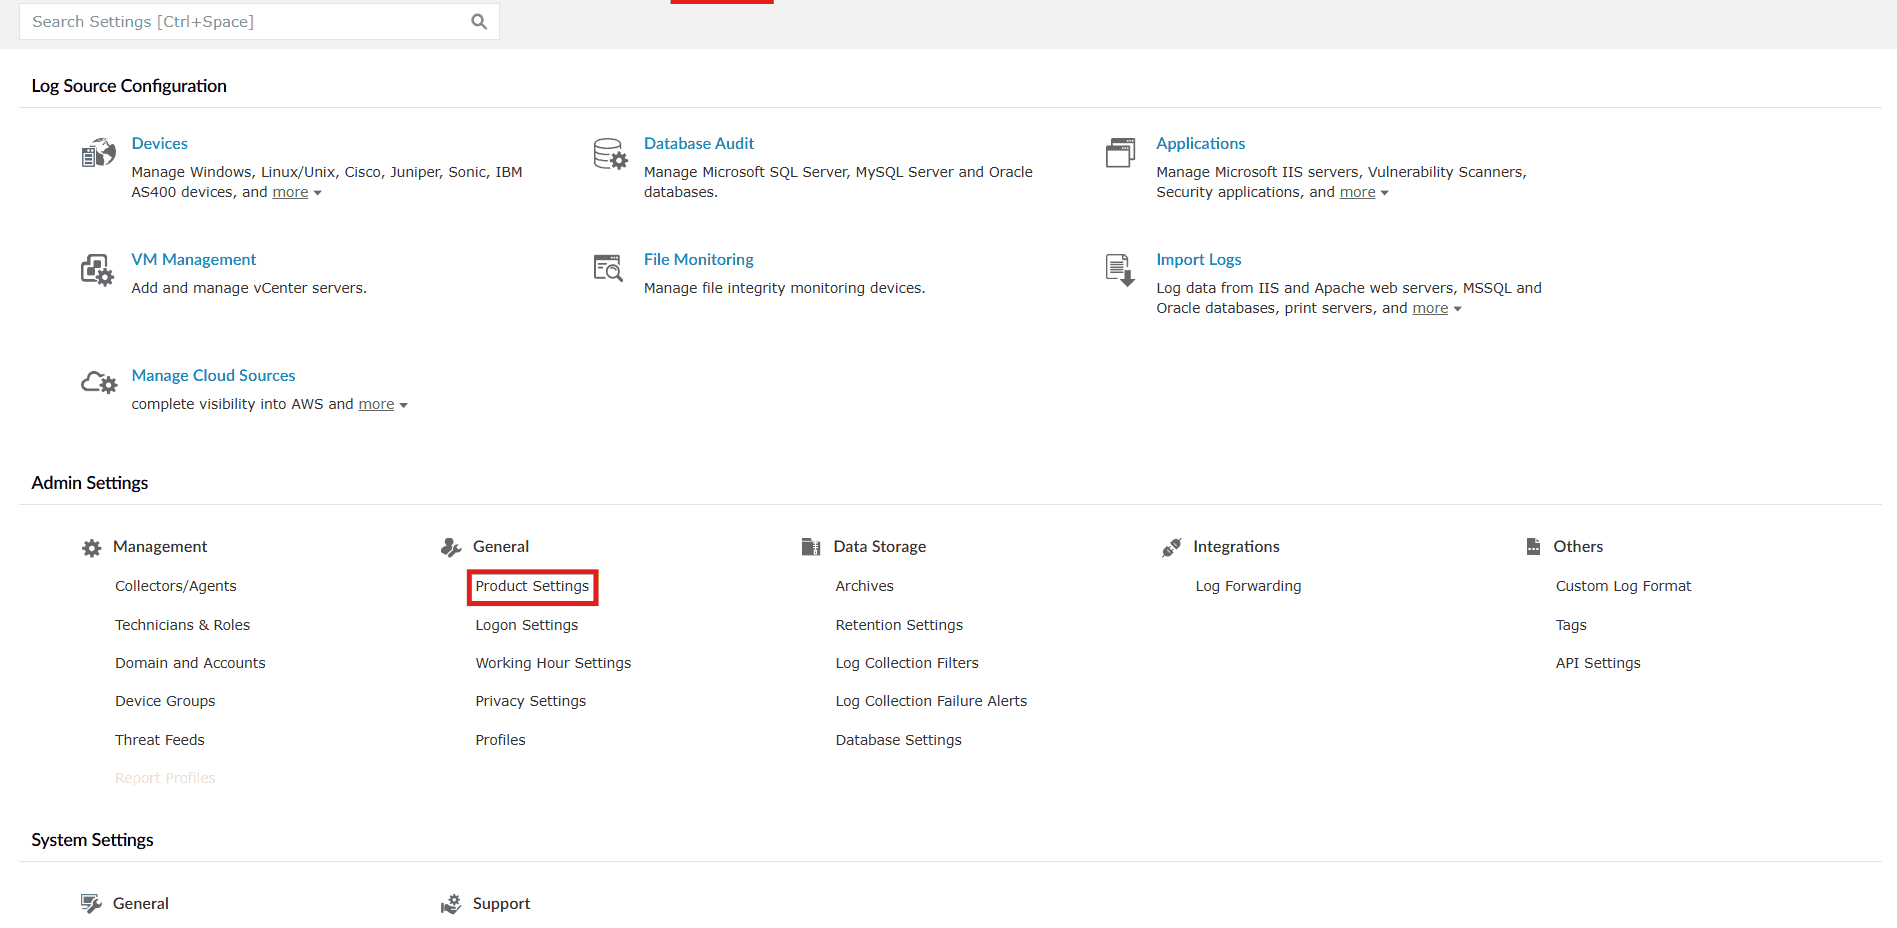
Image 3: Product settings via the Settings tab - You will be taken to the Product Settings module with the Product Configurations sub-tab displayed. Click on the Product Notifications sub-tab.
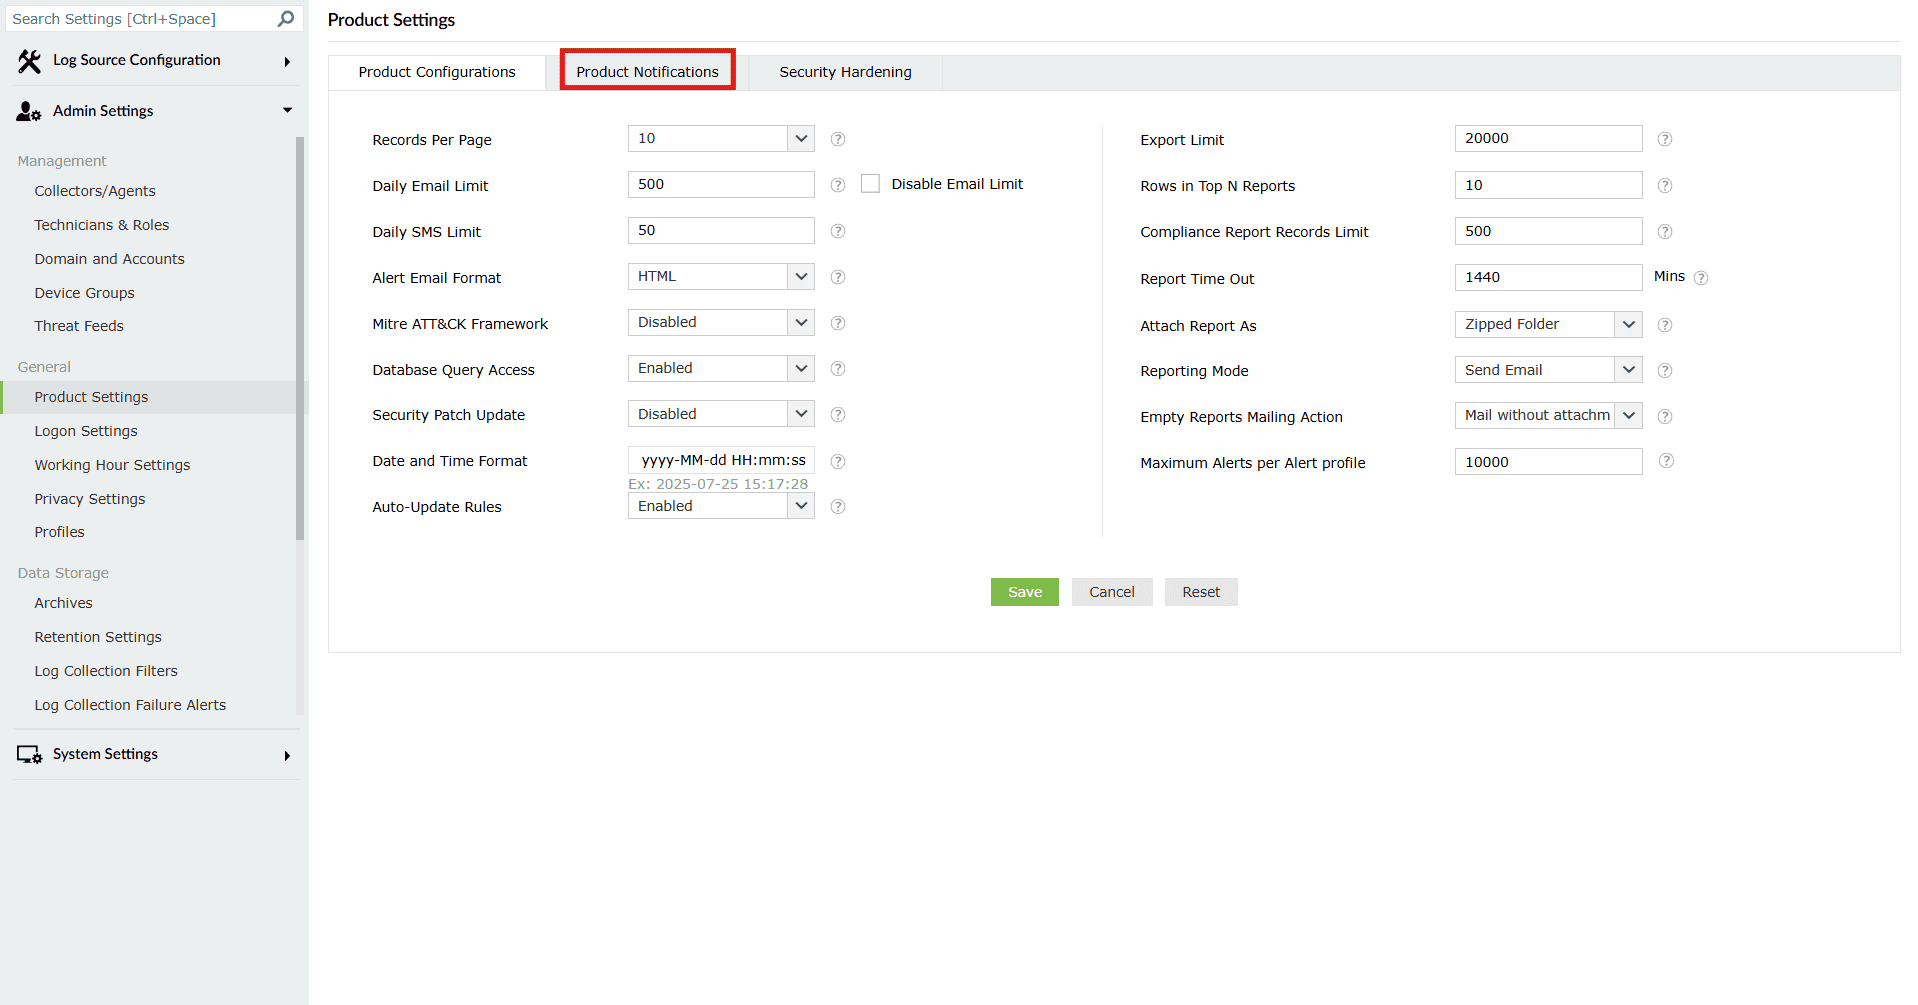
Image 4: Product Notifications sub-tab highlighted - The Product Notifications sub-tab opens as shown below.
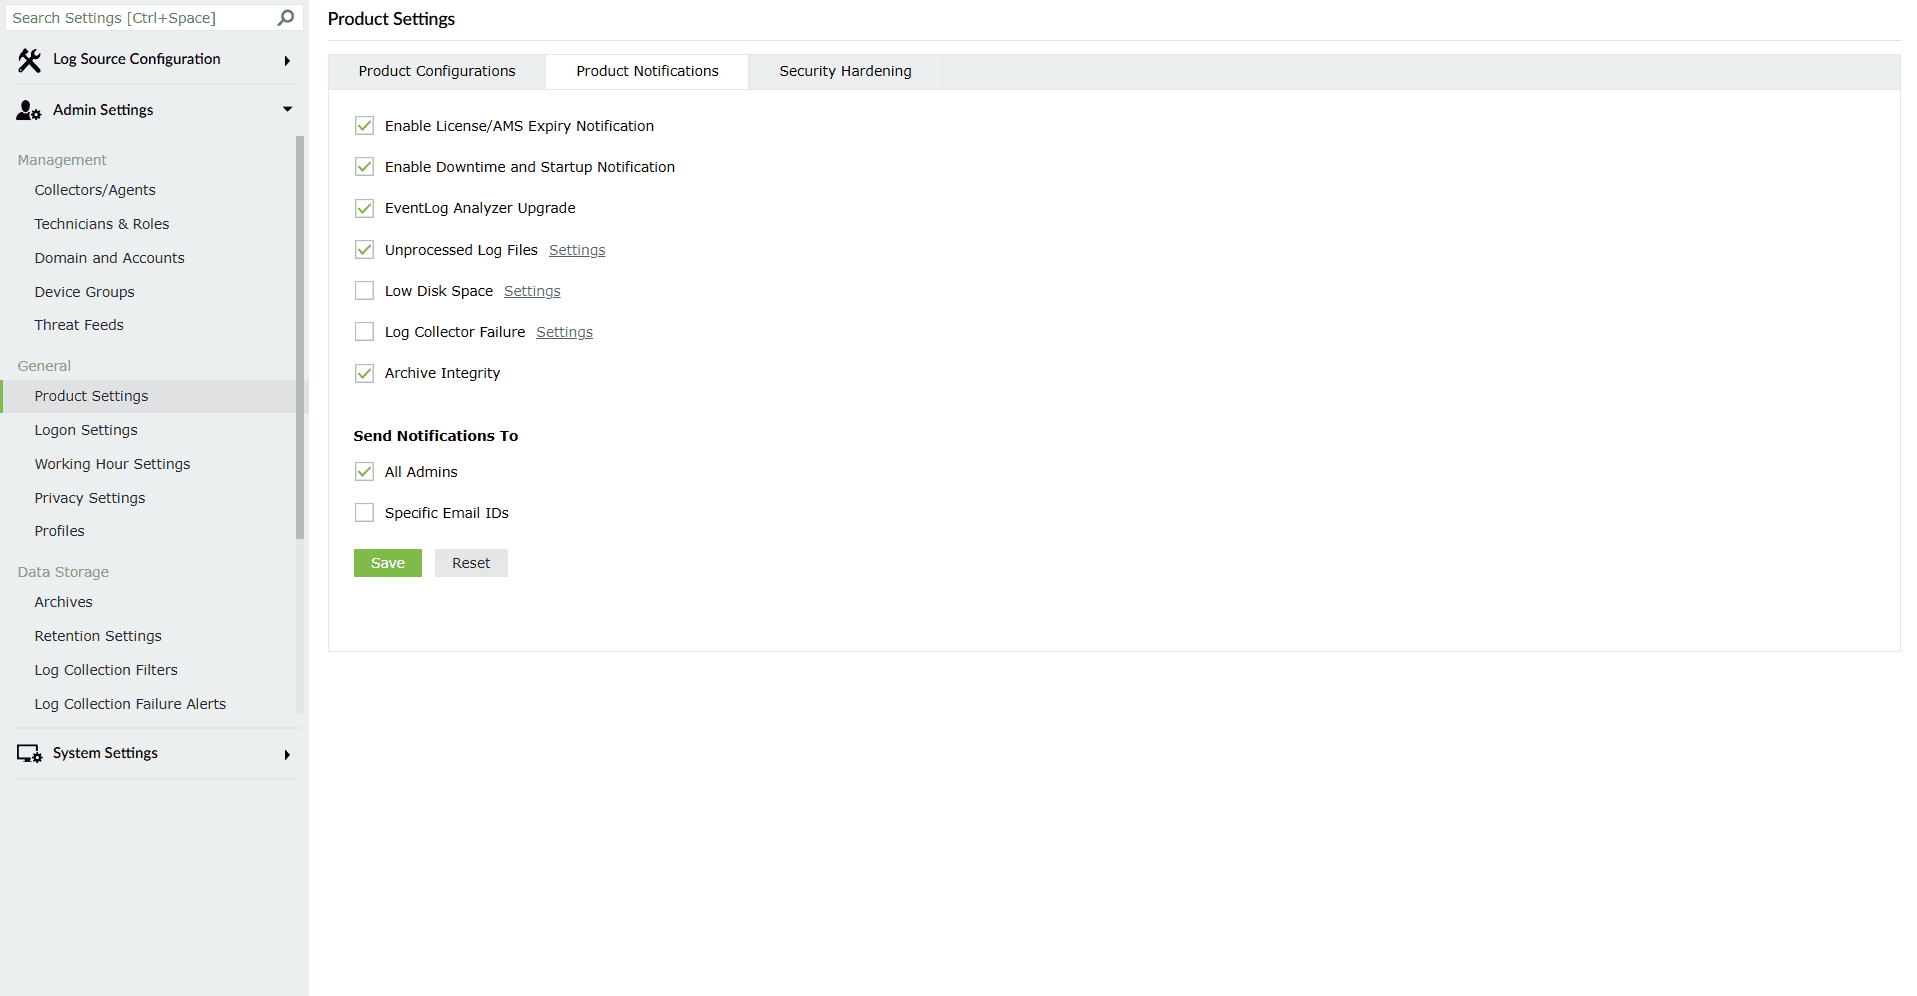
Image 5: Product Notifications sub-tab via the Product Settings tab The different settings for enabling or disabling alerts have been listed below.
Configurations Default configuration Description Enable License/AMS Expiry Notification Enabled You will be notified that your Log360 license is about to expire exactly 30 days, 7 days, and 1 day prior to the expiry date, as well as on the day of expiry. Enable Downtime and StartUp Notification Enabled You will be notified when the Log360 service shuts down or is started. Enable product Upgrade Enabled You will be notified when Log360 has been successfully upgraded. Unprocessed Log Files Enabled When Log360 is unable to process the incoming logs fast enough, the unprocessed logs will be added to files. They will be processed one after the other once Log360 can process logs. You can set a limit on the number of files that get filled with unprocessed logs. You will be notified once the limit is exceeded.In a new installation of Log360, the default value for Unprocessed Log Files is 100. Low Disk Space Disabled You will be notified when the free space available in the disk on which Log360 is installed goes below a certain value. You can set the limit in terms of GB of free disk space and give a suitable subject for the email that will get triggered. Log Collector Failure Disabled You will be notified when Log360's log collector is unable to collect logs. You can configure the subject of the email that will get triggered. Archive integrity Enabled You will be notified when the archive files are deleted or tampered via an email notification. NOTE In a new installation of Log360, notifications will be turned on by default for Enable License/AMS Expiry Notification, Enable Downtime and StartUp Notification, Enable Product Upgrade, and Unprocessed Log Files.
- Choose the mode for Send Notifications To:
- After configuring the necessary notification settings, select if those notification emails need to be sent to all the product designated Admins. This option is enabled by default. You can click on the checkbox to disable this option.
- Alternatively, you can choose to send the notification mails to specific email addresses. This option is disabled by default. Click on the checkbox to enable it.
- Upon enabling, a box to enter the mail address(es) appears as the below.
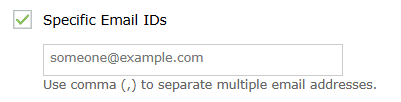
- Upon enabling, a box to enter the mail address(es) appears as the below.
- You can opt for both modes at the same time.
- After making the necessary configurations, click on the Save button.
- Upon successful completion of action, the below pop-up appears.

Security Hardening
Security hardening feature helps you manage and configure the security settings of the product console. This tab also displays a security score, which is calculated based upon the weightage given to each configuration.
To manage individual settings, click the Configure or Enable option corresponding to that security setting and make the required changes. Once configured, the setting will have a green ticked ![]() Configured/Enabled icon next to it.
Configured/Enabled icon next to it.
Enabling Security Hardening:
- Navigate to the Settings tab and click on Product Settings listed under General in Admin Settings as highlighted below.
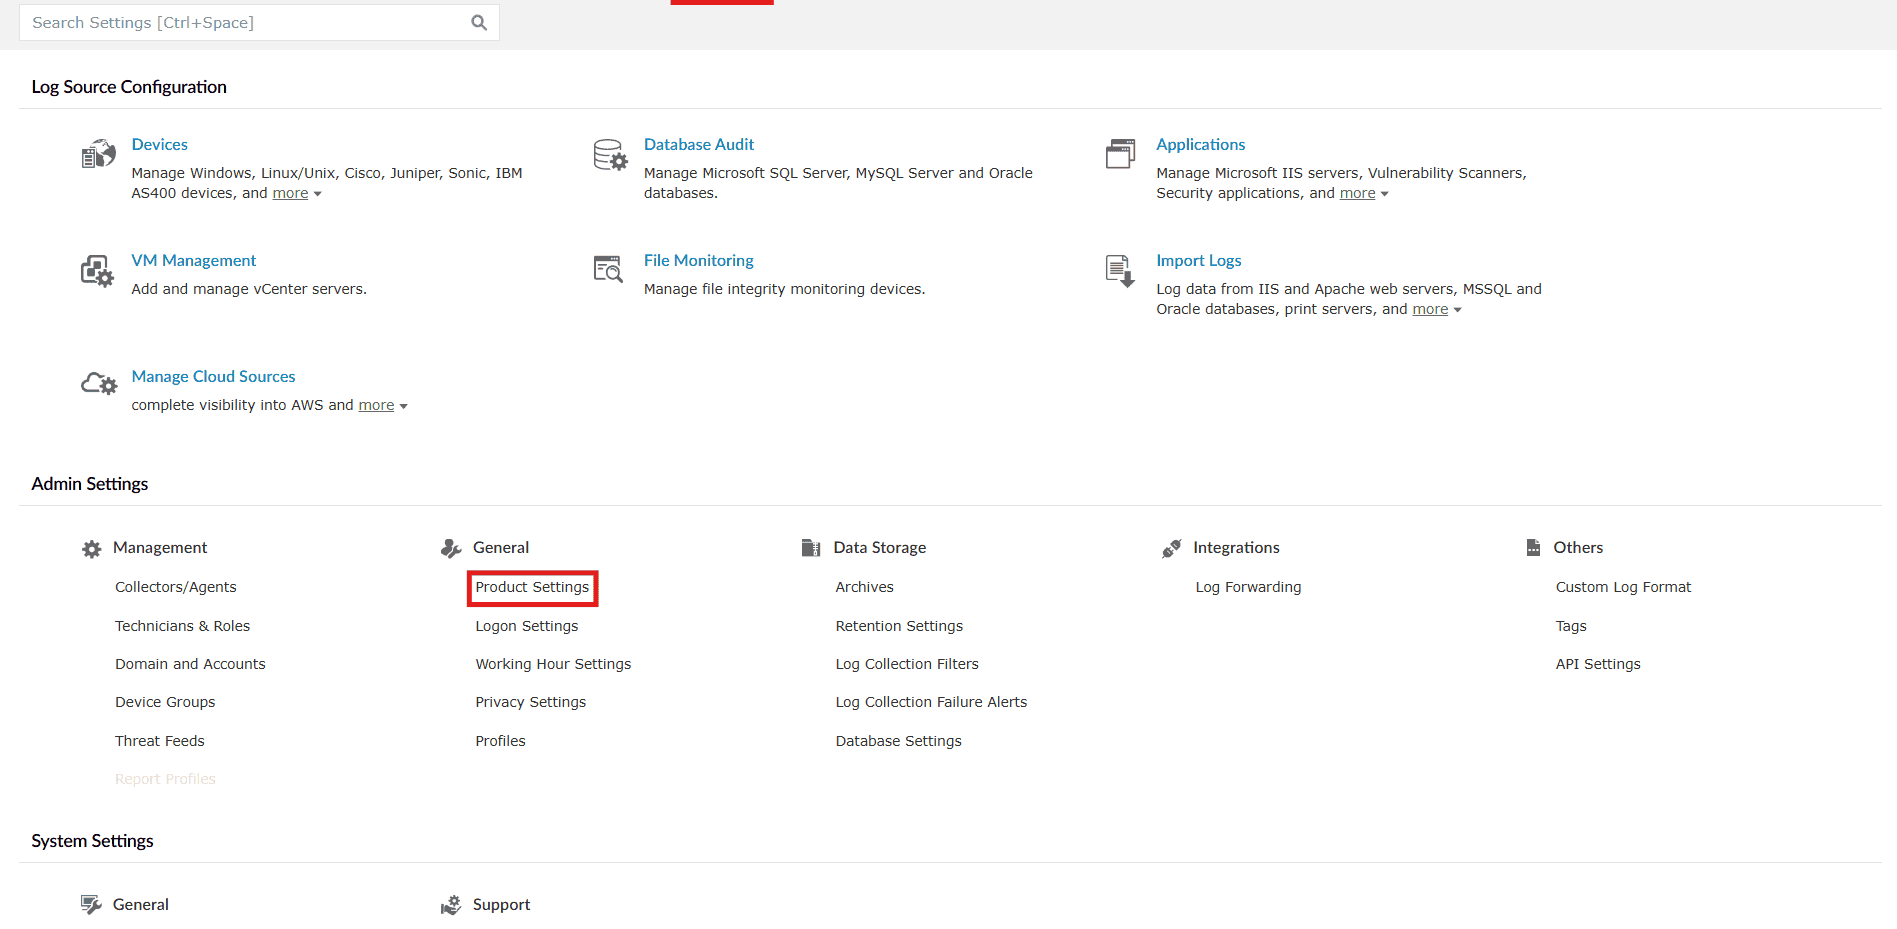
Image 6: Product settings via the Settings tab - You will be taken to the Product Settings module with the Product Configurations sub-tab displayed. Click on the Security Hardening sub-tab.
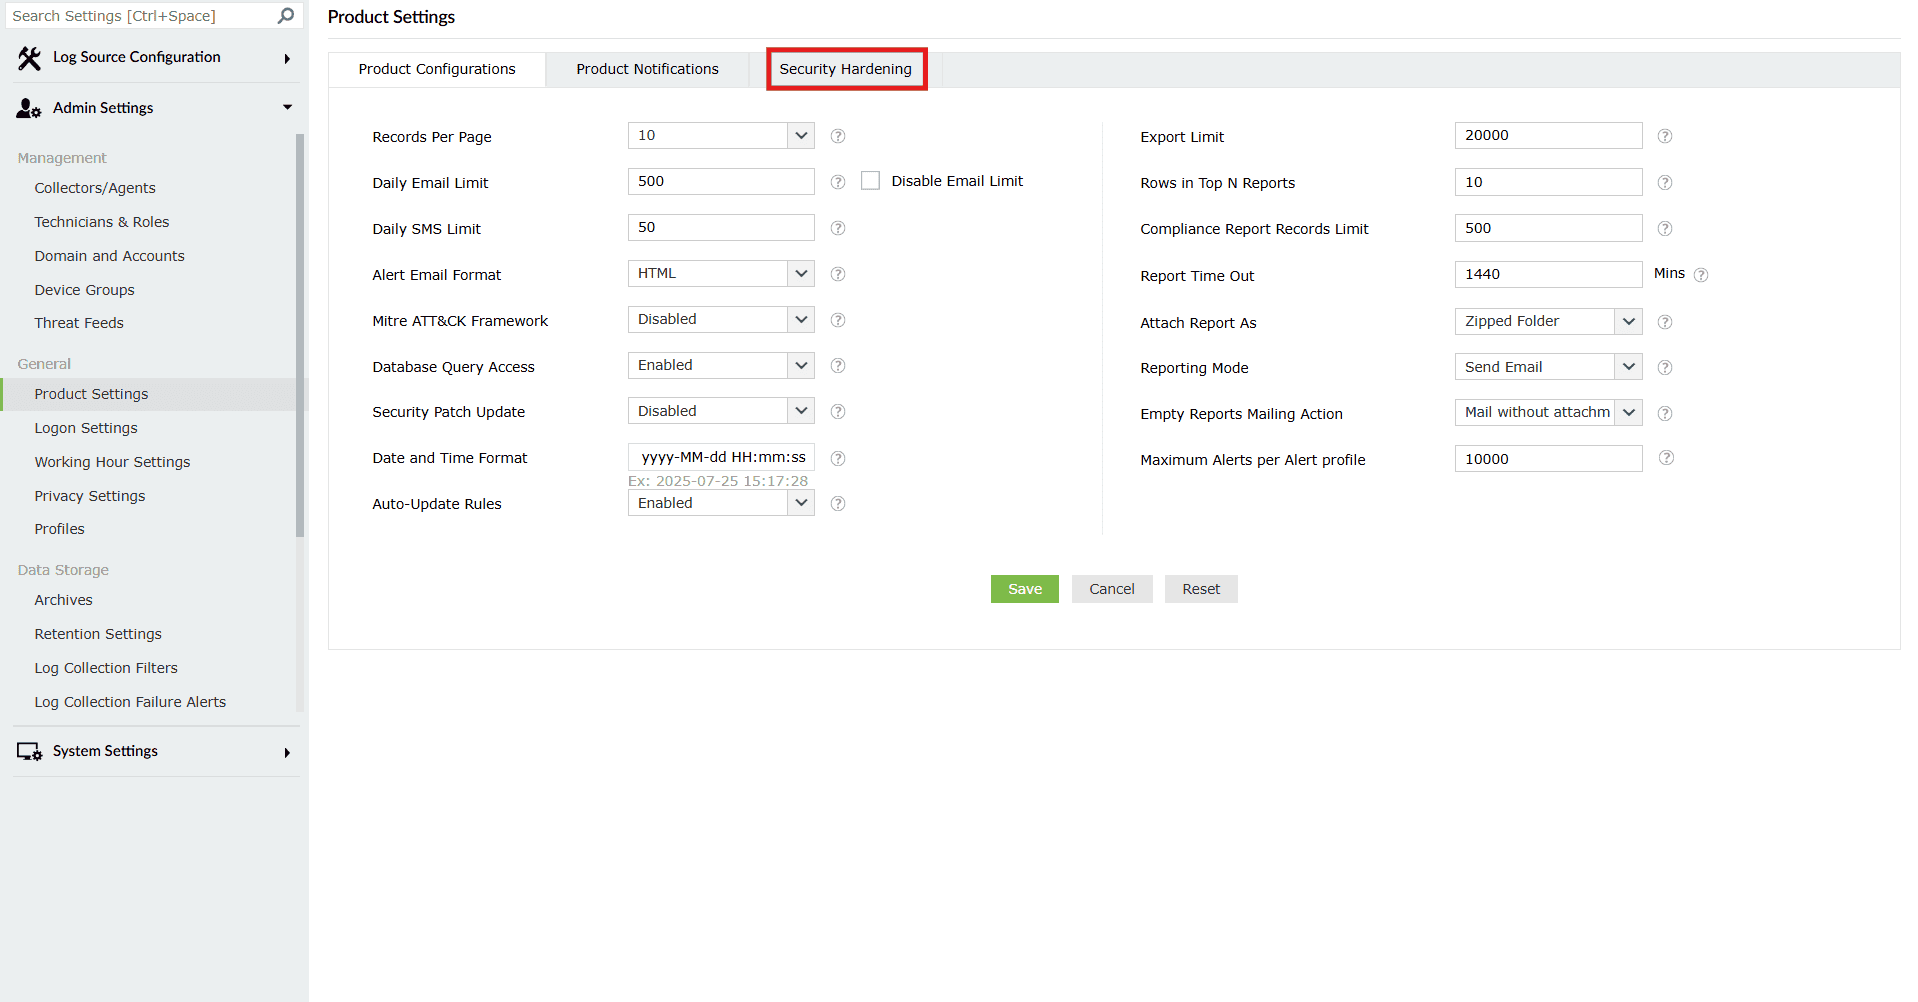
Image 7: Security Hardening sub-tab highlighted - The Security Hardening sub-tab opens as shown below.
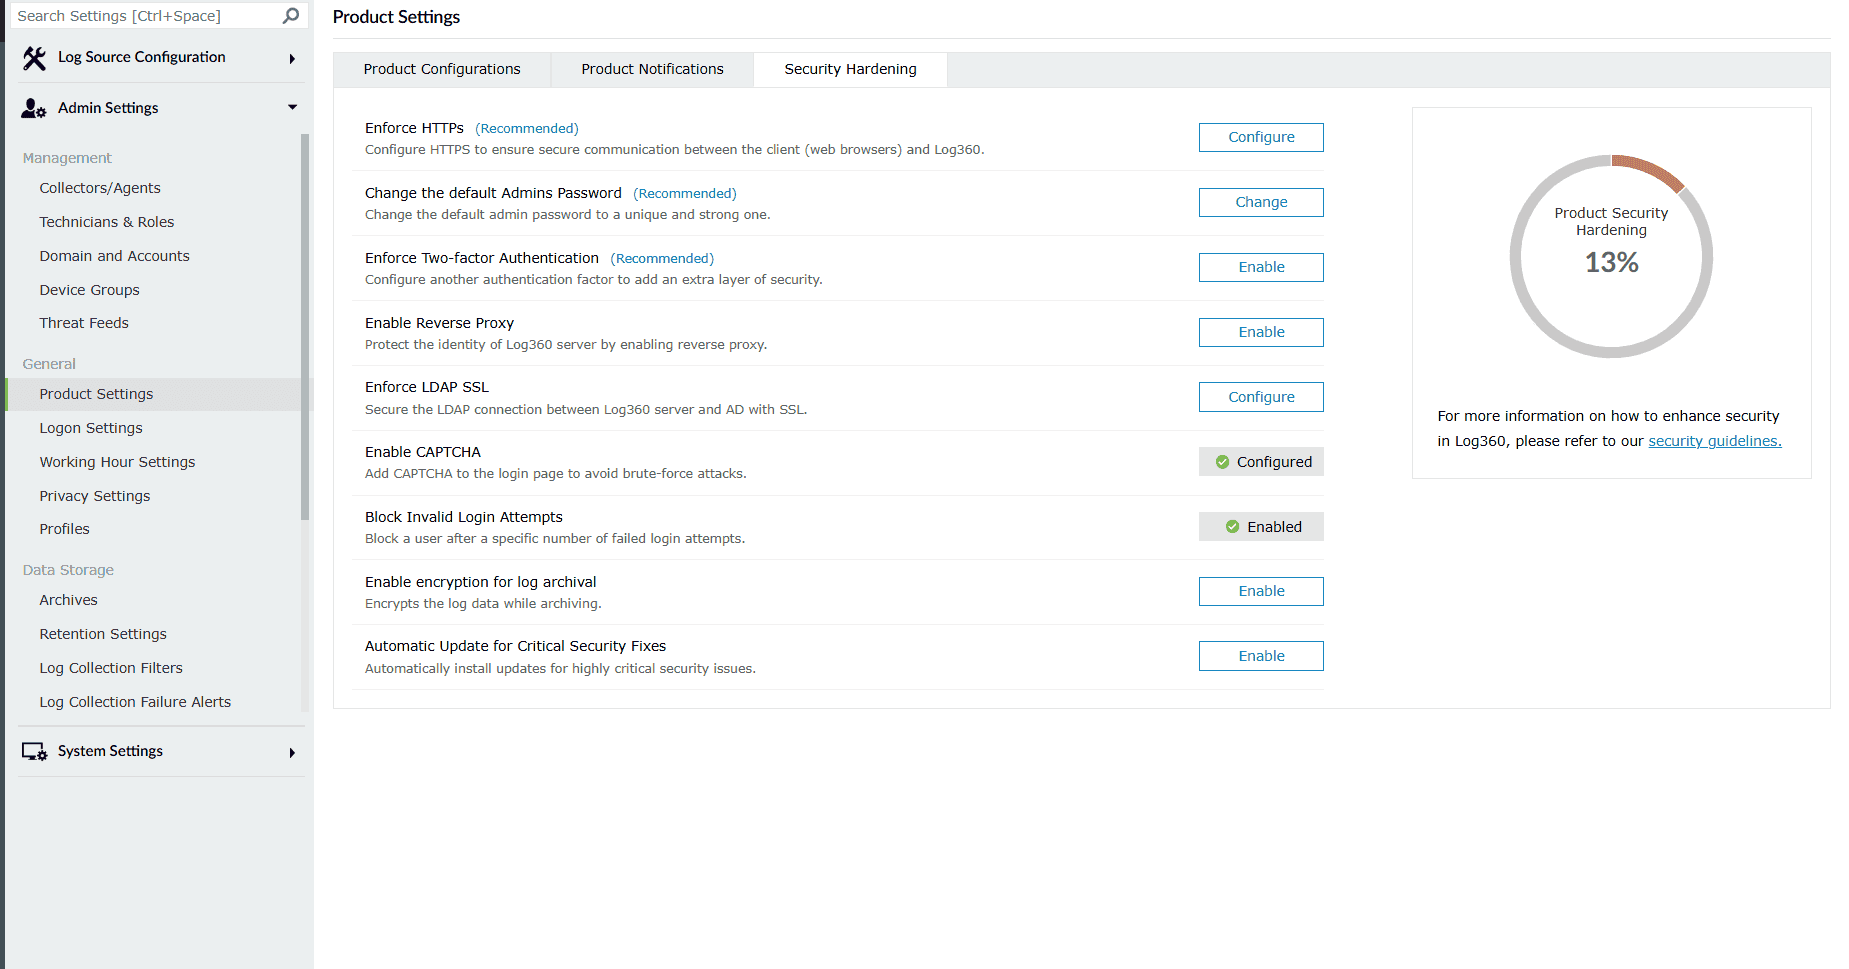
Image 8: Security Hardening sub-tab via the Product Settings tab
We recommend you configure all the settings and ensure your product security score is 100%. The security settings alert will be displayed in the notification center ( 🔔 icon on the top-right corner) until a security score of 100% is reached.
NOTE For licensed customers, the alert will also be displayed after every successful login until all the mandatory security configurations (marked with * under List of security settings) are done.
List of available settings
- Enforce HTTPS: Configuring HTTPS helps you secure a connection between the web browser and the product's server. See how to enable HTTPS.
- Change the default Admins Password : It is recommended to use a strong password to access the product's dashboard. Use this setting to change both the admin and operator passwords.
- Enforce Two-factor Authentication: Two-factor authentication adds an additional layer of security. See how to configure two-factor authentication.
- Enable Reverse Proxy: Enabling reverse proxy helps protect the identity of the product's server. Click on Configure to navigate to the reverse proxy settings tab. See how to enable reverse proxy settings.
- Enforce LDAP SSL: This setting lets you secure the LDAP (Lightweight Directory Access Protocol) connection between the product server and Active Directory with SSL (Secure Sockets Layer). See how to enable LDAP SSL.
- Enable CAPTCHA: This setting adds a captcha to the login page to avoid brute-force attacks. See how to add captcha.
- Block Invalid Login Attempts: This setting allows you to block a specific user who fails to login after a specific number of attempts. See how to block invalid login attempts.
- Enable encryption for log archival: Enable this setting to encrypt the log data every time while archiving.
- Automatic Update for Critical Security Fixes: Enable this setting to automatically update your product to the latest build. See how to enable auto-update.
NOTE The first three settings given in the above list are mandatory for Log360.
To ensure that you don't miss configuring any important security settings, Log360 sends the following alerts:
- Licensed users will receive a popup after every successful login to complete the mandatory security configurations.
- Admin accounts will be prompted to change the default admin password.
- A security alert will be displayed in the notification center until the security score reaches 100%.
Why we recommended Security Hardening?
To understand this, below is the breakdown of all the settings that the security hardening feature recommends:
1. Enforce HTTPS:
- This helps in preventing MITM attacks by encrypting the session between the browser and the Log360 server.
- Compliances like GDPR mandate organizations to use SSL encryption for secure data transmission.
2. Change the default Admins Password:
- Default passwords are publicly known and thus, can be easily exploited by attackers.
- Regular changes into strong passwords not only enhance security but also reduces the risk of privilege escalation.
3. Enforce two-factor authentication:
- In case the password does get compromised, attackers can still not login without the second factor.
- Also prevents unauthorized remote access.
- Some compliances make it mandatory to enable two-factor authentication.
4. Enable Reverse Proxy:
This conceals the actual IP addresses of the integrated components, making it hard for attackers to target them directly.
5. Enforce LDAP SSL:
Makes the connection secure by encrypting the traffic between Log360 and Active Directory.
6. Enable CAPTCHA:
Prevents automated brute force attacks by making manual human interaction necessary.
7. Block Invalid Login Attempts:
- Protects you against password guessing attacks and brute force attacks.
- Disables accounts temporarily after multiple repeated failed attempts.
- Flags suspicious login attempts for investigation and improves overall security monitoring.
8. Enable encryption for log archival:
Enable flat file encryption to encrypt the log data while archiving.
9. Automatic Update for Critical Security Fixes:
- Ensures that Log360 stays up to date with the latest builds and fixes for any vulnerabilities without needing any administrative burden.
- Ensures delivery of the latest security protocols of the comprehensive SIEM tool.
- Prevents exploitation of known vulnerabilities.
Security patch updates
Whenever critical vulnerabilities are discovered in the product, a security patch update is pushed to help mitigate any security threats. This option has to be enabled for automatic download of security patches whenever available.
Prerequisites for the security patch updates:
- Internet connection should be available
- Zoho creator website should be whitelisted as the patches will download from here.
Read also
This document detailed the configuration of product settings, including customization, notification preferences, and security hardening best practices. For additional features that help enhance security, administration, and automation, refer to: