OpManager Enterprise Installation
OpManager Enterprise Edition can be deployed in the following cases:
Case 1: When geographically distributed networks need to be monitored from one location.
Case 2: When the number of devices that need to be monitored is more than 1K devices.
ManageEngine recommends the installation of a Central server and a Probe to effectively achieve a distributed network monitoring environment.
- Installing OpManager Enterprise Edition on Windows
- Installing OpManager Enterprise Edition on Linux
- Installing OpManager Enterprise Edition on Linux using Console Mode/Silent Mode
- Starting OpManager Enterprise Edition
Central Server: Central periodically collects health, performance and fault data across all Probes and consolidates the information in one location.
Probe Server: The Probe periodically polls the devices in the local network and updates data to the central server. It has to be installed at the Remote Location.

Note: If OpManager is run with MSSQL as the backend database, then the MSSQL database must be configured before proceeding with the following installation.
Installing OpManager Enterprise Edition on Windows
OpManager Central Server
Step 1: Download the OpManager Central.exe from this link: Download Central Server | ManageEngine OpManager
Run the exe as 'administrator'
Step 2: Click 'Next' to proceed with installation.
Step 3: Click 'Yes' to the OpManager License agreement
Step 4: Choose the destination folder for OpManager installation and click 'Next' to proceed
Step 5: If you want to change the default web server port for OpManager installation enter the new port number (OpManager Central uses 8060 as the default web server port) and click 'Next' to proceed.
Step 6: Register your OpManager license with required details to get technical support and click 'Next' to proceed.
Step 7: If you select PGSQL, please proceed with Step 10. (or) If you select 'MSSQL' database (recommended for production). Click 'Next' to proceed
Step 8: If you select SQL Authentication, then provide MSSQL details like Host Name, Port, Database Name.

Step 9: Use the SQL Server Authentication credentials (Username and Password) created earlier. Click 'Next' to proceed

(or)
If you select WINDOWS Authentication, then provide MSSQL details like Host Name, Port, Domain Name, Database Name, Username and Password. Click 'Next' to proceed.
Step 10: Search for 'bcp.exe' file click 'Next' to proceed.
Note: The SQL server version compliant with the SQL Native Client must be installed in the same Server.

Step 11: Click 'Finish' to complete OpManager Central Server installation.
OpManager Probe Server
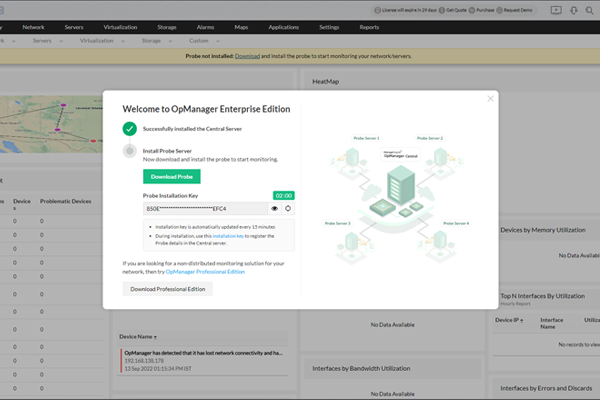
Step 1: Download the OpManager Probe.exe from the below link: Download Probe Server | ManageEngine OpManager (OR) Open OpManager Central and you will view a welcome notification screen with the Probe download link button. (The Probe installation key will get refreshed automatically every fifteen minutes. You can also use the refresh button to manually refresh the key.)
Run the exe as 'administrator' or Open the installed OpManager Central and click on Probe Link Download to download the appropriate Probe installer.

Step 2: Click 'Next' to proceed with installation
Step 3: Click 'Yes' to the OpManager License agreement
Step 4: Choose the destination folder for OpManager Probe installation and click 'Next' to proceed
Step 5: OpManager uses 8060 as the default web server port, change it as per your preference and click 'Next' to proceed.
Step 6: Register your OpManager license with required details to get technical support and click 'Next' to proceed.
Step 7: Enter the details of the proxy server if you want to use a proxy to communicate with the Central. If you do not need a proxy, please click Next without filling the details.

Step 8: If you select PGSQL, please proceed with Step 12. (or) If you select 'MSSQL' database (recommended for production). Click 'Next' to proceed and choose the authentication type - Windows/SQL.

Step 9: Provide MSSQL details like host name, port, database name. Use the credentials (username and password) that was created earlier while configuring SQL. Click 'Next' to proceed

Step 10: Search for bcp.exe file and select it. Click 'Register' to proceed.

Step 11: Provide OpManager Central server details like central server URL, Probe Name, Contact Name and Contact Mail ID.
Enter the Probe installation key. You can find the Probe Installation key in the Central Server page under Settings->Configuration->Probe Details.

Step 12: Click 'Finish' to complete OpManager Probe installation.
Note: You can also navigate to the Probe details page in the Central server to access the Probe download link.

Installing OpManager Enterprise Edition on Linux
Prerequisites
- Sometimes, you might encounter errors such as database connection not getting established or the server not starting up. To workaround these issues, comment the IPv6 related entries in the /etc/hosts file.
- Check if the DNS resolves properly to the IP Address on the system in which OpManager is installed. Add an entry to /etc/host file with ipaddress and host name if there is trouble starting OpManager.
Central Server
Step 1: Download ManageEngine_OpManager_Central_64bit.bin for Linux.
Step 2: Login as root user.
Step 3: Assign the executable permission to the downloaded file using the following command: chmod a+x ManageEngine_OpManager_Central_64bit.bin
Step 4: Execute ./ManageEngine_OpManager_Central_64bit.bin with administator privileges (sudo). This will display the installation wizard.
Step 5: Click 'Next' to begin the installation process. Go through the license agreement and proceed to the next step.
Step 6: In the subsequent steps of the wizard, select the OpManagerCentral language, the directory to install OpManagerCentral, and the port number to run OpManagerCentral Web Server. Proceed to the next step.
Step 7: Verify the installation details and click 'Next'.
Step 8: Click 'Finish' to complete the installation process.
Note: It is recommended to install OpManagerCentral in the opt folder. By default, OpManagerCentral is installed in the /opt/ManageEngine/OpManagerCentral directory.
Probe Server
Step 1: Download ManageEngine_OpManager_Probe_64bit.bin for Linux.
Step 2: Login as root user.
Step 3: Assign the executable permission to the downloaded file using the following command: chmod a+x ManageEngine_OpManager_Probe_64bit.bin
Step 4: Execute ./ManageEngine_OpManager_Probe_64bit.bin with administator privileges (sudo). This will display the installation wizard.
Step 5: Click 'Next' to begin the installation process. Go through the license agreement and proceed to the next step.
Step 6: In the subsequent steps of the wizard, select the OpManagerProbe language, the directory to install OpManagerProbe, and the port number to run the OpManagerProbe Web Server. Proceed to the next step.
Step 7: Please enter the Central URL, Probe Name, Probe Installation Key, Username, Email ID and proceed to register the Probe.
Step 8: Verify the installation details and click 'Next'.
Step 9: Click 'Finish' to complete the installation process.
Note: It is recommended to install OpManagerProbe in the opt folder. By default, OpManagerProbe is installed in the /opt/ManageEngine/OpManagerProbe directory.
Installing OpManager Enterprise Edition on Linux using Console mode/ Silent mode
Prerequisites
To begin with, make sure you have downloaded the binary for Central and Probe for Linux OS.
Click here to download the binary files for OpManager Central and Probe (Linux OS).
Central Server
Step 1: Execute ManageEngine_OpManager_Central_64bit.bin with administrator privileges (sudo) and -i console option.
Step 2: Go through the license agreement and enter 'Y' to proceed. You can register for technical support by providing the required details. (Name, E-mail ID, Phone, Company Name)
Step 3: Select the location.
Step 4: Choose the installation directory

Step 5: Configure the Webserver Port. (The default webserver port is 8060.)
Step 6: Verify the installation details and press 'Enter' to complete the installation

Probe Server
Step 1: Execute ManageEngine_OpManager_Probe_64bit.bin with security privileges (sudo) and -i console option.
Step 2: Go through the license agreement and enter 'Y' to proceed. You can register for technical support by providing the required details. (Name, E-mail ID, Phone, Company Name)
Step 3: Select the location from the list of available countries.
Step 4: Choose the installation directory and configure the Webserver Port.

Step 5: Verify the installation details and the installation status.
Step 6: Configure the Probe details and press 'Enter' to complete the installation.
Starting OpManager Enterprise Edition on Linux
- Go to /OpManager/bin folder
- Execute: sh run.sh
- To run OpManager server in the background, execute: nohup sh run.sh&