Download Service Pack
- OpManager
- Applications Manager
- NetFlow Analyzer
- Network Configuration Manager
- Firewall Analyzer
- OpUtils
- OpManager
- Applications Manager
- NetFlow Analyzer
- Network Configuration Manager
- Firewall Analyzer
- OpUtils
OpManager - Build Number 12.8.738
- Enterprise Edition: Previously, an unauthorized path traversal vulnerability was identified in legacy Smart Update Manager on Probe installations. This issue has now been fixed. (Reported by qquynh)
- General: Previously, from version 12.8.658, slowness was experienced on the Alarm page while filtering by Alarm Message. This issue has now been fixed.
- OpManager: Previously, file synchronization between OpManager and Analytics Plus failed when archive operations encountered failures. This issue has now been fixed.
- Enterprise Edition: Previously, from version 12.8.554, in certain scenarios, when device templates were synchronized from the Central server to probes for the first time without any modifications, the thresholds associated with the monitors in the respective templates were inadvertently deleted. This issue has now been resolved.
Eligible Build Numbers: 12.8.000 and above.


* - To migrate from build numbers 12.4.000 to 12.4.196 to the latest build, click here.
* -SHA256 for the PPM: 7f471863ca5eed806efb892b7bf718148b0b7ebc326b6fe3d1809020fdbacaff
![]()
![]()
Read and accept the License Agreement before downloading this software.
Steps to upgrade Service Pack:
I. For builds 12.8.000 and above
- Shut down OpManager/NetFlow Analyzer/Network Configuration Manager/Firewall Analyzer/OpUtils. (If the application is running as a Windows service, stop the service from Control Panel > Services window and close the window.)
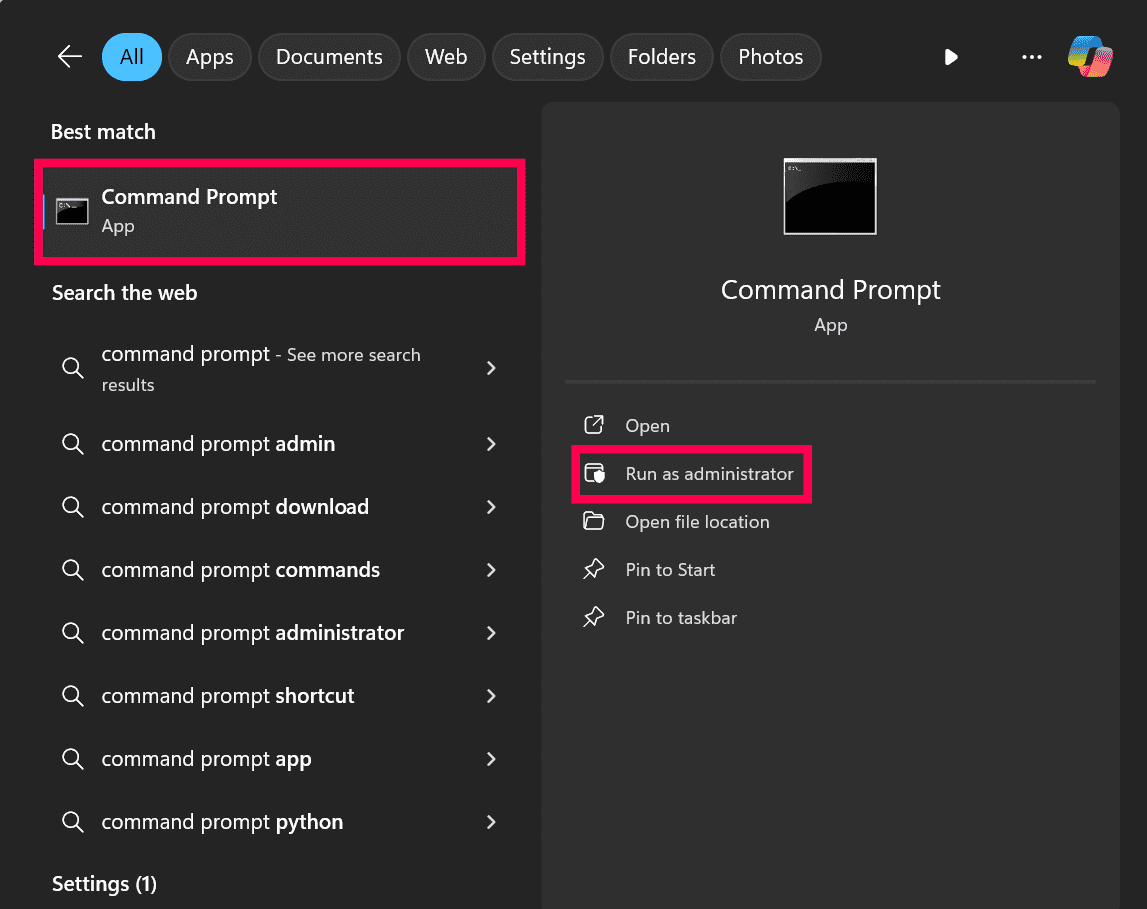
- Start the Command Prompt as an administrator: Search for “cmd”, right-click Command Prompt, then select Run as administrator.
- Backup database - click here. to know the steps.
- End the processes: Open the Task Manager and make sure the processes java.exe or wrapper.exe of the application are terminated.
- Backup the application folder. Make a copy of the '<OpManager-home-directory>' folder. This will back up the product configuration settings.
- Launch Update Manager:
- Windows OS: Go to the <OpManager-home-directory>/bin folder and run the script UpdateManager.bat
- Linux OS: Go to the <OpManager-home-directory>/bin folder and run the script UpdateManager.sh
- Click the Browse button to select the upgrade pack file (the .ppm file that you downloaded) and choose Install.
- Follow the on-screen instructions to apply the service pack
- Once the upgrade is complete, start the service for the changes to take effect.
Note: Applications Manager plugin, if present, should be upgraded to version 14540 or above before upgrading OpManager from version 12.5 to 12.5.100 and higher versions.
II. For builds 12.7.000 to 12.7.317
Upgrade to build 12.8.004
To download 12.8.004, click here.
III. For builds 12.6.000 to 12.6.329
Upgrade to build 12.7.007
To download 12.7.007, click here.
IV. For builds 12.5.000 - 12.5.664
Upgrade to build 12.6.007
To download 12.6.007, click here.
V. For builds 12.4.000 - 12.4.196
Step 1: Upgrade to build 12.5.011
To download 12.5.011, click here.
** Points to note:
- Back up your DB and VM snapshot folder before initiating the upgrade.
- Antivirus has to be disabled until the upgrade is complete.
- All files and folders under the <OpManagerHome>/pgsql directory should be closed before initiating the upgrade.
- No file under the <OpManagerHome>/pgsql directory should be opened during the upgrade process.
- The free disk space should be greater than 1.25x the size of the <OpManagerHome>/pgsql/data folder.
Step 2: Upgrade to build 12.5.383
** Points to note:
- You will not be able to upgrade from build 12.5.011 to 12.5.383 if the historical migration is not complete.
- The migration details can be checked under Settings > General Settings > Migration Status.
- Applications Manager plugin, if present, should be upgraded to version 14540 or above before upgrading OpManager from version 12.5 to 12.5.100 and higher versions.
Applications Manager Build Number 181101
Upgrade to the latest PPM with feature enhancements and recent bug fixes.

* -SHA256 for the PPM: 2e1d5db98dc2415577a6816af593423023472b791984bb17c650eadb749f3954
* - This pack can be updated directly by users with Build No. 170000 & above.
* - For older versions, visit this page.
Read and accept the License Agreement before downloading this software.
Steps to update service pack:
- Shut down Applications Manager as you normally do.
- Start command prompt as an administrator. View screenshot
- Via command prompt, execute the shutdownApplicationsManager.bat -force command (shutdownApplicationsManager.sh -force for Linux) from the 'Applications Manager Home' folder.
- As a best practice, take complete backup of 'Applications Manager Home' directory. SQL backend users should connect to SQL Management Studio & backup the AMDB database as well. click here. to know how to backup SQL database.
- Run the updateManager.bat script (updateManager.sh -c for Linux) under the 'Applications Manager Home/bin' folder which invokes the Update Manager tool.
- Browse and select the Service pack file (.ppm) saved in your computer.
- You might be asked to import the ManageEngine public key certificate (ppmsigner_publickey.crt) file during the upgrade process. If asked, download the certificate file, then browse and select the downloaded file to proceed further.Note: This is a one-time process done to verify the integrity of the service pack (.ppm) file.
- Click Install to initiate the upgrade process.
- Once you see the "Installed" message on your screen, click Finish to complete the installation.
- Start Applications Manager Server.
Note: To rollback to the old version, rename the existing 'Applications Manager Home' directory and restore the complete backup copy of this directory. SQL backend users should connect to SQL Management Studio & restore the AMDB database backup as well. Click here to know how to restore the SQL database backup.
NetFlow Analyzer - Build Number 12.8.738
Eligible Build Numbers: 12.8.000 and above.

* - To migrate from build numbers 12.4.000 to 12.4.196 to the latest build, click here.
* -SHA256 for the PPM: 7f471863ca5eed806efb892b7bf718148b0b7ebc326b6fe3d1809020fdbacaff
![]()
![]()
Read and accept the License Agreement before downloading this software.
Steps to upgrade Service Pack:
I. For builds 12.8.000 and above
- Shut down OpManager/NetFlow Analyzer/Network Configuration Manager/Firewall Analyzer/OpUtils. (If the application is running as a Windows service, stop the service from Control Panel > Services window and close the window.)
- Start the Command Prompt as an administrator: Search for “cmd”, right-click Command Prompt, then select Run as administrator.
- Backup database - click here. to know the steps.
- End the processes: Open the Task Manager and make sure the processes java.exe or wrapper.exe of the application are terminated.
- Backup the application folder. Make a copy of the '<OpManager-home-directory>' folder. This will back up the product configuration settings.
- Launch Update Manager:
- Windows OS: Go to the <OpManager-home-directory>/bin folder and run the script UpdateManager.bat
- Linux OS: Go to the <OpManager-home-directory>/bin folder and run the script UpdateManager.sh
- Click the Browse button to select the upgrade pack file (the .ppm file that you downloaded) and choose Install.
- Follow the on-screen instructions to apply the service pack
- Once the upgrade is complete, start the service for the changes to take effect.
II. For builds 12.7.000 to 12.7.317
Upgrade to build 12.8.004
To download 12.8.004, click here.
III. For builds 12.6.000 to 12.6.329
Upgrade to build 12.7.006
To download 12.7.006, click here.
IV. For builds 12.5.000 - 12.5.664
Upgrade to build 12.6.007
To download 12.6.007, click here.
V. For builds 12.4.000 - 12.4.196
Step 1: Upgrade to build 12.5.011
To download 12.5.011, click here.
** Points to note:
- Back up your DB and VM snapshot folder before initiating the upgrade.
- Antivirus has to be disabled until the upgrade is complete.
- All files and folders under the <OpManagerHome>/pgsql directory should be closed before initiating the upgrade.
- No file under the <OpManagerHome>/pgsql directory should be opened during the upgrade process.
- The free disk space should be greater than 1.25x the size of the <OpManagerHome>/pgsql/data folder.
Step 2: Upgrade to build 12.5.383
** Points to note:
- You will not be able to upgrade from build 12.5.011 to 12.5.383 if the historical migration is not complete.
- The migration details can be checked under Settings > General Settings > Migration Status.
Network Configuration Manager - Build Number 12.8.738
Eligible Build Numbers: 12.8.000 and above.

* - To migrate from build numbers 12.4.000 to 12.4.196 to the latest build, click here.
* -SHA256 for the PPM: 7f471863ca5eed806efb892b7bf718148b0b7ebc326b6fe3d1809020fdbacaff
![]()
Read and accept the License Agreement before downloading this software.
Steps to upgrade Service Pack:
I. For builds 12.8.000 and above
- Shut down OpManager/NetFlow Analyzer/Network Configuration Manager/Firewall Analyzer/OpUtils. (If the application is running as a Windows service, stop the service from Control Panel > Services window and close the window.)
- Start the Command Prompt as an administrator: Search for “cmd”, right-click Command Prompt, then select Run as administrator.
- Backup database - click here. to know the steps.
- End the processes: Open the Task Manager and make sure the processes java.exe or wrapper.exe of the application are terminated.
- Backup the application folder. Make a copy of the '<OpManager-home-directory>' folder. This will back up the product configuration settings.
- Launch Update Manager:
- Windows OS: Go to the <OpManager-home-directory>/bin folder and run the script UpdateManager.bat
- Linux OS: Go to the <OpManager-home-directory>/bin folder and run the script UpdateManager.sh
- Click the Browse button to select the upgrade pack file (the .ppm file that you downloaded) and choose Install.
- Follow the on-screen instructions to apply the service pack
- Once the upgrade is complete, start the service for the changes to take effect.
II. For builds 12.7.000 to 12.7.317
Upgrade to build 12.8.004
To download 12.8.004, click here.
III. For builds 12.6.000 to 12.6.329
Upgrade to build 12.7.006
To download 12.7.006, click here.
IV. For builds 12.5.000 - 12.5.664
Upgrade to build 12.6.007
To download 12.6.007 click here.
V. For builds 12.4.000 - 12.4.196
Step 1: Upgrade to build 12.5.011
To download 12.5.011, click here.
** Points to note:
- Back up your DB and VM snapshot folder before initiating the upgrade.
- Antivirus has to be disabled until the upgrade is complete.
- All files and folders under the <OpManagerHome>/pgsql directory should be closed before initiating the upgrade.
- No file under the <OpManagerHome>/pgsql directory should be opened during the upgrade process.
- The free disk space should be greater than 1.25x the size of the <OpManagerHome>/pgsql/data folder.
Step 2: Upgrade to build 12.5.383
** Points to note:
- You will not be able to upgrade from build 12.5.011 to 12.5.383 if the historical migration is not complete.
- The migration details can be checked under Settings > General Settings > Migration Status.
Firewall Analyzer - Build Number 12.8.738
Eligible Build Numbers: 12.8.000 and above.

* - To migrate from build numbers 12.4.000 to 12.4.196 to the latest build, click here.
* -SHA256 for the PPM: 7f471863ca5eed806efb892b7bf718148b0b7ebc326b6fe3d1809020fdbacaff
Read and accept the License Agreement before downloading this software.
Steps to upgrade Service Pack:
I. For builds 12.8.000 and above
- Shut down OpManager/NetFlow Analyzer/Network Configuration Manager/Firewall Analyzer/OpUtils. (If the application is running as a Windows service, stop the service from Control Panel > Services window and close the window.)
- Start the Command Prompt as an administrator: Search for “cmd”, right-click Command Prompt, then select Run as administrator.
- Backup database - click here. to know the steps.
- End the processes: Open the Task Manager and make sure the processes java.exe or wrapper.exe of the application are terminated.
- Backup the application folder. Make a copy of the '<OpManager-home-directory>' folder. This will back up the product configuration settings.
- Launch Update Manager:
- Windows OS: Go to the <OpManager-home-directory>/bin folder and run the script UpdateManager.bat
- Linux OS: Go to the <OpManager-home-directory>/bin folder and run the script UpdateManager.sh
- Click the Browse button to select the upgrade pack file (the .ppm file that you downloaded) and choose Install.
- Follow the on-screen instructions to apply the service pack
- Once the upgrade is complete, start the service for the changes to take effect.
II. For builds 12.7.000 to 12.7.317
Upgrade to build 12.8.004
To download 12.8.004, click here.
III. For builds 12.6.000 to 12.6.329
Upgrade to build 12.7.007
To download 12.7.007, click here.
IV. For builds 12.5.000 - 12.5.664
Upgrade to build 12.6.007
To download 12.6.007, click here.
V. For builds 12.4.000 - 12.4.196
Step 1: Upgrade to build 12.5.011
To download 12.5.011, click here.
** Points to note:
- Back up your DB and VM snapshot folder before initiating the upgrade.
- Antivirus has to be disabled until the upgrade is complete.
- All files and folders under the <OpManagerHome>/pgsql directory should be closed before initiating the upgrade.
- No file under the <OpManagerHome>/pgsql directory should be opened during the upgrade process.
- The free disk space should be greater than 1.25x the size of the <OpManagerHome>/pgsql/data folder.
Step 2: Upgrade to build 12.5.383
** Points to note:
- You will not be able to upgrade from build 12.5.011 to 12.5.383 if the historical migration is not complete.
- The migration details can be checked under Settings > General Settings > Migration Status.
OpUtils - Build Number 12.8.738
Eligible Build Numbers: 12.8.000 and above.

* - To migrate from build numbers 12.4.000 to 12.4.196 to the latest build, click here.
* -SHA256 for the PPM: 7f471863ca5eed806efb892b7bf718148b0b7ebc326b6fe3d1809020fdbacaff
Read and accept the License Agreement before downloading this software.
Steps to upgrade Service Pack:
I. For builds 12.8.000 and above
- Shut down OpManager/NetFlow Analyzer/Network Configuration Manager/Firewall Analyzer/OpUtils. (If the application is running as a Windows service, stop the service from Control Panel > Services window and close the window.)
- Start the Command Prompt as an administrator: Search for “cmd”, right-click Command Prompt, then select Run as administrator.
- Backup database - click here. to know the steps.
- End the processes: Open the Task Manager and make sure the processes java.exe or wrapper.exe of the application are terminated.
- Backup the application folder. Make a copy of the '<OpManager-home-directory>' folder. This will back up the product configuration settings.
- Launch Update Manager:
- Windows OS: Go to the <OpManager-home-directory>/bin folder and run the script UpdateManager.bat
- Linux OS: Go to the <OpManager-home-directory>/bin folder and run the script UpdateManager.sh
- Click the Browse button to select the upgrade pack file (the .ppm file that you downloaded) and choose Install.
- Follow the on-screen instructions to apply the service pack
- Once the upgrade is complete, start the service for the changes to take effect.
II. For builds 12.7.000 to 12.7.317
Upgrade to build 12.8.004
To download 12.8.004, click here.
III. For builds 12.6.000 to 12.6.329
Upgrade to build 12.7.006
To download 12.7.006, click here.
IV. For builds 12.5.000 - 12.5.664
Upgrade to build 12.6.007
To download 12.6.007, click here.
V. For builds 12.4.000 - 12.4.196
Step 1: Upgrade to build 12.5.011
To download 12.5.011, click here.
** Points to note:
- Back up your DB and VM snapshot folder before initiating the upgrade.
- Antivirus has to be disabled until the upgrade is complete.
- All files and folders under the <OpManagerHome>/pgsql directory should be closed before initiating the upgrade.
- No file under the <OpManagerHome>/pgsql directory should be opened during the upgrade process.
- The free disk space should be greater than 1.25x the size of the <OpManagerHome>/pgsql/data folder.
Step 2: Upgrade to build 12.5.383
** Points to note:
- You will not be able to upgrade from build 12.5.011 to 12.5.383 if the historical migration is not complete.
- The migration details can be checked under Settings > General Settings > Migration Status.