
Scheduled Automation
Scheduled Automation lets administrators automate or semi-automate routine management tasks across Active Directory, Microsoft 365, and Google Workspace, along with folder access permissions, orchestartion templates, and webhooks, so a single schedule can also carry the corresponding changes into integrated enterprise applications.. A task or sequence of tasks can be configured to run at a specified time or interval, reducing repetitive manual effort while helping ensure that critical operations are performed consistently.
Administrators can use scheduled automations to perform tasks such as provisioning users, managing group memberships, cleaning up inactive accounts, and running automation policies. For sensitive tasks, automations can be routed through a configured workflow, allowing organizations to maintain control, enable review, and ensure accountability before changes are applied.
How scheduled automation works
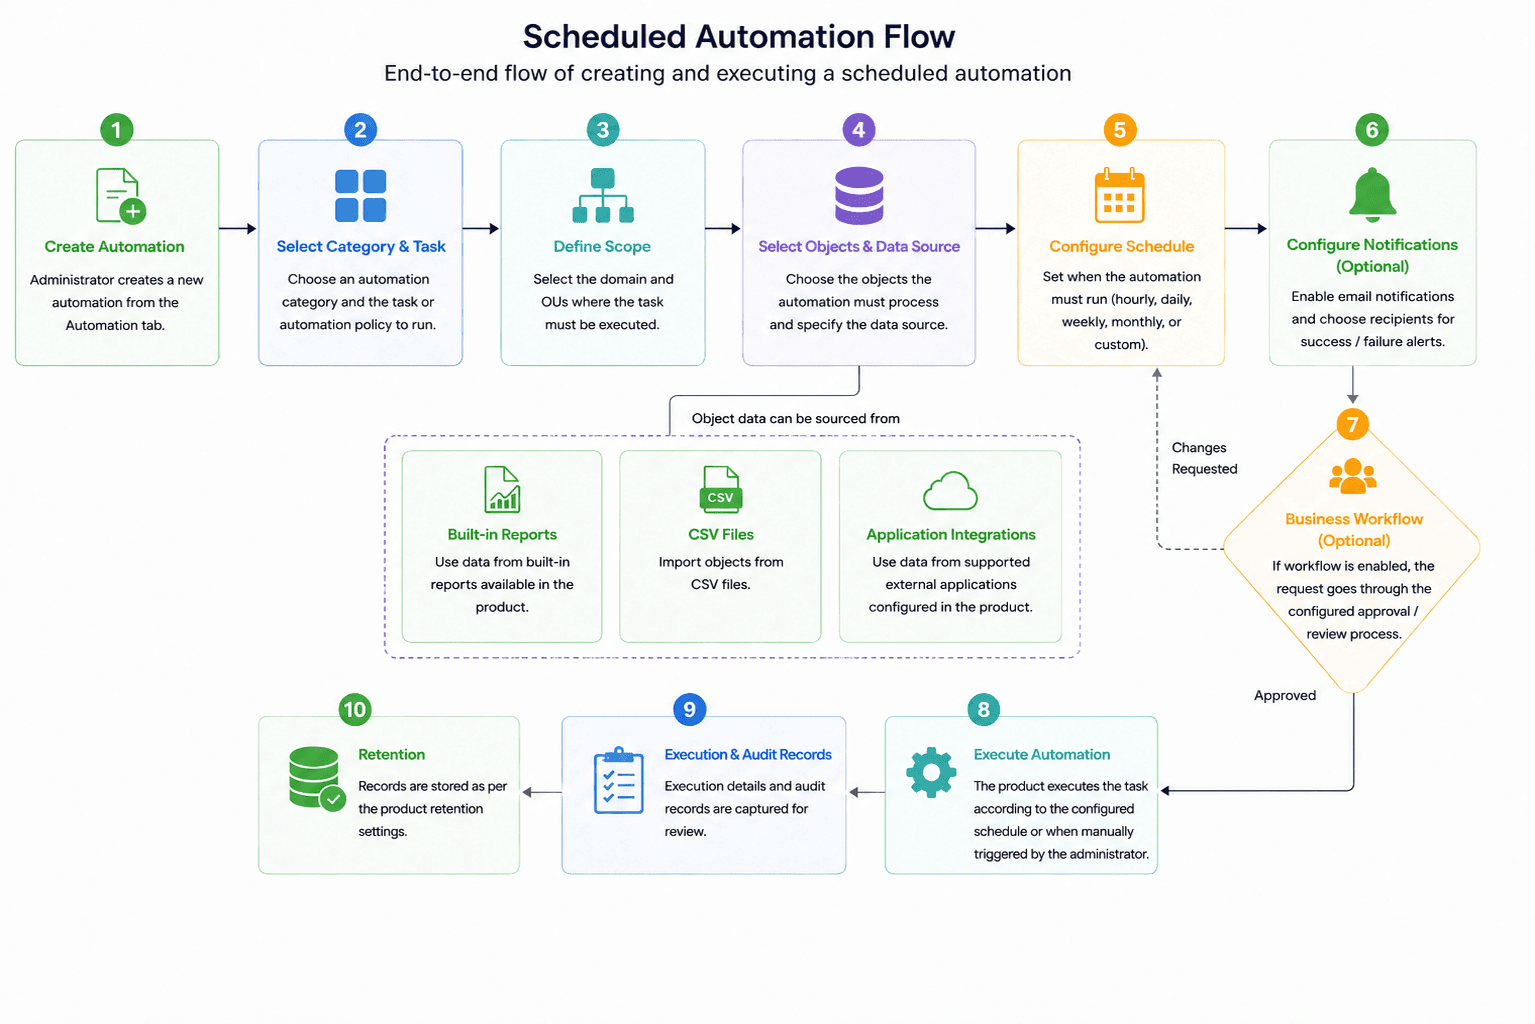
Scheduled automation uses the configured schedule to identify eligible objects from the selected source at runtime, applies the selected task within the defined domain and OU scope, and records the result of each run in the execution history. If notifications are configured, the product sends the execution details to the selected recipients. If workflow approval is associated with the automation, the scheduled task follows the configured approval path before the action is completed. Configuration changes, such as updates to the task, schedule, scope, sharing, or status, are recorded in the audit history so administrators can trace what changed and when.
Note to the HTML team: Insert a flow image like this.
What is automation?
Automation is a configured task, or a sequence of tasks, that the product executes on a defined schedule. Each automation specifies what should be done, to which objects, when, and whether approvals are required before execution. Automations can be managed entirely from the Automation tab, where all existing automations are listed along with their schedule, request type, execution type, criteria, and category.
The following sections explain how to work with automations in the product:
- Configure an automation: Create a new scheduled automation for Active Directory or Microsoft 365 tasks.
- Modify an automation: Update the configuration, schedule, or scope of an existing automation.
- Enable and disable an automation: Control whether an automation runs at its scheduled time without altering its configuration.
- Copy an automation: Duplicate an existing automation as a starting point for a new one.
- Share an automation: Grant other technicians view or edit access to an automation.
- View an automation's audit history: Track configuration changes made to the automation itself.
- View an automation's execution history: Review past runs, tasks performed, and outcomes.
- Delete an automation: Permanently remove an automation and its history.
Prerequisites
- A Standard or Professional edition license of ADManager Plus.
- For automations that act on Microsoft 365 or Google Workspace objects, the corresponding tenant or service must be integrated with the product.
Note:
- CSV files used as input sources must remain accessible at the specified path at the time of execution; missing or moved files will cause the automation to fail.
- Automations that depend on reports reflect the report data at the time of execution, not at the time of automation creation.
- A disabled automation will not run at its scheduled time and must be manually enabled to resume execution.
Steps to configure a scheduled automation
- Navigate to the Automation tab in the product.
- To create a new scheduled automation, click + Create New Automation in the top-right corner of the page.
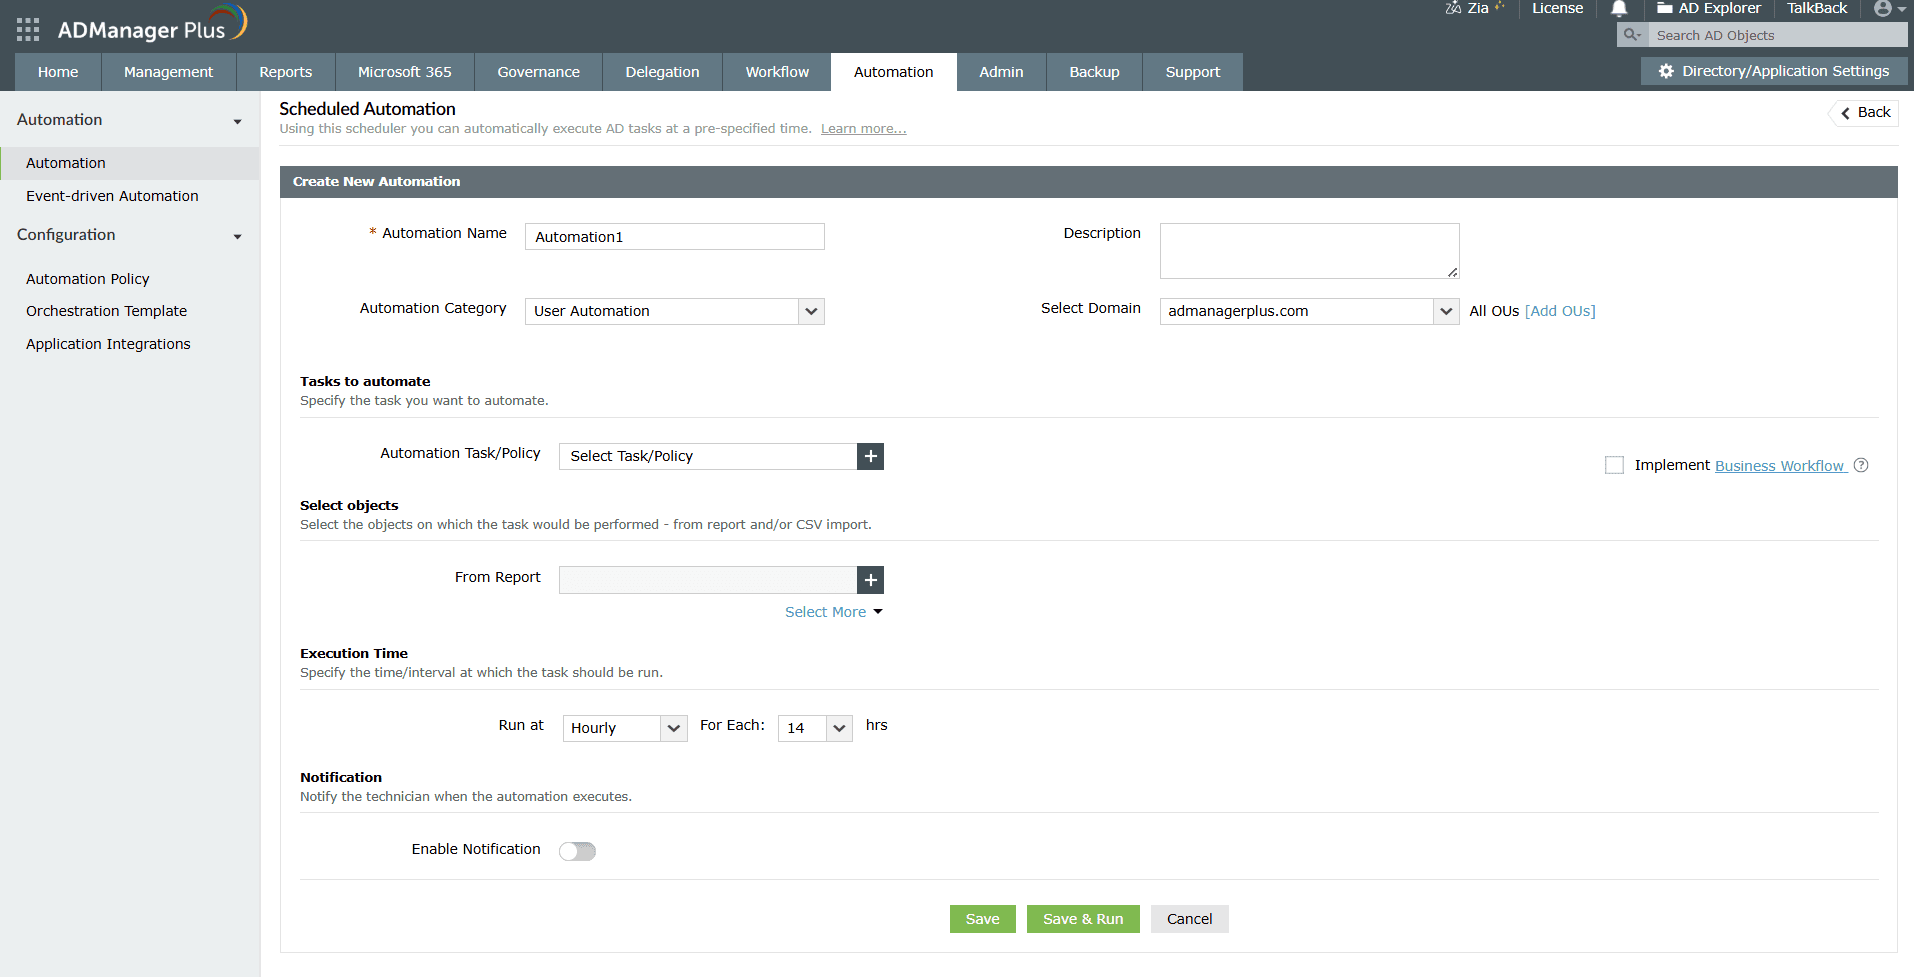
- In the Automation Name field, enter a unique name that clearly identifies the purpose of the automation.
- In the Description field, enter a brief explanation of what the automation does and when it should run.
- Select the required Automation Category and the domain in which the automation must run.
- Select the task or automation policy that must be executed in the Automation Task/Policy field. Enable the Implement Business Workflow check box if the automation must be routed for approval.
- Choose the source from which the automation must obtain the objects to process. Depending on the selected task, available source options may include reports, a CSV file, and application integrations.
- If you select a report, choose the required report and define the report criteria, if applicable.
- If you select a CSV file, specify the path to the file and map the required attributes.
Note: The file must reside in a shared path or a folder on the machine where the product is installed.
- If you select an integrated application, select the application and configure the required object selection criteria.
- Configure the execution frequency. Available scheduling options may include hourly, daily, weekly, monthly, or a custom schedule.
- Configure notification settings, if required.
- Run the automation manually or allow it to run based on the configured schedule using the Save or Save & Run options.
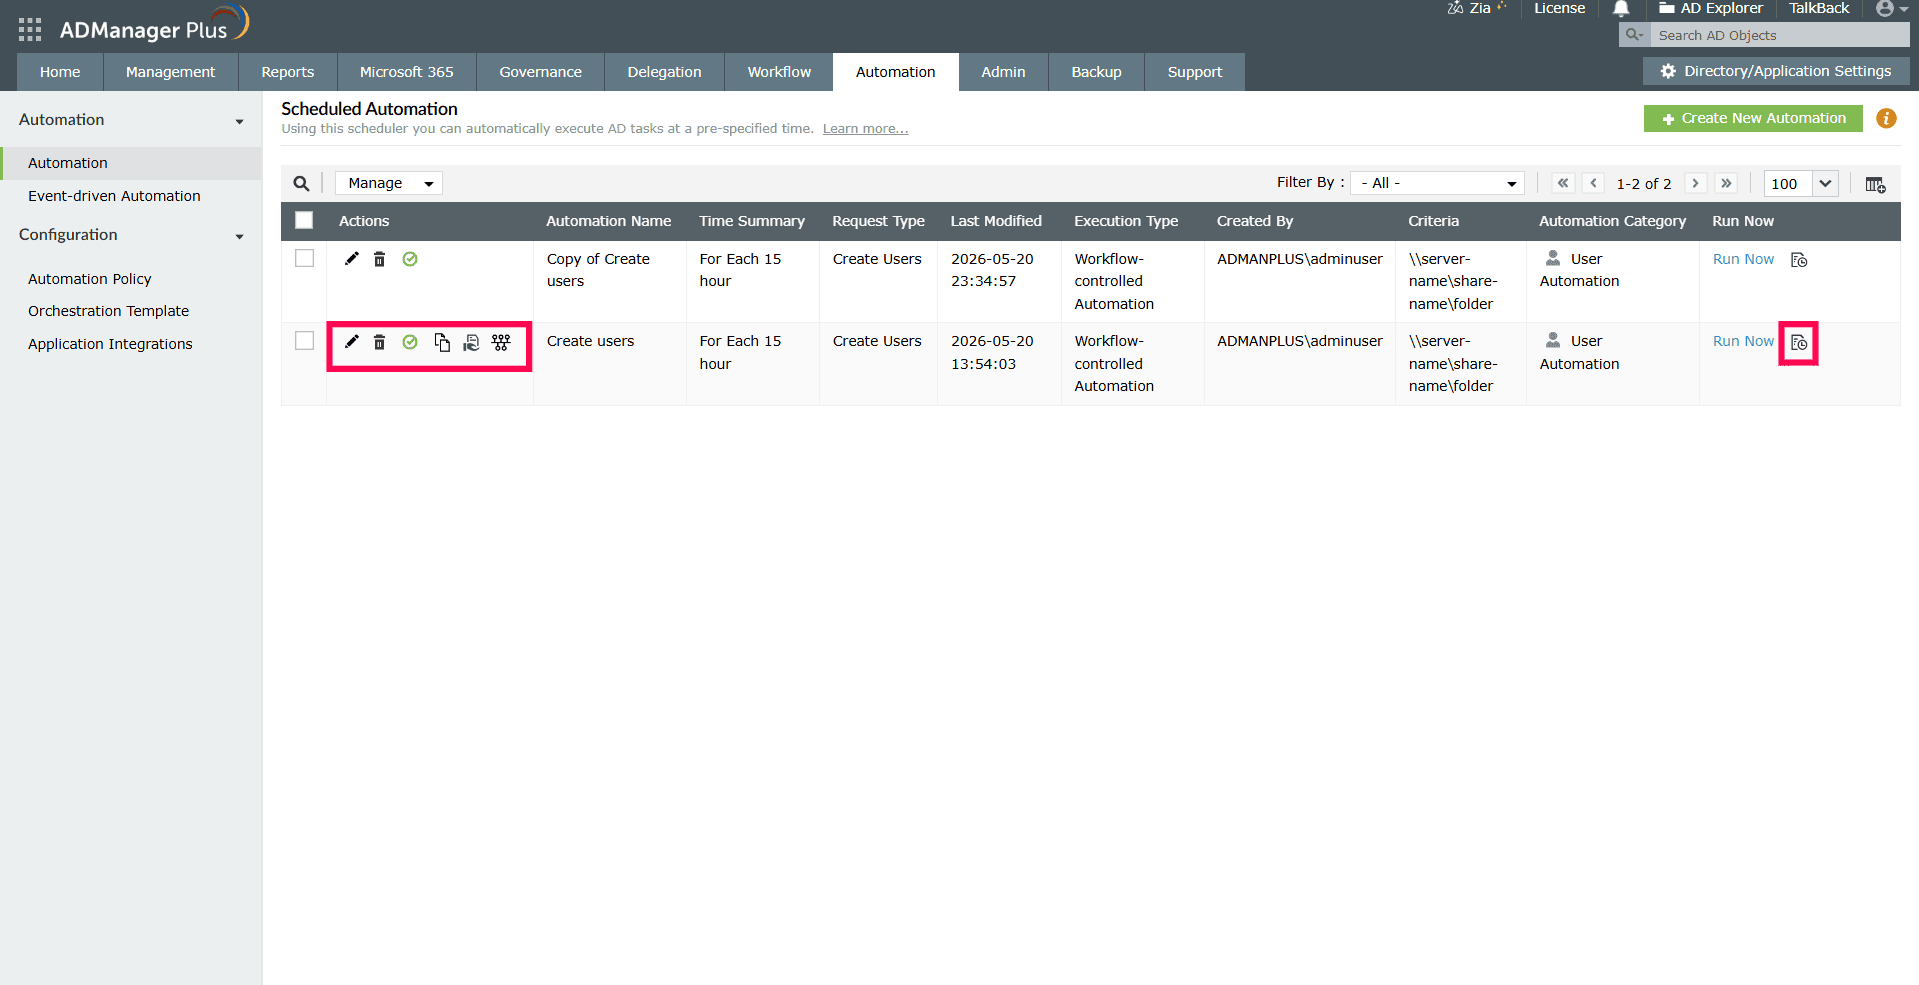
- To modify an automation, locate the automation in the Scheduled Automation page and click the edit icon. Update the required fields, review the changes, and click Update.
- To enable or disable an automation, locate the scheduled automation and click the enable or disable icon in the Action column. Confirm the change, if prompted, and verify that the automation status reflects the expected state.
- To copy an automation, locate the automation, click the copy icon, enter a new automation name, modify the copied configuration as required, review the settings, and click Update.
- To view audit history, locate the automation, click the audit history option, and review the recorded configuration changes, including the action performed, technician, and timestamp.
- To view execution history, locate the automation. Under the Run Now column, click the
 icon corresponding to any of the automation schedules.
- To delete an automation, locate the automation, select it, click Delete, and confirm the deletion when prompted.
Note: Deleting an automation permanently removes its saved configuration. Before deleting it, review any audit or execution history that you may need for troubleshooting, reporting, or compliance.
Tips
- Explore the automation use cases page for real-world scenarios, including automated user provisioning, group membership rule enforcement, and end-to-end inactive-user cleanup.
- For automations that need to trigger based on an action rather than a fixed schedule, use event-driven automation instead.
- Extend automations beyond Active Directory and Microsoft 365 by connecting third-party services such as ITSM, HRMS, and collaboration tools through application integrations.
- Use descriptive naming conventions so that automations remain easy to identify as the list grows.
- Always pair high-impact automations, such as deletion or OU moves, with a workflow approval step, even if the technician has the necessary permissions. This adds a safety net against misconfigured criteria.
- Review the execution history of newly created automations after their first few runs to confirm that the criteria are selecting the intended objects.