ADManager Plus, an IGA solution, facilitates streamlined user life cycle management across integrated enterprise applications. Even if your application isn't on the predefined list, you can integrate it with ADManager Plus, provided it supports REST APIs, SOAP APIs, and Graph APIs. Once integration is complete, you can automate and orchestrate key identity life cycle processes across applications.
How to integrate a custom application with ADManager Plus
Integrating a custom application with ADManager Plus involves two major steps:
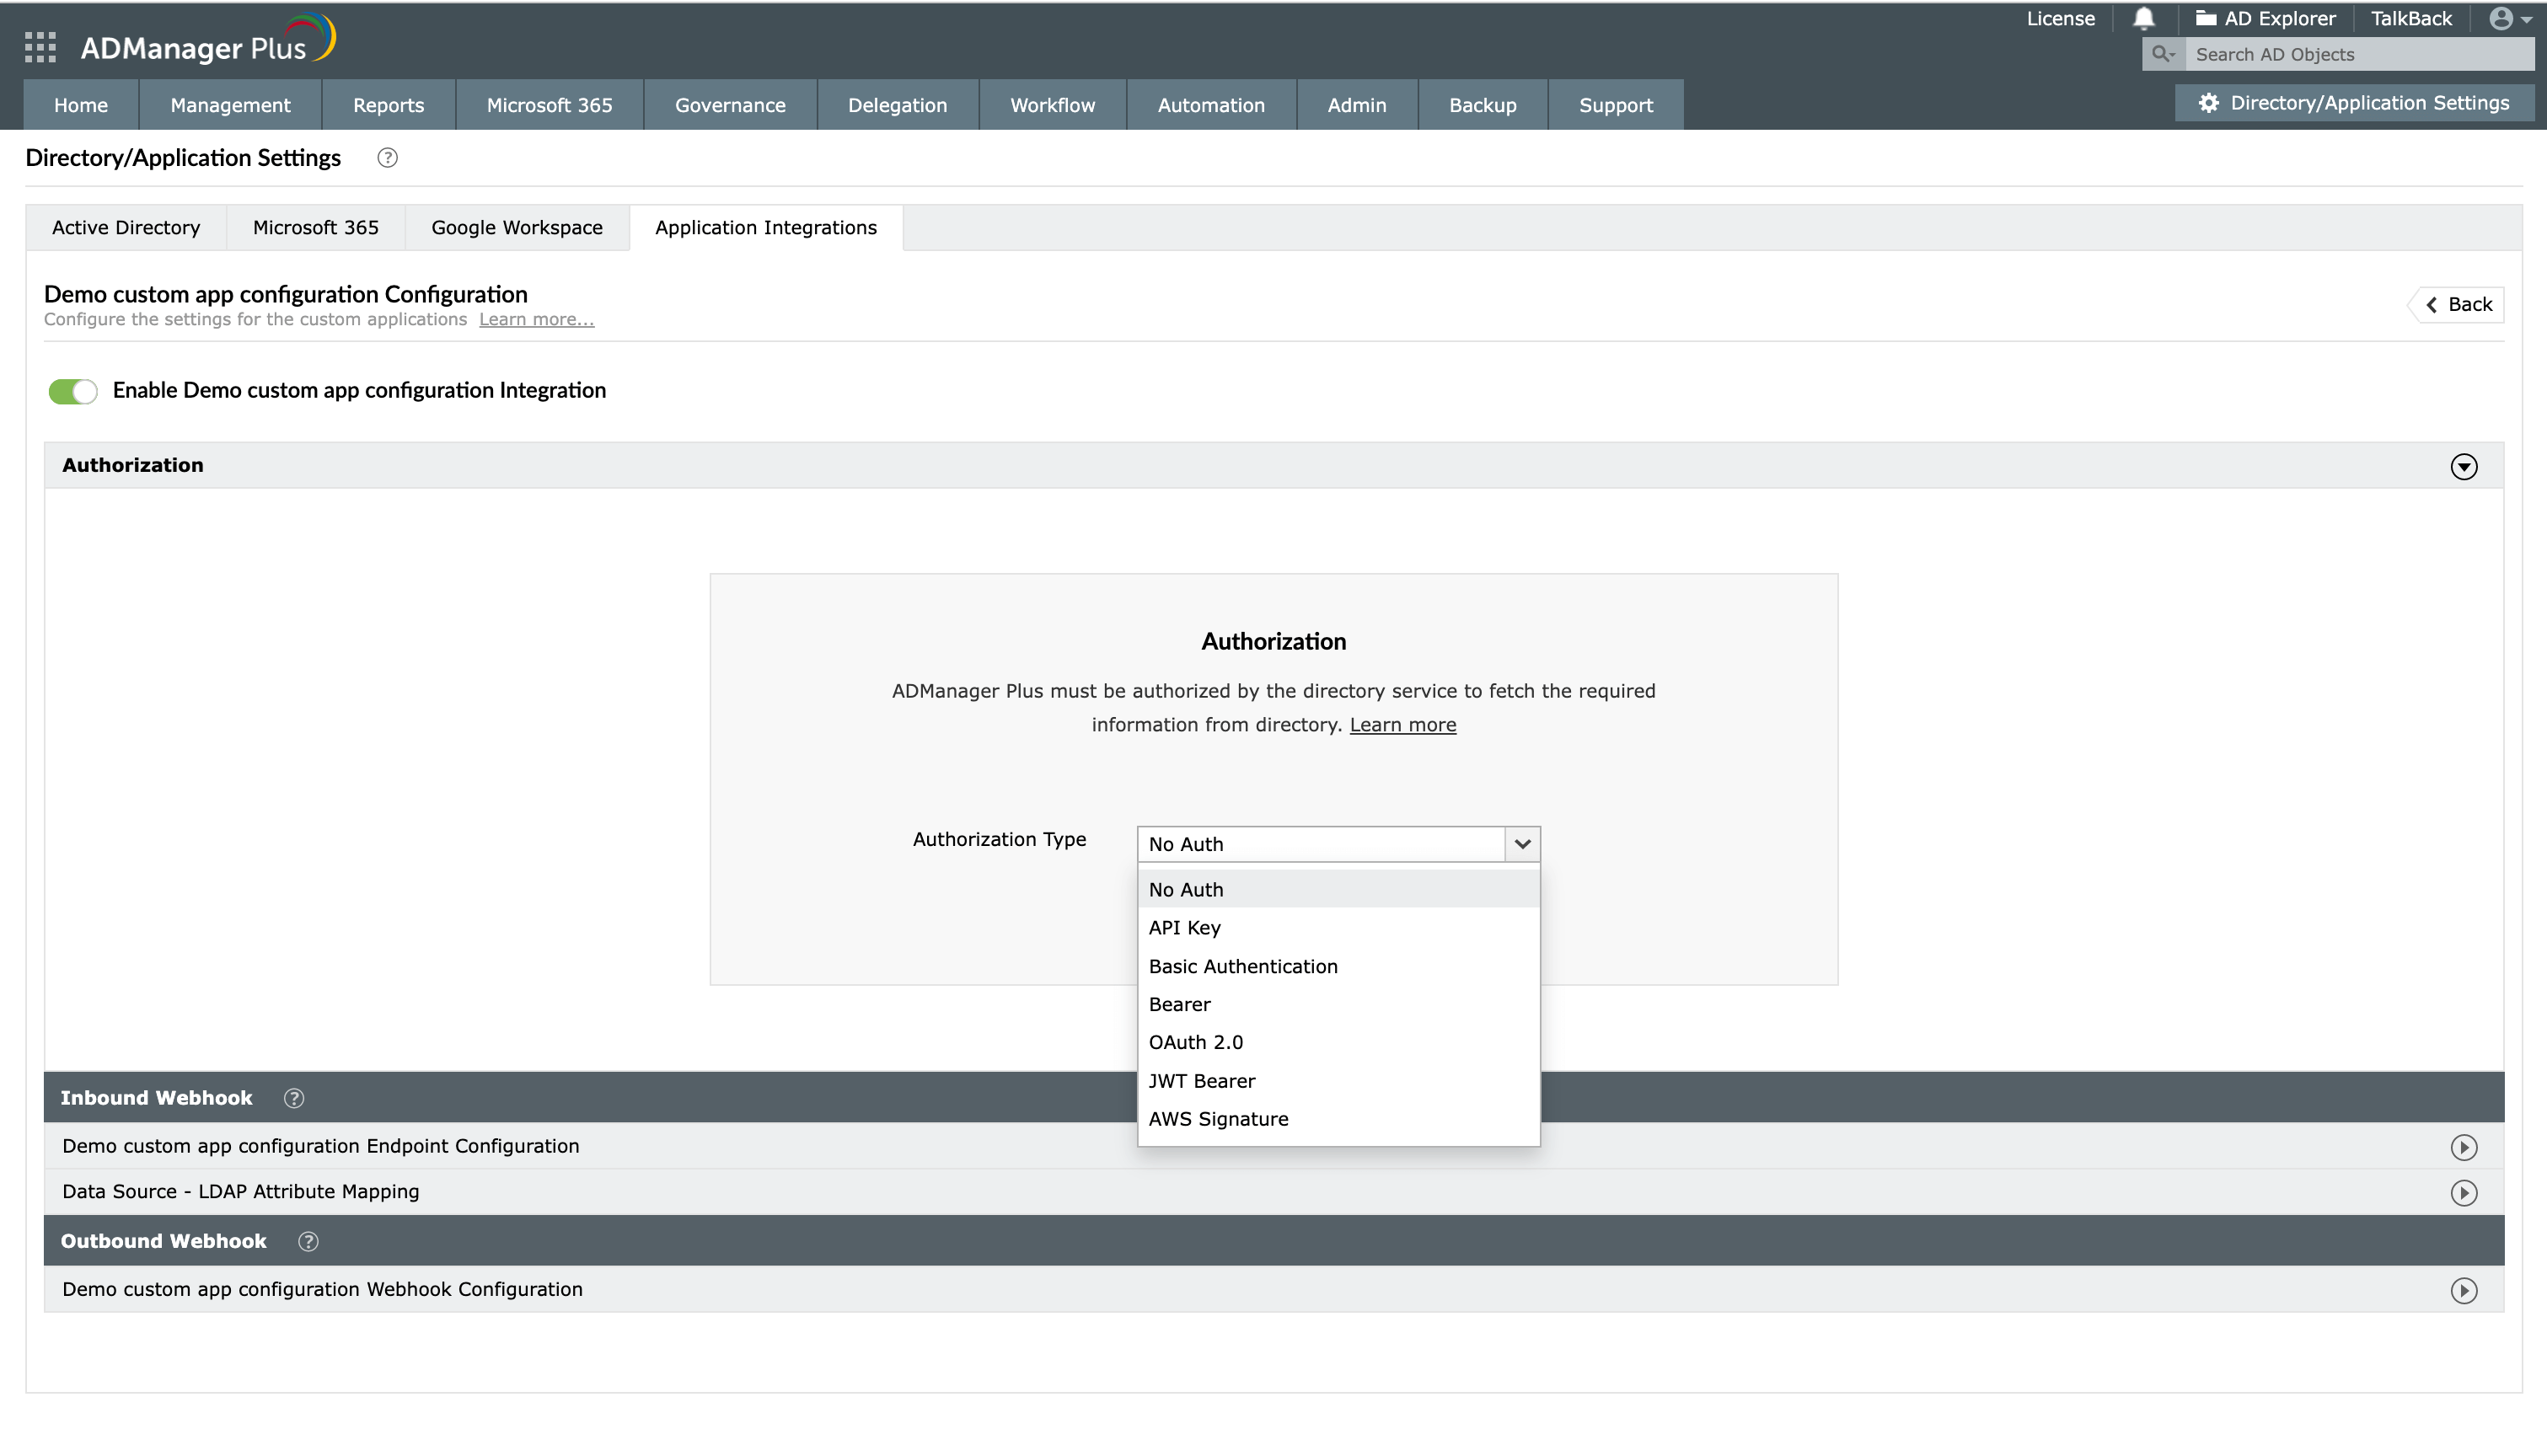
ADManager Plus offers five authorization methods to authorize API requests. Choose the method that fits your security and operational needs and configure it.
API endpoint configuration
You need the API endpoints of the application to import objects and their necessary details into ADManager Plus. You can find the required API information in the application's API documentation, or you can contact the support team of the application with which you're integrating. There are two types of endpoint configuration in ADManager Plus:
Steps to integrate ADManager Plus with a custom application
Log in to ADManager Plus.
Navigate to Automation > Configuration > Application Integrations.
Click the + Custom Applications tile to integrate with a new application.
In the window that pops up, enter a suitable Name and Description, upload a Logo for the application, and click Save.
Click the custom application added in the previous step to configure the API authorization methods, endpoints, and webhooks.
In the Authorization section, select the Authorization Type from the drop-down:
No Auth
Select No Auth as the Authorization Type if your request doesn't require authorization, then click Configure. If you do this, the authorization details will not be shared with the API client.
API Key
If you select API Key as the Authorization Type, enter the key name and value in the Key and Value fields, respectively. Associate the key with a header or query parameter using the Add to drop-down and click Configure. You can refer to your application's API documentation for more details.
Basic Authentication
If you select Basic Authentication as the Authorization Type, specify a Username and Password and click Configure.
Bearer
If you select Bearer as the Authorization Type, enter your application's API key in the Token field and click Configure. The API key can be obtained by following the steps mentioned in your application's API documentation.
OAuth 2.0
If you select OAuth 2.0 as the Authorization Type, specify the following:
Header Prefix: Specify a prefix value for your authorization header.
Grant Type: Authorization code is the default Grant Type, but you can choose Client Credentials as the Grant Type depending on the application.
Callback URL: The Callback URL is where you will be redirected after authentication. For the applications on the list, it is prefilled with ADManager Plus' URL.
For example: http://{hostname}/OAuthCode.do. The hostname will be the machine on which the ADManager Plus instance is installed.
While integrating a new application, this should be configured in the API provider's OAuth configuration.
Auth URL: Specify the authorization endpoint URL obtained from the application that you want to integrate with while configuring the OAuth details. You can refer to the application's API document for more information.
Access Token URL: Enter the OAuth server URL where the application can exchange the authorization code for an access token. The server URL will be the redirect URI of the application. Refer to the API documentation for the steps to get the redirect URI of the application with which you are integrating.
Client ID and Client Secret: Enter a valid ID and its secret key obtained from the application you want to integrate with ADManager Plus.
Scope: Scopes are defined in the API documentation of the application with which you are integrating. It limits the client's access to specific endpoints and determines if the client can only read or also write to those endpoints. Specify the scope values in ADManager Plus after referring to the scope values in the API documentation.
Client Authentication: You can use this option to choose if the client credentials have to be included in the request body or the header. By default, Send Client Credentials in Request Body will be selected.
Advanced Options: Click this option and choose the headers or query parameters from the Add to drop-down.
API-based Authorization:
While integrating custom applications with ADManager Plus, you now have the option to get the authentication tokens from API endpoints for authorization. This is supported in the <API Key> and <Bearer> authorization types. To utilize this option,
Select the API Key or Bearer (according to the integrating application's authorization standard) option from the Authorization Type drop-down.
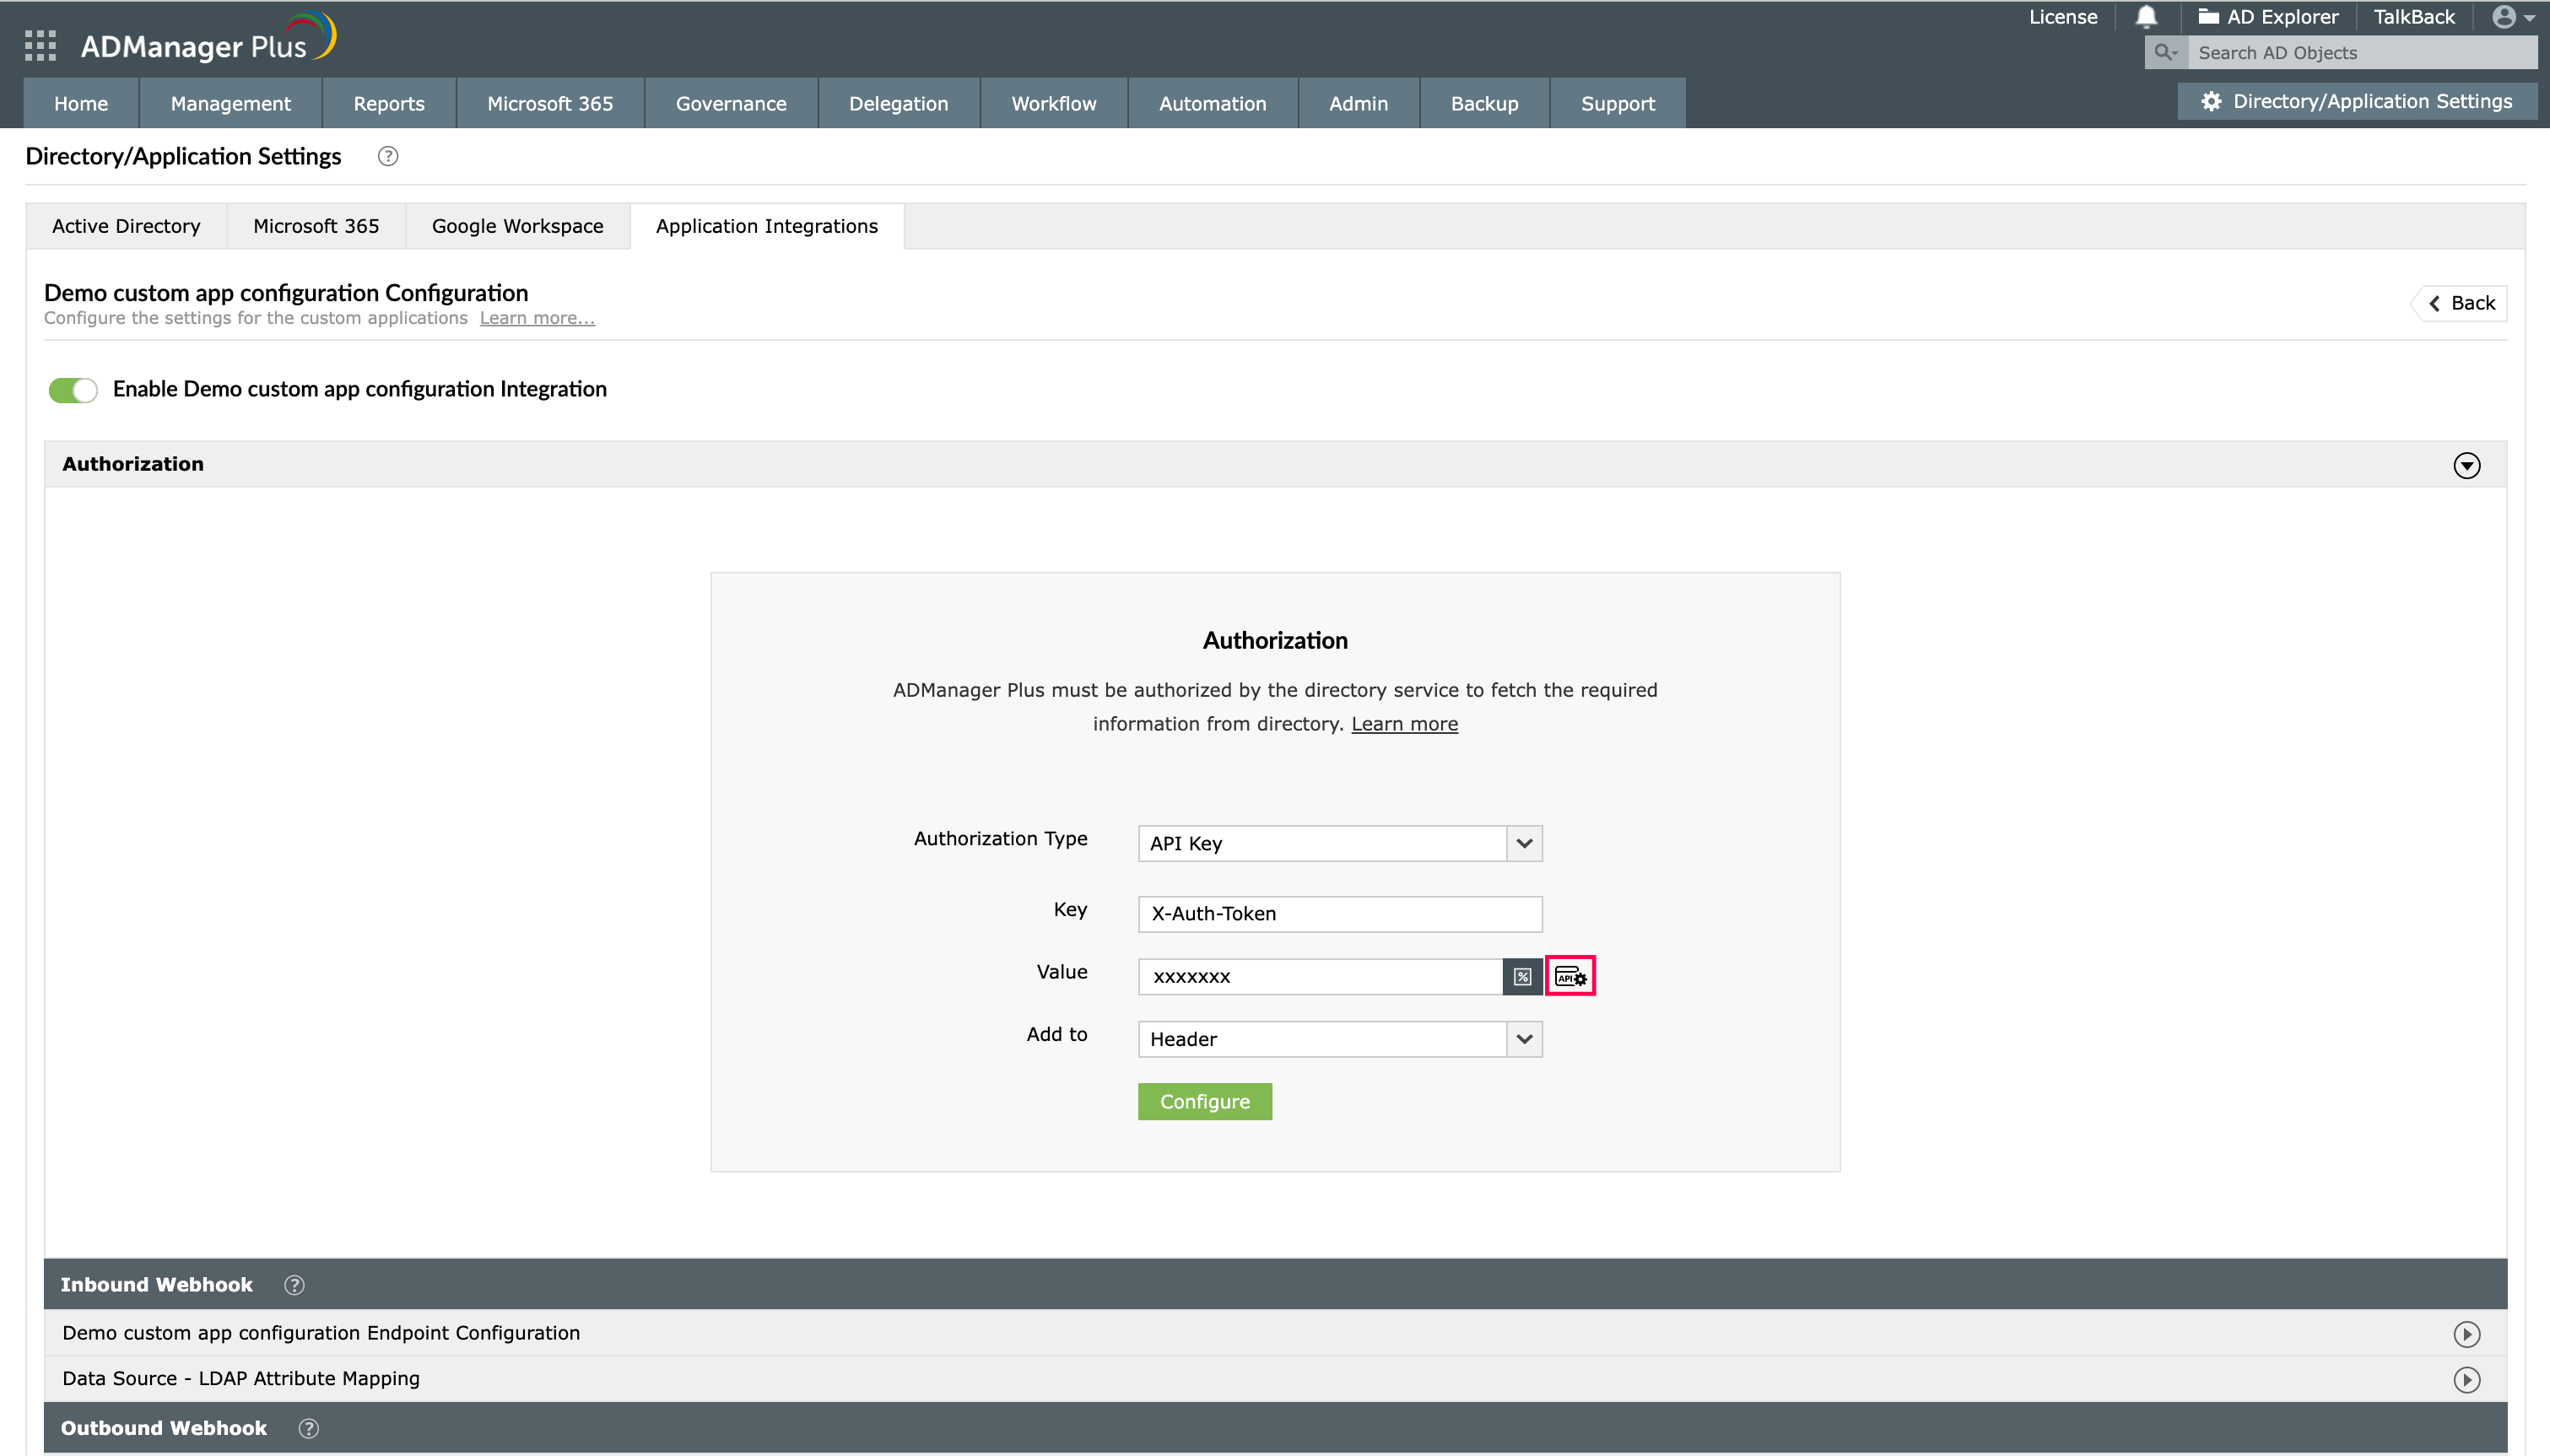
In the Value field, click the webhook icon as highlighted in the image.
Configure the API authentication token in the endpoint URL or add it either in headers or in parameters.
Click Test and Configure to test the webhook and proceed to set this as an authorization method.
Note This will also be listed as a macro in inbound and outbound webhooks in the Select Macro window pop-up.
Click the icon to add a authentication token webhook
Note ADManager Plus sends an authorization request to the Auth URL specified above, along with the Client Id and Client Secret. The authorization server responds with an authorization code, which is then exchanged for refresh and access tokens. The access tokens are then used to make API calls, after which the user is redirected to the specified Callback URL.
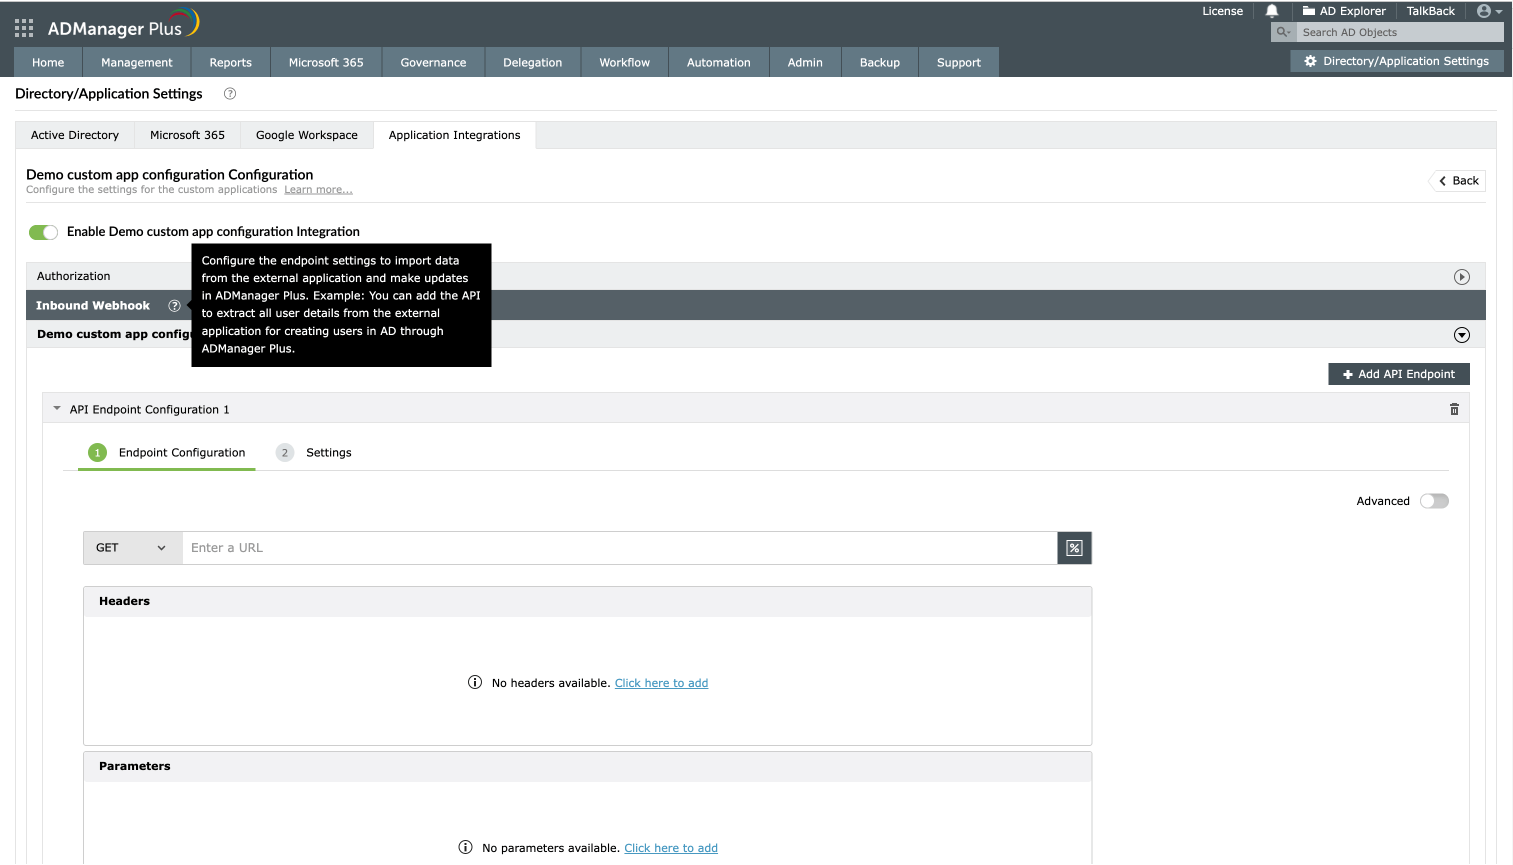
An inbound webhook enables the transfer of data from the custom application to ADManager Plus. To configure this, provide the required details under the Endpoint Settings and Response Settings sections.
Endpoint Settings
Under Inbound Webhook, under API Endpoint Configuration, click Endpoint Settings to provide the endpoint details listed below. If required, you can configure multiple endpoints for a custom application using the + Add API Endpoint button.
Endpoint URL: Enter the Endpoint URL. The Endpoint URL will differ according to the operation that has to be performed and the type of data that has to be retrieved from the application.
For example: The Endpoint URL used to get user data will be different from the URL used to fetch the group data. Refer to the API documentation of the application you are integrating with ADManager Plus.
Method: Choose either GET or POST for the HTTP request method.
Headers: Click and configure the respective HTTP headers.
Parameters: Click and configure the query parameters.
Body Message: Select the body message data type from the available options based on the API type:
Note If the response type is XML, go to the Response Settings section and set the response type to XML. Then, return to the Endpoint Settings tab and select a CSV file that contains the attribute paths needed to parse the XML response.
To upload a CSV file, click CSV Import under the XML Path File field to upload a CSV file and extract the required data from the XML response.
Click Test and Save.
Note Follow these steps to configure advanced settings.
Response Settings
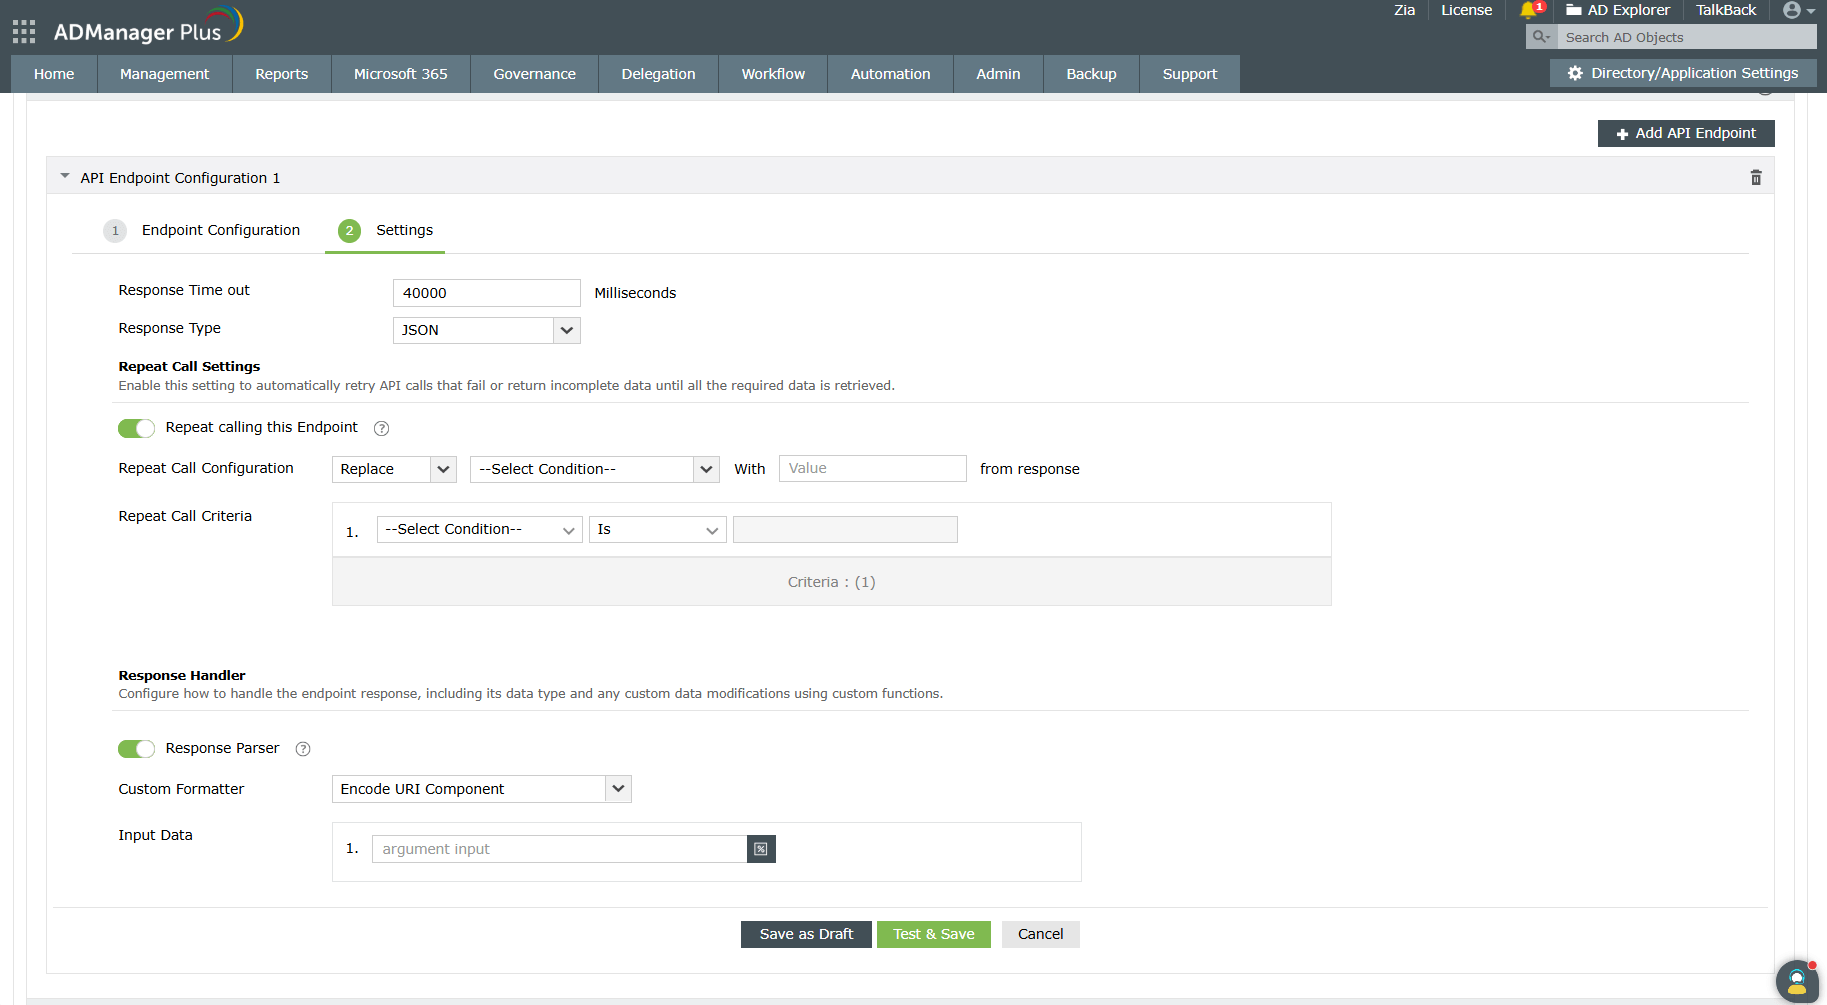
In the Response Settings section,
Response Timeout: Set the maximum time to wait for a response from the API before it times out.
Specify the maximum time in milliseconds in the Response Timeout field.
Response Type: Choose the format in which the response has to be returned. Select either JSON or XML from the Response Type field. By default, it is set to JSON, but you can change it to XML depending on the API requirements.
Repeat Call Settings: Configure these settings to handle pagination when making repeated calls to the endpoint.
Repeat Calls to this Endpoint:
Enable the Repeat Call to this Endpoint toggle to configure a criteria that will repeatedly run until all data is retrieved from the integrated application.
Repeat Call Configuration: Define how repeated requests should be triggered to ensure complete data retrieval from the integrated application.
Select the type of action from the list given in the first drop-down. In the adjacent drop-down, mention the pagination parameters to get the data in ordered sets until the whole dataset is fetched. Enter the value of the pagination parameters in the Value field.
Repeat Call Criteria:
You can also set a condition using the Repeat Call Criteria option to specify how long you can wait for a response to an API call.
Response Handler: The Response Handler settings let you define how the response from the endpoint should be processed and customized.
Response Parser:
Enable the Response Parser toggle to configure how to handle the endpoint response a nd any custom data modifications using custom functions. By default, all entitlements linked to the selected objects are included.
Response Parser:
A custom function used to modify or remove unwanted fields from the received response.
Arguments:
Use macros in the Arguments field to specify whether data should be retrieved from the response header, response body, response status code, or any custom input.
Once done, click Save or Test & Save. A response window will display all the requested elements.
Click Data Source - LDAP Attribute Mapping to match endpoints and to map AD LDAP attributes with the respective attributes of the custom application.
Enter the Configuration Name and Description and select the Automation Category from the drop-down menu.
In the Select Endpoint field, check the custom application's endpoint box and in the Primary Key drop-down select the attribute that is unique to users (employeeIdenifier, username, etc.) but hold the same value in all the endpoints. If you have configured dependent endpoints, then select the unique attribute for those endpoints as well.
In the Attribute Mapping field, select the attribute from the LDAP Attribute Name drop-down and map it with the respective attribute of the custom application.
Note
Click Add New Format to create a new format for the user naming attributes in the custom application. In the Custom Naming format pop-up window, fill in the details and click Save. You can also add macros while specifying format values if necessary.
The following custom attributes can be used during mapping and are supported across all external data source integrations along with CSV integration.
templateName: Specifies the name of the template that can be used for user, computer, group, and contact creation and user modification.
executionTime: Specifies the execution time for each object for non-template-based actions.
Click Save.
How to use inbound webhooks
After configuring an inbound webhook, you can use it as a data source in scheduled automations for different identity management actions in ADManager Plus. To do so, navigate to Automation, click + Create New Automation, and use the Select More option under the Select objects section. This enables you to automate the action you want to perform on the list of objects imported through the inbound webhook either once or periodically.
Advanced endpoint configuration for nested endpoints with inbound webhooks
For some API configurations, you may have to configure multiple endpoints where the endpoints are dependent on others. For example, the first endpoint fetches all employee IDs in the organization, and you need to hit another API for each employee ID received in the response to fetch each employee's details. In cases like these, configure the first API as a base endpoint (the default type) and the second endpoint as a dependent endpoint using the Advanced option in the Endpoint Configuration section.
Steps to configure a dependent endpoint
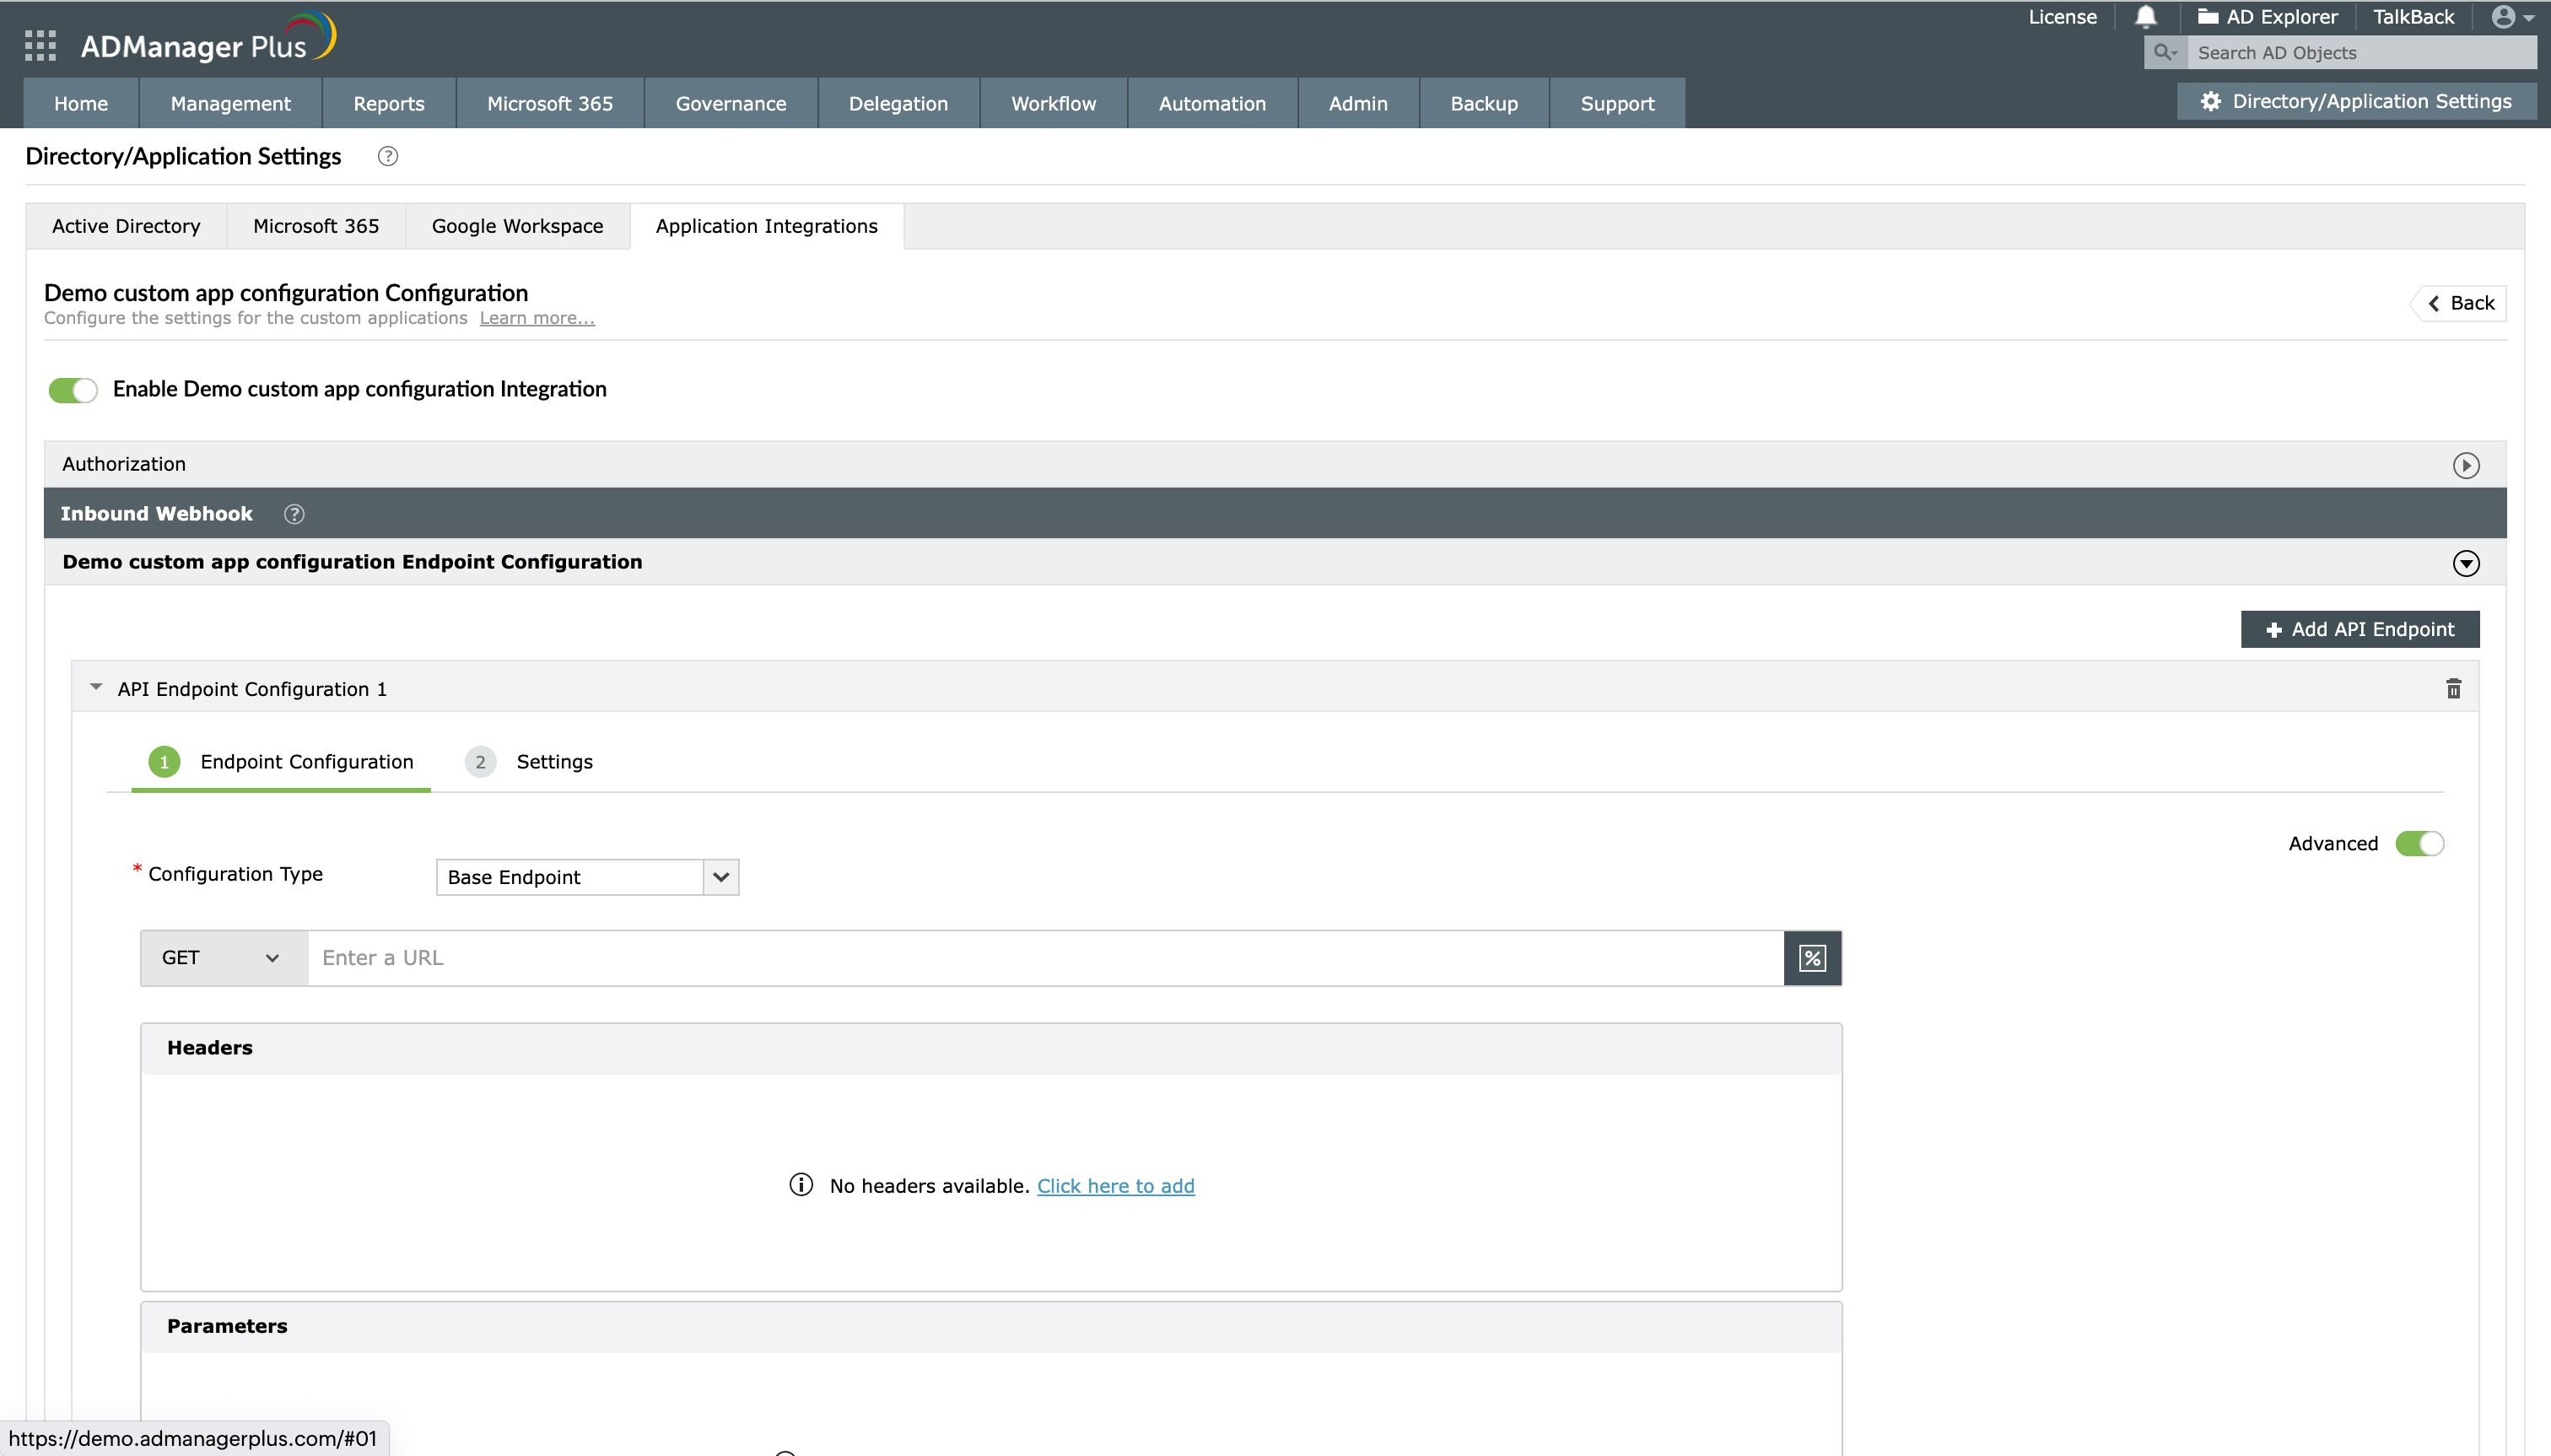
Toggle the Advanced button to on under the API Endpoint Configuration to fill in information when the endpoint is dependent on the previous API endpoint.
In the Endpoint Configuration section, toggle the Advanced option on to fill in information when an endpoint is dependent on a previous API endpoint.
From the Configuration Type drop-down, select the endpoint type. By default, the Base Endpoint option will be selected. You have to change it to Dependent Endpoint.
From the Depends On drop-down, select the relevant base endpoint upon which the data for the dependent endpoint relies. Thus, the dependent endpoint will be called for each object received from the base endpoint.
To utilize a field from the response of the base endpoint, use the base endpoint macros listed by typing % or clicking .
Steps to fetch values from a REST API response using conditions
Follow all the steps mentioned in the Inbound webhook configuration section. When the Message Type is set to JSON and you need to retrieve data from an array of responses based on specific conditions, ADManager Plus allows you to do so using JSON conditional parsing.
This option filters the required data from the API's JSON response containing an array of values for a desired key, which can then be mapped to the corresponding LDAP attributes. The mapping format can be configured using single or multiple conditions, based on your requirements.
Condition syntax
Use the following formats to define a condition:
<path of array object key>[?(('<path of condition key>')='<condition value>')].<path of value to be fetched>
<path of array object key>[?(('<path of condition key>')='<condition value>')&(('<path of condition key>')='<condition value>')].<path of value to be fetched>
Syntax parameters
<path of array object key>
The path to the JSON array object, ending with its key
<path of condition key>
The path to the key inside the array object used for the condition
<condition value>
The value to be matched in the condition path
<path of value to be fetched>
The path to the value that needs to be fetched (after the array object)
Retrieve a value from a JSON array based on a single condition. This method is useful when you want to filter and extract a specific piece of information that meets only one matching criterion from a set of data. The condition acts as a simple filter, ensuring that only the relevant object from the array is selected.
Example: To fetch the value cityname2 from the sample response, set the condition path data[].address[].position.city.isHome to true and the target array path as data[].address[].position.city.name.
data[].address: This is the path to the JSON array object.
position.city.isHome: This is the condition key path inside the array data[].address.
true: This is the condition value to match.
position.city.name: This is the value path to fetch.
Output: The given condition matches the second item in the array, so the resulting value is cityname2.
Type 2: Mapping using multiple conditions
Retrieve a value from a JSON array and map it to an LDAP attribute by applying multiple conditions. This method is ideal for complex or nested data where multiple criteria must be met to accurately map the value to LDAP attributes. By combining conditions using the logical AND (&) or OR (|) operator, you can narrow down the selection to an object that meets all specified criteria.
Example: To fetch the value groupname2 from the sample response, set the condition paths data[].items[].category to group and data[].items[].data[].type to secondary, and set the target array path as data[].items[].data[].value.
AND and OR cannot be combined in the same condition.
How to configure condition-based parsing in ADManager Plus
In ADManager Plus, condition-based parsing can be configured in two ways. Method 1, which is recommended, offers more flexibility since you can define multiple format mappings with different conditions for the same JSON array and reuse them across LDAP attributes. Method 2, on the other hand, is configured directly at the endpoint level and allows only one condition per JSON array path, limiting it to fetching only one value from the array. This makes it more restrictive but simpler to set up.
Method 1: [recommended]
In the Data Source - LDAP Attribute Mapping section, select the endpoint.
Select Add New Format from the drop-down in the Attribute Mapping field.
In the Format Mapping Attribute pop-up, enter the format name and select the format.
In the Format Value field, click the macro icon.
In the Select Macros pop-up, navigate to Functions > Match Condition.
Enter the condition value in the text box.
Click Add.
Click Save.
Now, you can use this format to map with any LDAP attribute.
Note For each LDAP attribute you want to map, you can create multiple formats using this method.
Method 2
After filling in the endpoint configuration details, click Test and Save or select the Response Fields icon.
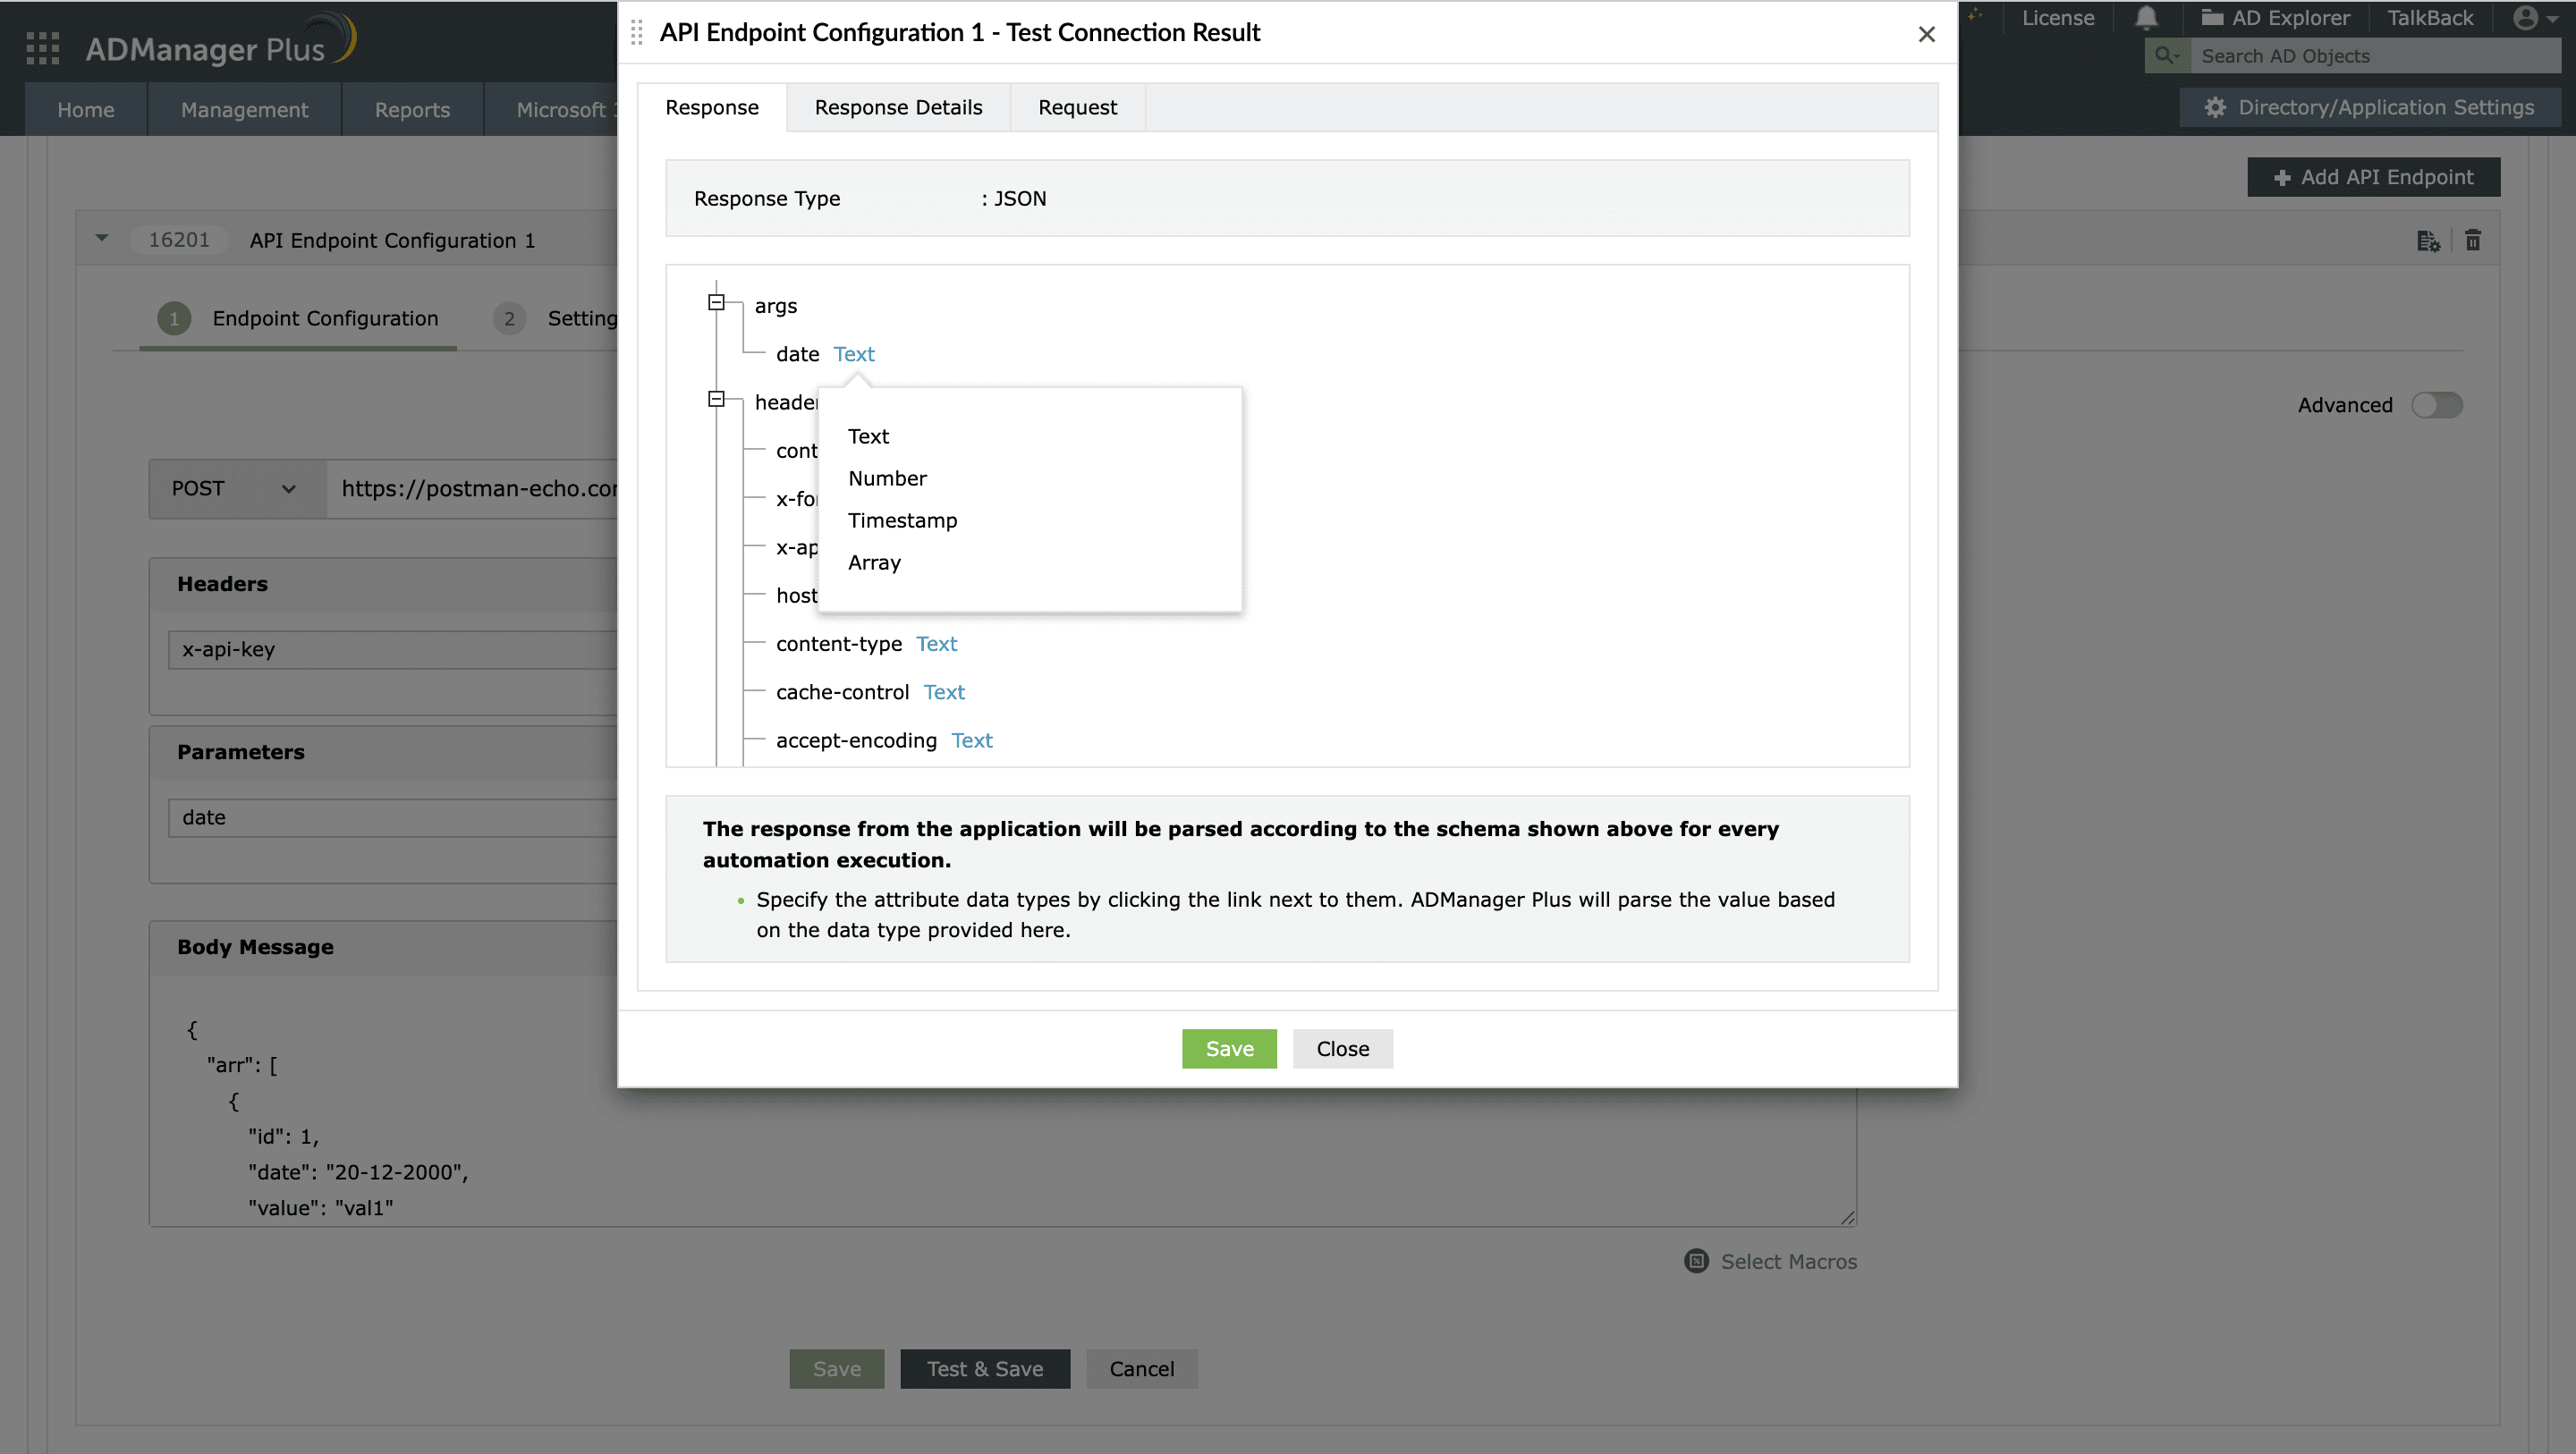
Click any data type field to open the drop-down menu and select Array.
Enter the condition value in the text box.
Click Save.
Now, you can use this column to map with any LDAP attribute.
Inbound webhook configuration test connection result showing a parsed JSON response schema, where attribute data types such as text, number, timestamp, and array can be selected for endpoint configuration.
Steps to configure a SOAP API endpoint
You have to follow all the steps mentioned in the inbound webhook configuration section except for this step. When the Message Type is set to XML, ADManager Plus requires the Response Parser CSV file. This file helps in filtering only the required data from the endpoint's XML response. The filtered attributes can then be linked to the AD LDAP attributes.
The CSV file should have three columns as given below:
columnName: This is the desired name for the data to be filtered from the XML response.
xPath: This is the location where the data is to be fetched from.
isParameter: If set to 1, it will become an iterating attribute during repeated calls. For example, if a node named Page in the message body needs to increase by an increment of one during each call, the isParameter for Page is set to 1.
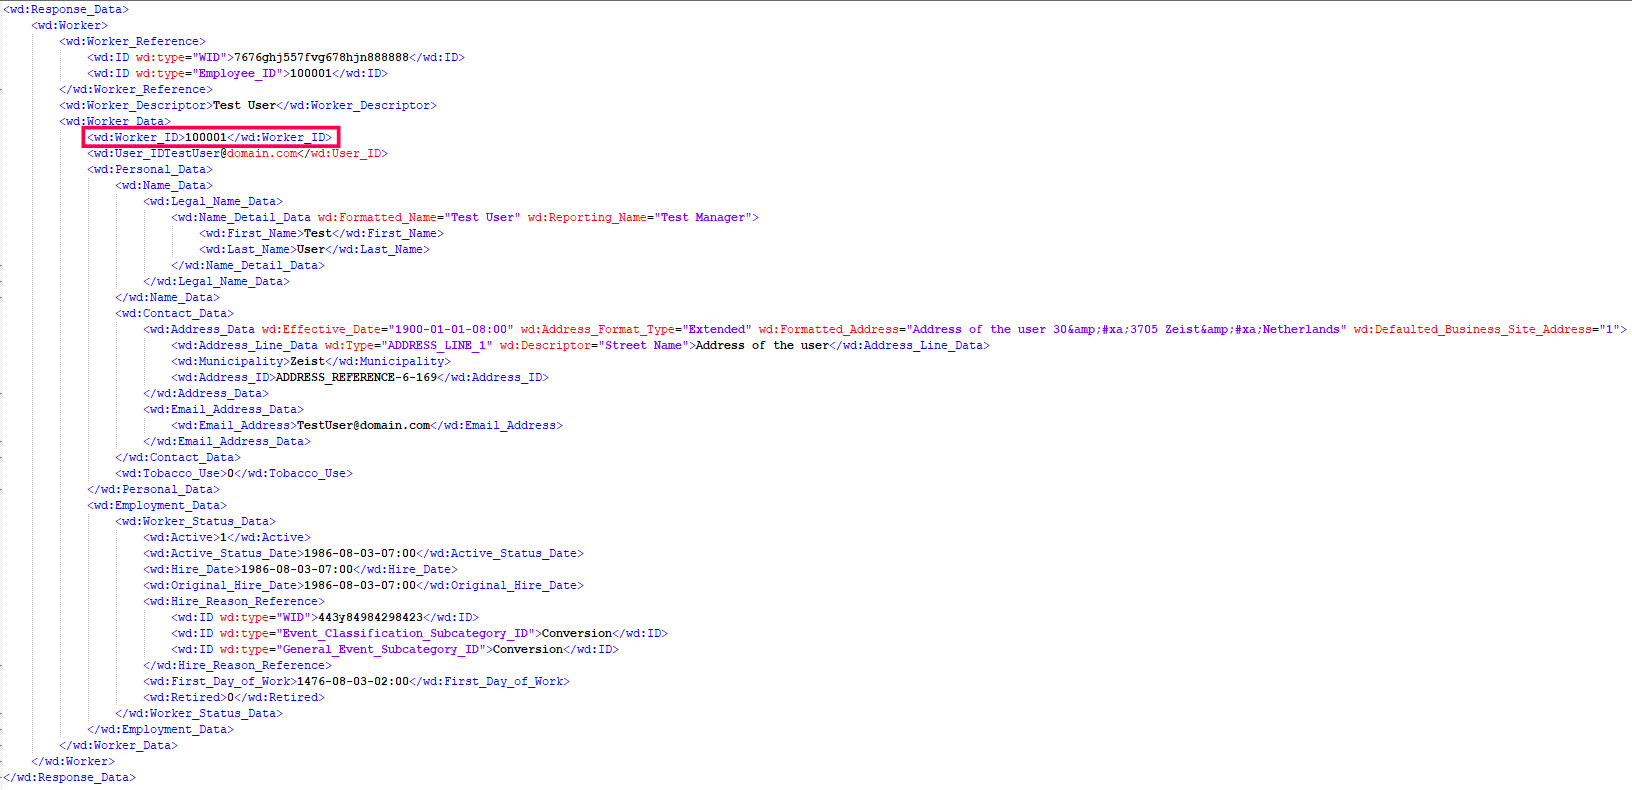
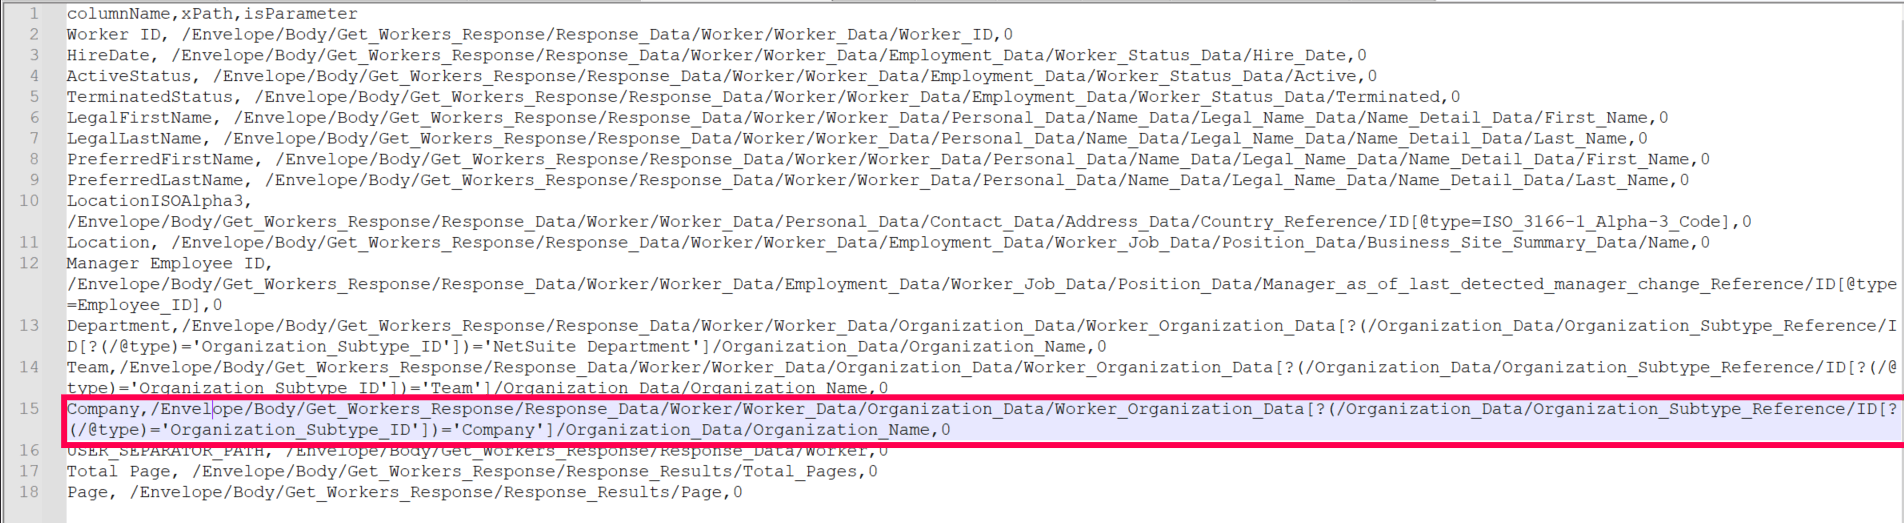
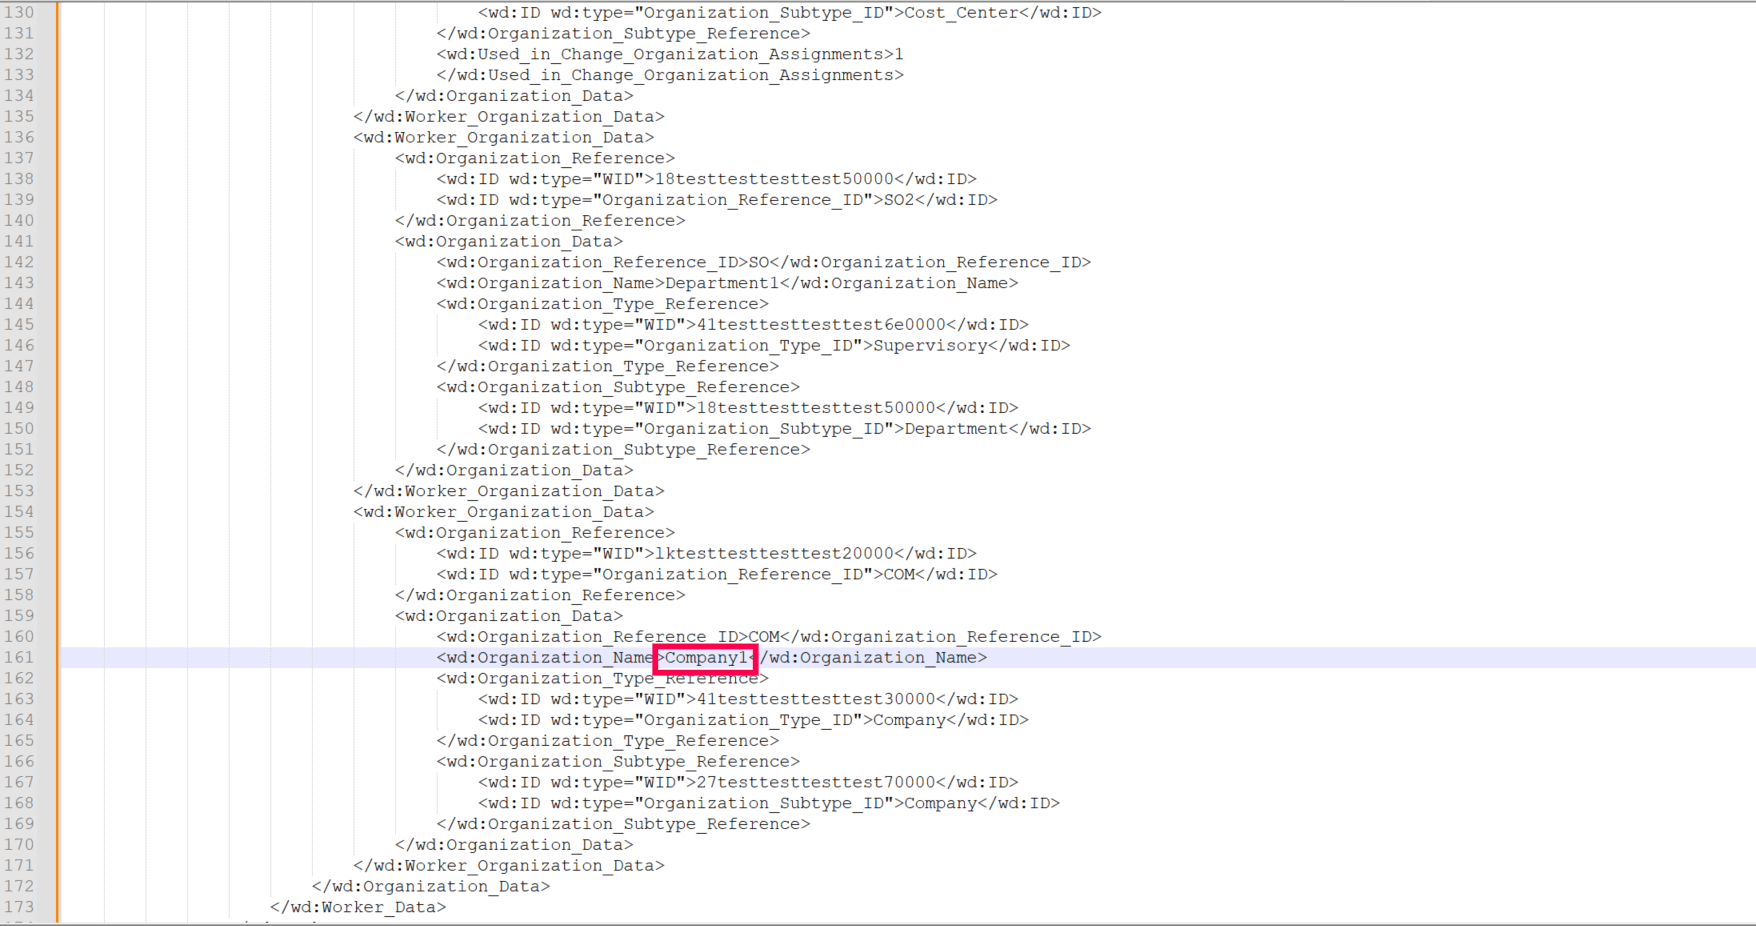
For example, as shown in the images below, the value for the columnName Worker ID as highlighted in the sample CSV file is extracted from the attribute Worker_ID(value:100001) as highlighted in the sample XML response. This value can be mapped to the AD LDAP attribute employeeID later.
Value-based indexing is a technique used to efficiently locate and retrieve data by applying specific conditions to its values. This approach enables users to create a specific xPath, allowing them to efficiently find entries that match defined criteria.
As shown in the images below, the value for the Company column in the sample CSV file is taken from the Organization_Name attribute (value: company1), highlighted in the second image. Since there are multiple entries of Worker__Organization_Data, an additional condition (Organization_Subtype_ID='company') is set to specify the correct Worker_Organization_Data. This means that the final value is selected based on a condition tied to another specific value.
This xPath filters the data under Worker_Organization_Data by checking if the Organization_Subtype_ID equals Company. It then returns the Organization Name of the matching condition.
To create a condition, follow these steps:
Identify the data field you want to filter (e.g., Organization_Subtype _ID).
Specify the value to match (e.g., Company).
Apply the condition in the form [?(searchpath = 'value')] to filter based on the selected attribute.
This approach enables creation of a precise xPath and results based on a defined condition.
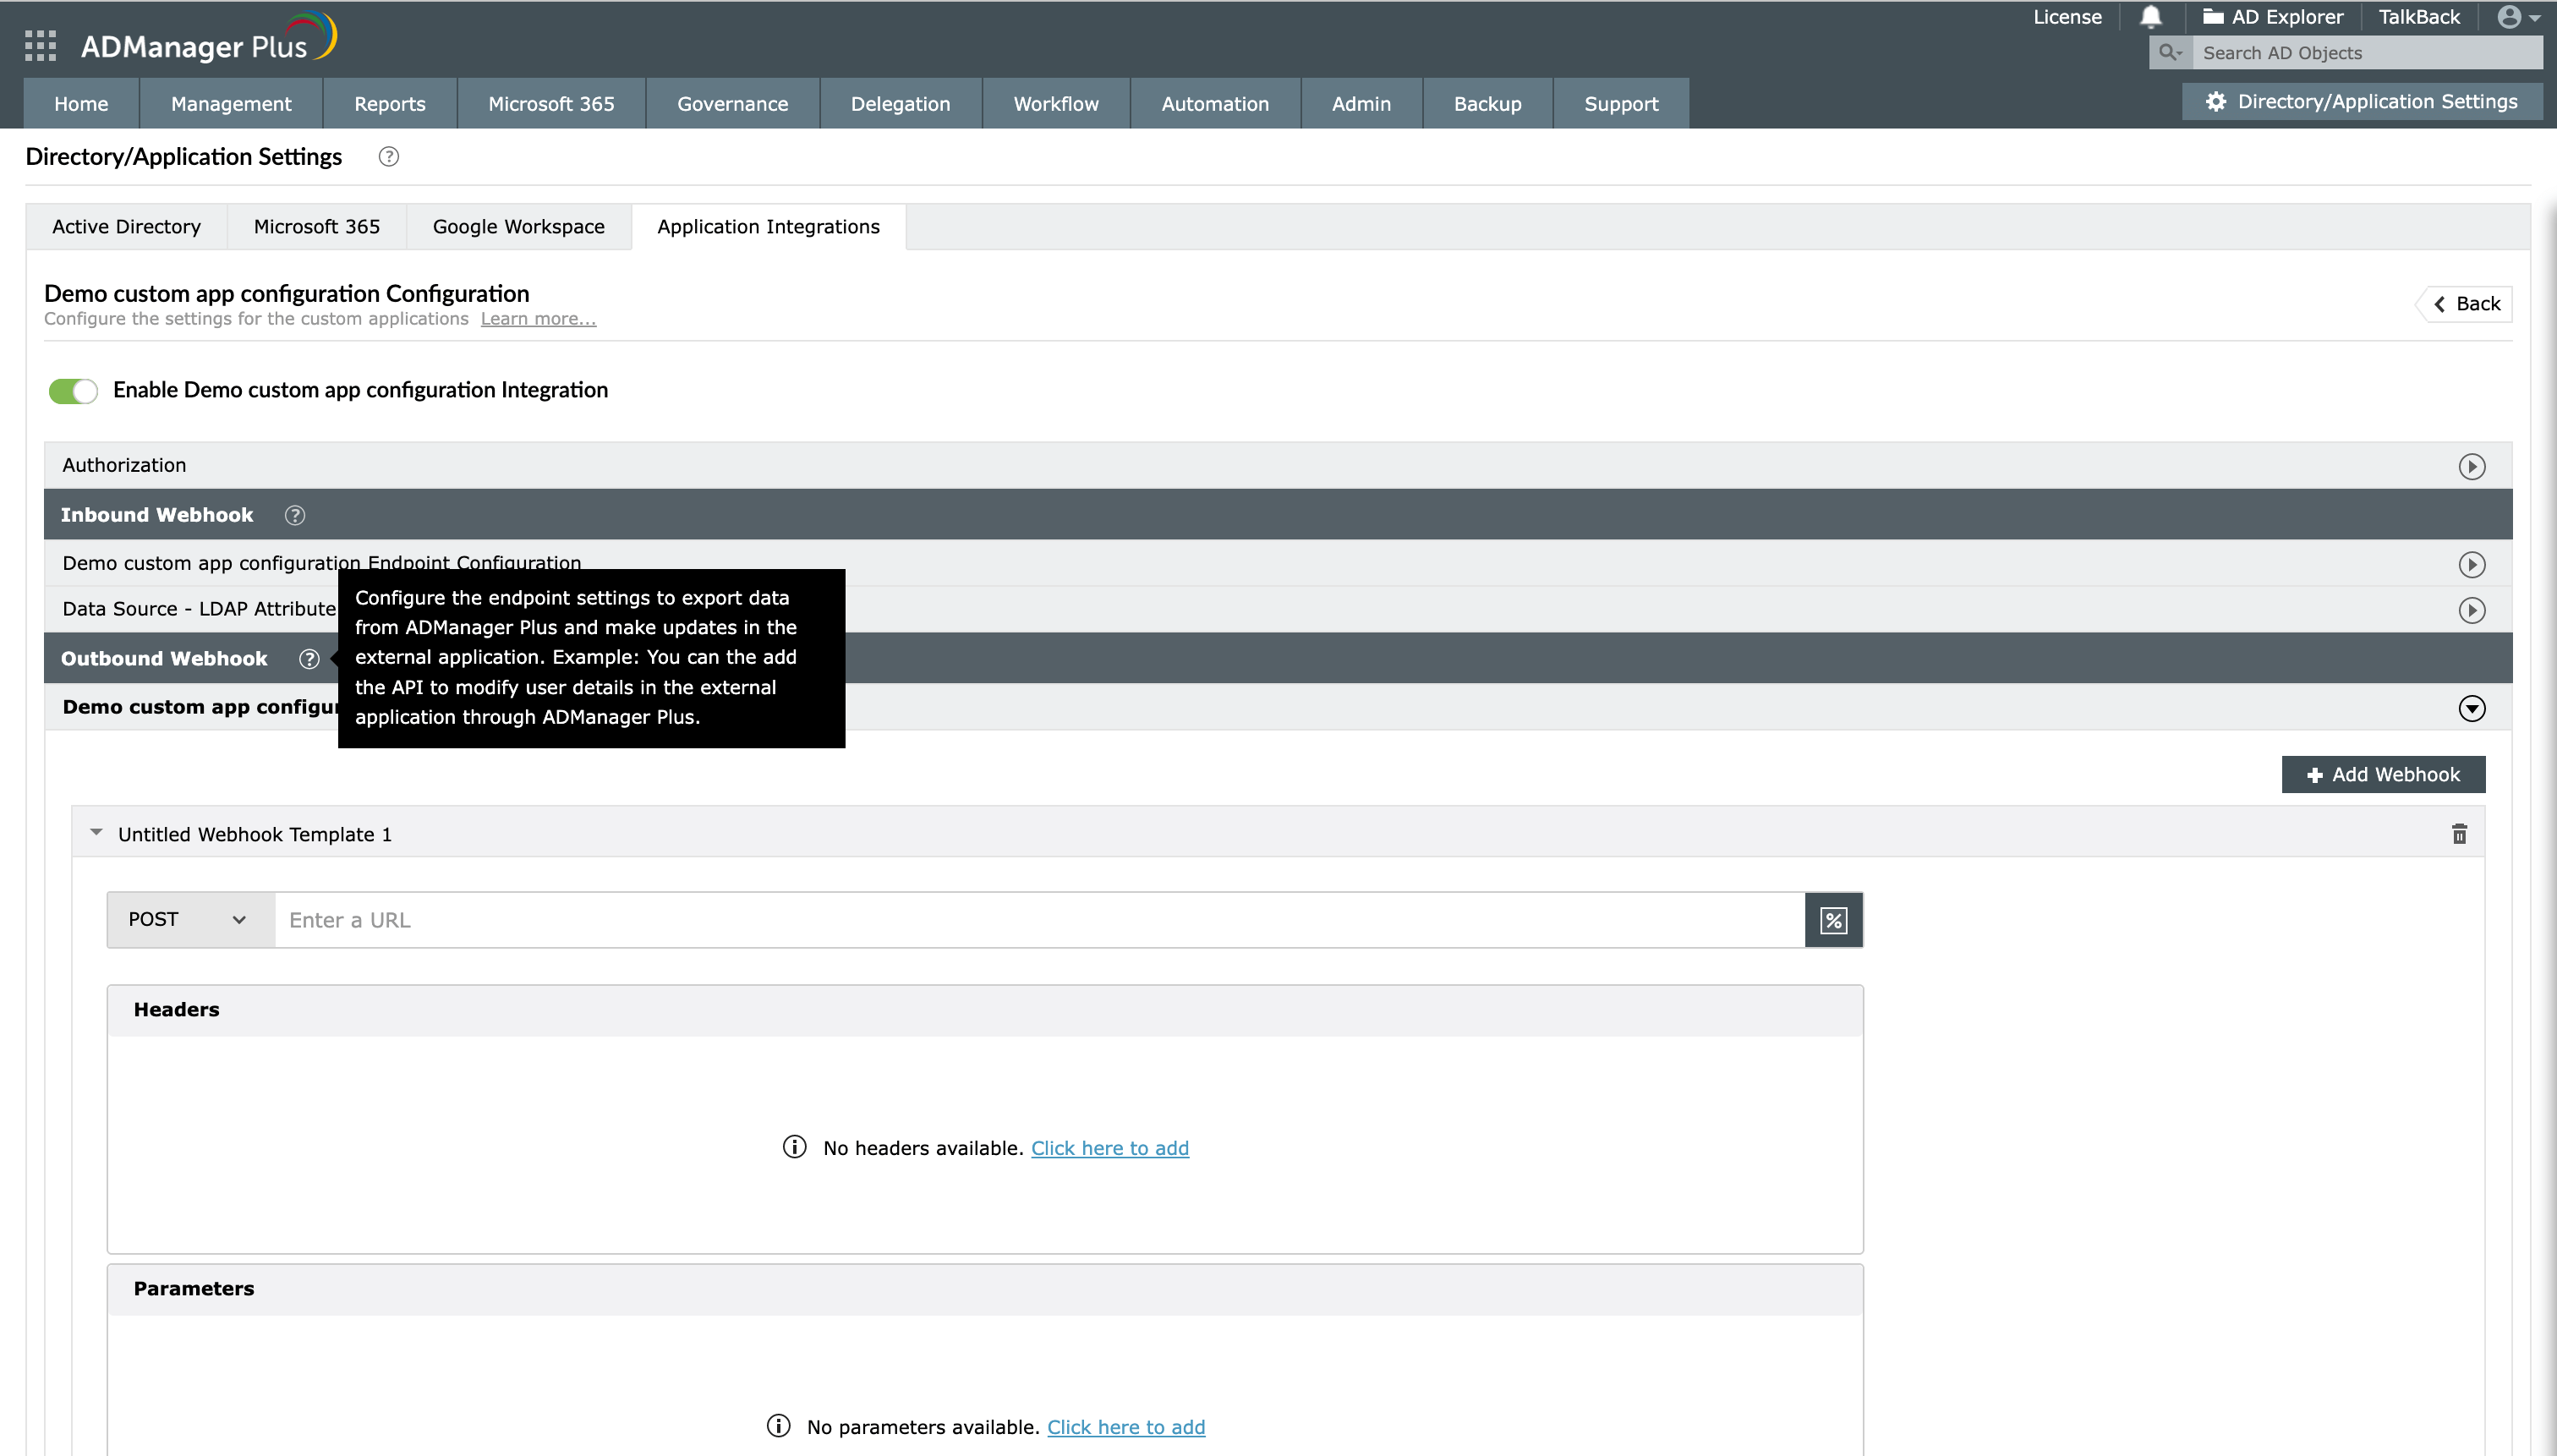
An outbound webhook enables you to send the changes made in AD using ADManager Plus to the custom application. To configure an outbound webhook:
Under Outbound Webhook, click <Custom application > Webhook Configuration.
Click + Add Webhook.
Enter a name and description for this webhook.
Refer to the custom application's API references, decide on the action that has to be performed, and identify the API that is required to perform the action.
From the drop-down, select the HTTP method that will enable you to perform the desired action on the endpoint.
Enter the Endpoint URL. It will vary according to the data that you want to transfer to the application.
For example: The endpoint URL used to update user attributes will be different from the endpoint URL used to update the recently changed passwords of users. Refer to the API documentation of the application that you are integrating with ADManager Plus.
Configure the Headers, Parameters, and Message Type in the appropriate format based on the API call for the action you would like to perform.
Click Test and Save. A pop-up window will then display a list of users and groups.
Select the desired users and groups on which this API request has to be tested and click OK. This will make a real-time call to the endpoint URL to execute the configured API's function on the selected objects.
A pop-up window will then display the webhook response and request details. If you are unable to receive the response for the API request, ensure that the mapped attributes, headers, parameters, and request message are correct.
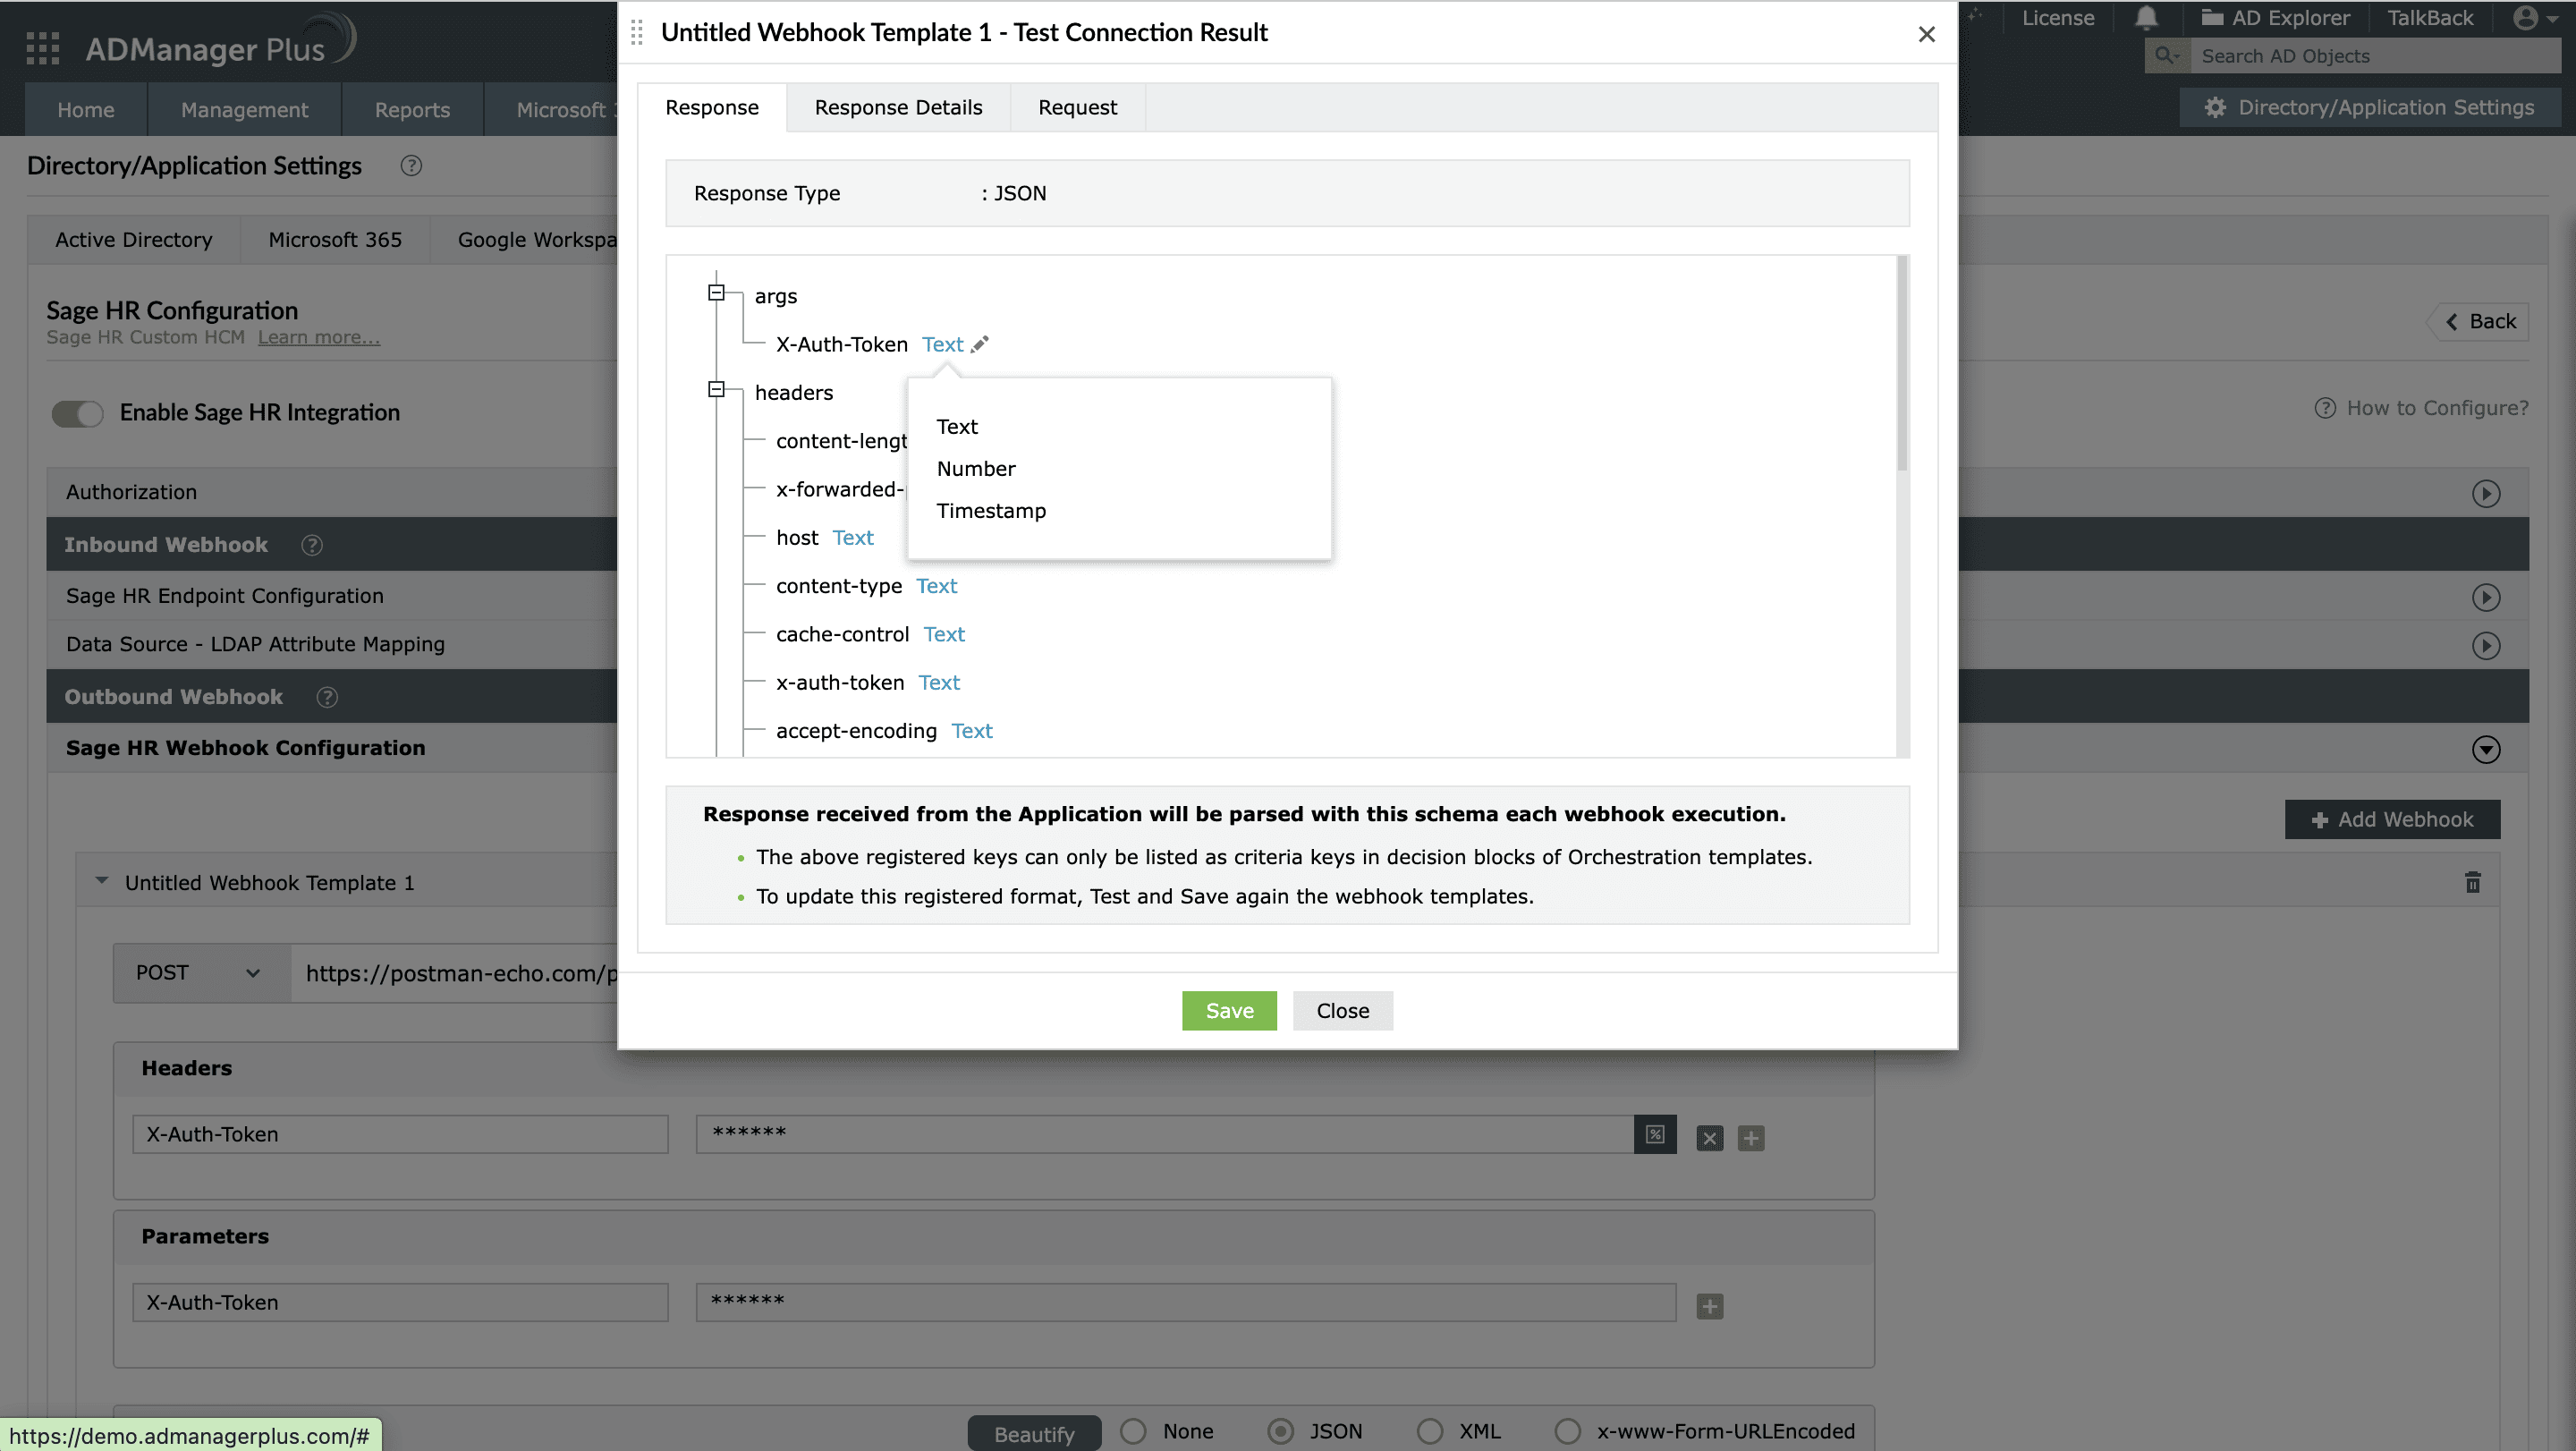
Note In the webhook response window, you can modify the data type or format of the attribute value fetched by the API call by using the edit option.
For example: The date format used in the integrated app might be different from the date format used in ADManager Plus. To resolve this, use the edit option in the response window to modify the date format.
Outbound webhook configuration test connection result allowing administrators to define data types for headers and parameters used during webhook execution.
How to use attributes supported by macros
You can either type % or click to add the macros of your choice in the Enter a URL, Headers, and Parameters fields.
If you have to add the macros in the message body, click Select Macros.
How to use outbound webhooks
After you configure an outbound webhook for the required action, use it as a block in an orchestration template. The configured Orchestration Template can be executed using event-driven automations, scheduled automations, or automation policies. It can also be applied directly to the desired users to perform a sequence of actions on them under Management > Advanced Management > Orchestration.
 .
.