Microsoft DNS management
The Domain Name System (DNS) plays a vital role in enterprise networks by translating domain names into IP addresses, ensuring seamless communication between devices and applications. However, managing DNS servers manually can be challenging, as it involves tracking thousands of records and maintaining multiple zones spread across distributed environments.
OpUtils Microsoft DNS management enables administrators to add DNS servers, automate scans with periodic schedules, and keep zone and record data up to date. It offers centralized visibility for efficient tracking and management of DNS infrastructure. Communication with DNS servers is securely handled via WinRM (Windows Remote Management) for safe and reliable operations.
What is DNS management?
DNS management is the process of maintaining and overseeing DNS zones and records to ensure accurate and consistent name resolution within a network. DNS data is organized as records such as A, AAAA, CNAME, MX, and NS within zones, each serving a specific purpose in mapping domain names to IP addresses or other resources.
Efficient DNS management helps prevent name resolution errors, reduce downtime, and avoid IP conflicts, ensuring uninterrupted communication across enterprise networks.
Current capabilities of DNS management in OpUtils
At present, OpUtils lets you add your DNS server from Settings → IP Address Manager → General within the console. The added DNS server is used for name resolution purposes to translate hostnames into IP addresses during IP tracking and lookup operations.

OpUtils also sends alerts via email or syslog for DNS lookup issues such as Reverse Lookup Failed, Forward Lookup Failed, or Forward Lookup Returning a Different IP, enabling administrators to quickly detect and address potential resolution inconsistencies.
Forward and Reverse lookup zones
To manage and resolve names efficiently in a network, it’s essential to understand how forward and reverse lookup zones function and how they organize DNS data.
Understanding lookup zones
In DNS, zones are used to organize and manage name resolution data. Each zone can handle either forward or reverse lookups:
- Forward lookup zones: Used to resolve hostnames to IP addresses.
- Reverse lookup zones: Used to resolve IP addresses to hostnames, typically using PTR records.
These zones help ensure accurate name resolution across devices in the network.
Zone types
Both forward and reverse lookup zones can be categorized as one of the following standard types:
- Primary zone: The main, writable copy of the DNS database.
- Secondary zone: A read-only copy that receives updates from a primary zone through zone transfers.
- Stub zone: A minimal zone containing only references to authoritative servers for a specific domain.
DNS Zone Management with OpUtils
Managing DNS zones efficiently is crucial for maintaining the integrity and performance of your network’s DNS configurations. With OpUtils, administrators can seamlessly configure and adjust DNS settings.
Step 1: Create a Zone
Before diving into DNS zone management, you first need to create a DNS zone. A DNS zone is essentially a container for records in the Domain Name System. These records include vital information such as IP addresses, mail servers, and more. Once a zone is created, you can configure various parameters and manage DNS records.


Step 2: Advanced configuration for Primary DNS zone
In Microsoft DNS, zones hold all the resource records that define how names are resolved within a domain. To help administrators manage these zones more efficiently, OpUtils offers an advanced configuration view for primary DNS zone, bringing together replication, SOA details, and zone transfer settings in a single pane.
1. Zone replication and scavenging
This section allows administrators to define how and where zone data is stored and replicated.
- Store zone details in: Choose whether the DNS zone data is stored in Active Directory or as a Zone File.
- Active Directory replication scope: Specify the replication scope as Domain, Forest, Legacy, or Custom, determining how zone data is propagated across domain controllers.
- Dynamic update type:
- Secure updates only (recommended): This allows updates only from authenticated clients.
- Secure and non-secure updates: Choosing this option accepts updates from any source, though less secure.
- No dynamic updates: This disables automatic record updates for static environments.
- Zone aging and scavenging:
- Enable automatic scavenging of stale DNS records to prevent clutter and ensure record freshness.
- Configure No-refresh and Refresh intervals to control how frequently records are validated and renewed.
Benefit: This helps maintain DNS hygiene by automatically removing outdated resource records and ensuring data consistency across replicated environments.
2. Name servers and SOA (Start of Authority) configuration
The Name Servers & SOA tab provides visibility into the zone’s authoritative configuration details.
- Name Servers: View or specify the fully qualified domain names (FQDNs) of the DNS servers authoritative for this zone.
- Start of Authority (SOA) details:
- Serial number denotes the version of the zone file, used to trigger updates to secondary zones.
- Primary server identifies the main authoritative DNS server for the zone.
- Responsible contact email address of the administrator responsible for zone management.
- Timing parameters:
- Refresh interval: Defines how frequently secondary servers check the primary server for zone updates.
- Retry interval: Specifies how long secondary servers wait before retrying after a failed refresh attempt.
- Expire after: Determines when secondary servers should discard the zone data if no updates are received from the primary server.
- Minimum TTL: Sets the minimum duration that other DNS servers or clients should cache the zone’s records.
Benefit: This ensures transparency in authority configuration and helps admins verify synchronization and zone update intervals.
3. Zone transfers configuration
The final configuration step defines zone transfer policies, which determine which DNS servers are authorized to receive zone data from the primary server.
- Enable zone transfers: Turn on or off the transfer of zone data to secondary DNS servers.
- Zone transfer to: Define whether transfers are allowed to any server or restricted to specific authorized servers.
- Automatic notifications: Enable notifications to authoritative name servers whenever zone data changes, ensuring secondary zones remain synchronized.
Benefit: Properly configured zone transfers enhance DNS redundancy and prevent unauthorized replication of zone data.
Through the advanced configuration interface, OpUtils provides complete visibility into zone replication, authority, and transfer settings, giving network administrators a clear overview of how each DNS zone operates.


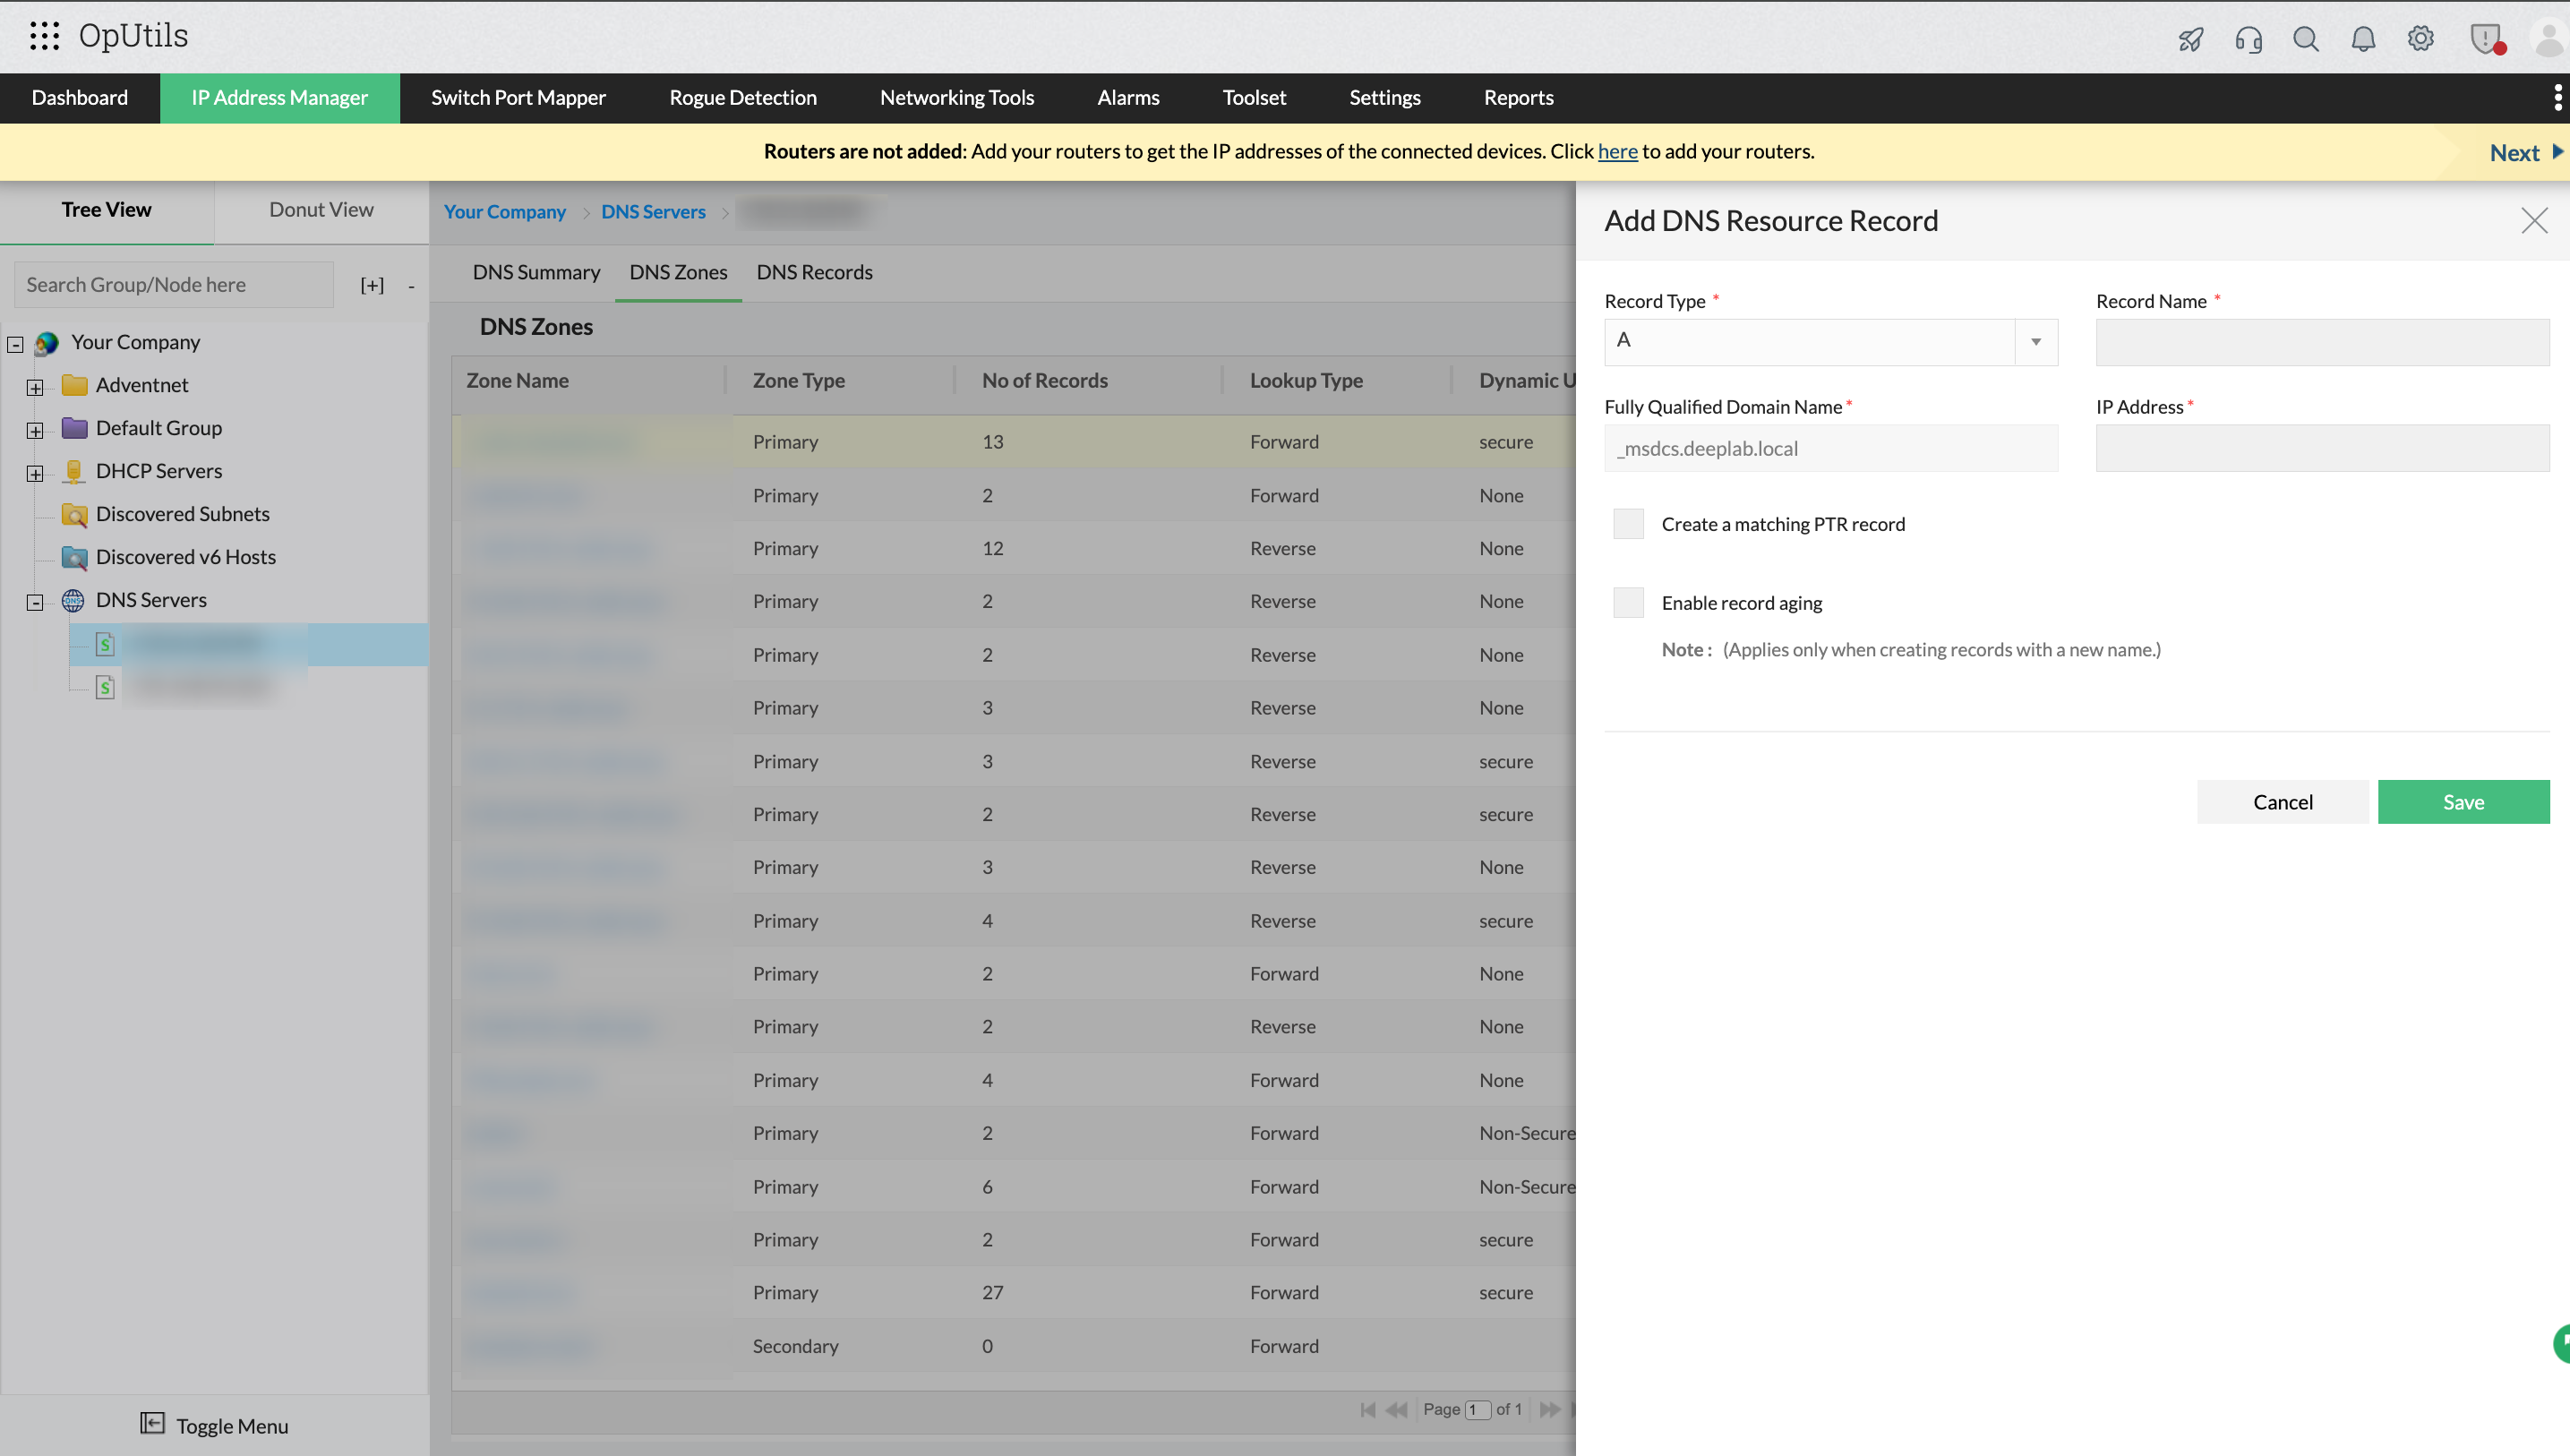
Step 3: Adding DNS resource records
Once a DNS zone is created and configured, administrators can add new resource records to define hostname-to-IP or server-to-service mappings. In OpUtils, this process is designed to be straightforward and consistent with Microsoft DNS conventions.
How to add a DNS record in OpUtils
To create a new DNS record:
1. Record type: Choose the type of record to create.
2. Supported types:
- A (Address record): Maps a hostname to an IPv4 address.
- AAAA (IPv6 address record): Maps a hostname to an IPv6 address.
- NS (Name Server record): Identifies the authoritative DNS servers for a zone.
- CNAME (Canonical Name record): Maps an alias name to the true (canonical) domain name.
- SRV (Service Locator record): Specifies the location (hostname and port) of servers providing specific services.
- MX (Mail Exchange record): Defines mail servers responsible for receiving email for a domain.
- PTR (Pointer record): Maps an IP address to its corresponding hostname, enabling reverse DNS lookups.
3. Fully Qualified Domain Name (FQDN) for target host: Specify the complete hostname (for example, server01.example.com) for the record.
4. Enable record aging: Enable this option to apply scavenging settings that automatically remove stale records.
Note: Record aging applies only when creating records with a new name.
After filling in the required details, click Save to add the record. The newly created record will be reflected in the selected zone’s record list within OpUtils.
Note: Currently, OpUtils supports viewing and adding A, AAAA, NS, CNAME, SRV, PTR, and MX records. Editing or deleting existing records will be available in a future update.

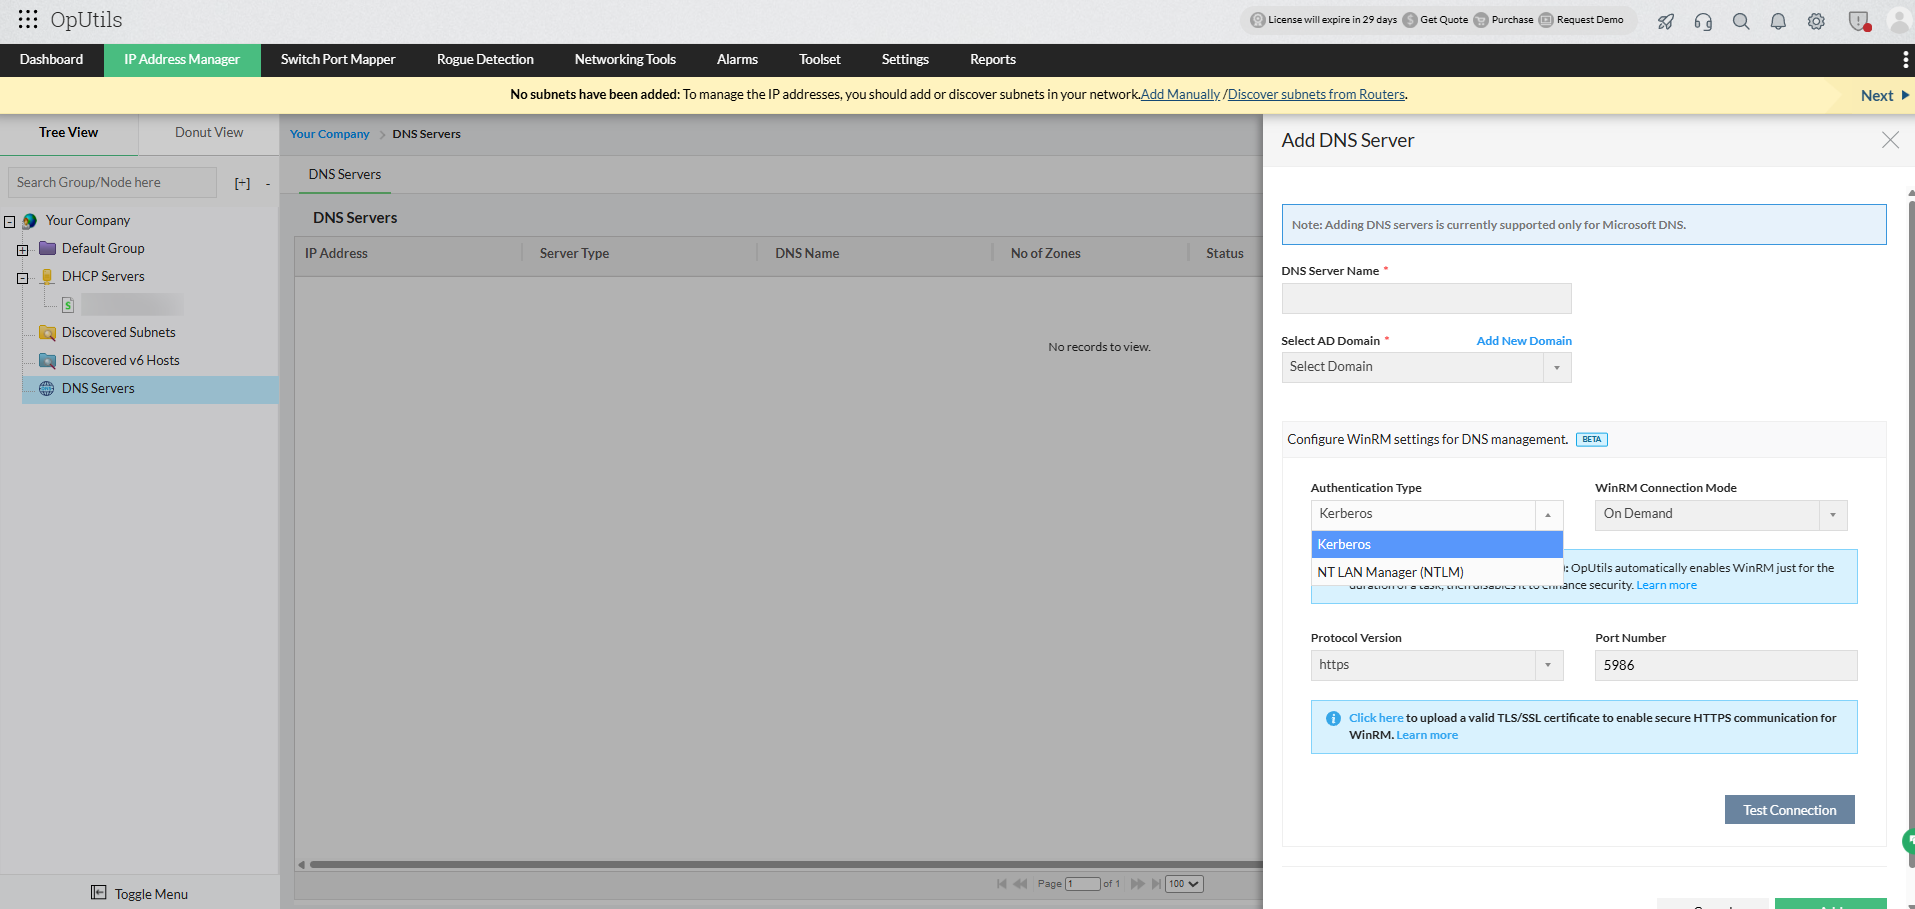
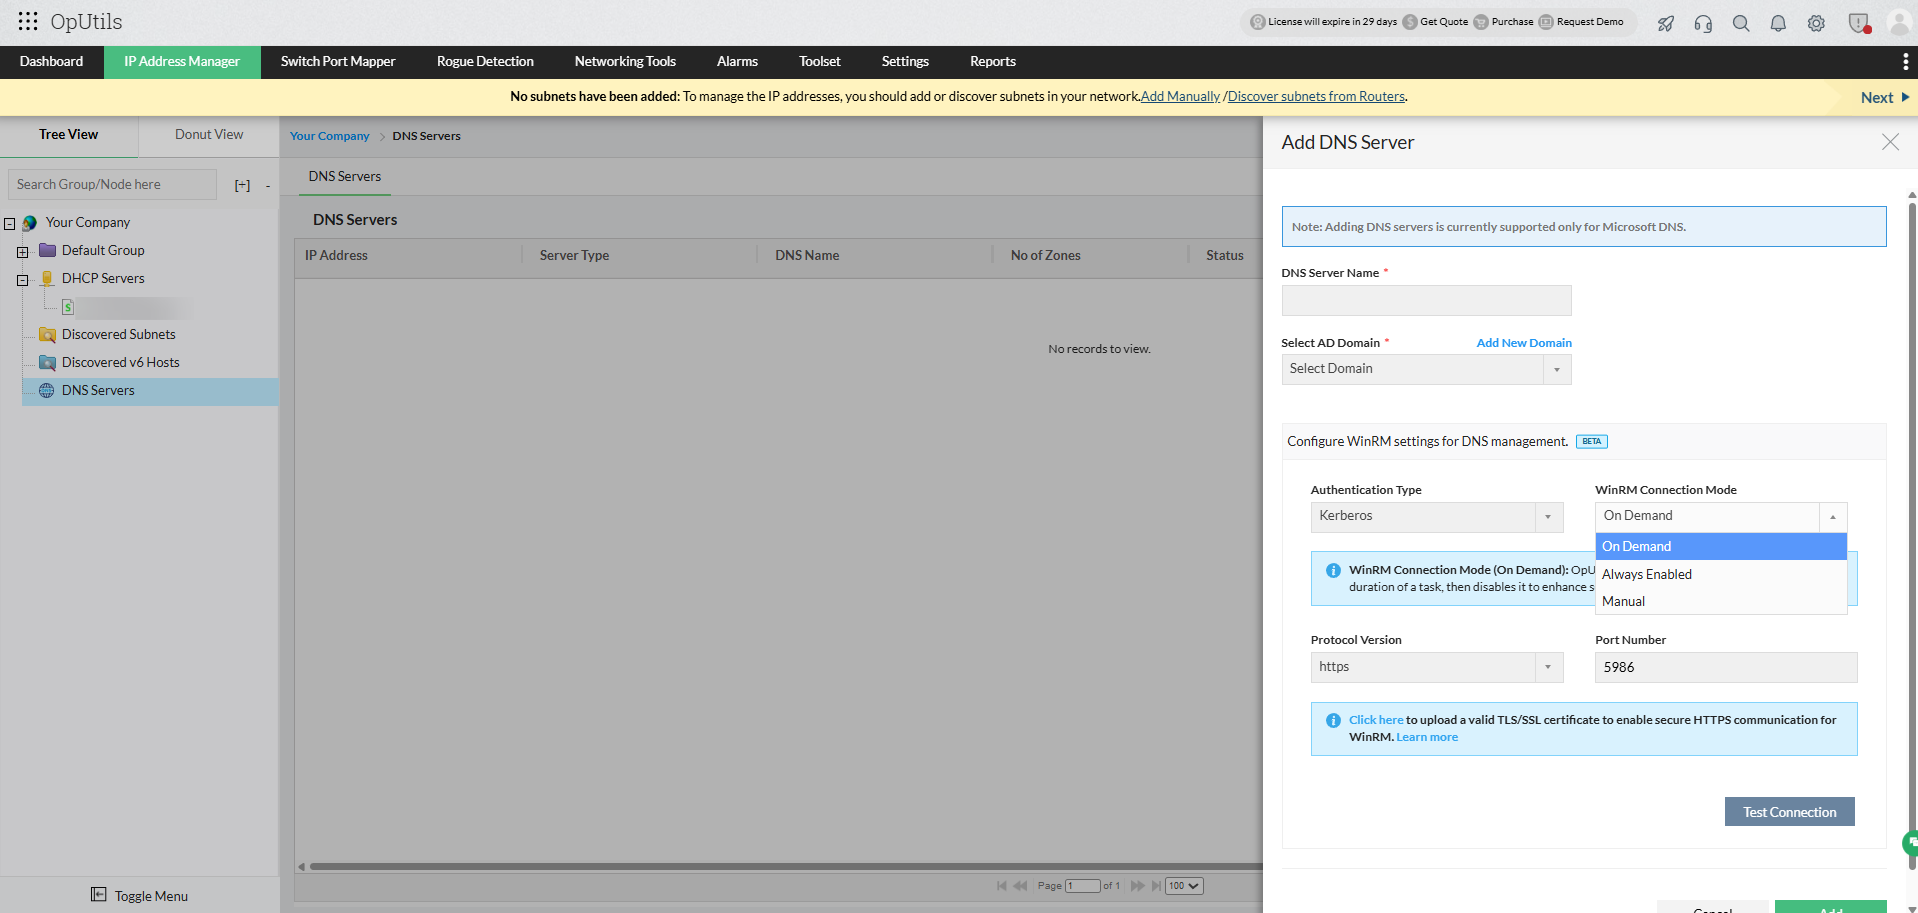
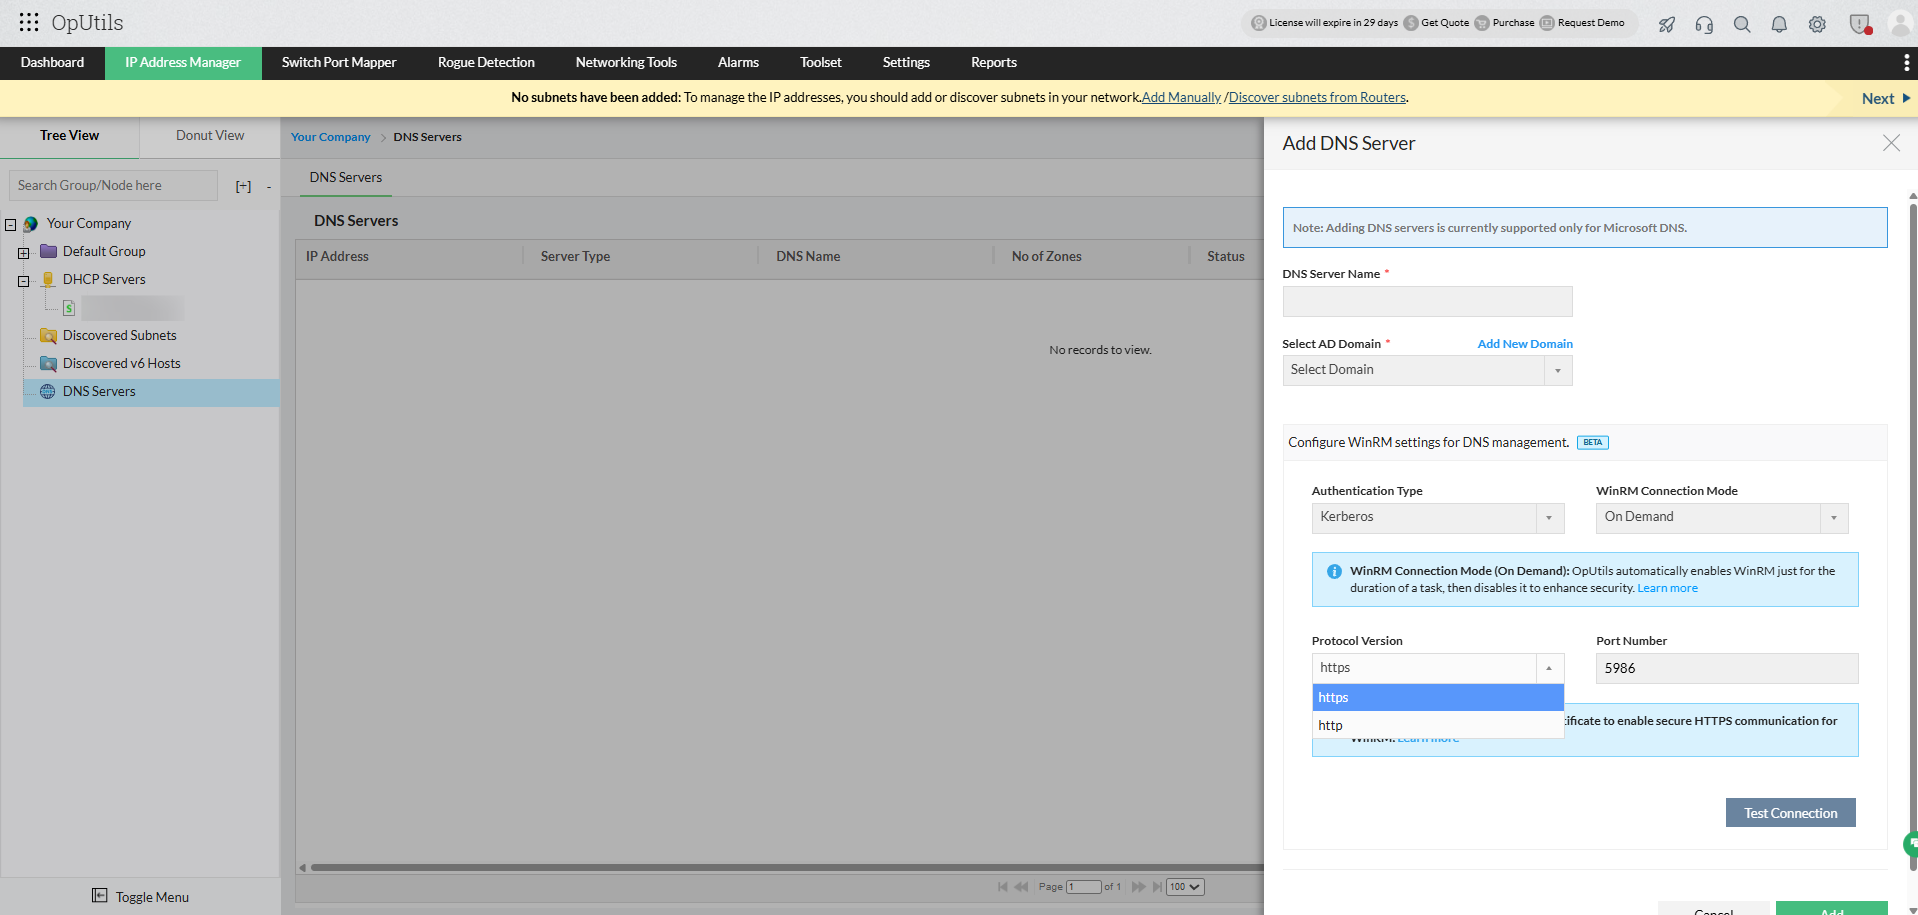
WinRM-based integration
OpUtils uses WinRM (Windows Remote Management) for secure, agentless communication with Microsoft DNS servers, enabling direct zone and record management. It supports Kerberos and NTLM authentication with on-demand or always-on connection modes. Ensure a valid SSL certificate, domain trust, and an open port 5986 (customizable) for seamless connectivity.

To learn more about secure integrations, see our DNS WinRM guide.
Managing Microsoft DNS with OpUtils simplifies zone and record administration, enhances name resolution accuracy, and provides administrators with unified visibility into DNS zones, records, and replication settings, all from a single console.
Get started with OpUtils Microsoft DNS management today by downloading a 30-day free trial, or schedule a free personalized demo, and our product experts will walk you through the setup and capabilities.