Migrating from ADSelfService Plus 32-bit to ADSelfService Plus 64-bit
This article will help you migrate from ADSelfService Plus 32-bit version to the 64-bit version.
Before you begin
- 32-bit to 64-bit migration is possible only between the same builds. For example, you cannot migrate from a 32-bit version of build 5310 to a 64-bit version of build 5311 or 5309.
- Please upgrade your 32-bit version of ADSelfService Plus to the latest build using the service pack before migration. This will ensure that the above point does not become an issue.
- Please take a backup of the ADSelfService Plus directory before you proceed. If you are going to install the 64-bit version in a new machine, then do not uninstall ADSelfService Plus from the old machine until the new installation works fine.
Performing the migration
Step 1: Identify the database
- Open the ADSelfService Plus installation directory (By default: C:\Program Files\ManageEngine\ADSelfService Plus).
- Navigate to the conf folder in the ADSelfService Plus installation directory (By default: C:\Program Files\ManageEngine\ADSelfService Plus\conf).
- Open database_params.conf file in a text editor and identify the database that is being used by ADSelfService Plus in your environment.
- If the database is PostgreSQL, then continue with Step 2.
- If the database is MySQL or MS SQL, then contact ADSelfService Plus support for further guidance.
Step 2: Back up the database
Method 1: Offline manual backup
- Start the Command Prompt as an administrator by right-clicking Command Prompt and selecting Run as Administrator.
- Navigate to the bin folder in the installation directory (By default: C:\Program Files\ManageEngine\ADSelfService Plus\bin) by using the cd command.
- Now, execute the command backupDB.bat to back up the database.
- A folder named Backup will be created in the ADSelfService Plus installation directory (By default: C:\Program Files\ManageEngine\ADSelfService Plus\Backup) and it will contain the database back-up in compressed file format (e.g., OfflineBackup_20230926151025.ezip).
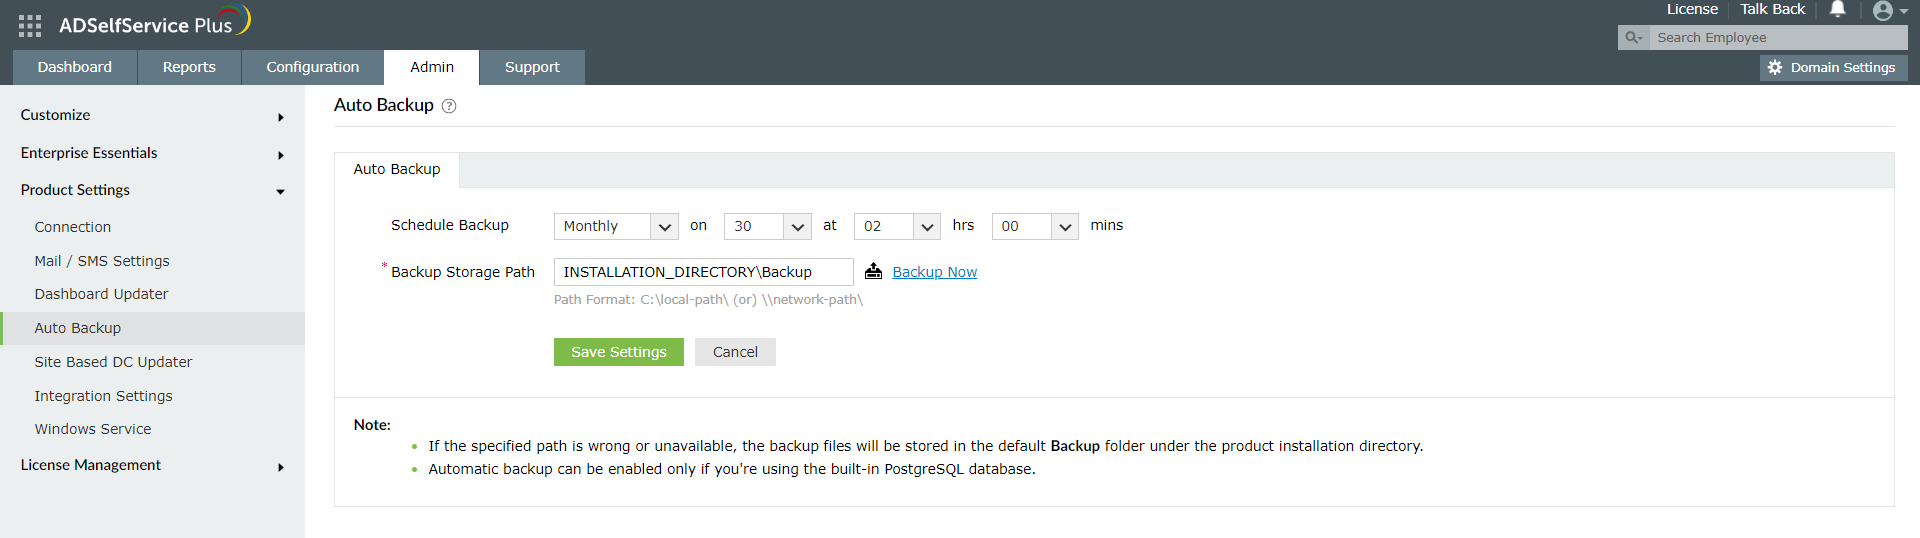
Method 2: Backup using the ADSelfService Plus admin portal
- Log in to the ADSelfService Plus portal with admin credentials.
- Go to Admin > Product Settings > Auto Backup.
- In the Auto Backup page, enter your preferred file path (By default the installation directory file path will be mentioned).
- Click on Backup Now.
- A folder named Backup will be created at ADSelfService Plus installation directory (By default: C:\Program Files\ManageEngine\ADSelfService Plus\Backup) and it will contain the database back-up in compressed file format (e.g., 081224-1547.ezip)
Step 3: Back up the necessary files
- Backup the ZohoCreator file: Copy the ZohoCreator.properties file present in ADSelfService Plus conf folder under the installation directory (Default location: C:\Program Files\ManageEngine\ADSelfService Plus\conf\ZohoCreator.properties).
- Back up all patch files (Optional): Copy the patch folder present in ADSelfService Plus installation directory (Default location: C:\Program Files\ManageEngine\ADSelfService Plus\patch).
- Back up all customized language files (Optional): Navigate to the installation directory, and copy the resources folder within. (Default location: C:\Program Files\ManageEngine\ADSelfService Plus\resources)
- Back up the customized login page (Optional): Navigate to the adssp folder under the installation directory, and copy the html, images, resources, and styles folders (Default location is C:\Program Files\ManageEngine\ADSelfService Plus\webapps\adssp).
- Back up all SSL certificates (Optional): If you have enabled the HTTPS option for ADSelfService Plus in the old machine, then, navigate to the conf folder in the installation directory, and copy the server.xml, web.xml, and SSL keystore. (For example: server.keystore) files (Default location is C:\Program Files\ManageEngine\ADSelfService Plus\conf).
- Backup the MPM folder (Optional): If you have enabled the mobile app deployment feature, then, backup the MPM folder (Default location: C:\Program Files\ManageEngine\ADSelfService Plus\MPM).
Note: The reason we are backing up folders from the old machine is because some folders can be lost during the migration process. Lost files, like the language or login agent-related files, should be restored in the new machine. If they are not restored, any customizations made to the language file or the login agent will not work correctly in the new machine.
Step 4: Restore the database in the new server
- Uninstall ADSelfService Plus.
- Download and install ADSelfService Plus 64-bit. Its build number should be the same as the 32-bit version you were running.
Note: In case you want to continue with the older version of ADSelfService Plus and not able to find the older build of ADSelfService Plus, then contact ADSelfService Plus support for assistance.
- Stop ADSelfService Plus whether it is being run as an application or as a service.
- If you have followed the steps under Step 3, then:
- Paste the ZohoCreator.properties file under ADSelfService Plus conf folder under the ADSelfService Plus installation directory (Default location: C:\Program Files\ManageEngine\ADSelfService Plus\conf\).
- Paste the patch folder under the installation directory (By default: C:\Program Files\ManageEngine\ADSelfService Plus).
- Paste the resources folder under the installation directory (By default: C:\Program Files\ManageEngine\ADSelfService Plus).
- Paste the html, images, resources, and styles folders in the adssp folder. (By default: C:\Program Files\ManageEngine\ADSelfService Plus\webapps\adssp).
- Paste the server.xml, web.xml, and the SSL keystore files in the conf folder (Default location: C:\Program Files\ManageEngine\ADSelfService Plus\conf).
- Paste the MPM folder under the installation directory (By default: C:\Program Files\ManageEngine\ADSelfService Plus).
- Copy the customer-config.xml from the existing old conf folder, rename the file to new-customer-config.xml and place that in the conf folder of the new installation directory (Default location: C:\Program Files\ManageEngine\ADSelfService Plus\conf).
- Copy and paste the compressed (ZIP) file (from Step 2) under the bin folder (By default: C:\Program Files\ManageEngine\ADSelfService Plus\bin).
- Start the Command Prompt as an administrator.
- Navigate to bin folder (By default: C:\Program Files\ManageEngine\ADSelfService Plus\bin)
- Now, execute the following command:
restoreDB.bat compressed_file_name.zip -p <password>
E.g.:restoreDB.bat 081224-1547.zip -p <password>
The password for the database backup file could be one of two types:
- Default password: This is the reverse string of the filename. For the filename mentioned above, the password would be "7451-422180".
- Admin-configured password: This is the custom password that was configured in the admin portal before creating the database backup. The Change Password For Database Backup Files option under Admin → Connection → General Settings is used for this.
- If you have forgotten the password to the backup file, but have access to the ADSelfService Plus installation directory, the encrypted password can be obtained from the customer-config.xml file (Default location: C:\Program Files\ManageEngine\ADSelfService Plus\conf\customer-config.xml), and you can contact support@adselfserviceplus.com to decrypt it.
- If not, the backup will be inaccessible and a new backup will have to be created.
- You should’ve now successfully migrated from the 32-bit version of ADSelfService Plus to the 64-bit.
- If you face any issues in the migration process or have any feedback for improving this article, please let us know by contacting support@adselfserviceplus.com
Highlights of ADSelfService Plus
Allow Active Directory users to self-service their password resets and account unlock tasks, freeing them from lengthy help desk calls.
Get seamless one-click access to 100+ cloud applications. With enterprise single sign-on, users can access all their cloud applications using their Active Directory credentials.
Intimate Active Directory users of their impending password and account expiry via email and SMS notifications.
Synchronize Windows Active Directory user passwords and account changes across multiple systems automatically, including Microsoft 365, Google Workspace, IBM iSeries, and more.
Strong passwords resist various hacking threats. Enforce Active Directory users to adhere to compliant passwords by displaying password complexity requirements.
Enable Active Directory users to update their latest information themselves. Quick search features help admins scout for information using search keys like contact numbers.
