How to configure SAML-authenticated self-service password reset in ADSelfService Plus
In this article
Objective
ADSelfService Plus supports SAML authentication as one of its multi-factor authentication (MFA) methods for self-service password reset (SSPR) and account unlock. Using the SAML 2.0 standard, ADSelfService Plus verifies user identities through a trusted identity provider (IdP)—such as Okta, OneLogin, or any custom SAML-compliant IdP—before allowing users to reset their Active Directory (AD) or LDAP directory passwords or unlock their accounts without contacting the help desk.
When SAML authentication is enabled, users who initiate a self-service password reset are redirected to the identity provider's login URL for verification. After successful authentication, the IdP returns a signed SAML assertion to ADSelfService Plus, which validates it using the configured X.509 certificate and grants the user access to complete the operation.
Unlike enrollment-dependent authentication methods—such as one-time password (OTP) or knowledge-based authentication (KBA)—SAML-based SSPR does not require users to enroll in ADSelfService Plus beforehand as long as they have an active account with the IdP.
Note: The IdP must have SAML 2.0 enabled for this feature to work.
Why use SAML authentication for self-service password reset?
SAML delegates identity verification to an IdP that the organization already trusts and manages, rather than requiring users to register separate credentials or enroll in a new authentication method. This makes it well-suited for SSPR in environments where an IdP is already enforcing authentication policies across the organization.
Key advantages include:
- No user enrollment required: Users can reset their password or unlock their account from day one without prior registration in ADSelfService Plus, as long as they have an active IdP account.
- Consistent identity verification: The same IdP authentication policies—including any MFA enforced at the IdP level—apply when users verify their identity for password reset, ensuring SSPR does not become a weaker path than standard login.
- Reduced help desk burden: Users locked out of their accounts can verify their identity through the IdP and complete self-service account unlock without administrator intervention.
- Reuses existing SAML infrastructure: The IdP configuration used for SSPR is the same infrastructure that powers enterprise single sign-on (SSO) in ADSelfService Plus, so no additional IdP application setup is needed.
Prerequisites
Before configuring SAML self-service password reset, ensure the following are in place:
- Admin credentials: You must have credentials for both the ADSelfService Plus web console and your IdP's admin console.
- ADSelfService Plus registered in your IdP: Log in to your IdP's admin console and locate ADSelfService Plus in the list of applications. If it is not available by default, create a new custom SAML application for ADSelfService Plus in your IdP.
- IdP configuration details: From within that application, obtain one of the following:
- The SAML metadata XML file (downloaded directly from the IdP), or
- The Issuer URL/Entity ID, IdP Login URL (IdP SSO URL), and X.509 certificate (public certificate key), copied manually.
- The IdP must support SAML 2.0.
Step 1: Access the SAML authenticator setup
- Log in to the ADSelfService Plus web console with admin credentials.
- Navigate to Active Directory or Microsoft Entra ID depending on the directory configured. Go to Configuration > Self-Service > Multi-factor Authentication.
- Select the ADSelfService Plus policy that applies to the users with self-service password reset enabled and require SAML authentication from the Choose the Policy tab.
- Click SAML Authentication in the Authenticators Setup tab.
Step 2: Configure the identity provider
- In the Configure Identity Provider (IdP) section, select Custom SAML from the Select IdP drop-down.
- Enter an appropriate IdP name.
- Choose one of the following configuration methods:
- Option A: Upload Metadata File
Click Browse and upload the SAML metadata XML file downloaded from your IdP. ADSelfService Plus will automatically parse the Issuer URL, IdP Login URL, and X.509 certificate from the file.
- Option B: Manual Configuration
Enter the values collected in the prerequisites step:
- Issuer URL/Entity ID: The unique SAML entity identifier from the IdP.
- IdP Login URL: The IdP SSO endpoint that users are redirected to for authentication.
- X.509 Certificate: The public certificate key that is used to validate SAML assertions.
- Click Save.
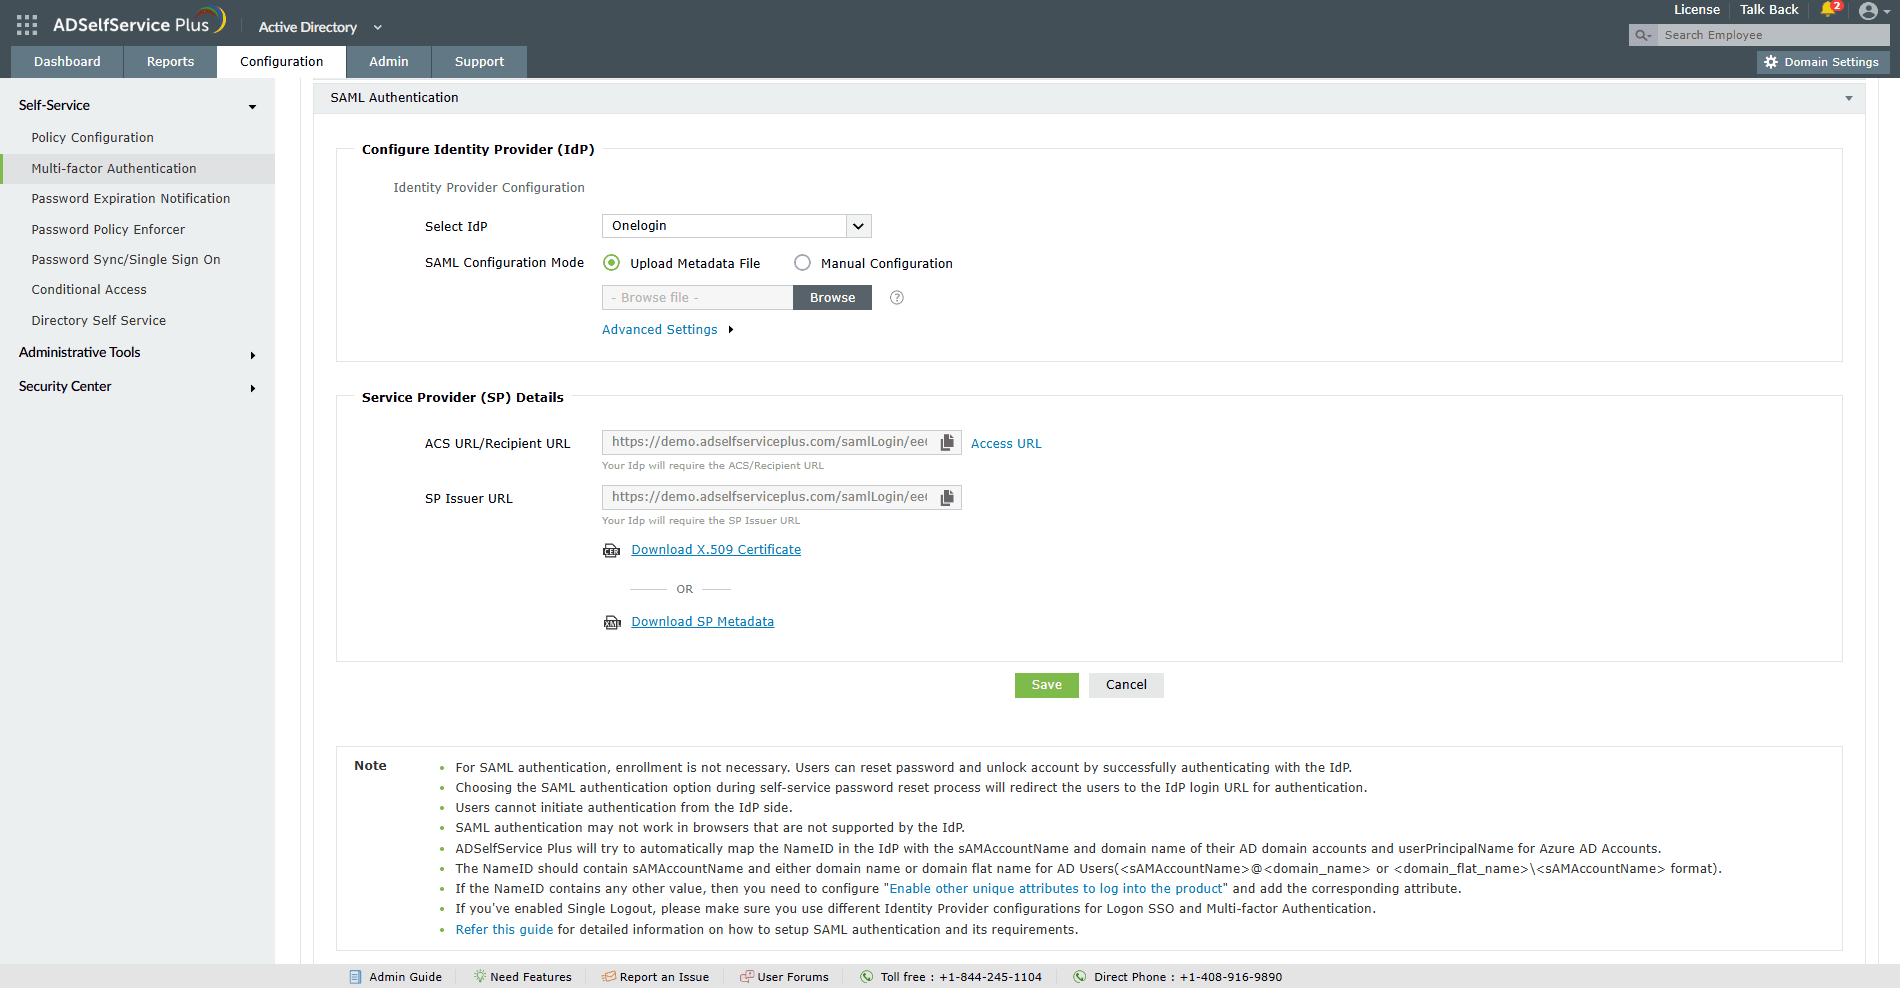
Configuring the SAML IdP in ADSelfService Plus
Steps to enable SAML authentication for password reset and account unlock
Step 3: Enable SAML in the authentication policy
- Navigate to the MFA for Reset/Unlock tab.
- In MFA for Password Reset, set the number of authentication factors required for user verification.
- From the Select the authenticators required drop-down, select SAML Authentication.
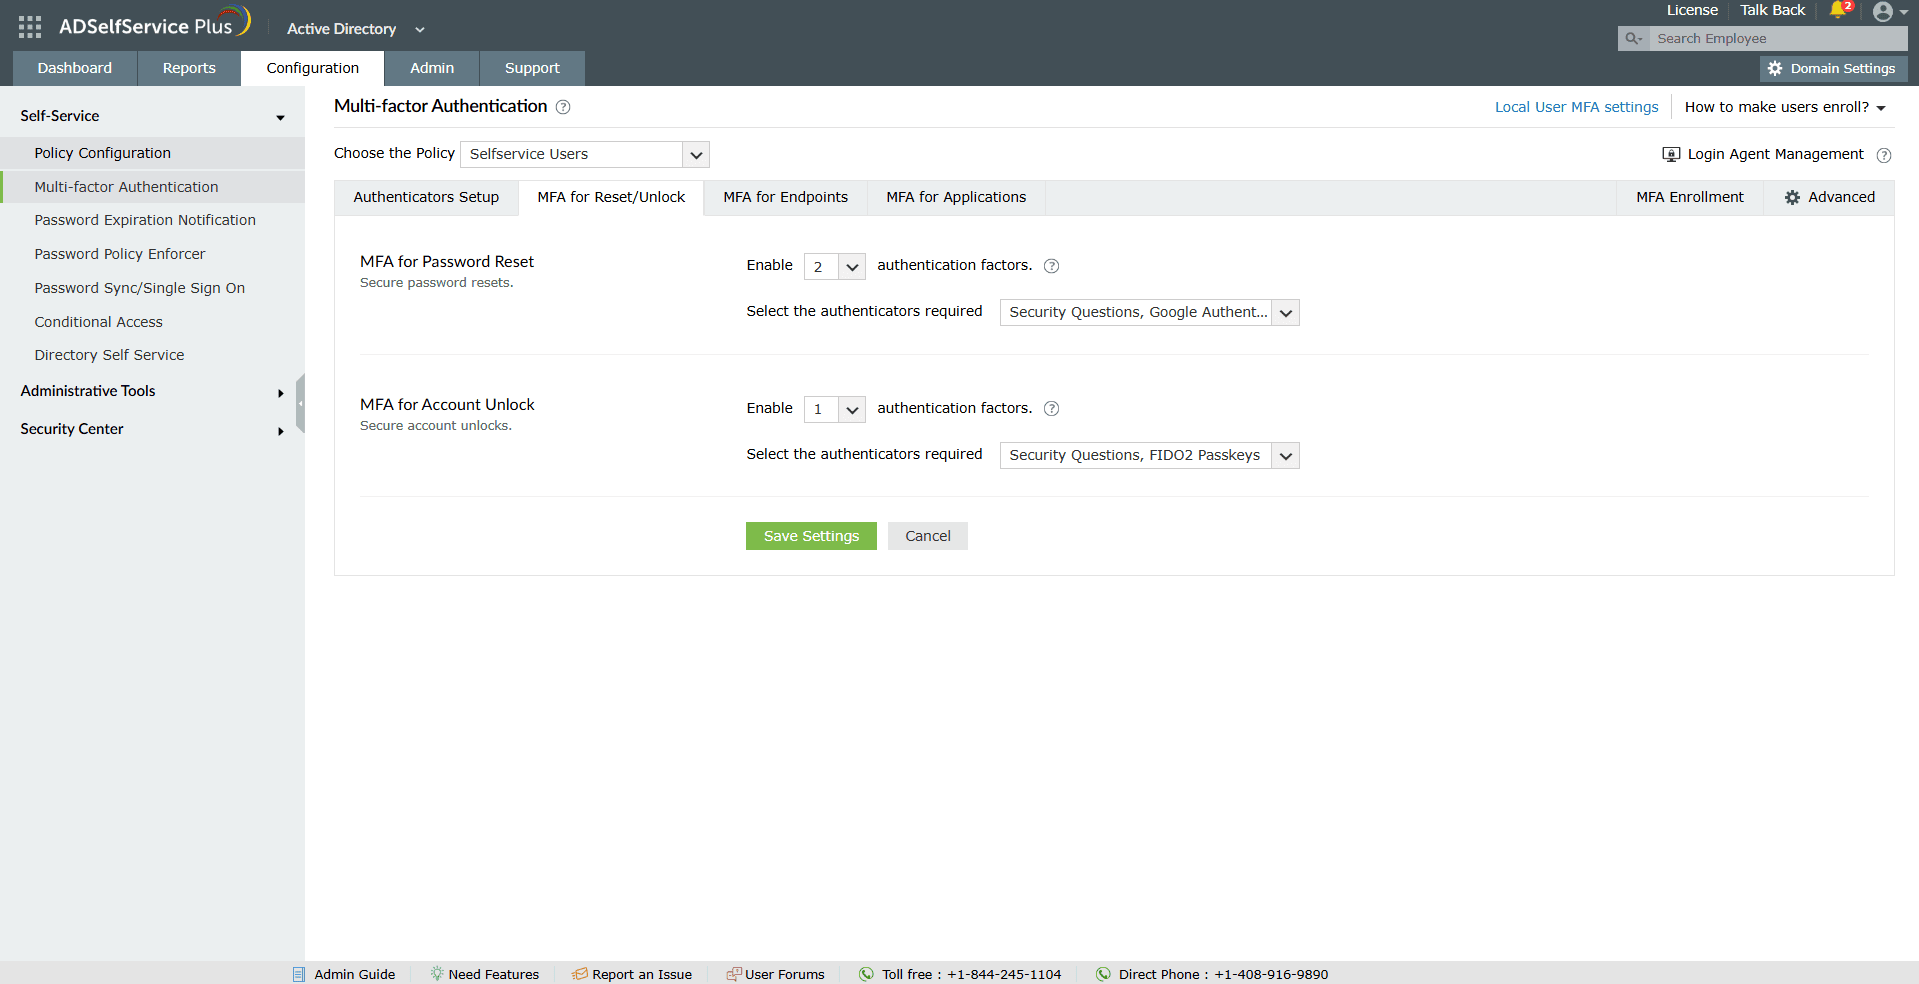
Enabling SAML authentication for password reset and account unlock in ADSelfService Plus
- Click Save Settings.
SAML is now active in the authentication policy. Users who initiate a self-service password reset or account unlock will be redirected to the IdP for verification before completing the operation.
Modify or remove the configuration
- Navigate to Configuration > Self-Service > Multi-factor Authentication > Authenticators Setup.
- Click SAML Authentication.
- To edit the configuration, update the IdP details, such as the Issuer URL/Entity ID, IdP Login URL, or X.509 certificate, and click Save.
- To remove SAML as an authentication method, deselect it from the MFA for Reset/Unlock policy and click Save Settings.
Note: Removing SAML from the authentication policy does not delete the IdP configuration. The IdP settings are retained and can be re-enabled at any time. If SAML is the only configured authenticator in a policy, removing it will prevent users under that policy from completing self-service password reset or account unlock until an alternative authentication method is added.
Validation and confirmation
- After saving the configuration, navigate to the MFA for Reset/Unlock tab and confirm that SAML Authentication appears as a selected authenticator in the relevant policy.
- To verify the end-to-end user journey, initiate a password reset from the ADSelfService Plus portal using a test account that falls within the policy scope. The portal should redirect to the configured IdP Login URL for authentication.
- After successfully authenticating with the IdP, confirm that the user is returned to the ADSelfService Plus portal and presented with the password reset form.
- A completed password reset confirms that the SAML assertion is being correctly issued by the IdP, transmitted to ADSelfService Plus, and validated against the configured X.509 certificate.
- If the redirect does not occur or authentication fails, verify that the Issuer URL/Entity ID, IdP Login URL, and X.509 certificate match exactly what is configured in the IdP application for ADSelfService Plus.
Tips
- Use the Upload Metadata File option instead of manual configuration wherever possible. The SAML metadata XML file automatically populates the Issuer URL, IdP Login URL, and X.509 certificate, reducing the risk of entry errors that cause assertion validation failures.
- When the identity provider renews its X.509 certificate, update the certificate in ADSelfService Plus before the old one expires to avoid SAML authentication failures during password reset.
- Keep at least one additional authentication method, such as email OTP, enabled alongside SAML in the authentication policy. If the IdP is unreachable, users will still be able to complete a password reset through the fallback method.
- Test the SAML configuration with a non-privileged test account before applying the authentication policy to production users or high-privilege groups.
- Verify that the ADSelfService Plus application is correctly registered and active in the IdP before enabling SAML for SSPR. A misconfigured or inactive IdP application will cause the redirect to fail silently for users.
Highlights of ADSelfService Plus
Allow Active Directory users to self-service their password resets and account unlock tasks, freeing them from lengthy help desk calls.
Get seamless one-click access to 100+ cloud applications. With enterprise single sign-on, users can access all their cloud applications using their Active Directory credentials.
Intimate Active Directory users of their impending password and account expiry via email and SMS notifications.
Synchronize Windows Active Directory user passwords and account changes across multiple systems automatically, including Microsoft 365, Google Workspace, IBM iSeries, and more.
Strong passwords resist various hacking threats. Enforce Active Directory users to adhere to compliant passwords by displaying password complexity requirements.
Enable Active Directory users to update their latest information themselves. Quick search features help admins scout for information using search keys like contact numbers.

 Free Edition