Important :
Kindly identify your build number and follow the sequence as given in the table below to move to the latest version: (How can I find my Build number?)
To upgrade ServiceDesk Plus, import the certificate linked below during the upgrade process:
Click here to learn more about the upgrade process.
| Current Build | Service Pack | Move to Build |
Know more Windows
For ex : -Xmx2512m %JAVA_OPTS% -Dtier-type=BE Linux
For ex : $JAVA -Xmx2512m $JAVA_OPTS -Dtier-type=BE | ||
| 15100, .. , 15150 | SHA256 Value - Know more Windows
For ex : -Xmx2512m %JAVA_OPTS% -Dtier-type=BE Linux
For ex : $JAVA -Xmx2512m $JAVA_OPTS -Dtier-type=BE | 15200 |
| 14840, ..., 14990 | SHA256 Value - Know more Windows
For ex : -Xmx2512m %JAVA_OPTS% -Dtier-type=BE Linux
For ex : $JAVA -Xmx2512m $JAVA_OPTS -Dtier-type=BE | 15100 |
| 14600, .., 14830 | SHA256 Value - dfff88066fb1e5af1924dc16cb31aebd4944f8602bb1b93c772500ded690fd6e Skip the forced backup Entry : -DSkipForcedBackUp_14840=true Know more Windows
For ex : -Xmx2512m %JAVA_OPTS% -Dtier-type=BE Linux
For ex : $JAVA -Xmx2512m $JAVA_OPTS -Dtier-type=BE | 14840 |
| 14500, 14501, ... , 14506 | The correct patch name for the 14600 servicepack is ManageEngine_ServiceDesk_Plus_14600_SP-1.ppm SHA256 Value - b07f4482697c0aa9b26b4379fcdbb4ed71e6aa6d9618c8ab3724b010df8aa501 Skip the forced backup Entry : -DSkipForcedBackUp_14600=true Know more Windows
For ex : -Xmx2512m %JAVA_OPTS% -Dtier-type=BE Linux
For ex : $JAVA -Xmx2512m $JAVA_OPTS -Dtier-type=BE | 14600 |
| 14300, .. , 14306 | The correct patch name for the 14500 servicepack is ManageEngine_ServiceDesk_Plus_14_4_0_SP-1_0_0.ppm SHA256 Value - ad2d002f6844eecf11c2cdd9a1d205cbd05b02799c71cbf4994d73d3d6895ac7 Skip the forced backup Entry : -DSkipForcedBackUp_14500=true Know more Windows
For ex : -Xmx2512m %JAVA_OPTS% -Dtier-type=BE Linux
For ex : $JAVA -Xmx2512m $JAVA_OPTS -Dtier-type=BE | 14500 |
Skip the forced backup Entry : -DSkipForcedBackUp_14300=true Know more Windows
For ex : -Xmx2512m %JAVA_OPTS% -Dtier-type=BE Linux
For ex : $JAVA -Xmx2512m $JAVA_OPTS -Dtier-type=BE | ||
| 13000, 13001, .. , 14204 | SHA256 Value - 5658904a0bdf504e6a0b5c2cf0e59a9f2b642f15ffcb396208cd165e27464c4a | 14205 |
| 12000 ... 12010 |
Skip the forced backup Entry : -DSkipForcedBackUp_13000=true Know more Windows
For ex : -Xmx2512m %JAVA_OPTS% -Dtier-type=BE Linux
For ex : $JAVA -Xmx2512m $JAVA_OPTS -Dtier-type=BE | 13000 |
| 11200,...11315 | SHA256 Value - ac3ced4a0bf3c6a2cd71d61f3e7a066bfeffae66231a7091622834430142dda5 Skip the forced backup Entry : -DSkipForcedBackUp_12000=true Know more Windows
For ex : -Xmx2512m %JAVA_OPTS% -Dtier-type=BE Linux
For ex : $JAVA -Xmx2512m $JAVA_OPTS -Dtier-type=BE | 12000 |
| 11100, ... 11150 | SHA256 Value - 7c56ea827857c5d0cc890b23601a91dae03288c97c373a093ceb7979a83a0612 | 11200 |
| 11000, ... 11012 |
| 11100 |
| 10513, ... 10515 | SHA256 Value - 0d74e3da4e64acdd7aa0e0a46c0f2cf4efa9af45ca32131a1e2296cbe3087583 | 11000 |
| 10500, ... 10514 | SHA256 Value - 6550a0ce4d7d6ec6316f58c6cda7e3d52e9c29b53c0ef0e14f96d4f3c3b97633 | 10515 |
| 10000, 10001, ... 10021 |
| 10500 |
| 9400, 9401, ... 9427 | SHA256 Value - 86babeccf555dcb3d0a804c5eaef03516186cee99f2d1e3c31e724e47f18d768 | 10000 |
| 9334, 9335, 9336 | 9400 | |
| 9300, 9301, ... 9335 | 9336 | |
| 9200, 9201, ... 9242 | 9300 | |
| 9119, 9120, 9121 | 9200 | |
| 9100, ... 9120 | 9121 | |
| 9046, 9047, 9048, 9049 | 9100 | |
| 9000, 9001, ... 9048 | 9049 | |
| 8214, 8215, 8216, 8217 | 9000 | |
| 8212, 8213, ... 8216 | 8217 | |
| 8200, 8201, ... 8211 | 8212 | |
| 8121, 8122, ... 8127 | 8200 | |
| 8121, 8122, ... 8126 | 8127 | |
| 8100 | 8121 | |
| 8027 | 8100 | |
| 8000 | 8027 | |
| 7611 | 8000 | |
| 7600 | 7611 | |
| 7514 | 7600 | |
| 7500, 7501, ... 7513 | 7514 | |
| 7022 (new link) | 7500 | |
| 7000, 7001, ... 7021 | 7022 | |
| 6012, ... 6015 | 7000 | |
| 6000, 6001, ... 6011 | 6012 | |
| 5500, 5501, ... 5507 | 6000 | |
| 5001, 5002, ... 5011 5500, 5501, ... 5506 | 5507 | |
| 5000 | 5000 | |
| 4112, 4113, 4114 | 5001 | |
| 4102, 4103, ... 4111 | 4112 |
| Series | Latest version |
14900 | Sha256 value : - 06889ce257546c04d6c25f8aa9d9419527986f494e09801722615748631c209b |
14800 | Sha256 value : - d1d917de524d73a43d55f2764bbd6bc9fdd80048af64751227df25a15d388929 |
14700 | Sha256 value : - 250794a0bcf0fc8c2008cc5c97a1d7cd043785463b1cc29f313087a5dd72a482 |
14600 | Sha256 value : - b4902f90c3591f7b8522035255d14809168827509bfed5c70e0dab8f3a42dc80 |
Instructions to apply the Service Pack / Hotfix
- Shut down ServiceDesk Plus Server.
- Run the script UpdateManager.bat (UpdateManager.sh for Linux) in the <ServiceDesk_Plus_Home>/bin folder. This opens the Update Manager tool.
- Click "Browse" to select the Service Pack file (AdventNet_ManageEngine_ServiceDesk_Plus_< Version No>_0_0_SP-x_0.ppm file that you had downloaded) and then click "Install...".
- Follow the on-screen instructions to apply the Service Pack / Hotfix.
- Once the upgrade is complete, start ServiceDesk Plus Server.
For upgrades to build version 12004 or above, a certificate is required before installing the PPM, This is a one-time process and the certificate will be automatically applied during future upgrades. Click here to download the certificate. Click Browse and import the certificate.
Important: for Windows Users :
We have changed the Target to start the ServiceDesk Plus server in
"Windows Start menu -> Programs -> ManageEngine ServiceDesk Plus -> ServiceDesk Server" and ServiceDesk Plus Desktop shortcut icon. This needs to be done by users who have upgraded from any of earlier builds (from 4.0, 5.0, 5010 and below) to ServiceDesk Plus 5.5(5500 and above). This can be changed as follows
- Right click 'ServiceDesk Server' option and choose the Properties option.
- Change the value in Target field from
"{ServiceDesk_home}\jre\bin\javaw.exe -Dproduct.home=. -cp ..\lib\startupclasses.jar;..\server\default\lib\SDUtils.jar com.adventnet.start.ProductStarter StartServiceDeskService ..\server\default\conf\TrayIconInfo.xml"
to
"{ServiceDesk_home}\bin\startSDP.bat" where {ServiceDesk_home} is the ServiceDesk Plus installation directory which will be typically like C:\AdventNet\ME\ServiceDesk directory. - Click "Apply", followed by "OK" button
The step 1 to 3 has to be repeated for the
ServiceDesk Plus desktop icon.
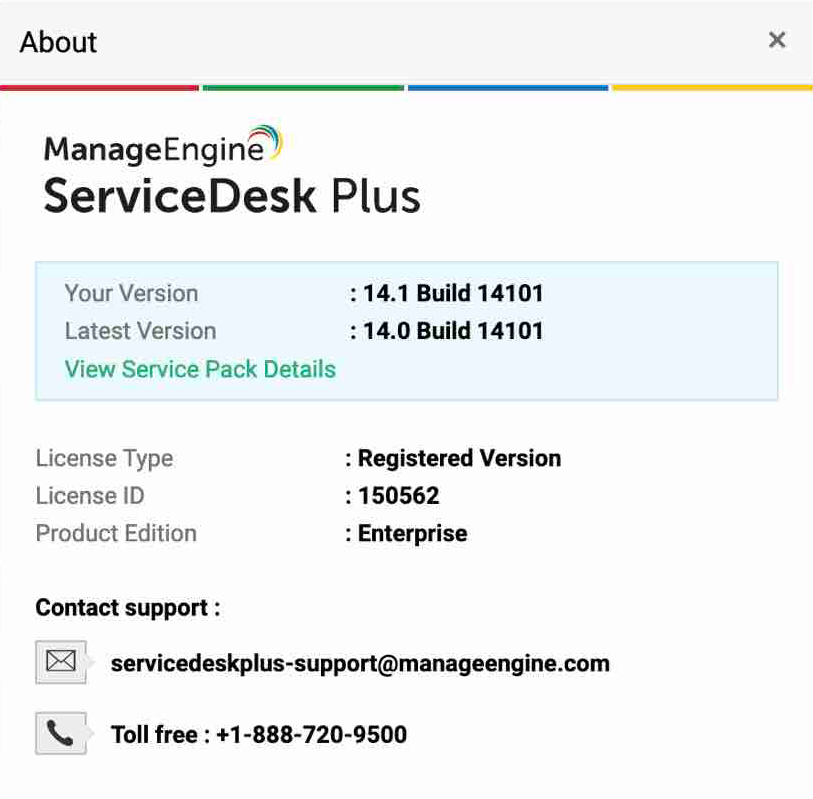
How can I find the Build Number of ServiceDesk Plus?
- In the ServiceDesk Plus web client, click the "About" link on top right of the page.
- You should see the Build number mentioned on the top right of the page.
- Check the following image guide to locate the build number.

Need help ?
Want help with upgrading ServiceDesk Plus to the latest version? Contact ServiceDesk Plus Support