Automated Machine Learning in Analytics Plus
Automated Machine Learning (AutoML) in Analytics Plus provides a code-free experience to build, train, and evaluate ML models using historical IT data. Users can predict outcomes, identify patterns, and group similar events with minimal machine learning expertise. The AutoML workflow comprises two phases: deploying the AutoML infrastructure and creating, training, and managing ML models.
- Deployment of the AutoML add-on in Analytics Plus
- Verify AutoML deployment
- Configuration of an ML model in Analytics Plus
- Best practices
- Building and launching an AutoML Model
- Machine learning models in Analytics Plus
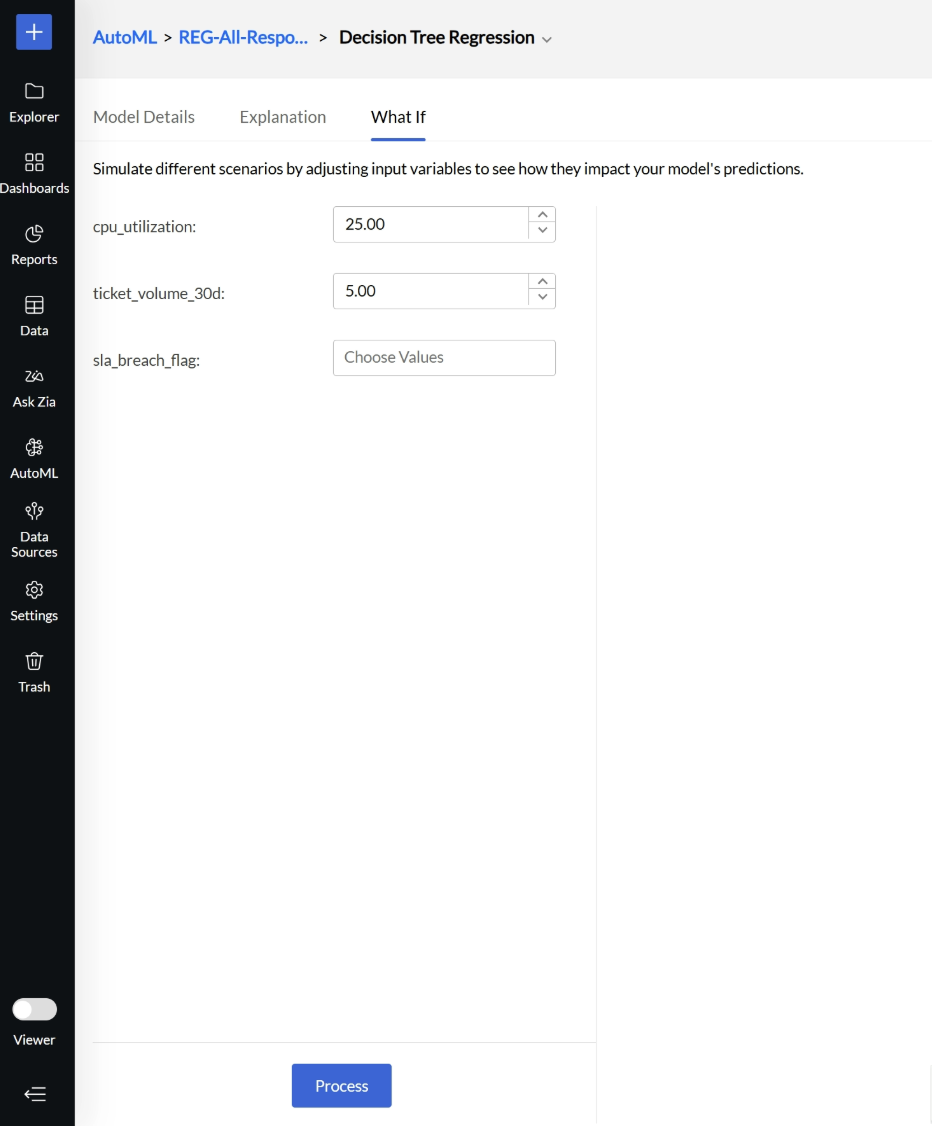
- What-if Analysis in AutoML
Deployment of the AutoML add-on in Analytics Plus
Prerequisites for deploying AutoML
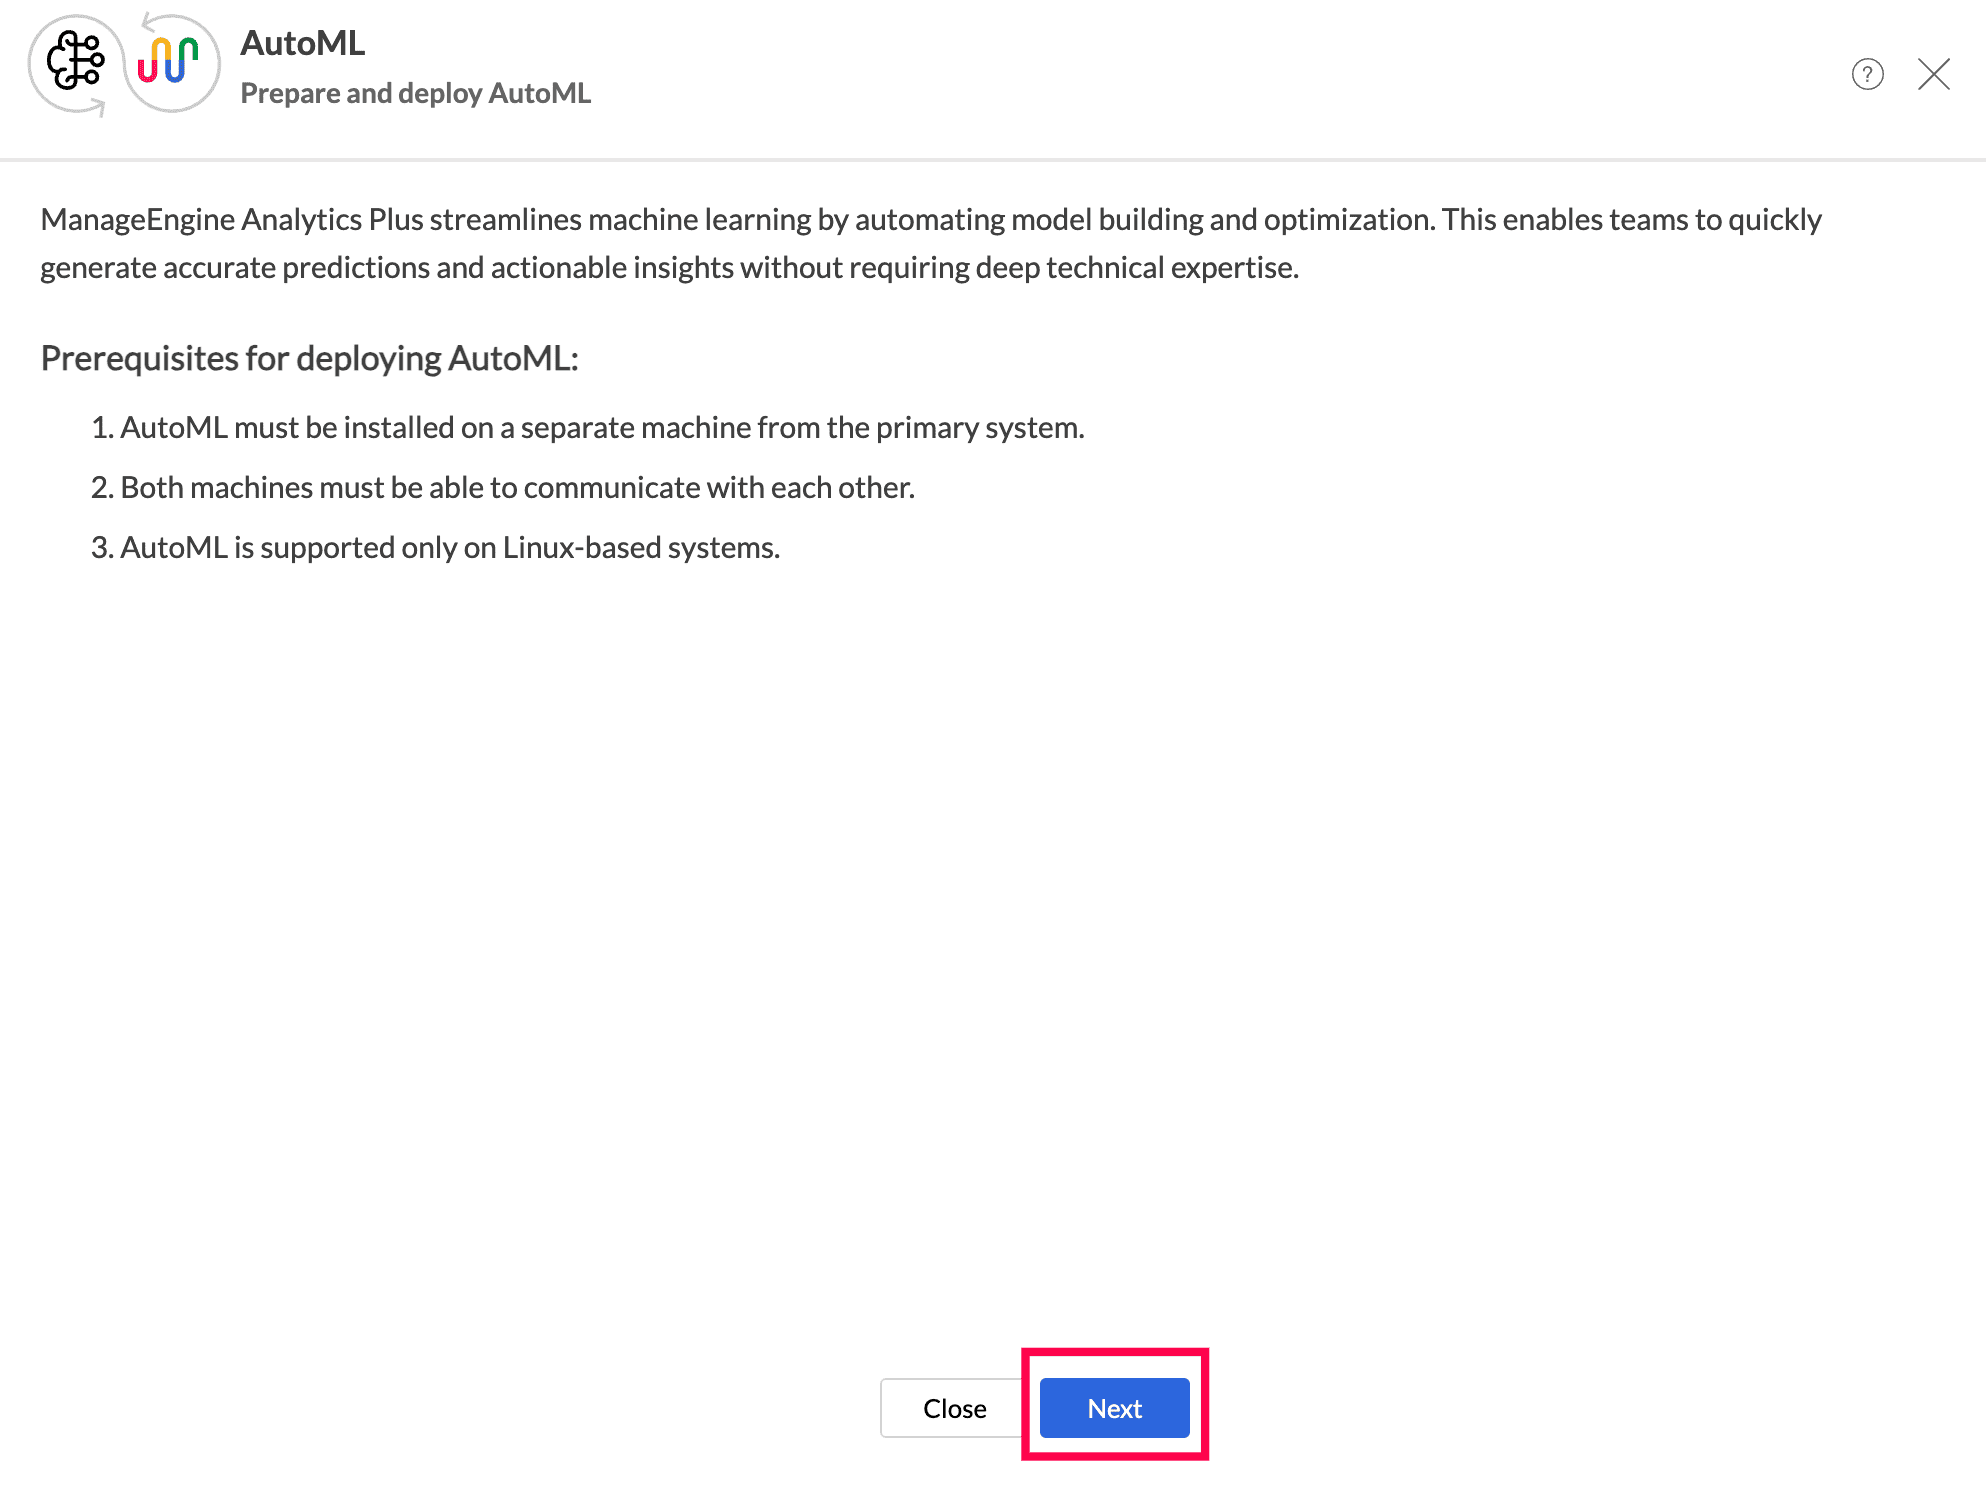
- AutoML is supported only in Linux-based systems.
- AutoML must be installed on a separate Linux server—it cannot be installed on the same machine as Analytics Plus.
- Both machines must be able to communicate with each other over the network.
- The deployment server must be assigned a static IP address. This is required for the connection step later and must not change.
Deploying the AutoML add-on
Prepare the Linux deployment server
Before installing the AutoML add-on, you need a dedicated Linux server ready to host the gRPC deployment agent. This must be different from the server running Analytics Plus—AutoML cannot be installed on the same machine.
Note:
- The IP address for this AutoML deployment server must be a static IP. A dynamic or changing IP will break the connection between Analytics Plus and the deployment server.
Prepare and deploy the AutoML add-on
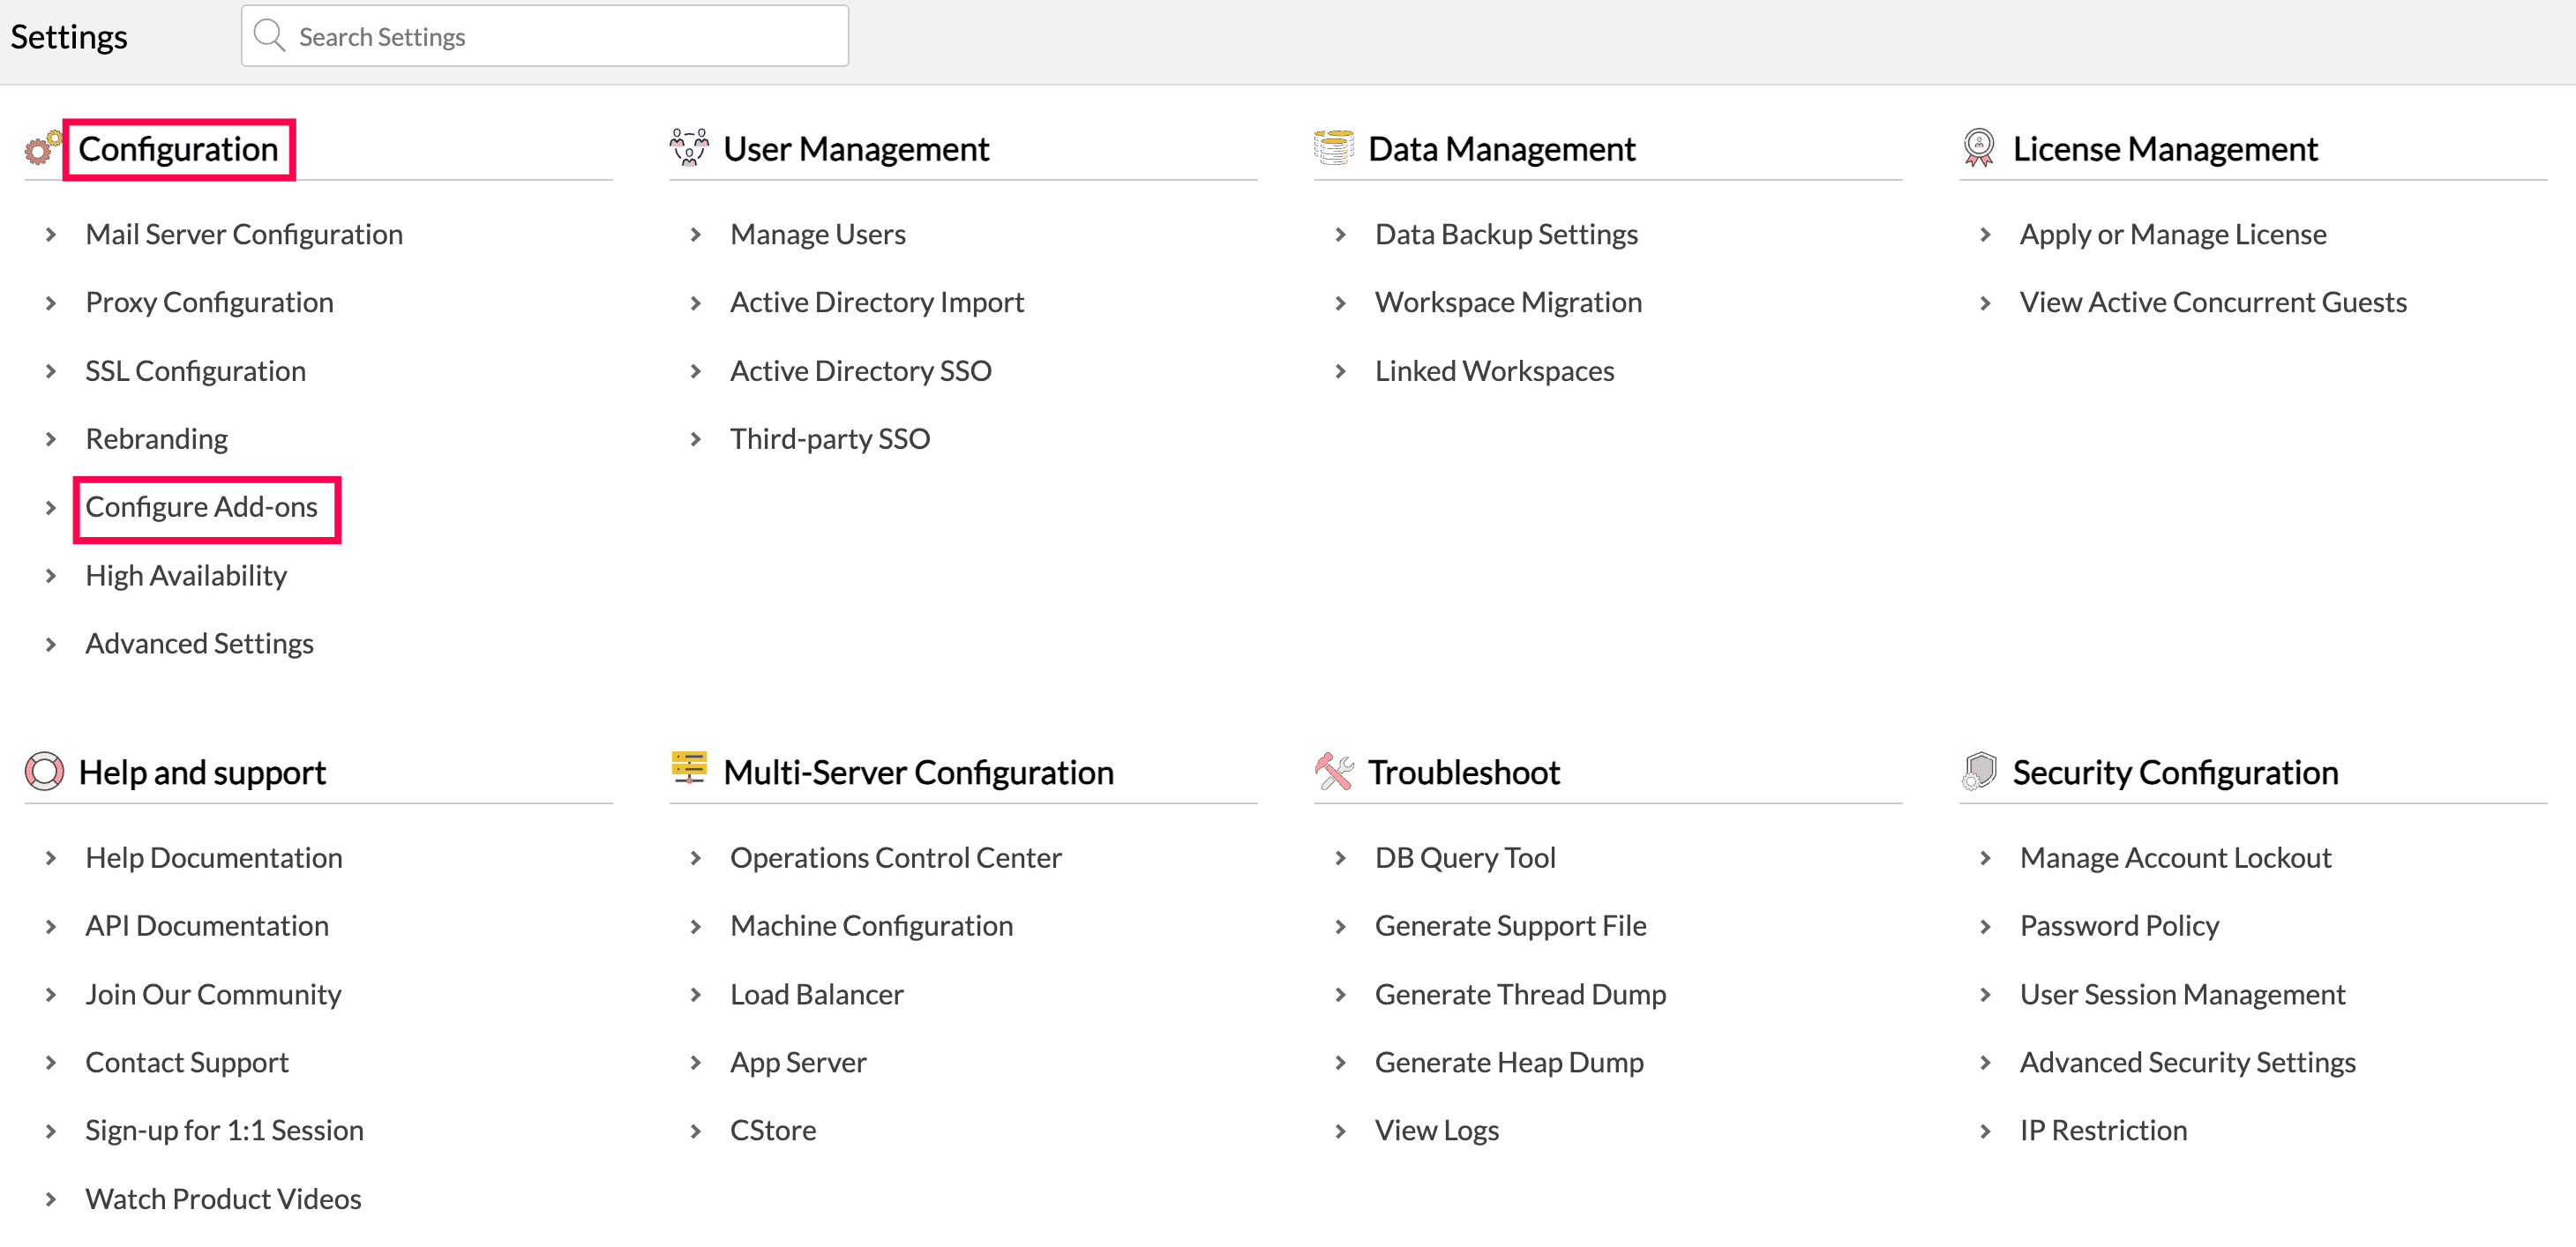
Log in to Analytics Plus and navigate to Settings>>Configuration>>Configure Add-ons.
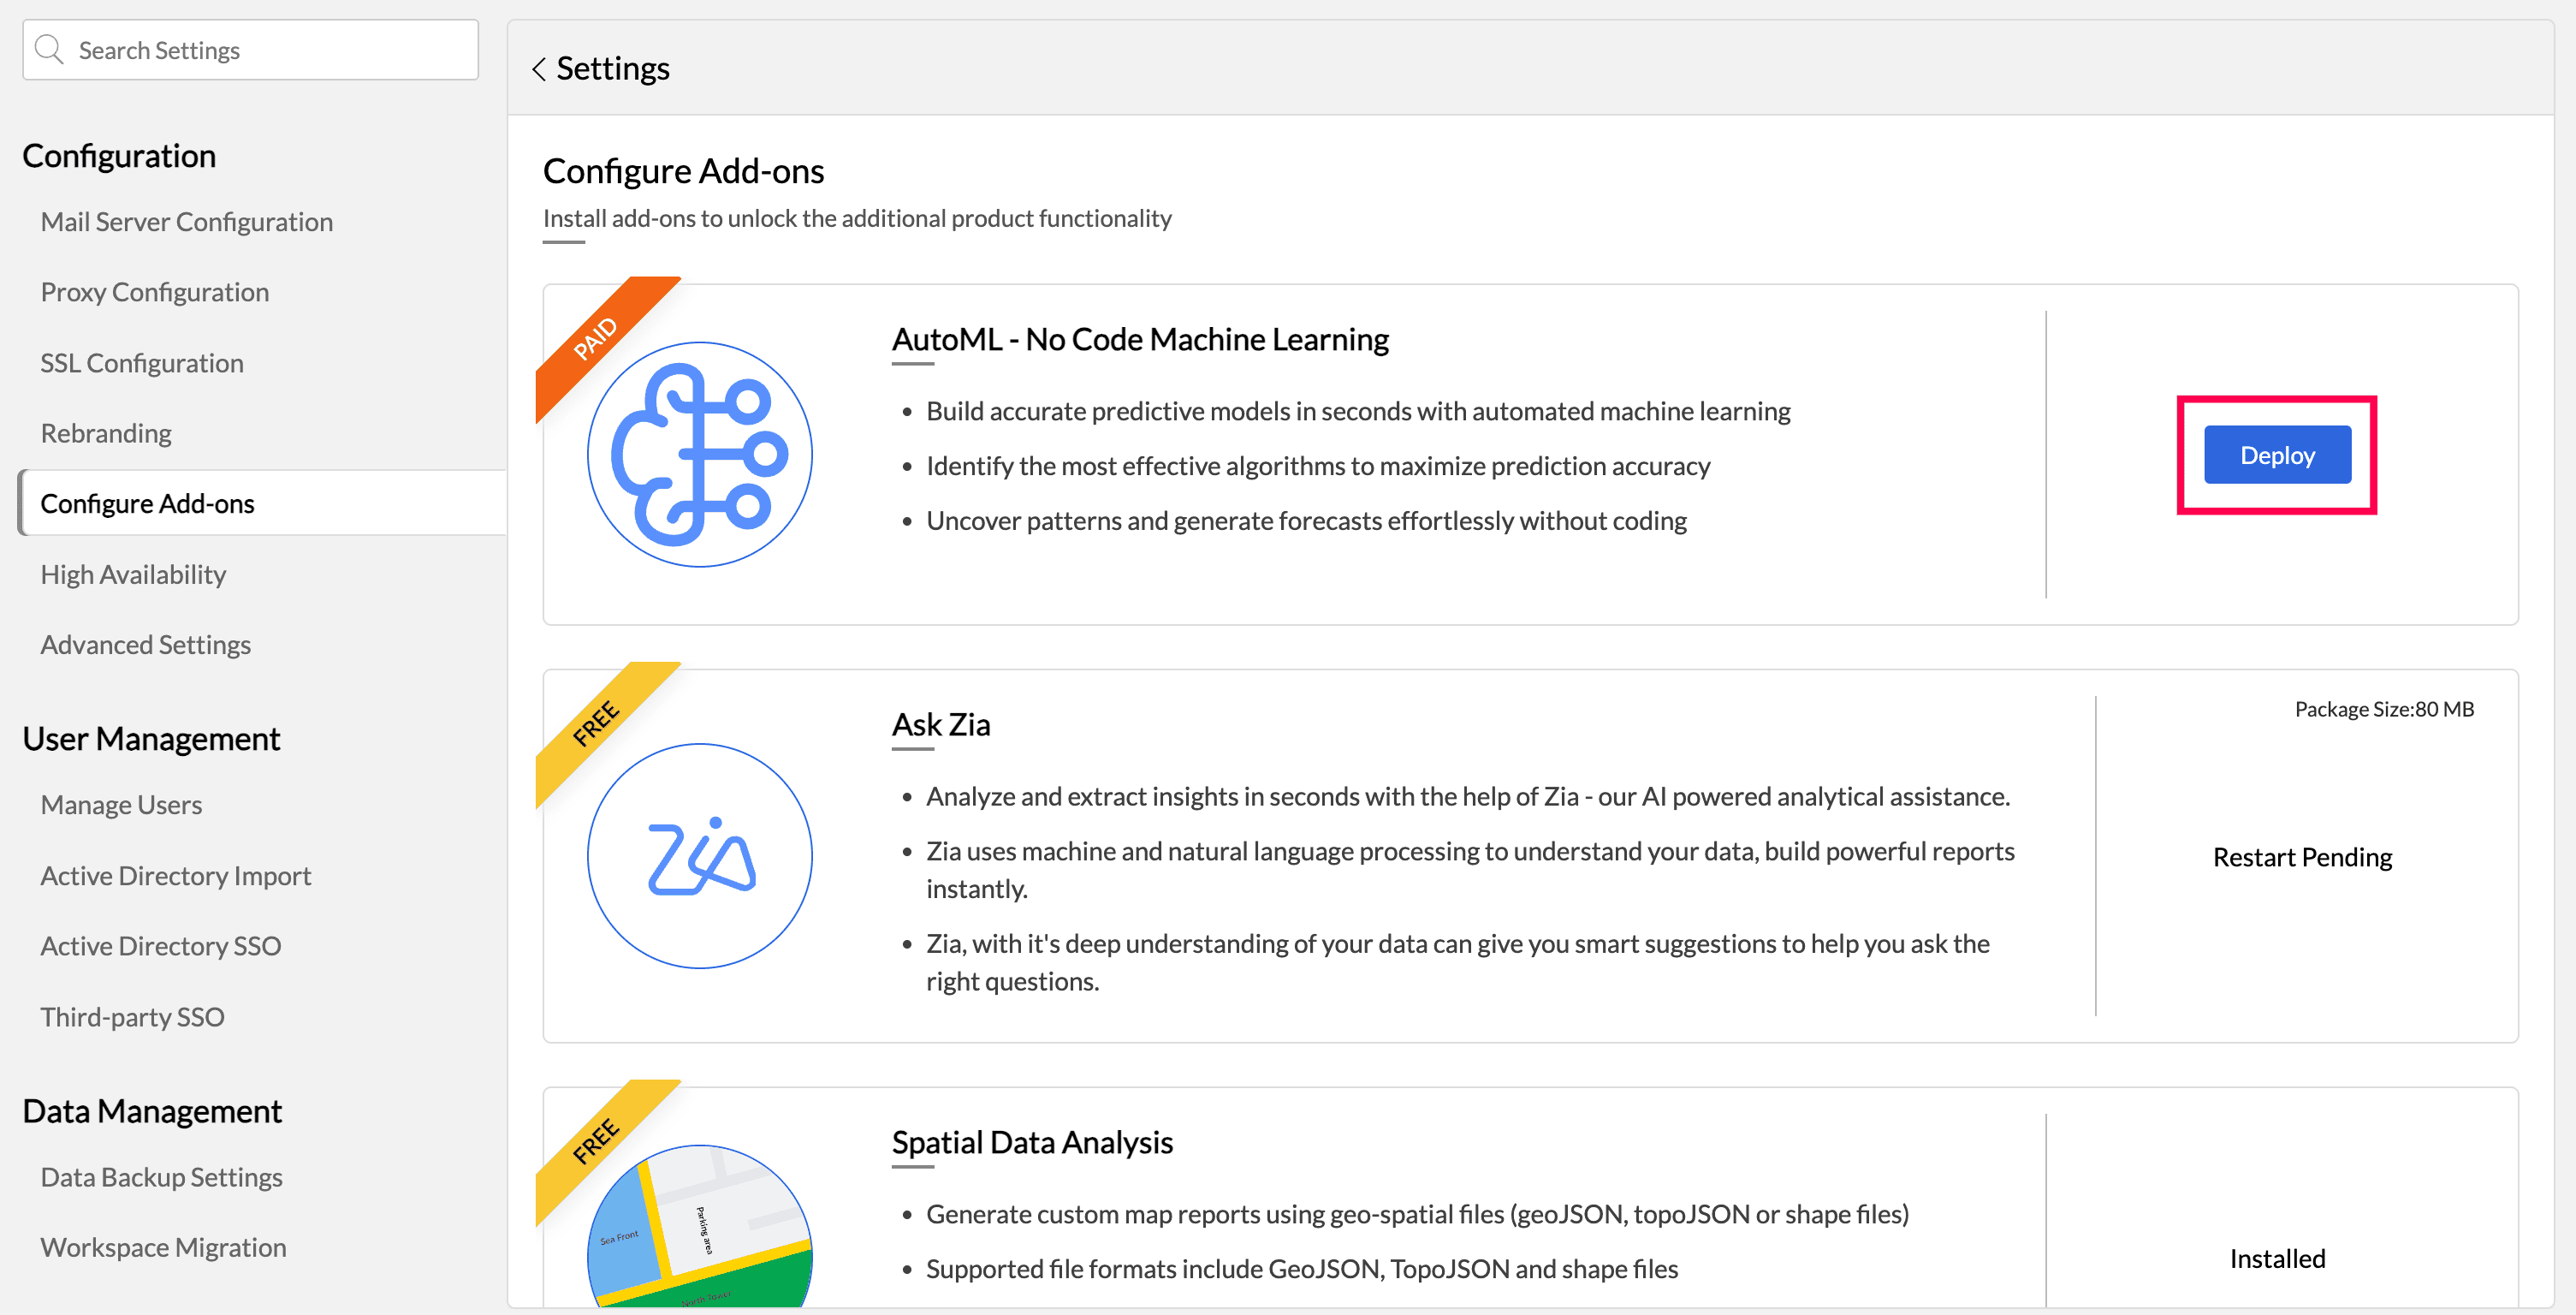
Locate AutoML — No Code Machine Learning and click on the Deploy button.
The Prepare and deploy AutoML dialog box appears. Review the prerequisites and click Next to start the deployment.
The AutoML add-on deployment wizard has four stages:
- Prepare Installation
- Configure FQDN
- Connect Deployment Agent
- Deploy AutoML
1. Prepare installation
- Analytics Plus downloads the AutoML Essentials package required for AutoML training and inference.
- Click Download AutoML Binary and wait for the download to complete.
- Ensure that the wizard displays AutoML is ready for deployment.
Download the gRPC Deployment Agent package
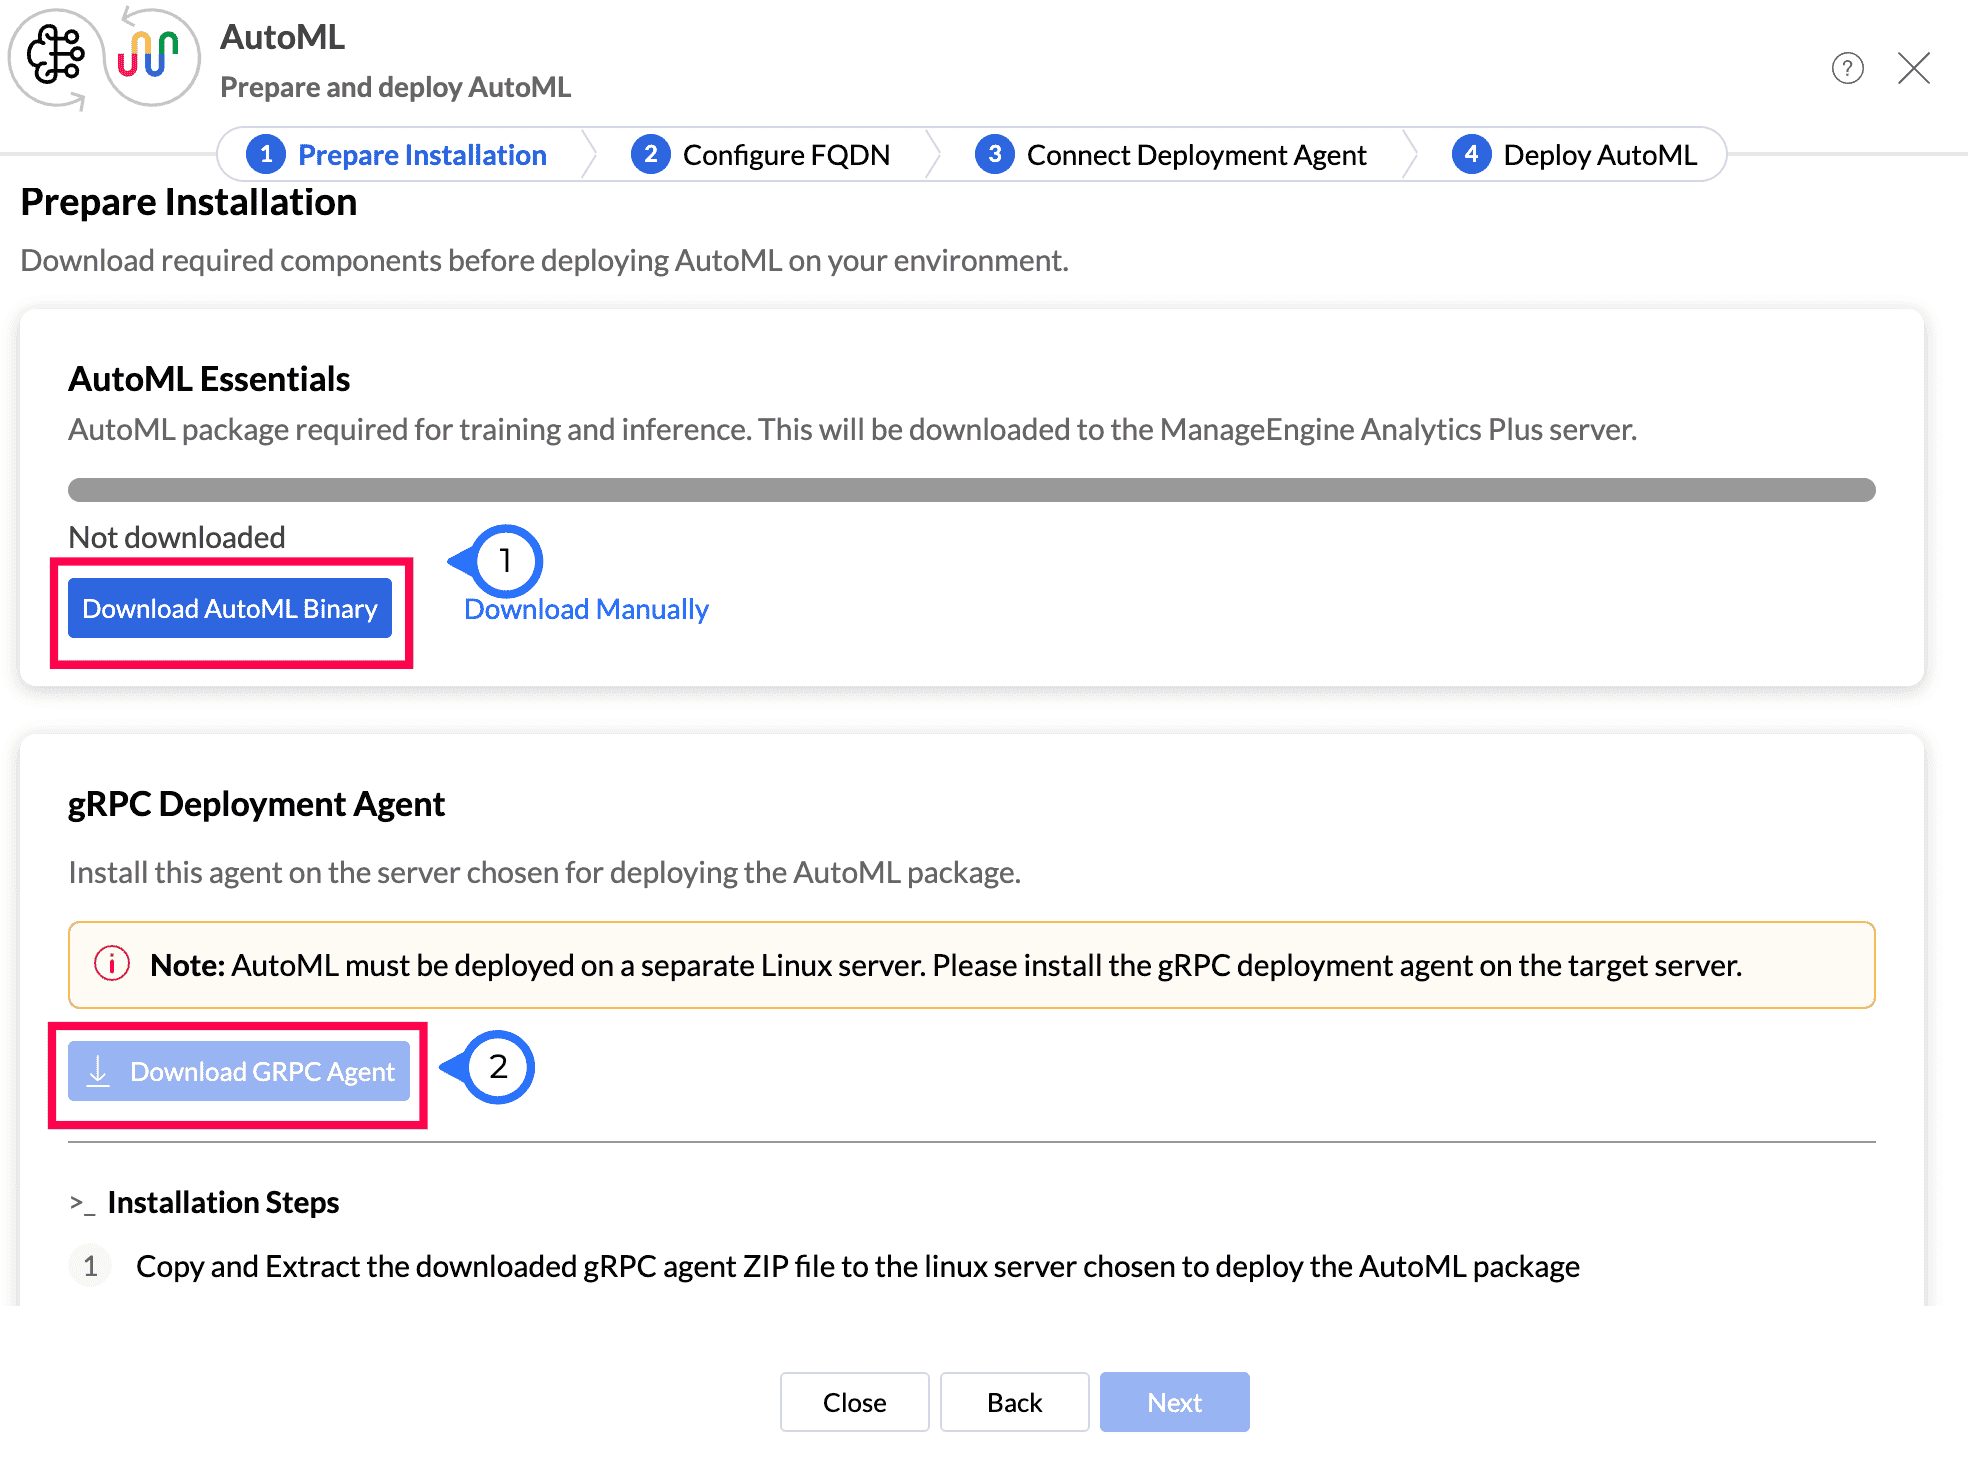
Download manually
If the AutoML package cannot be downloaded automatically (for example, due to restricted internet access on the Analytics Plus server), you can download the required files manually and place them in the correct folder yourself.
- On the Prepare Installation screen, click Download manually.
- Download both files:
AutoML Package — the core package required for training and running models. Copy the downloaded file to the folder path displayed under Copy to gRPC Agent — the deployment agent package required to connect to your deployment server. Move this package to the AutoML server.
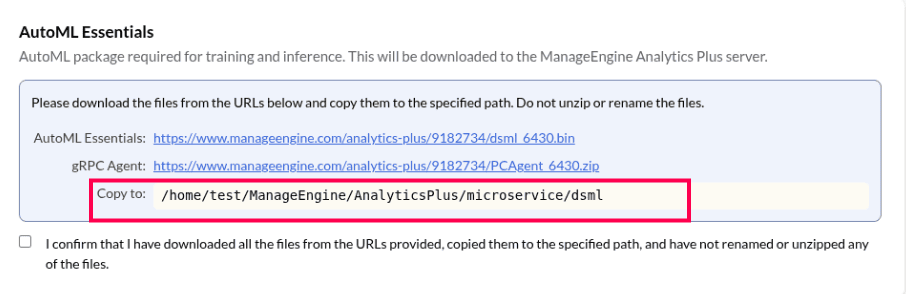
- Do not unzip or rename the downloaded files. They must be placed exactly as downloaded, or the installation will fail.
- Start the gRPC deployment agent:
- Open a terminal in the Linux deployment server (i.e., the AutoML server).
- Navigate to the folder where you extracted the deployment agent.
- Start the deployment agent using the command sh start-agent.sh <port_number>
- Once started, the agent will display a message confirming it is running and the port it is listening on. Note this port number—you will need to enter it in a later step.
- Keep the deployment agent running. Do not close this terminal or stop the process before completing the remaining steps in Analytics Plus.
5. Once both files have been copied to their respective locations check the confirmation box that reads: "I confirm that I have downloaded all the files from the URLs provided, copied them to the specified path, and have not renamed or unzipped any of the files."
6. Click Next to continue.
2. Configure FQDN
This step allows the AutoML server to communicate back with your Analytics Plus server.
- In the AutoML setup wizard, move to the Configure FQDN step.
Enter the fully qualified domain name (FQDN) of your Analytics Plus server (not the deployment server).
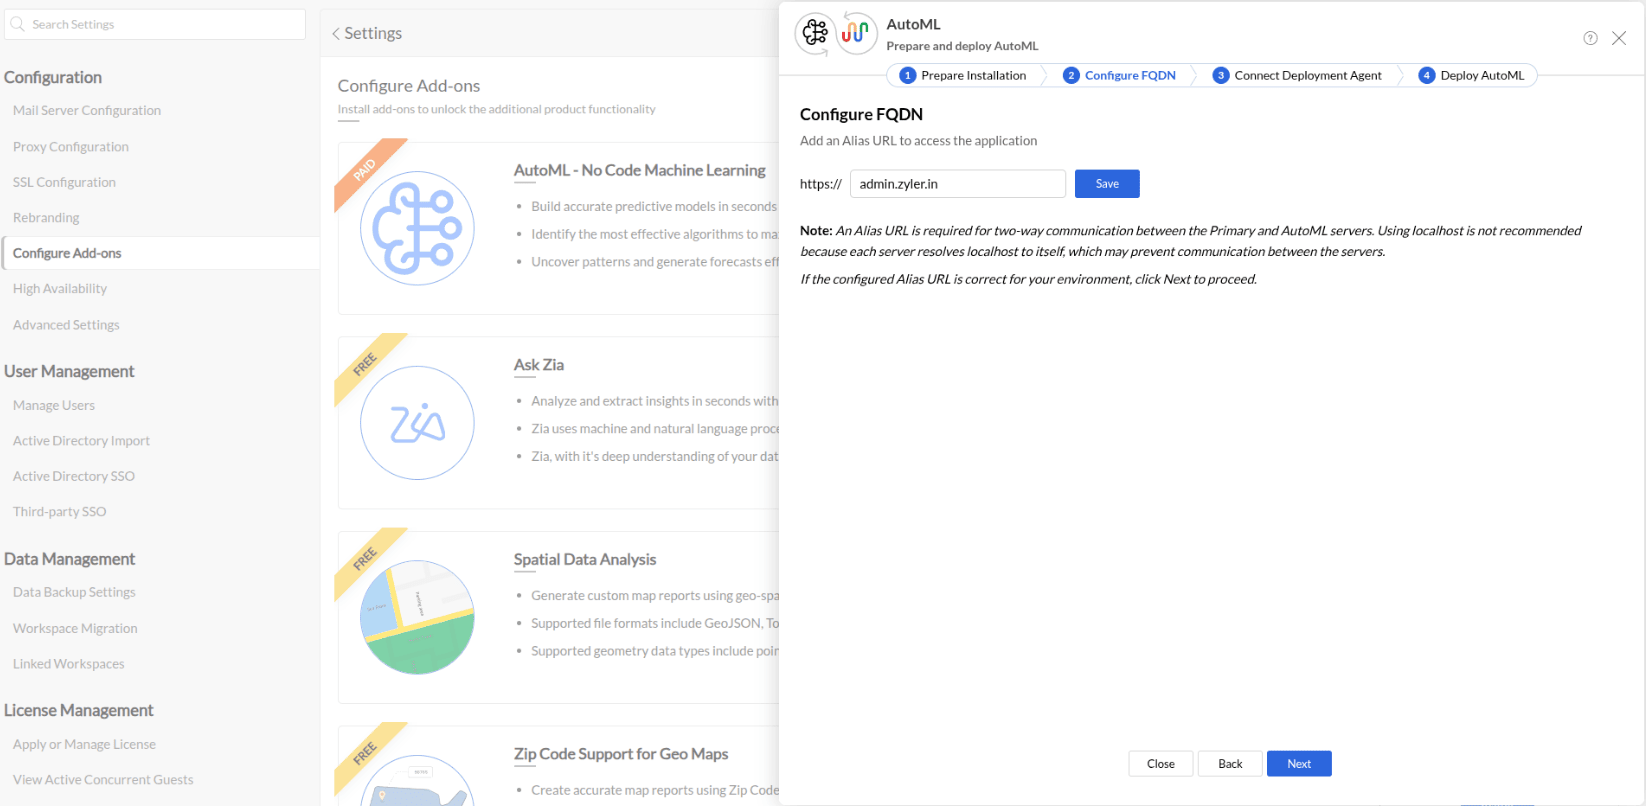
- Click Save.
- Verify that the FQDN resolves to the Analytics Plus server and is reachable from the AutoML deployment server.
- Once confirmed, click Next to proceed.
3. Connect the deployment agent
- Move to the Connect Deployment Agent step in the wizard.
- Under "Select AutoML Deployment Server", choose the machine from the drop down if it's already connected. If not, click Add more to add a new machine.
- Enter the following details:
- Static IP address of the deployment server
- Machine name to identify the server
gRPC port — the same port number which was used when the gRPC agent was started on the deployment server
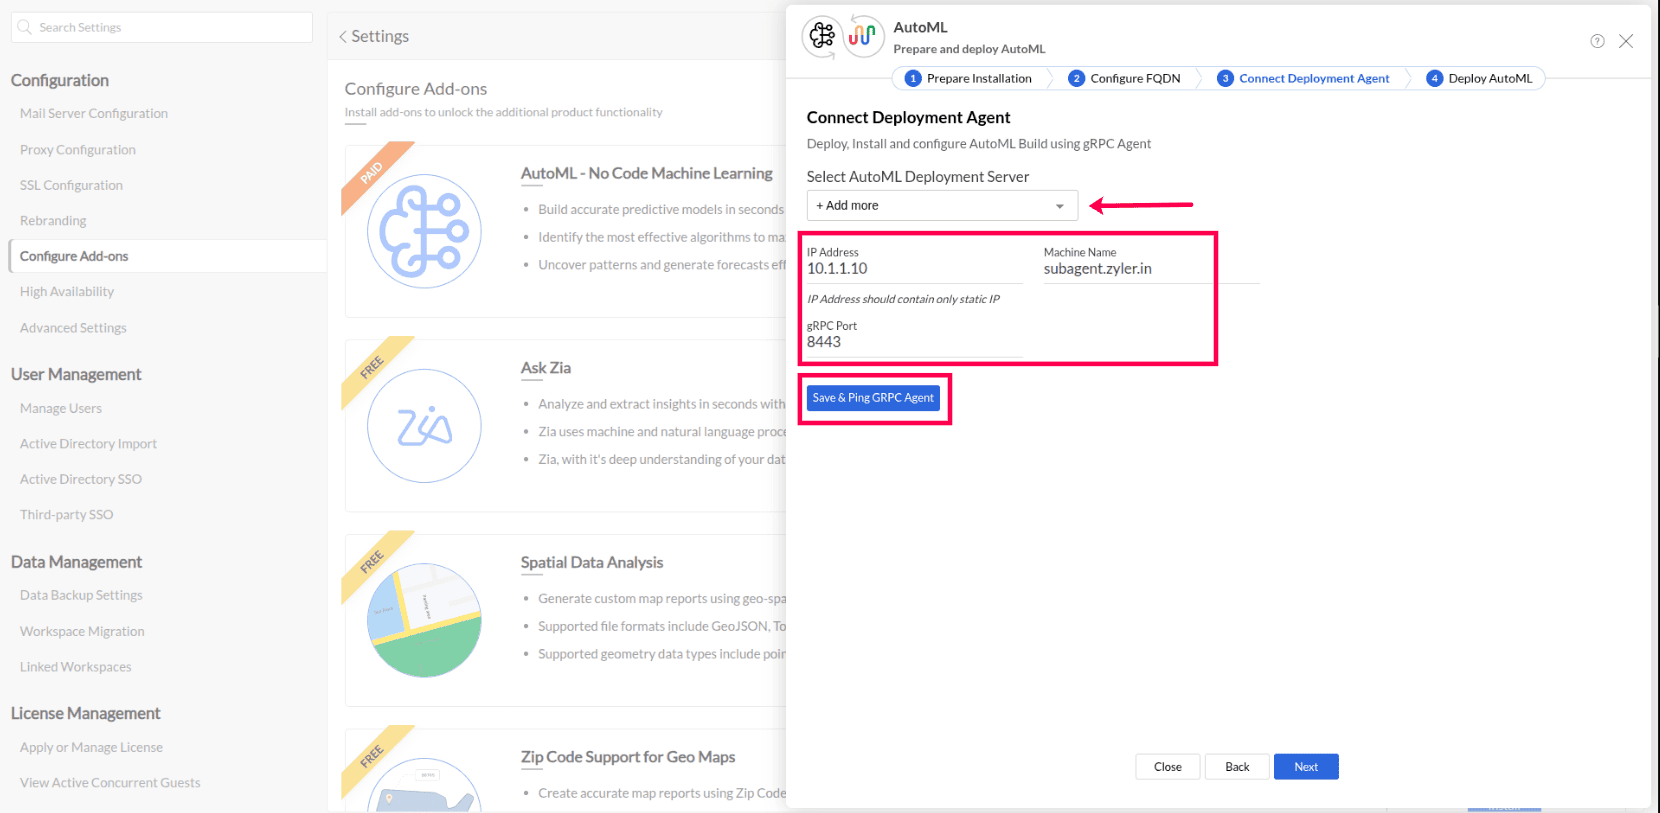
- Click Save & Ping gRPC Agent.
Wait for a success message confirming the connection.
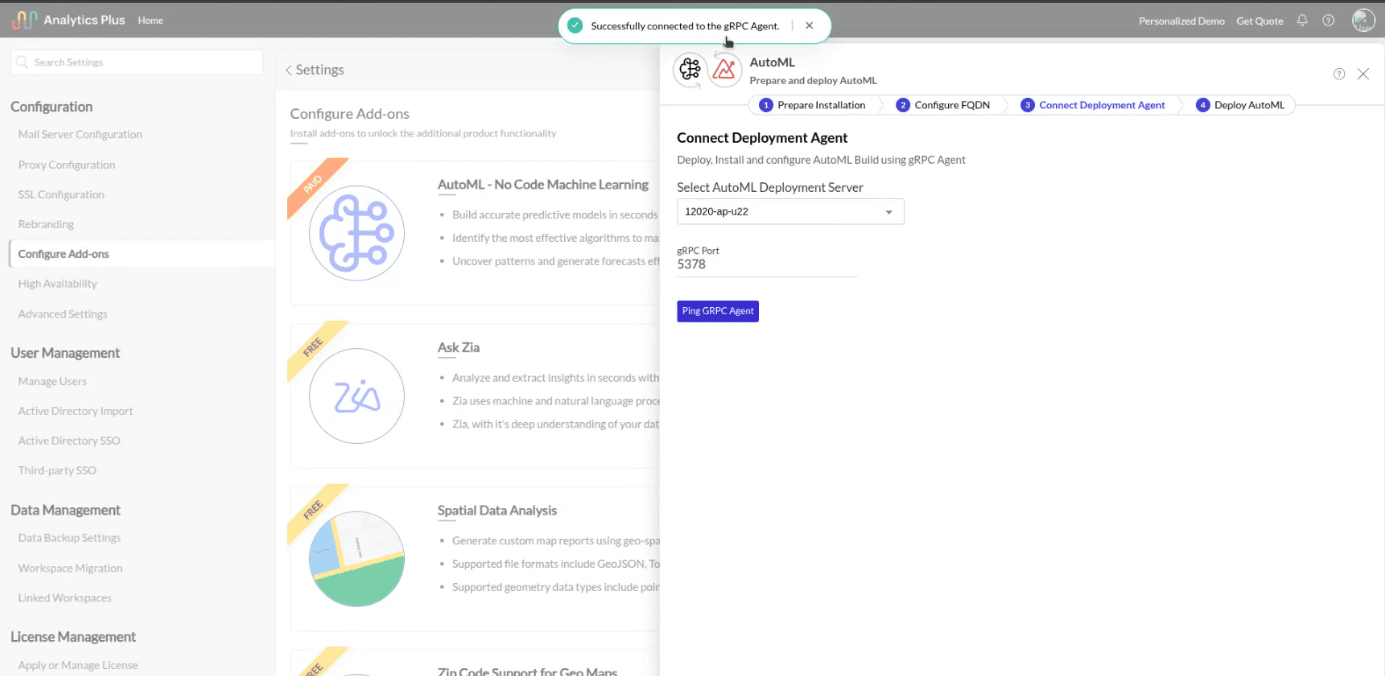
- Do not proceed to the next step until the connection is confirmed successful. If it fails, recheck the IP address, port number, and make sure the agent is still running.
4. Deploy AutoML
- Move to the final step in the wizard: Deploy AutoML.
Click Start Deployment.
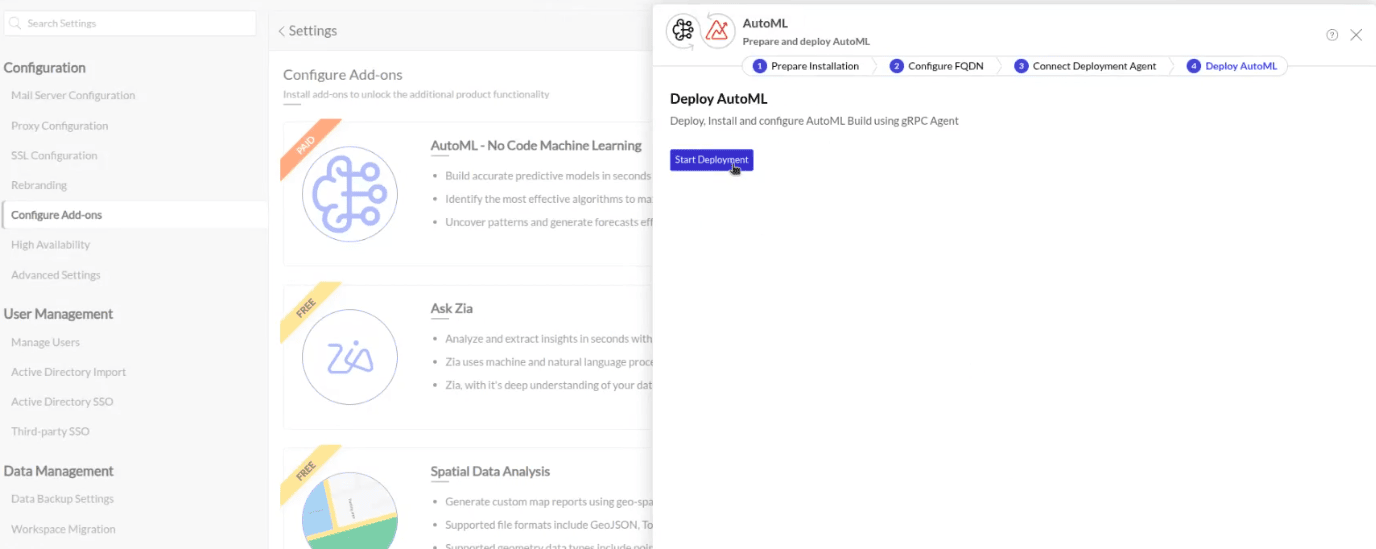
- Analytics Plus will begin installing and configuring AutoML using the connected deployment agent.
- Monitor the on-screen progress indicator as the installation proceeds.
Do not close the window or stop the deployment while installation is in progress.
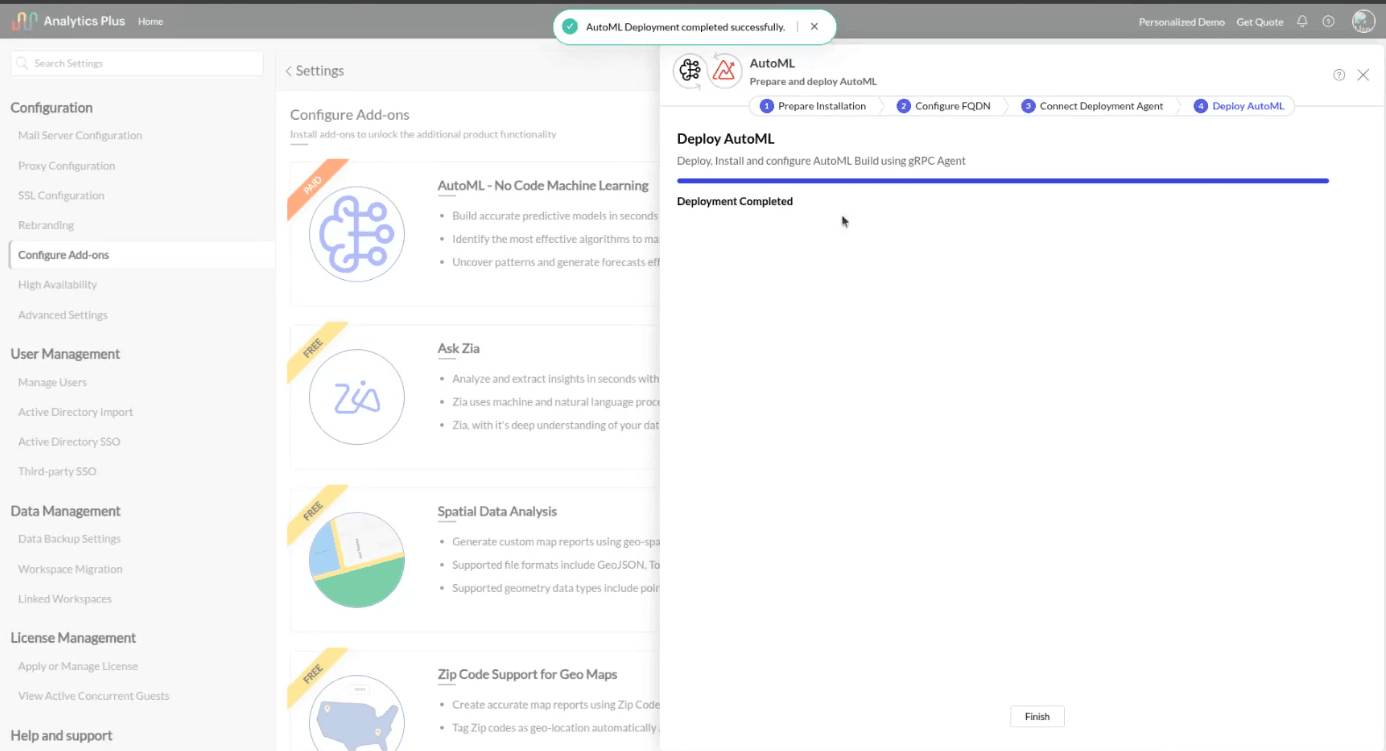
- Wait until the deployment completes successfully.
Verify AutoML deployment
- Go to Settings → Configure Add-ons.
- Locate the AutoML add-on.
Confirm that its status now shows as Deployed.
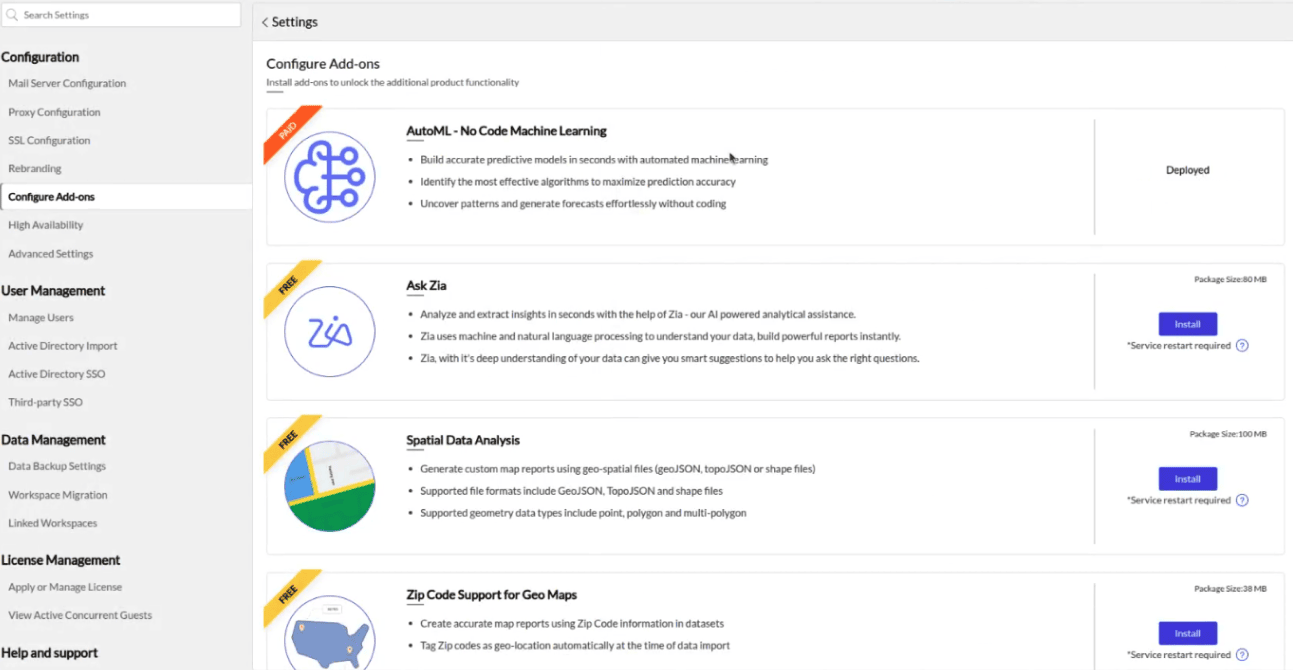
- AutoML is now ready to be used for creating and training models.
Configuration of an ML model in Analytics Plus
Best practices
Clearly define the business problem for which you intend to build an ML model. Ensure you select the relevant fields and columns that have a direct correlation with the expected results. While AutoML can be a powerful tool, its accuracy depends on the information made available to build the model.
Building an ML model in Analytics Plus comprises of two high-level steps,
- Select the input dataset for training and pick the model that fits your use case. Please note that you require sample or historical data available with you in order to build an ML model. For example, if you wish to build a model that predicts the next downtime, you should have historical performance data and outages that happened in the past for the model to learn from.
- Assess the model performance and deploy the model to a new dataset.
Building and launching an AutoML Model
Select the data for training
- Access the workspace which has the training table or dataset.
- To invoke the AutoML environment, click the Create icon on the side navigation panel.
- Click Create New Analysis.
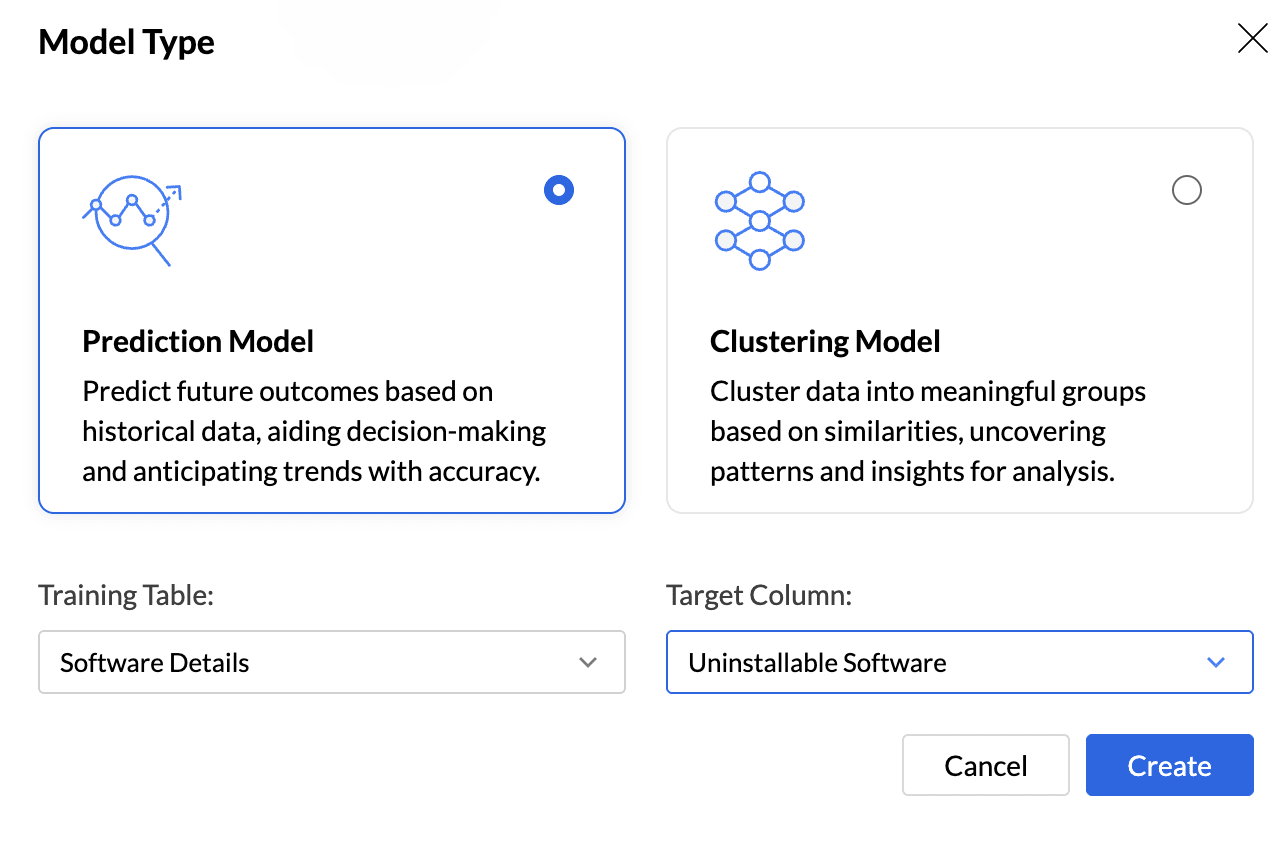
- Select the Model Type that should be used for training based on your goal. Analytics Plus supports two model types, Prediction and Clustering.
- The Training Table is the dataset used to train the machine learning model. Select the appropriate Training Table.
- The Target column (or target variable) is the specific column in the dataset that you aim to predict. It contains the outcomes or values that the model is trained to forecast based on the input features.
Click Create.
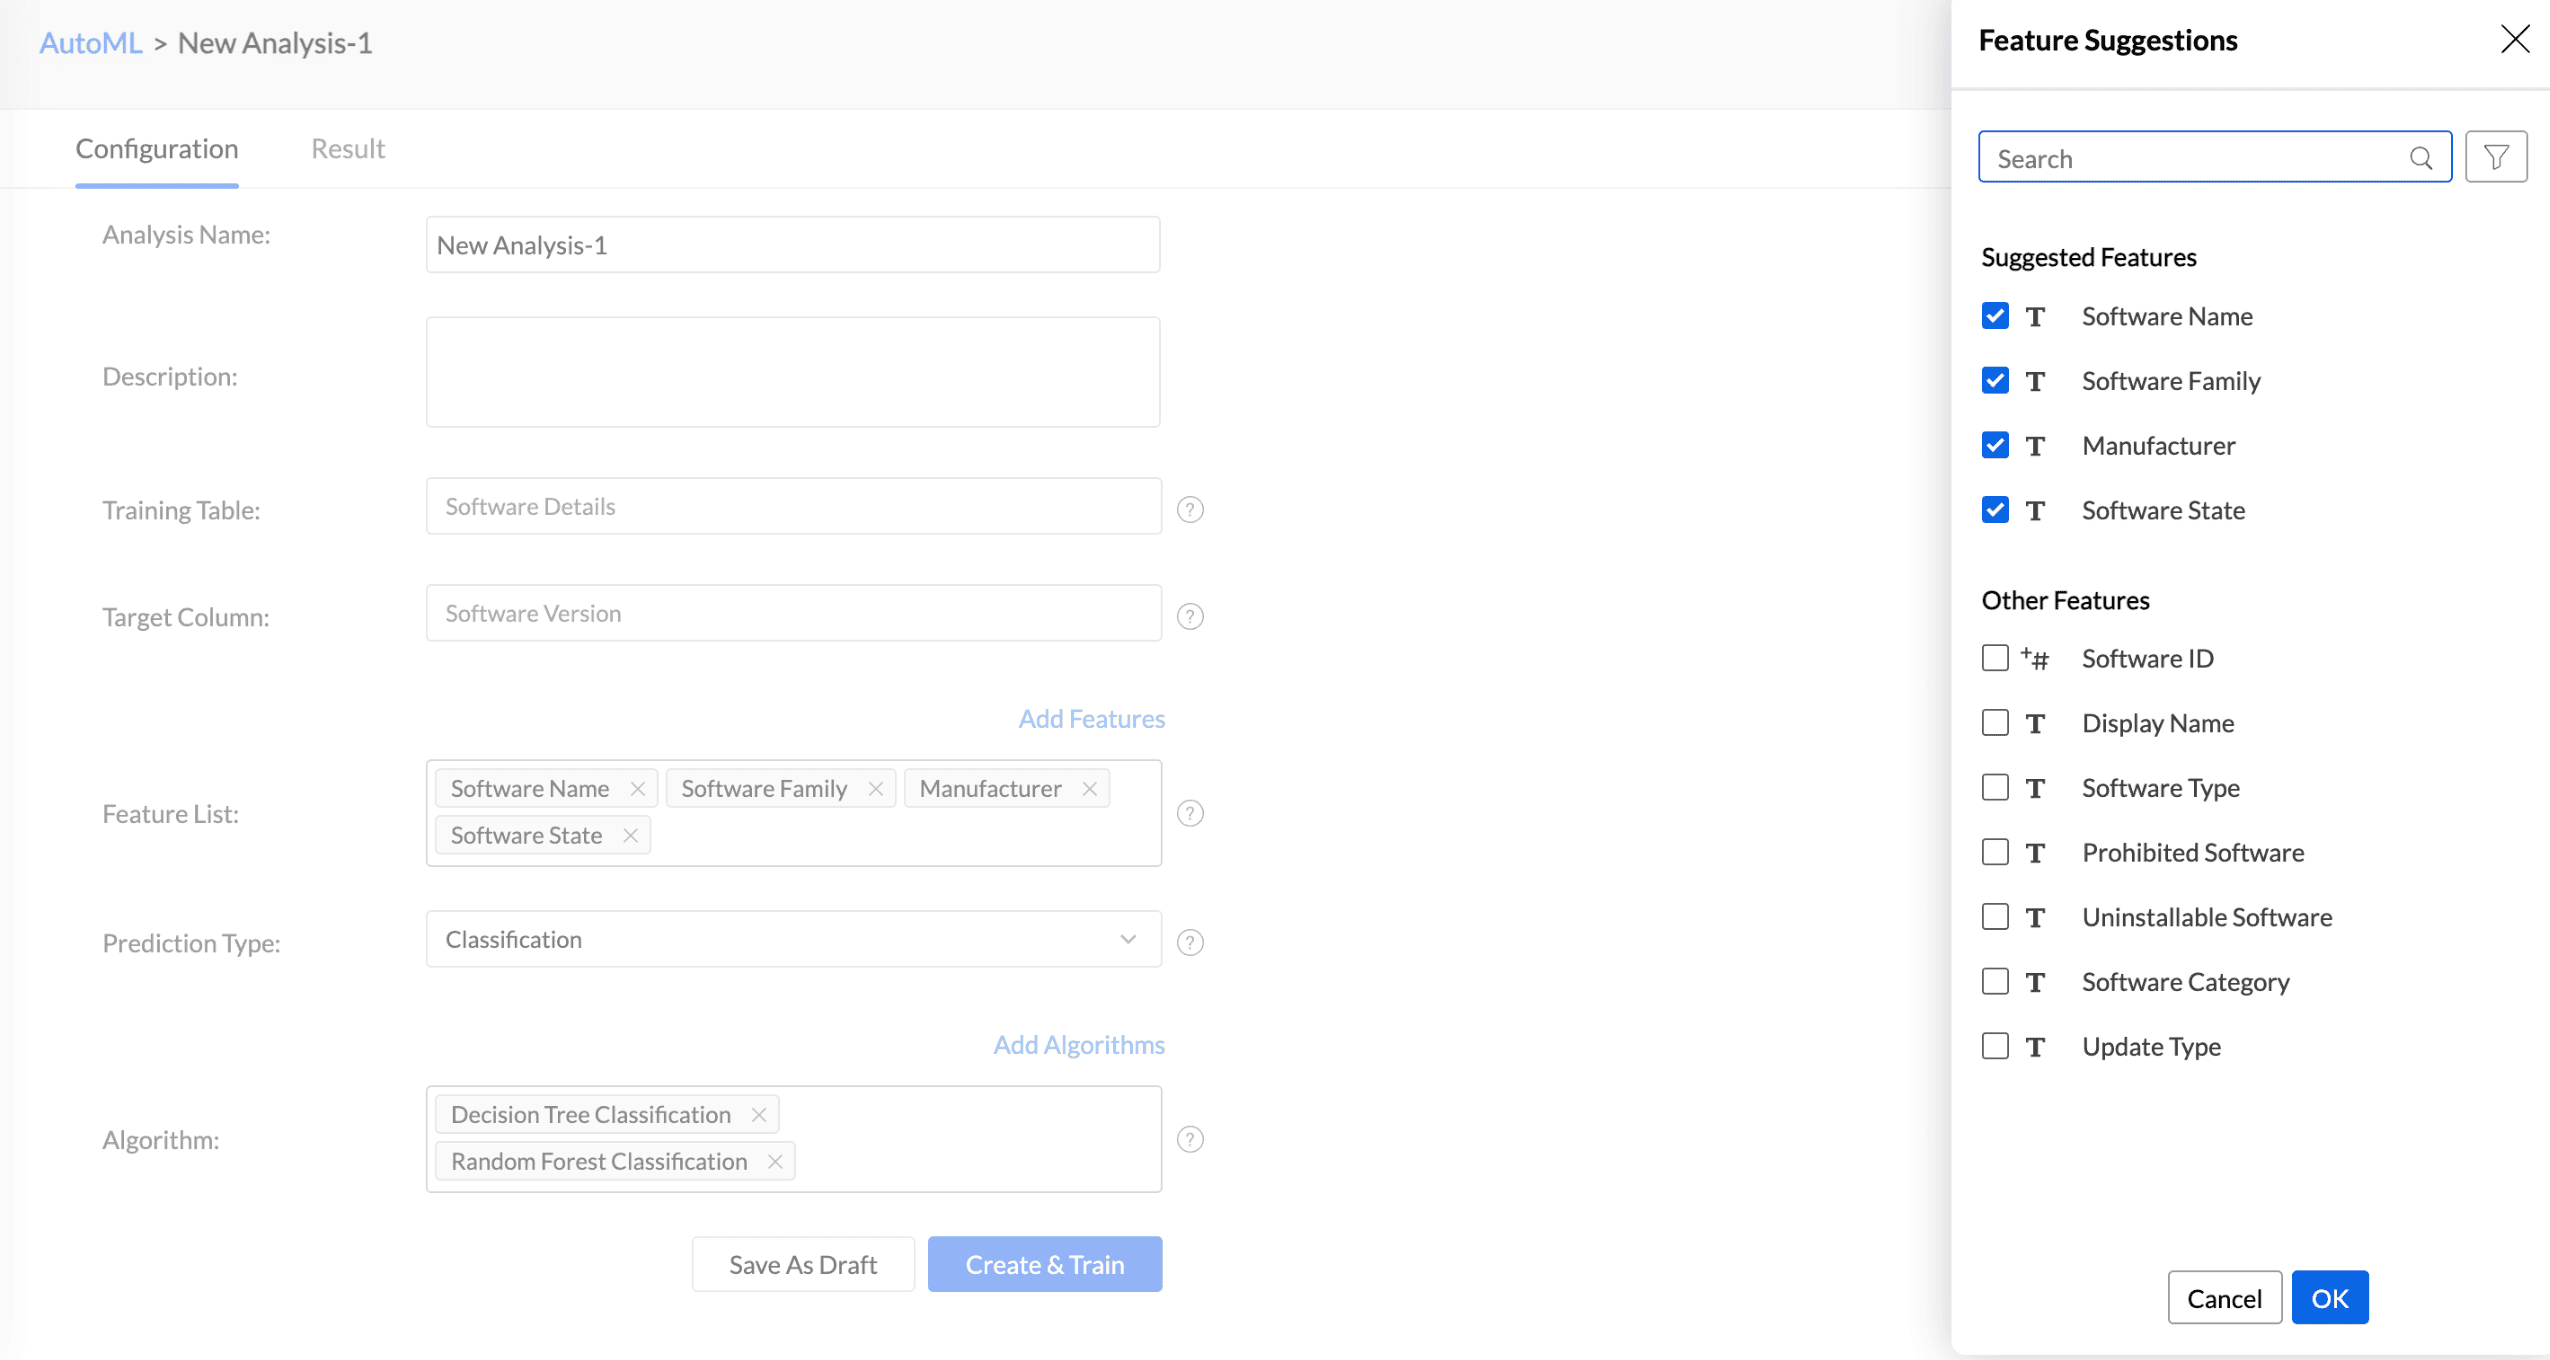
- In the AutoML configuration page, specify a suitable analysis name and add a description about the training model.
- The selected Training Table and Target Column will be displayed.
Features are the factors that influence the column being predicted. Click Add Features to include additional influencing columns. Analytics Plus will automatically suggest features that influence the column in the Suggested Features field. You can also select other features that may have an impact.
- Choose the Prediction Type.
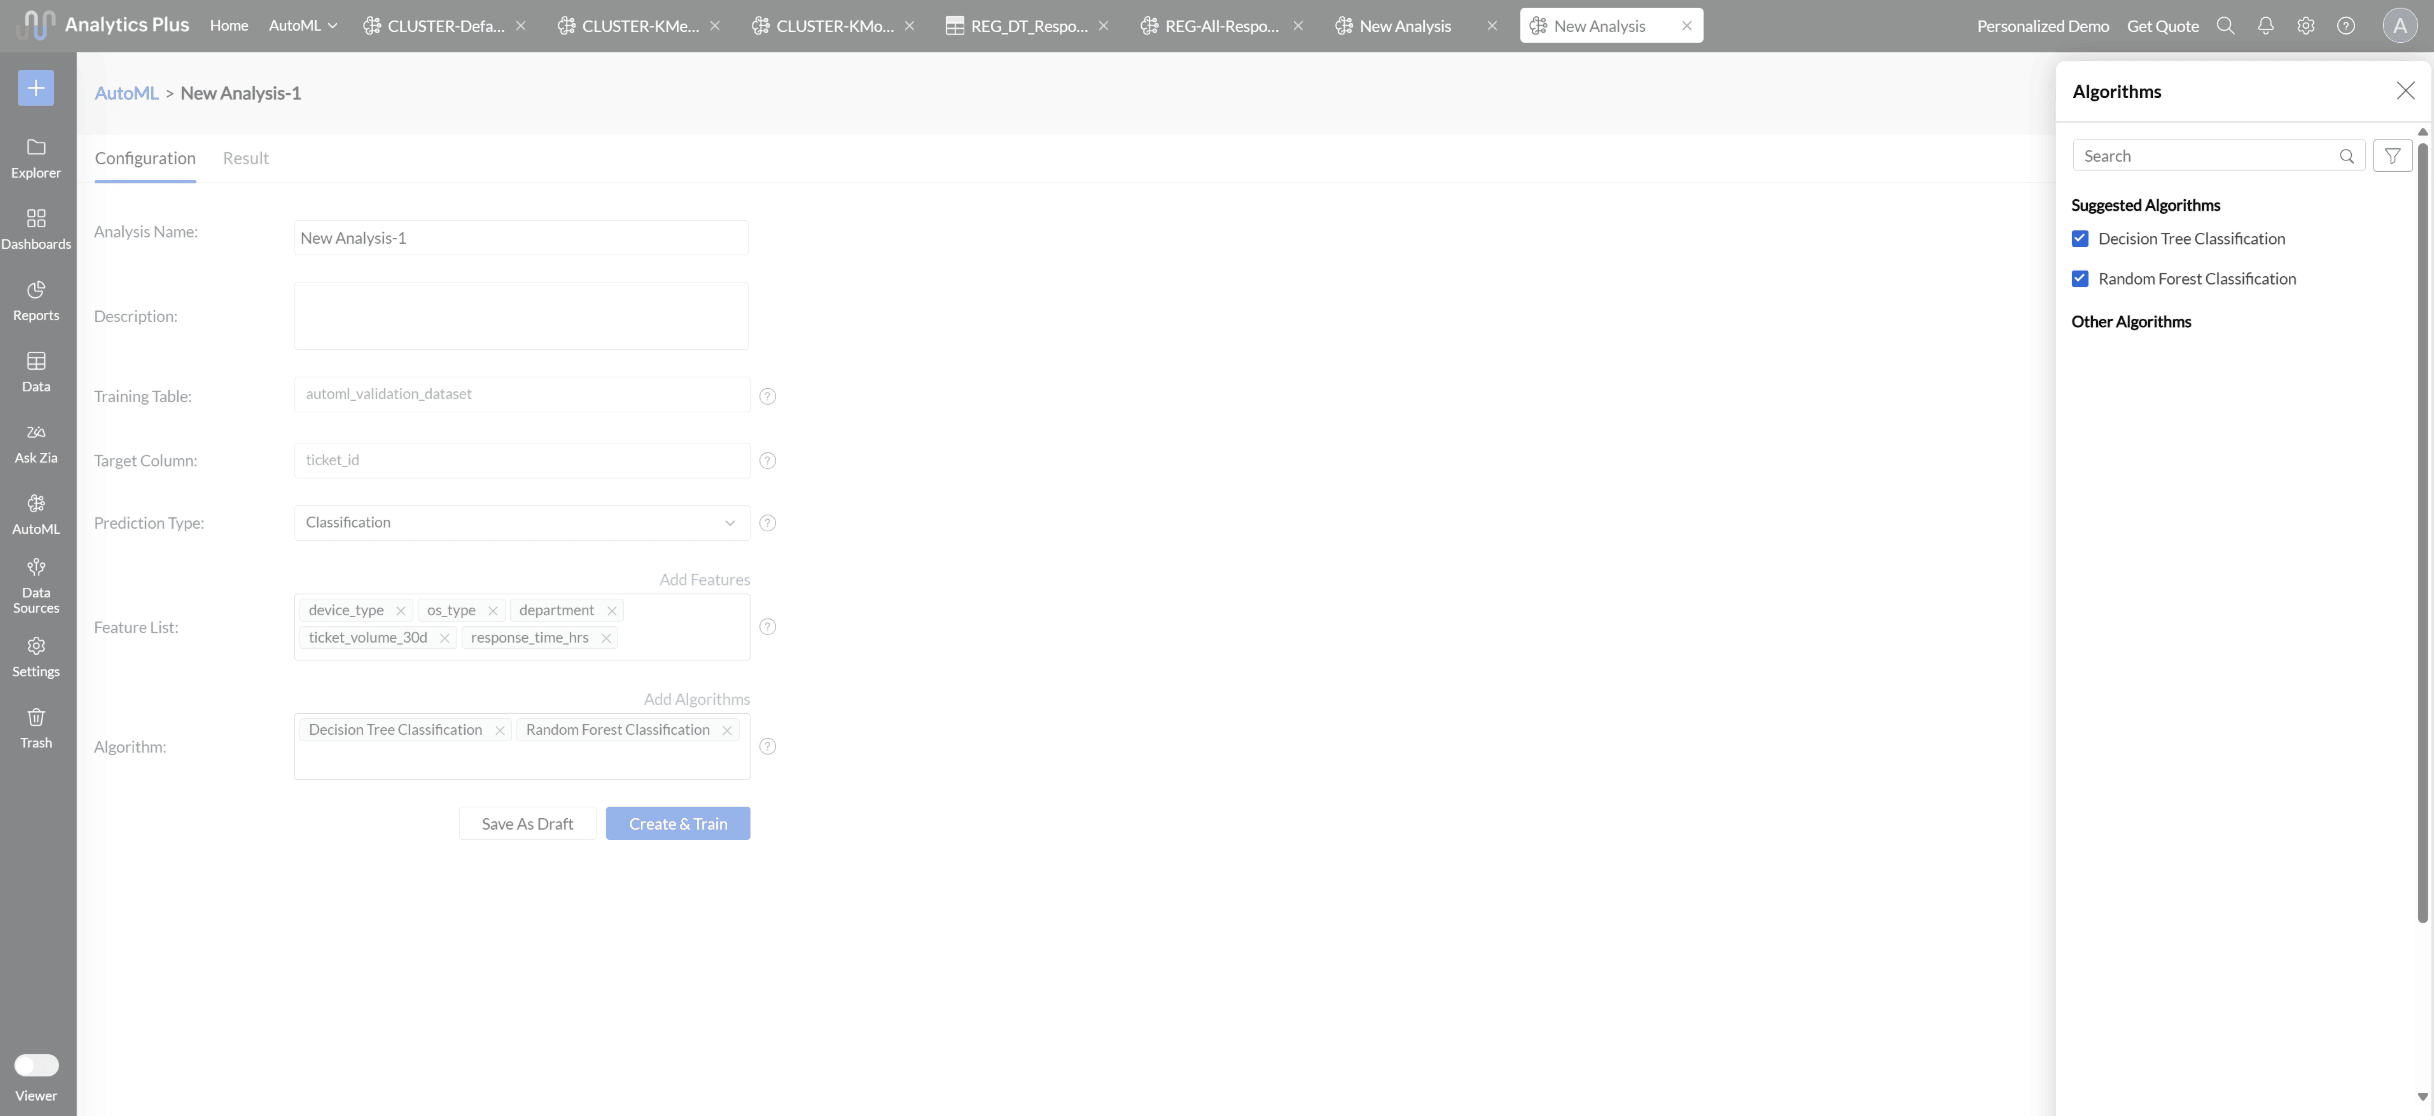
- Analytics Plus automatically selects the most suitable algorithm for training. However, you can also choose specific algorithms for model training. Click Add Algorithm to select the algorithms you want to use for training the model.
Click the Settings icon to modify the parameter settings.
- The Save as Draft option lets you preserve the model configuration, including algorithm selection and feature settings, so that you can initiate model training later at your convenience.
- Click Create and Train to initiate the model training.
- Choose the Server options and click Save and Train.
Model information
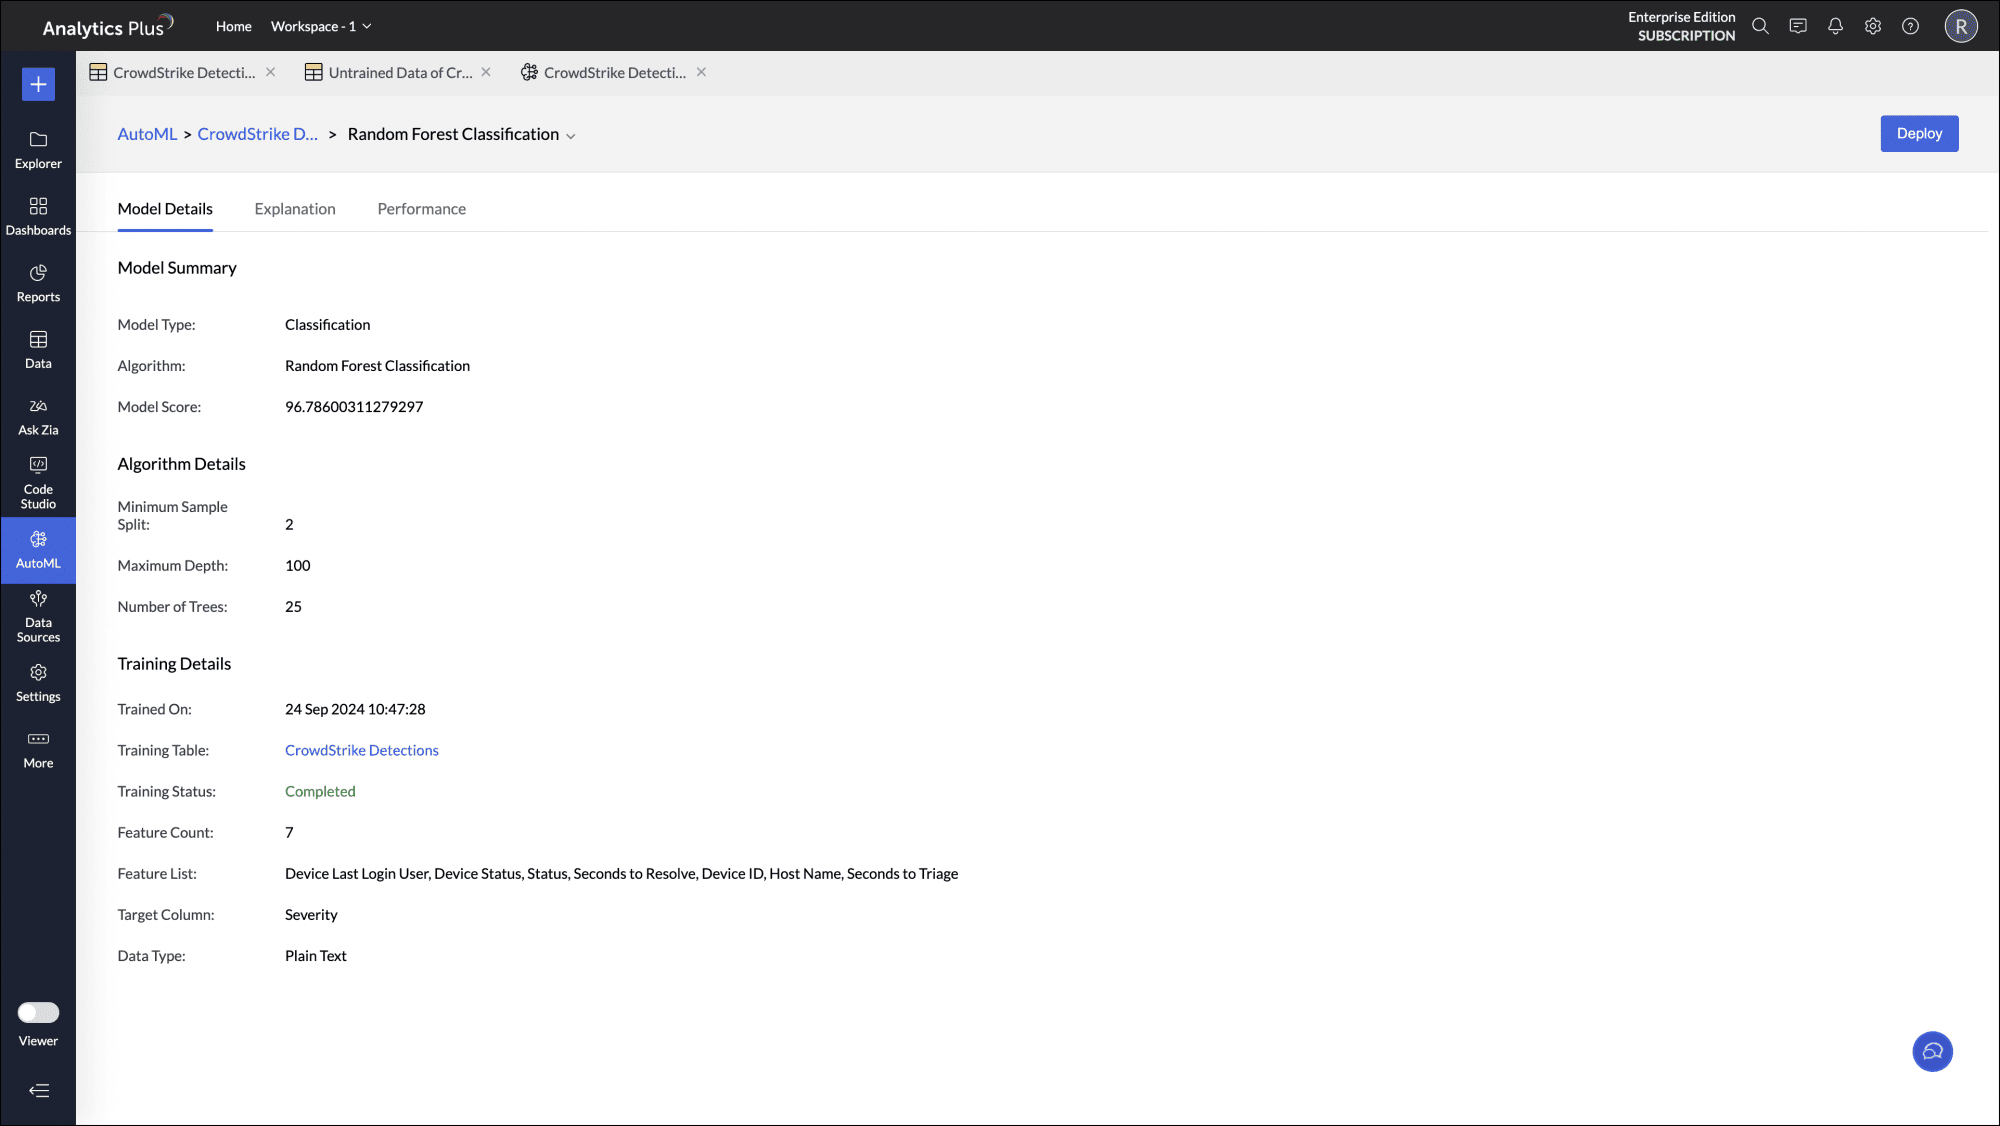
Once the training is completed, the model will be saved and will be listed in the Analysis tab. Click the model name to get additional details such as the Algorithm Name, Accuracy and Training Time of the model.
Deploy the ML model
Once you have assessed the quality of the ML model, you can deploy it on a production dataset to get results.
- Click the Deploy Now button on the top.
- Select the Input table for which the prediction model should be applied.
- Select the Output table—this is the table where the result of the model will be stored.
- Choose the import type in output table
- Delete existing records and add: Deletes all existing rows in the table and adds the imported data as new entry.
- Add records at the end: Choosing this will append the new records to the end of the table.
- Add records and replace if already exists: Updates the existing records in the table and appends the new records at the end of the table.
- Select the Schedule Time.
Click Deploy Now.
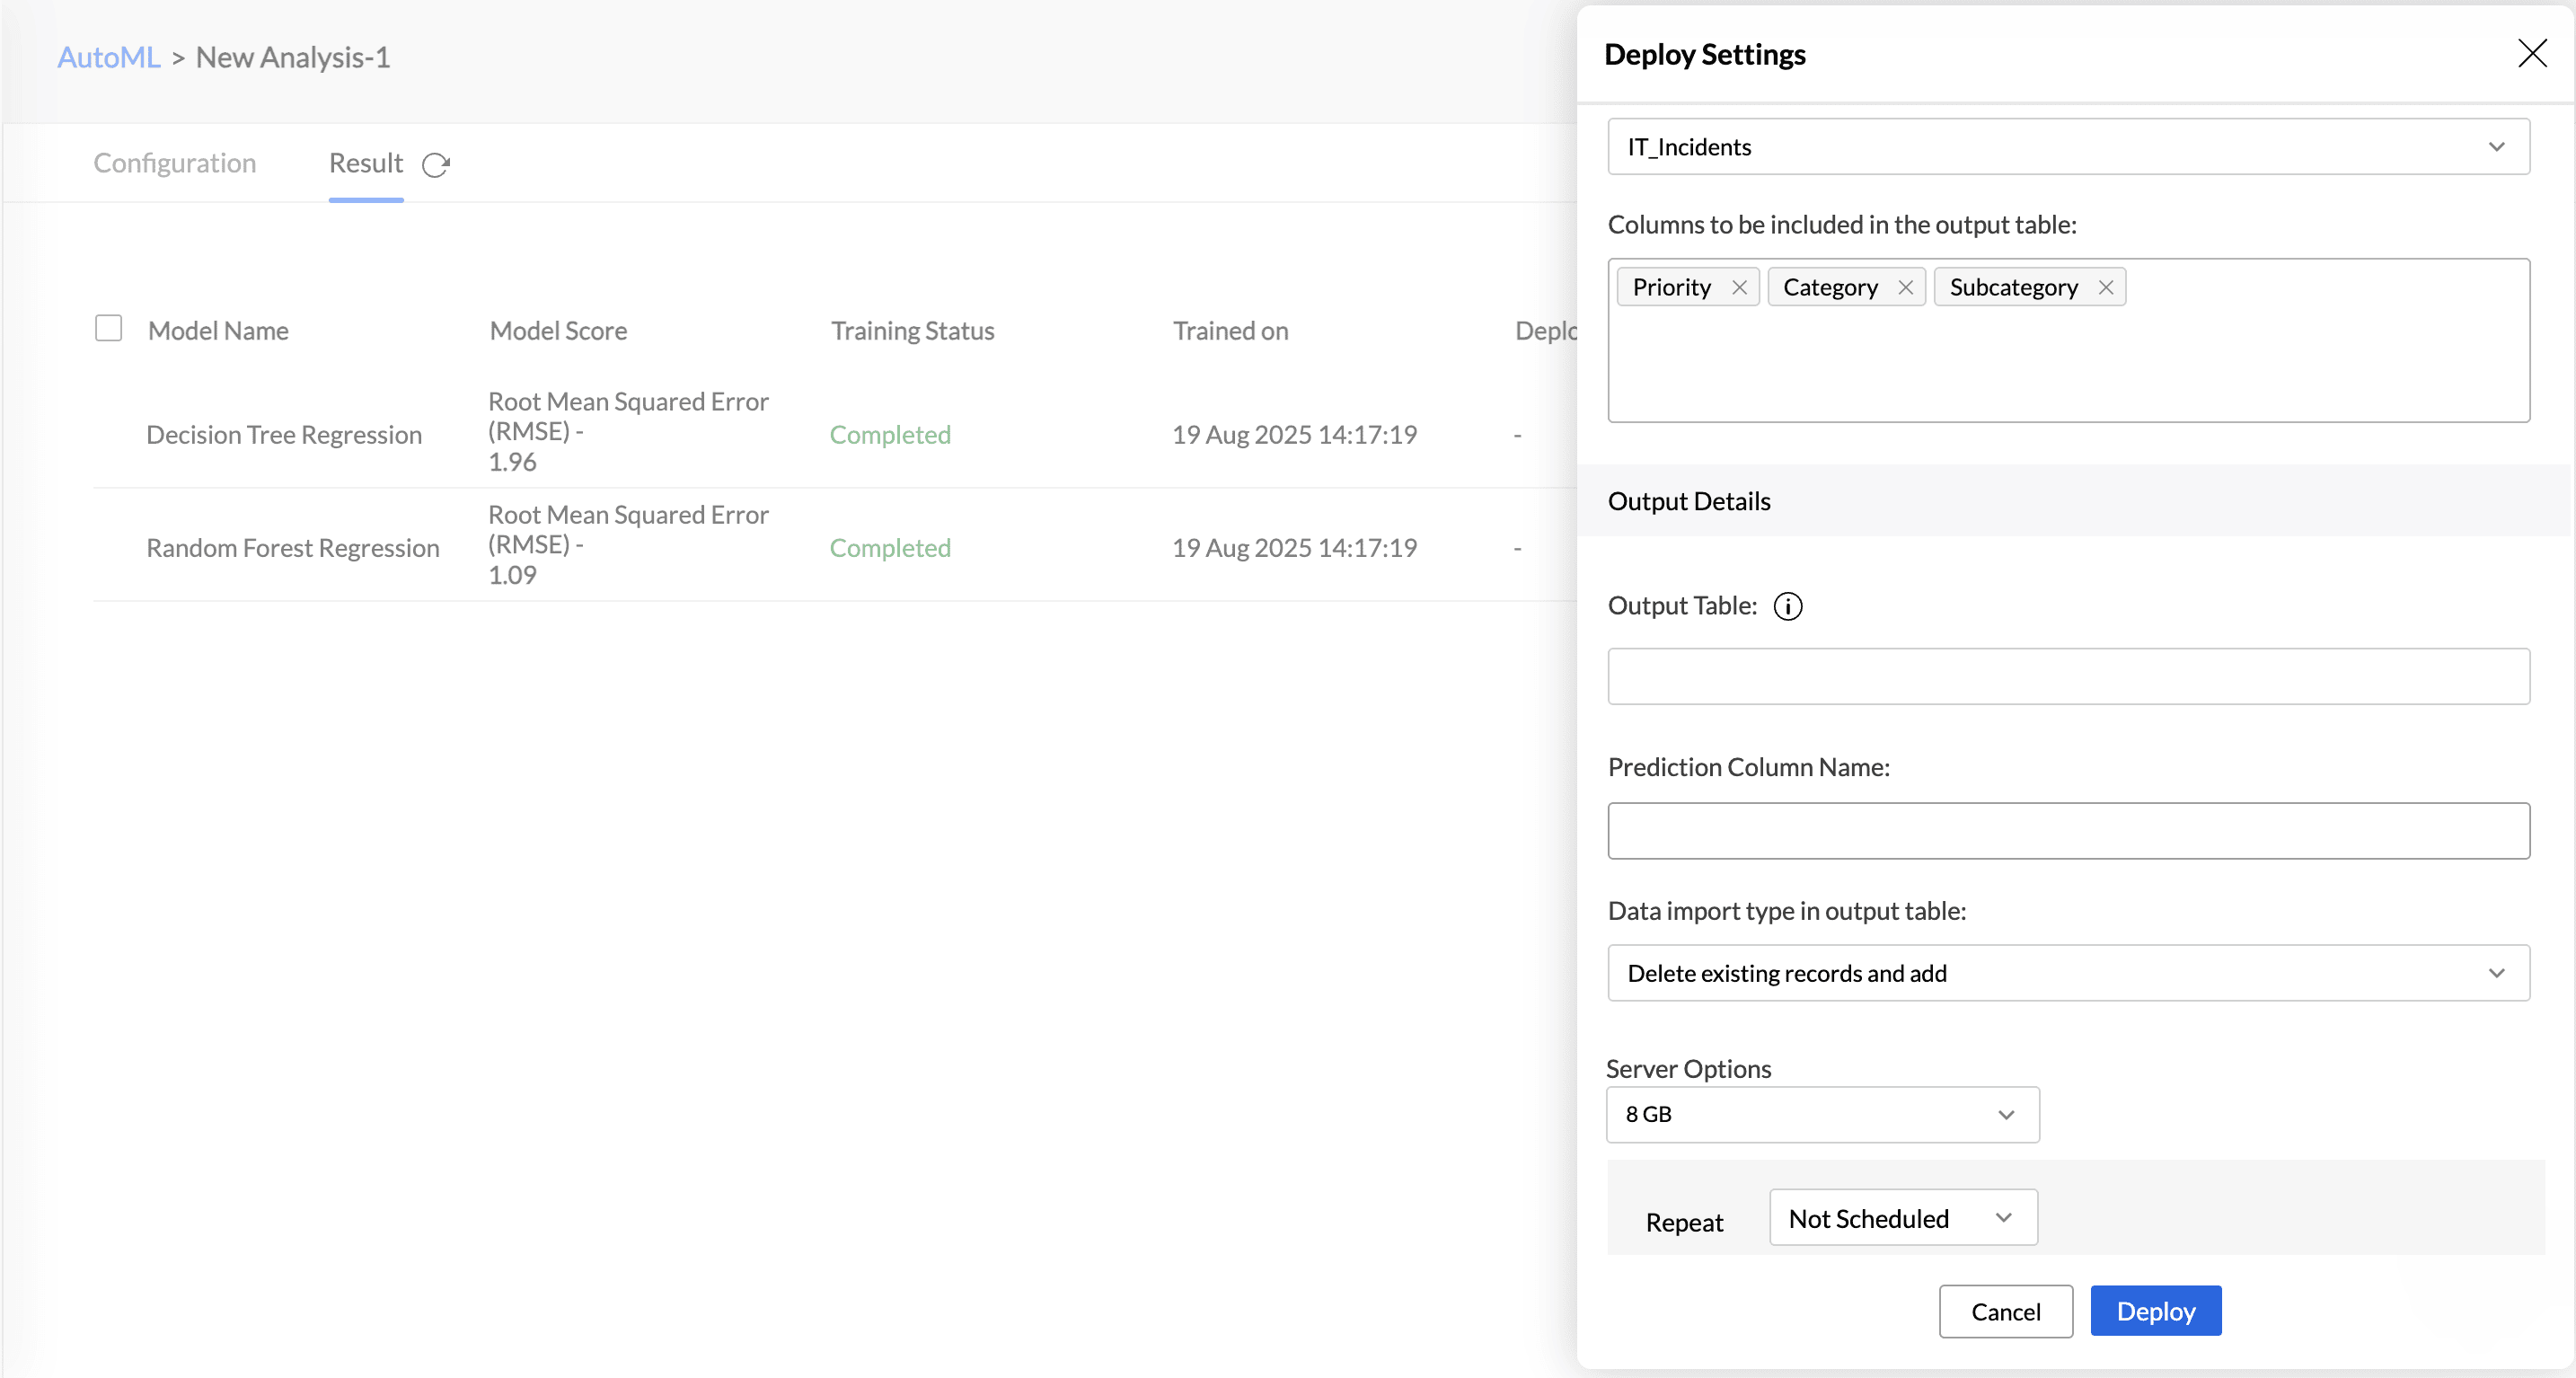
A new table will be created; you can then create visualizations on top of it.
Retrain the ML Model
Data patterns and operational insights evolve, requiring constant model adaptation. Machine learning models trained on old data lead to inaccurate insights and poor decisions. Periodically training ML models helps adapt to current trends, reduce errors, eliminate data drift, improve model performance, and make them suitable for current business objectives.
Analytics Plus allows you to retrain an ML model in any of the following three ways:
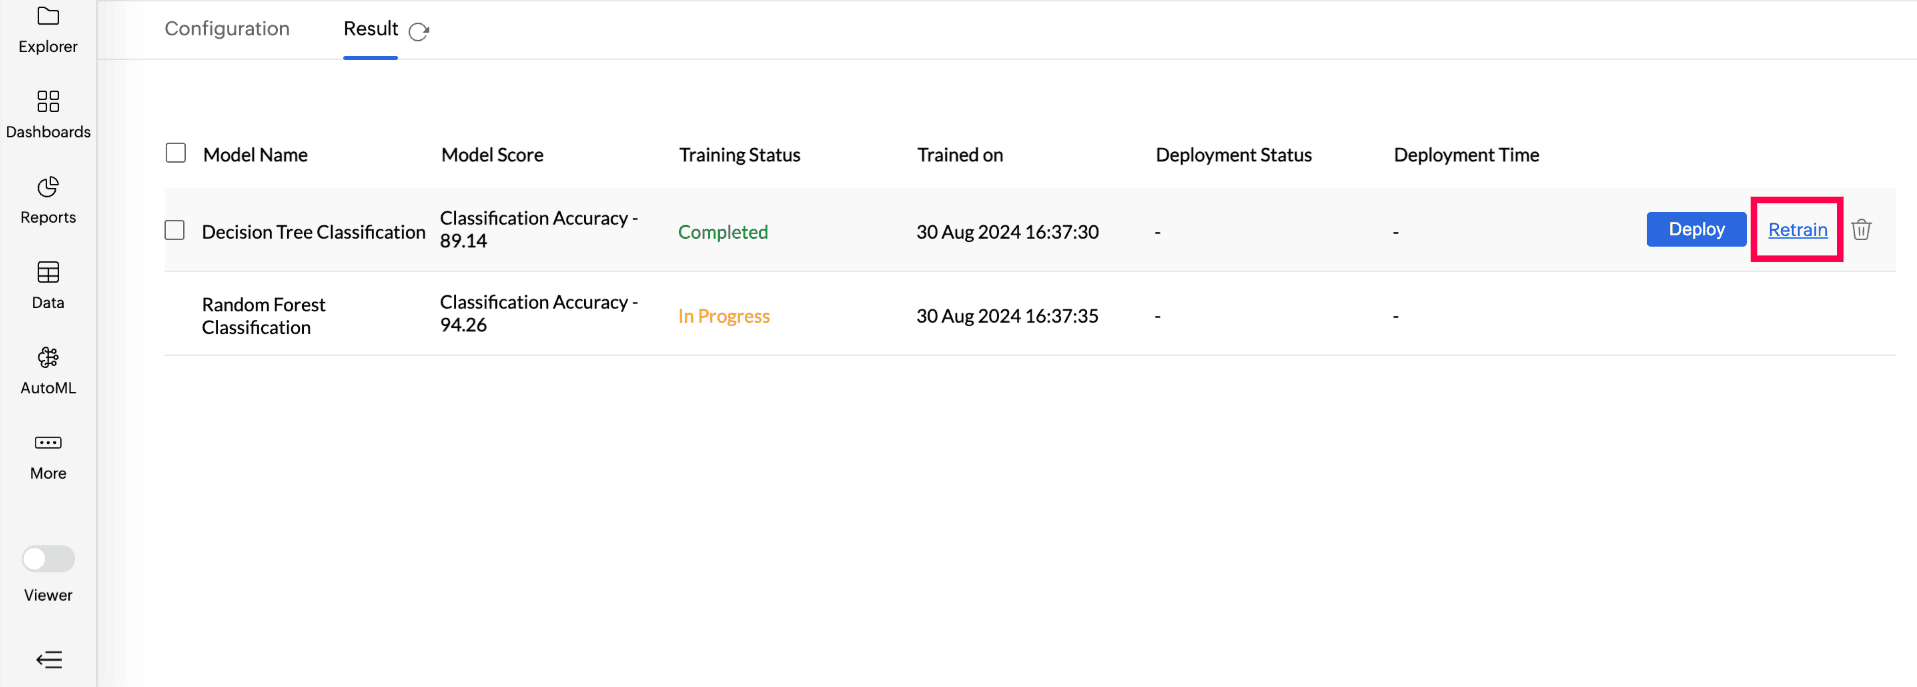
Retraining a specific ML model: Access the AutoML tab and choose the Model you want to retrain. Hover on the model and click Retrain.
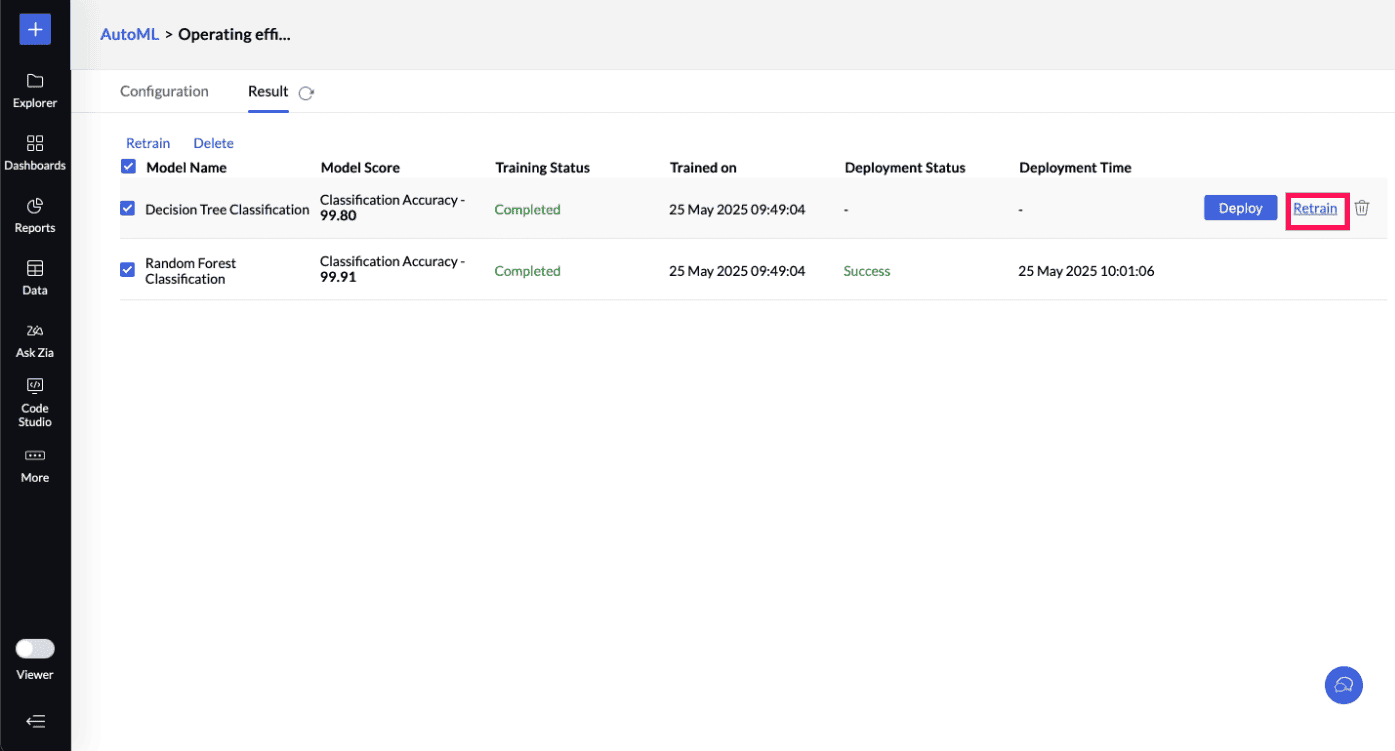
Retraining Multiple ML Models: You can also multi-select the ML models you want to train and click the Retrain option on the toolbar.
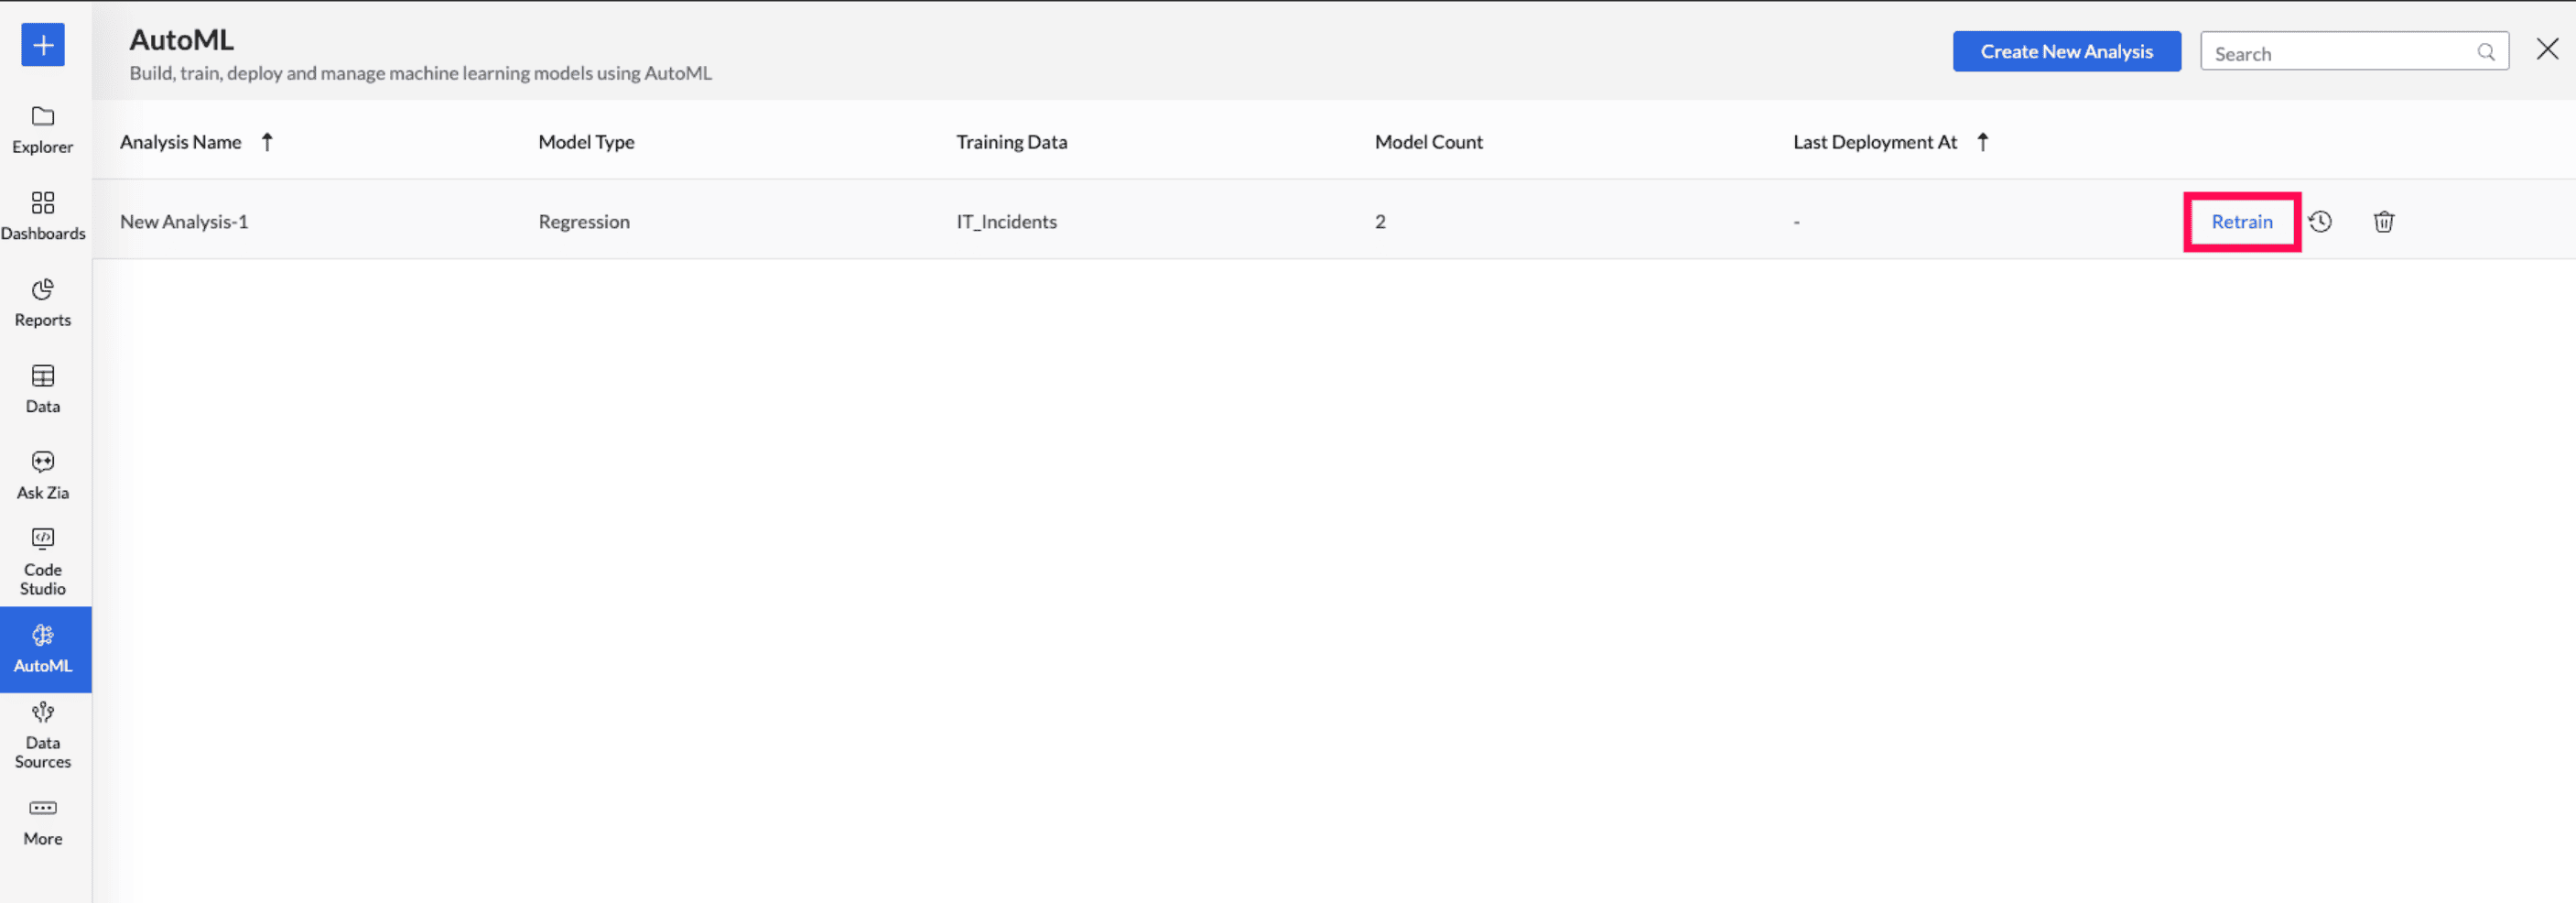
Retraining an Analysis: Access the AutoML tab and hover over the Analysis to be retrained, and click Retrain. This will retrain all the models in the selected analysis.
Delete the ML model
Deleting a machine learning model permanently removes the trained model and its associated metadata from the system. This is usually done to free up storage, remove obsolete models, or eliminate those misaligned with current data or business goals.
Machine learning models in Analytics Plus
The quality of the output generated by AutoML framework will depend on choosing the right machine learning model from the available list of options. Ensure you select the model that is most appropriate to the dataset at hand and the result that is expected.
Regression Model
Regression is a supervised learning method used to determine the relationship between the dependent and independent variables. The regression model is primarily used for predictive analysis.
Random Forest Regression
Random forest regression is a supervised machine learning algorithm that uses a combination (ensemble) of decision trees for prediction. Random subsets of the training data are chosen while constructing each decision tree. Each decision tree is combined to output a single prediction value.
The random forest model is best suited for predicting continuous values, like time series forecasting and price predictions. Since the algorithm involves constructing multiple decision trees, the predictions are always of high accuracy.
Classification Model
Classification is a supervised machine learning method that predicts the category or type to which an observation or data point belongs. For instance, the classification of emails as spam, social, or primary.
Random Forest Classification
The random forest classification is a supervised machine learning method that combines multiple decision trees to arrive at a conclusion. This method is best suited for discrete variables.
Clustering Model
Clustering is an unsupervised learning technique. This model identifies patterns and relationships within the data that are not immediately apparent and groups similar data points into clusters.
K - means
The K-means algorithm segregates a dataset into K distinct, non-overlapping clusters. This is an iterative process that assigns each data point to one of the K-clusters based on the input provided. This algorithm works effectively with quantitative data as it is based on calculating distances between data points.
K - modes
The K-modes algorithm is used for grouping categorical data, like segmentation based on demographics. Each cluster is determined by modes; the most frequent value in the cluster.
K - Prototypes
The K-Prototypes algorithm is an extension of the K-Means algorithm used for clustering datasets containing both numerical and categorical features. It combines the K-Means algorithm's clustering approach for numerical data with a mechanism to handle categorical data.
What-if analysis in AutoML
What-if analysis in AutoML enables you to explore how changes in IT metrics or operational factors affect the final outcomes predicted by the machine learning models. By simulating different scenarios, you can:
Understand feature impact: Identify which parameters, such as ticket volume, response time, or SLA compliance, most influence the outcome.
Test hypothetical situations: Evaluate the effect of changes—for example, hiring additional support agents, modifying shift schedules, or adjusting incident prioritization.
Support IT planning: Predict future outcomes by modelling best case, worst case, or most likely scenarios.
Note: For information about AutoML availability and pricing, see the Analytics Plus pricing page.