Deploying the IDSecurity Agent on Windows using Group Policy
The IDSecurity Agent secures a Windows machine by enforcing multi-factor authentication on device actions such as login, and, on Identity360-joined devices, by acting as the identity provider for the device.
System requirements
| Item | Requirement |
|---|---|
| Supported operating systems |
Windows Server 2025, 2022, 2019, and 2016 Windows 11, 10, and 8.1 |
| Supported architectures | x64 and Arm64. |
| Runtime dependency | The latest Microsoft Visual C++ Redistributable installed. |
The agent needs the following outbound network access:
- Outbound rule: TCP on port 443 to your Identity360 data center domain (for example, id360.manageengine.com for the US data center).
- Outbound rule: WebSocket protocol on port 443 to the Zoho messaging service (DMS) domains for your data center. Required for Identity360-joined devices only.
DMS domains by data center:
| Data center | Primary domain | Secondary domain |
|---|---|---|
| US | us4-dms.zoho.com | us3-dms.zoho.com |
| EU | eu1-dms.zoho.eu | eu2-dms.zoho.eu |
| IN | in2-dms.zoho.in | in1-dms.zoho.in |
| AU | au1-dms.zoho.com.au | au2-dms.zoho.com.au |
| JP | jp1-dms.zoho.jp | jp2-dms.zoho.jp |
| CA | ca1-dms.zohocloud.ca | ca2-dms.zohocloud.ca |
Prerequisites
- The installer and installation key from the Identity360 admin console:
- Sign in to the admin console and go to either Universal Directory > All Devices or Protection > Conditional Access Policy > Agent Summary > Install Agent.
- Download the installer (Identity360CloudIDSecurityAgent.msi) and copy the installation key shown under Step 2 of the agent installation steps.
Note The installation key authenticates the agent to your Identity360 organization during the first installation on a device. It is a unique secret for your organization and is the same for all platforms (Windows, macOS, and Linux). Treat it as a secret. If you suspect it has leaked, use Regenerate Installation Key to issue a new key for future installations; devices that have already enrolled are unaffected. - Optional: a customizations.json file, if you want to customize the agent. See Customizing the IDSecurity Agent.
Deploying the agent
Step 1: Prepare the installer files
- Download the Identity360CloudIDSecurityAgent.msi file from the Identity360 admin console (Step 1 of the agent installation steps).
- Copy the installation key from the admin console (Step 2 of the agent installation steps).
- Generate a transform file (MST) for the installer using a table-editor tool such as Orca (distributed with the Windows SDK):
- Open the Identity360CloudIDSecurityAgent.msi file in Orca and go to Transform > New Transform.
- Select the Property table and click Add Row.
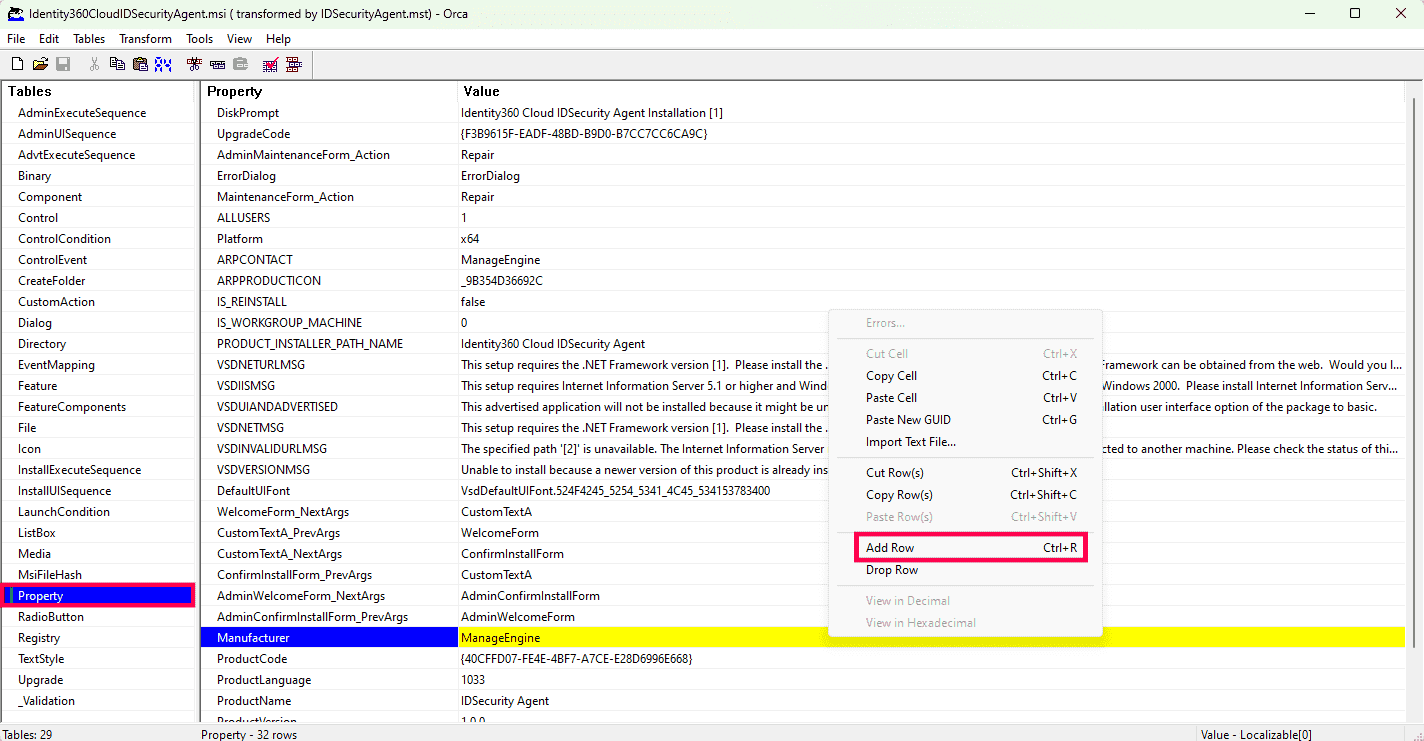
Fig 1: Adding a row to the Property table in Orca. - Enter the property below and click OK:
Property Value INSTALLATION_KEY The installation key copied from the admin console. 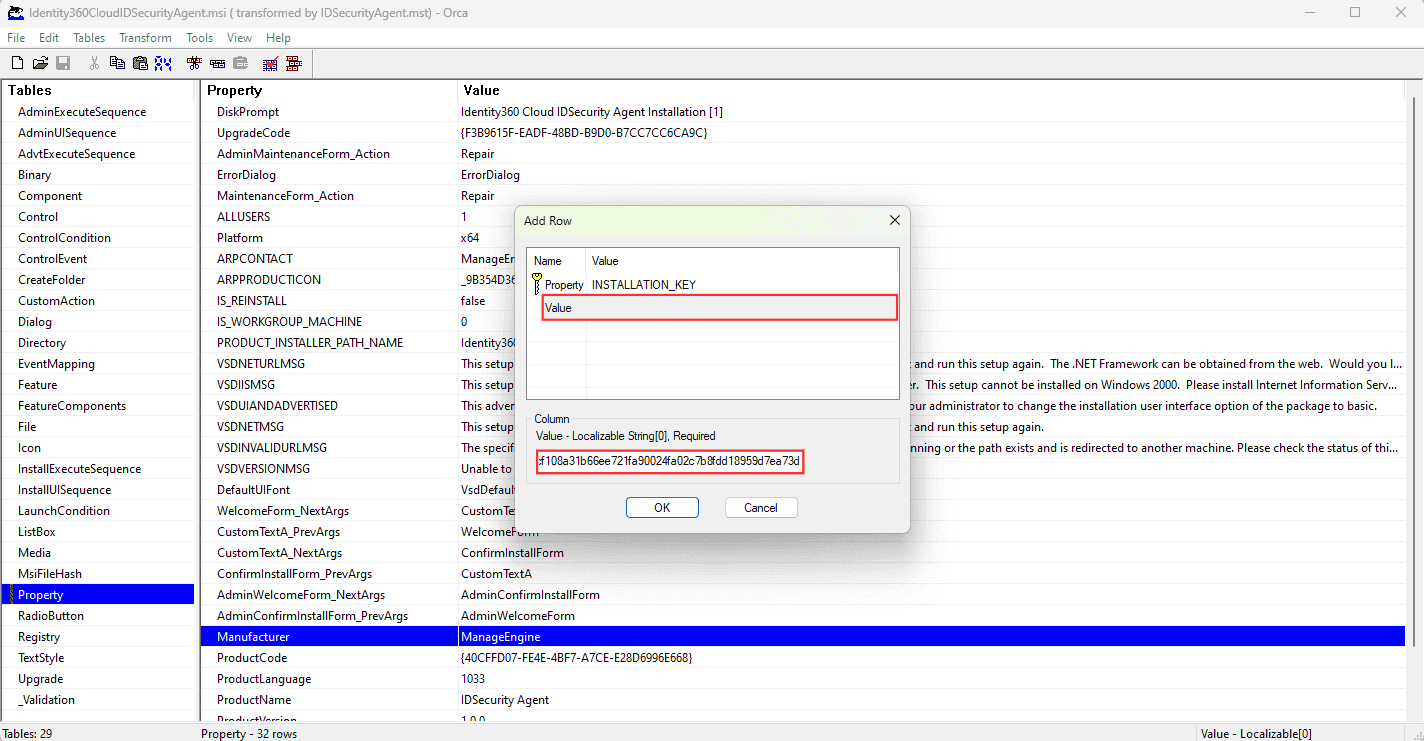
Fig 2: Setting the INSTALLATION_KEY property value. - Go to Transform > Generate Transform to create the MST file with the installation key.
- Exit Orca without saving changes to the original MSI file.
Step 2: Create a network share
- Create a network-shared folder on your server and place the Identity360CloudIDSecurityAgent.msi file in it.
- Copy the transform file (MST) created in Step 1 into the same network share.
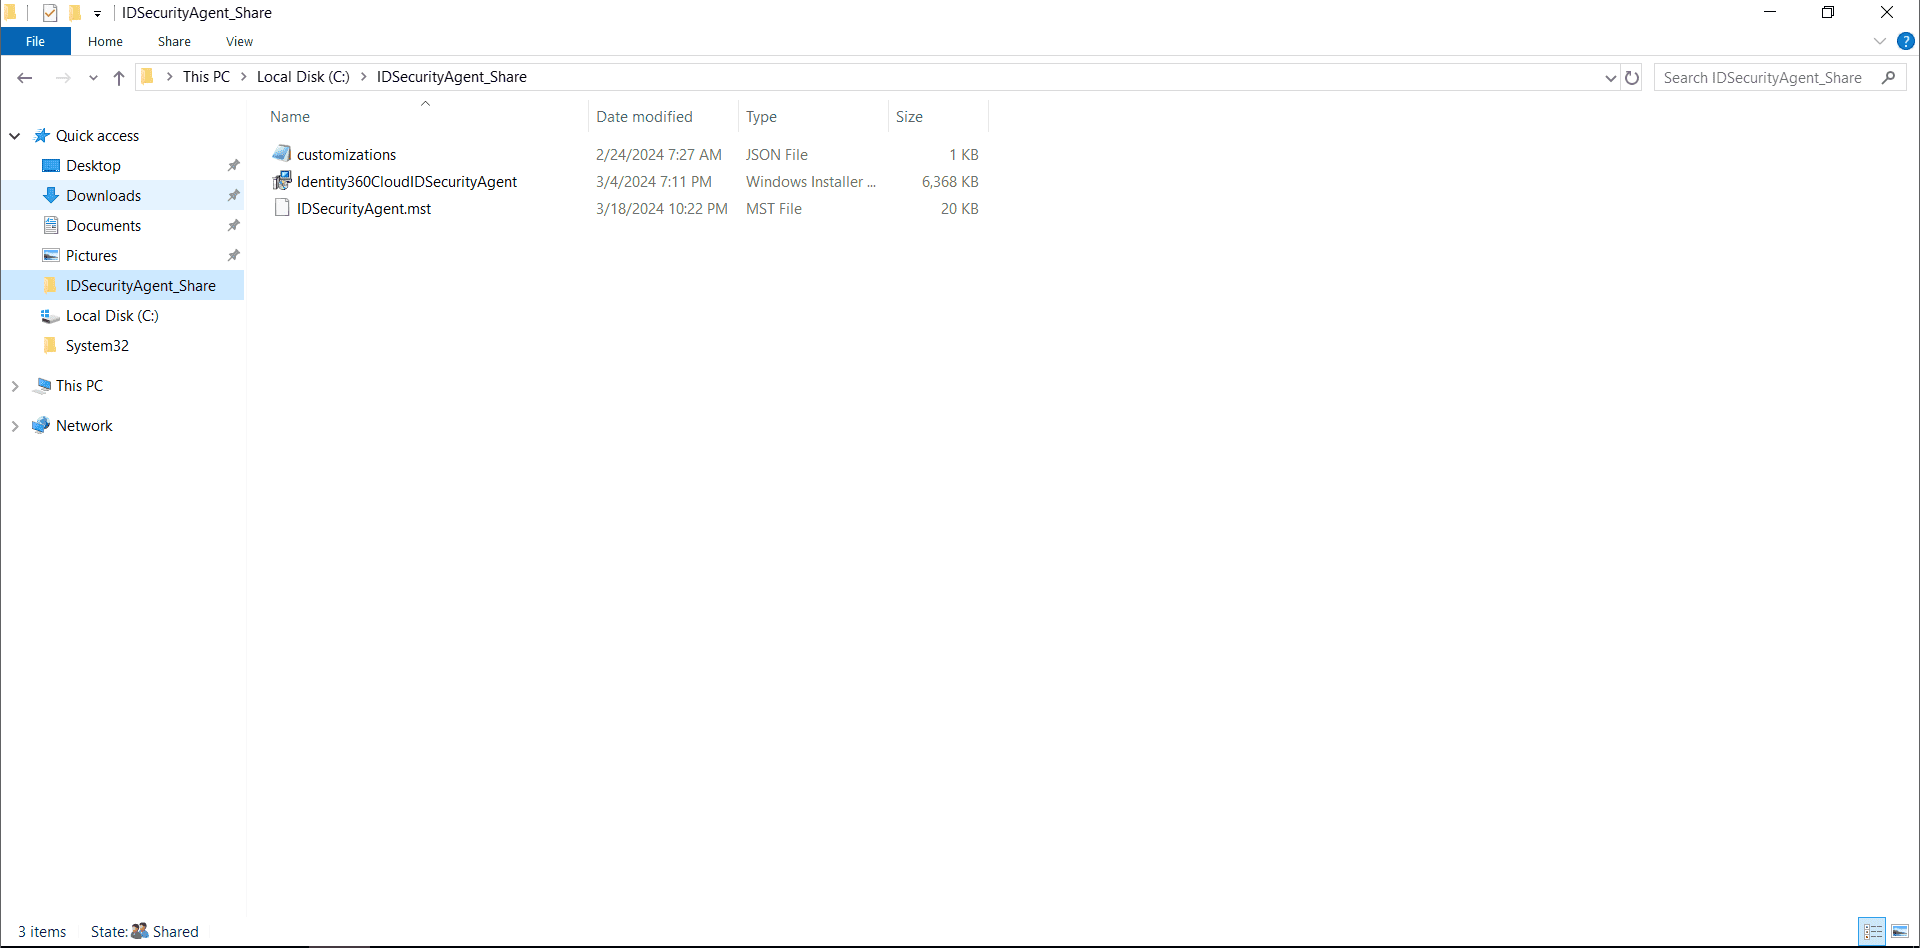
Fig 3: The MSI and MST files in the network share.
Essential security permissions
- Right-click the network-shared folder and select Properties > Advanced Sharing.
- Select Permissions, add only the Authenticated Users group, enable only the Read permission in the Allow column, and click OK.
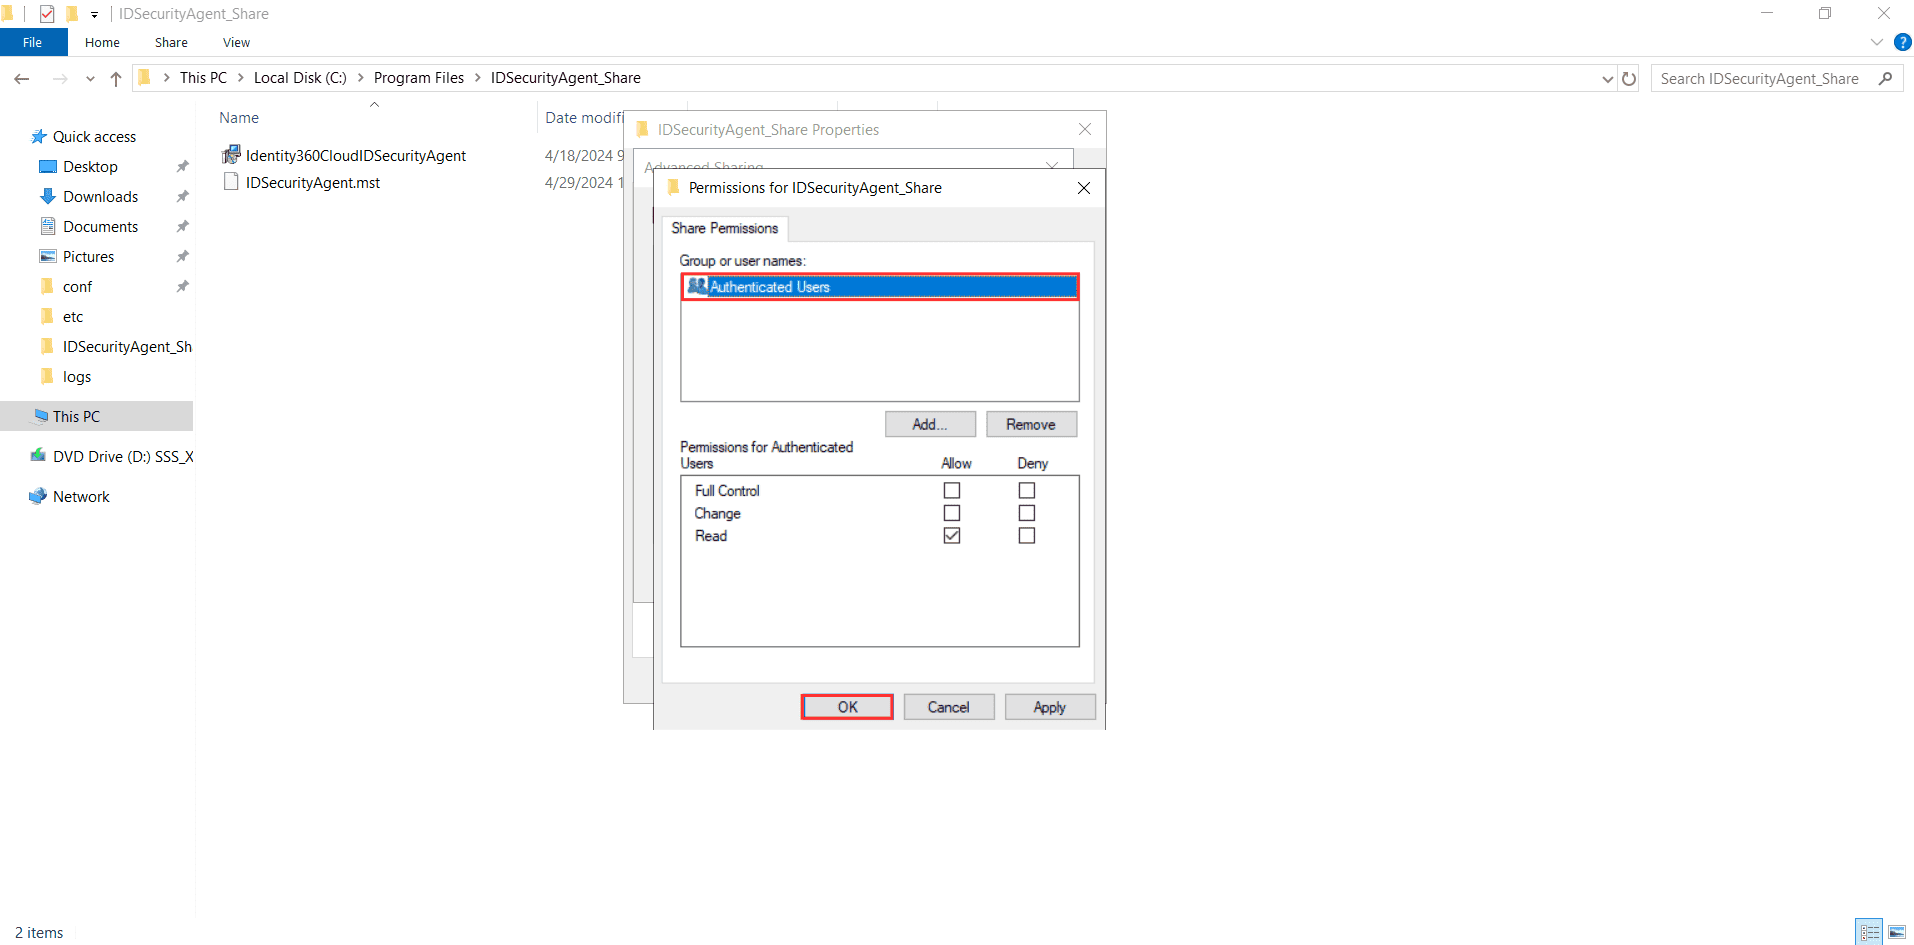
Fig 4: Granting Authenticated Users read-only share permission. - Go to the Security tab and click Edit.
- Click Add, select the custom computer group you created, and click OK.
Note Ensure no users or groups other than CREATOR OWNER, SYSTEM, Administrators, and your custom computer group can access the network-shared folder. Ensure the transform file (MST) has identical security permissions.
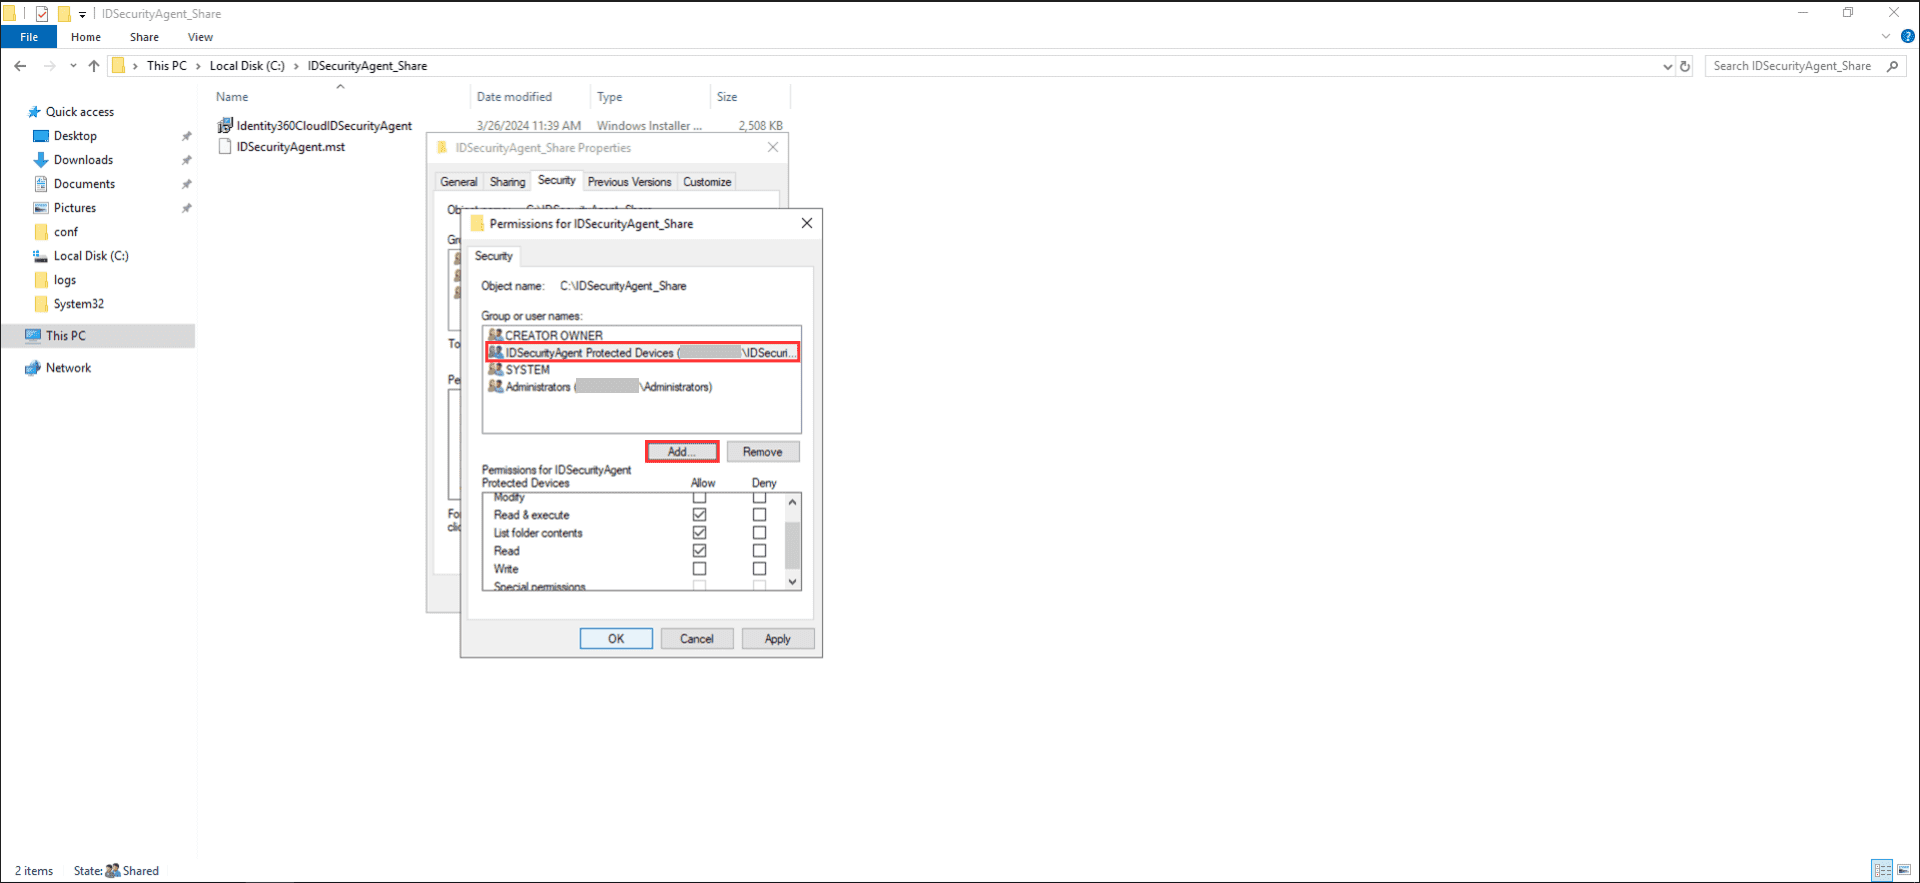
Fig 5: Restricting security permissions to the custom computer group.
Step 3: Create and link the GPO
- Open the Group Policy Management console.
- In the left pane, right-click the Group Policy Objects container and select New.
- Give the GPO a descriptive name and click OK.
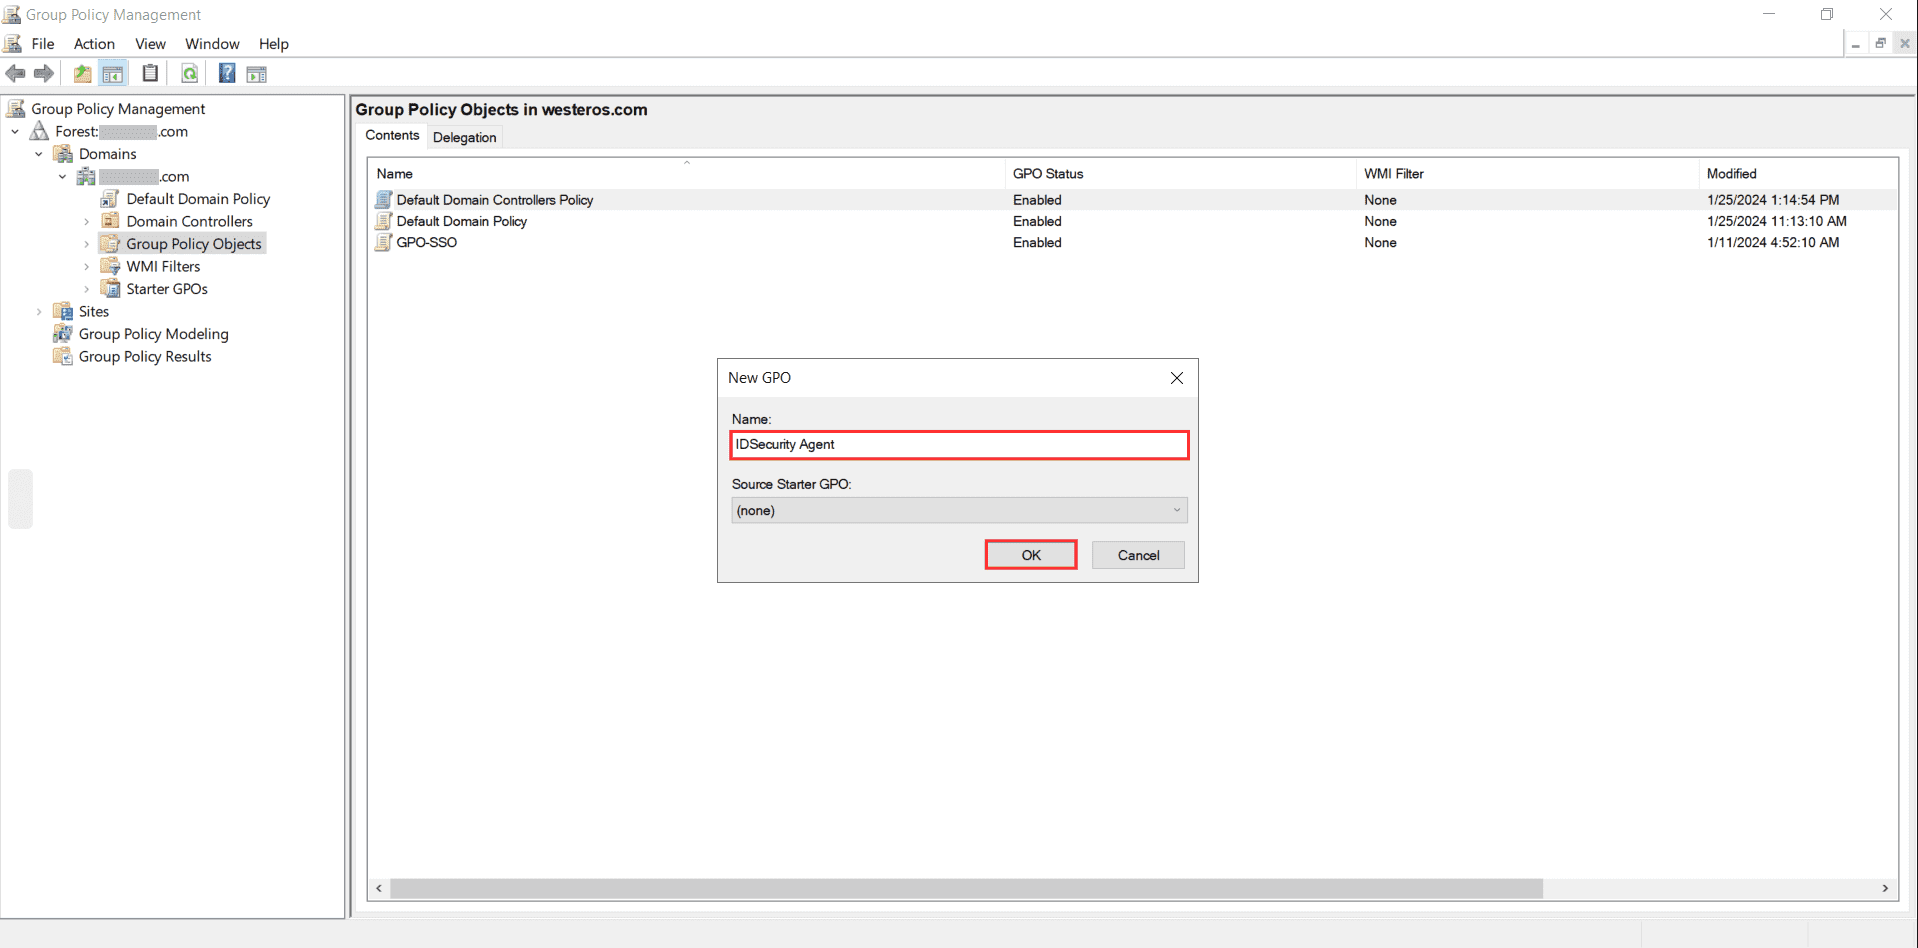
Fig 6: Creating a new GPO. - Right-click the preferred OU or domain and select Link an Existing GPO.
- In the Select GPO window, choose the GPO you created and click OK.
- Select the GPO, and on the Security Filtering tab, click Add and add your custom computer group.
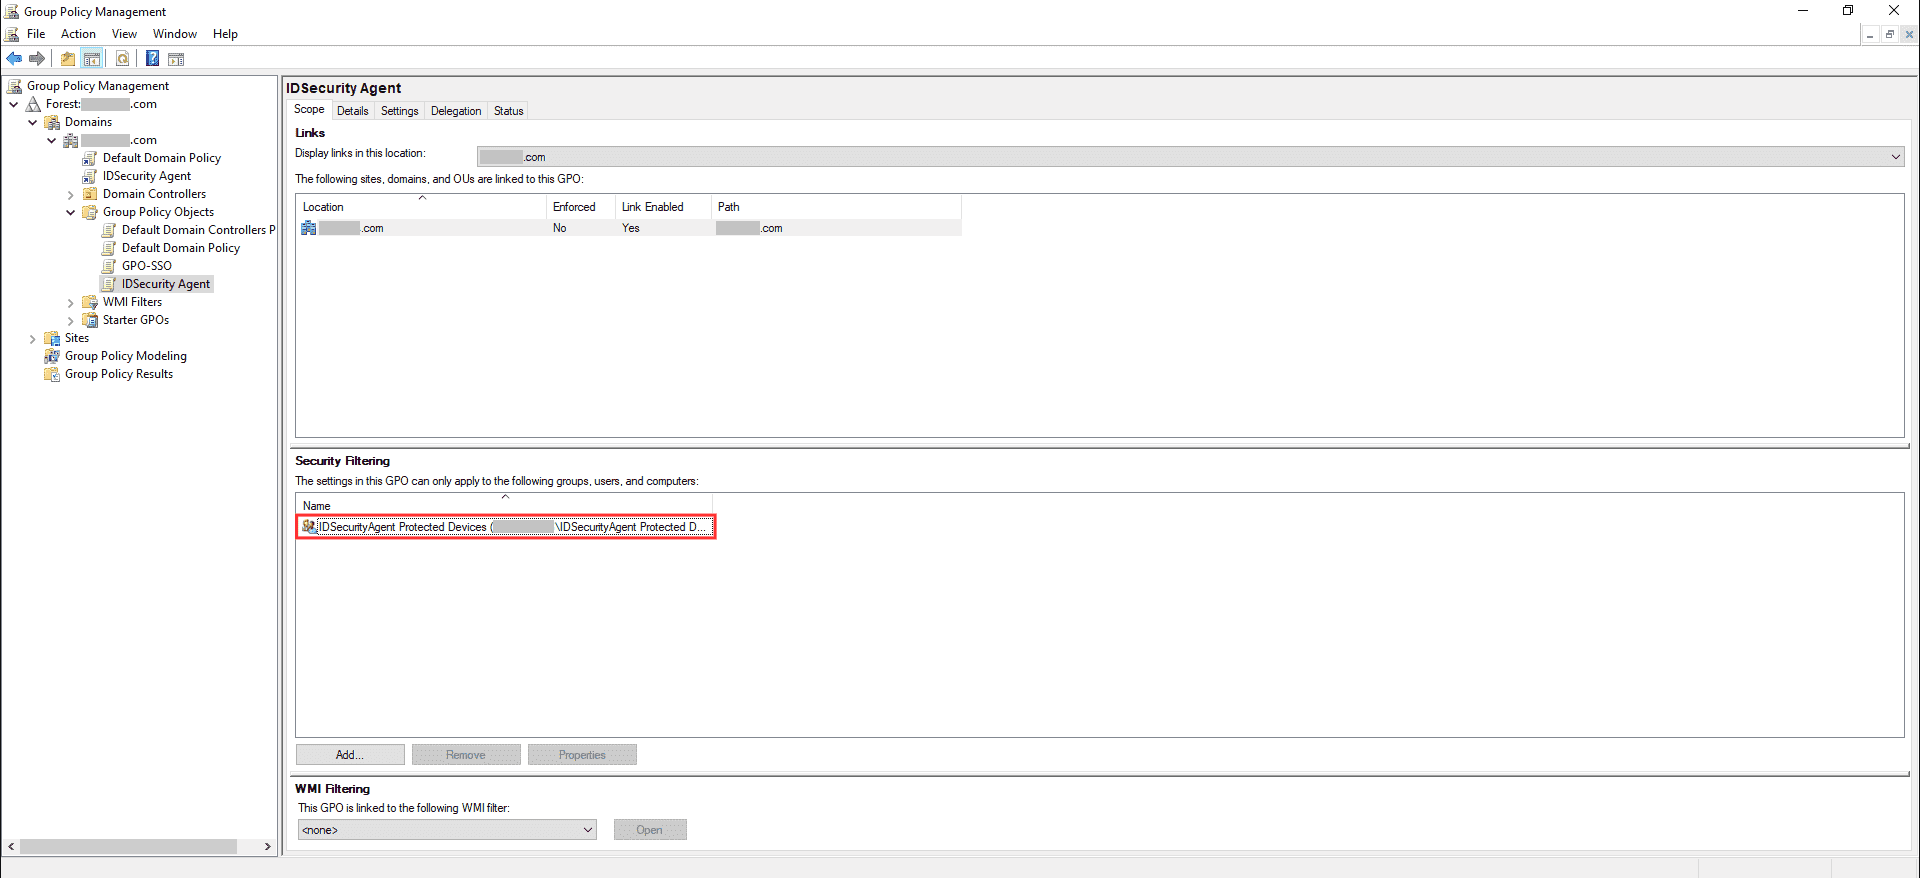
Fig 7: Adding the custom computer group to Security Filtering. - On the Delegation tab, ensure the group has Read and Apply group policy permissions enabled.
Step 4: Configure software installation settings
- Right-click the GPO you created and click Edit to open the Group Policy Management Editor.
- Right-click Computer Configuration > Policies > Software Settings > Software installation, then select New > Package.
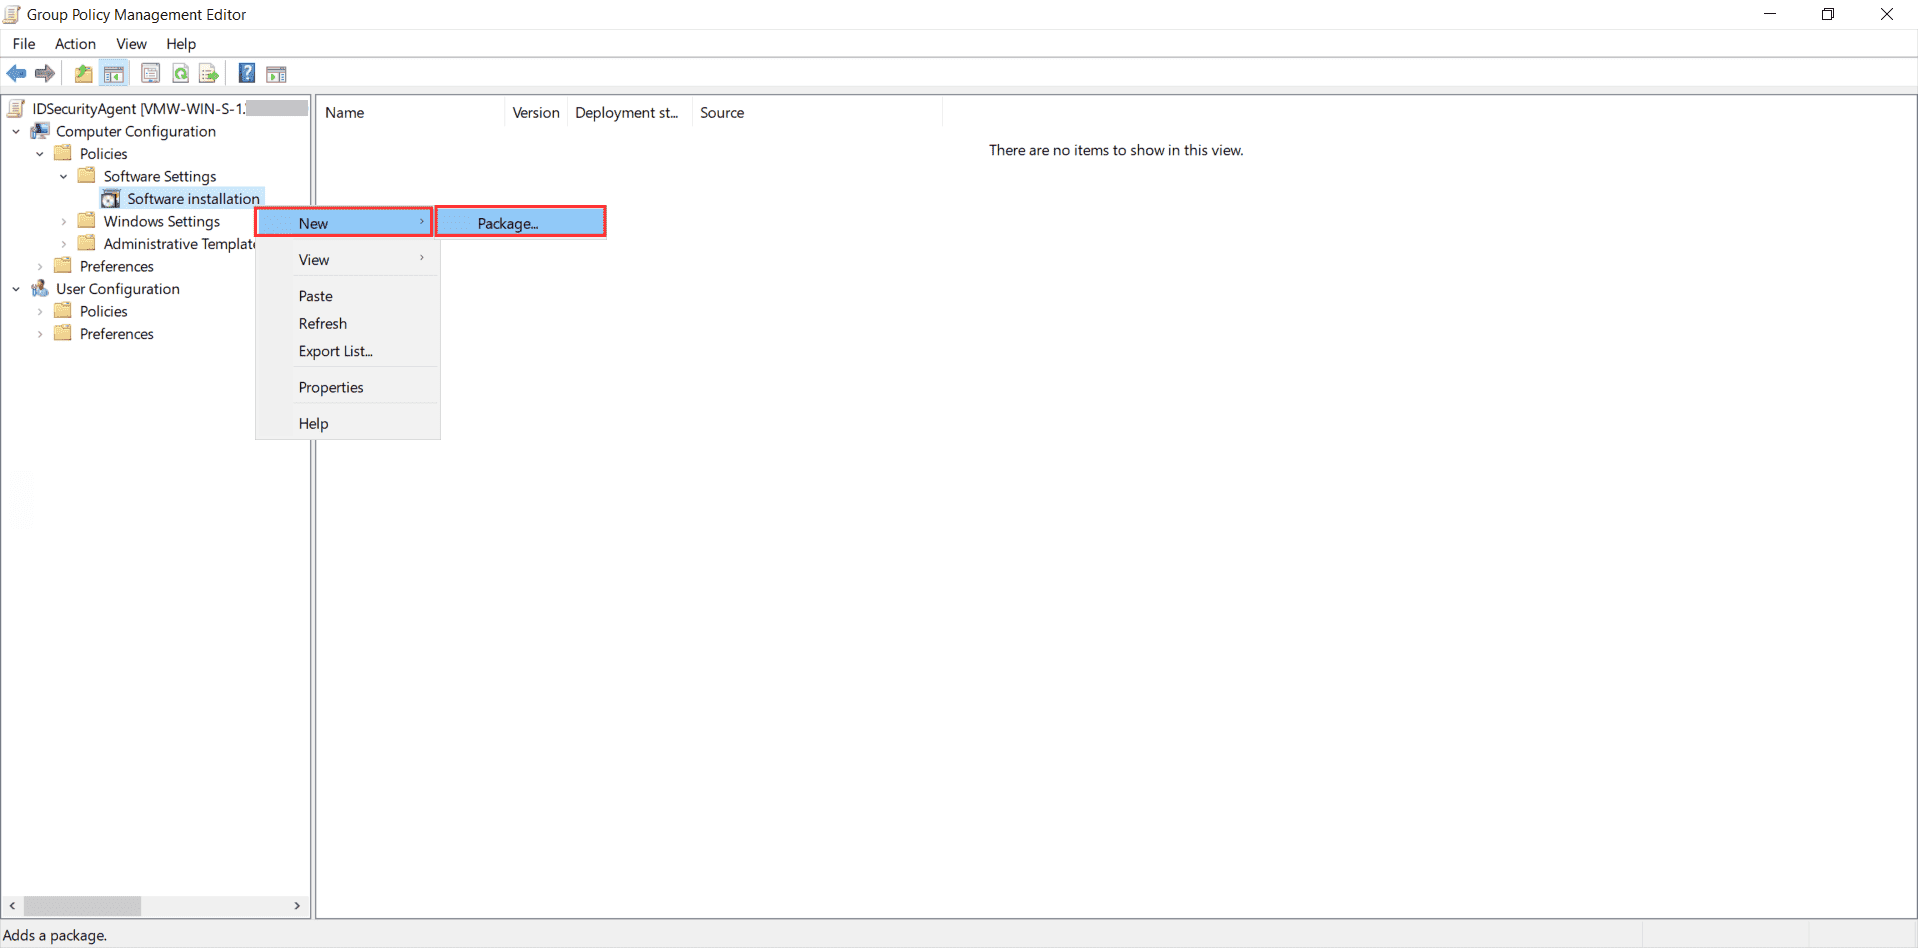
Fig 8: Adding a new software installation package. - Select the Identity360CloudIDSecurityAgent.msi file in your network share and click Open.
- In the Deploy Software window, select Advanced and click OK.
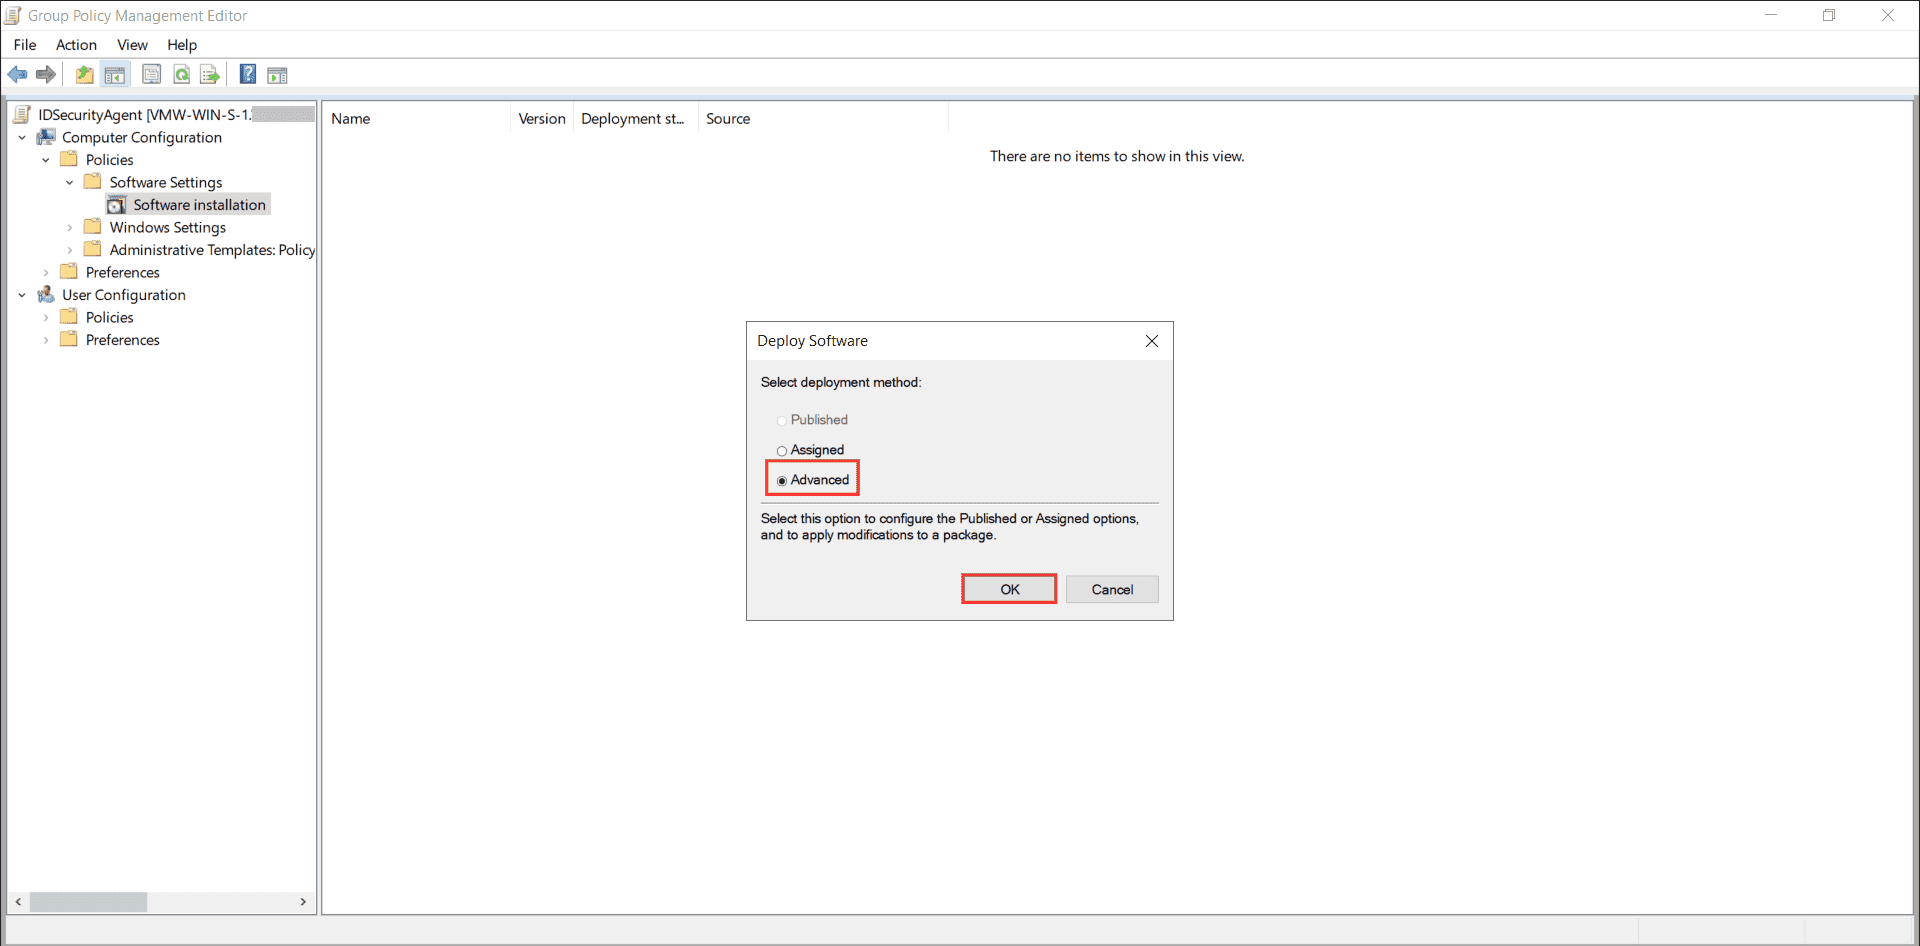
Fig 9: Choosing Advanced deployment. - In the properties window, go to the Modifications tab and click Add.
- Select the transform file (MST) in your network share and click Open.
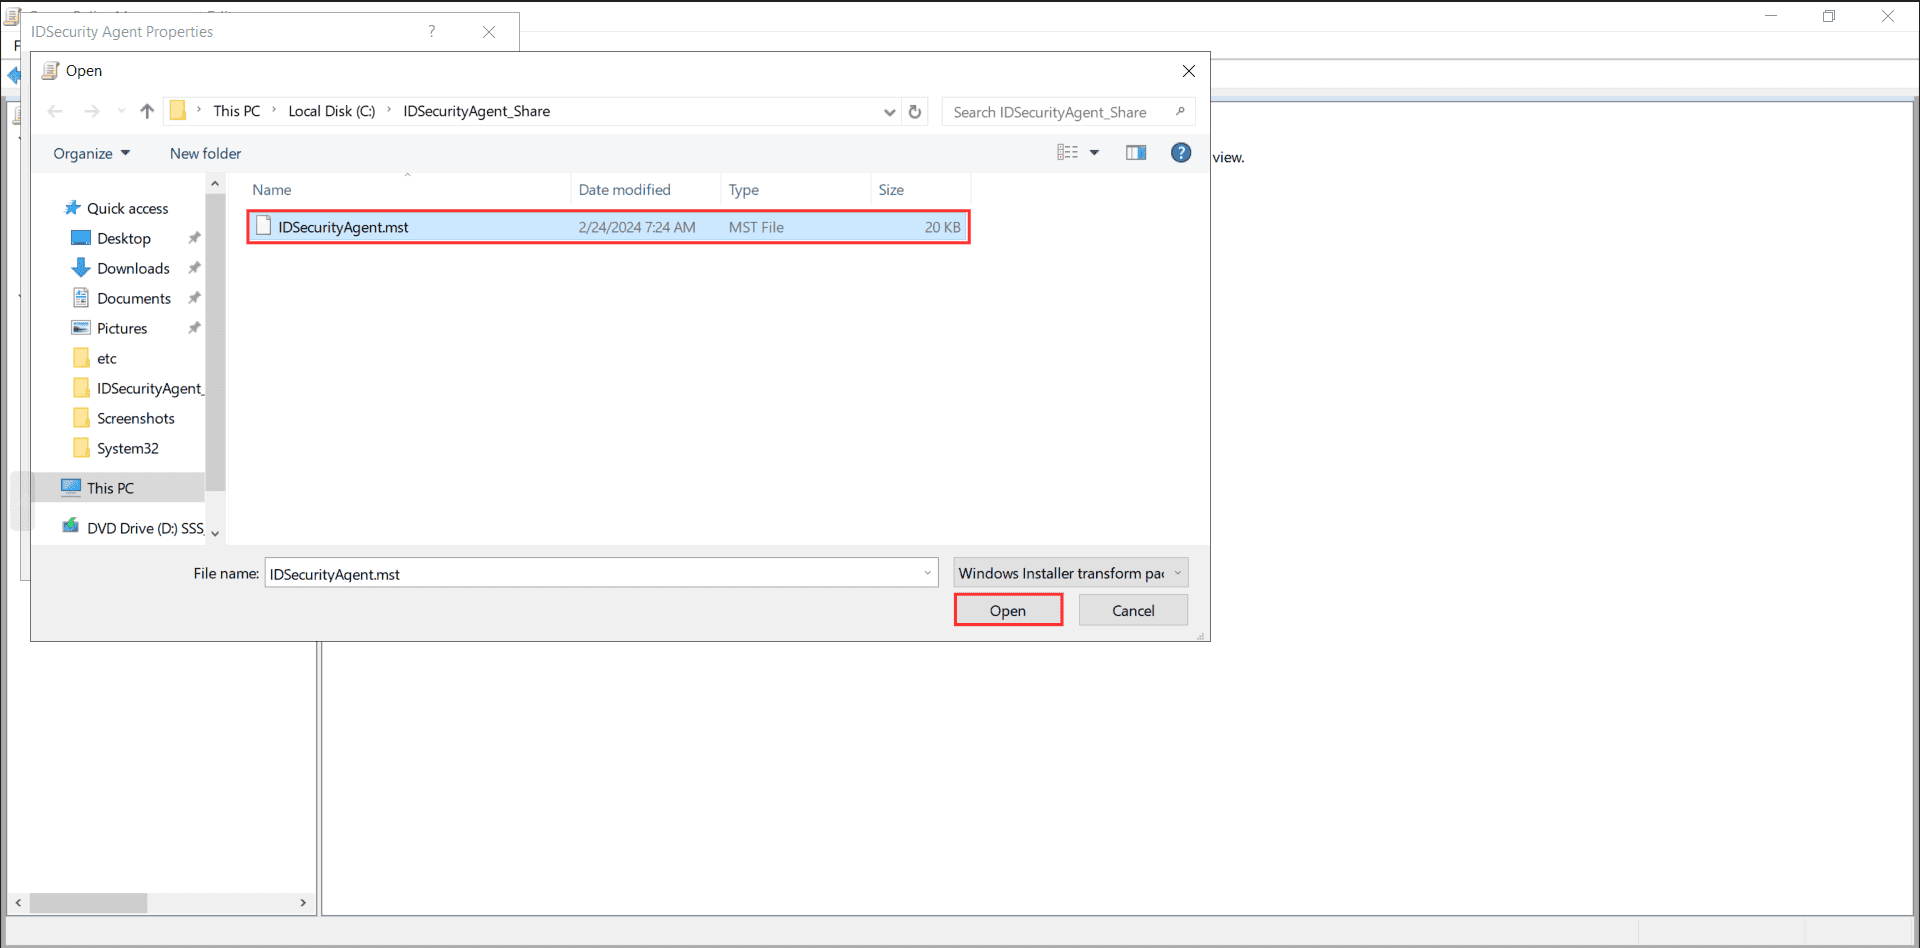
Fig 10: Adding the MST transform on the Modifications tab. - Click OK to complete the software installation setup.
Testing the agent installation
The installation takes effect only after the client machines reboot. Verify that the computers in the custom computer group have the agent installed:
- On a client machine, open Command Prompt and run gpresult /v.
- Confirm that the GPO you configured appears under Applied Group Policy Objects.
You can also confirm installation in the Identity360 admin console: go to Universal Directory > All Devices, find the device, and check the IDSecurity Agent Status column (AD/Entra-joined devices show Installed).
On the machine itself, you can also confirm the agent directly:
- Confirm that the installation folder C:\Program Files\ManageEngine\Identity360 Cloud IDSecurity Agent\ exists.
- On Identity360-joined devices, confirm the background service is running: open services.msc, locate the ManageEngine Identity360 Cloud IDSecurity Agent service, and check that it shows Running with startup type Automatic.
If the agent does not work as expected, see the Troubleshooting guide.
Customizing the agent
To customize the agent's behavior, prepare a customizations.json file and place it in the same network share as the MSI. If customization is not required, the installer uses the default parameters. For the full list of parameters and samples, see Customizing the IDSecurity Agent.
Upgrading the agent
When a new version of the agent is released, place the new Identity360CloudIDSecurityAgent.msi (and a new MST, if the installation key changed) in the network share and add it as a new package in the GPO, as in Step 4. Upgrading replaces the agent binaries and resources in place, without uninstalling the existing agent or erasing any data on the device, and an installation key is not required for an upgrade.
Uninstalling the agent
To remove the agent through Group Policy, edit the GPO, right-click the agent package under Computer Configuration > Policies > Software Settings > Software installation, and select All Tasks > Remove. Choose to uninstall the software from users and computers immediately. The removal takes effect after the client machines reboot.
Updating the installation key
If the current installation is compromised, regenerate the installation key in the Identity360 admin console (Step 2 of the agent installation steps > Regenerate), then:
- Create a new transform file (MST) with the new installation key, as in Step 1.
- Replace the old MST file with the new one in the network share.