Invoking Investigation Agent
Last updated on:
In this page
Overview
This page explains how to invoke the Investigation Agent from Alerts in the product.
You can pause, resume, skip steps, or extend the investigation window when required. Once the analysis is complete, the agent displays a detailed investigation result, including key findings, affected entities, and event-level insights.
You can export the results as a PDF report, attach them to an incident, or create a new incident directly from the investigation view. Options to regenerate or clear the investigation are also available when you need to perform a fresh analysis.
Invoking Investigation Agent from Alerts
- In the product console, go to the Alerts tab and select Alerts.
NOTE Use the Select view dropdown to filter alerts. Select from Critical Alerts, Trouble Alerts, or Attention Alerts. You can also use the default All Alerts view or add a custom view using Add Custom View.
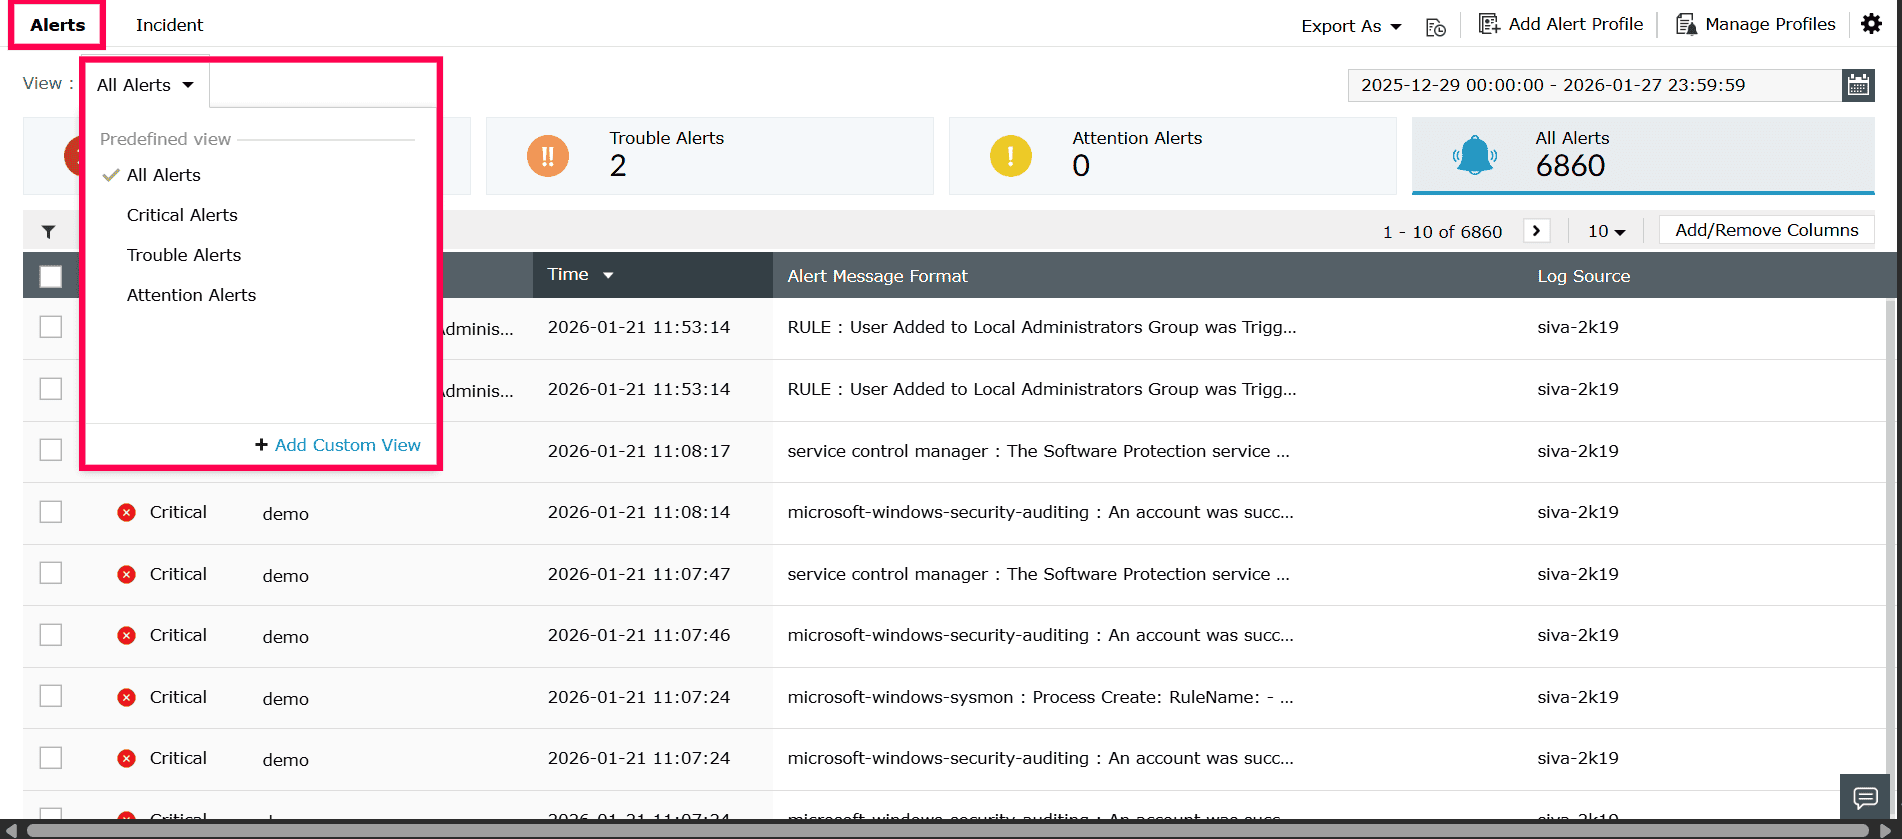
Figure 1: Navigating to Alerts tab - Select an alert from the list.
- Click the
 icon displayed at the top-right corner of the alert.
NOTE If both Insights and Investigation Agent are enabled, Zia Insights will be triggered first, followed by the Investigation Agent's results.
icon displayed at the top-right corner of the alert.
NOTE If both Insights and Investigation Agent are enabled, Zia Insights will be triggered first, followed by the Investigation Agent's results.
Figure 2: Investigating an alert - Click Start Investigation at the bottom-right corner to begin the AI-guided investigation.
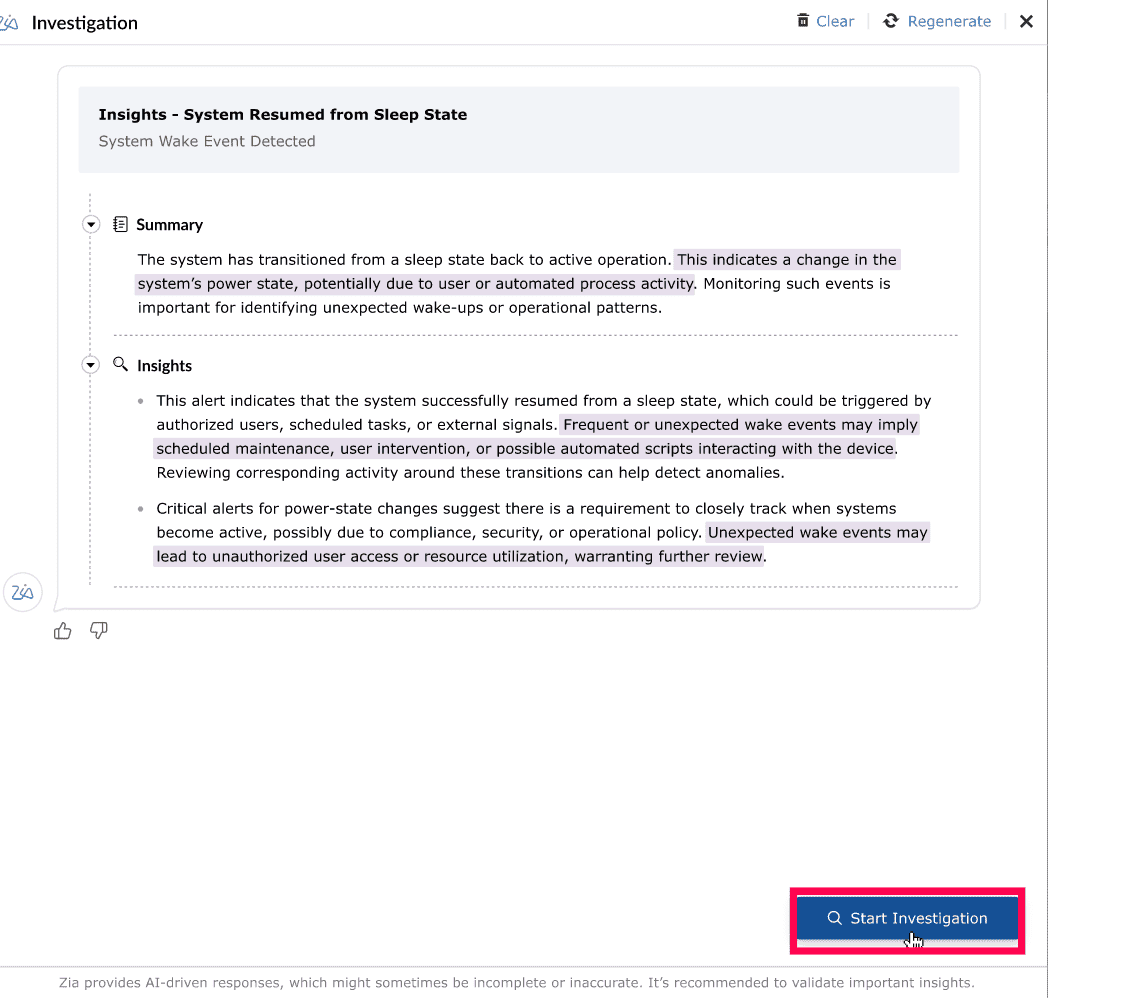
Figure 3: Starting investigation - Once the investigation begins, the following steps will be performed by the Investigation Agent:
- Fetching entities associated with the alert (users, hosts, domains, processes)
- Checking for other alert profiles linked to those entities
- Identifying related alerts across the selected timeframe
- Offering to expand the investigation to previous days if no related profiles are found
- Reviewing entities in each related alert profile
- Analyzing patterns, suspicious behavior, or repeated activity
- Fetching raw logs when deeper context is needed
- Detecting duplicates and validating non-malicious event sequences to reduce false positives
- If the Investigation Agent is unable to find any related alert profiles, entities or logs for the specified time period, a message will be displayed indicating that no matching data was found. In this scenario, the agent will display the following options:
- Yes - Extends the search to the previous day.
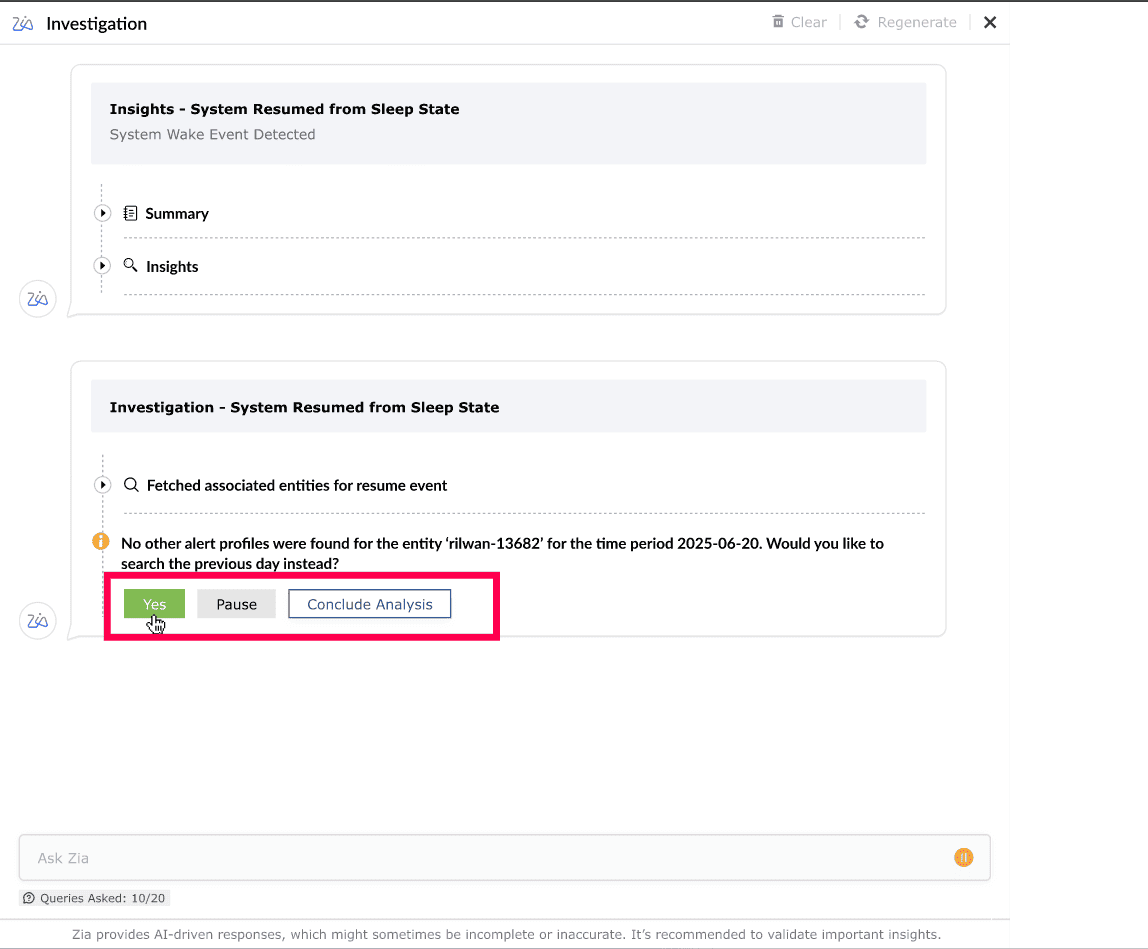
Figure 4: Using Investigation Agent - Pause - Immediately pauses the investigation.
- Skip - Continues the investigation without performing the suggested step.
NOTE Skip appears only when sufficient related logs have already been analyzed and the investigation can proceed without fetching additional data.

Figure 5: Using Investigation Agent - Conclude Analysis - Ends the investigation and generates the result based on progress so far.
NOTE If no logs, or alert profiles are found for the previous day, the system may offer additional options to further extend the search window. These options can include:
- 3 days
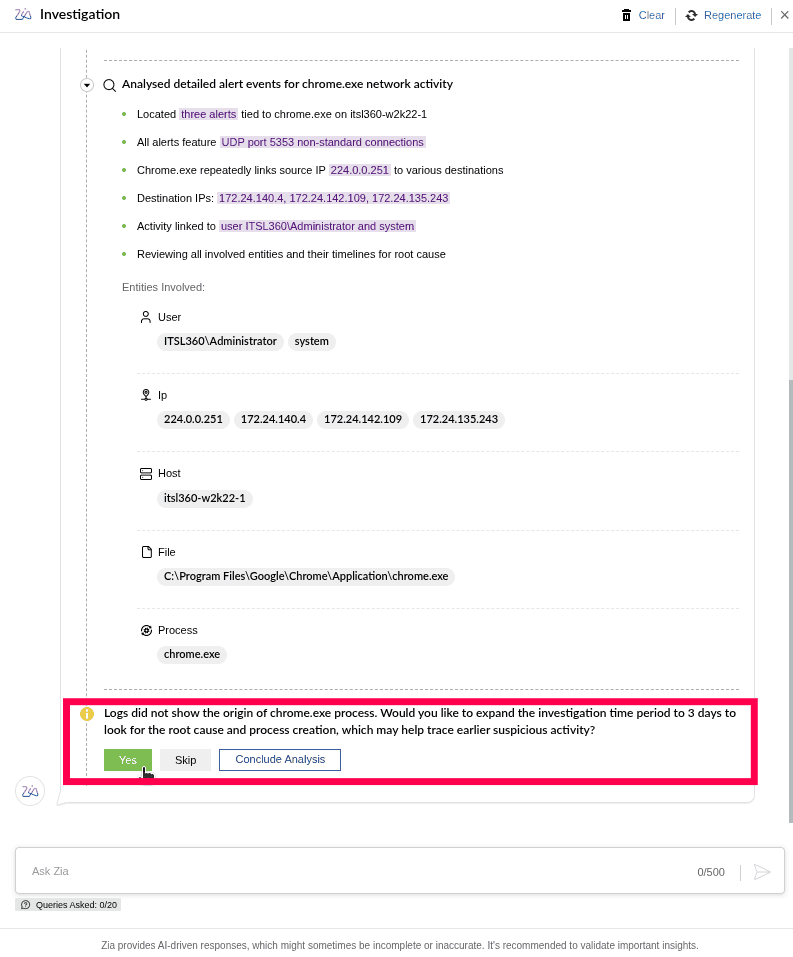
Figure 6: Extending investigation time period to 3 days - 7 days
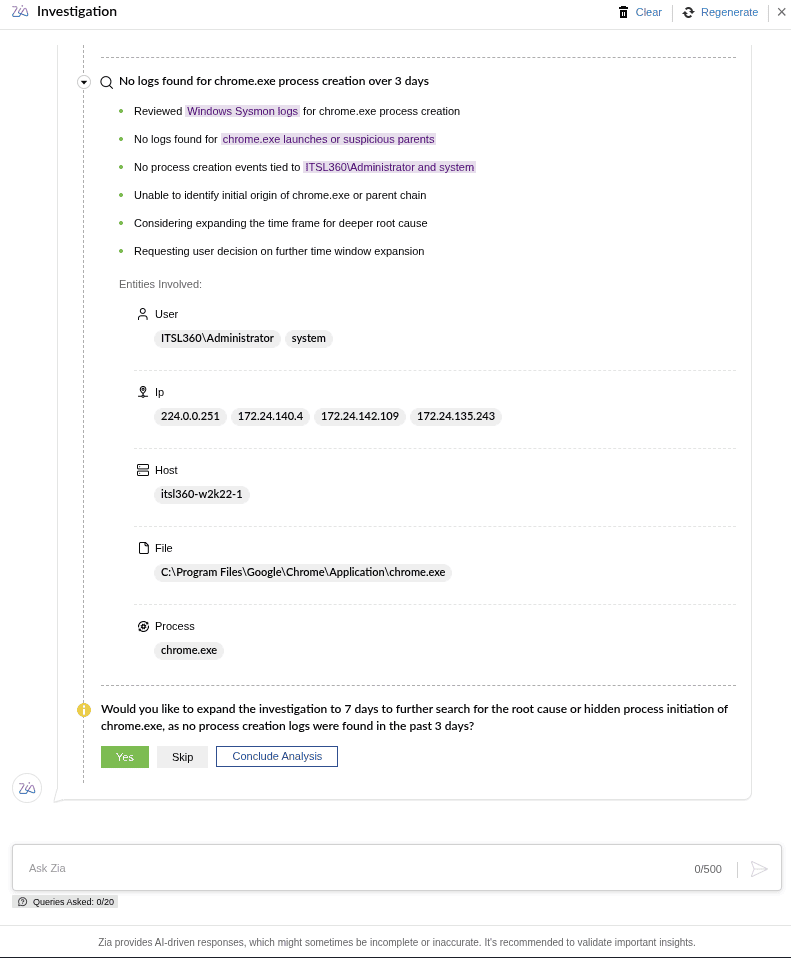
Figure 7: Extending investigation time period to 7 days
- 3 days
- Yes - Extends the search to the previous day.
- During any stage of the investigation, you can choose to Pause the analysis by clicking the
 icon.
icon. - After pausing, you will see the following options:
- Resume - Click Resume to continue the investigation from the exact step where it was paused. The agent will proceed with the remaining investigation sequence, such as analyzing additional entities, checking related alert profiles, or retrieving logs.

Figure 8: Resuming analysis - Resume analysis with this entity - If multiple entities (hosts, users, processes, domains) were identified during the investigation, these will be shown as selectable options. Click a suggested entity to instruct the Investigation Agent to continue the analysis focusing on that specific entity.
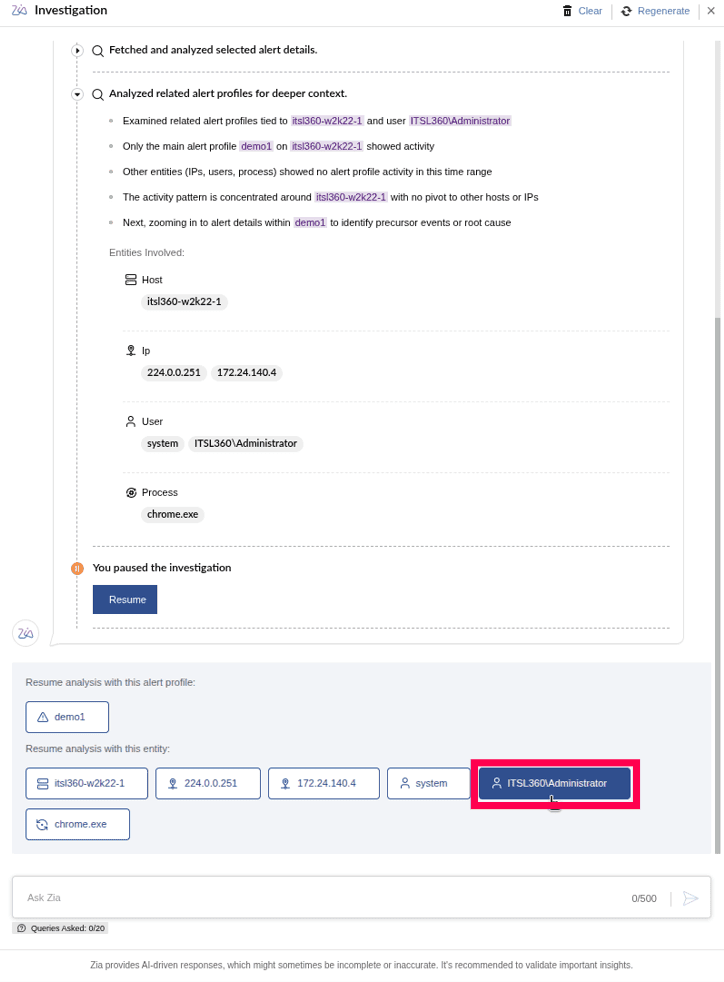
Figure 9: Resuming analysis with a different entity - Resume analysis with this alert profile - Enables you to continue the investigation starting from a particular related alert profile. You can select from the suggested alert profiles to resume the investigation with the most relevant profile.
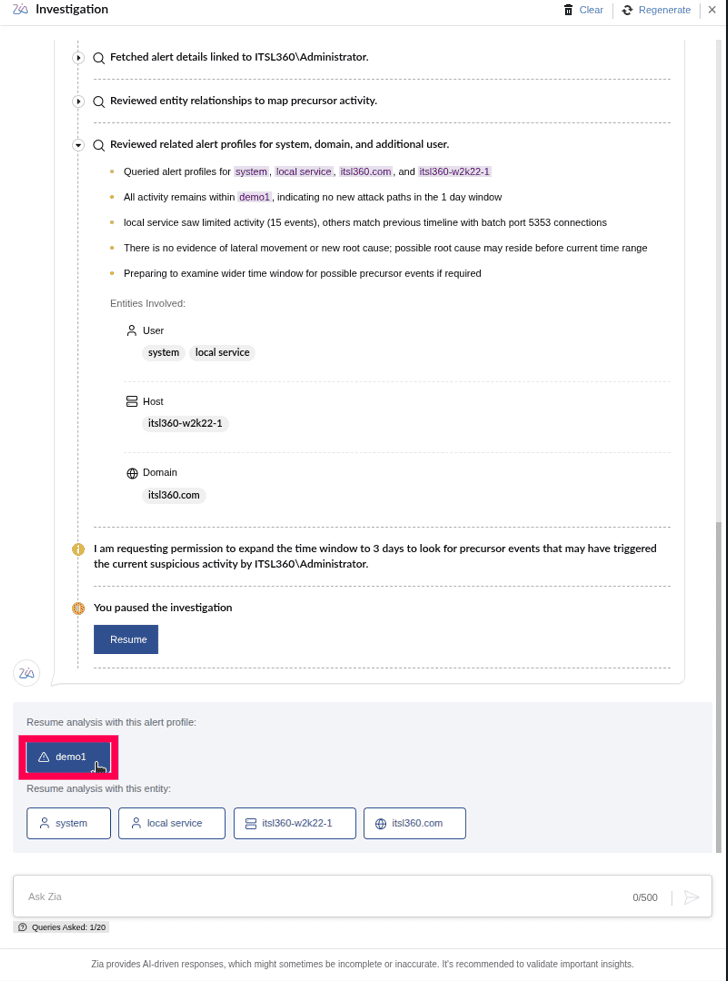
Figure 10: Resuming analysis with a different alert profile - Custom resume input - You can also manually enter an alert profile or entity name to resume analysis on a specific pattern or threat type.
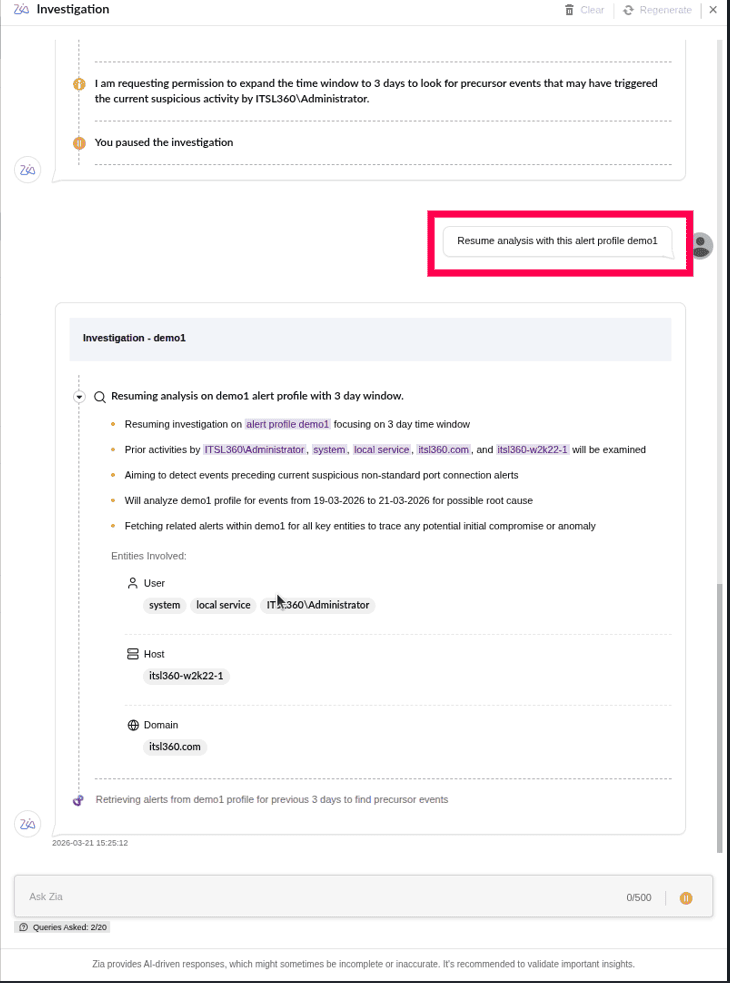
Figure 11: Resuming analysis with custom alert profile/entity
- Resume - Click Resume to continue the investigation from the exact step where it was paused. The agent will proceed with the remaining investigation sequence, such as analyzing additional entities, checking related alert profiles, or retrieving logs.
- Once the Investigation Agent completes its analysis, the investigation result will be displayed. The result typically includes a summary of key findings, the reconstructed attack chain (if any), affected entities, MITRE ATT&CK mapping, and recommended actions based on the alert and correlated activity.
- If an attack chain is identified, each event in the sequence includes an option to view its underlying event data.
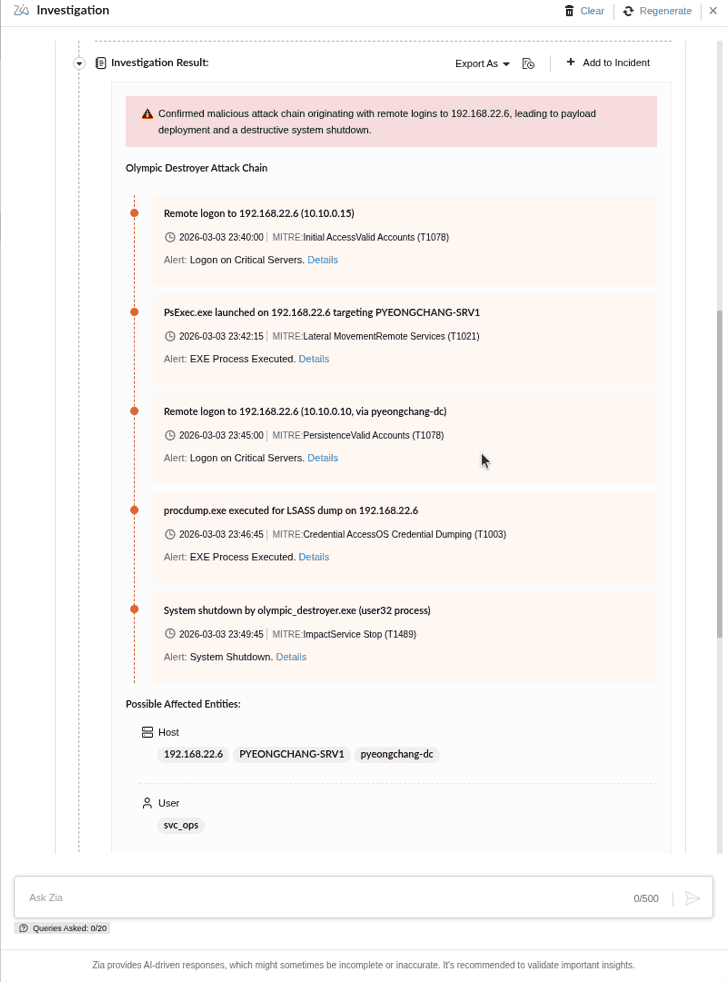
Figure 12: Attack chain - By clicking Details you can view the raw log information associated with that specific event.
NOTE The Details option is displayed only when the timeline entry has an associated alert or raw log event. If the entry represents an alert profile, or if the underlying event data is unavailable, the Details option will not be shown.
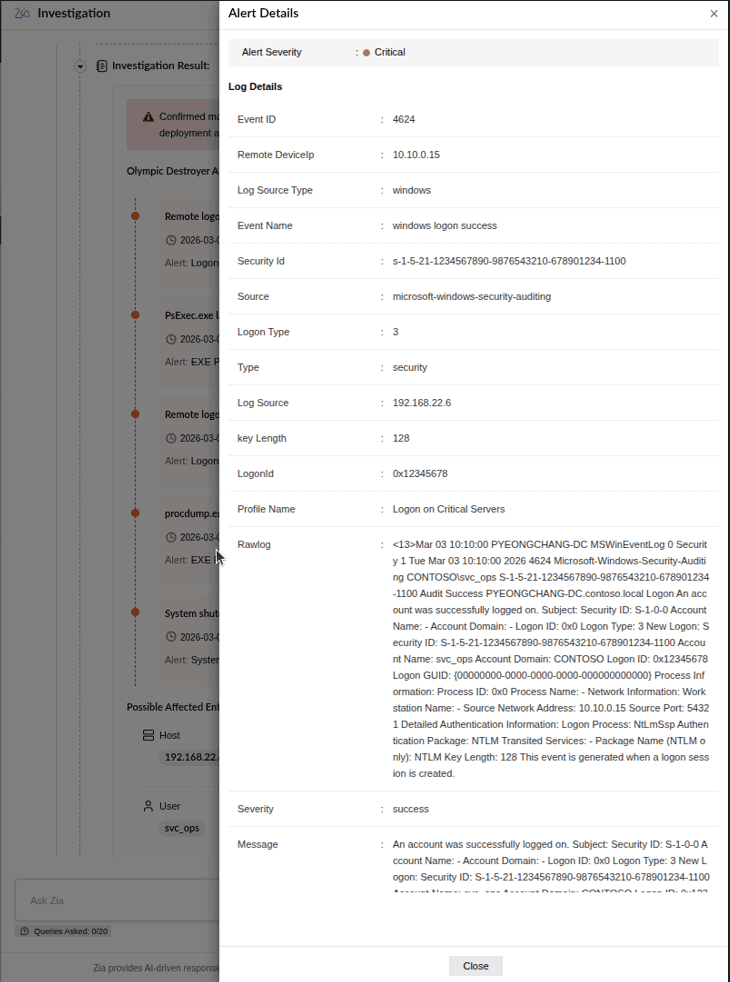
Figure 13: Viewing alert details - You can download the complete investigation report by clicking Export As and selecting PDF.
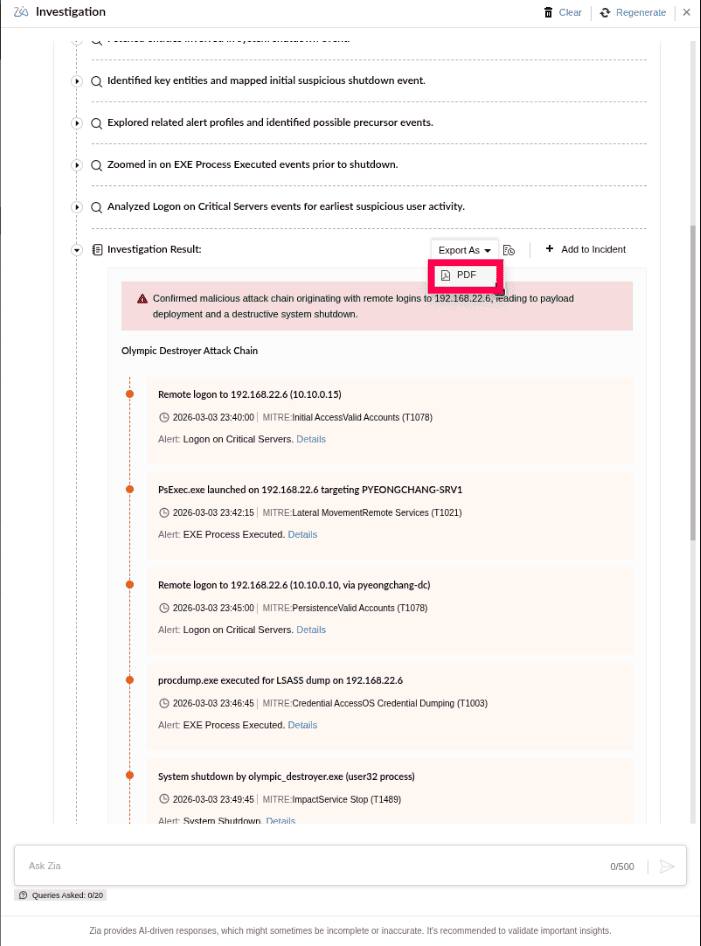
Figure 14: Exporting as pdf - Click the
 icon to view the export status, and select a downloaded report to view it.
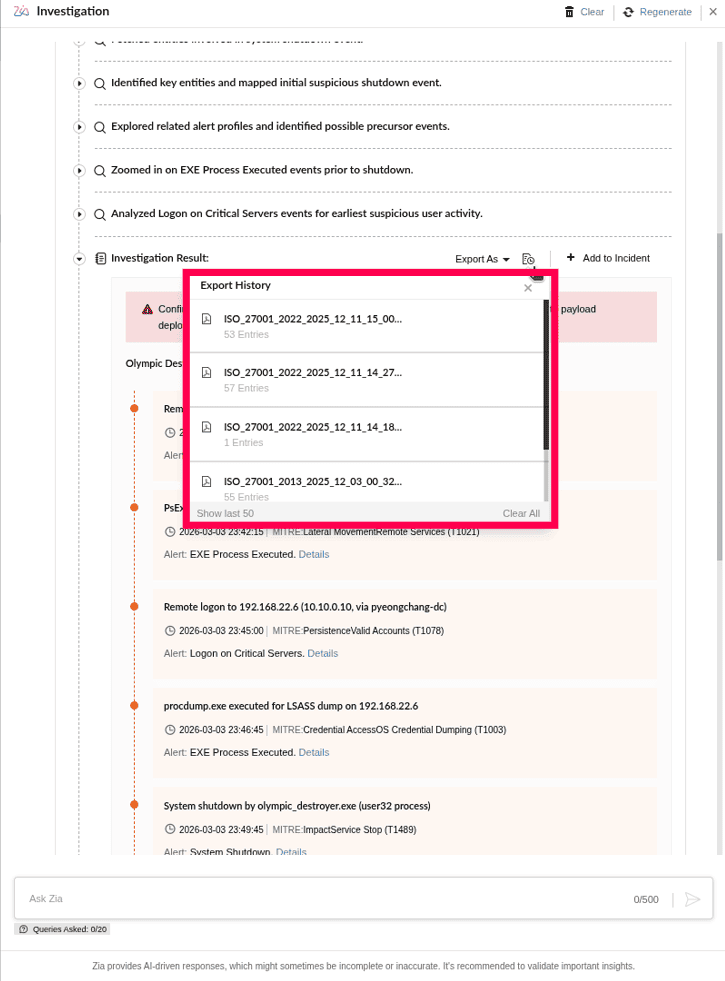
Figure 15: Viewing export status - Click Add to Incident to link the investigation to an existing incident or create a new one.
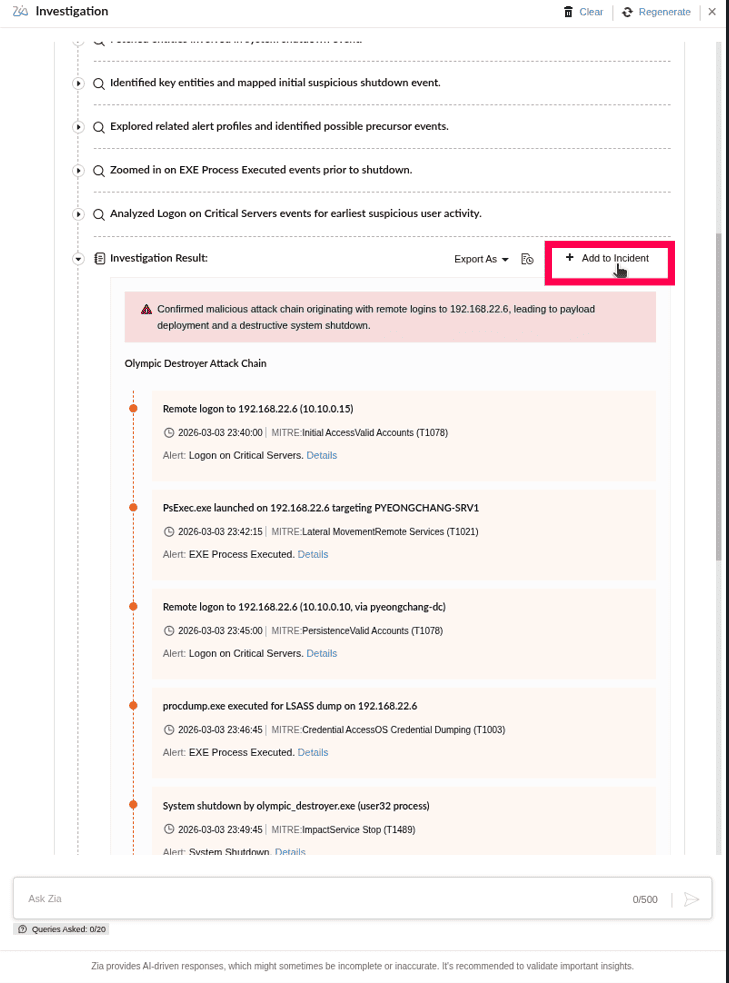
Figure 16: Adding to incident - To create a new incident, click Add New Incident.
- After selecting either option, the incident configuration window will open. In the window, enter the following details:
NOTE The incident window opens in both cases, whether you choose an existing incident or select Add New Incident. However, the Incident Name(the title for the new incident) and Description (a short summary of the issue) fields are required only when creating a new incident.
- Assignee - Select the technician to assign the incident to.
- Severity - Choose the severity level.
- Status - Set the current status of the incident, such as Open, In Progress, Closed.
- Due Date - (Optional) Select a due date.
- Investigation Name - Required name under which the investigation will be added.

Figure 17: Creating a new incident - Click Add to create the incident and link the investigation to it.
- After the incident is updated, the confirmation banner shown below appears.
 NOTE Select Click here in the banner to open the incident, where the attached investigation result will be listed. Then, click Details next to the incident to view the full investigation report.
 - To regenerate the investigation, click Regenerate at the top-right corner of the investigation window.
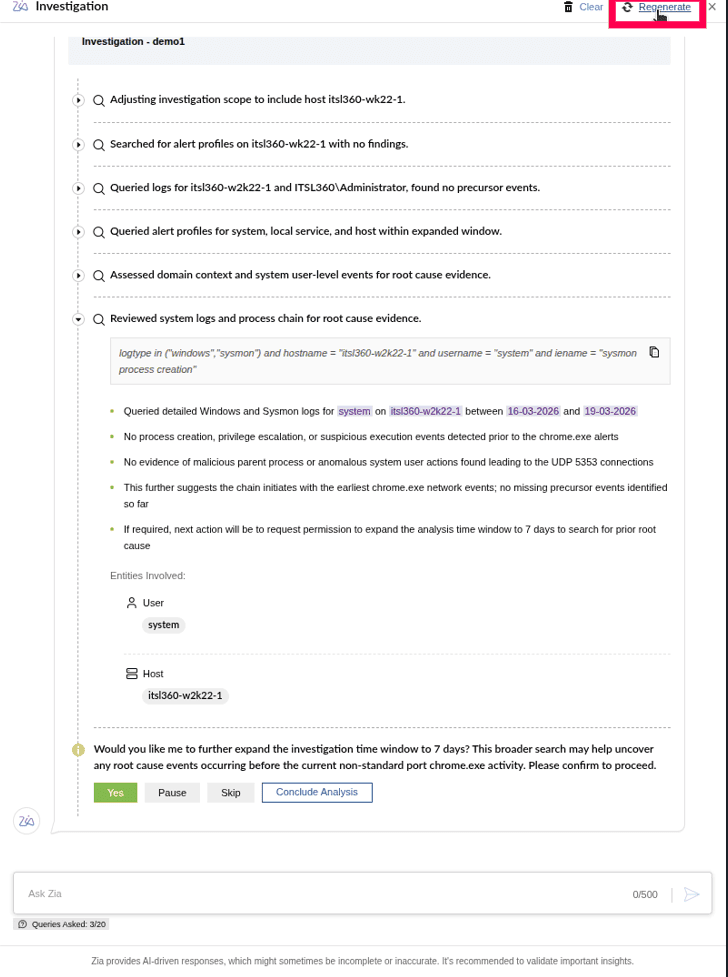
Figure 18: Regenerating analysis - In the confirmation pop-up that appears, click Yes to restart the investigation with a fresh analysis.
NOTE Once regeneration begins, the Investigation Agent clears the previous findings and reruns the entire investigation sequence from the beginning.

Figure 19: Confirming regeneration - You can clear the current investigation by clicking Clear in the top-right corner of the investigation window.
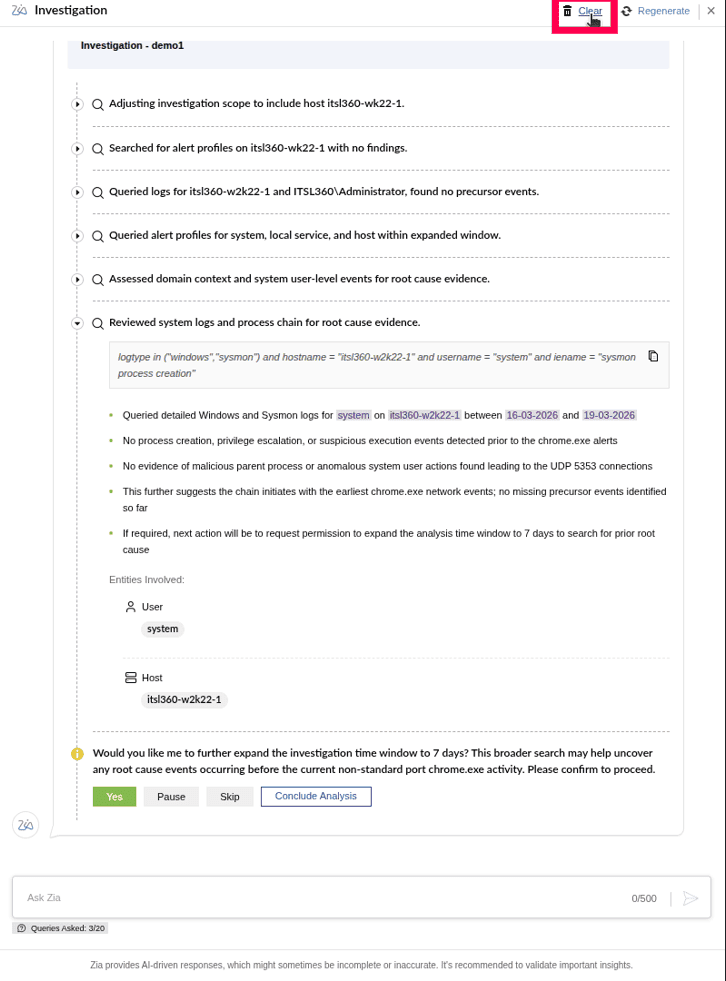
Figure 20: Clearing analysis - A confirmation pop-up will appear, click Yes to remove all insights and analysis.
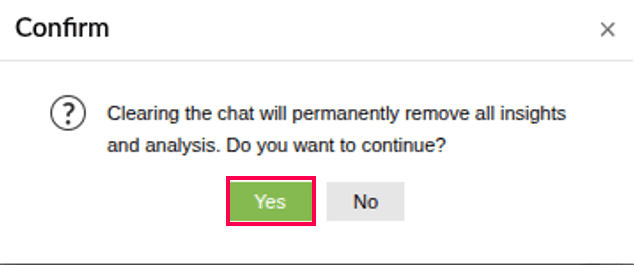
Figure 21: Confirming to remove insights and analysis - You can use the Ask Zia to ask additional questions during the investigation. You can ask things like:
- Clarifications about an alert, entity, or activity
- Questions about why a particular alert profile was selected
- Requests to analyze a different entity or alert profile.
NOTE At the bottom of the investigation window, the Queries Asked displays how many queries have been used. The Investigation Agent allows up to 20 such queries per investigation session. - After reviewing the investigation results, click Close Alert at the bottom of the investigation panel.
NOTE It is recommended to review the investigation summary, affected entities, and suggested remediation steps before closing the alert to ensure no further action is required.
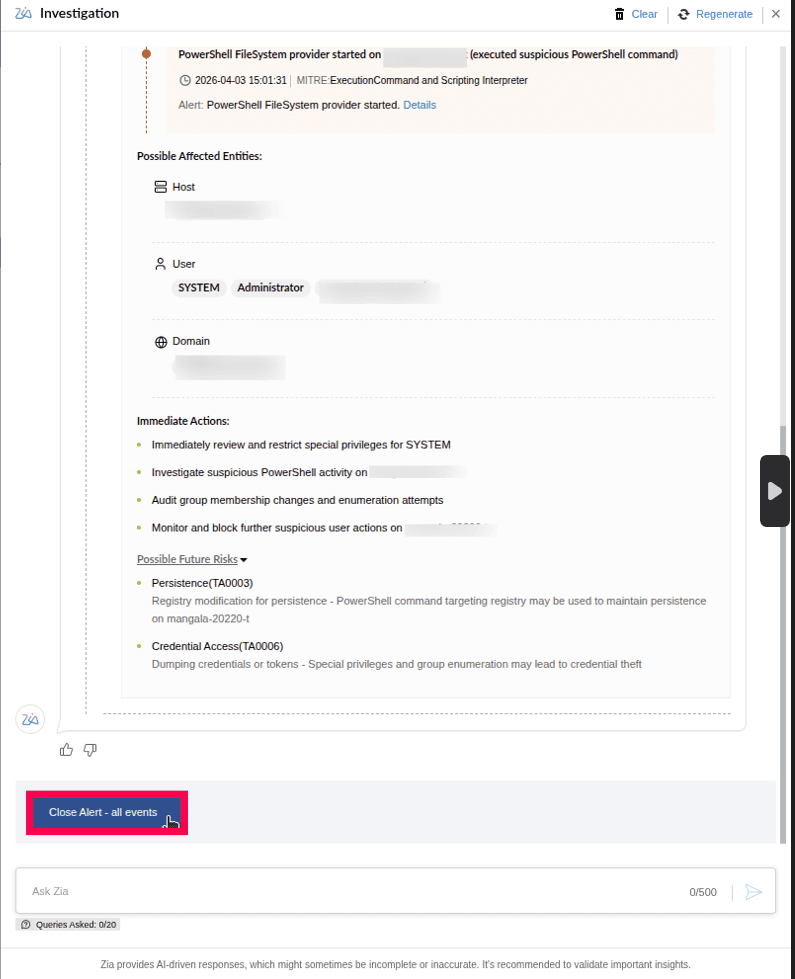
Figure 22: Closing alert - Once the alert is closed, if similar alerts exist within the same alert profile, the system prompts you to extend the closure action with the following options:
- Yes - Extends the closure action to all similar alerts.
- No - Closes only the selected alert.
NOTE A maximum of 100 duplicate alerts will be displayed. Only these alerts are included when closing similar alerts.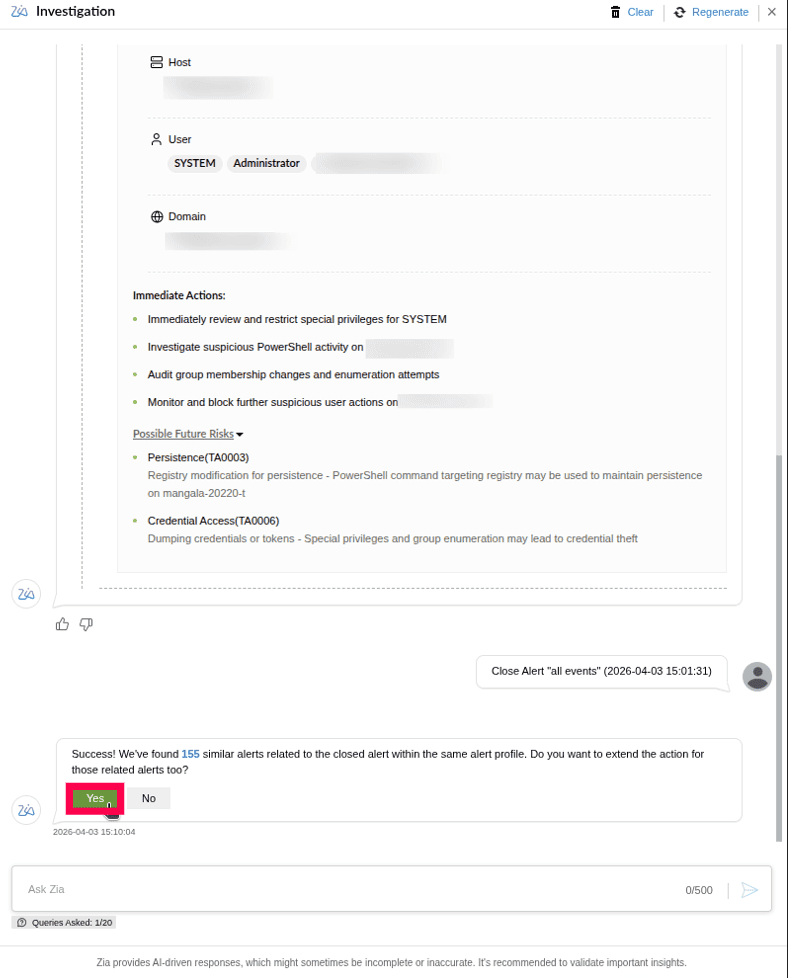
Figure 23: Extending alert closure to similar alerts - At the end of the investigation, you can provide feedback on the accuracy and usefulness of the results. Click the
 or
or  icon to open the Feedback window. In the Feedback window, you can:
- Select the checkbox next to the aspects of the investigation that were helpful.
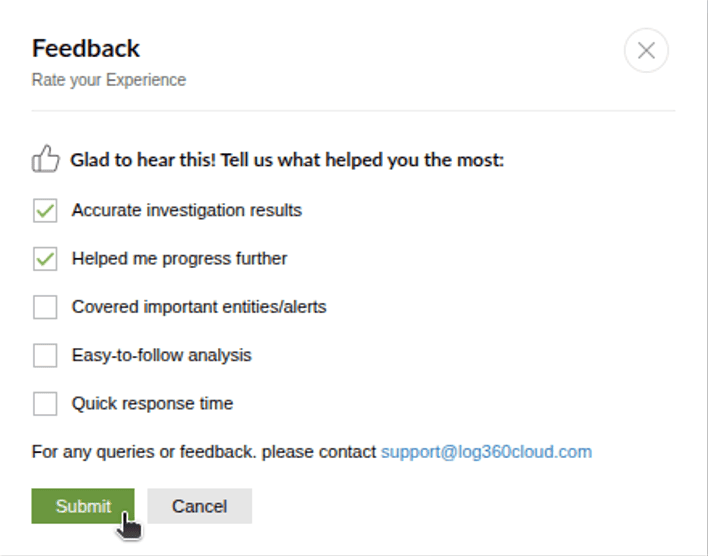
Figure 24: Feedback - Click Submit to record your feedback.
Read also
This page explains how to run investigations and analyze results using the Investigation Agent. To understand configuration and related capabilities, refer to: