Overview
The Inventory details provides a comprehensive overview of each enrolled device, allowing admins to effectively monitor and manage their device fleet.
Visibility into your device estate: Gain a complete view of all managed devices within your organization, including device status, user details, and ownership information.
Granular Information: Access detailed information about device hardware, operating system versions, installed apps, security settings, restrictions, geo-location, and certificates. This ensures comprehensive monitoring of device health and compliance.
Troubleshooting: Quickly diagnose device performance issues, monitor alerts, and identify any potential problems. This enables admins to address concerns in real-time and enhance the operational efficiency of the device fleet.
Remote Actions: Perform remote actions such as locking, wiping, or restarting devices, ensuring you can take immediate control when needed, especially in case of lost or compromised devices.
Reporting: Schedule and generate reports based on the device details to track device performance, security compliance, and usage. These reports can be shared with your teams for better operational management and decision-making.
Accessing Device Details
Admins can view detailed device information from several locations within the ME MDM Admin Console. The following are the different areas where device details can be accessed:
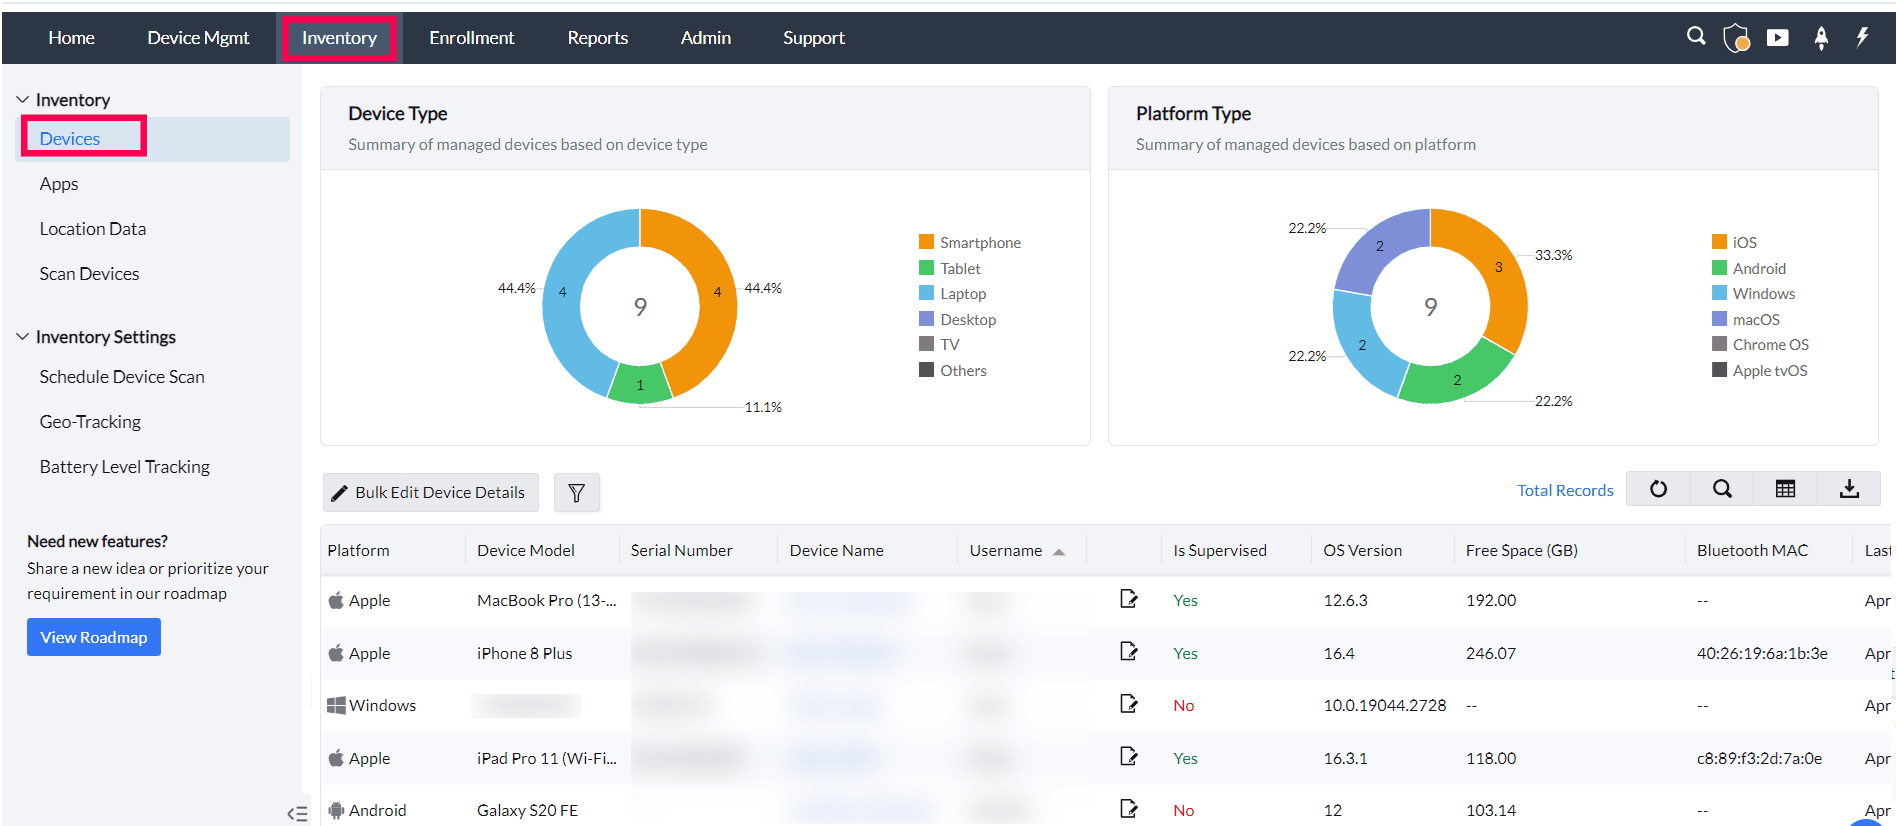
Inventory Tab:
- Navigate to the Inventory tab.
- Click on the Devices section to display a list of all managed devices.
- Select the device name to view its detailed information, including hardware, software, and status.
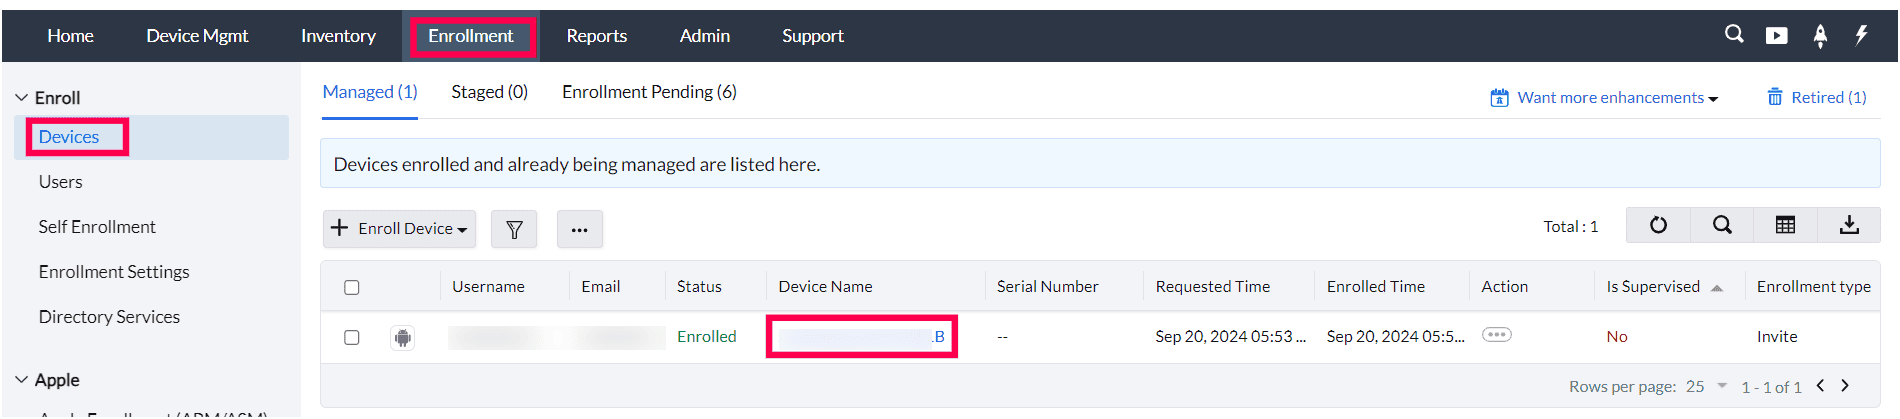
Enrollment Tab:
- Navigate to the Enrollment tab.
- Click on Devices to see a list of all enrolled devices.
- Select the device name to access detailed enrollment information and device attribute
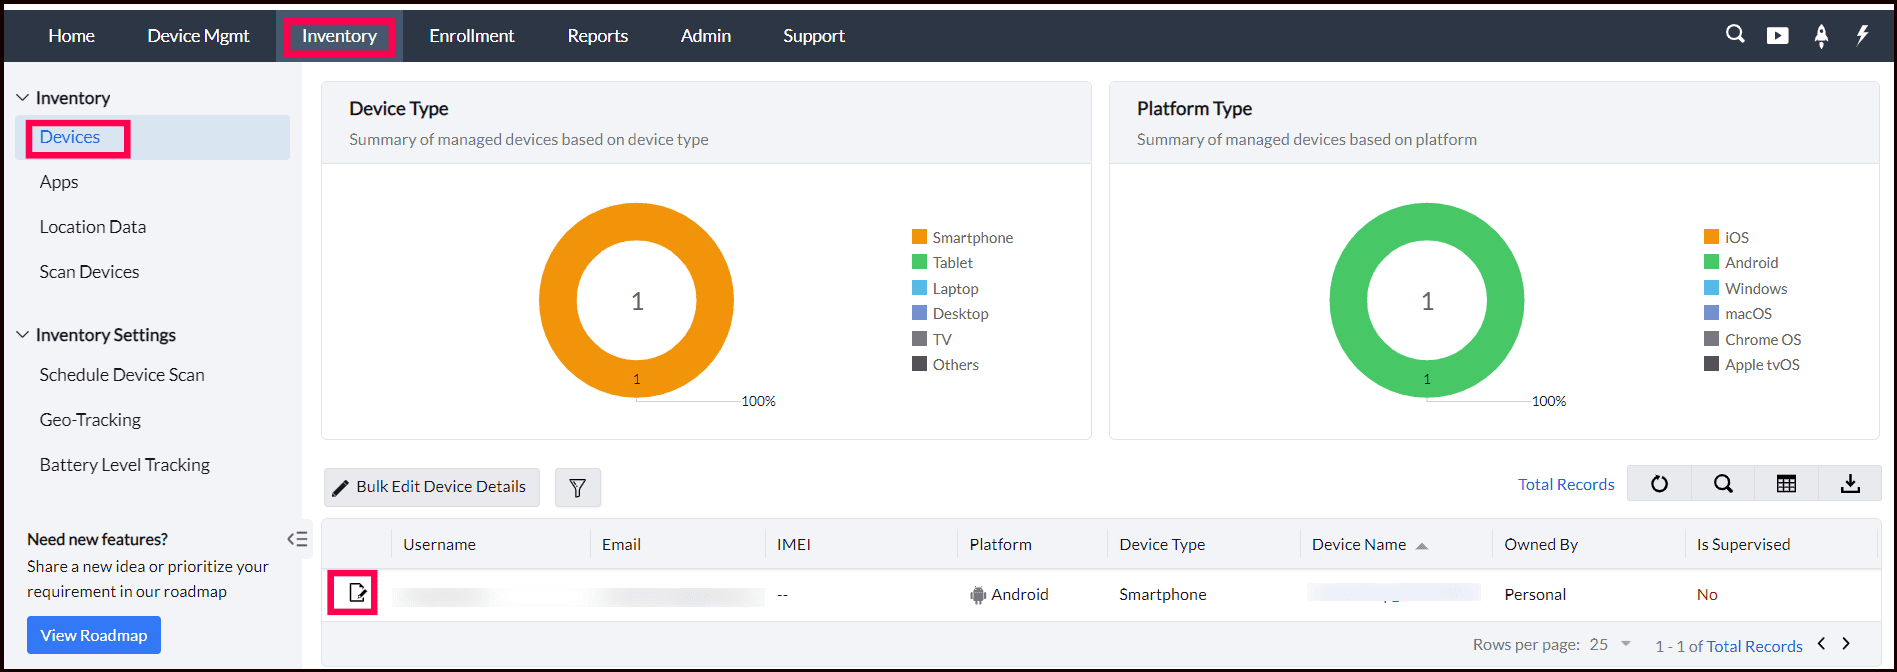
Device Management Tab:
- Navigate to the Device Mgmt tab.
- Click on the Groups & Devices and select Devices to display the list of managed devices.
- Click on the device name and choose the View Device Details option (accessible via the arrow icon next to the device name) to view comprehensive device details, including installed apps, certificates, restrictions, and more.

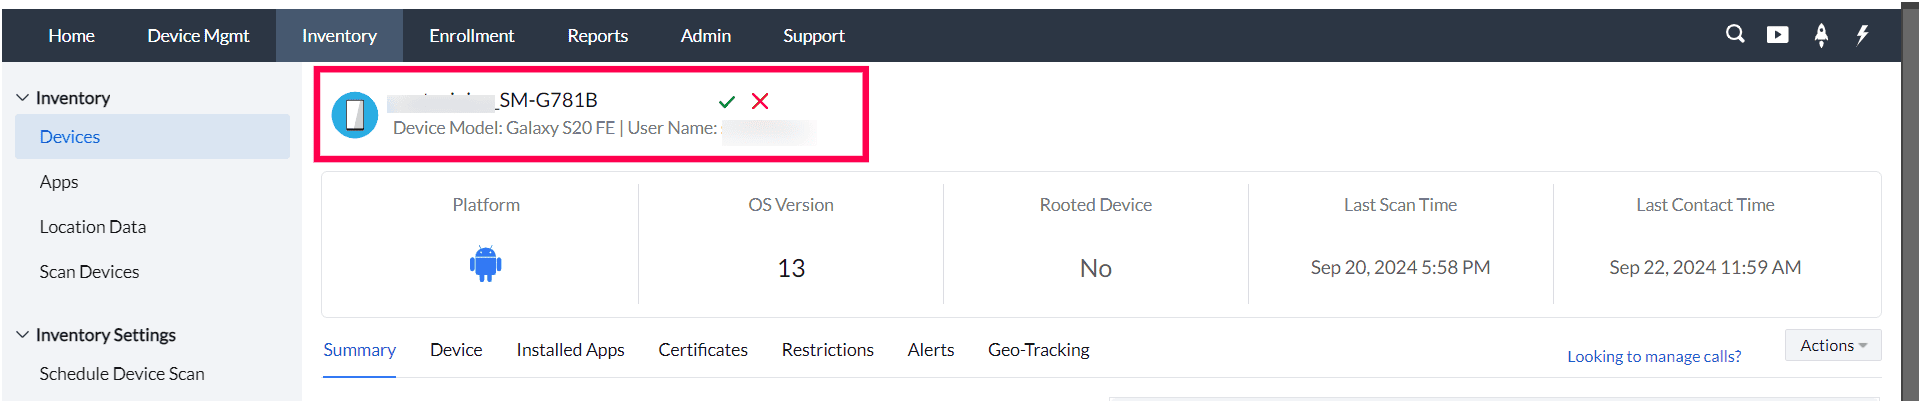
Device Details Summary
To view the detailed information about a device, click on the Device Name in the MDM Console. The section is organized into several tabs, each providing specific details about the device:
- Summary: General information and statistics about the device.
- Device: Detailed device-specific information.
- Installed Apps: List of all applications installed on the device.
- Certificates: Information about certificates installed on the device.
- Restrictions: Policies and restrictions applied to the device.
- Alerts (Applicable only for Android): Notifications and alerts for the device will be enabled only after an alerts policy is created.
- Geo-Tracking: Location and tracking details for the device, if enabled.
- Security Settings (Applicable only for MacBook): View details on the device's FileVault Encryption Status and Firmware Password under the Security Settings tab.
- User Accounts (Applicable only for MacBook): Access user account details such as Username, Login Time, and Secure Token status.
- Threats (Applicable only for Windows): View detected security threats on the device, including malware and vulnerabilities.
List of device attributes
| Attributes | Android | iOS | Windows | MacOS | Chrome |
|---|---|---|---|---|---|
| Device Information | |||||
| Device Name | Applicable | Applicable | Applicable | Applicable | Applicable |
| OS Version | Applicable | Applicable | Applicable | Applicable | Applicable |
| Build Version | Applicable | Applicable | Applicable | Applicable | Applicable |
| Last Security Update | Applicable | Not Applicable | Not Applicable | Not Applicable | Not Applicable |
| Model No | Applicable | Applicable | Not Applicable | Applicable | Not Applicable |
| Device Model | Applicable | Applicable | Applicable | Applicable | Applicable |
| Device Type | Applicable | Applicable | Applicable | Applicable | Applicable |
| Product Name | Applicable | Applicable | Not Applicable | Applicable | Not Applicable |
| UDID | Applicable | Applicable | Applicable | Applicable | Applicable |
| IMEI | Applicable | Applicable | Applicable | Not Applicable | Applicable |
| MEID | Applicable | Applicable | Not Applicable | Not Applicable | Not Applicable |
| Serial Number | Applicable | Applicable | Applicable | Applicable | Applicable |
| Device Capacity (GB) | Applicable | Applicable | Applicable | Applicable | Applicable |
| Free Space | Applicable | Applicable | Not Applicable | Applicable | Not Applicable |
| Available RAM Memory | Applicable | Not Applicable | Not Applicable | Not Applicable | Not Applicable |
| Total RAM Memory | Applicable | Not Applicable | Not Applicable | Not Applicable | Not Applicable |
| Cellular Technology | Applicable | Applicable | Applicable | Applicable | Not Applicable |
| Battery Level | Applicable | Applicable | Not Applicable | Partially Applicable | Not Applicable |
| External capacity | Applicable | Not Applicable | Not Applicable | Not Applicable | Not Applicable |
| Available External Capacity | Applicable | Not Applicable | Not Applicable | Not Applicable | Not Applicable |
| OS Name | Applicable | Not Applicable | Applicable | Not Applicable | Applicable |
| EAS Device Identifier | Applicable | Applicable | Applicable | Not Applicable | Applicable |
| Processor Details | Applicable | Not Applicable | Not Applicable | Not Applicable | Not Applicable |
| Number of Cores | Applicable | Not Applicable | Not Applicable | Not Applicable | Not Applicable |
| Cloud back up in device | Applicable | Not Applicable | Not Applicable | Not Applicable | Not Applicable |
| Cloud last back up time | Applicable | Not Applicable | Not Applicable | Not Applicable | Not Applicable |
| Processor Type | Applicable | Not Applicable | Not Applicable | Not Applicable | Not Applicable |
| Enterprise Factory Reset Protection | Applicable | Not Applicable | Not Applicable | Not Applicable | Not Applicable |
| Modem Firmware Version | Not Applicable | Applicable | Applicable | Not Applicable | Applicable |
| Is Supervised | Applicable (For Corporate Enroled Devices) | Applicable (For Corporate Enroled Devices) | Not Applicable | Applicable (For Corporate Enroled Devices) | Not Applicable |
| EAS Device Identifier | Not Applicable | Applicable | Applicable | Not Applicable | Applicable |
| Battery Health | Not Applicable | Applicable | Not Applicable | Partially Applicable | Not Applicable |
| Find my device enabled | Not Applicable | Applicable | Not Applicable | Not Applicable | Not Applicable |
| Activation Lock Enabled | Not Applicable | Applicable | Not Applicable | Not Applicable | Not Applicable |
| Do Not Disturb Enabled | Not Applicable | Applicable | Not Applicable | Not Applicable | Not Applicable |
| iTunes Account Logged in | Not Applicable | Applicable | Not Applicable | Not Applicable | Not Applicable |
| iCloud back up in device | Not Applicable | Applicable | Not Applicable | Not Applicable | Not Applicable |
| iCloud last back up time | Not Applicable | Applicable | Not Applicable | Not Applicable | Not Applicable |
| Device Manufacturer | Not Applicable | Not Applicable | Applicable | Not Applicable | Not Applicable |
| Network Information | |||||
| Bluetooth MAC | Applicable | Applicable | Applicable | Applicable | Applicable |
| IMSI | Applicable | Not Applicable | Not Applicable | Not Applicable | Not Applicable |
| Data Roaming Enabled | Applicable | Applicable | Not Applicable | Not Applicable | Not Applicable |
| Voice Roaming Enabled | Applicable | Applicable | Not Applicable | Not Applicable | Not Applicable |
| IP Address | Applicable | Not Applicable | Not Applicable | Not Applicable | Not Applicable |
| Wi-Fi MAC | Applicable | Applicable | Applicable | Applicable | Applicable |
| Personal hotspot enabled | Not Applicable | Applicable | Not Applicable | Not Applicable | Not Applicable |
| Embedded Identity Document (EID) | Not Applicable | Applicable | Not Applicable | Not Applicable | Not Applicable |
| Wi-Fi IP | Not Applicable | Not Applicable | Applicable | Not Applicable | Applicable |
| Ethernet MAC | Not Applicable | Not Applicable | Applicable | Not Applicable | Applicable |
| Ethernet IP | Not Applicable | Not Applicable | Applicable | Not Applicable | Applicable |
| SIM Information | |||||
| IMEI | Applicable | Applicable | Applicable | Not Applicable | Not Applicable |
| IMSI | Applicable | Applicable | Not Applicable | Not Applicable | Not Applicable |
| ICCID | Applicable | Applicable | Applicable | Not Applicable | Applicable |
| Phone Number | Applicable | Applicable | Applicable | Not Applicable | Not Applicable |
| Current Carrier Network | Applicable | Applicable | Applicable | Not Applicable | Not Applicable |
| Carrier setting version | Applicable | Applicable | Applicable | Not Applicable | Not Applicable |
| Current MCC | Applicable | Applicable | Applicable | Not Applicable | Not Applicable |
| Current MNC | Applicable | Applicable | Applicable | Not Applicable | Not Applicable |
| Subscriber MNC | Applicable | Applicable | Not Applicable | Not Applicable | Not Applicable |
| Roaming | Applicable | Applicable | Applicable | Not Applicable | Not Applicable |
| Subscriber MCC | Applicable | Applicable | Not Applicable | Not Applicable | Not Applicable |
| Data Preferred | Not Applicable | Applicable | Not Applicable | Not Applicable | Not Applicable |
| Voice Preferred | Not Applicable | Applicable | Not Applicable | Not Applicable | Not Applicable |
| Label | Not Applicable | Applicable | Not Applicable | Not Applicable | Not Applicable |
| Label ID | Not Applicable | Applicable | Not Applicable | Not Applicable | Not Applicable |
| Slot | Not Applicable | Applicable | Not Applicable | Not Applicable | Not Applicable |
| Embedded Identity Document (EID) | Not Applicable | Applicable | Not Applicable | Not Applicable | Not Applicable |
| Accessbility Settings | |||||
| Zoom | Not Applicable | Applicable | Not Applicable | Not Applicable | Not Applicable |
| Voice Over | Not Applicable | Applicable | Not Applicable | Not Applicable | Not Applicable |
| Touch Accommodations | Not Applicable | Applicable | Not Applicable | Not Applicable | Not Applicable |
| Reduce Motion | Not Applicable | Applicable | Not Applicable | Not Applicable | Not Applicable |
| Reduce Transparency | Not Applicable | Applicable | Not Applicable | Not Applicable | Not Applicable |
| Increase Contrast | Not Applicable | Applicable | Not Applicable | Not Applicable | Not Applicable |
| Bold Text | Not Applicable | Applicable | Not Applicable | Not Applicable | Not Applicable |
| Text Size | Not Applicable | Applicable | Not Applicable | Not Applicable | Not Applicable |
| Installed Apps | |||||
| App Marked as(Icon) | Applicable | Applicable | Applicable | Applicable | Applicable |
| App Name | Applicable | Applicable | Applicable | Applicable | Applicable |
| Version | Applicable | Applicable | Applicable | Applicable | Applicable |
| App Identifier | Applicable | Applicable | Applicable | Applicable | Applicable |
| App Size (MB) | Applicable | Applicable | Applicable | Applicable | Applicable |
| Documents & Data (MB) | Applicable | Applicable | Applicable | Applicable | Applicable |
| App Short Version | Applicable | Applicable | Applicable | Applicable | Applicable |
| App Installed By | Applicable | Applicable | Applicable | Applicable | Applicable |
| Is App Clip | Applicable | Applicable | Applicable | Applicable | Applicable |
| Certificate | |||||
| Certificate Name | Applicable | Applicable | Applicable | Applicable | Applicable |
| Client Certificate | Applicable | Applicable | Applicable | Applicable | Applicable |
| Certificate Expiry Date | Applicable | Applicable | Applicable | Applicable | Applicable |
| Certificate Issuer Name | Applicable | Applicable | Applicable | Applicable | Applicable |
| Certificate Type | Applicable | Applicable | Applicable | Applicable | Applicable |
| Certificate Version | Applicable | Applicable | Applicable | Applicable | Applicable |
| Certificate Serial Number | Applicable | Applicable | Applicable | Applicable | Applicable |
| Certificate Algorithm OID | Applicable | Applicable | Applicable | Applicable | Applicable |
| Signature Algorithm Name | Applicable | Applicable | Applicable | Applicable | Applicable |
| Certificate Subject Name | Applicable | Applicable | Applicable | Applicable | Applicable |
| Restrictions | |||||
| Restrictions on Device | Applicable | Applicable | Applicable | Not Applicable | Applicable |
| Applications | Applicable | Applicable | Applicable | Not Applicable | Applicable |
| Browser | Not Applicable | Applicable | Not Applicable | Not Applicable | Not Applicable |
| Security | Applicable | Applicable | Not Applicable | Not Applicable | Not Applicable |
| Keyboard Settings | Not Applicable | Applicable | Not Applicable | Not Applicable | Not Applicable |
| Privacy | Not Applicable | Applicable | Not Applicable | Not Applicable | Not Applicable |
| Network and Roaming | Applicable | Applicable | Not Applicable | Not Applicable | Not Applicable |
| Content Rating | Not Applicable | Applicable | Not Applicable | Not Applicable | Not Applicable |
| Classroom | Not Applicable | Applicable | Not Applicable | Not Applicable | Not Applicable |
| iCloud | Not Applicable | Applicable | Not Applicable | Not Applicable | Not Applicable |
| NFC and Bluetooth | Applicable | Not Applicable | Not Applicable | Not Applicable | Not Applicable |
| Browser Restriction | Applicable | Not Applicable | Not Applicable | Not Applicable | Not Applicable |
| Bluetooth | Not Applicable | Not Applicable | Applicable | Not Applicable | Applicable |
| sercurity and privacy | Not Applicable | Not Applicable | Applicable | Not Applicable | Applicable |
| Restrictions on Network | Not Applicable | Not Applicable | Applicable | Not Applicable | Applicable |
| Geo-Tracking | |||||
| Last Located At | Applicable | Applicable | Applicable | Applicable | Applicable |
| Last Located | Applicable | Applicable | Applicable | Applicable | Applicable |
| Coordinates | Applicable | Applicable | Applicable | Applicable | Applicable |
| Location Status | Applicable | Applicable | Applicable | Applicable | Applicable |
| Location History | Applicable | Applicable | Applicable | Applicable | Applicable |
| Deprovision (Wipe) | Applicable | Applicable | Applicable | Applicable | Applicable |
| Lost Mode | Applicable | Applicable | Not Applicable | Not Applicable | Applicable |
| Alerts | |||||
| SIM Card status | Applicable | Not Applicable | Not Applicable | Not Applicable | Not Applicable |
| Location Services | Applicable | Not Applicable | Not Applicable | Not Applicable | Not Applicable |
| Passcode Activity | Applicable | Not Applicable | Not Applicable | Not Applicable | Not Applicable |
| Device Reboot | Applicable | Not Applicable | Not Applicable | Not Applicable | Not Applicable |
| Security Settings | |||||
| FileVault Encryption Status | Not Applicable | Not Applicable | Not Applicable | Applicable | Not Applicable |
| Firmware Password Details | Not Applicable | Not Applicable | Not Applicable | Applicable | Not Applicable |
| User Accounts | |||||
| User Name | Not Applicable | Not Applicable | Not Applicable | Applicable | Not Applicable |
| Login Time | Not Applicable | Not Applicable | Not Applicable | Applicable | Not Applicable |
| Secure Token Enabled | Not Applicable | Not Applicable | Not Applicable | Applicable | Not Applicable |
| Mobile Account | Not Applicable | Not Applicable | Not Applicable | Applicable | Not Applicable |
| Login Status | Not Applicable | Not Applicable | Not Applicable | Applicable | Not Applicable |
| User GUID | Not Applicable | Not Applicable | Not Applicable | Applicable | Not Applicable |
| Threats | |||||
| User Name | Not Applicable | Not Applicable | Applicable | Not Applicable | Applicable |
| Actions | |||||
| Scan Now | Applicable | Applicable | Applicable | Applicable | Applicable |
| Remote Lock | Applicable | Applicable | Not Applicable | Applicable | Not Applicable |
| Remote View | Applicable | Applicable | Not Applicable | Not Applicable | Not Applicable |
| Clear Passcode | Applicable | Applicable | Not Applicable | Not Applicable | Not Applicable |
| Locate Device | Applicable | Applicable | Applicable | Not Applicable | Applicable |
| Enable Lost Mode | Applicable | Applicable | Not Applicable | Not Applicable | Not Applicable |
| Restart Device | Applicable | Applicable | Applicable | Applicable | Applicable |
| Shutdown | Not Applicable | Applicable | Not Applicable | Applicable | Not Applicable |
| Pause Kiosk | Not Applicable | Applicable | Not Applicable | Not Applicable | Not Applicable |
| Deprovision (Wipe) | Applicable | Applicable | Applicable | Applicable | Applicable |
| Remove Screen Time Passcode | Not Applicable | Applicable | Not Applicable | Not Applicable | Not Applicable |
| Request Bug Report | Applicable | Not Applicable | Not Applicable | Not Applicable | Not Applicable |
| Clear App Data | Applicable | Not Applicable | Not Applicable | Not Applicable | Not Applicable |
| Delete User | Not Applicable | Not Applicable | Not Applicable | Applicable | Not Applicable |
| Recover user account | Not Applicable | Not Applicable | Not Applicable | Applicable | Not Applicable |
In corporate Samsung devices running Android 10.0 or later enrolled using Enrollment via Invites method, the ME MDM app cannot access the device's identifiers such as IMEI, serial number, etc. You can enroll the device as Device Owner or Profile Owner to collect the device ID, IMEI, etc. MDM cannot fetch IMEI, Serial number from Android 12 devices that are enrolled as Profile Owner, as per Android's Privacy policy. Only UDID is used for device identification.
For Knox-supported devices, additional details such as the Knox status, Container status, and Knox version will be displayed. You can view all installed apps within both the Knox container and the device itself. Additionally, any restrictions will be listed separately for the device and the Knox container.
Audit Logs
The Audit Logs tab provides a detailed record of all actions and changes performed on the device within the MDM console. This helps administrators track activity for compliance, troubleshooting, and accountability.

Key Features
- Date Range Filters: Select a predefined period (e.g., last day, week, or month) or define a custom range to view relevant logs.
- Module Type Filters: Narrow logs to specific modules such as Enrollment, Geofencing, Profile Management, App Management, Announcements, Certificates, Security Settings, OS Update Management, and more. Selecting All displays every logged activity.
- User Filter: Use the User dropdown to filter audit logs by the administrator who performed the action. By default, it shows All users, but you can select specific users to isolate their activity. This helps in quickly identifying who made specific changes.
Log Entry Details
Each entry in the Audit Logs table includes:
- Type: The event type of the action (e.g., Info, Warning, Error).
- Remarks: A short description of the action performed (e.g., device enrolled, policy applied, announcement sent).
- Module: The MDM module where the action occurred.
- Event Time: The exact timestamp when the action took place.
Monitor Device Restrictions
Restrictions in ME MDM allow administrators to enforce policies on enrolled devices, ensuring compliance with organizational security and operational standards. These restrictions can control access to features like cameras, app installations, data sharing, and more. Restrictions can vary based on the platform (iOS, Android, Windows), device ownership (corporate or personal), and specific user groups.
Applying Restrictions Profile:
Admins can configure restrictions by navigating to the Profiles section in the ME MDM console and assign them to individual devices or device groups. These restrictions are pushed over-the-air (OTA) during device synchronization with the MDM server, ensuring seamless enforcement without requiring physical access to the device.
Monitor the Restriction:
Admins can view the current restriction status of a device by navigating to the Device Details page, where the "Restrictions" tab lists all applied policies. This includes details such as disabled features (e.g., camera, app installations), allowed or blocked apps, and enforced data-sharing restrictions. The device regularly sends updates to the MDM server to confirm compliance with these restrictions, and any changes made to the restriction settings are communicated back to the MDM console in real-time or during scheduled sync intervals.
Last Contact Time
Last Contact Time is the most recent timestamp when an enrolled device communicated with the MDM server. This helps administrators identify inactive devices, verify policy sync status, and monitor how responsive devices are.
If a device has not reported in within the expected timeframe, it may be inactive, offline, or experiencing connectivity issues.
Update behavior by platform
For Android, iOS/iPad OS, and macOS devices, Last Contact Time is updated based on the conditions below:
| OS | Last Contact Time update behavior |
|---|---|
| Android | Updated every 6 hours. Additionally updated when any of the following events occur:
|
| iOS/iPadOS/macOS | Updated when any of the following events occur:
|
Where it appears: The Last Contact Time value is displayed in the Device Details Summary and as a column in the Inventory devices list.
Real-Time Device Updates
In ME MDM, the device information displayed in the View Device Details section is regularly updated to ensure that admins have access to accurate and current data. The system relies on two primary methods to keep device information up to date: scheduled scans and real-time updates from devices.
Based on Scheduled Scans
- Scheduled Device Scans: ME MDM allows administrators to configure periodic scans for enrolled devices. These scans are automatically initiated at set intervals, such as daily or weekly, depending on the organization’s preferences.
- Data Collected During Scans: During these scheduled scans, the system collects a wide range of device data, including hardware details, installed applications, security settings, network configurations, and any changes in compliance with assigned profiles and restrictions.
- Update Frequency: Admins can adjust the scan frequency according to organizational needs. For example, critical devices might be scanned more frequently, while other devices can be scanned at longer intervals.
- Offline Devices: If a device is offline during a scheduled scan, the information will be updated the next time the device connects to the network and syncs with the MDM server.
Real-Time Information Updates from Device
- Push Notifications for Critical Events: ME MDM uses push notifications to receive real-time updates from enrolled devices. This allows the system to report critical changes instantly, such as security incidents, new app installations, or modifications in device settings.
- Automatic Sync During Policy Changes: Whenever an admin makes changes to policies, profiles, or restrictions, the device is prompted to sync with the MDM server immediately, ensuring that any updates are reflected in the View Device Details page without delay.
- Instant Reporting of Actions: Real-time data updates also include the results of actions initiated by the admin, such as wiping a device, locking it, or installing a new app. The device reports back to the MDM server once the action is completed.
- Location Tracking and Geo-Tracking: If geo-tracking is enabled, the device sends location updates in real-time, which are displayed under the Geo-Tracking section of the device details.
Keeping Device Information Accurate: By combining scheduled scans and real-time data syncing, ME MDM ensures that admins always have the most up-to-date information about each managed device. This system allows for timely troubleshooting, policy enforcement, and effective device management. For more details on managing scan settings and real-time updates, refer to the Device Scanning Configuration section of the Help Guide.
Managing and Updating Device Attributes
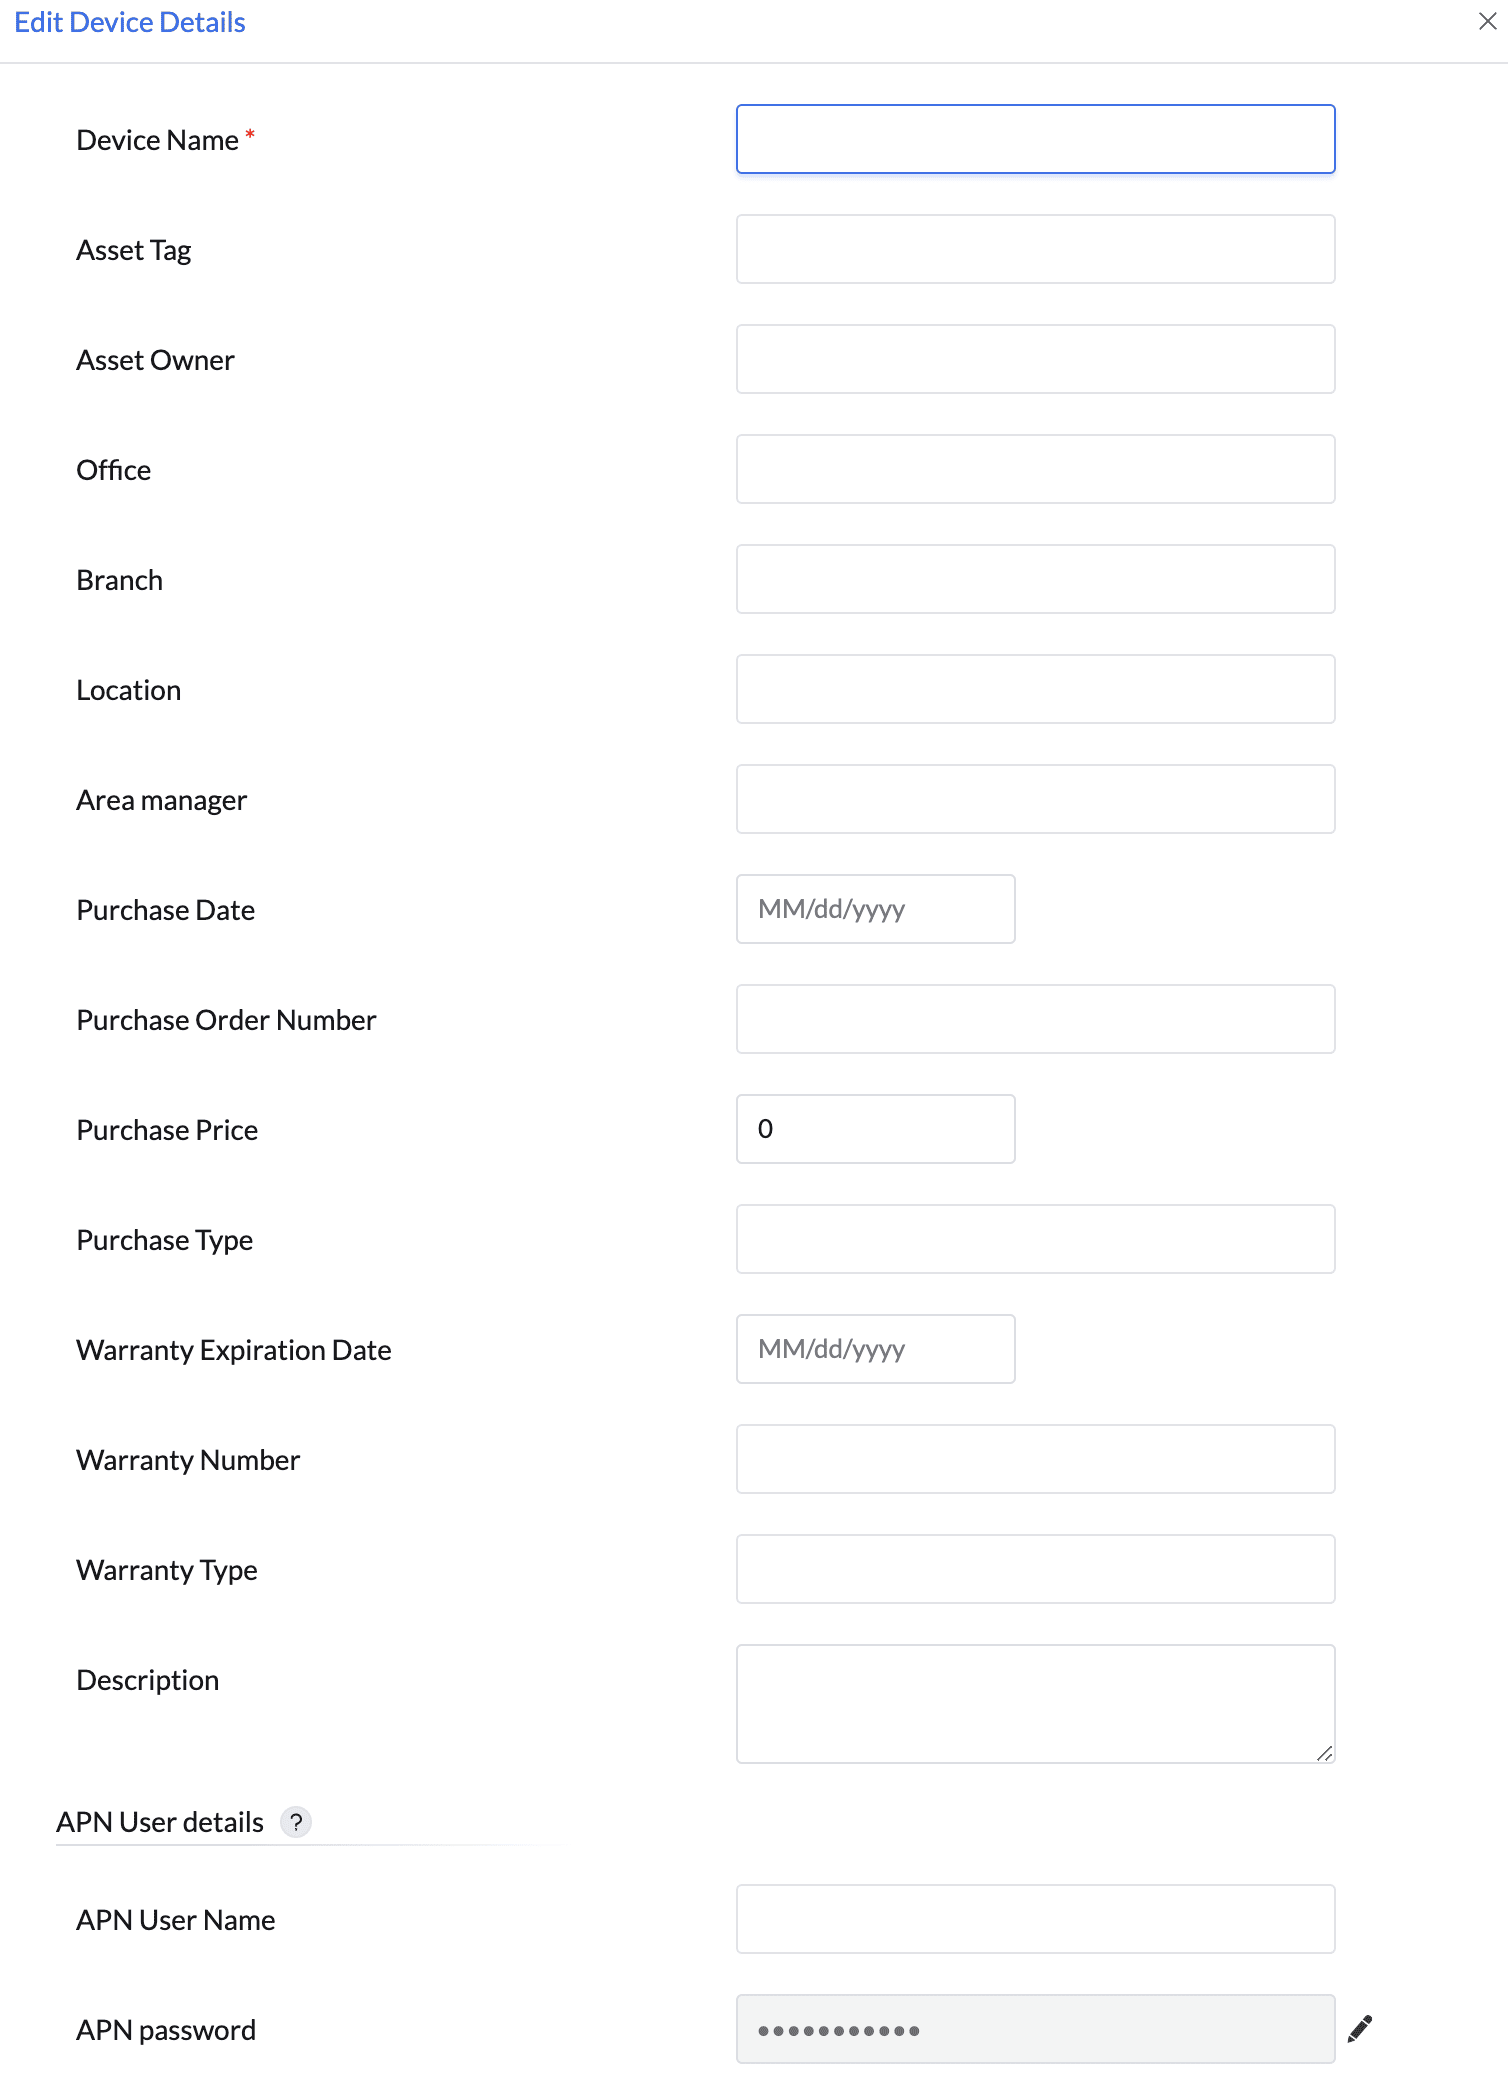
The View Device Details page in ME MDM allows admins to manage and update various attributes associated with each device. Maintaining accurate and up-to-date information is crucial for effective device management, asset tracking, and reporting. This section outlines how to modify device details, including individual and bulk modifications. For Windows phones, macOS devices, and Supervised iOS devices running iOS 7 or later, the updated device name in the server will also be reflected to the device.
Device Name
To change the device name, navigate to the View Device Details page, click on the Device Name, and then click the pencil icon to edit. Enter the new name that accurately reflects the device’s usage or assignment, and click "Save" to apply the changes. Keeping the device name up-to-date facilitates easier identification and tracking, particularly in environments with a large number of managed devices.
When a device is enrolled in Mobile Device Manager Plus (MDM), the Device Name is initially fetched from the device itself. Here is how the device name functions across different platfoms:
- Android Devices: If an admin changes the device name of an Android device, the modification will only be visible in the Device Details of the ME MDM app.
- iOS Devices: When the admin updates the device name of an iOS device in the MDM console, the new name will appear in the enrolled device settings->About->General->Name for the supervised devices.
- Windows Devices: Any changes made to the device name of a Windows device in the MDM console will not be reflected on the Device.
- macOS: If the admin modifies the device name on a macOS device, a confirmation prompt will appear stating, "Modifying the device name will change the Host Name on the device as well. Do you want to continue?" If the admin clicks "Yes," both the Device Name and Host Name will be updated.

Modifying Device Details
Admins have the ability to modify various device attributes directly within the MDM server. The following details can be updated:
Device Name, Asset Tag, Asset Owner, Office, Branch, Location, Area Manager, Purchase Date, Purchase Order Number, Purchase Price, Purchase Type, Warranty Expiration Date, Warranty Number, Warranty Type, Description, APN User Details, APN User Name, APN Password
To modify these details:
For Single Devices:
- Navigate to the Inventory section and locate the device. Click on the Edit icon next to the device name to modify the details. Enter the new information, and click Save to apply your changes.
For Bulk Device Modifications:
For efficiency, admins can also modify device details in bulk. This feature is particularly useful for managing large fleets of devices with similar attributes. To perform bulk modifications:
- Go to Inventory > Devices > Bulk Edit Device Details.
- Create (Sample CSV) and upload a .csv file containing the device details to be modified, including the IMEI or Serial Number of each device.
- You can add or modify details in bulk, which will be reflected in the MDM server.
- After uploading the file, click Save to apply the changes.
Note :
- The CSV file can contain the following fields:
DEVICE_NAME,IMEI,SERIAL_NUMBER,UDID,ASSET_TAG,ASSET_OWNER,DESCRIPTION,OFFICE,BRANCH,LOCATION,AREA_MANAGER,PURCHASE_DATE,PURCHASE_ORDER_NUMBER,PURCHASE_PRICE,PURCHASE_TYPE,WARRANTY_EXPIRATION_DATE,WARRANTY_NUMBER,WARRANTY_TYPE,APN_USER_NAME,APN_PASSWORD
- Either IMEI or SERIAL_NUMBER or UDID is mandatory to identify the device.
- The first line of the CSV is the column header, and the columns can be in any order.
- Blank column values should be comma separated.
- If the column value contains comma, it should be specified within quotes.
Only devices enrolled in MDM can have their details modified. Once the changes are saved, the details are successfully updated.
Reports for Analysis and Decision-Making
Device Inventory page in ME MDM is not only essential for monitoring individual devices but also serves as a critical resource for generating comprehensive reports that aid in analysis and decision-making. This section outlines how to leverage device details to create meaningful reports that can enhance organizational efficiency and inform strategic decisions.
Export from the Devices List:
Admins can export device details from the Inventory Detailed page by customizing the columns using the column chooser option. These exports can be generated in PDF, XLSX, and CSV formats.
Pre-Defined Reports:
Admins can also export pre-defined reports available in the Reports section, including App reports, Hardware reports, Enrollment reports, Location reports, Security reports, Telecom expense reports, and more.
Scheduled Reports:
Admins can schedule reports to be generated automatically at specified times and sent directly to the designated admin email addresses. Additionally, column ordering can be customized to meet specific requirements. For more information, visit our Reports Guide.
What's Next?
Associate Profile / Apps:
Assign the necessary profiles and applications to the enrolled devices to ensure they have the required configurations and software. For detailed instructions, refer to our Profile and App Management Help Guide.
Configure Tracking:
Admins can configure various tracking options to enhance device management and monitoring.
FAQ
1. Why is the phone number not detected for my device?
The phone number might not be detected if there is no SIM card installed or if the phone number status on the device is "Unknown". Refer to our KB article on Phone number is not detected for detailed troubleshooting steps.
2. Why is my tablet displayed as a smartphone in the MDM inventory?
ManageEngine MDM classifies devices as either Smartphone or Tablet based on the Android recommended method for determining screen size. Android uses the smallest width (sw) qualifier to differentiate device types:
- Devices with a smallest width of 600dp or greater are classified as Tablets.
- Devices with a smallest width below 600dp are classified as Smartphones.
This classification is determined by the device hardware and the Android system itself. MDM reads the device-reported screen configuration values through standard Android APIs and does not independently decide the device type. If a device that you expect to be a tablet is showing as a smartphone, it means the device itself is reporting a smallest width below 600dp.
Why does this happen?
- Some manufacturers classify their devices differently based on internal display configuration.
- The screen resolution (in DPI) and smallest dp value may vary between devices of the same model depending on firmware or regional variants.
- This is a device-specific classification, not an MDM limitation.