Self Enrollment
MDM self-enrollment simplifies the enrollment by allowing users to enroll their personal devices without IT Admin assistance, using a user-friendly interface where they access an enrollment portal, authenticate with company credentials, and install an MDM profile that automatically configures settings and apps. This method benefits both end-users and admins. Users can enroll their devices independently, avoiding IT delays, enabling quick setup for new or upgraded devices with minimal downtime, and following intuitive step-by-step instructions, while admins save time by eliminating manual registrations, ensuring immediate compliance with security policies, and automatically deploying required apps and configurations upon enrollment.
Use Cases
This section outlines various scenarios for the Self Enrollment feature of MDM across different platforms: iOS, iPadOS, MacOS, Android, and Windows. Each scenario demonstrates how Self Enrollment can enhance device management and improve user experience while maintaining security and compliance.
1. Self Enrollment for iOS/Android/Windows Devices: An organization issues iOS/iPadOS/MacOS/Android/Windows to its employees, allowing them to manage their devices independently while ensuring corporate security.
2. Corporate BYOD Policy: Employees bring their personal iPhones/iPads/Android/Windows devices to work and need access to corporate resources while keeping personal and work data separate.
3. Remote Work Setup: Employees working remotely need to enroll their devices to access company applications and resources.
4. MDM for Contractors: Temporary workers need access to specific corporate applications and resources during their contract period.
Pre-requisites for Self Enrollment
Before initiating the self-enrollment, ensure that the following requirements are met. These prerequisites are essential to ensure a smooth and successful enrollment of devices into the MDM.
- The user must have valid organizational credentials (username and password) provided by the IT or HR department.
- The credentials are typically tied to the organization’s authentication system, such as Active Directory such as Okta, Google Workspace, EntraID or zoho directory solution, which will be used during the enrollment.
- If MFA is enabled, users may need access to their secondary authentication method (e.g., SMS code, authentication app) to complete the login.
- The user’s device must have internet connectivity to access the portal and download the MDM profile.
- In some cases, users may need to be connected to the corporate network (via Wi-Fi or VPN) to initiate the enrollment.Certain device settings, such as enabling Location Services or allowing the installation of profiles, may need to be activated to complete the enrollment.
Enable Self Enrollment in MDM Console
- Configure Self Enrollment Settings: To enable the Self Enrollment feature in MDM, log in to the MDM console using your admin credentials. Navigate to the Enrollment->Self Enrollment. select "Configure." Customize the Self Enrollment settings according to your organization's requirements for seamless device onboarding.

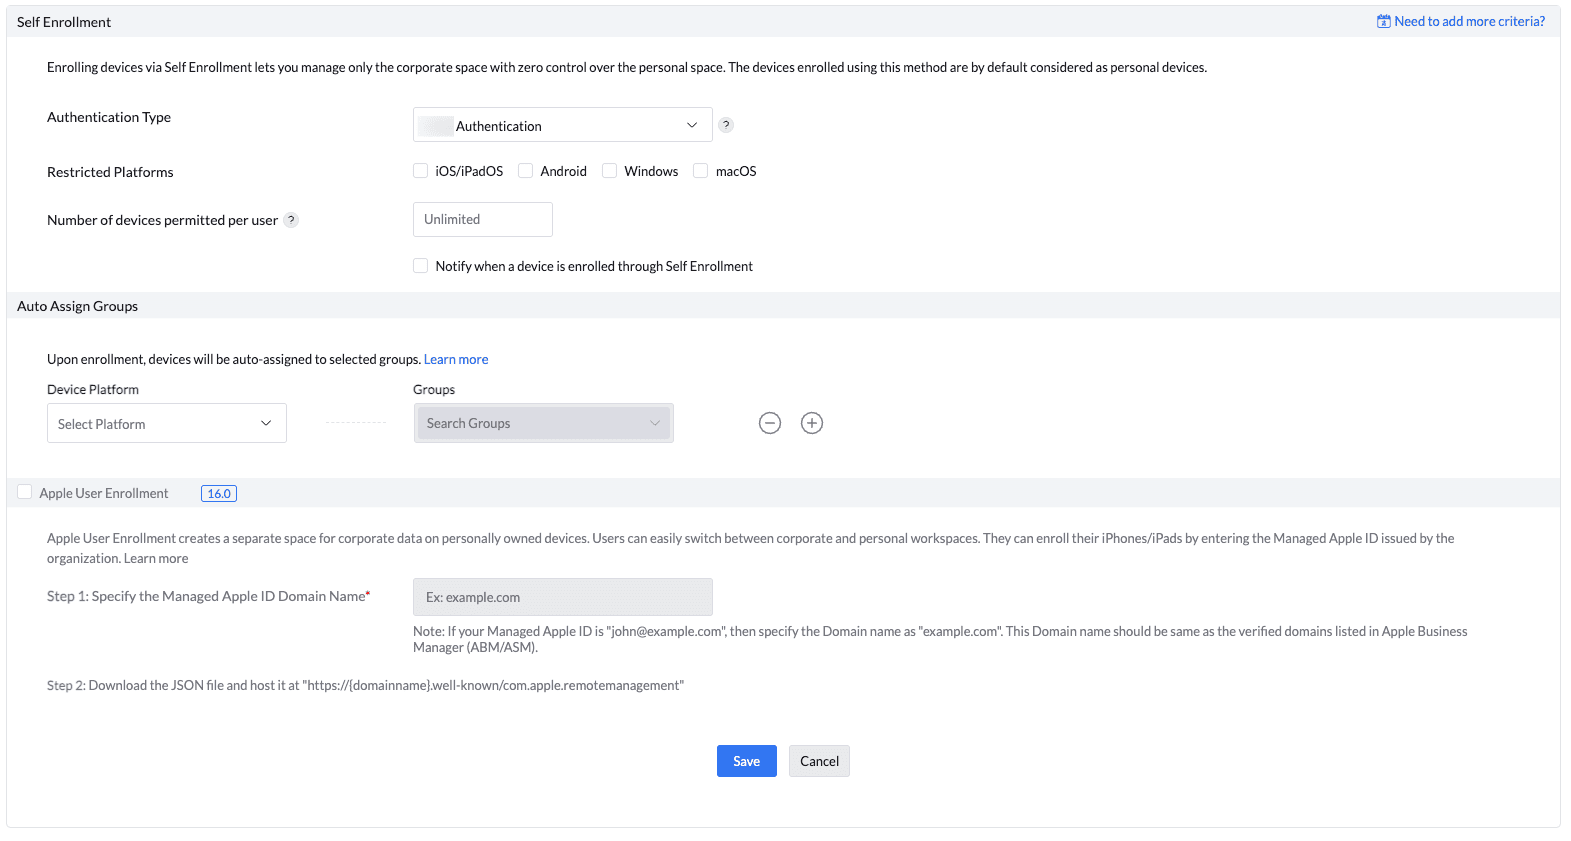
- Authentication Type: Choose the Authentication Type from the drop-down : Okta, zoho, Azure, etc.
- Allow Self Enrollment For:The self enrollment URL is usually shared across the organization and any device can be enrolled with the URL as it is device/ user independent. Thus, administrators may want to restrict self enrollment to specific AD groups. MDM allows you to restrict self enrollment only to specific AD groups, ensuring only specific devices get enrolled with MDM. Follow the steps specified below to restrict self enrollment:
- Select All AD Groups, to allow users in all the AD groups to self enroll the devices. You can optionally exclude specific groups as well by specifying the groups to be excluded the option of Self Enrollment.
- If you choose Selected AD Groups, only users of specific groups are allowed to self enroll the devices. Specify the groups to be allowed self enrollment.
- Restricted Platform: Select the platforms you want to allow or restrict. For example, you may choose only to allow self-enrollment on iOS and Android while excluding Windows.
- Number of devices permitted per user: Self-enrollment enables users to register multiple devices without admin approval. However, for security purposes, most organizations restrict the number of devices a single user can enroll. If the limit is left blank, the device limit is set to unlimited.
Steps to Restrict Number of Devices per User: To configure device limits, navigate to the "Number of devices permitted per user" setting and specify the maximum number of devices a user is allowed to enroll. Once this limit is reached, the user will no longer be able to enroll additional devices using the self-enrollment URL. This helps maintain control over the number of devices associated with each user.
- Notification on Enrollment: To receive notifications when a device is enrolled, select "Notify when a device is enrolled through Self Enrollment" and enter the email address in the "Specify Email for notification" field
- Auto-Assign Groups: To ensure devices are properly organized and policies are applied immediately upon enrollment, configure the system to automatically assign devices to specific groups based on predefined criteria. Steps to Auto-Assign Devices to Groups:
- Platform: Select the Platform from the dropdown to allocate a device to a given group.
- Groups: The list of available groups will be listed here. Select the group to which devices meeting these criteria will be automatically added.
- Apple User Enrollment [iOS 16.0]: Administrators can set up Apple User Enrollment, which creates a dedicated workspace for corporate data on personal devices. This allows users to switch easily between their personal and corporate environments. To enroll their iPhones or iPads, users need to enter the Managed Apple ID provided by the organization. For further details, refer to our "Self Enrollment Settings for Apple User Enrollment (iOS 16.0 and Later)" guide.
Notes:
1. Apple User Enrollment is designed to protect personal data on devices. While corporate data and apps are managed by the organization, personal data remains untouched, enhancing user privacy.
2. Enrolled devices will receive policies and settings, such as network configurations, app installations, and access controls, for the corporate workspace only.
3. Unlike other enrollment types, Apple User Enrollment does not give IT admins full control over the device. Only corporate-related data and apps are managed.
4. This method of enrollment is ideal for BYOD (Bring Your Own Device) scenarios, where users are required to access corporate resources on their personal devices. It provides the organization with the necessary control over corporate data while maintaining user privacy for personal apps and information. - Save Settings: Save the Self Enrollment settings.
Steps to follow After configuring Self Enrollment
Once Self Enrollment has been successfully configured in MDM, the following steps outline how users can enroll their devices:
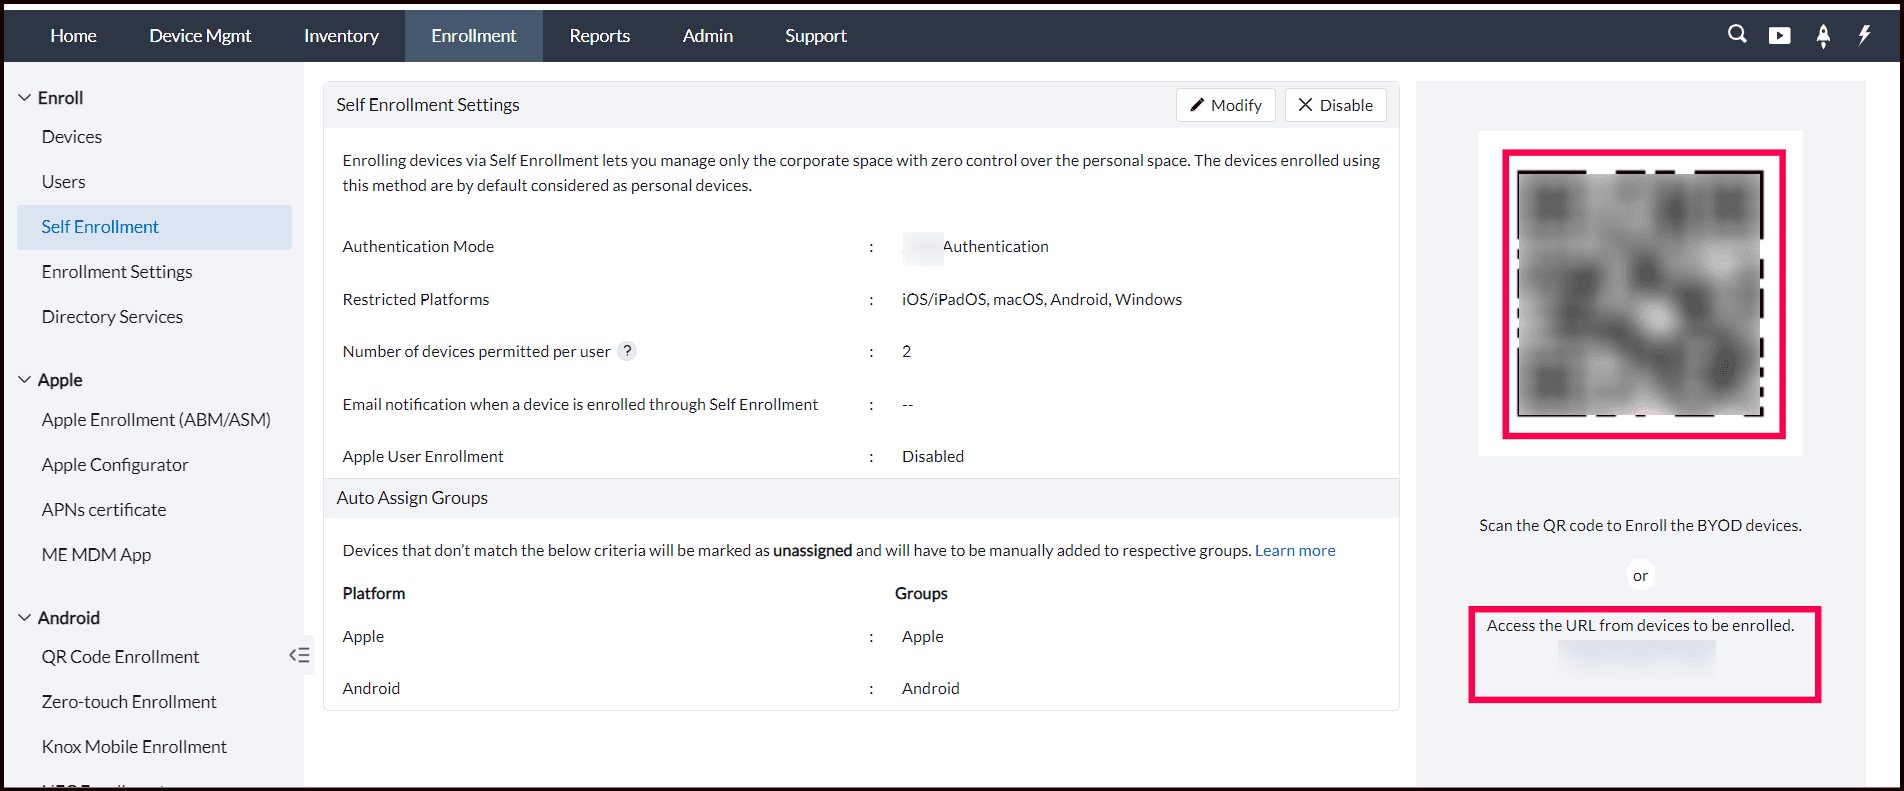
Access the Enrollment URL or QR Code in MDM Console:
After completing the Self Enrollment configuration, an Enrollment URL and a QR code will be provided. These are the primary tools users will use to enroll their devices, whether they are on iOS, Android, or Windows platforms. Users can either scan the QR code or access the Enrollment URL from the device they wish to enroll. The enrollment remains consistent across all supported platforms, ensuring a seamless experience for users.
Enrollment URL Formats:
- On-premise Enrollment URL: https://<FQDN>:<PORT>/mdm/client/enroll
- Cloud Enrollment URL: https://mdm.manageengine.com/mdm/client/enroll
Note: The URL may vary based on the region (e.g., ".eu" for Europe, ".in" for India).
Promoting Self Enrollment
To ensure widespread adoption of the Self Enrollment feature, it is important to promote Self Enrollment across the organization. Here are some strategies:
- Internal Communication: Share the enrollment URL and instructions via internal forums, newsletters, or blogs.
- Email Campaigns: Send an email to employees with step-by-step enrollment instructions and the Enrollment URL/QR code.
- IT Help Portal: Post detailed instructions and troubleshooting guides on your organization’s IT support or help portal to assist users during the enrollment.
Promoting the self-enrollment ensures that employees are informed and can easily enroll their devices into the MDM system.
What's Next?
Android Enrollment
Enroll your Android BYOD devices through self enrollment by visiting our Android Self Enrollment Guide. This guide offers detailed instructions for a seamless integration and management experience across Android devices.
Apple Enrollment
For step-by-step guidance on enrolling Apple devices—such as iOS, iPadOS, and macOS—refer through self enrollment, visir our Apple Self Enrollment Guide.
Windows Enrollment
For enrolling Windows devices through self enrollment, visir our Windows Self Enrollment Guide.