Implementing and Managing Access Control Workflow
Effective password management is essential for ensuring the security and integrity of privileged access within an organization. The Access Control Workflow enables administrators to enforce approval-based access, ensuring only authorized users can retrieve and utilize privileged passwords. This approach supports the zero-standing privileges model by eliminating persistent access and granting access only as needed. Administrators can define specific approval hierarchies, set access duration, and implement auto-approval rules by configuring the access control workflow. Additionally, a ticketing system can be integrated to auto-approve password access requests by validating the ticket IDs against active tickets. This mechanism strengthens security and introduces accountability through detailed auditing.
This document provides detailed instructions for managing privileged access through access control, covering the entire lifecycle from configuring the access control workflow to deactivating it when necessary. It explains how to define global access control settings, designate approval administrators, and enforce conditions such as exclusive access, grace periods, and auto-approval rules. With a streamlined request-release process, administrators can efficiently review, approve, reject, or modify password access requests, minimizing the risk of unauthorized access.
By following the instructions in this document, administrators can effectively implement and manage access control workflow for privileged resources within their environment, enhancing overall security while simplifying access management processes.
This document covers the following topics in detail:
- Configuring Access Control Workflow for Resources
- Configuring Access Control Workflow for Accounts
- Viewing Access Control Details
- Password Access Requests
- Deactivating Access Control
1. Configuring Access Control Workflow for Resources
PAM360 allows you to configure access control workflow at the account and resource levels. The configuration steps are almost identical for both cases. Follow these steps to configure access control at the resource level:
- Navigate to the Resources tab, click the Resource Actions icon beside the desired resource for which you wish to configure access control workflow, and select Configure >> Access Control from the displayed options.
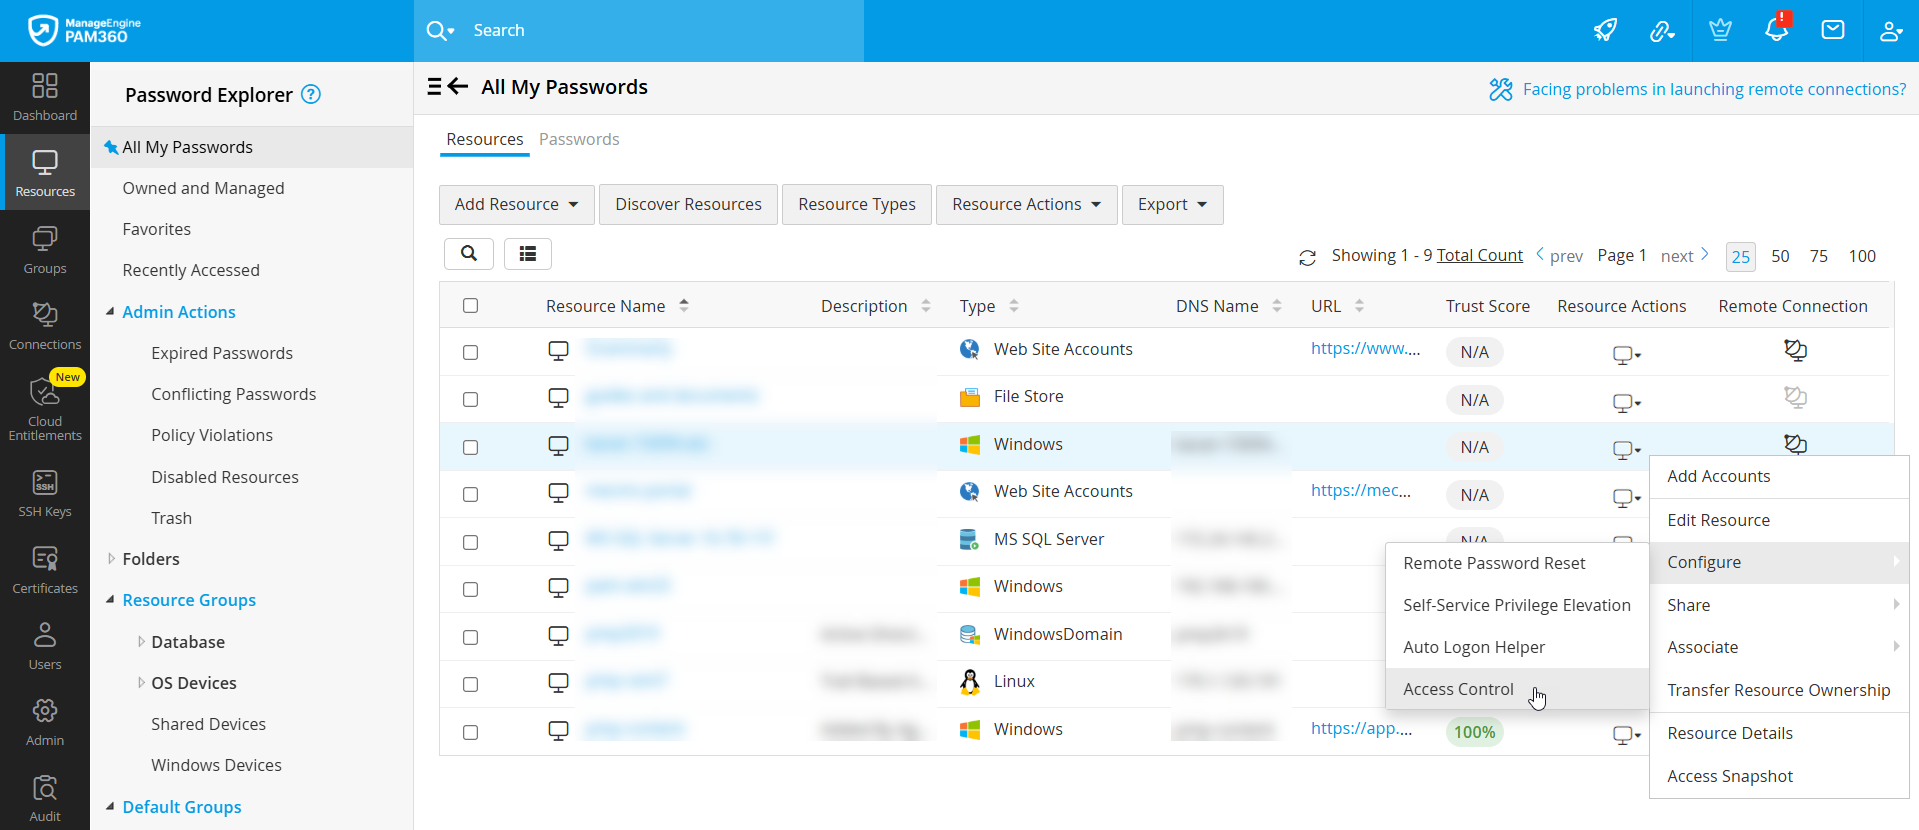
- To configure access control for resources in bulk, tick the checkbox beside the desired resources for which you wish to configure access control workflow, click the Resource Actions button on the top pane, and select Configure >> Access Control.
- In the Access Control configuration window that appears, you will see the following configuration settings, where you can customize various options related to the password access based on your requirements.
1.1 Approval Administrators
Designating approval administrators is a crucial step in configuring the access control workflow. Whenever a user requests access to a password, the request is forwarded to the administrators designated as approval administrators in this section. Under All Administrators, you will see the list of all the administrators in your environment, including the password and privileged administrators. Select the administrator from this list and click the right arrow button to assign an administrator as an approver for password access requests. The selected administrator will be designated as an approver. Anyone listed under the Authorized Administrators section can approve or reject password access requests made for any of the accounts within the selected resource.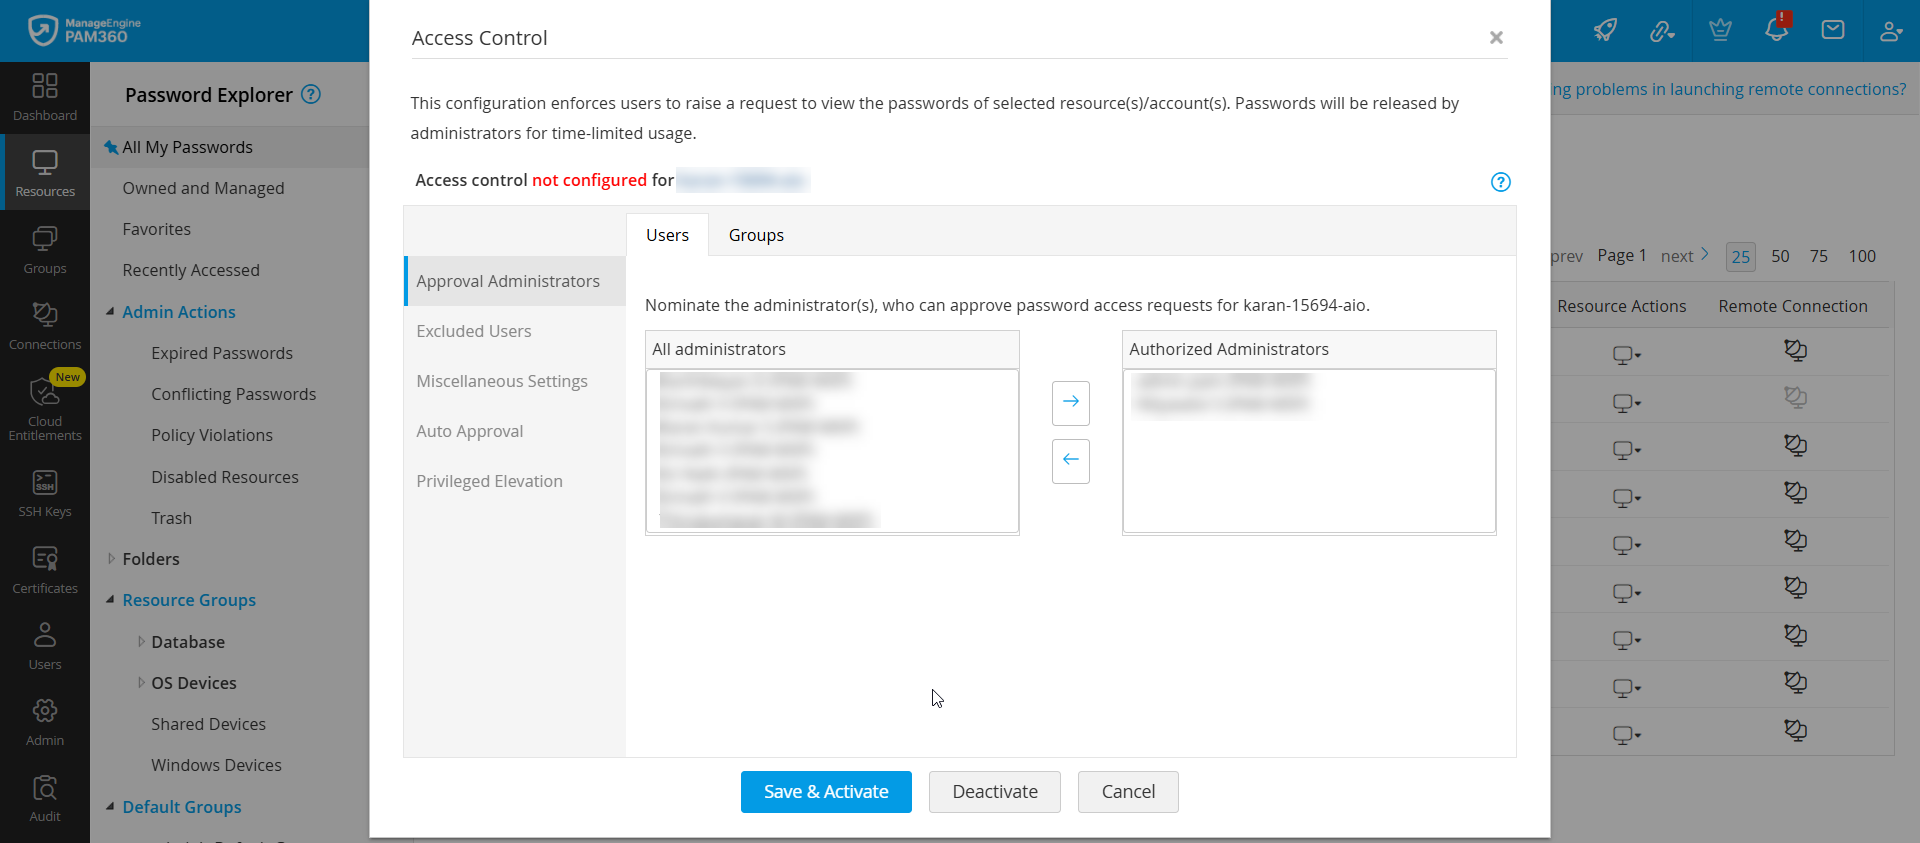
Alternatively, if you wish to designate the users present within a user group as the approval administrator, you can switch to the Groups tab and designate the desired user group as Authorized Groups. Only the user groups that contain users with administrator privileges will be listed here. Any user with administrator privileges who belongs to the user group designated as authorized administrators can approve or reject password access requests made for any of the accounts within the selected resource.
1.2 Excluded Users
While configuring the access control workflow for a resource, you can exclude certain users from the workflow. The users designated as Excluded Users can access the passwords shared with them directly without following the access control workflow. To exclude a user from the access control workflow, select the desired user you wish to exclude and click the right arrow button. You can also exclude users part of a user group from the access control workflow. To exclude user groups, switch to the Groups tab, select the desired user group you wish to exclude, and click the right arrow button.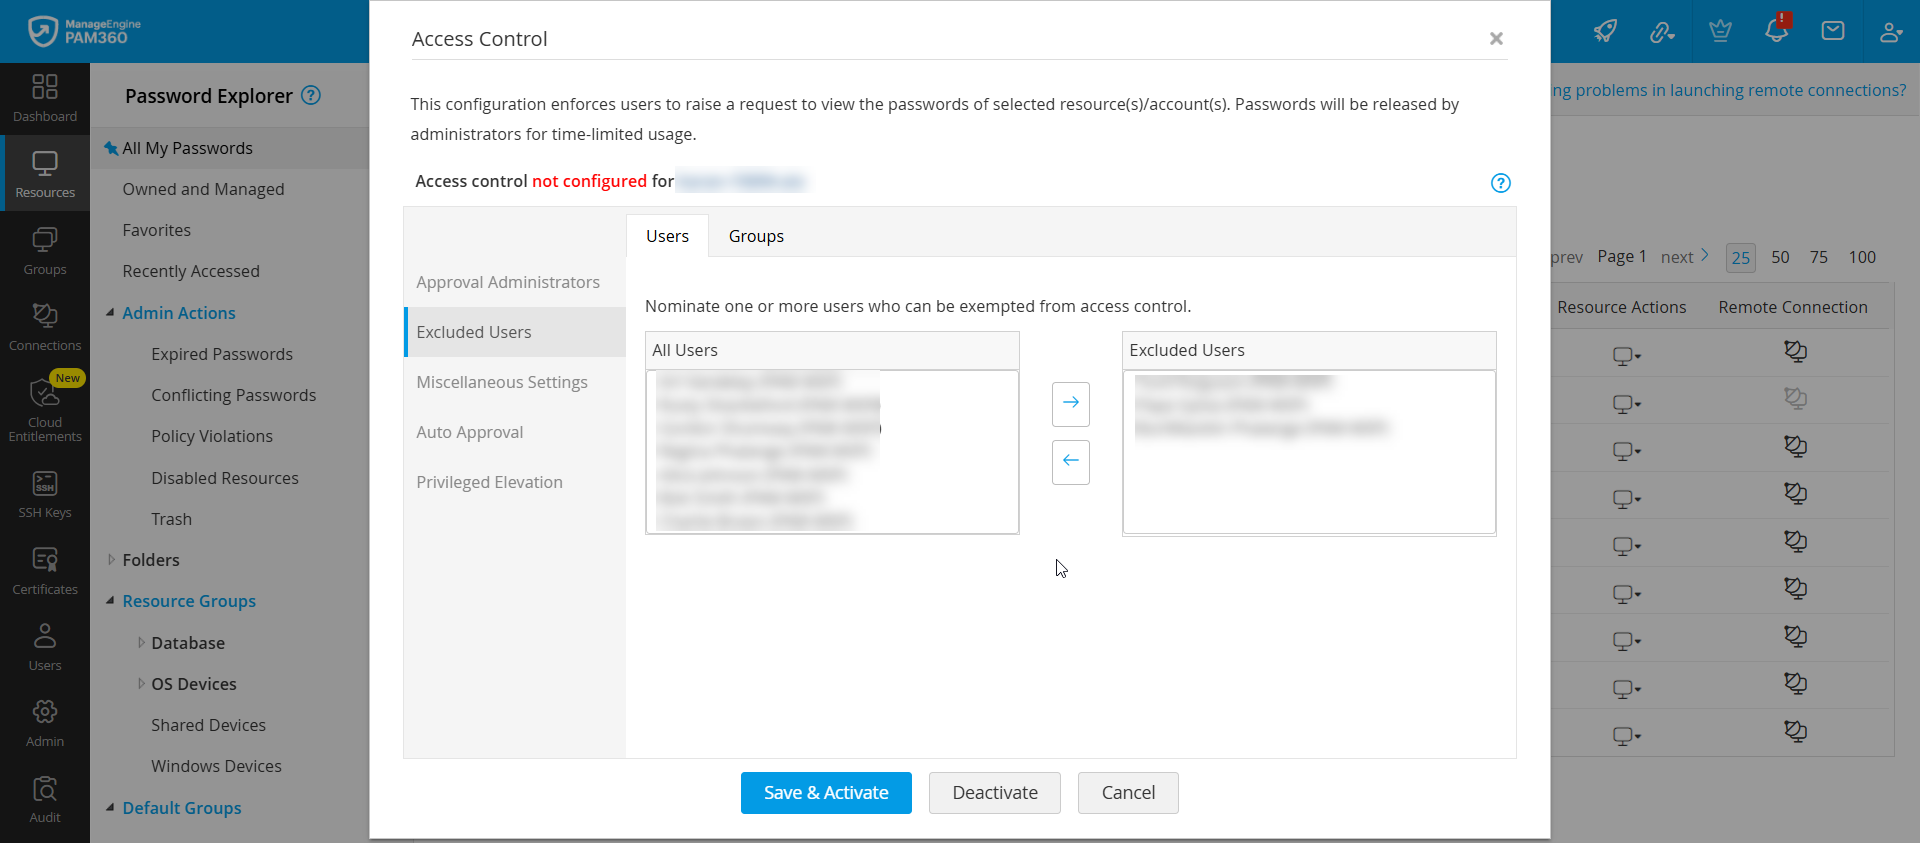
1.3 Miscellaneous Settings
Under this section, you will find the various access conditions based on which users are granted access to the requested password and other security settings that help minimize vulnerabilities and insider threats.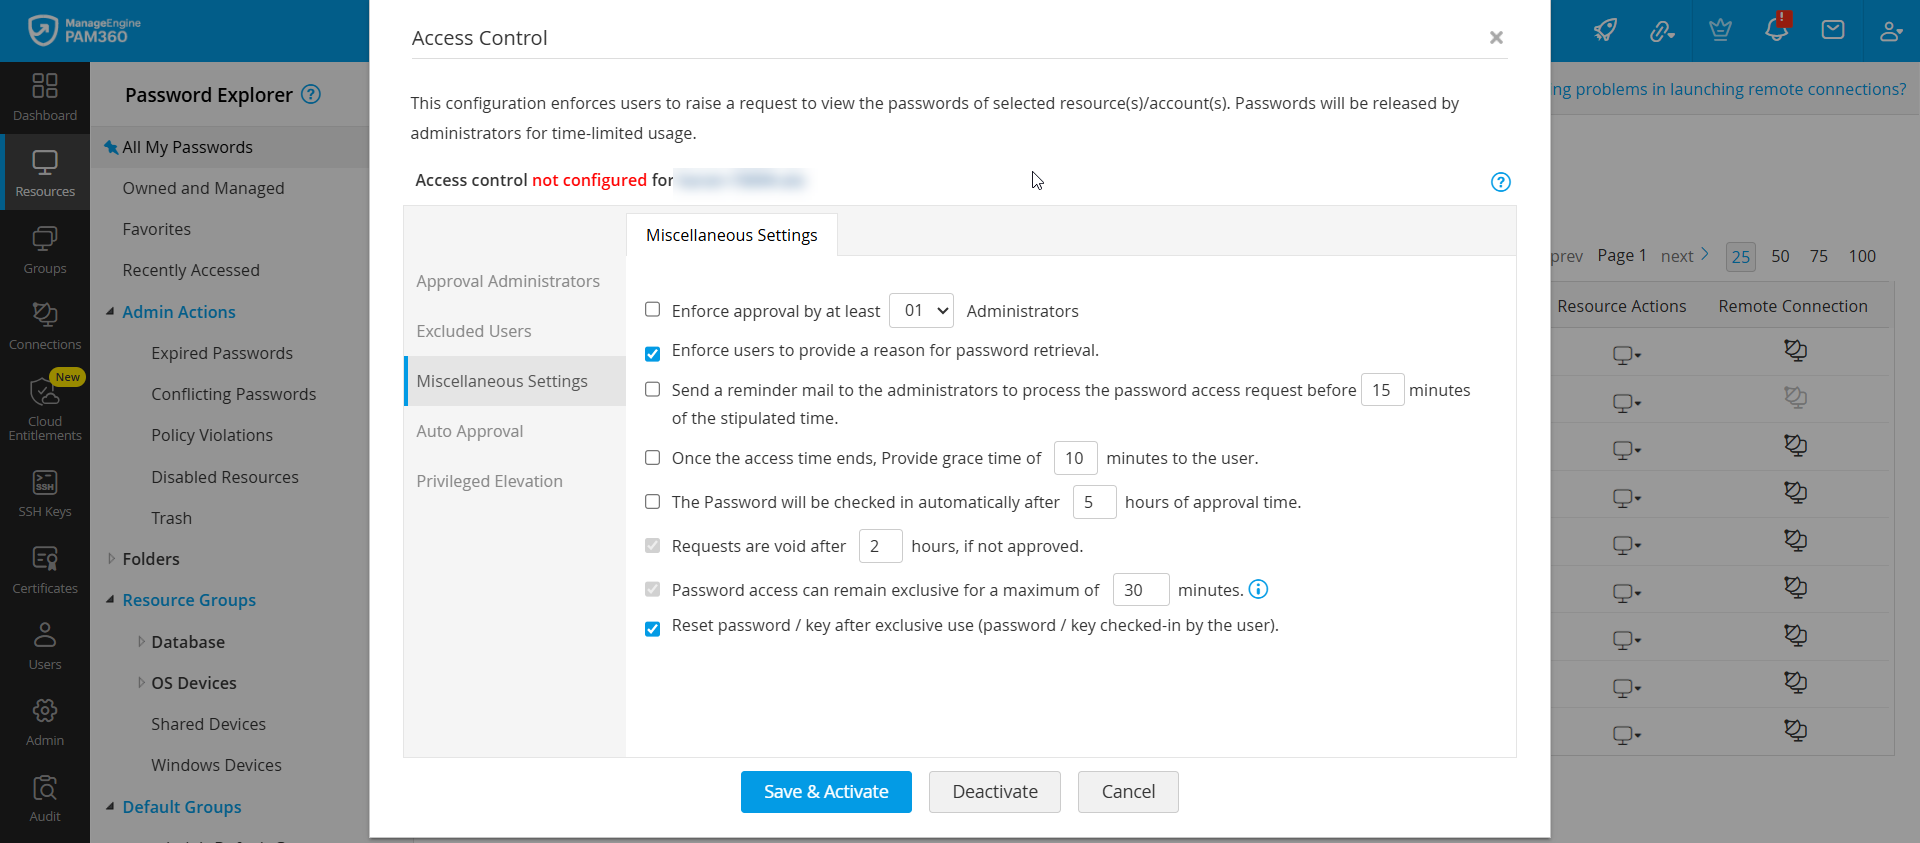
- Enforce approval by at least [X] Administrators - Enable this option to enforce approval from a specific number of administrators for each password access request. Use the drop-down menu to select a number between 1 and 10. If you choose to enforce approval by at least 10 administrators, you must designate at least 10 administrators as Authorized Administrators under the Approval Administrator section.
Additional Detail
You can also set the maximum number of required approvers globally under the Password Retrieval section on the General Settings.
- Enforce users to provide a reason for password retrieval - Enable this option to mandate users to specify a reason when they retrieve the passwords in plain text by clicking on the asterisks. By enabling this option, you can ensure accountability and maintain a clear audit trail of password access and its purpose.
- Send a reminder mail to the administrators to process the password access request before X minutes of the stipulated time - Enable this option to send a reminder email to the administrators about the password access requests awaiting approval. Specify the duration (in minutes) before the email should be sent to the administrators, reminding them to review the pending password access requests. If you enter 30 in this field, PAM360 will send a reminder email 30 minutes before the start time specified by the user in the password access request. By default, this value is set to 15.
- Once the access time ends, provide grace time of X minutes to the user - Enable this option to provide grace time for the users to access the passwords after their access duration ends. Specify the duration (in minutes) for which the users can maintain exclusive access to the passwords after the end time. You can configure a grace time of up to 60 minutes. If you enter 15 in this field and the requested access duration is between 5 pm and 6 pm, then users can utilize the password until 6:15 pm. By default, this value is set to 10.
- The password will be checked in automatically after X hours of approval time - Use this option to specify the exact time after which the password will be checked in automatically and will no longer be available for use.
- Requests are void after X hours, if not approved - Use this option to specify the maximum time, in hours, after which a pending password request will become void if the administrators do not approve. If even one administrator approves the password request, then the approval status will be sent as notification to the other authorized administrators.
- Provide exclusive access to passwords for [X] minutes - Specify the duration (in minutes) for which users can maintain exclusive access to the password when they request immediate access by choosing the Now option in the Password Request window. If you enter 60 in this field, users will maintain exclusive access to the passwords requested using the Now option for 60 minutes. By default, this value is set to 30.
- Rotate passwords or keys upon check-in after each exclusive use - Enable this option to reset the passwords or SSH keys automatically once they are returned to the vault after each exclusive use.
Caution
- When grace time is configured, PAM360 will forcefully check the password into the vault only after the configured grace time ends.
- The grace time will not be applicable in the following cases even though it is configured:
- When the user checks the password back into the vault before the end time specified in the password access request.
- When the user has not checked out the password until the end time specified in the password access request.
- Ensure you have configured remote password reset using the necessary login credentials with password reset privileges to reset the passwords after each use. Explore these links for the detailed steps to configure remote password reset for resources available on the same network as the PAM360 server and those managed via the PAM360 agents.
1.4 Auto Approval
PAM360 allows you to configure auto-approval settings for the password access requests made by the users based on the following criteria:
- The time at which the password access request was made
- Ticket ID validation
The auto-approval option will be helpful in scenarios where the approval administrators are unavailable to approve password access requests or when the number of requests is high. Administrator configuring the password access control workflow can specify the criteria based on their requirement. All the requests whose start time matches with the auto-approval criteria will be automatically approved by the system, and the users configured as authorized administrators will be notified via email. For example, you can set the time for auto-approval as Every day between 09:00 AM and 06:00 PM. You will find the following options under the auto-approval section.
- Approve access requests automatically for requests raised - Enable this checkbox to allow the system to approve the password access requests based on specific criteria automatically. You should select one of the below-mentioned criteria for auto-approval. If this checkbox is not enabled, password access requests made by the users will not be approved automatically.
- All times during the day - Select this option to automatically approve the password access requests made by the users during the day.
- Criteria - Select a time frame when the password access requests should be approved automatically using the given options. You can set up to three approval time frames for a single day.
- Approve access requests by validating service request ticket ID - If you have a ticketing system integration in your environment, you can select this option to approve the password access requests based on the service request ticket ID. PAM360 will verify the Ticket ID specified by the users before granting password access.
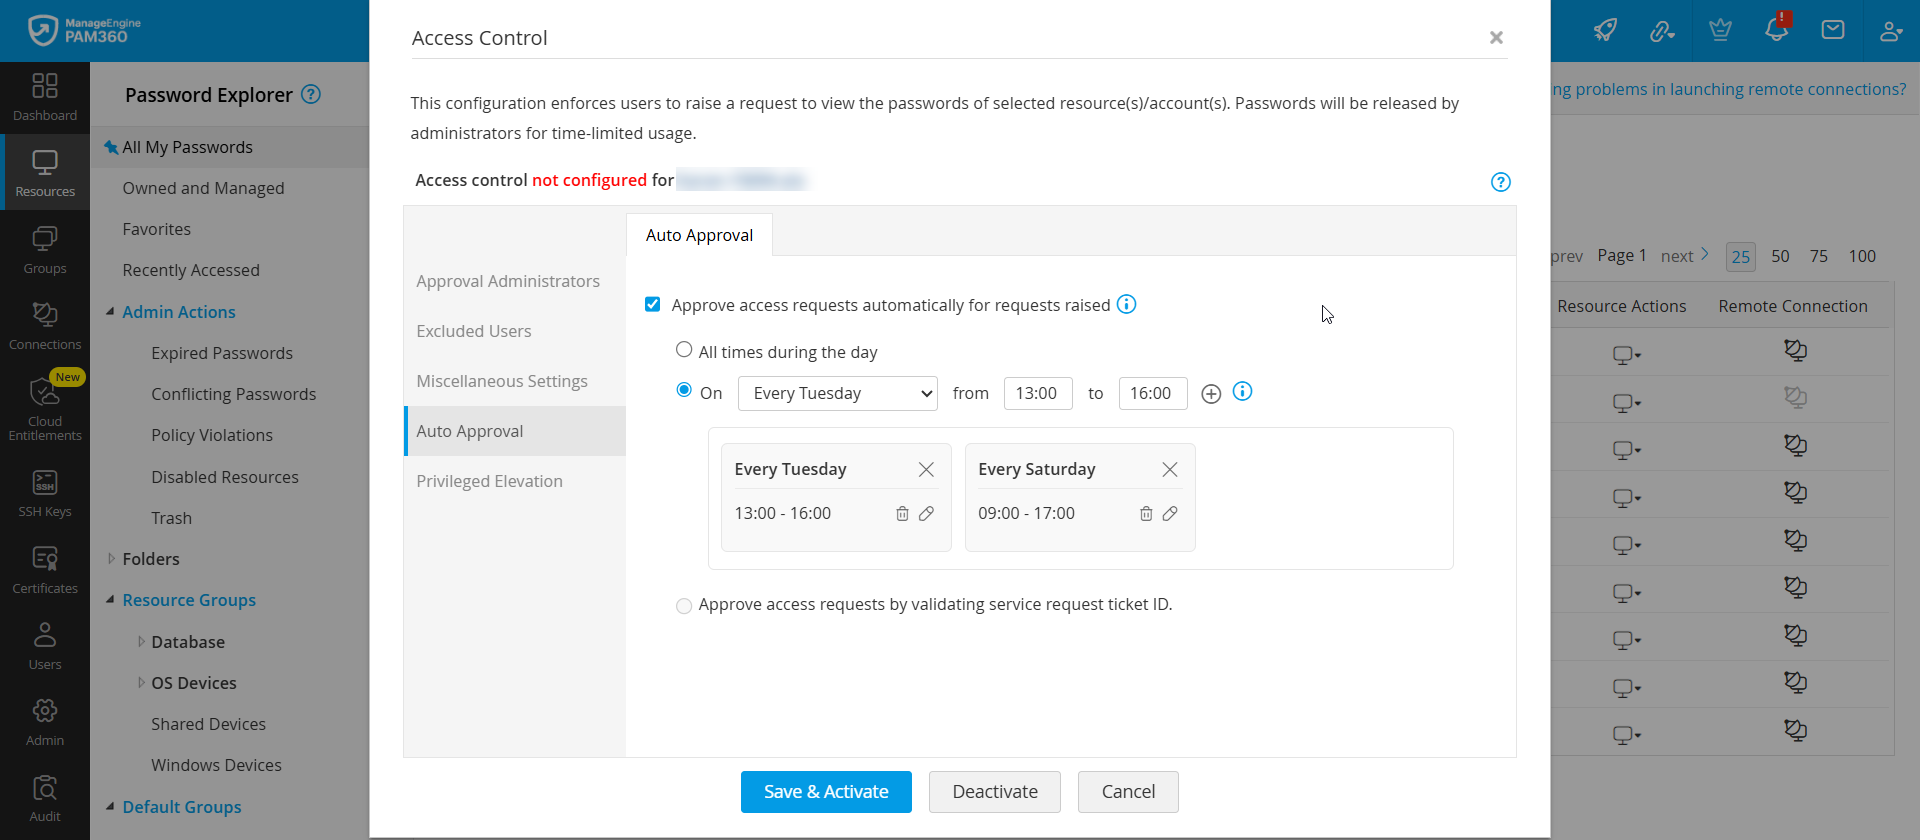
After configuring the required details, such as approval administrators, excluded users, access policies, and approval settings, click the Save & Activate button to configure the access control workflow for the selected resource successfully.
1.5 Privileged Elevation
The Just-in-Time (JIT) privilege elevation mechanism in PAM360 allows administrators to temporarily elevate access for Windows local accounts and domain accounts. This functionality enables users to perform privileged tasks within a specified timeframe, ensuring that elevated access is only granted when necessary. With JIT privilege elevation, a Windows local account can be granted privileged access by adding it to the local group on the corresponding machine. Similarly, a domain account can be elevated by adding it to the appropriate domain security groups in the domain controller.
By leveraging JIT privilege elevation, organizations can implement granular control over access permissions, reducing the need to provide blanket access with elevated privileges across multiple user accounts. This temporary elevation approach significantly mitigates security risks associated with permanent administrative access, ensuring that elevated privileges are only granted when required. Explore this link for detailed steps on configuring JIT privilege elevation.
Additional Details
- Starting from build 7510, administrators can orchestrate JIT privilege elevation to local security policies. Through automated workflows, temporary run-time roles and associated local security policies are provisioned to privileged users precisely when required during access control. These elevated privileges are automatically removed at the end of the designated time-bound session. Refer to this document for more details.
- Password access control cannot be deactivated for a resource when the password is checked out and is currently in use.
- It is recommended that resource owners do not change the Resource Type or Remote Password Reset configuration of a resource for which access control is configured and whose password is currently in use. Doing so will remove the access control configuration. To check the status of a password, go to Admin >> Access Requests >> Password Access and check the status under the Action column.
- If privilege elevation fails for an local user account when PAM360 attempts to add it to the selected local group(s), users with access to the account will not be able to request its password. For more details on the reasons for failure, check the audit logs in the Audit tab.
- Administrators can also configure access control workflow for specific accounts within a resource without affecting the access control configuration applied at the resource level for other accounts within the resource.
2. Configuring Access Control Workflow for Accounts
Follow these steps to configure access control at the account level:
- To configure access control for an account - Navigate to the Resources tab, switch to the Passwords window, click the Account Actions icon beside the desired account, and select Configure Access Control from the displayed options.
- To configure access control for various accounts from different resources in bulk - Tick the checkbox beside the desired accounts on the Passwords window, click the Account Actions button on the top pane, and select Configure >> Access Control.
- To configure access control for an account within a resource - Navigate to the Resources tab and click on the resource that contains the desired account. Click the Account Actions icon beside the desired account on the Account Details window and select Configure Access Control from the displayed options.
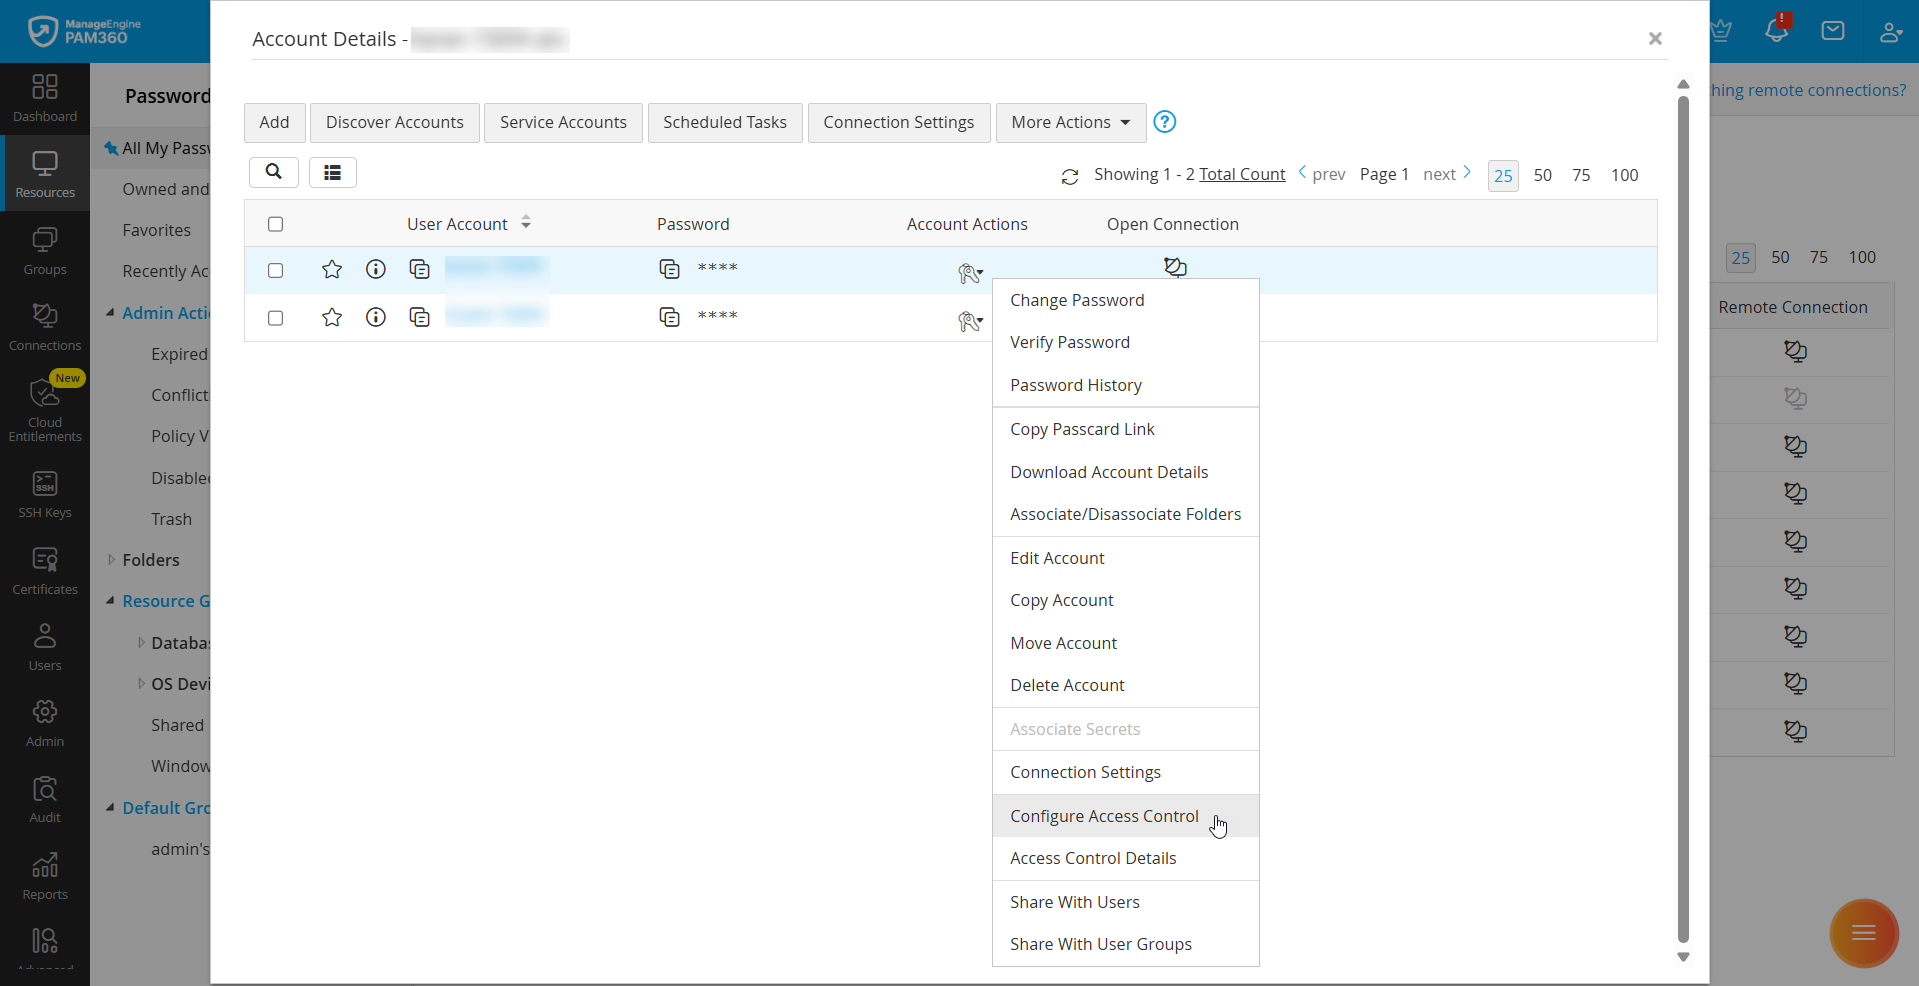
- To configure access control for multiple accounts in bulk within a single resource - On the Account Details window, tick the checkbox beside the desired accounts, click the More Actions button on the top pane, and select Configure Access Control.
- In the Configure Access Control window that appears, you will see the following configuration settings, where you can customize various options related to the password access policies based on your requirements.
- Approval Administrators
- Excluded Users
- Miscellaneous Settings
- Auto Approval
- Privileged Elevation
Follow the steps detailed here to configure access control for the desired accounts.
3. Viewing Access Control Details
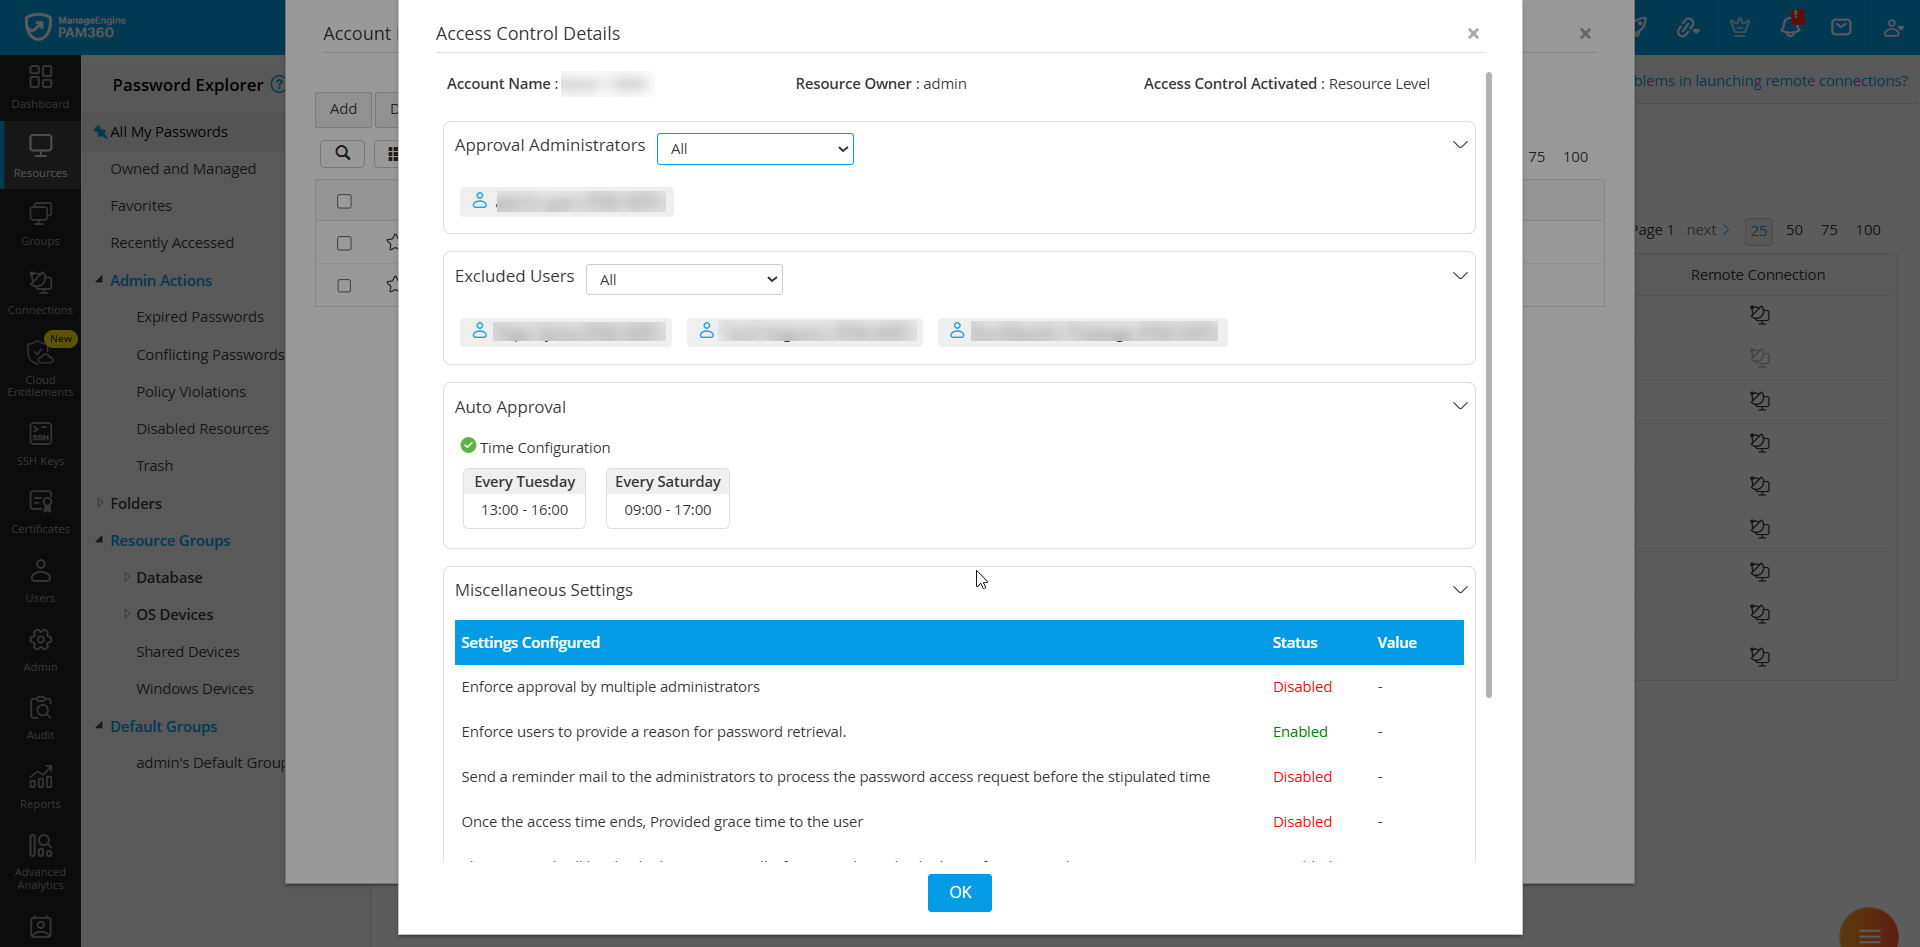
After the Access Control Workflow is configured for an account or a resource, you can view all the applied settings from a single place. i.e., the Access Control Details window for quick and easy reference, allowing administrators to review and verify the configured access control configuration without navigating through multiple sections. This window provides a comprehensive summary of the configured access control details, including associated conditions, approval workflows, excluded users, and approval administrators, along with the resource details and the level at which the workflow is configured. This summary helps administrators efficiently manage the access permissions for the selected resource.
Follow these steps to access the Access Control Details window to view the configured access control workflow details:
- Navigate to the Resources tab, switch to the Passwords window, and click the Account Actions icon beside the desired account whose configured access control details you wish to review. In the drop-down menu, select Access Control Details from the displayed options.
- Alternatively, switch to the Resources window and click on the resource whose configured access control details you wish to review. On the Account Details window, click the Account Actions icon beside the desired account and select Access Control Details from the displayed options.
Administrators can view the following details on the Access Control Details window:
- Account details, including the account name, resource owner, and the level at which the access control workflow is configured.
- List of users designated as approval administrators
- List of users excluded from the configured access control workflow
- Criteria set for auto-approval
- Any miscellaneous settings, including the number of administrators required for approval, are the users enforced to provide a reason for password access, reminder emails to inform administrators about the requests awaiting approval, configured password access duration for exclusive use, and the configured grace time.
Caution
- The Access Control Details window can be accessed only from the Account Actions menu.
- Once the request is approved, users can only access the list of resources approved by the approval administrators using the requested domain account password.
4. Password Access Requests
The Password Access Requests window in PAM360 allows administrators to view, manage, and audit all password access requests in a single location. This window offers enhanced visibility into ongoing and past requests, helping administrators enforce secure access management and streamline compliance tracking. By consolidating all password access requests into one interface, the Password Access Requests window helps administrators efficiently monitor, approve, reject, or modify access requests. This structured approach prevents unauthorized access, reduces security risks, and simplifies access management workflows.
To access the Password Access Requests window, go to Admin >> Access Requests >> Password Access. All password access requests awaiting approval along with the relevant details such as the resource and account names for which the access request was made, the user who made the password access request, the reason for the request, and the requested time will be displayed here. Through this window, administrators can review pending requests that require approval and seamlessly manage access approvals and rejections.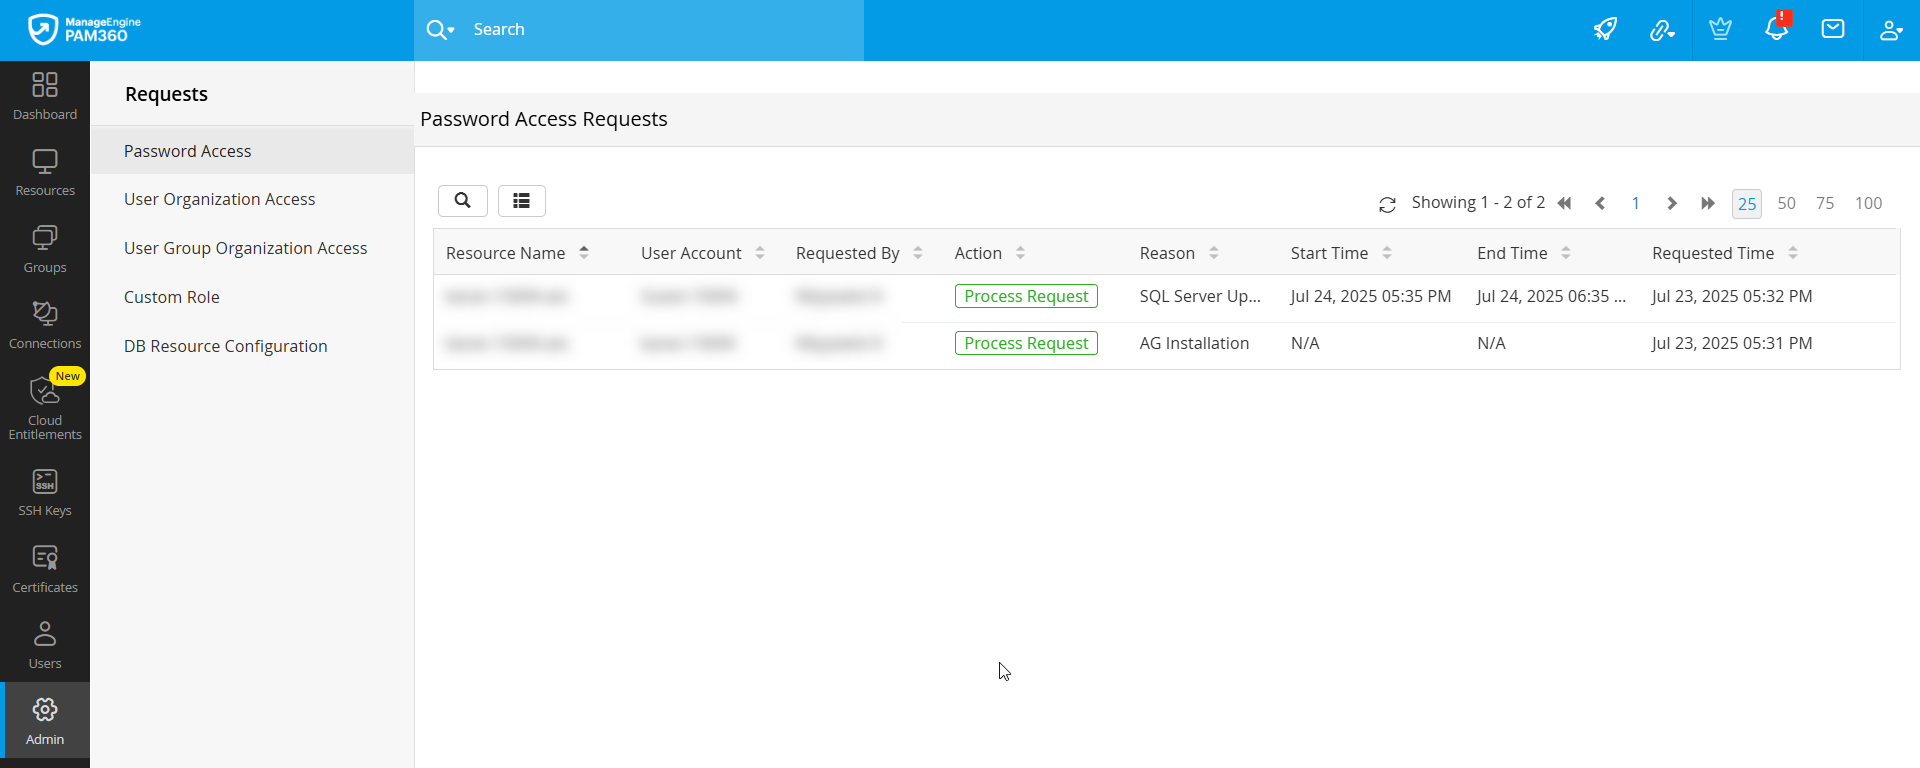
4.1 Managing Password Access Requests
Once the users submit the password access requests, the administrators designated authorized approvers can manage these requests from the Password Access Requests window. This section explains how to review pending password access requests, manage them, modify the access duration if needed, and forcefully return the passwords to the vault after approval. Follow these steps to manage the password access requests that are awaiting approval:
- Access the Password Access Requests window to view the list of all the password access requests that are currently awaiting approval, along with the relevant details such as the resource name, account name, requested user, reason for requesting access, duration, and requested time.
- Click the Process Request button under the Actions column beside the desired request to manage the password access request.
- In the Password Access Request Review pop-up window, you will find the relevant details about the password access request.
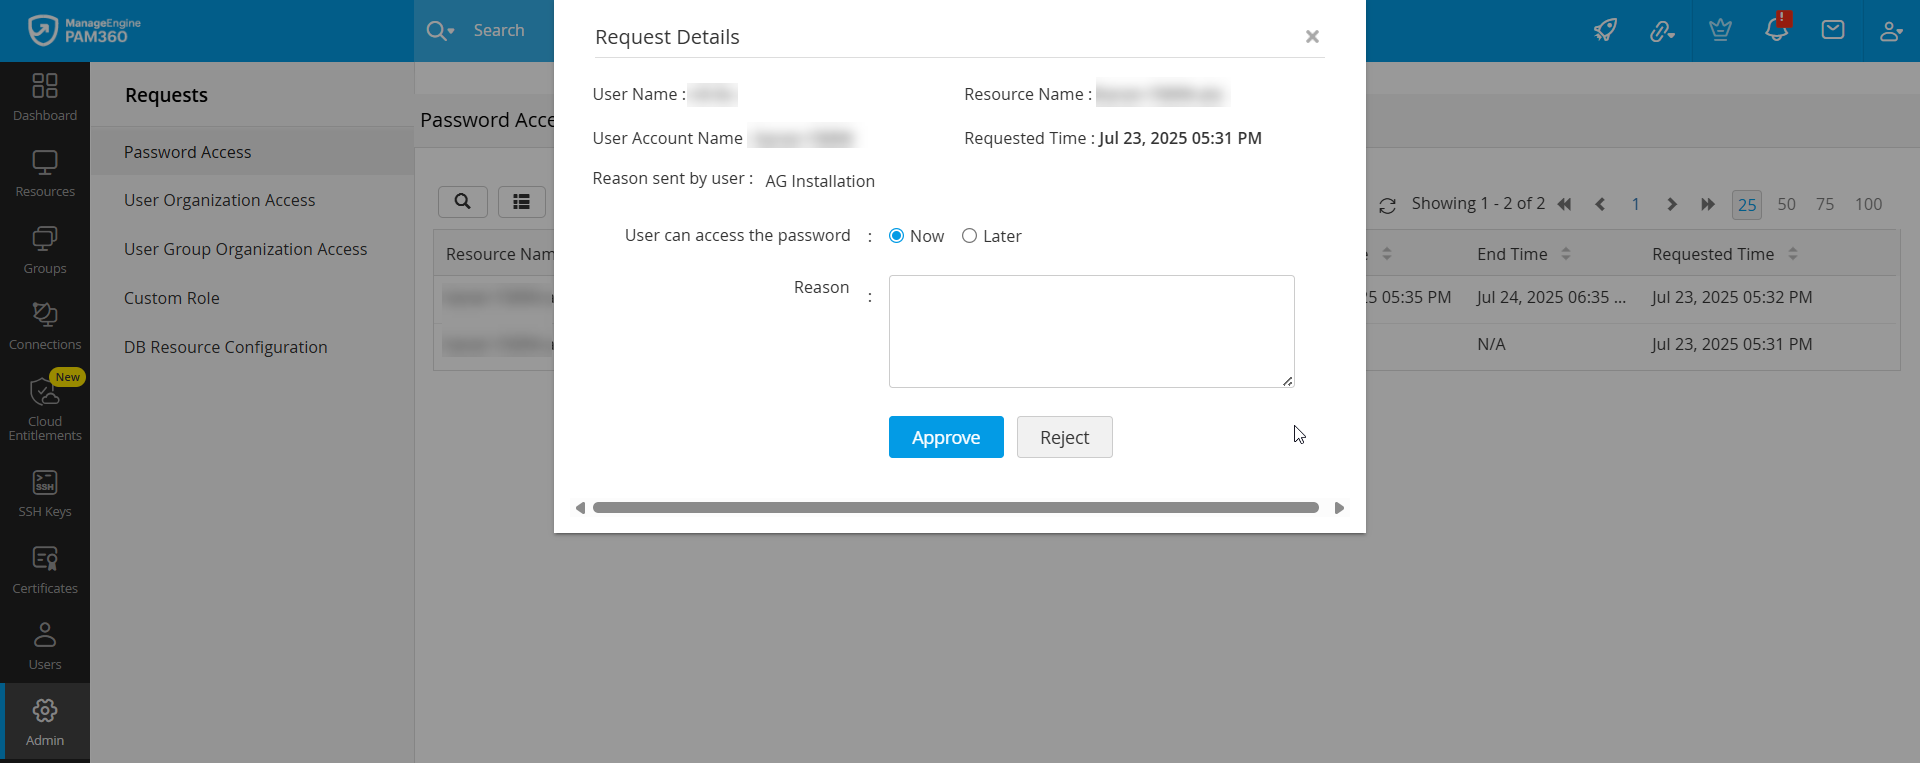
- Review the request details, enter the reason in the given field, and perform one of the following actions:
- Click the Approve button to approve the password access request as requested by the user without modifying the access period.
- Click the Reject button to deny the password access request.
- Modify the request access period using the Now or Later options.
- When the password access request is approved, the status will be displayed as Yet To Use until the user checks out the password from the vault. Once the user checks out the password, the status will be changed to In Use.
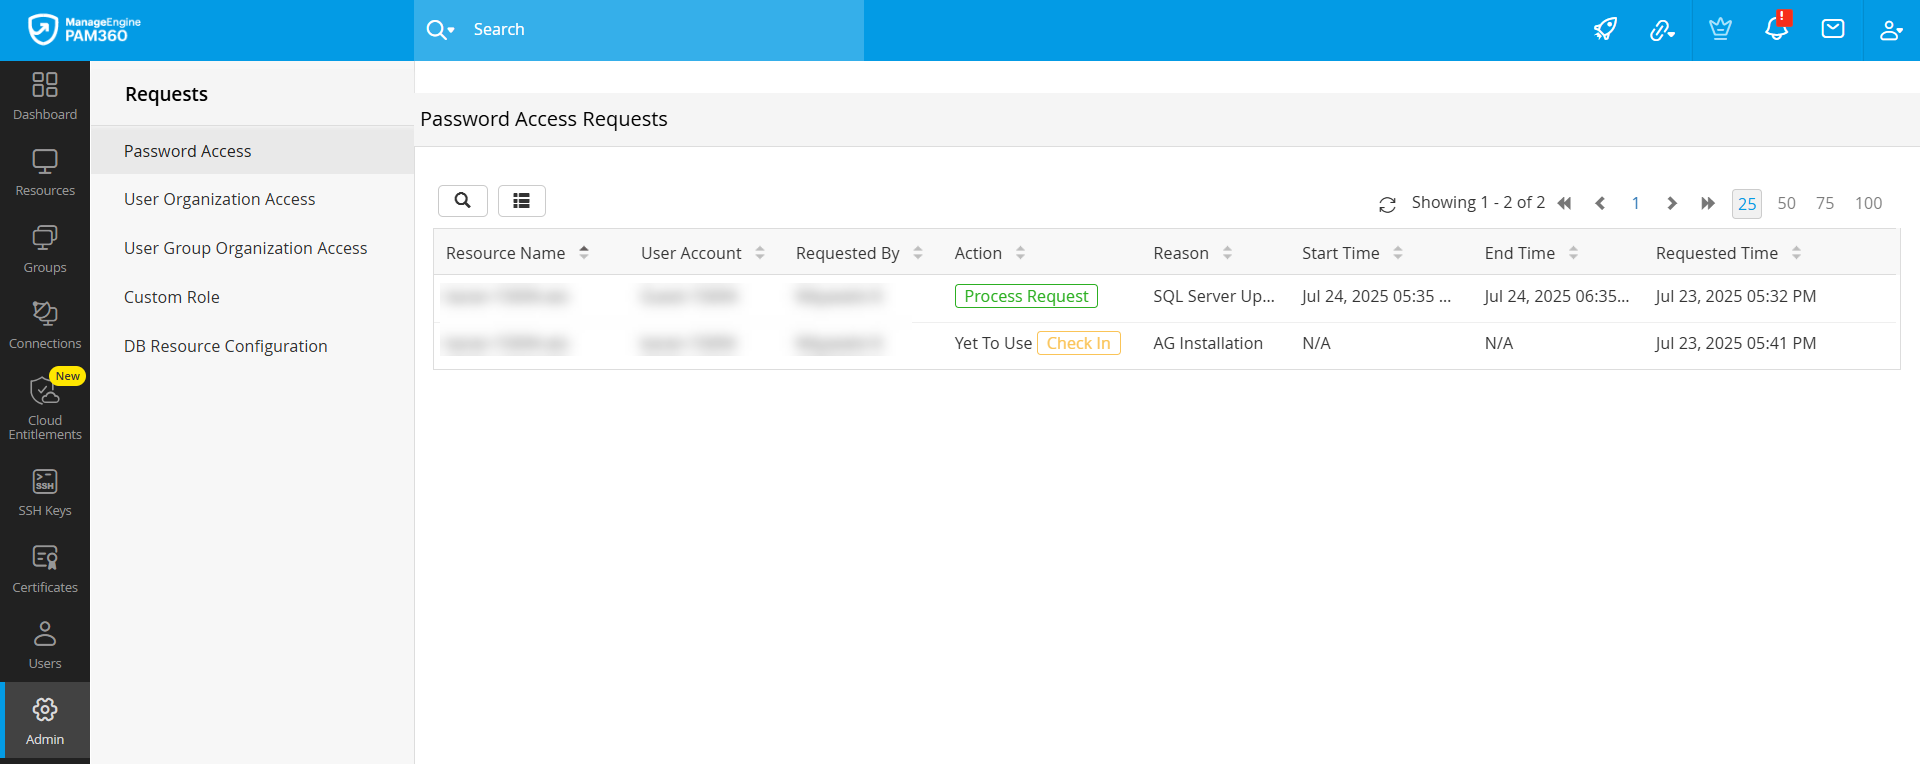
- Click the Check-In button to revoke the user's access to the password. You can forcefully return the password when the password is in the Yet To Use and In Use stages. If you reject a password access request, the request will be removed from the queue.
Managing requests effectively ensures secure and controlled access to privileged account passwords in your environment.
5. Deactivating Access Control
PAM360 allows administrators to disable Access Control for any resource or account at any time, allowing users with the necessary permissions to directly access the passwords without requiring approval. The following section details the necessary steps to deactivate access control at both the resource and account levels based on your requirements.
5.1 Deactivating Access Control for Resources
Follow these steps to deactivate the access control workflow configured for a resource:
- Navigate to the Resources tab, click the Resource Actions icon beside the desired resource, and select Configure Access Control from the displayed options.
- In the Configure Access Control window, click the Deactivate button at the bottom to deactivate the access control workflow configured for the selected resource.
The same can be performed in bulk for resources by selecting the desired resources, clicking the Resource Actions drop-down, selecting Configure >> Access Control and Deactivate.
5.2 Deactivating Access Control for Accounts
Follow these steps to deactivate the access control workflow configured for a account:
- Navigate to the Resources tab, switch to the Passwords window, click the Account Actions icon beside the desired account, and select Configure Access Control from the displayed options.
- In the Configure Access Control window, click the Deactivate button at the bottom to deactivate the access control workflow configured for the selected account.
The same can be performed in bulk for accounts by selecting the desired accounts, clicking the Account Actions drop-down, selecting Configure Access Control and Deactivate.