Support
 
Phone Live Chat
 
Support
 
US: +1 888 720 9500
US: +1 800 443 6694
Intl: +1 925 924 9500
Aus: +1 800 631 268
UK: 0800 028 6590
CN: +86 400 660 8680

Direct Inward Dialing: +1 408 916 9393


Knowledge Base

How to install an SSL certificate in ADManager Plus

Objective: To install SSL certificate in ADManager Plus

Solution: Steps to apply an SSL certificate in ADManager Plus

  1. Enable SSL in the ADManager Plus client.
  2. Create a Certificate Signing Request (CSR).
  3. Issue the SSL certificate.
  4. Associate the certificate with ADManager Plus.
  • Step 1: Enable SSL in the ADManager Plus client

    1. Logon to ADManager Plus, click the Admin tab and click the Connection section.
    2. Check the Enable SSL option. The port number 8443 is selected automatically.
    3. Click Save Changes and restart the product for the changes to take effect.
  • Step 2: Create a Certificate Signing Request (CSR)

    1. Stop ADManager Plus (Start → All Programs → ADManager Plus → Stop ADManager Plus)
    2. Open command prompt and browse to the <installation_directory>\ManageEngine\ADManager Plus\jre\bin path.
    3. Execute the following command to create a Keystore.

      keytool -genkey -alias tomcat -keypass <your key password> -keyalg RSA -validity 1000 -keystore <domainName> .keystore

      Replace <your key password> with a password of your choice. Replace the <domainName> with the name of your domain.

    4. Type in your keystore password. To avoid any confusion, try giving the same password as your 'keypass'.

      You will be prompted to answer the following questions:

      Sr. No. Question Answer
      1. What is your first name and last name? Enter the NetBIOS or FQDN of the server in which ADManager Plus is configured.
      2. What is the name of your Organizational Unit? Enter the name of the OU of your choice.
      3. What is the name of your Organization? Provide the legal name of your organization.
      4. What is the name of your City or Locality? Enter the City or Locality name as provided in your organization's registered address.
      5. What is the name of your State or Province? Enter the name of your State or Province as provided in your organization's registered address.
      6. What is the two-letter country code for this unit? Provide the two-letter code of the country your organization is located in.
    5. In the same path, execute the following command to create a CSR with Subject Alternative Name (SAN).

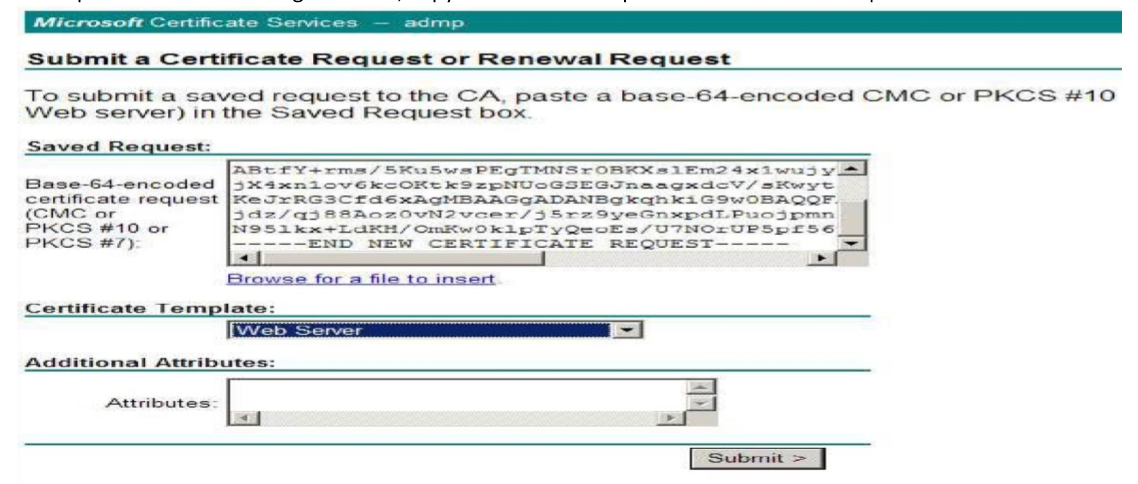
      keytool -certreq -alias tomcat -keyalg RSA -ext SAN=dns:server_name,dns:server_name.domain.com,dns:server_name.domain1.com -keystore <domainName>.keystore -file <domainName>.csr

      Replace the <domainName> with the name of your domain and provide the appropriate Subject Alternatives Names.

  • Step 3: Issue the SSL certificate

    1. Issue the SSL certificate using an internal CA.

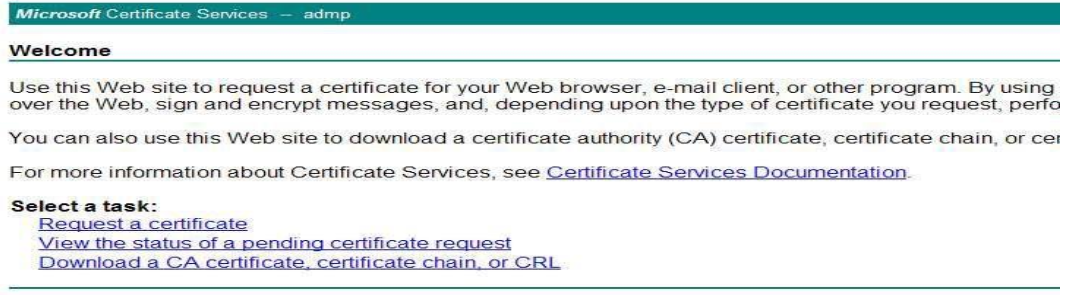
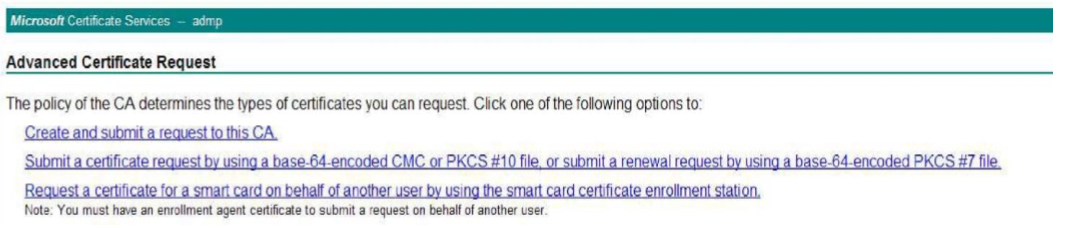
      An internal CA is a member server or domain controller in a specific domain, that has been assigned the role of a CA.

      1. Connect to the Microsoft Certificate Services of your internal CA and click on the Request a certificate link.

      2. Click on 'Advanced certificate request' and select the Submit a certificate by using a base-64-encoded CMC or PKCS #10 file, or submit a renewal request by using a base-64-encoded PKCS #7 file option.

      3. Copy the content from your '.csr' file and paste it under the Saved Request field.
      4. Select the Web Server as the Certificate Template and click Submit.

      5. Click on the Download Certificate Chain link to download the issued 'PKCS #7 Certificates' types. The downloaded certificate will be of the p7b file format.
      6. Copy and paste this '.p7b' file at the <installation_directory>\ManageEngine\ADManager Plus/ jre/bin location.
      7. Return to the Microsoft Certificate Services and click on the Home link at the top-right corner of the page.
      8. Click on the Download a CA certificate, chain certificate or CRL link to download the CA root certificate. `
      9. Click on the Download CA certificate link to download and save the root certificate that is in the '.cer' format.
      10. Copy and paste the '.cer' file at the <installation_directory>\ManageEngine\ADManager Plus\jre\bin location.
      11. Open command prompt, browse to the <installation_directory>\ManageEngine\ADManager Plus\ jre\bin path and execute the following query to import the internal CA certificate into the '.keystore' file.

        Keytool -import -trustcacerts -alias tomcat -file certnew.p7b -keystore <keystore_name>.keystore

        Replace the <keystore_name> with the name of your keystore.

      12. In the same path, execute the following query to add the internal CA's root certificate to the list of trusted CAs in the Java cacerts file.

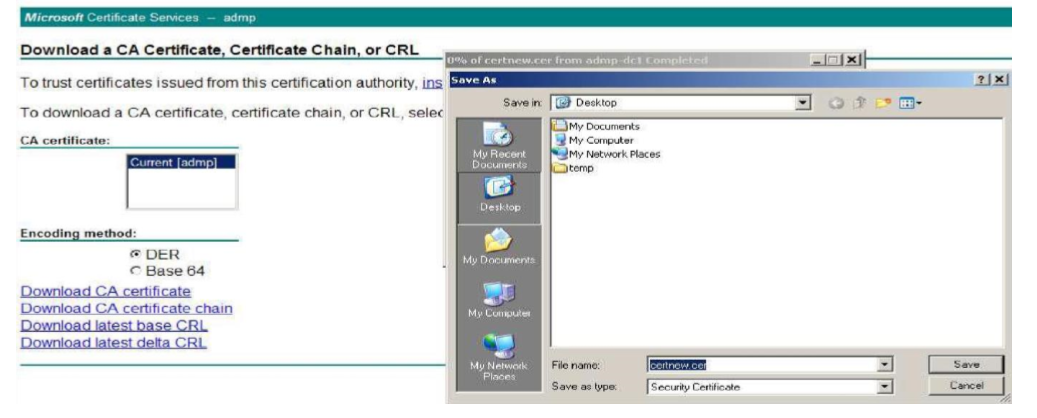
        keytool -import -alias <internal CA_name> -keystore ..\lib\security\cacerts -file certnew.cer

        Note: Open the '.cer' file to get the name of your internal CA. When prompted, provide 'changeit' as the keystore password.

    2. Issue the SSL certificate using external CAs.
      1. To request a certificate from an external CA, submit the CSR to that CA.
      2. Unzip the certificates returned by your CA and place them in the <installation_directory>/ManageEngine/ADManager Plus/jre/bin folder
      3. Open the command prompt and navigate to the <installation_directory>/ManageEngine/ADManager Plus/jre/bin folder
      4. Run the respective commands from the given list as applicable to your CA:
        1. For "GoDaddy" certificates
          1. keytool -import -alias root -keystore <domainname>.keystore -trustcacerts -file gdrootg2.crt
          2. keytool -import -alias cross -keystore <domainname>.keystore -trustcacerts -file gdrootg2_cross.crt
          3. keytool -import -alias intermed -keystore <domainname>.keystore -trustcacerts -file gdig2.crt
        2. For "Verisign" certificates
          1. keytool -import -alias intermediateCA -keystore <domainName>.keystore -trustcacerts -file <your intermediate certificate.cer>
          2. keytool -import -alias tomcat -keystore <domainName>.keystore -trustcacerts file admanager.cer
        3. For "Comodo" certificates
          1. keytool -import -trustcacerts -alias root -file AddTrustExternalCARoot.crt -keystore <domainName>.keystore
          2. keytool -import -trustcacerts -alias addtrust -file UTNAddTrustServerCA.crt -keystore <domainName>.keystore
          3. keytool -import -trustcacerts -alias ComodoUTNServer -file ComodoUTNServerCA.crt - keystore <domainName>.keystore
          4. keytool -import -trustcacerts -alias essentialSSL -file essentialSSLCA.crt -keystore <domainName>.keystore
        4. For Entrust certificates
          1. keytool -import -alias Entrust_L1C -keystore <keystore-name.keystore> -trustcacerts file entrust_root.cer
          2. keytool -import -alias Entrust_2048_chain -keystore <keystore-name.keystore> - trustcacerts -file entrust_2048_ssl.cer
          3. keytool -import -alias -keystore <keystore-name.keystore> -trustcacerts -file <domain-name.cer>
        5. For Thawte certificates
          1. Purchased directly from Thawte:

            keytool -import -trustcacerts -alias tomcat -file <certificate-name.p7b> -keystore <keystore-name.keystore>

          2. Purchased through the Thawte reseller channel:
            1. keytool -import -trustcacerts -alias thawteca -file <SSL_PrimaryCA.cer> -keystore <keystore-name.keystore>
            2. keytool -import -trustcacerts -alias thawtecasec -file <SSL_SecondaryCA.cer> - keystore <keystore-name.keystore>
            3. keytool -import -trustcacerts -alias tomcat -file <certificate-name.cer> -keystore <keystore-name.keystore>

    Note: If you use an external CA which is not in the aforementioned list, please contact your CA for the required commands.

  • Step 4: Associate your SSL certificate with ADManager Plus.

    1. Copy the '.keystore' file from the <installation_directory>\ManageEngine\ADManager Plus\jre\bin location and paste it at the <installation_directory>\ManageEngine\ADManager Plus\conf location.
    2. At the <installation_directory>\ManageEngine\ADManager Plus\conf location, locate the 'server.xml' file and take a backup of that file.
    3. Open the server.xml file using an editor and navigate to the last connector tag.
    4. Replace the value of the keystore file with the location of your keystore ('./conf/<keystore_name>.keystore).
    5. Replace the value of the 'keystorePass' with the password given during keystore creation.
    6. Save the server.xml file and start ADManager Plus (Start → All Programs → ADManager Plus → Start ADManager Plus).
    7. Once the ADManager Plus service has started, launch the ADManager Plus client.

Click here to download a guide on how to install an SSL certificate in ADManager Plus. Use this video to view how an SSL certificate can be installed in ADManager Plus using an internal Certification Authority (CA).

ManageEngine named a customers choice 2023 for identity governance and Administration


Select a language to translate the contents of this web page:

Need further assistance?

Fill this form, and we'll contact you rightaway.

Request Support

  •  
  • *
     
  • *
     
  • *
     
  • By submitting you agree to processing of personal data according to the Privacy Policy.

"Thank you for submitting your request.

Our technical support team will get in touch with you at the earliest."

ADManager Plus Trusted By

The one-stop solution to Active Directory Management and Reporting
Email Download Link email-download-top