An administrator may need to restore a deleted policy, replicate baseline security settings in a new domain, or migrate existing Group Policy settings to another domain. In each of these scenarios, importing a Group Policy Object (GPO) becomes necessary.
Rebuilding complex policies manually is time-consuming and increases the risk of configuration inconsistencies. Importing a GPO allows administrators to reuse tested configurations, maintain consistency across domains, and accelerate deployment without starting from scratch.
Before importing any GPO, ensure:
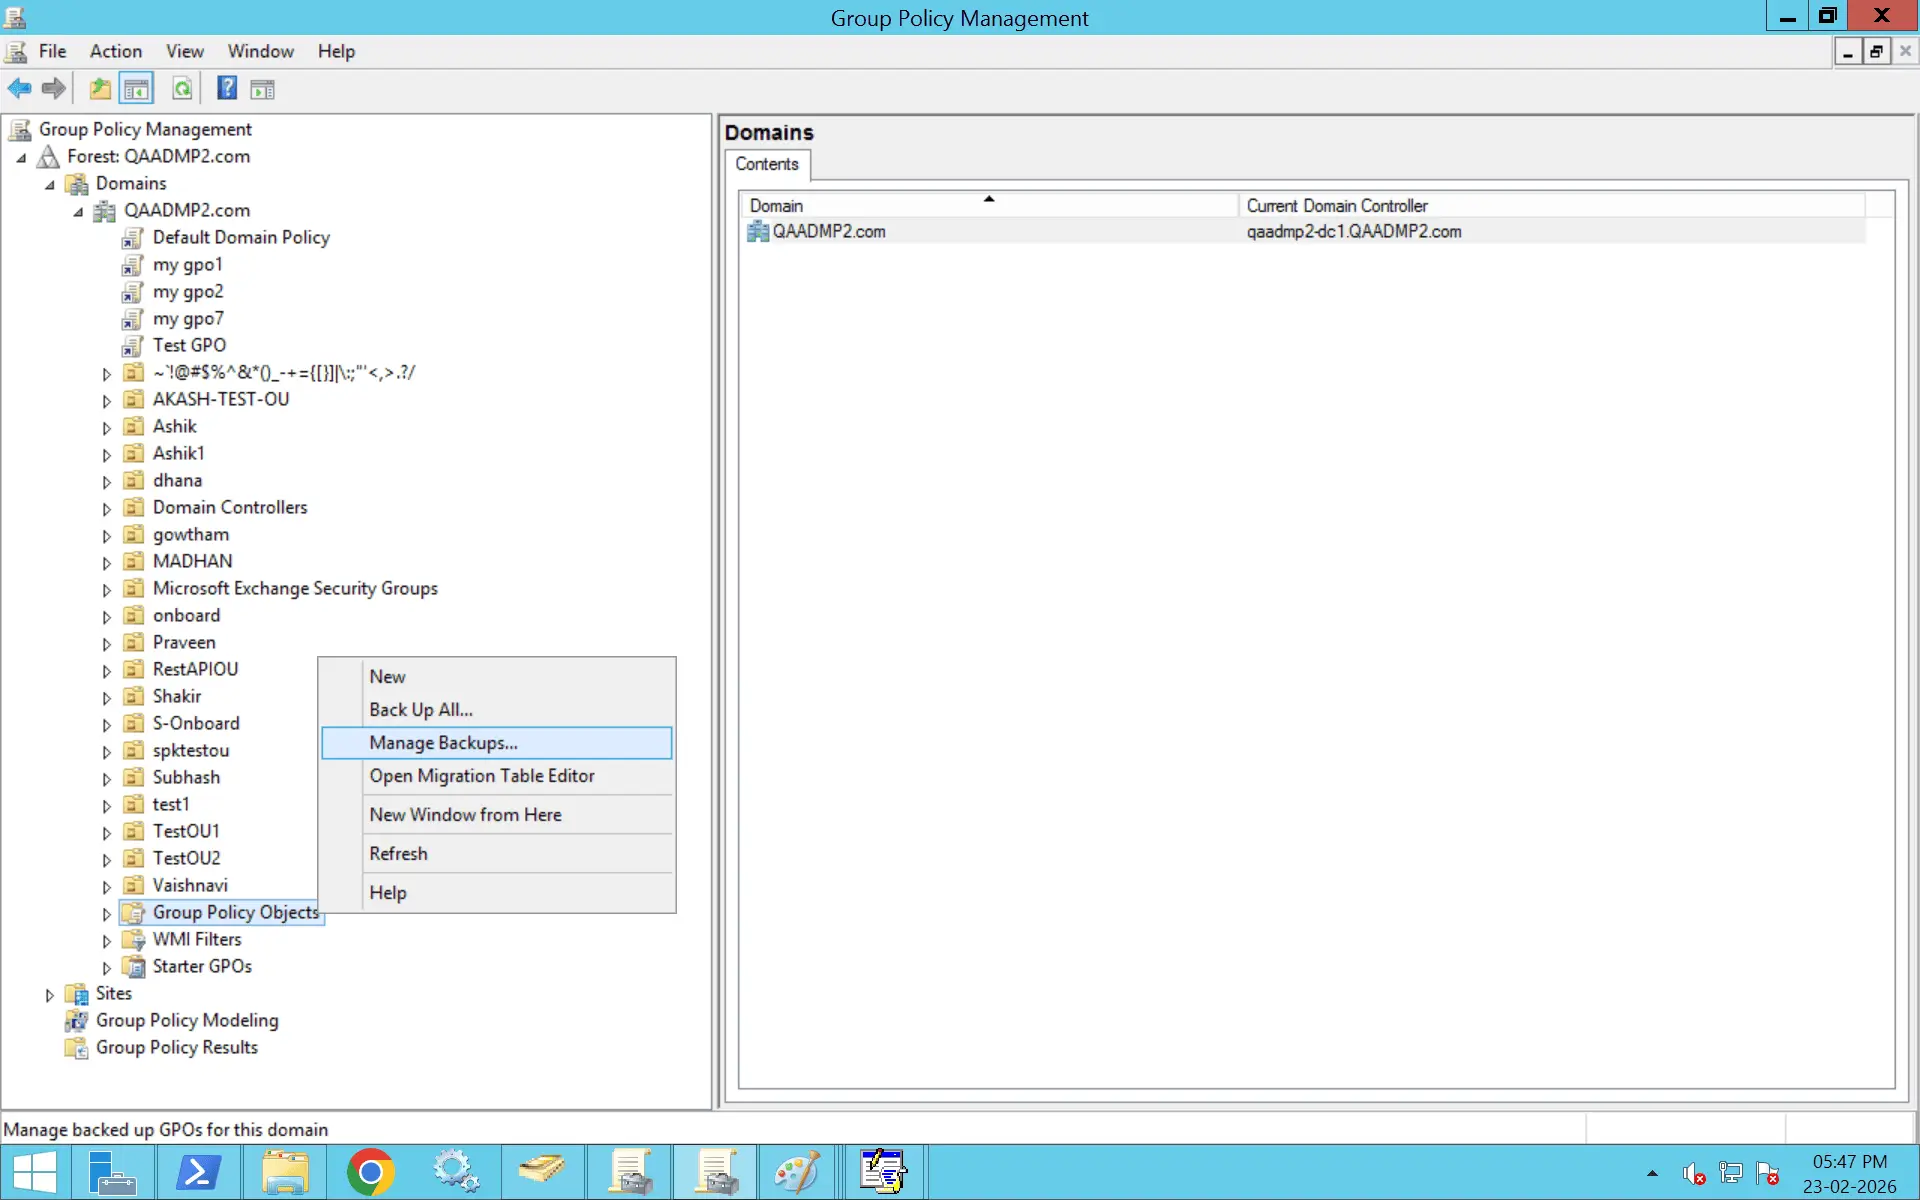
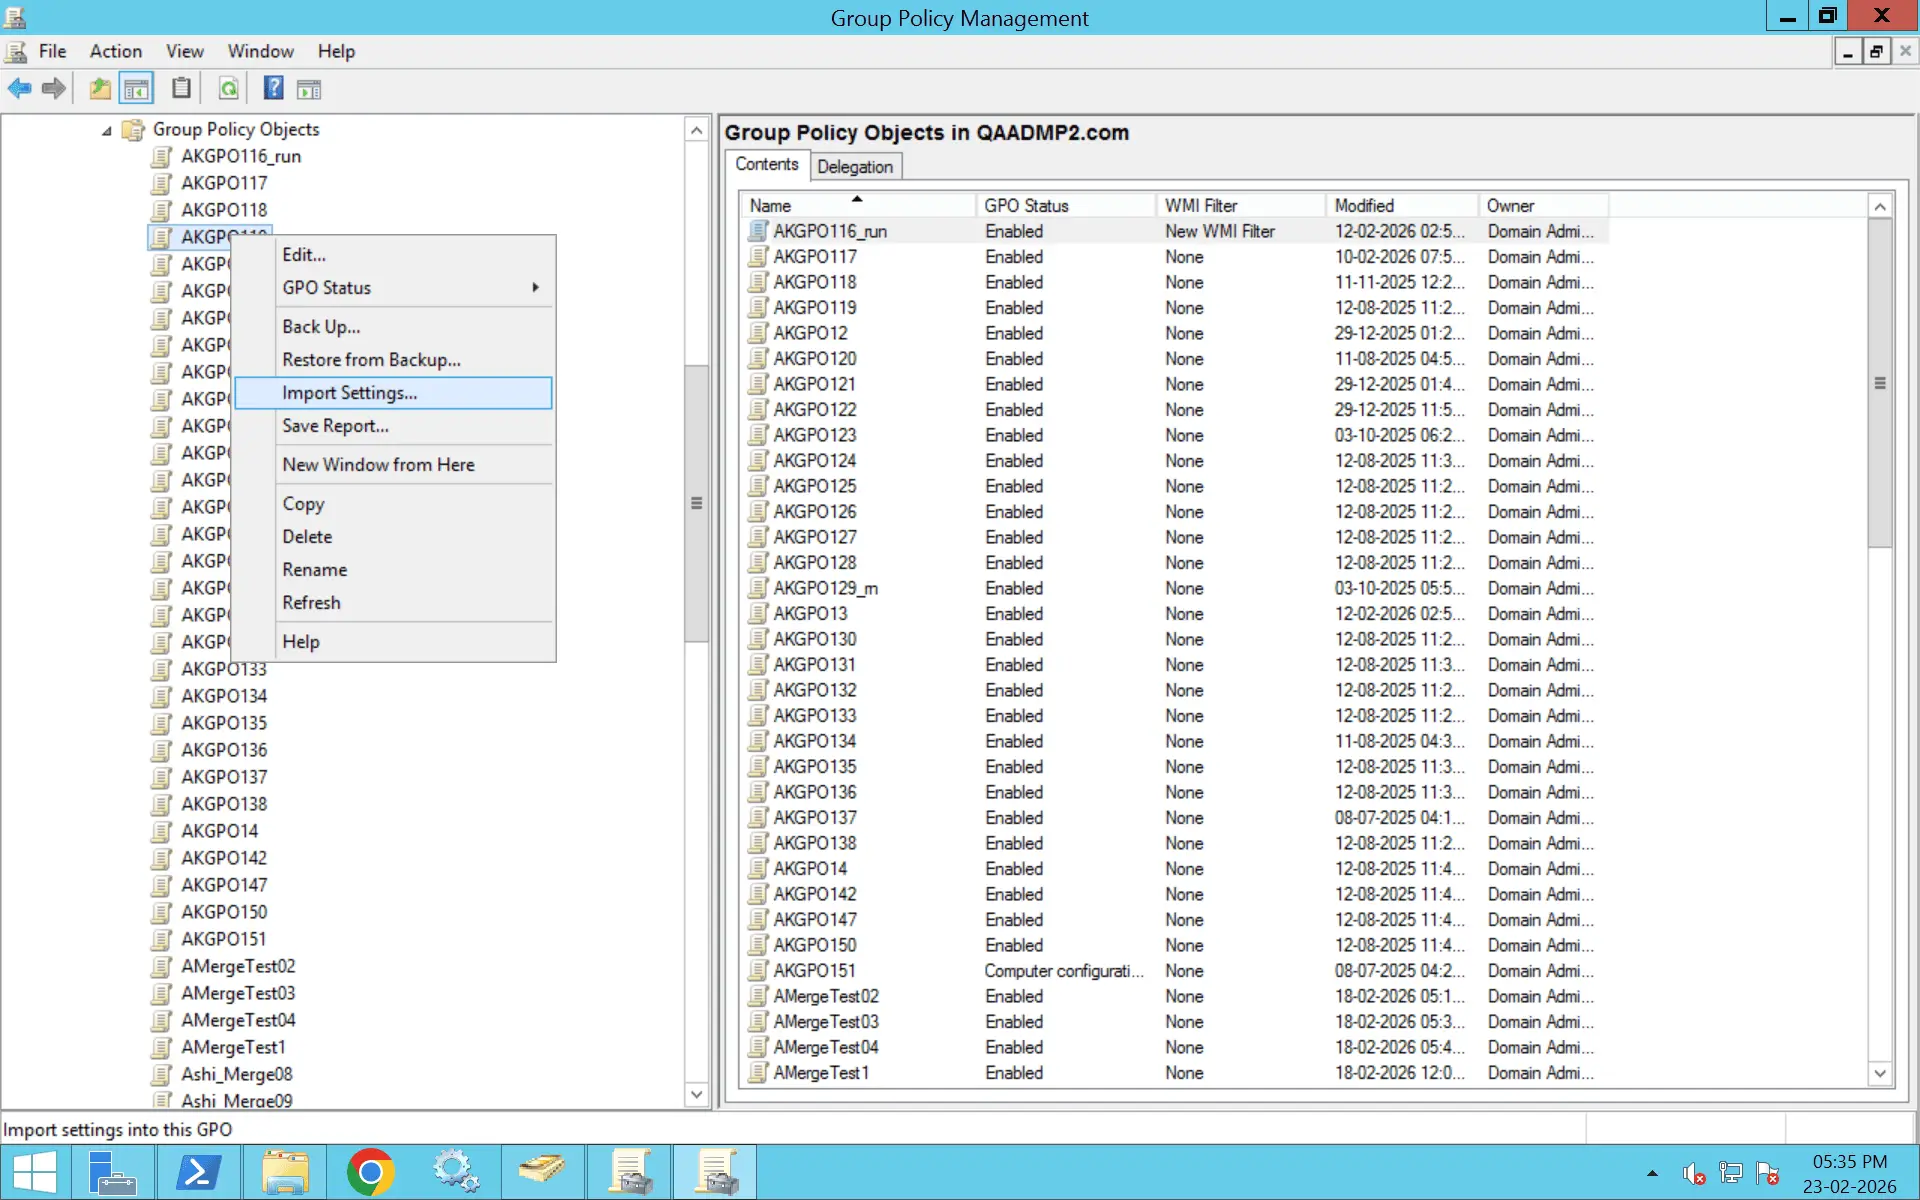
The most common method for importing a GPO is through the Group Policy Management Console (GPMC).
Importing a GPO across domains requires a backup from the source domain and, in most cases, a migration table to map security principals correctly.
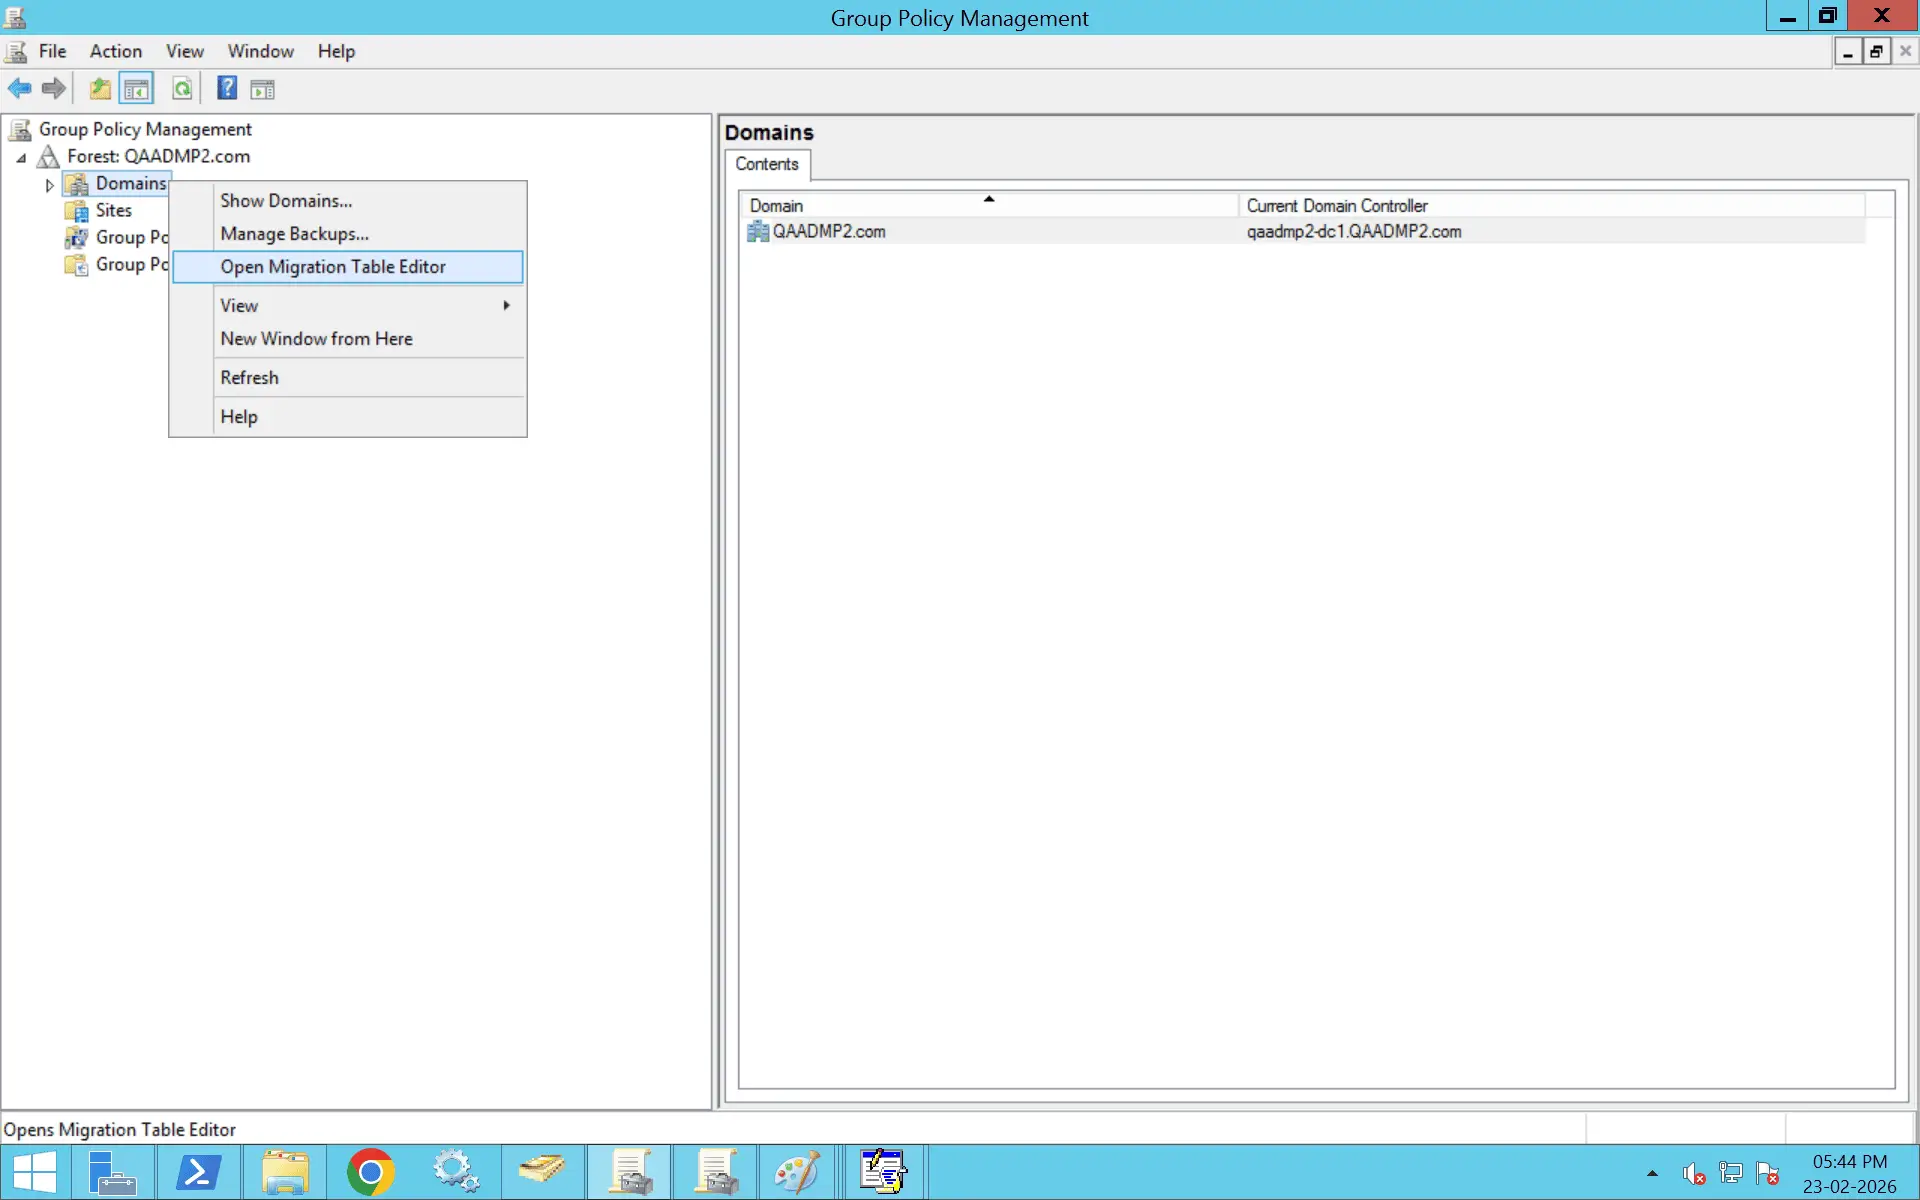
A GPO migration table (.migtable) maps:
This ensures that references from the source domain are replaced correctly in the target domain. Without a migration table, imported GPOs may contain broken security references.
List available backups:
Get-GPOBackup -Path "C:\GPOBackups"
Import the backup into a new GPO:
									Import-GPO -BackupId "<BackupID>" `

										-TargetName "New GPO Name" `

										-Path "C:\GPOBackups"
									Import-GPO -BackupId "<BackupID>" `

										-TargetName "Existing GPO Name" `

										-Path "C:\GPOBackups"
Alternatively, use the GUID of the target GPO:
									Import-GPO -BackupId "<BackupID>" `
										-TargetGuid "<Target-GPO-GUID>" `
										-Path "C:\GPOBackups"
To import a GPO from another domain, first create a backup in the source domain, then copy it to the target domain.
Backup-GPO -Name "Source GPO Name" -Path "C:\GPOBackups"
Copy the backup folder to the target domain.
									Import-GPO -BackupId "<BackupID>" `
									-TargetName "New GPO Name" `
									-Path "C:\GPOBackups"
A migration table is required when importing across domains where users, groups, or paths differ.
After creating a .migtable file in the GPMC, use it during import.
									Import-GPO -BackupId "<BackupID>" `

										-TargetName "New GPO Name" `

										-Path "C:\GPOBackups" `

										-MigrationTable "C:\MigrationTables\mapping.migtable"
When both domains are in the same forest, you can copy a GPO directly using the Copy-GPO cmdlet from the GroupPolicy module.
Before copying:
Open PowerShell as an administrator and run:
Import-Module GroupPolicy
Verify the module is available:
Get-Command -Module GroupPolicy
List GPOs in the source domain:
Get-GPO -All -Domain source.domain.com
Identify the exact GPO name you want to copy.
This creates a new GPO in the target domain with the copied settings.
Use the Copy-GPO cmdlet:
									Copy-GPO -SourceName "SourceGPOName" `

									-SourceDomain "source.domain.com" `

									-TargetDomain "target.domain.com" `

									-TargetName "NewGPOName"
This ensures references resolve correctly in the target domain. If security groups, SIDs, or UNC paths differ between domains, use a migration table:
									Copy-GPO -SourceName "SourceGPOName" `

									-SourceDomain "source.domain.com" `

									-TargetDomain "target.domain.com" `

									-TargetName "NewGPOName" `

									-MigrationTable "C:\MigrationTable.migtable"
List GPOs in the target domain:
Get-GPO -All -Domain target.domain.com
Generate a report to confirm settings:
Get-GPOReport -Name "NewGPOName" -Domain target.domain.com -ReportType HTML -Path "C:\CopiedGPO.html"
Review the report to validate settings and permissions.
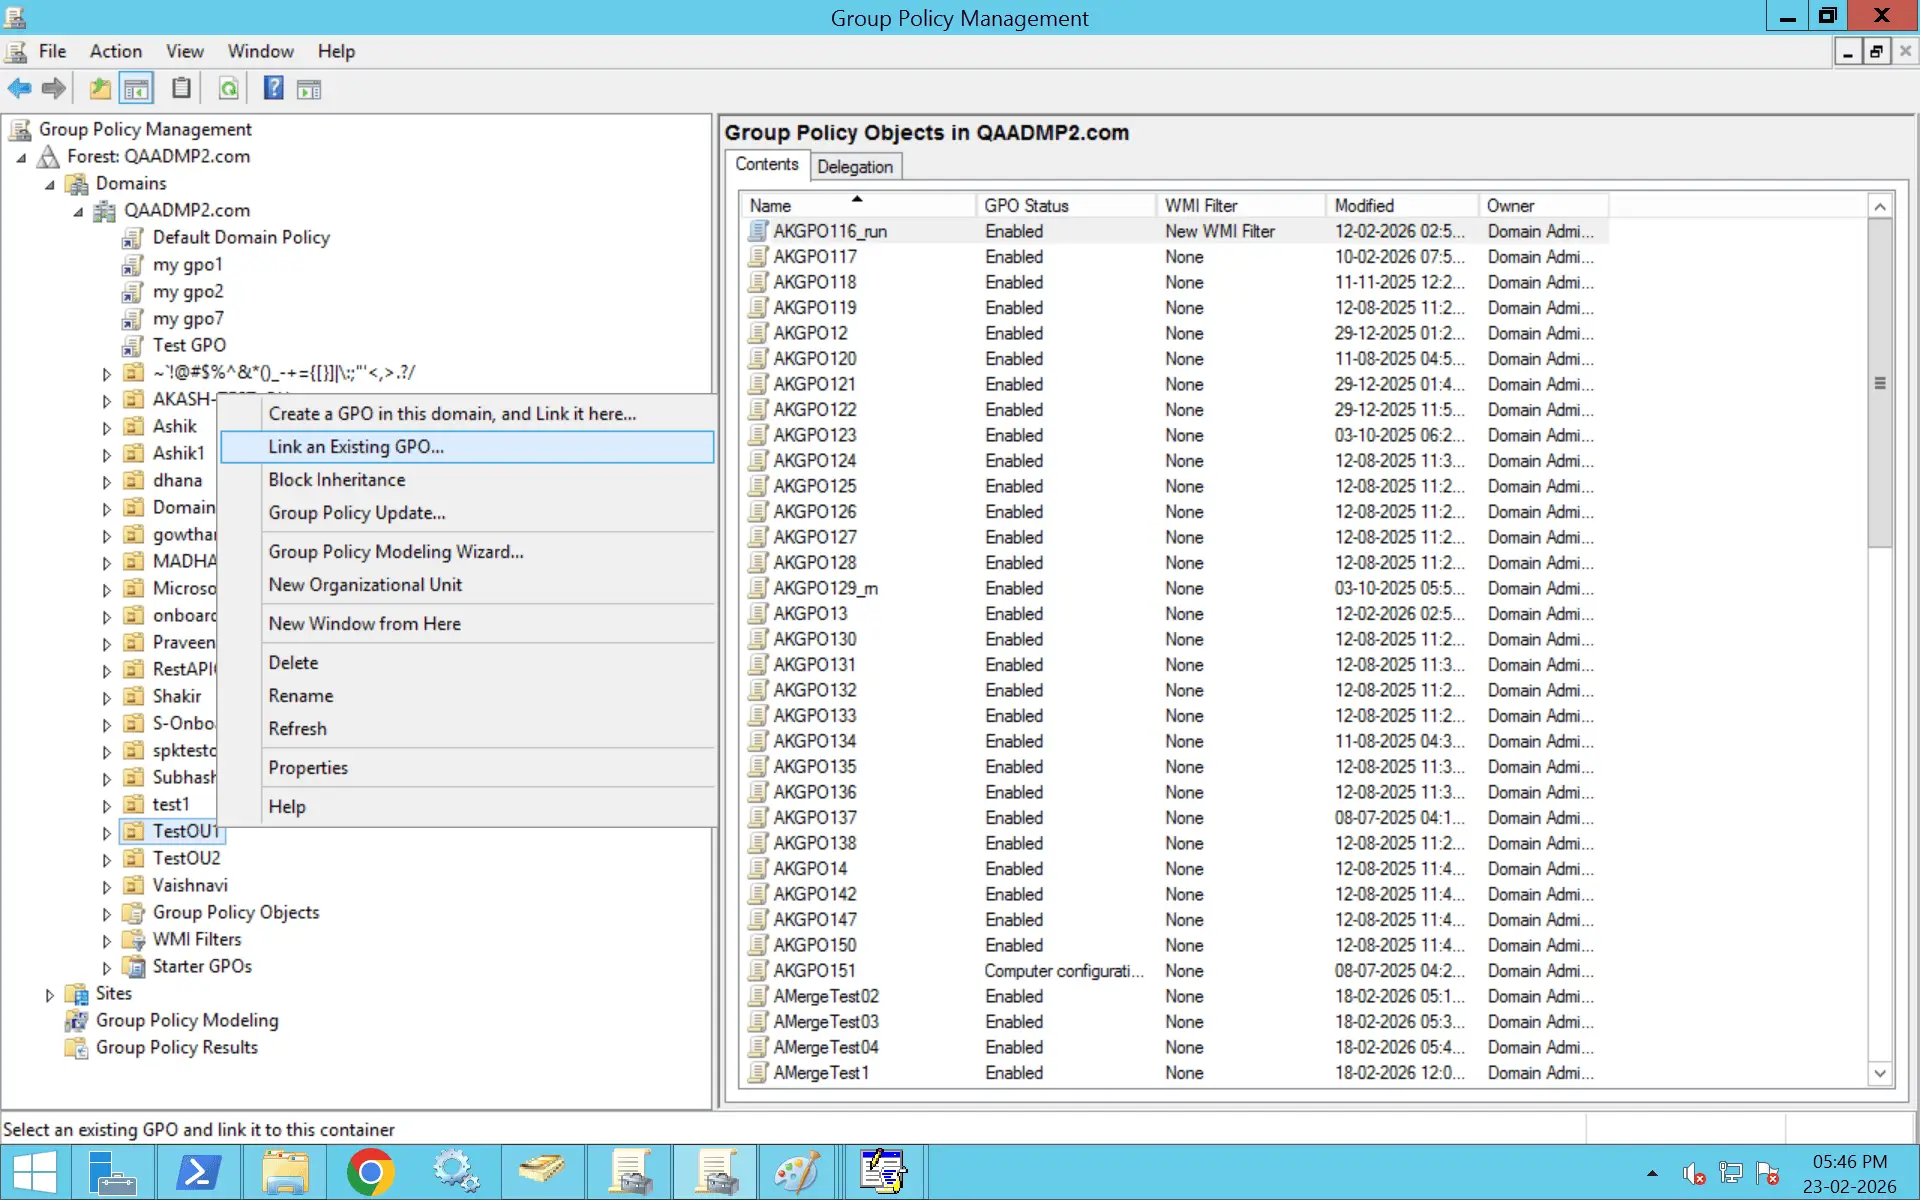
Copying a GPO does not automatically link it.
Link it manually using the GPMC or PowerShell:
New-GPLink -Name "NewGPOName" -Target "OU=Users,DC=target,DC=domain,DC=com"
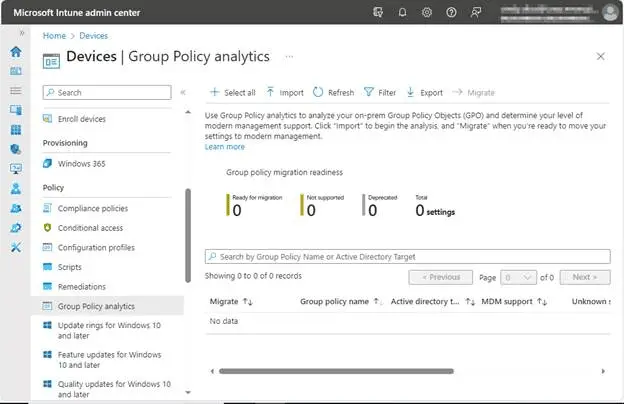
On-premises GPOs cannot be directly imported into Intune.
Instead:
Active Directory does not support direct GPO import from an XML file. XML files generated from the GPMC are read-only reports and cannot be imported back into the domain.
A valid GPO import requires a GPO backup folder, not an XML report. A proper GPO backup contains the full Group Policy structure, including:
An XML report only provides a snapshot of policy settings in report format. It does not contain the underlying files or configuration structure needed for restoration.
Because of this, XML reports are useful for documentation and auditing—not for direct import.
If you do not have a GPO backup and only have an XML report, you must manually recreate the policy.
Below are the recommended steps.
Open the XML file in a browser or text editor and identify all configured settings under:
Take note of enabled, disabled, and configured values.
Work systematically through each section to avoid missing configurations.
After recreating policy settings:
These elements are not automatically restored from XML.
On a test machine, run:
gpresult /r
You can also export the recreated GPO:
Get-GPOReport -Name "NewGPOName" -ReportType XML -Path "C:\NewGPO.xml"
Compare the new XML file with the original report to confirm alignment.
If a similar GPO already exists and you want to validate it against the XML:
Get-GPOReport -Name "ExistingGPO" -ReportType XML -Path "C:\LiveGPO.xml"
Use a comparison tool such as:
Review differences in:
If discrepancies are found:
Error: The Directory is not empty
Solution: Temporarily pause or refresh DFSR replication before attempting the import. Run dfsrdiag PollAD on the domain controller to force Active Directory polling, and ensure staging folders (such as MachineStaging or UserStaging) are not interfering with the replication process.
Error: No backups found
Solution: Confirm that the backup folder contains the required files, including GPT.ini and GPO.xml, and that the complete backup structure has been copied correctly. Instead of manually placing files under SYSVOL\Policies\{GUID}, use GPMC's Import Settings option to restore the backup properly.
Error: The process cannot access the file because it is being used by another process
Solution: Specify a less busy domain controller using the -TargetDomainController parameter in the Import-GPO command. Avoid targeting the PDC Emulator during peak activity, and wait for any ongoing Group Policy refresh or SYSVOL replication to complete before retrying.
Error: The system cannot find the file specified
Solution: Local Group Policy exports cannot be directly imported into domain GPOs using the GPMC. Recreate the policy settings manually in a domain GPO, or use a compatible backup and migration method designed for domain-level policies.
Error: Import-GPO "Operation not valid" or cmdlet not recognized
Solution: Run the command in Windows PowerShell (version 5.1) rather than PowerShell 7 or later. Ensure the GroupPolicy module is loaded using Import-Module GroupPolicy, and verify that the backup path and GPO name parameters are specified correctly.
Always create a backup of the target GPO before importing. This allows you to quickly restore the previous configuration if settings merge incorrectly or cause unexpected behavior.
Import and validate the GPO in a staging domain or test OU before applying it in production. This helps identify conflicts, security filtering issues, or unintended policy impact.
When importing across domains or forests, use a migration table to map SIDs, groups, and UNC paths. Without it, permissions and references may break due to mismatched identifiers.
Use Import-GPO for restoring from backups or cross-domain moves and Copy-GPO for duplicating policies within the same domain. Selecting the wrong method can result in missing links or configuration gaps.
Importing a GPO does not recreate OU or site links automatically. After import, review security filtering, delegation, and manually link the GPO where required.
Use gpresult or Get-GPOReport to confirm the policy is applied as expected. Comparing reports ensures no settings were lost or altered during import.
Only select Overwrite existing settings if you intend to replace all configurations in the target GPO. Overwriting without review can remove critical existing settings.
Record the source, target, backup reference, and date of import. Proper documentation simplifies troubleshooting and supports audit requirements.
Native methods typically require backing up GPOs, transferring backup folders, using migration tables, and carefully validating security mappings.
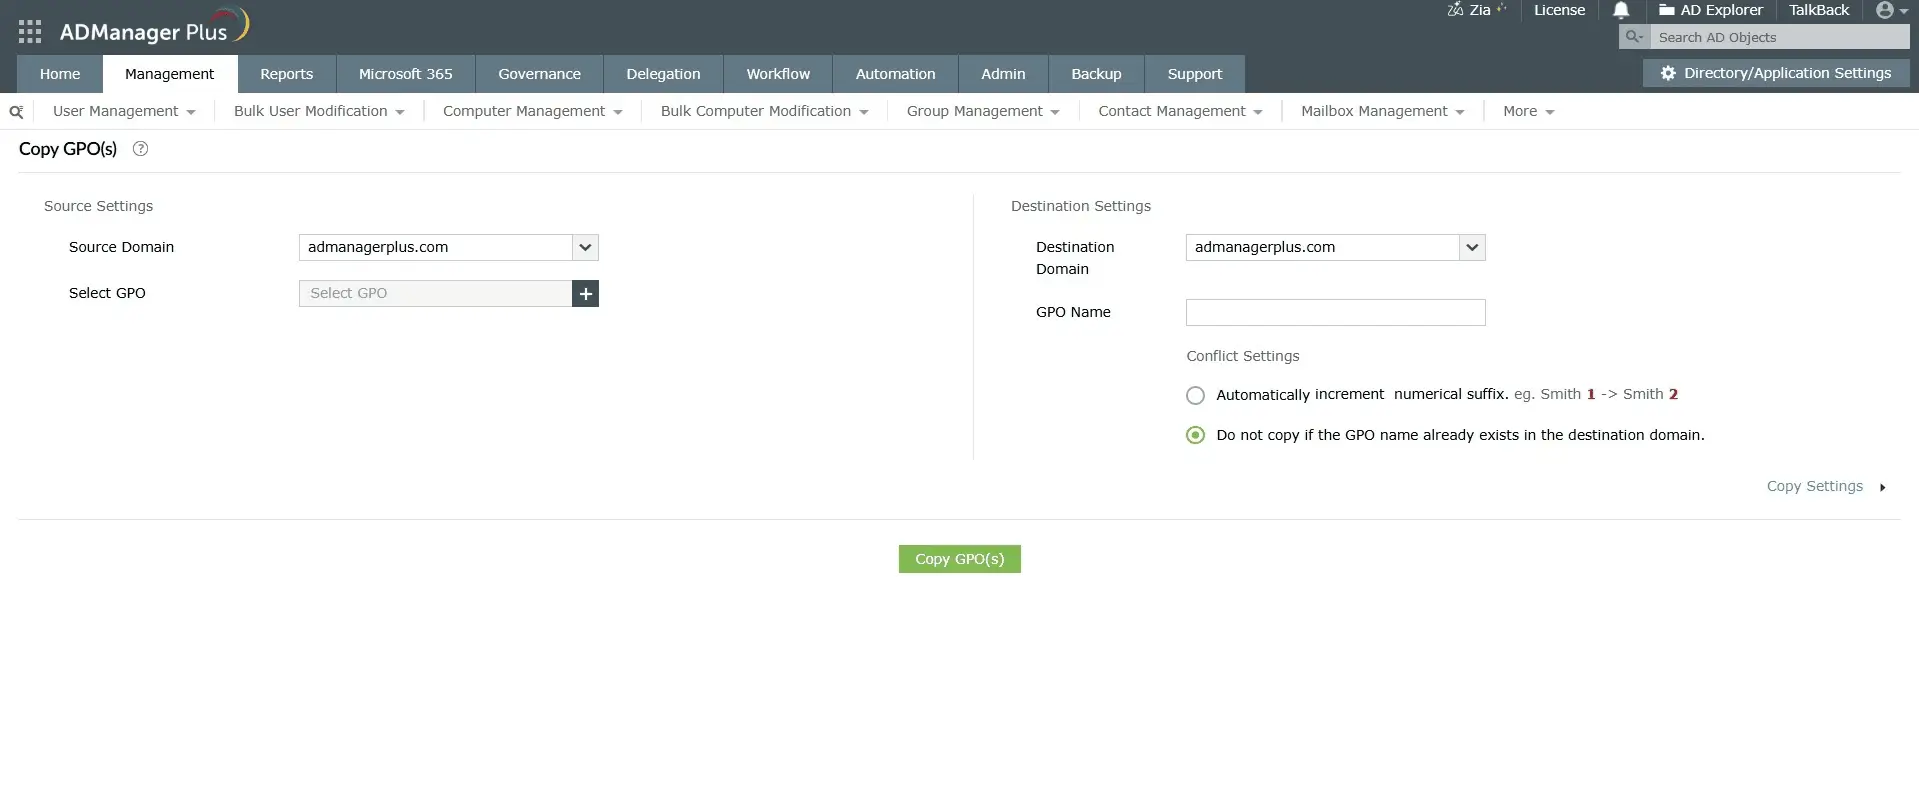
In addition to native tools, ADManager Plus provides centralized GPO management and reporting capabilities that simplify administration across domains.
Generate detailed reports on GPO settings, linked OUs, disabled policies, and modification history to assess existing configurations before performing imports or migrations.
Copy and migrate GPOs directly between domains without relying solely on manual backup and restore workflows.
Assign specific GPO management tasks to administrators without granting full domain-level privileges, ensuring controlled and role-based access.
Schedule and automate routine Active Directory tasks to reduce manual errors during large-scale migrations or restructuring projects.
Identify over-permissive configurations and review access regularly to maintain governance and reduce privilege-related risks.
DISA STIG GPOs are usually provided as policy backups or administrative templates. The method depends on the format you downloaded.
If DISA provides a GPO backup folder:
If DISA provides an administrative template (.admx or .adml files):
STIG templates must be reviewed before broad deployment, as they enforce strict security baselines.
gpupdate /force
gpresult /r
If you're importing a security template (.inf file):
For ADMX templates, follow the administrative template method:
No, importing a GPO through the GPMC either creates a new GPO or merges settings into an existing one. It will not overwrite configurations unless you specifically select Overwrite existing settings during the import process.
To avoid unintended changes, back up the target GPO before importing. If using PowerShell, the Import-GPO cmdlet with the -BackupGpoName parameter provides more controlled and predictable results.
Yes, provided the source and target domain functional levels are compatible. For example, importing from Windows Server 2016 to 2022 is generally supported.
Minor version differences typically work without issue, but newer policy settings or security features may not apply correctly in older environments. In cross-version scenarios, testing in a non-production environment is recommended. If migrating across domains, use a migration table to resolve SID and UNC path differences.
No, importing a GPO transfers the policy settings and permissions only. It does not recreate links to OUs, sites, or domains.
After importing, you must manually link the GPO in the GPMC. This design prevents policies from being unintentionally applied in the new environment.
Import-GPO imports settings from a backup into a new or existing GPO. It is commonly used for cross-domain migrations or restoring from backup.
Copy-GPO, on the other hand, duplicates a GPO within the same domain. It preserves links and permissions but is not designed for backup restoration or cross-domain transfers.
Use Copy-GPO for intra-domain duplication. Use Import-GPO when working with backups or migrating between domains.
The GPMC does not provide a built-in bulk import option. However, you can automate the process using PowerShell by scripting multiple Import-GPO commands in a loop.
For large environments, third-party tools such as ManageEngine ADManager Plus support bulk GPO imports and template-based deployments, making large-scale operations more efficient.
A migration table is an XML file that maps SIDs, security groups, and UNC paths from the source environment to the target environment during GPO import.
It is required when importing GPOs across domains or forests where object identifiers differ. Without a migration table, permissions and file paths may break due to unresolved references.
You can create a migration table using the GPMC or PowerShell (New-GPMMigrationTable).
After importing, validate the GPO using both reporting and client-side checks.
On a test machine, run:
gpresult /r /scope computer
or
gpresult /r /scope user
In the GPMC, generate an HTML or XML report and compare it with the source GPO report. You can also use PowerShell:
Get-GPOReport -Name "GPOName" -ReportType HTML
Additionally, review the Event Viewer logs for relevant Group Policy processing events to confirm successful application.